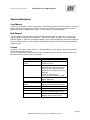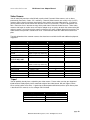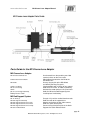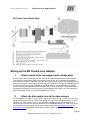
1
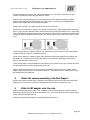
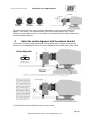
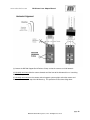
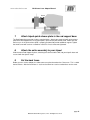
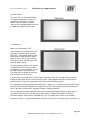
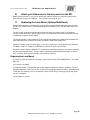
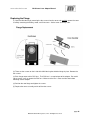
M2 Cinema Lens Adapter
Setup Guide
© 2006 Redrock Microsystems, LLC. All Rights Reserved.
www.redrockmicro.com
M2 Cinema Lens Adapter Manual
WARRANTY
Redrock Microsystems LLC (REDROCK MICRO) warrants that its accessories, when installed in
accordance with REDROCK MICRO installation instructions, will perform in accordance with the
REDROCK MICRO specifications current as of the date of shipment, and will be free from defects in
material and workmanship for a period of one (1) month on new accessories as defined below and thirty
(30) days on repaired accessories and/or components. Specifically excluded from this Warranty is any
physical damage caused by abuse, accident, or improper operation, and any lack of performance
attributable to such abuse, accident, or improper operation, as determined by REDROCK MICRO.
REDROCK MICRO shall not be liable for any incidental or consequential damages, including loss of
production time or money, regardless whether the accessory functioned properly or improperly for any
reason, including those for which REDROCK MICRO bears liability under this Warranty. The one (1)
month warranty period for new accessories shall be the one (1) month period beginning with the date of
the accessories receipt by the customer, except that in no instance shall the warranty period extend
beyond three (3) months from the date of shipment as established with the serial number as identified on
the accessory, its date of manufacture and its date of shipment. Where an accessory consists of multiple
components, the warranty period for all the components shall commence on the receipt date of the last
component, providing that such date shall be no later than sixty (60) days from the earliest date of
shipment of a component for the purchased accessory. For repaired or replaced accessories, the
repaired or replaced component is warranted to be free of material and workmanship defects, and to
perform its function in accord with REDROCK MICRO specifications for a period of thirty (30) days from
its date of shipment, or its original new accessory Warranty period, whichever is the latter. All claims
under this Warranty shall be immediately submitted to REDROCK MICRO in writing and are subject to
confirmation by REDROCK MICRO. Should REDROCK MICRO deem it appropriate to return the
accessory or a component thereof to an REDROCK MICRO-designated location, it will issue the Buyer a
Return Material Authorization (RMA), which must accompany all returns. The returned accessory or
component thereof shall remain the property of the Buyer who shall ship it freight prepaid to the
designated REDROCK MICRO location with the RMA number clearly displayed on the packaging exterior
and all accompanying paperwork. REDROCK MICRO, upon receipt and subsequent confirmation of a
Warranty defect, at its sole option, shall repair or replace the accessory or its component and return it
freight prepaid to the Buyer within thirty (30) days from date of its receipt. On other equipment such as a
video camera and/or other peripheral equipment, its original manufacturer warrants such equipment
separately, and warranty claims should be addressed to that respective manufacturer. This Warranty is
made in lieu of all other warranties whatsoever, express, implied and statutory, including, without
limitation, the implied warranties of merchantability and fitness. The acceptance of any order with
REDROCK MICRO is expressly made subject to the Buyer’s agreement to this Warranty.
©2006 Redrock Microsystems, LLC. All Rights Reserved.
page 2
www.redrockmicro.com
M2 Cinema Lens Adapter Manual
M2 Cinema Lens Adapter......................................................................................................... 1
Setup Guide ................................................................................................................................. 1
WARRANTY ................................................................................................................................. 2
Overview......................................................................................................................................... 5
Package Contents ........................................................................................................................ 6
Introduction to the M2 Cinema Lens Adapter ................................................................................ 7
How the M2 adapter works..................................................................................................... 7
Why the Cinescreen is necessary............................................................................................ 7
Why the Cinescreen moves..................................................................................................... 7
Why the image is inverted ...................................................................................................... 8
Required Equipment ................................................................................................................... 9
Lens Mounts............................................................................................................................ 9
Rod Support ............................................................................................................................ 9
Lenses ..................................................................................................................................... 9
Video Camera ....................................................................................................................... 10
Tripod.................................................................................................................................... 10
Parts Guide for the M2 Cinema Lens Adapter.......................................................................... 11
Installing the 9-volt Battery in the M2 Housing ........................................................................... 12
Setting up the M2 Cinema Lens Adapter...................................................................................... 13
1. Attach camera to the rod support quick release plate. ...................................................... 13
2. Attach the Achromatic Lens to the video camera. ............................................................ 13
3. Attach the camera assembly to the Rod Support. ............................................................. 14
4. Slide the M2 adapter onto the rods. .................................................................................. 14
5. Adjust the vertical alignment with the optional shim kit.................................................. 15
6. Adjust the horizontal alignment........................................................................................ 17
7. Attach tripod quick release plate to the rod support base. ................................................ 21
8. Attach the entire assembly to your tripod. ........................................................................ 21
9. Set the back focus. ............................................................................................................ 21
10.
Attach your 35mm lens to the lens mount on the M2................................................... 25
11.
Replacing the Lens Mount (Optional/Additional) ........................................................ 25
Replacing the Lens Mount .................................................................................................... 25
Replacing the Flange............................................................................................................. 26
©2006 Redrock Microsystems, LLC. All Rights Reserved.
page 3
www.redrockmicro.com
M2 Cinema Lens Adapter Manual
Welcome
Congratulations on your purchase of the M2 Cinema Lens Adapter!
Redrock Microsystems is committed to providing low cost, high quality cinema accessories to the
independent filmmaker.
This manual describes basic setup procedures. Online video tutorials demonstrating setup are available
on our website in the user forums area. You may want to watch those videos first, and then use this
manual as a reference when you are performing setup, for clarification, or if you need to make
adjustments in the field.
The majority of our product support is customer generated through our extensive on-line forums. If you
have a setup issue or problem the solution may have already been answered by one of your fellow
customers, so please take time to review customer posts to our forum before contacting our support
department.
This manual is available in portable document format and tutorial format from our website. Registration is
required and account activation is quick and free.
Our forums require you to use your “real name.” Please visit our user forums as there are many talented
users already registered. We feel that the sharing of ideas and knowledge benefits us all.
Redrock Microsystems online user guide
• http://redrockmicro.com/forum/fiewforum.php?f=22
• http://www.redrockmicro.com/docs/M2User.pdf
Redrock user forums
• www.redrockmicro.com/forum
Redrock contact information
• Sales: [email protected]
• Support: [email protected]
• Order status: [email protected]
• Phone (Sales inquires only): (888) 214-3903
Redrock Microsystems, LLC
P.O Box: 271395
Flower Mound, TX 75027-1395
©2006 Redrock Microsystems, LLC. All Rights Reserved.
page 4
www.redrockmicro.com
M2 Cinema Lens Adapter Manual
Overview
Congratulations on your purchase of the Redrock Microsystems M2 Cinema Lens Adapter! We are
making every effort to provide you with the finest Cinema Lens Adapter available at any price. We hope
you enjoy our product.
The image sensors in most video cameras are too small to provide cinematic depth of field control. It is
very difficult to get an object in sharp focus in the foreground against a blurred background, to
communicate depth with focus, and to provide cinematic rack focus for shifting attention in a scene with
most video cameras. The Redrock Microsystems M2 enables a 35mm lens to be utilized with a standard
video camera, providing cinematic depth of focus control with all the benefits of video.
©2006 Redrock Microsystems, LLC. All Rights Reserved.
page 5
www.redrockmicro.com
M2 Cinema Lens Adapter Manual
Package Contents
Please verify contents of your package before attempting the initial setup of your M2 adapter. A copy of
the sales order or a packing list is included with your shipment. Use this document to verify all
components were shipped. Once all of the contents have been verified the initial setup can begin.
Indie / Cinematographer’s / HD M2 Bundle
M2 Cinema Lens Adapter
Includes
o The M2 housing
o The Cinescreen (already inside the M2).
o The selected Lens Mount (already attached to the M2).
Canon EOS
Canon FD
Nikon F
Pentax K
Pentax K + screw mount
Minolta MD
Olympus
PL
Oct-19
Accessory kit includes
o 9 volt battery
o Wrench set
o “ ” sticker
Achromatic Lens
o SD 55mm
o HD 72mm
M2 rod support system
Includes
Two 15mm x18” rods
Quick release camera plate
M2 rod support base
Complimentary “
” hat (styles may vary)
Optional components (not included in package, ordered and shipped separately)
AC adapter for Cinescreen
M2 rod support shim kit
Additional components (if needed) (not sold by Redrock micro, ordered and shipped separately)
Spacer tube and/or 82mm to 72mm adapter ring
©2006 Redrock Microsystems, LLC. All Rights Reserved.
page 6
www.redrockmicro.com
M2 Cinema Lens Adapter Manual
Introduction to the M2 Cinema Lens Adapter
The M2 uses a device called a Cinescreen that is contained in the center of the M2 Housing. The
Cinescreen is a specially designed image screen mounted on a spindle that enables it to rotate at
extremely high speeds. The 35mm lens is attached to the front of the M2 housing, and focused to create
an image on the Cinescreen. A custom built achromatic lens is affixed to the front of your video camera
enabling the video camera to focus on the Cinescreen and record the 35mm image that is projected onto
the Cinescreen. When the M2 is turned on, the Cinescreen spins. This motion eliminates the appearance
of the Cinescreen grain, and provides a beautifully clear image.
How the M2 adapter works
Light from the scene passes through your 35mm lens, into the housing of the M2 adapter, where it
creates an image on the Cinescreen. The Achromatic Lens, a magnifying lens, enables your video
camera to focus only a few inches in front of the camera, on the small image on the Cinescreen, and to
record it. The 35mm lens and the Cinescreen together work very much like a Camera Obscura or like a
View Camera. You can verify this by taking the M2 with a 35mm lens attached and looking into the back
(camera side) of it at the Cinescreen. You will see an inverted image.
Why the Cinescreen is necessary
It would seem that with the right combination of lenses and adapters, the light from a 35mm lens could be
focused directly onto the camera sensor. And this is possible. But it does not create the desired effect:
the 35mm look. Depth of focus is related to image size. If the final image is 1/3rd of an inch (about
16mm) then there will be a very deep focus. Getting an object in focus in the foreground against an outof-focus background might require that the background be 50 feet or more behind the foreground. This
deep focus is one characteristic of digital video. The goal is not just to shoot video through a 35mm lens,
but to get the look of 35mm film, including a more shallow focus. If the final image is closer to 35mm
(about 2/3rds of an inch), then there will be a shallower depth of focus. A background might only need to
be a few feet behind the foreground to be out-of-focus. The M2 adapter creates an image on the
Cinescreen that is close to 35mm in size, and displays a depth of focus similar to 35mm film.
Why the Cinescreen moves
There are two kinds of 35mm lens adapters for video cameras, those with static (unmoving) screens and
those with moving screens. The M2 uses a moving screen. When an image is created on film, the light
causes a chemical reaction resulting in small molecular structures called grain. The size and shape of
grain depends on the chemical process that occurs. The grain from one frame to another is always
different. With a static screen, imperfections in the surface of the screen can simulate the appearance of
grain. However, these shapes are unchanging from one frame to another and can be distracting.
Therefore, with a static screen, the challenge is to make the imperfections so small that they are not
noticeable – smaller than film grain. Our Cinescreen uses ground glass that has been manufactured so
that the imperfections are similar in size to film grain. When the Cinescreen is rotated by the motor inside
the M2 Housing, the grain pattern appears to be changing from one frame to another, just like film. The
result is a look that is similar to 35mm film.
©2006 Redrock Microsystems, LLC. All Rights Reserved.
page 7
www.redrockmicro.com
M2 Cinema Lens Adapter Manual
Why the image is inverted
This is the way 35mm lenses work. Even in a film camera, the image is upside down when it reaches the
film. People don’t describe “inverting the film” in post, but that is actually what they do. Although the
footage will be upside-down when you edit it, it is a trivial issue. Every popular non-linear editing system
provides a method for image inversion. It is usually as simple as flipping a switch.
It is possible to optically turn the image right-side up in a 35mm adapter using prisms. However, prisms
consume some of the light, making a dimmer image and reducing the range of lighting situations in which
the adapter can be used. And the extra glass provides greater opportunities for image distortion.
So, for better quality images and a broader range of use, the M2 leaves the image inverted in the camera.
Now that means the image will be inverted in the viewfinder and in the camera’s LCD, which can
complicate framing scenes. There are several methods for dealing with the inverted image in the camera.
Some people are not bothered by the inverted image or can find a more comfortable viewing position,
such as by operating the camera from the side rather than from the rear (looking down and back at the
LCD). Very few cameras include an “invert image” menu feature, although this would be an ideal
solution. A common addition to the M2 is a separate LCD monitor that either has an “invert” button or that
can be mounted upside-down. Some people add larger LCD monitors or high definition monitors to help
with manual focus of the 35mm lens.
Redrock also offers a software product called Redrock Revolution that enables a firewire attached
Windows computer to act as a video monitor. Revolution works with DV and HD source and inverts the
image at the touch of a button.
©2006 Redrock Microsystems, LLC. All Rights Reserved.
page 8
www.redrockmicro.com
M2 Cinema Lens Adapter Manual
Required Equipment
Lens Mounts
The M2 can be ordered in various configurations, with a wide selection of 35mm lens mounts. These lens
mounts enable you to re-purpose existing SLR camera lenses from various manufacturers, or to rent
professional cinema (motion picture) lenses. The lens mounts are interchangeable.
Rod Support
The rod support system that comes with the M2 comes standard with 18” rods and it is a heavy-duty
support capable of supporting the M2 adapter, . While other supports may work, we recommend the
Redrock support. In particular, light weight support systems have been found to not consistently hold the
M2 in the correct position. In this manual we will describe setting up the M2 with the Redrock M2 Rod
Support System.
Lenses
In general, a fast (f/2.8 or lower) SLR lens is recommended, but a high quality image can be achieved
with the M2 with almost any lens.
The lenses should have manual aperture control. The table below lists the lens mounts available and
describes the kinds of lenses that are supported.
Lens Mount
Canon EOS lens mount
Canon FD/FL lens
mount
Nikon F lens mount
Pentax K lens mount
Pentax Screw lens
mount
Minolta MD lens mount
Olympus lens mount
PL lens mount
OCT 19 lens mount
Lenses Supported
Canon EOS (EF) Lenses
Canon FD Lenses
Canon FL Lenses
The following lenses require a
camera body to adjust the aperture
and are not recommended for this
application even though they can be
attached:
Canon EF (EOS) lenses
Canon FD lenses without FL mode
All Nikon F-mount lenses (Tamron,
Sigma, and others)
Pentax K lenses
Pentax Screw Mount Lenses (uses
Pentax K to screw mount converter
Minolta MD lenses
Olympus lenses
Zeiss, Cooke, or Arri (professional
cinema and motion picture lenses)
Motion picture lenses from Russia
(Konvas 35mm camera lenses)
©2006 Redrock Microsystems, LLC. All Rights Reserved.
page 9
www.redrockmicro.com
M2 Cinema Lens Adapter Manual
Video Camera
You will most likely want to use the M2 with a professional Cinematic Video camera, such as those
produced by Panasonic, Canon, JVC, and Sony. Cinematic Video cameras are usually 3-chip (3-CCD)
cameras and are heavier and have more features than smaller consumer video cameras. In particular,
you will need to have manual control over the focus and iris to use the M2. The M2 is designed for use
with a 72mm lens that is common on many of the professional Cinematic Video Cameras. Some video
cameras with larger or smaller lenses will require adapter rings or spacers to attach the camera to the M2,
and may require s shim kit to raise the camera so that the lens center is 50mm above the base plate. The
video camera must provide a standard 3/8” or1/4” screw mount to mount the video camera to the base
plate.
The table below describes common cameras that have been used with the M2 and additional equipment
suggested.
Video Camera
Canon XL1
Canon XL1s
Canon XL2
Canon XLH1
Canon GL2
JVC GY-HD100, HD200,
HD250
Panasonic AG-DVX100
Panasonic
AG-DVX100A/ 100B
Panasonic DCX30
Panasonic HVX200
Adapters Recommended
None
None
None
Shim kit
Shim kit
Shim kit
SD Achromat
X
X
X
1” Spacer Tube
None
X
X
None
Shim kit
X
Sony FX1
Sony PC9
Sony PD150
Sony PD170
Sony Z1U
Sony HC/ A1
None
Shim kit
1” Spacer Tube
1” Spacer Tube
None
Shim Kit
X
82mm to 72mm step-down ring
82mm to 72mm step-down ring
X
X
X
HD Achromat
X
X
X
X
X
X
Tripod
You will probably already have a tripod for your video camera. Please make sure that your tripod and
tripod head are rated properly for the combined weight of the video camera, M2, rod support, 35mm
lenses and any other accessories. A professional video tripod and fluid head, with a quick release plate
is described in this manual, such as a Bogen 516 fluid head.
Equipment
M2 Cinema Lens Adapter
M2 Rod Support System
35mm lens
Video camera
Weight
1 lb 15 ozs
2 lb 10.5 ozs
Varies with lens used
Varies with camera used
©2006 Redrock Microsystems, LLC. All Rights Reserved.
page 10
www.redrockmicro.com
M2 Cinema Lens Adapter Manual
Parts Guide for the M2 Cinema Lens Adapter
M2 Cinema Lens Adapter
M2 Cinema Achromatic lens
Rubber Hood Camera Mount
M2 Handle
35mm Lens Mount
M2 Screen Housing
Switch
M2 Screen Housing Rod Clamp
Battery Access Panel
M2 Rod Support System
M2 18” Rods (2)
M2 Rod Support Rod Clamp
M2 Rod Support Quick Release Plate
M2 Rod Support Quick Release Block
M2 Rod Support Quick Release Clamp
M2 Camera Mount Block
An achromatic lens that enables your video
camera to focus on the Cinescreen.
Adjustable gasket attaches the M2 to the
achromatic lens.
An easy way to pick up the M2 without
accidentally touching any optics.
Interchangeable with a variety of lens mounts.
Holds the Cinescreen, its motor, and battery.
Activates the motor that turns the Cinescreen.
Holds the M2 to the Rod Support System.
Install/replace 9-volt battery.
One pair 18” precision crafted aluminum rods.
Holds the rods to the support base.
Attaches to the base of your video camera.
Holds the quick release plate.
Secures the quick release plate in the block.
Supports the Quick Release block.
©2006 Redrock Microsystems, LLC. All Rights Reserved.
page 11
www.redrockmicro.com
M2 Cinema Lens Adapter Manual
Installing the 9-volt Battery in the M2 Housing
The M2 Housing contains a motor that powers the Cinescreen. A 9-volt battery is supplied. You must
install the 9-volt battery inside the M2 Housing on the inside of the Cover Assembly, and replace the
battery when it is low. There is no need to remove the Cover Assembly to replace the battery. There
is a Battery Access Panel on the underside of the M2 Housing.
(1) Open the Battery Access Panel on the bottom of the M2 Housing by removing the screws.
(2) Install the battery and attach the wire cap to the 9-volt. The battery will fit snugly inside the Cover
Assembly in the provided location.
(3) Replace the Battery Access Panel and install the screws.
Redrock micro sells an optional AC adapter. The adapter can be plugged in while the battery is
installed. There is no need to remove the battery to use the AC adapter.
Some people have used rechargeable batteries strapped to the outside of the M2 Housing and
connected through the AC adapter receptacle to power the motor.
At least one person has reported leaving the M2 motor running on a single 9-volt battery and it was
still in operation after 24 hours. Your experience may vary.
©2006 Redrock Microsystems, LLC. All Rights Reserved.
page 12
www.redrockmicro.com
M2 Cinema Lens Adapter Manual
Setting up the M2 Cinema Lens Adapter
1.
Attach camera to the rod support quick release plate.
A rubber plug in the quick release plate will allow you to remove the extra thumbscrews provided.
Then attach the quick release plate to your camera using the 3/8” or ¼” thumbscrews provided. If
your camera has multiple screw holes, you may want to use more than one thumbscrew to attach the
plate to ensure that it is stable. Make sure that the brass metal pin fits into the corresponding hole on
the camera to ensure that there is additional support for the items you will add to the rod support
system. You may want to tighten the thumbscrews with a coin or screwdriver. But be careful not to
over-tighten the thumbscrews because doing so could damage your camera. Be sure to attach the
quick release plate so that it is perfectly aligned with the camera.
2.
Attach the Achromatic Lens to the video camera.
The Achromatic Lens comes in an SD (55mm) and an HD (72mm) version. In either case, the back
part of the Achromatic Lens has 72mm screw threads that will fit into your video camera’s lens filter
screw mount. Some cameras (such as the Panasonic HVX200 and the HVX HD100YU) use an
82mm lens filter size and will require an 82mm-to-72mm step-down adapter ring. Step-rings can be
purchased from any pro camera shop, or can be purchased through www.adapterrings.com or
www.adorama.com among other online retailers. Some cameras require that a one-inch spacer tube
©2006 Redrock Microsystems, LLC. All Rights Reserved.
page 13
www.redrockmicro.com
M2 Cinema Lens Adapter Manual
be placed between the camera lens and the Achromatic Lens. The correct accessories for your
camera are listed in the table on page 10 of this manual.
Stabilize your camera by mounting it in your tripod to prevent accidentally touching any optical
elements while attaching the Achromatic Lens to the camera. The industry standard M2 Quick
Release Plate should work with your fluid head tripod.
Remove your camera’s lens hood. (Store the lens hood for later use.)
Remove any lens filter that is already in the camera’s screw mount. (Many people keep a clear glass
filter or a clear UV filter attached to their camera at all times to protect the camera’s lens. Some filters
have a threaded front to permit other filters to be attached. Any lens filter should be removed as it will
change the distance between the Achromatic Lens and the camera lens. Store the lens filter for later
use.)
If your camera requires an optional adapter ring, attach these to your camera first by screwing them
into the camera lens mount in a clockwise direction.
If your camera requires an optional spacer tube, attach the spacer tube between the achromat and
the adapter by screwing in to the back of the adapter. The achromat should always be placed as
close as possible to the camera’s lens.
To ensure that there is no dust between the Achromatic Lens and the camera lens, remove dust from
the optical elements by blowing compressed air on them.
Attach the M2 Achromatic Lens to your camera by screwing it into the camera lens mount (or the
adapter ring or the spacer tube) in a clockwise direction. The Achromatic Lens should have a firm fit
but should not be over tightened.
3.
Attach the camera assembly to the Rod Support.
Remove the camera from the tripod. Slide the camera with the quick release plate into the M2 Rod
Support base and secure it using the M2 Rod Support Quick Release Clamp on the side.
4.
Slide the M2 adapter onto the rods.
Slide the M2 Housing onto the rods. Push it forwards until the flexible hood on the back of the M2
Housing just touches the front lip of the Achromatic Lens. Secure the M2 to the rods using the clamp
on the side of the M2 Rod Housing.
Examine the relationship between the hood and the Achromatic Lens.
©2006 Redrock Microsystems, LLC. All Rights Reserved.
page 14
www.redrockmicro.com
M2 Cinema Lens Adapter Manual
The center of the camera lens must be perfectly aligned with the center of the M2 Cinema Lens
Adapter. If the camera is not centered vertically, then you will need to perform step 5, vertical
alignment, using the optional shim kit. If the camera is vertically aligned with the M2, proceed to step
6 to verify horizontal alignment.
5.
Adjust the vertical alignment with the optional shim kit.
If your camera is vertically aligned with the M2, then proceed to step 6. Cameras that require the
shim kit for vertical alignment include the Panasonic HVX200, the JVC HD100, and the Canon XLH1.
(1) Determine the correct combination of shims for your camera.
©2006 Redrock Microsystems, LLC. All Rights Reserved.
page 15
www.redrockmicro.com
M2 Cinema Lens Adapter Manual
Shimming the rods will raise the rods so that the M2 and other accessories such as a Follow Focus
and Matte Box will be properly aligned with the camera.
Shims come in 1/4”, 1/8”, and 1/16” thicknesses. Estimate the combination of shims required by
stacking them on top of the Hood up to the level of the top of the front lip of the Achromatic Lens.
Alternative methods for estimating the combination of shims are described below.
Alt-1, Push the hood back for a clearer view of the
barrel inside the hood. Estimate shims needed
between barrel and inside of the Achromatic Lens.
Alt-2, Remove the hood for an unobstructed view
of the barrel and Achromatic Lens.
Alt-3, Place the Achromatic Lens in the hood, and
then estimate the shims required using the offset
between the back of the Achromatic Lens and the
Camera Lens.
(2) Remove the M2 Housing from the rods.
(3) Remove the rods from the Rod Support base plate.
These screws
Turn the base plate over and use the supplied
wrenches to remove the two screws that hold
the M2 Rod Support and Rod Clamp in place.
(4) Turn the base back over and set it on a flat surface. Lift the Rod Support part off of the base plate.
(5) Place the required shims on top of the base plate.
(6) Place the Rod Support part on top of the shims.
Turn the base, shims, and Rod Support
upright, using the flat surface to keep them
all aligned.
Screws
©2006 Redrock Microsystems, LLC. All Rights Reserved.
page 16
www.redrockmicro.com
M2 Cinema Lens Adapter Manual
(7) Replace the two screws. You may need to use the longer screws that are supplied with the shim
kit to accommodate the extra depth of the shims.
(8) Return the rods to the Rod Support base. They will no longer fit completely beneath the rod
support block. This is normal. There is still sufficient support for this application.
(9) Return the M2 Housing to the rods, slide it forwards, and verify that the vertical alignment is now
correct.
6.
Adjust the horizontal alignment.
Determine whether horizontal alignment is required.
Most cameras will require horizontal alignment.
The horizontal alignment of the M2 with your
camera is critical to getting good results from the
M2 Cinema Lens Adapter.
The M2 Rod Support System provides horizontal
adjustments.
(1) Remove the UV Lens Filter and Rubber Hood from the back of the M2 Housing. This will enable
the Achromatic Lens to rest flush against the M2 Housing.
(2) Using the supplied wrenches, loosen the two Horizontal Adjustment Screws in the bottom of the
Rod Support base. The adjustment method described in the following steps ensures that the
adjustment will be horizontal (correct) and not skewed (incorrect).
©2006 Redrock Microsystems, LLC. All Rights Reserved.
page 17
www.redrockmicro.com
M2 Cinema Lens Adapter Manual
(3) Loosen the M2 Rod Support Quick Release Clamp so that the camera can slide forwards.
(4) Carefully and slowly slide the camera forwards until the front of the Achromatic Lens is touching
the M2 Housing.
(5) Carefully and slowly turn the camera and rod support system upright so that the camera and
Achromatic Lens rests on top of the M2 Housing. This procedure is best done sitting down.
©2006 Redrock Microsystems, LLC. All Rights Reserved.
page 18
www.redrockmicro.com
M2 Cinema Lens Adapter Manual
(6) Gently nudge the base plate to the left and
right with your fingers while the camera rests
flush on top of the M2 Housing. The objective
is to get identical spacing on either side of the
Achromatic Lens from the edges of the M2
Housing, as shown in the illustration on the
right.
Keeping the Camera and Achromatic Lens
flush against the M2 Housing, resting on it,
ensures that the rods and the M2 remain
perpendicular to the camera and are not
askew.
(7) Turn on your camera while it is still resting on top of the M2 Housing and zoom out.
(8) Prepare for Fine Alignment
a. Turn camera auto iris ON.
b. Move camera zoom to its widest
setting.
c. Make sure the cap is removed from the
front of the M2 Housing.
d. Point the M2 and camera at a light area
on the floor.
The dark object in the lower center of the
LCD is the M2 motor. The dark shadows
in the upper corners of the LCD is the M2
Housing and the barrels of the various
optical elements.
The objective is to move the base support
left and right to balance the shadows.
©2006 Redrock Microsystems, LLC. All Rights Reserved.
page 19
www.redrockmicro.com
M2 Cinema Lens Adapter Manual
(9) Fine Horizontal Alignment
As you slowly zoom in, you will notice the
shadowy areas in the upper corners
disappearing off screen. These shadows
should disappear at the same rate. If one
of them falls off screen faster than the
other, as shown in the diagram on the
right, the camera is not perfectly aligned
with the M2.
Gently nudge the camera with your
fingers to balance the shadow areas on
each side, zoom back, and try again.
(10) Proper Horizontal Alignment
The diagram on the right shows the effect
of proper Fine Horizontal Alignment. The
shadows on the upper left and right
corner are disappearing at the same rate.
(11) When alignment is achieved, tighten the screws in the base. The screws should be snug, but not
over-tightened.
(12) Carefully and slowly return the camera and rod system to its original position so that the weight
of the camera is resting on the rods and not on the M2 Housing.
(13) Slide the camera back from the M2 Housing and secure it in position with the M2 Rod Support
Quick Release Clamp.
(14) Replace the UV Filter and Hood on the back of the M2 Housing.
(15) Slide the Achromatic Lens into the M2 hood, lifting the hood over the front lip of the Achromatic
Lens so that the back of the Achromatic Lens lip is flush with the front of the hood.
©2006 Redrock Microsystems, LLC. All Rights Reserved.
page 20
www.redrockmicro.com
7.
M2 Cinema Lens Adapter Manual
Attach tripod quick release plate to the rod support base.
The Rod Support base provides industry standard holes. Attach your camera tripod’s quick release
plate to the Rod Support base using your tripod’s quick release plate thumbscrew. Make sure that
the brass pin in the quick release plate is properly positioned to provide additional support. Tighten
the thumbscrew with a coin or screwdriver so that it is firm, but not over-tightened.
8.
Attach the entire assembly to your tripod.
Slide the entire Rod Support System, containing the camera and the M2, into your tripod’s base and
secure it with the tripod’s clamp.
9.
Set the back focus.
Before you can use the adapter, the video camera must be focused on the Cinescreen. This is called
the back focus. After the back focus is set, then the 35mm lens can be used to focus on the scene.
.
©2006 Redrock Microsystems, LLC. All Rights Reserved.
page 21
www.redrockmicro.com
M2 Cinema Lens Adapter Manual
(1) Remove the 35mm lens if it is attached to the M2. The back focus is set with the 35mm lens off.
(2) Point the camera and M2 at a moderately lit, light colored target. The rest of the process requires
looking through the camera’s viewfinder, LCD, or an external monitor.
©2006 Redrock Microsystems, LLC. All Rights Reserved.
page 22
www.redrockmicro.com
M2 Cinema Lens Adapter Manual
(3) Prepare for focus.
a. Turn camera auto focus OFF.
b. Turn camera auto iris OFF.
c. Move camera zoom to its widest
setting.
The dark object in the lower center of the
LCD is the M2 motor. The dark shadows
in the upper corners of the LCD is the M2
Housing and the barrels of the various
optical elements.
The objective is to use your camera’s
controls to zoom into the Cinescreen
between these dark areas.
(4) Verify Fine Horizontal Alignment
As you slowly zoom in, you will notice the
shadowy areas in the upper corners
disappearing off screen. These shadows
should disappear at the same rate. If one
of them falls off screen faster than the
other, as shown in the diagram on the
right, the camera is not perfectly aligned
with the M2.
Instructions on setting the Horizontal
Alignment are on page 17 of this manual.
(5) Proper Horizontal Alignment
The diagram on the right shows the effect
of proper Fine Horizontal Alignment. The
shadows on the upper left and right
corner are disappearing at the same rate.
Notice that the motor now is a shadowy
blur.
The next objective is to zoom in until the
camera is zoomed safely past the shadow
of the motor, so that it does not appear in
the frame.
©2006 Redrock Microsystems, LLC. All Rights Reserved.
page 23
www.redrockmicro.com
M2 Cinema Lens Adapter Manual
(6) Correct Zoom.
On some LCDs it is hard to see whether
the shadow of the motor is faint or has
disappeared. For safety, it is best to
zoom in a bit more after the shadow
seems to have disappeared to ensure that
the motor will not appear in the frame.
(7) Set the focus
Make sure the M2 motor is OFF.
You will want to use all of the focus assist
tools that your camera offers to set the
back focus. That includes peaking (EVF)
which draws a single white pixel around
objects in focus. And on some cameras,
Focus Assist, which magnifies part of the
image for better viewing.
On many cameras, auto focus will provide
a rough focus on the Cinescreen grain if
the exposure is correct. However, it is not
accurate enough to set the back focus.
The camera lens is capable of finer focus
than the auto focus can achieve.
Turn the camera to manual focus. Using an external monitor or Focus Assist (magnification) and with
peaking enabled, focus the lens on the Cinescreen grain. Some people prefer to put a small piece of
tape on the focus ring of their camera to prevent if from accidentally being moved.
It is a good idea to frequently verify that the back focus is properly set. A small bump of the camera could
change the Fine Horizontal Alignment or change the back focus. Many people prefer to check the back
focus in the field any time there is substantial change in camera movement.
Using a large external monitor with your video camera (and a High Definition Monitor on HD cameras)
can make it much easier to set the back focus with accuracy. Redrock Micro offers the Redrock
Revolution software, which enables a Windows PC (such as a laptop) to be used as a field monitor.
During use, all focus is accomplished with the 35mm lens (front focus) once the back focus has been set.
©2006 Redrock Microsystems, LLC. All Rights Reserved.
page 24
www.redrockmicro.com
10.
M2 Cinema Lens Adapter Manual
Attach your 35mm lens to the lens mount on the M2.
Now that the back focus is set, you can attach your choice of 35mm lens to the lens mount on the
front of the M2 Cinema Lens Adapter. The system is now ready for use.
11.
Replacing the Lens Mount (Optional/Additional)
Redrock Micro provides a number of lens mounts that can be purchased separately and will enable
you to use a variety of lenses, including professional film camera lenses, with your M2 Cinema Lens
Adapter.
The lens mount assembly on the M2 Housing consists of the lens mount, which is the part that
connects to the 35mm lens, and the flange, which is the metal tube that connects to the M2 Housing
and provides a seat for the lens mount.
The flange provides a solid support for the lens mount and provides the proper distance between the
back of the 35mm lens and the Cinescreen, called the Flange Focal Length (FFL).
Some lens mounts share the same flange. In this case, only the lens mount itself must be replaced.
The Nikon, Canon FD, Olympus, and Minolta lens mounts share the same flange.
Some lens mounts require a different FFL or unique lens mounting mechanism, and require replacing
the lens mount and the flange. The lens mounts requiring specialized individual flanges are the PL,
OCT-19, Canon EOS, Pentax, and other still camera lens mounts.
Replacing the Lens Mount
(1) There are three set screws on the flange. Loosen them but DO NOT REMOVE them. The mount
pops out.
(2) Insert the new mount.
(3) Orient the mount. The positioning of the lens alignment dot on the mount is important. The lens
alignment dot on the 35mm lens will line up with the corresponding dot on the mount. Position the dot
so that the lens markings, such as the aperture setting, will be clearly visible (typically on top) when
the lens is mounted.
(4) Re-tighten the screws.
©2006 Redrock Microsystems, LLC. All Rights Reserved.
page 25
www.redrockmicro.com
M2 Cinema Lens Adapter Manual
Replacing the Flange
(1) Open the M2 Housing by removing the four screws from the cover and carefully remove the cover
assembly containing the battery, motor, and Cinescreen. Set the cover assembly aside.
(2) There are four screws on the inside of the M2 Housing that hold the flange in place. Remove the
four screws.
(3) Each flange comes with a DCX lens. The DCX lens is a required part of the adapter. Be careful
not to scratch, scuff, or remove the DCX lens. Make sure the lens is clean and dust free before
mounting it to the adapter.
(4) Position the new flange and tighten the screws.
(5) Replace the cover assembly and install the four screws.
©2006 Redrock Microsystems, LLC. All Rights Reserved.
page 26
www.redrockmicro.com
M2 Cinema Lens Adapter Manual
This page intentionally blank.
©2006 Redrock Microsystems, LLC. All Rights Reserved.
page 27