1
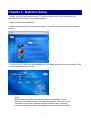
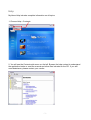
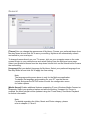
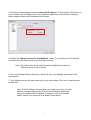
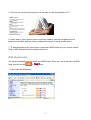
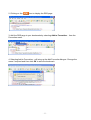
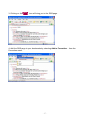
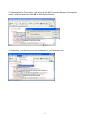
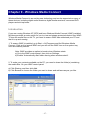
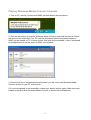
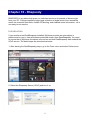
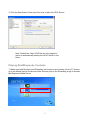
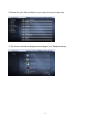
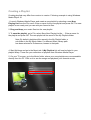
MyHome delivers all the media files stored
in your computer through D7 and your
home entertainment system. Watch your
digital movies, enjoy your music and view
your photos, all from the comfort of your
couch. With its well-designed and easy-touse interface, you can now navigate all
your media and content using the remote
control on your TV screen!
V1.4
June 28, 2006
Table of Contents
CHAPTER 1 - INTRODUCTION
-1-
THE MYHOME APPLICATION
SYSTEM REQUIREMENTS
PC REQUIREMENTS
INSTALLATION
PC
-1-1-1-1-1-
CHAPTER 2 - MYHOME SETUP
-2-
HELP
GENERAL
[THEME]
[LANGUAGE]
[MEDIA SERVER]
SERVICE
[MEDIA SERVICE]
[WEB BOOKMARK]
SYSTEM
[SYSTEM]
[SECURITY]
[MAC ADDRESS]
-3-4-4-4-4-5-5-5-6-6-6-6-
CHAPTER 3 ADDING THE MYHOME SERVER
-7-
MANUALLY ADDING NEW SERVER
-8-
CHAPTER 4 - VIDEO PLAYBACK
- 10 -
INTRODUCTION
[HOME]
[GO TO]
[SEARCH]
[PLAY]
[SHUFFLE]
[BACK]
VIDEO LIBRARY
[VIDEO FOLDER]
[WATCH FOLDER]
VIDEO PLAYLIST
[RANDOM PLAYBACK]
- 10 - 10 - 10 - 10 - 10 - 10 - 10 - 11 - 11 - 11 - 12 - 12 -
CHAPTER 5 - MUSIC PLAYBACK
- 13 -
INTRODUCTION
[HOME]
[GO TO]
- 13 - 13 - 13 -
[SEARCH]
[PLAY]
[SHUFFLE]
[BACK]
[SORT]
MUSIC LIBRARY
[MUSIC FOLDER]
[WATCH FOLDER]
[ITUNES]
MUSIC PLAYLIST
[RANDOM PLAYBACK]
[PHOTO ALBUM]
[ADD YOUR OWN PLAYLIST]
- 13 - 13 - 13 - 13 - 13 - 14 - 14 - 14 - 14 - 15 - 15 - 15 - 15 -
CHAPTER 6 - PHOTO PLAYBACK
- 16 -
INTRODUCTION
[HOME]
[GO TO]
[SLIDESHOW]
[SHUFFLE]
[BACK]
PHOTO LIBRARY
[PHOTO FOLDER]
[WATCH FOLDER]
[PHOTO SCALE]
PHOTO PLAYLIST
[RANDOM PLAYBACK]
[PLAYLIST]
[SLIDESHOW]
- 16 - 16 - 16 - 16 - 16 - 16 - 17 - 17 - 17 - 17 - 18 - 18 - 18 - 18 -
CHAPTER 7 - SERVICE
- 19 -
INTRODUCTION
[WEB BOOKMARKS]
[MEDIA SERVICES]
PREFERENCES AND SETUP
[MEDIA SERVICE]
[WEB BOOKMARK]
ADDING BOOKMARKS
RSS BOOKMARKS
PODCAST BOOKMARKS
MP3 BOOKMARKS
RADIO PLAYLIST (PLS)
FIREFOX LIVE BOOKMARKS
3RD PARTY MEDIA SERVICES
- 19 - 19 - 19 - 20 - 20 - 20 - 20 - 22 - 26 - 30 - 33 - 36 - 40 -
CHAPTER 8 - ITUNES
- 41 -
INTRODUCTION
SHARING MUSIC
VIDEO
PODCAST
RADIO
- 41 - 43 - 44 - 45 - 46 -
CHAPTER 9 WINDOWS MEDIA CONNECT
- 47 -
INTRODUCTION
PLAYING WINDOWS MEDIA CONNECT
CONTENTS
- 47 -
CHAPTER 10 - RHAPSODY
- 50 -
INTRODUCTION
PLAYING REALRHAPSODY CONTENTS
- 50 - 51 -
CHAPTER 11 - NAPSTER
- 53 -
INTRODUCTION
PLAYING NAPSTER CONTENTS
- 53 - 54 -
CHAPTER 12 WINDOWS MEDIA PLAYER
- 56 -
INTRODUCTION
CREATING A PLAYLIST
- 56 - 57 -
CHAPTER 13 - WINAMP
- 58 -
INTRODUCTION
CREATING A PLAYLIST
- 58 - 59 -
CHAPTER 14 - APPENDIX
- 60 -
FAQ
ABOUT THIS MANUAL
- 60 - 62 -
- 48 -
Chapter 1 - Introduction
The MyHome Application
MyHome delivers all the media files stored in your computer through your home
entertainment system. Watch your digital movies, enjoy your mp3s and view your photos,
all from the comfort of your couch. With its well-designed and easy-to-use interface, you
can now navigate all your media and content using the remote control on your TV screen!
Screenshots and descriptions used in this manual are based mainly on Internet Explorer.
The functions however, are identical for Firefox. Images and descriptions may therefore
slightly vary between this manual and the actual browser you are using.
System Requirements
PC Requirements
• Minimum Intel Processor II 350MHz, 64MB RAM
• Operating System; Win98SE, WinME, Win2000, WinXP
• 10 Mbps, 100 Mbps or 10/100Mbps Ethernet equipped PC with CD-ROM
Installation
PC
1. Insert the installation CD into your CD-ROM and browse for the setup file.
2. Double click on the MyHome setup file and follow the installation wizard.
3. In order to be able and share your files on the computer, the MyHome server needs to
be up and running at all times. To start the MyHome server during boot up of your
system, enable the “Auto-start Streaming Server” option.
4. Setup your internet security and firewall allowing MyHome to access the local network
and the internet.
-1-
Chapter 2 - MyHome Setup
To enjoy your favourite media on your TV screen, make sure all your media files are
placed in My Documents or your selected path.
1. Start the MyHome application.
2. Wait a few seconds for the service to start up. You will then see the MyHome welcome
screen.
3. Turn on the D7, which will automatically list your media server on the main screen. Click
on your computer name to enter.
Note:
Before starting the MyHome server, make sure that both D7 and
MyHome have been setup and configured correctly. They have to be
connected to the same network and the firewall on your computer
has to be configured to allow the media server to access the network.
-2-
Help
MyHome Help includes complete information on all topics.
1. Choose Help > Contents
2. You will see the Contents side menu on the left. Browse the help content to understand
the application better or read the manual and other files included on the CD. If you still
need assistance, please contact your vendor.
-3-
General
[Theme] You can change the appearance of MyHome. Choose your preferred theme from
the drop down list and click OK to save your setting. MyHome will automatically refresh
and switch to your new layout.
To change themes directly on your TV screen, click on your computer name on the main
screen to login to your media server and select Setting from the MyHome home page.
Select your preferred theme from the drop down list and click on the Submit button to save
the new setting.
[Language] Set your default language for MyHome. Select your preferred language from
the drop down list and click OK to apply the new setting.
Note:
The language setting seen above is only for the MyHome application.
To change the language and encoding for your D7, use the remote
control and press the SETUP button to enter the configuration menu
for further options.
[Media Server] Enable additional features supporting iTunes, Windows Media Connect or
Rhapsody. Select your preferred option and save the setting. If support for iTunes is
enabled, the Music playlist will be updated using the iTunes library. See Music Playback
for further information.
Note:
For details regarding the Video, Music and Photo category, please
refer to chapter 4, 5 and 6.
-4-
Service
Settings for additional media services and synchronisation with bookmarks from popular
web browsers.
[Media Service] Select a playlist from the drop down menu to be played during a photo
album slideshow (media service). Set it to None for no background music at all or choose
your own folder. This feature is only for additional plug-ins in the Service mode. For music
to your standard slideshow, go to the Photo menu and setup your background music there.
[Web Bookmark] Select your browser to synchronise your bookmarks. To access them on
the TV, click on the computer name on your main screen to login to your media server,
then go to Service and Web Bookrmarks.
-5-
System
System information and setup for internet security and access restrictions.
[System] Shows system information of your media server. If you need to add the media
server on the D7 manually, refer to this tab for computer name and IP address. You also
have the option to change the port number in case of conflicts but the default port (8000)
will work in most cases, so you will likely not need to change anything.
[Security] Option to enable and use a password for login. Use this for added security and
prevent unauthorised access. Any user trying to access this media server will be prompted
to enter a password on the TV screen before access is granted.
[MAC Address] Security option to restrict access to the media server based on the
hardware’s MAC address. On D7, go to IP Config to read the MAC address.
-6-
Chapter 3 - Adding the MyHome Server
Once MyHome is setup and the server is running, turn on D7 and wait for it to start up. It
will automatically search for new UPnP devices on the network and list the MyHome
server on the main screen.
If you have installed MyHome on more than one computer, it will list all servers it can find.
Select the one you would like to use and press ENTER to access your shared files on the
remote computer.
Note: The colour of the MyHome icon changes depending on the status.
- indicates MyHome is not available
(MyHome is not running, computer is not turned on or no connection)
- indicates MyHome is ready for access
- indicates default MyHome
-7-
Manually Adding New Server
If MyHome is not recognised automatically, you can add it manually.
1. Click on the add button on the D7 main screen. The setup wizard will appear and you
can add your own MyHome server.
-8-
3. Enter the corresponding computer name and IP address. To look up this information on
your computer, go to Preferences of your MyHome application. In the System category,
both computer name and IP address will be shown.
4. Enable the “Always connect to this MyHome” option, if you want your D7 to directly
connect to this MyHome server every time after start up.
Note: This option only works when the selected MyHome is the only
MyHome server on the network.
6. Click on the save button when done, which will save your settings and return to the
main screen.
7. Your MyHome server will now show up on your main screen. Click on it to access your
shared files.
Note: If the IP address changed after you setup your server, you can
edit the corresponding server. Click on the edit button, select your
server and update the IP address. To delete it, click on the delete
button, select your old server and delete it from the list.
-9-
Chapter 4 - Video Playback
With this feature you can watch your video file collection on the TV screen. By default,
MyHome will play all your video files (in MPEG, AVI, DAT format) that are stored in your My
Document/My Videos folder.
Introduction
1. On D7, login to your media server and select Video.
2. Browse for your files and press Enter to play your movies.
3. If the video library has been updated, go back to the main screen and select Video once
more. It will automatically refresh and show the new content.
Tip: You can organise your video files in whichever way you
like. We recommend creating different folders to represent
different videos/events and name your folder accordingly.
[Home] Go to the main screen to select another media folder.
[Go To] Jump to a certain folder or video using the file number.
[Search] Search for a video using the file name.
[Play] Play all video files in that particular folder.
[Shuffle] Shuffle all video file in that particular folder and start playback.
[Back] Return to the previous screen. You can also use the RETURN button on your
remote control instead.
To navigate back to the main screen, press the HOME button on your remote control,
which is the A-B button with the yellow house icon.
- 10 -
Video Library
[Video Folder] By default, this path is set to your media files stored in My Documents/My
Videos. Browse for a different folder to locate the videos if they are stored elsewhere.
[Watch Folder] If you have additional folders with video files on a different drive or in a
separate folder, add this folder to the watch list, so that you can access it from D7. These
files will not be visible on your computer screen but can be accessed and viewed on the
TV screen.
- 11 -
Video Playlist
Once the path to your video folder has been set, you will be able to see all your media files
in the video playlist. If you have recently updated the content, click on the minus sign on
the left hand side of the My Videos folder to collapse the file list, and then expand it again
or go to home and back to video. This will refresh the content and list all new files.
[Random Playback] Enable this option to play all your video files in random order. You
can either set this on your computer or directly on the TV screen under Setting. Login to
your media server and click on Setting, then enable it and submit the changes.
- 12 -
Chapter 5 - Music Playback
This feature lets you play your various music files through your home entertainment
system. By default, MyHome plays MP3, AAC, OGG, WAV and WMA audio files that are
stored in your My Documents/My Music folder. Additionally, you can use MyHome together
with Windows Media Player or Winamp.
Introduction
1. On D7, login to your media server and select Music.
2. Browse for your files and press Enter to play your audio files.
3. If the music library has been updated, go back to the main screen and select Music
once more. It will automatically refresh and show the new content.
Tip: You can organise your music files in whichever way you
like. We recommend creating different folders to represent
different music/album and name your folder accordingly.
[Home] Go to the main screen to select another media folder.
[Go To] Jump to a certain folder or song using the file number.
[Search] Search for a song using the file name.
[Play] Play all audio files in that particular folder.
[Shuffle] Shuffle all video file in that particular folder and start playback.
[Back] Return to the previous screen. You can also use the RETURN button on your
remote control instead.
[Sort] Click on library to sort the files using the standard tree structure or use album, artist
or genre to sort the audio files by ID3 tag.
- 13 -
Music Library
[Music Folder] By default, this path is set to your media files stored in My Documents/My
Music. Browse for a different folder to locate the songs if they are stored elsewhere.
You can retrieve ID3 tags for MP3 songs to show on the TV screen. Enable the scan for
song information option and your music library will be categorised into Artist, Genre and
Album. If the song title from an ID3 tag exists, it will be displayed instead of the filename.
Enable the scan windows media player or winamp playlist if you have setup a playlist
using one of those players.
[Watch Folder] If you have additional folders with audio files on a different drive or in a
separate folder, add this folder to the watch list, so it can be accessed from the D7. These
files will not be visible on your computer screen but can be accessed and viewed on the
TV screen.
[iTunes] To enable the iTunes library, go to the General category and select the Media
Server tab. Turn on the “Support iTunes” option if you prefer using the iTunes file library
and playlist to listen to your music. Once this is enabled, the standard music folder will be
disabled and the iTunes library will be used instead.
- 14 -
Music Playlist
Once the path to your music folder has been set, you will be able to see all your media
files in the music playlist. If you have recently updated the content, click on the minus sign
on the left hand side of the My Music folder to collapse the file list and expand it again or
go to home and back to music. This will refresh the content and list all new files.
[Random Playback] Enable this option to play all your audio files in random order. You
can either set this on your computer or directly on the TV screen under Setting. Login to
your media server and click on Setting, then enable it and submit the changes.
[Photo Album] To view your favourite photos during music playback, you can setup a
folder here. Set to None for no slideshow at all, leave it on Default to display generic
images or set your own folder. If none of your folders are visible, go to Preferences and set
the path to the photo folder first.
[Add your own playlist] Instead of using your media player’s playlist, you can also setup
your own. Download a *.pls file from the internet (i.e. shoutcast.com) and save it in your
music folder. The list will only be visible on your TV, where you can then access it from D7.
- 15 -
Chapter 6 - Photo Playback
This feature lets you view photos and enjoy a slideshow of them on your TV screen. By
default, MyHome will display all your image files (JPG, BMP, TIF, GIF and PNG format)
that are stored in your My Document/My Pictures folder.
Introduction
1. On D7, login to your media server and select Photo.
2. Browse for your files and press Enter to see your image files.
3. If the photo library has been updated, go back to the main screen and select Photo
once more. It will automatically refresh to show the new content.
Tip: You can organise your images in whichever way you like.
We recommend creating different folders to represent different
images/albums and name your folder accordingly.
[Home] Go to the main screen to select another media folder.
[Go To] Jump to a certain folder or image using the file number.
[Slideshow] Play all photos in that specific folder as a slideshow presentation.
[Shuffle] Shuffle all pictures in that particular folder and start playback.
[Back] Return to the previous screen. You can also use the RETURN button on your
remote control instead.
To navigate back to the main screen, press the HOME button on your remote control. That
is the A-B button with the yellow house icon.
- 16 -
Photo Library
[Photo Folder] By default, this path is set to your media files stored in My Documents/My
Pictures. Browse for a different folder to locate the images if they are stored elsewhere.
[Watch Folder] If you have additional folders with photos on a different drive or in a
separate folder, add this folder to the watch list, so it can be accessed from your D7.
These files will not be visible on your computer screen but can be accessed and viewed on
the TV screen.
[Photo Scale] Select your preferred display mode. You can choose between the option to
fit to screen (original proportion), full screen (stretched) or the actual size (original size).
You can either set this on your computer or directly on the TV screen under Setting. Login
to your media server and click on Setting, then enable it and submit the changes.
- 17 -
Photo Playlist
Once the path to your pictures folder has been set, you will be able to see all your media
files in the photo playlist. If you have recently updated the content, click on the minus sign
on the left hand side of the My Pictures folder to collapse the file list, then expand it again
or go to home and back to photo. This will refresh the content and list all new files.
[Random Playback] Enable this option to play all your photos in random order. You can
either set this on your computer or directly on the TV screen under Setting. Login to your
media server and click on Setting, then enable it and submit the changes.
[Playlist] To listen to music during the picture slideshow, you can setup a folder here. Set
it to None for no music at all or select your own folder. If none of your folders are visible,
go to Preferences and set the path to the music folder first.
[Slideshow] Set the time from 1-60 seconds, for how long each slide should be displayed.
- 18 -
Chapter 7 - Service
Extra features and services let you to do more with MyHome. You can surf the web from
the comfort of your living room, access a wide variety of information, or add 3rd party
media services.
Introduction
1. On D7, login to your media server and select Service.
2. Select the service you would like to access and press Enter.
[Web Bookmarks] MyHome will synchronise with your favourites and bookmarks from
Firefox or Internet Explorer. Use your own bookmarks to access internet content right from
your TV screen.
MyHome automatically refreshes and retrieves bookmarks & RSS links created in your
web browser. Many sites and blogs use RSS to publish their most recent headlines, such
as www.apple.com/hotnews, www.podcast.net and many more. MyHome supports RSS
feeds and you can bookmark sites that have RSS feed in your browser and then view
them from the D7 on your TV screen. In addition, there are many websites providing
playlists in *.pls format or a URL that links directly to a MP3 file, such as
www.shoutcast.com. You may directly bookmark these MP3 links and PLS playlists.
Note: RSS is a format for syndicating news and the content of news-like sites, including
major news sites, news-oriented community sites and personal weblogs. Once information
about each item is in RSS format, an RSS-aware program can check the feed for changes
and react to the changes in an appropriate way.
[Media Services] Adding 3rd party media services will allow you to surf the internet and
enjoy various multimedia files and other content from the World Wide Web.
- 19 -
Preferences and Setup
[Media Service] Select a playlist from the drop down menu to be played during a photo
album slideshow (media service). Set it to None for no background music at all or choose
your own folder. This feature is only for additional plug-ins in the Service mode. For music
to your standard slideshow, go to the Photo menu and setup your background music there.
[Web Bookmark] Select your browser to synchronise your bookmarks.
Adding Bookmarks
Adding your favourite links and saving bookmarks is different for each browser. In the
following examples, we use Internet Explorer to demonstrate but it is very similar in Firefox.
1. You can save your favourite site as bookmark by selecting Add to Favourites... from
the Favourites menu.
- 20 -
2. Change the bookmark name if required and then click OK to save the bookmark.
3. Once done, you will see your new bookmark in your favourites list.
4. On your TV under Service, you can now see the new bookmark.
- 21 -
5. Click on your favourite link and you will be able to view the website on TV.
6. Press stop on your remote control to exit the website. Use the navigation keys to
browse the website, and the Volume adjustment buttons to scroll up and down.
7. To navigate back to the main screen, press the HOME button on your remote control.
That is the A-B button with the yellow house icon.
RSS Bookmarks
You have to manually add sites that have RSS feeds. When you visit a site that has RSS
feed, you will see an
or
icon.
1. Find a site with RSS feed.
- 22 -
2. Clicking on the
icon to display the RSS page.
3. Add the RSS page to your bookmarks by selecting Add to Favourites... from the
Favourites menu.
4. Selecting Add to Favourites... will bring up the Add Favourite dialogue. Change the
name if required and then click OK to save the bookmark.
- 23 -
5. Once done, you will see your new bookmark in your favourites list.
6. On your TV under Service and Web Bookmarks, you can now see the new bookmark.
7. Click on an RSS feed to read an overview of the news article shown at the bottom of the
page.
- 24 -
8. Click on the
icon to access the external web site on which the article is hosted.
9. Press stop on your remote control to exit the website. Use the navigation keys to
browse the website, and the Volume adjustment buttons to scroll up and down.
10. To navigate back to the main screen, press the HOME button on your remote control.
That is the A-B button with the yellow house icon.
- 25 -
Podcast Bookmarks
You can find many RSS news feeds with audio files - these sites will play an audio file
rather than display text. The RSS news feeds with audio files are often called Podcast
stations.
1. Find a Podcast station such as www.podcast.net or similar.
2. You can click on the
icon and add it to your bookmarks. If you would like to listen
icon to play it (a
to the music before adding it to your bookmarks, click on the
window will pop up as shown below).
- 26 -
3. Clicking on the
icon will bring you to the RSS page.
4. Add the RSS page to your bookmarks by selecting Add to Favourites... from the
Favourites menu.
- 27 -
5. Selecting Add to Favourites... will bring up the Add Favourite dialogue. Change the
name if required and then click OK to save the bookmark.
6. Once done, you will see your new bookmark in your favourites list.
- 28 -
7. On your TV under Service and Web Bookmarks, you can now see the new bookmark.
8. Click on a link to listen to the radio or news broadcast.
- 29 -
MP3 Bookmarks
If you have a direct link to MP3 files, you can also add these as bookmarks.
1. Find a website offering free MP3 files.
2. To add MP3 as bookmark, right click on the file link and select Add to Favourites...
- 30 -
3. Selecting Add to Favourites... will bring up the Add Favourite dialogue. Change the
name if required and then click OK to save the bookmark.
4. Once done, you will see your new bookmark in the favourites list.
- 31 -
5. On your TV under Service and Web Bookmarks, you can now see the new bookmark.
Click on it to listen to the song.
6. Enjoy!
- 32 -
Radio Playlist (PLS)
You can bookmark your favourite radio playlist from a website such as www.shoutcast.com
or similar. Instead of downloading the PLS file and saving it in your music library, you can
add a link to your bookmarks.
1. Find a website which provides playlists for webradio or other programs.
2. To add the playlist to your bookmarks, right click on the Tune In! icon and select Add to
Favourites...
- 33 -
3. Selecting Add to Favourites... will bring up the Add Favourite dialogue. Change the
name if required and then click OK to save the bookmark.
4. Once done, you will see the new bookmark in your favourites list.
- 34 -
5. On your TV under Service and Web Bookmarks, you can now see the new bookmark
that you have added. Click on it to bring up the list of songs or play the radio station
directly if there is only one on the list.
6. Enjoy!
- 35 -
Firefox Live Bookmarks
For general bookmarks for Firefox, please refer to the previous pages with examples
shown using Internet Explorer. As an example, we show you how to add Live Bookmarks
in Firefox.
Firefox has feature called Live Bookmarks. Live Bookmarks are special types of
bookmarks in the Firefox browser that update themselves with whatever new content is
available on the bookmarked site.
1. When you visit a site that is enabled for Live Bookmarks, you will see the orange icon
in the bottom right part of the Firefox browser window (the status bar).
2. By clicking on the
icon you can subscribe to the feed.
- 36 -
3. Selecting an RSS feed will bring up the Add Bookmark dialogue. Select OK and you will
see Live Bookmarks with the rest of your bookmarks.
4. Once you have added your site as a Live Bookmark, you will see the list of latest RSS
feeds (articles) from the site as a list of bookmarks in that folder. This will get refreshed as
RSS feed is getting updated.
Note:
If a site has an RSS feed, but the icon doesn't show up, you can add the
feed manually. Select New Live Bookmark... in the Bookmarks Manager
and enter the URL and other information of the feed.
- 37 -
5. On your TV under Service and Web Bookmarks, you can now see the new bookmark
folder that you have added. Click on it to see the different RSS feeds.
6. Click on an RSS feed to read an overview of the news content, which will show on the
bottom of the page.
- 38 -
7. Click on the
icon to access the external web site on which the RSS feed is hosted.
8. Press stop on your remote control to exit the website. Use the navigation keys to
browse the website and the Volume adjustment buttons to scroll up and down.
9. To navigate back to the main screen, press the HOME button on your remote control.
That is the A-B button with the yellow house icon.
- 39 -
3rd party Media Services
There are many media services you can download, such as iTunes Music, MSNBC News,
Music Radio, Podcast and others.
1. To install a media service, store the new media service in the service folder on your
computer. By default, that folder can be found in your Program Files under
MyHome\webapps\ROOT\service.
2. Once installed, you can access the service from your TV screen.
3. Click on your preferred service to access that particular website.
4. Clicking on your favourite media service will bring you to the provider’s internet site with
their customised interface and further options or links.
- 40 -
Chapter 8 - iTunes
Instead of setting up your own music folders, you can use iTunes to manage your media
files. Once setup, you can access the iTunes library from your TV screen.
Introduction
1. Make sure that you have added or imported your music files (in AAC, AIFF, MP3 and
WAV formats) to the iTunes library.
2. Once your iTunes library is setup, close iTunes and start the MyHome application. To
start, select Edit and then select Preferences option at MyHome menu bar.
3. Go to Preferences and select the General menu. In the Media Server tab, select the
“Support iTunes” option and click OK to save your settings. If the path to the iTunes library
is not found automatically, click on Browse to locate the XML file manually. Enable the
option to look for shared music if you would like to access files shared by other computers
also running iTunes.
- 41 -
4. Instead of the music playlist, MyHome will now show the iTunes logo. The content will
be synchronised with your iTunes library and you will be able to see the files on your TV.
5. On your TV screen, you can now access your files from the iTunes library.
Note: If you would like to share your iTunes music library, you can do
so in your iTunes preferences.
- 42 -
Sharing Music
To share your music files, start iTunes and go to preferences. Select the Sharing tab and
enable Share my music.
Setup the folders you would like to share and name the share. DO NOT enable the
password option.
- 43 -
Video
The MyHome application can also play your music and movie files stored in your iTunes
library. MyHome supports MPEG4 videos in mov and mp4 formats.
Drag your movies into your preferred album. They will be added to your iTunes library.
On D7, the movies will be listed under Video. You will see a playlist created by iTunes, and
will then be able to access your file from your TV.
- 44 -
Podcast
The MyHome application can play podcasts downloaded from the iTunes music store.
Start iTunes and access the podcast directory to find new content.
Select your preferred podcast and subscribe to it. After adding the new podcast, it will be
listed in iTunes under Podcasts.
On your D7 under Music, you can click on the podcasts playlist to see and access the files.
- 45 -
Radio
The MyHome application supports PLS Radio Playlist files that are downloaded from
webradio sites such as www.shoutcast.com.
Launch iTunes; click the radio icon on the left and select your preferred radio station. Add
the playlist to your library and close iTunes.
On your D7 under Music, you can click on the newly added playlist to see and access the
webradio stations.
- 46 -
Chapter 9 - Windows Media Connect
Windows Media Connect is an exciting new technology and can be supported on many of
these devices, including digital audio receivers, digital media receivers, connected DVD
players and set-top boxes.
Introduction
If you are running Windows XP (SP2) and have Windows Media Connect (WMC) installed,
MyHome provides an extra option for you to view and stream protected content from WMC.
To view the media files on the TV, you need to ensure WMC has authorised your D7 and
that it is up and running.
1. To ensure WMC is installed, go to Start -> All Programs and find Windows Media
Connect. Click on it to launch WMC and you will see the WMC icon on the system tray
once successfully started.
Note: WMC provides an option to launch when Windows starts.
a) Go to the WMC control panel, then click on Settings.
b) Enable “Automatically start folder sharing when windows starts”.
2. To make your contents available on the D7, you need to share the folder(s) containing
the media files. On your WMC control panel:
a) Click Sharing, and then click Add.
b) Click Browse to choose the folder you want to share and add as many as you like.
- 47 -
Playing Windows Media Connect Contents
1. Turn on D7, wait for it to boot and WMC will auto detect the new device.
2. Click on the balloon tip and the Windows Media Connect wizard will be pop up. Select
the device to be authorised. The D7 must be authorised before the shared content of
WMC can be viewed on TV. If there is more than one device available, a list of authorised
or available devices can be seen on WMC control panel.
3. Once the device is recognised and authorised, you will see a new Windows Media
Connect device on your D7 main screen.
If it is not recognised or not accessible, reboot your device and try again. Make sure your
firewall is setup to allow Windows Media Connect to access the local network.
- 48 -
4. Click on it to access your shared media files and browse the content of your computer.
5. The content will be listed according to the media files, folders or playlist. Choose the
one suitable for your content.
- 49 -
Chapter 10 - Rhapsody
RHAPSODY is a jukebox that gives you unlimited access to thousands of albums right
from your PC. It brings together a large legal collection of digital music from around the
world, the Internet's best radio, flexible CD burning, and detailed music information - all in
one easy-to-use service.
Introduction
If your machine has RealRhapsody installed, MyHome provides an extra option in
preferences for you to view and stream protected content from RealRhapsody. You need
to ensure that in MyHome this option is turned on and that RealRhapsody has enabled the
UPnP service. The detail steps are described as below.
1. After starting the RealRhapsody player, go to the Tools menu and select Preferences.
2. Select the Rhapsody Server (UPnP) and turn it on.
- 50 -
3. Click the Start button if this is the first time to start the UPnP Server.
Note: Enable the “Start UPnP Server once logged in”
option to automatically startup the UPnP Server in the
future.
Playing RealRhapsody Contents
1. Make sure both MyHome and Rhapsody are turned on and running. On the TV screen,
go to the Media Service Portal and under Service click on the Rhapsody plugin to access
the Rhapsody Media Server.
- 51 -
2. Browse for your files and listen to your music from your living room.
3. The files are sorted and displayed according to your Rhapsody library.
- 52 -
Chapter 11 - Napster
Napster is a jukebox that gives you unlimited access to thousands of albums right from
your PC.
Introduction
If your computer has Napster installed, MyHome provides an extra option for you to view
and stream protected content downloaded or purchased from Napster via Windows Media
Connect (WMC). The detail steps are described as below.
1. Launch Napster.
2. Search for new music and click on buy album or buy track to purchase the song.
3. After purchasing and downloading the song, it will appear in your Napster library.
- 53 -
4. The downloaded songs will be stored in the My Music folder.
Playing Napster Contents
1. Before you can play your purchased songs, you need to start up Windows Media
Connect (WMC). See Chapter 9 for details about WMC. Once started, your D7 will be able
to access the Napster library. Click on the Windows Media Connect device on your main
screen.
- 54 -
2. Once you have logged in, click on the All Music folder to access the Napster music files.
3. Your purchased songs are now visible on your TV screen. Click on a song to playback
the music file.
Note: To access the Napster library, ensure WMC has authorised
your device. The detailed steps for WMC are described in
Chapter 9.
- 55 -
Chapter 12 - Windows Media Player
Windows Media Player is an all-in-one media player that provides a great experience for
discovering, playing and taking your digital entertainment anywhere--on Windows XPbased PCs and a wide choice of portable devices.
Introduction
MyHome supports playlists that are created in Windows Media Player (WMP). The playlist
file formats that MyHome currently supports are .wpl, .asx and .m3u.
1. In MyHome, choose Edit and select Preferences.
2. In the Music category, go to the Music Library tab.
2.Enable the “Scan Windows Media Player/Winamp playlist” option to use the Windows
Media Player’s playlist.
- 56 -
Creating a Playlist
Creating playlists may differ from version to version. Following example is using Windows
Media Player 10.
1. Launch Windows Media Player and create a new playlist by selecting a new Now
Playing List from the File menu. Enter a name for the new playlist and press OK. The new
playlist is now ready and you can add your favourite files.
2. Drag and drop your music files into the new playlist.
3. To save the playlist, go to File, select Save Now Playing List As... . Enter a name for
the playlist and press OK. The new playlist will be saved in the My Playlists folder.
Note: By default, playlists will be saved in the My Playlist folder, a
sub-folder in the My Music folder. If a different Music Library path
has been selected in Preferences, browse to that path.
4. Start MyHome and go to the Music tab. A My Playlists link will now be listed in your
playlist library. These are your collections of playlists from Windows Media Player.
5. On your TV screen, go to the Music folder, where your new playlists are now accessible
directly from the D7. Click on it to see the songs and playback your favourite music.
- 57 -
Chapter 13 - Winamp
Winamp is a jukebox that gives you unlimited access to thousands of albums and other
multimedia content right from your PC.
Introduction
MyHome supports playlists created in Winamp. The playlist file formats that MyHome
currently supports are .b4s and .m3u.
1. In MyHome, choose Edit and select Preferences.
2. In the Music category, go to the Music Library tab.
3. Enable the “Scan Windows Media Player/Winamp playlist” option to use the
Windows Media Player’s playlist.
- 58 -
Creating a Playlist
1. Launch Winamp and create a new playlist by clicking the Playlists button. A playlist
name is automatically created.
2. To rename the new playlist, right-click the playlist and select Rename playlist. Type in a
new name and press Enter. The new list will then be displayed in the Playlist Editor.
3. You can now add music files to the new playlist.
4. To save the playlist, click the Playlist button again and select Save playlist as...
5. Save the playlist in the My Music folder or the Music Library path set in MyHome.
6. Start MyHome and go to the Music tab. The link will now be listed in your playlist. These
are your collections of playlists from Winamp.
7. On your TV screen, go to the Music folder, where your new playlists are now accessible
directly from D7. Click on it to see the songs and playback your favourite music.
- 59 -
Chapter 14 - Appendix
FAQ
Q: I don't see the Video, Music and Photo Menu.
A: You must first install the MyHome application on your computer. Once installed, make
sure your firewall is setup properly and then refresh the screen. Your computer should then
be recognised and you can access the shared files from the main screen.
Q: What music file formats can I use?
A: MyHome is able to play audio files of the following format:
· MPEG I Layer 1 (MP1) (.mp1, .mpa)
· MPEG I Layer 2 (MP2) (.mp2)
· MPEG I Layer 3 (MP3) (.mp3)
· Ogg Vorbis (OGG) (.ogg)
· AC3 5.1 (AC3) (.ac3)
· Microsoft PCM Wave (WAV) (.wav)
· Advanced Audio Coding (AAC, ADIF, ADTS) (.aac, m4a, .aiff)
· Apple MPEG4 AAC Audio (M4A) (.m4a)
· Microsoft Windows Media Audio version 1 and version 2 (WMA) (.wma)
Q: What image formats can I use?
A: MyHome is able to display picture files of the following format:
· JPEG
· BMP
· GIF
· PNG
· TIF
Q: What video file formats can I use?
A: MyHome is able to play video files of the following format:
· MPEG 1 VCD format (1150Kbps CBR) (.mpg, .mpe, .mpeg, .dat, .m1v)
· MPEG 2 up to 9.5Mbps (.mpg, .mpe, .mpeg, .m2v, .vob)
· MPEG 4 (XviD, RMP4) (.avi, xvid, .rmp4, .mov, .mp4)
· AVI audio codec : MP3, AC3, PCM, WMA, Ogg, WMV9
· MOV : 3ivX + MP3, 3ivX + PCM, 3ivX + AAC
(3ivX converted from supported MPEG 4 video codec using Dr. DivX II for MAC OS)
· MP4 : MP4 + AAC (still in progress, currently only able to playback certain MP4 files)
Q: I can't access MyHome from D7!
A: Check the following to troubleshoot your connection:
1. Check your computer. It should be ON, NOT in sleep mode.
2. Check the settings for the media content path. Confirm that you have placed your media
files in the correct folder, in which you have assigned in your MyHome Preferences.
- 60 -
3. Check the computer's connection to your home network. Ensure that your computer is
physically connected to your home network. If your home network includes a shared
internet connection, check that your computer is on your home network by opening the
internet browser and accessing the internet.
4. Check the D7 connection to your home network. Ensure that your D7 is physically
connected to your home network. If your home network includes a shared internet
connection, check if your D7 is able to access the internet directly.
5. Check that MyHome is running. You should see the application running on your
computer screen or visible as an icon in the taskbar.
6. Check for network security software. Some network security software (firewall) may
block D7 from accessing MyHome. Turn off any firewall to see if that is the reason and
later setup the ports properly.
7. Check that you are signed in and the computer is running.
8. Check the IP address of your computer and add it manually on your D7. On the main
screen of your D7, click on Add and fill in the fields manually to register a new MyHome
server.
Q: I can not hear any sound at all!
A: Check following to troubleshoot your audio output:
1. Check volume, power and speakers. Make sure that your television or entertainment
centre is powered on and that the volume is at an acceptable hearing range. Ensure that
the Mute function is turned off.
2. Check the connections and make sure the cables are connected properly and firmly.
3. Check the video or music file. Play the file on your computer instead to make sure it is
not corrupted. If the audio codec is not supported on your D7, convert the file to a standard
which can be played back on D7 and MyHome.
Q: I don't see any of my shared videos, music or photos on D7!
A: Check following to troubleshoot your shared content:
1. Check the path to your media files set in MyHome. On your computer, you should be
able to see the files in the MyHome playlist, only those will be visible on your D7.
2. Check the content and make sure the format is supported by MyHome and D7.
Q: I changed some of the contents on MyHome but I can't see the changes on D7!
A: Some changes do not appear on your D7 immediately. You can reload the content,
which will refresh and obtain the latest changes made in MyHome by pressing the refresh
or Home button on your remote control or by selecting the Video, Music or Photo menu on
MyHome and contracting, then expanding the file list again.
- 61 -
Q: An error occurred while browsing Video, Music and Photo content on D7!
A: Check following to troubleshoot your device:
1. Check that the content you are playing has not been deleted.
If you have moved or deleted some files while D7 is accessing miHome, it may cause an
error. If this happened, please refresh (go back to the Home screen) or restart your D7.
Additionally, you may also want to restart your MyHome application on your computer to
update the playlist content.
2. Check the number of files in your folders.
The group of video, music or photos that you are trying to access may be too large. We
recommend using other folders or playlists with fewer files. You can group the files within
subfolders to minimise the amount of files stored within a folder itself.
Q: D7 responds slowly when I watch movies, browse photos or listen to music!
A: Check following to troubleshoot your device:
1. Publish multiple folders.
If there are a large number of files placed in a folder, navigating through these folders may
be slow. Try creating more folders with less content in each one.
2. Remove unusable files.
Move files that are not known to be digital content media files. Non-supported file formats,
although they may not be seen in MyHome, will still be processed to be filtered out, which
may slow down the system during your search for media files.
3. Change the performance settings.
Try adjusting your computer that is running MyHome to run at an optimal level. This is
mainly to enhance the performance of your computer, while serving the published content
to D7.
About this Manual
This manual covers both D7-DMA (wired version) and D7-WDMA (wireless version). The
screenshots in this manual were mainly taken using Internet Explorer, so if you are using
the Firefox browser, it may look slightly different, although the functions are identical.
Images and descriptions may slightly vary between this manual and the firmware version
you are using.
© Copyright 2006 by Macpower & Tytech Technology Co., Ltd. all Rights Reserved
The information contained in this manual is believed to be accurate and reliable. Macpower & Tytech
Technology assumes no responsibility for any errors contained in this manual and reserves the right to make
changes in the specifications and/or design of this product without prior notice. The diagrams contained in
this manual may also not fully represent the product that you are using and are there for illustration purposes
only. Macpower & Tytech Technology assumes no responsibility for any differences between the product
mentioned in this manual and the product you may have.
- 62 -