1
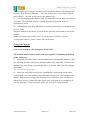
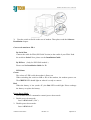
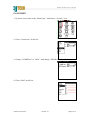
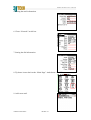
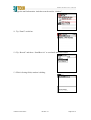
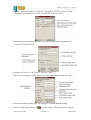
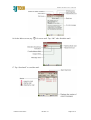
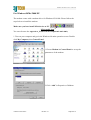
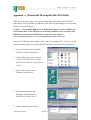
PP2-5600 and PP2I-5600 User’s Manual User’s Manual for: PP2-5600 (Serial Modem) PP2I-5600 (Infrared &Serial Modem) Revision Issue Date Engineer/Comments 1.0 April 11, 2002 YLYang/Pre-release 1.1 July 5, 2002 WWJ/Proofread Copyright by 3JTech. Co., Ltd. All rights reserved. 2002/12 From 3JTech Revision 1.0 Page 1 of 41 PP2-5600 and PP2I-5600 User’s Manual TABLE TABLE .......................................................................................................2 I. INTRODUCTION.................................................................................3 II. 56K ACCESS INFORMATION .........................................................4 III. HARDWARE INSTALLATION.......................................................5 BEFORE YOU START ....................................................................................................5 SYSTEM REQUIREMENTS .............................................................................................6 FRONT VIEW ...............................................................................................................6 REAR VIEW .................................................................................................................6 BATTERY COMPARTMENT ............................................................................................6 SETTING YOUR MODEM ..............................................................................................7 Connect the modem to a PC through the Serial Cable ..........................................7 Connect the modem to PDA...................................................................................8 LED Status .............................................................................................................8 IV. SOFTWARE INSTALLATION GUIDE .........................................9 FOR PALM ORGANISER ................................................................................................9 FOR WINDOWS CE/POCKET PC ................................................................................12 FOR PSION-5 SERIES ...............................................................................................15 FOR PSION-618C.....................................................................................................18 FOR PENBEX...........................................................................................................21 FOR SHARP .............................................................................................................24 FOR PC .....................................................................................................................28 V. TECHNICAL SUPPORT...................................................................32 VI. SPECIFICATION ............................................................................33 3JTECH. CO., LTD. LIMITED WARRANTY....................................34 APPENDIX A_WINDOWS98 IR SETUP(R220L/210L/200L) ..........37 APPENDIX B_COUNTRY CODE SETTING.....................................40 2002/12 From 3JTech Revision 1.0 Page 2 of 41 PP2-5600 and PP2I-5600 User’s Manual I. INTRODUCTION Thank you for purchasing 3JTech’s Pegasus III series high-speed modem with Infrared wireless communication. The users could connect the infrared modem to PDAs, with IrDA port and different OS like Win CE, Palm, PSION, Linux, DOS and Penbex, etc. It extends the features of the PDA. Connecting the modem to a phone line and turn it into a great travel-mate for Internet connection, file transferring or accessing your own proprietary servers. The Modem can also be used with Personal Computers through its serial port with the included serial cable or through an external IrDA dungo from third parties. With the high performance Modem chipset, this modem will take the user into the wide world of Internet. 3JTech also works on IrDA protocol and other firmware modification to meet with customer’s special needs. For modification of modem firmware to fit your customized application please contact with 3JTech at [email protected]. The modem also offers a battery compartment. It uses four AAA rechargeable or disposal batteries. Unlike other modem like compact flash connector type of modem or PCMCIA type of modem, it won’t drain power from the battery of your PDA. This user’s manual explains how to install the modem and it’s software. Installation is quick and easy if you follow the instructions carefully. You’ll also learn from this manual about how to detect and solve problems you might encounter with the Pegasus III series modem. 2002/12 From 3JTech Revision 1.0 Page 3 of 41 PP2-5600 and PP2I-5600 User’s Manual II. 56K ACCESS INFORMATION The International Telecommunications Union (ITU) determines the technical protocols communications devices must use to interoperate with each other. Modems that comply with ITU standards can “talk” to other standards-compliant modems and fax machines worldwide. * In accordance with the ITU-T standard for 56K transmissions, this modem is capable of 56 Kbps downloads. However, actual speeds may vary depending on line conditions and other factors. Uploads from users to servers travel at speeds of up to 33.6 Kbps. An analogue phone line compatible with the ITU-T 56K standard technology, and an Internet provider or corporate host site compatible with the ITU-T 56K The ITU has determined a worldwide standard for 56K modem technology. With a Pegasus III series modem, you can get the Internet service you want from any service provider who offers the ITU 56K standard technology to their customers. standard are necessary for these high-speed downloads. 3JTech also works on IrDA protocol to provide access of PDA or other devices, which have IrDA interface to access the Internet, file transferring or accessing uses’ own proprietary information servers. For modification of modem firmware to fit your customized application please contact with 3JTech at [email protected]. 2002/12 From 3JTech Revision 1.0 Page 4 of 41 Infrared Modem User’s Manual III. HARDWARE INSTALLATION Before You Start Please check if the follows are include in your Pegasus III packaging Box: z Infrared Modem z Travel Charger z Telephone Cord z CD with User's Manual PDF file and driver z RS-232 cable for direct connect (One side is MiniDIN 9Pin connector, and one side is mini din 9-pin female connector.) 2002/12 From 3JTech Revision 1.0 Page 5 of 41 Infrared Modem User’s Manual System Requirements PDA or any hardware devices with IrDA or RS232 serial interface and any of the following Operating System: Windows 95 and above, DOS, Linux, WinCE, Palm OS, PSION, Penbex and others… Front View 1. Speaker produces the sound to show the connection to the ISP or host device. 2. IR Module output the Infrared signal to search and connect to another Infrared device. 3. LED shows the status of on-line, infrared connection and power of the battery. Rear View 1. Multi switch for selecting functions among Serial, Off and IR 2. RS-232/Power port for connecting to a PDA, PC or other device with serial port using the serial cable included in this package. 3. Phone Jack for connecting to telephone line. 4. Power Jack for connecting to the AC power supply through a 100~240VAC travel charger. Battery Compartment The modem could be used with four rechargeable AAA batteries or three regular disposal batteries. When use with disposal AAA battery, you could also use four batteries. There is a better efficiency when using three disposal batteries. 2002/12 From 3JTech Revision 1.0 Page 6 of 41 Infrared Modem User’s Manual Connecting the travel charger, the smart circuit inside the modem will automatically take care of the batteries charging . Also, the main power source will be from the travel charger. In order to save power, the modem will: 1) Get into sleeping mode when no data is transmitting over the phone line for over 4 seconds, (The transition between sleeping and normal operation modes is transparent to users) 2) Automatically shut down when there is no data transmitting over the phone line for over 1Min. When the modem is shut down, you will need to push the reset button to turn on the modem. Notice: Do not open the battery cover. If you encounter problems with your rechargeable batteries, please contact your local dealer. Setting Your Modem Connect the modem to a PC through the Serial Cable The modem could of course works with your regular PC including the desktop with a serial port: 1) Insert one end of the phone cord (included) into the Pegasus III modem’s LINE jack and plug the other end into any analogue phone jack. Important: Connect to an analogue line only. Using a non-analogue line (e.g., digital, Multi line) may damage the modem. (Refer to the connection diagram page 3). 2) Insert one end of the Serial (Power combination) Cord into the serial socket located on the rear of the modem. Insert the other end of power cord into the travel charger. Plug the travel charger into a regular power wall outlet (You can also use batteries for power.) Connect the same end to your serial port of your computer. If your PC only has a 25 pin serial port, please use a 25 pin to 9-pin converter. 2002/12 From 3JTech Revision 1.0 Page 7 of 41 Infrared Modem User’s Manual 3) Turn the switch to Serial on the rear of modem. Then please read the Software Installation chapter. Connect the modem to PDA By Serial Port Connect the cable for PDA (PP2-5600 Version) to the cradle of your PDA. Push the switch to Serial. Next, please see the Installation Guide. By IR Port (Only for PP2I-5600 models.) Please read the Installation Guide for IR. LED Status Green: The colour of LED is tells the modem is Power on. When switching the switch to MR or IR of the modem, the modem powers on. The GREEN LED should light on when it is ready to connect. Red: When the battery is low (under 4V), the Red LED would light. Please recharge the battery or replace the battery. Power-Down Mode Use terminal and AT command to control power down mode: 1. Enable power-down mode: Issue “ATS63.1=0”. ( Def.) 2. Disable power-down mode: Issue “ATS63.1=1”. 2002/12 From 3JTech Revision 1.0 Page 8 of 41 Infrared Modem User’s Manual IV. SOFTWARE INSTALLATION GUIDE For Palm Organiser (1) Hardware needed: 1. 3JTech. Pegasus III series modem 2. Pilot 1000*. Pilot 5000*, Palm Pilot Personal*, Palm Pilot Professional*, Palm III and above (IIIe Not include), IBM Workpad series and TRGPro 3. Cable for Palm III or Cable for Palm V (The Serial Cable synchronizes the Palm organizer and the Pegasus modem. One end of the cable is a Palm connector (see Note below); the other end is the MiniDIN 9Pin male connector that connects to Pegasus III modem. Please follow the following steps) (2) Software needed 1. Palm Desktop 3.0.1 or above 2. Palm OS 3.3 or above** (3) Modem Set-up: 1. Tap on "APPLICATIONS" 2. Tap on "PREFS" (Preferences). 3. Go to the top right hand corner under "Preference" page, and tap on the drop down menu. 4. Tap on "CONNECTION" in the drop-down menu on the top right hand corner. 5. Tap on “New”. 6. 7. Next to "Name", write IR MODEM. Next to Connection Method select IrCOMM to MODEM. 2002/12 From 3JTech Revision 1.0 Page 9 of 41 Infrared Modem User’s Manual 8. Tap on Details on the bottom right 9. Next to SPEED tap on the down arrow then select “57,600bps” 10. Go to "Volume" and Tap on the down arrow. Then choose a volume of your choice. Note: To turn speaker off enter the Init String M0 11. Go to "Flow Ctrl" and Tap on the down arrow and then select "NONE". 12. Go to "String" and type "ATZ". 13. Tap on OK and then tap on OK again. 14. (4) Network Set-up: 1. Go to the top right hand corner under "Preference" page again then select "Network" in the drop-down menu. 2. Go to "Service" and Tap on the down arrow and then select your service provider: (AOL, Earthlink, etc.). You can also write in and add your own service provider if yours is not listed. 2002/12 From 3JTech Revision 1.0 Page 10 of 41 Infrared Modem User’s Manual 3. Type in "user’s name", "user’s password", and "phone number" using the onscreen keyboard. 4. Next to CONNECTION choose IR Modem. Turn on the IR modem by switching the switch to IR (located at the rear of the modem). If your battery is not charged you may have to connect the AC power adapter. Point your Palm’s IR port to the Modem IR port and tap on "connect". Note: you can connect up to 1.5 meters away at a 15-degree angle. NOTE: 1. Make sure to use the cable for Palm Pilot when your Palm Organiser is Palm Pilot Personal***, Palm Pilot Professional***, Palm III, Palm IIIx, Palm IIIc, IBM Workpad 30X, TGRPro. 2. Make sure to use the cable for Palm V if your Palm OS Organiser is Palm V, Palm Vx, IBM Workpad C3 PC Companion (2Mb) and IBM Workpad C3 PC (8Mb). * Make sure you have upgraded the memory card. TRG SuperPilot Memory Board II XL or Palm III 2MB Upgrade Kit, and be sure to upgrade to OS 3.3 or above. ** Please download the latest version from Palm’s official website. http://www.palm.com/ 2002/12 From 3JTech Revision 1.0 Page 11 of 41 Infrared Modem User’s Manual For Windows CE/Pocket PC (1) Hardware needed 1. Pegasus III series modem 2. Windows CE or Pocket PC devices 3. Null modem cable or Cable for Casio Cassiopeia** (The serial cable synchronizes the POCKET PC and the Pegasus modem. One end of the cable is a 9-pin RS-232 male connector that connects to the female RS-232 9-pin serial cable provided by POCKET PC. The other end is the small flat connector that connects to Pegasus III modem. Please follow the following steps:) (2) Connect the modem to POCKET PC 1. Connect your POCKET PC to the cradle or serial HotSync Cable. Note: Do not push the HotSync button at anytime while HotSync is connected to the Pegasus III. 2. Remove the Pegasus III serial/power cable (male 9 pin RS-232 on one end and flat serial head on the other) (shorter black cable) 3. Connect one end of the male 9-pin RS-232 (included) into the female 9-pin RS-232 cable that is connected to the POCKET PC cradle. Connect the flat end of the Serial/Power cable end directly to the Pegasus III modem. (Refer to the connection diagram on opposite side) Insert one end of the phone cord (included) into the Pegasus modem’s LINE jack and plug the other end into any analog phone jack. Important: Connect to an analog line only. Using a non-analog line (e.g., digital, PBX, Multi line) may damage the modem. Remove the Travel AC adapter/charger and power cord from the box. Insert one end of the power cord into the AC/DC adapter and connect the other end to the serial/power Y-cable. Plug the AC/DC adapter into a regular 110V or 220V power wall outlet to charge the built in battery and begin to use the modem. Note: Please allow the battery to charge for a full 12 hours when charging the battery for the first time or after long period of time of discontinued use. (3) POCKET PC Modem setting 2002/12 From 3JTech Revision 1.0 Page 12 of 41 Infrared Modem User’s Manual 1. Turn on your POCKET PC. Make sure your Pocket PC organizer is not on the cradle. 2. 3. 4. 5. 6. Tap on the Start menu and select Settings. Tap on the "Connections" menu. Tap on "Modem" on the bottom left corner of your screen. Under modem connections tap New Connection. Enter a name for your connection. We recommend you use your ISP’s name. 7. Under Select Modem choose ”Generic IrDA modem” for IrDA port. 8. 9. 10. 11. 12. 13. 14. Or choose ”Hayes Compatible on COM1”.for cable. Under Baud Rate select ”57,600”. Choose “Advanced….” icon. Set Connection preferences to [8,N,1] and Flow Control to “None”. Choose OK to setting mode. Tap on Next to enter country code, area code and Phone number. Tap on Next and then choose Finish to exit setting menu. Choose Dialing menu then add a local setting. 15. Enter location name and set to Tone dialing. 16. Tap on Dialing Patterns menu and set functions as you want. (If you don’t dial country code or area code, set functions as “g”). 17. Choose OK to setting mode. 18. Choose OK to finish Modem setting. (4) POCKET PC Connections setting 1. Tap on the Start menu and select Connections. 2. Select the Modem name that just Step 2 you settings 3. Enter your user name and password. Contact your ISP or server administrator if you do not know what they are. 4. 5. Choose “Dial from” that you set in Step 2-16. Tap on Connect, it will dial to your ISP. (5) Internet Explorer settings 1. Tap on the Start menu and select Internet Explorer. 2. Enter the WWW address and tap on OK (6) Mail settings 1. Tap on the Start menu and select Inbox. 2. Tap on Services below windows. 3. Choose New Service. 2002/12 From 3JTech Revision 1.0 Page 13 of 41 Infrared Modem User’s Manual 4. 5. Enter your Service type (POP3 Mail) and choose Next. Choose Connection to the modem that you just setting. Enter your POP3 mail server under Server block. Enter your mail User ID and Password. Then tap on Next. 6. Enter your SMTP mail server. Enter your Return address. And choose Next. 7. Tap on Next if you don’t want change setting. 8. Tap on Finish if you don’t want change setting. 9. Choose OK to finish mail settings. 10. Tap on New to stat edit a new .mail. Once connection with your ISP or remote server is established, you may use your Internet or communication software. Tap on disconnect to terminate your dial-up session once you are done and remember to turn off your modem. 2002/12 From 3JTech Revision 1.0 Page 14 of 41 Infrared Modem User’s Manual For PSION-5 Series (1) Hardware needed 1. Pegasus III series modem 2. Psion 3, Psion 5, Psion 5mx 3. Null modem cable (The Serial Cable synchronizes the PSION 5 and the Pegasus modem. One end of the cable is a 9-pin RS-232 male connector that connects to the female RS-232 9-pin serial cable provided by PSION series 5. The other end is the PCMCIA male connector that connects to Pegasus modem. Please follow the following steps) (2) Software needed Message Suite (Using your PC, go to www.psion.com and download software for modem control. The modem software consists of (E-mail), web, and modem setup software). The software is called "Message Suite" and it is available at www.psion.com/downloads/mssgsuite.html (After downloading and installing "Message Suite" to the your PSION 5, verify that the software has been successfully installed.) (3) Connect the modem to PSION 5 series Connect one end of the male 9-pin RS-232 (shorter one, included) into the female 9-pin RS-232 cable connected to the rear of the PSION 5. Connect the other end of the PCMCIA connector into the socket to the rear of the modem. (Refer to the connection diagram on next page) Insert one end of the phone cord (included) into the Pegasus modem’s LINE jack and plug the other end into any analog phone jack. Important: Connect to an analog line only. Using a non-analog line (e.g., digital, PBX, Multi line) may damage the modem. (4) PSION 5 Remote Dial-Up Connection Setup 1. 2. Tap on "Extras". You should see web and e-mail. If you don’t, then you need to reinstall the software. Contact PSION for assistance. Continue by going to "Control panel", and tap on "Modem". Choose "Hayes compatible modem" under Modem Settings, then tap "Edit" 2002/12 From 3JTech Revision 1.0 Page 15 of 41 Infrared Modem User’s Manual 3. Make sure the name is "Hayes compatible modem" Speed is "57,600" baud. Connect via is "Serial" and Fax class is "Auto". Tap on "Initialization" Enter "ATZ" under Init. (Reset) string. Enter "AT&F" under Data init. string. And enter "AT&D2" under Fax init. string. Tap "Handshaking" Set flow control to "None" under Flow control. Terminal detect (DSR/DTR) and Carrier detect (DCD) should be unchecked. Tap "OK"; tap "OK" again to close "Modem settings". Tap "Internet" and enter your Internet service provider information: Tap "Edit" and you can enter your ISP name, for example: "Earthlink" Chose "Dial-up" next to Connection Type. Enter Standard dial-up number, for example: 941-1034. Tap "Account" under Edit Internet service, enter Username and Password. Tap "Addresses" then "Login" then "Advanced", without changing any settings. Tap "Done" and tap "OK" to close Internet service settings (5) To set up an Email Account: Tap the button on the upper left corner, choose "Settings" under "Tools" menu, and then choose "Email". Set up your E-mail account by entering your Email name, address, and SMTP server (if any). Use MIME encoding and Auto send on opening should be checked OK Email Screen: (6) To set up your Fax information: Under the "Tools" menu choose "Settings", and then choose "Fax". 2002/12 From 3JTech Revision 1.0 Page 16 of 41 Infrared Modem User’s Manual Enter your Fax number, name and preferred resolution, then check the "Show connection dialog" and tap "OK". Setup is now complete. Fax Screen: (7) To Email or browse the web on Internet: Tap "Extras" on the lower right side of screen, and tap "Web" (for Web Browsing), or Tap "Email" for sending E-mails. Web Screen: 2002/12 From 3JTech Revision 1.0 Page 17 of 41 Infrared Modem User’s Manual For PSION-618C This installation guide is intended to help PSION users install the PP2I modem. After following the procedures in this manual, the installation of the PP2I modem should be complete and functional. 1. 2. 3. 4. Connect the power and telephone line to your PP2I modem. Turn on your PP2I modem. On your PSION, go to System Æ Control Panel Æ Modem and setup your modem. The screen below should show: Select Generic modem settings and click OK. Then, as shown below: Under Modem Options, enter the name of the modem: PSION IrDA Modem, speed: 57,600 baud, connect via: Serial, and under fax class, select Auto. Then, under Modem Advanced as shown on the next page, enter Flow control: ”None”, Terminal detect (DSR/DTR): (un-checked), Carrier detect (DCD): (un-checked), and Modem type: Fixed Line, and click OK. 2002/12 From 3JTech Revision 1.0 Page 18 of 41 Infrared Modem User’s Manual 6. 7. Go to System Æ Control Panel Æ Internet and setup your Internet settings. The screen below should show: Click New to setup your Internet. Then, the screen below should show: Under Service, enter Your service name (ISP name), select Dial up for your connection type, select Use “smart” dialing, and enter the Standard dial-up 2002/12 From 3JTech Revision 1.0 Page 19 of 41 Infrared Modem User’s Manual 8. 9. number which is the number you wish to dial (contact your ISP if you don’t have this number.) Under Account, enter your username, password, and confirm 0password. The screen should be like as shown below: Under Addresses, also enter your username, password, and confirm password. 10. Click Done and your PP2I modem and should be installed and functional. 2002/12 From 3JTech Revision 1.0 Page 20 of 41 Infrared Modem User’s Manual For PENBEX 1. Tip home icon to back to the “Main Page”. And choose “Console” icon. 2. Chose “Connection” at title bar. 3. Change “COMM Port” to “IrDA”. And change “IrDA Receive” to “On”. 4. Chose “Mail” at title bar. 2002/12 From 3JTech Revision 1.0 Page 21 of 41 Infrared Modem User’s Manual 5. Setting the mail information. 6. Chose “Network” at title bar. 7. Setting the dial information. 8. Tip home icon to back to the “Main Page”. And choose “Email” icon. 9. Add a new mail. 2002/12 From 3JTech Revision 1.0 Page 22 of 41 Infrared Modem User’s Manual 10. Type the mail information. And then sent the mail to “Outbox”. 11. Tip “Email” at title bar. 12. Tip “Record” and chose “Send/Receive” to send mail and receive mail. 13. PDA is Setting finish, modem is dialing. 2002/12 From 3JTech Revision 1.0 Page 23 of 41 Infrared Modem User’s Manual For SHARP 1. On the Internet Setting Wizard screen, tap “New”. 2. Tap the “Dial-up (Telephone line)” radio button for “Select the connection type”. Then Press “Next”. 3. Setting The Modem type at “IR”. 2002/12 From 3JTech Revision 1.0 Page 24 of 41 Infrared Modem User’s Manual 4. Tap the “Advanced Setting”. Set the AT-command at “ATDT”, speed at ”57600”, Hardware flow control “not select”. And tap OK. Then tap “Next”. 5. The second screen appears telling you to set the connection ID and connection password. Then tap ”Next”. 6. Setting your Proxy, or “No Proxies”. Then tap ”Next”. 7. The next screen appears telling you to set up the e-mail settings.Then tap ”Next”. 8. Check your setting on this page. Tap “Register” to finish Modem Setting. 9. Tap the Connection Status icon ( 2002/12 From 3JTech ) on the taskbar. The pop-up list for network Revision 1.0 Page 25 of 41 Infrared Modem User’s Manual connection appears. Select dial-up name that you just setting. 10. After the dial tone, you are connecting to your ISP now. 11. On the Index screen, tap the “Options” menu and then tap “New Account”. 12. Tap the “Outgoing” tab to set the sending options. 13. Tap the “Incoming” tab to set the receiving options. 14. Tap “OK” to finish the settings. 15. On the Index screen, tap an e-mail message. 2002/12 From 3JTech Revision 1.0 Page 26 of 41 Infrared Modem User’s Manual 16 On the Index screen, tap . . for a new mail. Tap “OK” after finish the mail. 17. Tap “Send mail” to send the mail. 2002/12 From 3JTech Revision 1.0 Page 27 of 41 Infrared Modem User’s Manual For Windows98/Me/2000/XP The modem comes with a modem driver for Windows 95/98/Me. Please follow the steps below to install the modem. Make sure you have install IrDA device on PC IrDA enable Icon You can reference the Appendix A_Windows98 IR setup(R220L/210L/200L). 1. Turn on your computer and get in the Windows 98 main operation screen. Double click My Computer, then Control Panel. 1.Choose Modem in Control Panel to set-up the parameters of the modem. 2.Click “Add” in Properties of Modem. 2002/12 From 3JTech Revision 1.0 Page 28 of 41 Infrared Modem User’s Manual 3.Check the square “Do not check my Modem, I will choose in the list”. Click “Next”. 5. Choose” Hard Disk” and Choose “mdm3jir.inf”。 Then choose “ZyDAS ZD51_RS2 MROM” and Click “Next”. (If you haven’t drive, you can choose “standard modem” ) 5.Choose “Com Port” for RS232 Modem, Choose “Virtual Infrared COM Port” for IR Modem, Click “ Next”. 6.The System is installing the modem. 2002/12 From 3JTech Revision 1.0 Page 29 of 41 Infrared Modem User’s Manual 7.Modem installed OK. Click OK. 8. Then set-up the baud rate. Click Properties to set-up the baud rate in Modem of Control Panel. 9. Choose “Com Port” for RS232 Modem, and “Virtual Infrared COM Port” for IR Modem, Choose Baud Rate (57,600) under ZyDAS ZD51_RS2 MROM. Click OK to finish set-up. 2002/12 From 3JTech Revision 1.0 Page 30 of 41 Infrared Modem User’s Manual 10.After Installing the Palm Desktop Organizer Software, restart the computer. HotSync Manager should now be running 11.Press the HotSync button from the cradle and the data will transfer between your Palm and PC. 2002/12 From 3JTech Revision 1.0 Page 31 of 41 Infrared Modem User’s Manual V. TECHNICAL SUPPORT If you are experiencing a problem with your modem, try resolving it with the troubleshooting suggestions preceding this section. If necessary you can contact your local dealer’s Customer Service. Before returning any product, please call for a return authorization number. Remember the following before contacting: • Use a phone located near the computer to which your modem is attached. • Have the product serial number available. • Identify that modem you have and the communications software you are using. • Identify your computer or its operating system. • Write down details to your problem. IMPORTANT: • Before returning any product, please contact your local dealer for a Return Authorization number (RMA#). • Some modems require a shipping and handling charge for Warranty/Guarantee Service. 2002/12 From 3JTech Revision 1.0 Page 32 of 41 Infrared Modem User’s Manual VI. SPECIFICATION Dimensions: 2.5"(65mm) x3.75"(95mm) x0.83"(21mm) Weight: 7.35 oz Battery: rechargeable battery 100V-240V travel charger Dual operating modes: Infrared or serial RS-232 Works with Palm Pilot, Macs, Digital Cameras, PCs, Notebooks. Compliant to the IrDA 1.0 standard for serial infrared (SIR) data communication Link Distance 1 cm to 1.0 m Angle = +/- 15 deg. Downloadable MCU firmware from the host/DTE and downloadable MDP code modules from the MCU Data modem - ITU-T V.90 - V.34 (33.6 kbps), V.32 bis, V.32, V.22, V.23, and V.21; Bell 212A and 103 - ITU-T V.42 LAMP, MNP3, 4 - ITU-T V.42b and MNP5 data compression - V.17, V.29 ter, and V.21 channel 2 Fax modem send and receive rate up to 14.4 kbps Software compatible AT commands sets NVRAM directory and stored profiles Supports Serial PnP interface per Plug and Play External COM Device Flow control and speed buffering Automatic format/speed sending +5V operation ∗ IMPORTANT! In accordance with the ITU-T standard for 56K transmissions, this modem is capable of 56 Kbps downloads. However, due to FCC rules which restrict power output of the service providers’ modems, current download speeds are limited to 53 Kbps. Actual speeds may vary depending on line conditions and other factors. Uploads from users to server equipment travel at speeds up to 31.2 Kbps. An analogue phone line compatible with the ITU-T 56K standard technology, and an Internet provider or corporate host site compatible with the ITU-T 56K standard or K56Flex technology are necessary for these high-speed downloads. 2002/12 From 3JTech Revision 1.0 Page 33 of 41 Infrared Modem User’s Manual 3JTech. Co., Ltd. LIMITED WARRANTY z Hardware 3JTech warrants its hardware products to be free from defects in workmanship and materials. Under normal use and service, warranty is for the following lengths of time from the date of purchase from 3JTech or its Authorized Reseller: Pegasus III series modem 1 year Other hardware products 1 year (unless otherwise specified in the warranty statement above) Spare parts and spares kits 90 days If a products does not operate as warranted above during the applicable period, 3JTech shall, at its option and expense, repair the defective product or part, deliver to Customer an equivalent product or part to replace the defective item, or refund to customer the purchase price paid for the defective product. All products that are replaced will become the property of 3JTech. Replacement products may be new or reconditioned. Any replaced or repaired product or part has a 90-day warranty or the remainder of the initial warranty period, whichever is longer. 3JTech shall not be responsible for any software, firmware, information, or memory data of customer contained in, stored on, or integrated with any products returned to 3JTech for repair, whether under warranty or not. z Software 3JTech warrants that the software programs licensed from it will perform in substantial conformance to the program specifications therefore for a period of 90 days from the date of purchase from 3JTech or its Authorized Reseller. 3JTech warrants the media containing software against failure during the warranty period. No updates are provided. The sole obligation of 3JTech with respect to this express warranty shall be (at the discretion of 3JTech) to refund the purchase price paid by customer for any defective software products, or to replace any defective media with software, which substantially conforms to applicable 3Jtech’s published specifications. Customer assumes responsibility for the selection of the appropriate applications program and associated reference materials. 3JTech makes no warranty or representation that its software products will work in combination with any hardware or applications software products provided by third parties, that the operation of the software products will be uninterrupted listed in the 3JTech software product documentation or specification as being compatible, 3JTech will make reasonable efforts to provide compatibility, except where the 2002/12 From 3JTech Revision 1.0 Page 34 of 41 Infrared Modem User’s Manual non-compatibility is caused by a “bug” or defect in the third party’s product. z Standard Warranty Service Standard warranty service for hardware products may be obtained by delivering the defective product, accompanied by a copy of the dated proof of purchase, to 3JTech. Co., Ltd. or to an authorized dealer. Customer service is available during the applicable warranty period. Standard warranty service for software products may be obtained by contacting the 3JTech Customer Service or an Authorized 3J Tech Service Center, within the warranty period. Products returned to the 3JTech Customer Service must be preauthorized by 3JTech with a Return Material Authorization (RMA) number marked on the outside of the package, and sent prepaid, insured, and packaged appropriately for safe shipment. The repaired or replaced item will be shipped to Customer, at the expense of 3JTech, not later than thirty (30) days after receipt of the defective product by 3JTech. z Warranty Exclusive If a 3jtech product does not operate as intended, it shall be repaired, replaced, or refunded of the purchase price paid at the option of 3jtech. To the full extent allowed by law, the foregoing warranties and remedies are exclusive and are in lieu of all other warranties, terms, or conditions, express or implied, wither in fact or by opeartion of law, statutory or otherwise purpose, and satisfactory quality. 3jtech neither assumes nor authorizes any other person to assume for it any other liability in connection with the sale, installation, maintenance, or use of its products. 3jtech shall not be liable under this warranty if its testing and examinnation disclose that the alleged defect in the product does not exist or was caused by customer’s or any third person’s mis-use, neglect, improper installation or testing, unauthorized attempts to repair or modify, or other cause beyond the range of the intended use, or by accident, fire, lighting, or other hazard. z Limitation of Liability To the full extent allowed by law, 3jtech also excludes for itself and its suppliers any liability, whether based in contract or tort (including negligence), for incidental, consequential, indirect, special, or punitive damages of any kind, or for loss of revenue or profits, loss of business, loss of information or data, or other financial loss arsing out of or in connection with the sale, installation, maintenance, use, performance, failure, or interruption of its products, even if 3jtech or its authorized resseler has been advised of the possibility of such damageds, and limits its liability to repair, replacement, or refund of the purchase price paid, at the option of 3jtech. This disclaimer or liability for damages will not be affected if any remedy provided herein sjall fail of its essential purpose. z Disclaimer 2002/12 From 3JTech Revision 1.0 Page 35 of 41 Infrared Modem User’s Manual Some countries, states, or provinces do not allow the exclusion or limitation of implied warranties or the limitation of incidental or consequential damages for certain products supplied to consumers or the limitation of liability for personal injury, so the above limitations and exclusions may be limited in their application to you. When the implied warranties are not allowed to be excluded in their entirety, they will be limited to the duration of the applicable written warranty. This warranty gives you specific legal rights that may vary depending on local law. 2002/12 From 3JTech Revision 1.0 Page 36 of 41 Infrared Modem User’s Manual Appendix A_Windows98 IR setup(R220L/210L/200L) This section describes how to use 3JTech’s PP2I infrared modem with ACTiSYS’s IrDA dungo, which includes ACT-IR220L/210L/200L are IrDA dungos for converting RS232C to an infrared port. Caution: To install this SIR driver in Windows98, please be sure no FIR driver was installed first. If the FIR driver was already installed, even you remove this FIR driver and then install SIR driver, it may not work properly. *Do not install Infrared Driver Ver 2.0 under Windows98, it will not work at all. Connect ACT-IR2xxL serial adapter to the Com port of desktop PC. If there is no IR window on the portable PC, another IR2xxL should be connected to the portable PC. 1. Go to “Control Panel” and double click on “Add New Hardware”. 2. On the following screens, click on “Next” twice, then select “No, the device isn’t in the list”. And click on “next”. 3. Select “No I want to select Hardware from the list”, 4. Scroll down the menu and highlight “Infrared Devices”, then click on “Next” twice. 5. Under “Manufacturers” Select 2002/12 From 3JTech Revision 1.0 Page 37 of 41 Infrared Modem User’s Manual “(Infrared COM port or dongle)”, and then in “Infrared Devices” Select “(Generic Infrared Serial Port or dongle)”. Click on “OK”. 6. At “Infrared Transceiver”, Select “ACTiSYS IR-220L or ACTiSYS IR-200L”. For ACT-IR-210L, Select “Generic Infrared Port” instead. Then click on “Next”. 7. Select the COM port to which the Infrared device is physically connected. In most cases, choose COM2. Click on “Next”. 8. Follow the screen prompts until it asks you what default ports to use. Select “Use default ports (recommended)”. Click on “Next”. 9. Click on “Finish”, The driver is installed 2002/12 From 3JTech Revision 1.0 Page 38 of 41 Infrared Modem User’s Manual successfully. 10. Please reboot your computer. 11. Please refer to ACT-IR 200L/220L User’s to continue installation. 2002/12 From 3JTech Revision 1.0 Manual, “Setting Up” - Section B Page 39 of 41 Infrared Modem User’s Manual Appendix B_Country code setting For example US(255): ATS38=2#G255 Type commands as follow: ATS38=2#g< Decimal Country code > ( AT#H could see the country code setting) COUNTRY TLD Decimal United States US 255 South Africa ZA Netherlands TLD Decimal Russia SU 230 254 Hungary HU 229 NL 253 Slovak SK 228 Denmark DK 252 Thailand TH 227 Switzerland CH 225 Israel IL 226 Sweden SE 250 Switzerland CH 225 United Kingdom UK 249 UAE AE 224 Belgium BE 248 China_T CN Greece GR 247 China CN 222 Czech Republic CZ 246 Ukraine UA 221 Norway NO 245 Portugal PT 220 Australia AU 244 France FR 219 New Zealand NZ 243 Korea (u-law) KR 218 Hong Kong HK 242 Korea (a-law) KR 217 Singapore SG 241 Philippine PH 216 Finland FI 240 Slovenia SI 215 Morocco MA 239 India IN 214 Taiwan TW 238 Spain SP 213 Germany DE 237 European CTR21 Italy IT 236 Turkey TR 211 Ireland IE 235 Taiwan (a-low) TW 210 Japan JP 234 Austria AT 233 Malaysia MY 232 Poland PL 231 2002/12 From 3JTech COUNTRY Revision 1.0 212 Page 40 of 41 Infrared Modem User’s Manual 2002/12 From 3JTech Revision 1.0 Page 41 of 41