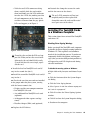
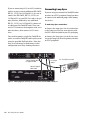
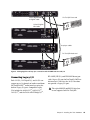
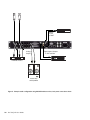
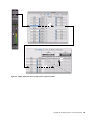
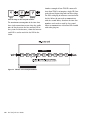
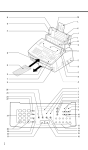
1
® Pro Tools|HD User Guide Version 8.1 Legal Notices This guide is copyrighted ©2010 by Avid Technology, Inc., (hereafter “Avid”), with all rights reserved. Under copyright laws, this guide may not be duplicated in whole or in part without the written consent of Avid. 003, 96 I/O, 96i I/O, 192 Digital I/O, 192 I/O, 888|24 I/O, 882|20 I/O, 1622 I/O, 24-Bit ADAT Bridge I/O, AudioSuite, Avid, Avid DNA, Avid Mojo, Avid Unity, Avid Unity ISIS, Avid Xpress, AVoption, Axiom, Beat Detective, Bomb Factory, Bruno, C|24, Command|8, Control|24, D-Command, D-Control, D-Fi, D-fx, D-Show, D-Verb, DAE, Digi 002, DigiBase, DigiDelivery, Digidesign, Digidesign Audio Engine, Digidesign Intelligent Noise Reduction, Digidesign TDM Bus, DigiDrive, DigiRack, DigiTest, DigiTranslator, DINR, D-Show, DV Toolkit, EditPack, Eleven, HD Core, HD Process, Hybrid, Impact, Interplay, LoFi, M-Audio, MachineControl, Maxim, Mbox, MediaComposer, MIDI I/O, MIX, MultiShell, Nitris, OMF, OMF Interchange, PRE, ProControl, Pro Tools M-Powered, Pro Tools, Pro Tools|HD, Pro Tools LE, QuickPunch, Recti-Fi, Reel Tape, Reso, Reverb One, ReVibe, RTAS, Sibelius, Smack!, SoundReplacer, Sound Designer II, Strike, Structure, SYNC HD, SYNC I/O, Synchronic, TL Aggro, TL AutoPan, TL Drum Rehab, TL Everyphase, TL Fauxlder, TL In Tune, TL MasterMeter, TL Metro, TL Space, TL Utilities, Transfuser, Trillium Lane Labs, Vari-Fi Velvet, X-Form, and XMON are trademarks or registered trademarks of Avid Technology, Inc. Xpand! is Registered in the U.S. Patent and Trademark Office. All other trademarks are the property of their respective owners. Product features, specifications, system requirements, and availability are subject to change without notice. Guide Part Number 9324-62039-00 REV C 08/10 Documentation Feedback At Avid, we are always looking for ways to improve our documentation. If you have comments, corrections, or suggestions regarding our documentation, email us at [email protected]. contents Chapter 1. Welcome to Pro Tools|HD . . . . . . . . . . . . . . . . . . . . . . . . . . . . . . . . . . . . . . . . . . 1 Pro Tools|HD Systems. . . . . . . . . . . . . . . . . . . . . . . . . . . . . . . . . . . . . . . . . . . . . . . . . . . . . 1 Pro Tools|HD System Packages . . . . . . . . . . . . . . . . . . . . . . . . . . . . . . . . . . . . . . . . . . . . . . 1 Pro Tools HD Software Capabilities . . . . . . . . . . . . . . . . . . . . . . . . . . . . . . . . . . . . . . . . . . . . 2 Pro Tools Hardware Overview . . . . . . . . . . . . . . . . . . . . . . . . . . . . . . . . . . . . . . . . . . . . . . . . 2 System Requirements and Compatibility . . . . . . . . . . . . . . . . . . . . . . . . . . . . . . . . . . . . . . . . 9 Registration . . . . . . . . . . . . . . . . . . . . . . . . . . . . . . . . . . . . . . . . . . . . . . . . . . . . . . . . . . . . 9 Conventions Used in This Guide . . . . . . . . . . . . . . . . . . . . . . . . . . . . . . . . . . . . . . . . . . . . . 10 Chapter 2. Installing Pro Tools Hardware . . . . . . . . . . . . . . . . . . . . . . . . . . . . . . . . . . . . . 11 Installing Pro Tools|HD Cards in a Mac Pro . . . . . . . . . . . . . . . . . . . . . . . . . . . . . . . . . . . . . 11 Installing Pro Tools|HD Cards in a Windows Computer . . . . . . . . . . . . . . . . . . . . . . . . . . . . . 13 Connecting TDM Flex Cables . . . . . . . . . . . . . . . . . . . . . . . . . . . . . . . . . . . . . . . . . . . . . . . 15 Connecting Audio Interfaces. . . . . . . . . . . . . . . . . . . . . . . . . . . . . . . . . . . . . . . . . . . . . . . . 16 Chapter 3. Installing Pro Tools on Mac . . . . . . . . . . . . . . . . . . . . . . . . . . . . . . . . . . . . . . . 21 Installing Pro Tools HD Software . . . . . . . . . . . . . . . . . . . . . . . . . . . . . . . . . . . . . . . . . . . . . 21 Launching Pro Tools . . . . . . . . . . . . . . . . . . . . . . . . . . . . . . . . . . . . . . . . . . . . . . . . . . . . . 22 Additional Software on the Pro Tools Installer Disc . . . . . . . . . . . . . . . . . . . . . . . . . . . . . . . . 23 Removing Pro Tools. . . . . . . . . . . . . . . . . . . . . . . . . . . . . . . . . . . . . . . . . . . . . . . . . . . . . . 24 Optimizing a Mac System for Pro Tools . . . . . . . . . . . . . . . . . . . . . . . . . . . . . . . . . . . . . . . . 25 Chapter 4. Installing Pro Tools on Windows . . . . . . . . . . . . . . . . . . . . . . . . . . . . . . . . . . . 27 Installing Pro Tools HD Software . . . . . . . . . . . . . . . . . . . . . . . . . . . . . . . . . . . . . . . . . . . . . 27 Launching Pro Tools . . . . . . . . . . . . . . . . . . . . . . . . . . . . . . . . . . . . . . . . . . . . . . . . . . . . . 29 Additional Software on the Pro Tools Installer Disc . . . . . . . . . . . . . . . . . . . . . . . . . . . . . . . . 30 Removing Pro Tools. . . . . . . . . . . . . . . . . . . . . . . . . . . . . . . . . . . . . . . . . . . . . . . . . . . . . . 31 Optimizing a Windows System for Pro Tools . . . . . . . . . . . . . . . . . . . . . . . . . . . . . . . . . . . . 32 Contents iii Chapter 5. Making Studio Connections . . . . . . . . . . . . . . . . . . . . . . . . . . . . . . . . . . . . . . . 35 Setting Up Your Studio . . . . . . . . . . . . . . . . . . . . . . . . . . . . . . . . . . . . . . . . . . . . . . . . . . . 35 Example Studio Setup with a Mixing Console . . . . . . . . . . . . . . . . . . . . . . . . . . . . . . . . . . . 36 Example Studio Setup without a Mixing Console . . . . . . . . . . . . . . . . . . . . . . . . . . . . . . . . . 37 Connecting Equipment with Digital Audio Ins and Outs . . . . . . . . . . . . . . . . . . . . . . . . . . . . 39 Connecting Effects Units . . . . . . . . . . . . . . . . . . . . . . . . . . . . . . . . . . . . . . . . . . . . . . . . . . 39 Connecting MIDI Devices. . . . . . . . . . . . . . . . . . . . . . . . . . . . . . . . . . . . . . . . . . . . . . . . . . 40 Connecting SMPTE Synchronization Devices . . . . . . . . . . . . . . . . . . . . . . . . . . . . . . . . . . . . 41 Connecting Ethernet Work Surfaces . . . . . . . . . . . . . . . . . . . . . . . . . . . . . . . . . . . . . . . . . . 41 Chapter 6. Configuring Your Pro Tools System . . . . . . . . . . . . . . . . . . . . . . . . . . . . . . . . 43 Starting Up or Shutting Down Your System . . . . . . . . . . . . . . . . . . . . . . . . . . . . . . . . . . . . . 43 Configuring the Pro Tools Playback Engine . . . . . . . . . . . . . . . . . . . . . . . . . . . . . . . . . . . . . 44 Configuring Pro Tools Hardware Settings . . . . . . . . . . . . . . . . . . . . . . . . . . . . . . . . . . . . . . 51 Configuring I/O Setup . . . . . . . . . . . . . . . . . . . . . . . . . . . . . . . . . . . . . . . . . . . . . . . . . . . . 60 Configuring MIDI Setup . . . . . . . . . . . . . . . . . . . . . . . . . . . . . . . . . . . . . . . . . . . . . . . . . . . 67 Appendix A. Hard Drive Configuration and Maintenance . . . . . . . . . . . . . . . . . . . . . . . . 69 Avoid Recording to the System Drive . . . . . . . . . . . . . . . . . . . . . . . . . . . . . . . . . . . . . . . . . 69 Supported Drive Formats and Drive Types. . . . . . . . . . . . . . . . . . . . . . . . . . . . . . . . . . . . . . 69 Formatting Audio Drives . . . . . . . . . . . . . . . . . . . . . . . . . . . . . . . . . . . . . . . . . . . . . . . . . . 70 Partitioning Drives . . . . . . . . . . . . . . . . . . . . . . . . . . . . . . . . . . . . . . . . . . . . . . . . . . . . . . 72 Defragmenting an Audio Drive. . . . . . . . . . . . . . . . . . . . . . . . . . . . . . . . . . . . . . . . . . . . . . 72 Using Mac Drives on Windows Systems . . . . . . . . . . . . . . . . . . . . . . . . . . . . . . . . . . . . . . . 73 Hard Disk Storage Space . . . . . . . . . . . . . . . . . . . . . . . . . . . . . . . . . . . . . . . . . . . . . . . . . 73 Appendix B. Configuring AMS (Mac OS X Only) . . . . . . . . . . . . . . . . . . . . . . . . . . . . . . . 75 Audio MIDI Setup . . . . . . . . . . . . . . . . . . . . . . . . . . . . . . . . . . . . . . . . . . . . . . . . . . . . . . . 75 MIDI Patch Name Support. . . . . . . . . . . . . . . . . . . . . . . . . . . . . . . . . . . . . . . . . . . . . . . . . 78 Appendix C. Configuring MIDI Studio Setup (Windows Only) . . . . . . . . . . . . . . . . . . . . 79 MIDI Studio Setup . . . . . . . . . . . . . . . . . . . . . . . . . . . . . . . . . . . . . . . . . . . . . . . . . . . . . . 79 MIDI Patch Name Support. . . . . . . . . . . . . . . . . . . . . . . . . . . . . . . . . . . . . . . . . . . . . . . . . 81 iv Pro Tools|HD User Guide Appendix D. DSP-Induced Delays in Mixing . . . . . . . . . . . . . . . . . . . . . . . . . . . . . . . . . . . . 83 Introduction to DSP-Induced Delay . . . . . . . . . . . . . . . . . . . . . . . . . . . . . . . . . . . . . . . . . . . 83 Using Delay Compensation. . . . . . . . . . . . . . . . . . . . . . . . . . . . . . . . . . . . . . . . . . . . . . . . . 84 Appendix E. TDM Mixing and DSP Usage . . . . . . . . . . . . . . . . . . . . . . . . . . . . . . . . . . . . . 85 Benefits of TDM II . . . . . . . . . . . . . . . . . . . . . . . . . . . . . . . . . . . . . . . . . . . . . . . . . . . . . . . 85 DSP Allocation . . . . . . . . . . . . . . . . . . . . . . . . . . . . . . . . . . . . . . . . . . . . . . . . . . . . . . . . . 87 DSP Usage and Mixer Plug-Ins . . . . . . . . . . . . . . . . . . . . . . . . . . . . . . . . . . . . . . . . . . . . . . 90 DSP Usage with TDM Plug-Ins. . . . . . . . . . . . . . . . . . . . . . . . . . . . . . . . . . . . . . . . . . . . . . . 95 Appendix F. Troubleshooting . . . . . . . . . . . . . . . . . . . . . . . . . . . . . . . . . . . . . . . . . . . . . . . . . 97 Backing Up Your Work . . . . . . . . . . . . . . . . . . . . . . . . . . . . . . . . . . . . . . . . . . . . . . . . . . . . 97 Common Issues . . . . . . . . . . . . . . . . . . . . . . . . . . . . . . . . . . . . . . . . . . . . . . . . . . . . . . . . 97 Checking Your System with DigiTest . . . . . . . . . . . . . . . . . . . . . . . . . . . . . . . . . . . . . . . . . . 98 Performance Factors . . . . . . . . . . . . . . . . . . . . . . . . . . . . . . . . . . . . . . . . . . . . . . . . . . . . 102 Before You Call Avid Customer Success. . . . . . . . . . . . . . . . . . . . . . . . . . . . . . . . . . . . . . . 102 Appendix G. Resources. . . . . . . . . . . . . . . . . . . . . . . . . . . . . . . . . . . . . . . . . . . . . . . . . . . . . 105 About the Pro Tools Guides . . . . . . . . . . . . . . . . . . . . . . . . . . . . . . . . . . . . . . . . . . . . . . . 105 About www.avid.com . . . . . . . . . . . . . . . . . . . . . . . . . . . . . . . . . . . . . . . . . . . . . . . . . . . . 106 Appendix H. Compliance Information . . . . . . . . . . . . . . . . . . . . . . . . . . . . . . . . . . . . . . . . 107 Environmental Compliance. . . . . . . . . . . . . . . . . . . . . . . . . . . . . . . . . . . . . . . . . . . . . . . . 107 EMC (Electromagnetic Compliance). . . . . . . . . . . . . . . . . . . . . . . . . . . . . . . . . . . . . . . . . . 108 Safety Compliance . . . . . . . . . . . . . . . . . . . . . . . . . . . . . . . . . . . . . . . . . . . . . . . . . . . . . 109 Index . . . . . . . . . . . . . . . . . . . . . . . . . . . . . . . . . . . . . . . . . . . . . . . . . . . . . . . . . . . . . . . . . . . . 111 Contents v vi Pro Tools|HD User Guide chapter 1 Welcome to Pro Tools|HD Pro Tools|HD® provides high-definition digital audio recording, editing, signal processing, mixing, and I/O capabilities. This guide covers installation and configuration of Pro Tools|HD hardware and Pro Tools® software on Mac and Windows platforms. Pro Tools HD supports up to seven Pro Tools|HD cards in systems using an expansion chassis. For more information, see the Expanded Systems Guide. Pro Tools|HD System Packages Pro Tools|HD Systems All Pro Tools|HD systems include the following: Pro Tools software supports the following systems: • Pro Tools|HD Accel Core card Pro Tools|HD Systems • Pro Tools Installer disc containing Pro Tools software, DigiRack™ TDM, RTAS™ (Real-Time AudioSuite), and AudioSuite™ plug-ins Pro Tools|HD systems are available in the following configurations: Pro Tools|HD 1 • Pro Tools|HD Accel Core card Pro Tools|HD 2 Accel • Pro Tools|HD Accel Core card • Pro Tools|HD Accel card Pro Tools|HD 3 Accel • Pro Tools|HD Accel Core card • Two Pro Tools|HD Accel cards • One or more Pro Tools|HD Accel cards (optional) • Pre-authorized iLok for running Pro Tools HD • This User Guide, covering installation and configuration of Pro Tools|HD systems • PDF versions of the Pro Tools Reference Guide and other Pro Tools documentation • DigiLink™ cable for connecting the Pro Tools|HD cards to an audio interface (one DigiLink cable is included with each Pro Tools|HD card) • TDM FlexCable™ (multi-card systems only) to connect the cards to each other • Registration Information Card Chapter 1: Welcome to Pro Tools|HD 1 All Pro Tools|HD systems also require at least one Pro Tools|HD audio interface (sold separately). See “Pro Tools|HD Audio Interfaces” on page 4. For more information on the print, electronic, and web-based resources available to help you use Pro Tools, see Appendix G, “Resources.” Audio Recording and Playback Capabilities Pro Tools|HD 1 Pro Tools|HD 1 systems provide recording and playback of 24-bit or 16-bit audio files with the following voiced track counts: • Up to 96 tracks at 44.1 kHz or 48 kHz • Up to 48 tracks at 88.2 kHz or 96 kHz Pro Tools HD Software Capabilities Pro Tools HD on Mac or Windows provides the following capabilities: • Up to a total of 192 voiced audio tracks (up to 256 voiceable audio tracks), 160 Auxiliary Input tracks, 64 Master Fader tracks, 128 VCA Master tracks, 256 MIDI tracks, 128 Instrument tracks, and 64 video tracks per session • 16-bit or 24-bit audio resolution, at sample rates up to 192 kHz • Non-destructive, random-access editing and mix automation • Audio processing with up to 10 TDM or RTAS plug-ins per track, depending on your computer’s capabilities • Up to 10 hardware inserts per track • Up to 10 sends per track • Up to 128 internal busses for routing and mixing The number of simultaneous tracks of audio recording or playback depends on the type of Pro Tools|HD system. 2 Pro Tools|HD User Guide • Up to 18 tracks at 176.4 kHz or 192 kHz Pro Tools|HD 2 Accel and HD 3 Accel Pro Tools|HD 2 Accel and HD 3 Accel systems provide recording and playback of 24-bit or 16-bit audio files with the following voiced track counts: • Up to 192 tracks at 44.1 kHz or 48 kHz • Up to 96 tracks at 88.2 kHz or 96 kHz • Up to 36 tracks at 176.4 kHz or 192 kHz Pro Tools Hardware Overview This section describes each hardware component of a Pro Tools|HD system. The number of Pro Tools|HD cards in your system will differ depending on your system configuration. Pro Tools|HD Hardware HD Accel Core Card All Pro Tools|HD systems include a Pro Tools|HD Accel Core PCIe card. The HD Accel Core card provides up to 96 voiceable tracks of direct-to-disk recording and playback, as well as DSP power for mixing and plugin processing. The Pro Tools|HD Accel Core card supports up to 24-bit, 192 kHz sessions. HD Accel cards provide additional channels of direct-to-disk recording and playback, as well as additional DSP power for mixing and plug-in processing. HD Accel cards support sessions up to 24-bit and up to 192 kHz. DigiLink HD Accel card DigiLink DigiSerial DigiLink Port The HD Accel card includes a single DigiLink port for connecting up to 32 channels of audio input and output to your Pro Tools|HD system. Accel Core card DigiSerial Port The DigiSerial port on the HD Accel card does not offer any functionality. DigiLink Port The HD Accel Core card includes a single DigiLink port for connecting up to 32 channels of audio input and output to your Pro Tools|HD system. TDM FlexCable DigiSerial Port The DigiSerial port on the HD Accel Core card is for connecting a SYNC peripheral. This connector is an 8-pin mini-DIN. The DigiSerial port on an HD Accel Core card does not support MachineControl connections. HD Accel Card The HD Accel PCIe card is included in Pro Tools|HD 2 Accel and Pro Tools|HD 3 Accel systems. Additional HD Accel cards can be purchased separately to expand the capabilities of your Pro Tools|HD system. HD Accel cards are expansion cards, and require the presence of an The TDM FlexCable is used to connect a pair of cards in your Pro Tools system so they can share data along the TDM bus. One FlexCable comes with each Pro Tools|HD Accel expansion card. The TDM FlexCable is a flexible printed circuit board with delicate traces. Do not overbend, twist, or pinch the cable. Doing so may cause unpredictable behavior in Pro Tools as well as harm to your system. TDM FlexCable HD Accel Core card in the system. Chapter 1: Welcome to Pro Tools|HD 3 Pro Tools|HD Audio Interfaces • Soft Clip and Curv limiting circuits to protect against clipping on analog input. To record and play audio with Pro Tools HD, you must have at least one Pro Tools|HD audio interface connected to the Pro Tools|HD Accel Core card. • 8 channels of analog back panel output using a DB-25 breakout cable (sold separately) with variable output gain HD OMNI Audio Interface • 2 channels of analog back panel output using TRS (Mirrors channels 1–2 or 7–8 on DB-25 connector) HD OMNI is a professional digital audio interface designed for use with Pro Tools|HD systems. HD OMNI provides a compact preamp, monitoring, and I/O solution for music production and recording, and post production studios. HD OMNI Features • Front panel stereo 1/4” headphone jack Digital I/O • 8 channels of AES/EBU output (up to 192 kHz Single Wire) using a DB-25 breakout cable (sold separately) • 2 channels of AES/EBU XLR input (up to 192 kHz Single Wire) HD OMNI provides up to 8 discrete channels of Pro Tools input and output, with 4-segment LED meters for input or output (selectable). • 2 channels of S/PDIF RCA input and output (up to 192 kHz) Analog I/O • 8 channels of ADAT TOSLINK input and output • 24-bit analog-to-digital (A/D) and digital-toanalog (D/A) converters, with support for sample rates up to 192 kHz • 2 high-quality Mic/DI preamps (Channels 1–2) • 2 combined XLR and 1/4-inch TRS front panel inputs for microphone and instrument level input • Support for ADAT S/MUX Optical for sample rates of 88.2 kHz, 96 kHz, 176.4 kHz, and 192 kHz. • Support for two channels of S/PDIF Optical with sample rates of up to 96 kHz. • Real-time sample rate conversion (SRC) on Digital Inputs 1–2 of either AES/EBU, S/PDIF, or Optical (S/PDIF) • 2 XLR back panel microphone inputs • 2 1/4-inch TRS Send and 2 1/4-inch TRS Return back panel jacks for hardware inserts on channels 1 and 2 • 4 analog TRS line level back panel inputs (Channels 1–4) HD OMNI provides multiple analog input connections, but only provides up to four channels of simultaneous analog input for Pro Tools. 4 Pro Tools|HD User Guide SRC is not supported with ADAT S/MUX. Monitoring • An additional stereo “CUE” output path in Pro Tools for headphone monitoring from the front panel headphone jack • Front panel Control Room (MAIN/ALT) and Headphone monitoring volume control • Flexible monitoring with fold-down from all stereo and surround formats (up to 7.1 surround) • Input mixer for low latency direct monitoring of a variety of incoming signals (configured in the Pro Tools Hardware Setup) Synchronization • Loop Sync input and output for connecting additional Pro Tools|HD interfaces and peripherals • External Clock input and output for synchronizing HD OMNI with external Word Clock devices. For more information about HD OMNI, see the HD OMNI Guide. HD I/O Audio Interface HD I/O is a multichannel digital audio interface designed for use with Pro Tools|HD systems. HD I/O features extremely high quality 24-bit analog-to-digital (A/D) and digital-to-analog (D/A) converters, and supports sample rates of up to 192 kHz. HD I/O comes in three standard configurations: • 8 x 8 x 8 (8 analog in, 8 analog out, and 8 digital in and out) • 16 x 16 analog in and out • 16 x 16 digital in and out You can also add or remove HD I/O Analog Expansion cards (ADC and DAC) and HD I/O Digital Expansion cards for custom configurations. Analog I/O • Up to sixteen channels of 24-bit D/A and A/D converters for superior analog input and output at sample rates of 44.1 kHz, 48 kHz, 88.2 kHz, 96 kHz, 176.4 kHz, and 192 kHz with Analog In and Analog Out HD I/O cards • Soft Clip and Curv limiting circuits to protect against clipping on analog input. Digital I/O • Up to sixteen channels of 24-bit digital I/O, using AES/EBU, TDIF DB-25, or Optical at sample rates of 44.1 kHz, 48 kHz, 88.2 kHz, 96 kHz, 176.4 kHz, and 192 kHz with a Digital HD I/O card • Real-time sample rate conversion on digital inputs with a Digital I/O card (up to sixteen channels of AES/EBU, Optical, or TDIF) • Support for S/MUX Optical for sample rates of 88.2 kHz and higher • Support for 2 channels of S/PDIF Optical (enclosed) with sample rates of up to 96 kHz • 2 channels of AES/EBU I/O (enclosed) with support for sample rates up to 192 kHz • 2 channels of 24-bit-capable S/PDIF I/O (enclosed) with support for sample rates up to 192 kHz Synchronization HD I/O Features • Loop Sync input and output for connecting additional Pro Tools|HD interfaces and peripherals HD I/O provides up to 16 discrete channels of Pro Tools input and output, with 4-segment LED meters for input and output. • External Clock input and output for synchronizing HD I/O with external Word Clock devices Chapter 1: Welcome to Pro Tools|HD 5 Expandability • Optional addition of I/O cards to expand analog or digital I/O • Simultaneous use of multiple Pro Tools|HD audio interfaces to further expand system input and output (for more information see the Expanded Systems Guide) For more information about HD I/O, see the HD I/O Guide. HD MADI Digital Audio Interface HD MADI is a 64-channel, digital audio interface designed for use with Pro Tools|HD systems. HD MADI supports the Multichannel Audio Digital Interface (MADI) format and sample rates of up to 192 kHz. HD MADI provides simplified connectivity between your Pro Tools|HD system and MADI-compatible audio equipment, such as routers, digital mixing consoles, and converters. HD MADI Features • 2 MADI Optical and Coaxial inputs and 2 MADI Optical and Coaxial outputs for up to 64 discrete channels of digital input and output (32 channels per DigiLink Mini port) • Supports sample rates of 44.1 kHz, 48 kHz, 88.2 kHz, 96 kHz, 176.4 kHz, and 192 kHz • Dedicated BNC Word Clock input and XLR AES/EBU input (clock input only) for external MADI synchronization (when using SRC on output) • Clock support for the following formats: Internal, Loop Sync, Word Clock, AES/EBU, and MADI • Varispeed modes (supports both 64- and 56channel standards) ` For more information about HD MADI, see the HD MADI Guide. 192 I/O Audio Interface 192 I/O™ is a multichannel digital audio interface designed for use with Pro Tools|HD systems. 192 I/O features high quality 24-bit analog-to-digital (A/D) and digital-to-analog (D/A) converters, and supports sample rates of up to 192 kHz. You can also add or remove analog cards (ADC and DAC) and digital cards for custom configurations. 192 I/O Features • 24- or 16-bit resolution • Supports sample rates up to 192 kHz. • Sample Rate Conversion (SRC) on input or output • Supports both analog and digital connections, including AES/EBU, S/PDIF, TDIF, and ADAT Optical: • Front panel clock and SRC indicators • Front panel signal present LEDs for input and output • BNC Word Clock I/O for synchronizing HD MADI with external 1x Word Clock 6 • BNC Loop Sync I/O for synchronizing HD MADI with additional Pro Tools|HD audio interfaces and peripherals (such as HD I/O, HD OMNI, or SYNC HD) Pro Tools|HD User Guide • Digital (Digital I/O Card): 8 channels, DB25 (AES/EBU and TDIF), or one pair of Lightpipe (ADAT Optical) connectors. Expandable up to 16 of channels digital I/O with the addition of the 192 Digital expansion card. • Analog: 8 channels, DB-25 (balanced) connectors, inputs selectable between +4 dBu or –10 dBV, outputs +4 dBu only. Expandable up to 16 analog inputs or 16 outputs using an optional 192 AD or 192 DA expansion card, respectively. • Digital (Enclosure): 2 channels, XLR (AES/EBU) connectors; 2 channels RCA (S/PDIF) connectors. • Optical (Enclosure): 8 channels, one pair of Lightpipe (ADAT Optical) connectors (switchable to 2 channels, S/PDIF). • Loop Sync In and Out for connecting Pro Tools|HD interfaces and peripherals • External Clock In and Out receive or send 1x Word clock (configurable to 256x for Legacy support, see “Optional Legacy I/O Audio Interfaces” on page 8). For more information, see the 192 I/O Guide. 192 Digital I/O Audio Interface 192 Digital I/O™ is a multichannel digital audio interface designed for use with Pro Tools|HD systems, and supports sample rates of up to 192 kHz. 192 Digital I/O Features • Supports sample rates up to 192 kHz. • Supports digital connections, including AES/EBU, S/PDIF, TDIF, and ADAT Optical: • Digital (2 Digital I/O Cards): 16 channels, DB-25 (AES/EBU and TDIF), or two pairs of Lightpipe (ADAT Optical) connectors. • Digital (Enclosure): 2 channels, XLR (AES/EBU) connectors; 2 channels RCA (S/PDIF) connectors. • Loop Sync In and Out for connecting Pro Tools|HD interfaces and peripherals. • External Clock In and Out receive or send 1x Word clock (configurable to 256x for Legacy support, see “Optional Legacy I/O Audio Interfaces” on page 8). For more information, see the 192 Digital I/O Guide. 96 I/O Audio Interface 96 I/O™ is a multichannel digital audio interface designed for use with Pro Tools|HD systems. 96 I/O features high quality 24-bit analog-todigital (A/D) and digital-to-analog (D/A) converters, and supports sample rates of up to 96 kHz. 96 I/O Features • Supports sample rates up to 96 kHz. • Supports analog and digital connections, including AES/EBU, S/PDIF, and ADAT optical: • Analog: 8 channels, 1/4-inch TRS (balanced or unbalanced) connectors, +4 dBu or –10 dBV. • Digital: 2 channels, XLR (AES/EBU) connectors; 2 channels, RCA (S/PDIF) connectors. • Optical: 8 channels, one pair of Lightpipe (ADAT Optical) connectors (switchable to 2 channels, S/PDIF). • External Clock In and Out receive or send 1x Word clock (configurable to 256x for Legacy support, see “Optional Legacy I/O Audio Interfaces” on page 8). For more information, see the 96 I/O Guide. • Optical (Enclosure): 8 channels, one pair of Lightpipe (ADAT Optical) connectors (selectable to 2 channels, S/PDIF). Chapter 1: Welcome to Pro Tools|HD 7 96i I/O Audio Interface 888|24 I/O Audio Interface 96i I/O™ is a multichannel digital audio interface designed for use with Pro Tools|HD systems. 96i I/O features high quality 24-bit analog-to-digital (A/D) and digital-to-analog (D/A) converters, and supports sample rates of up to 96 kHz. • Analog: 8 channels, XLR (balanced or unbalanced) connectors, selectable between +4 dBu or –10 dBV • Digital: 8 channels, XLR (AES/EBU) connectors; 2 channels, RCA (S/PDIF) connectors 882|20 I/O Audio Interface 96i I/O Features • Supports sample rates up to 96 kHz. • 16 discrete channels of input, and 2 channels of output, with 4-segment LED meters on each channel. Audio inputs and outputs include: • 16 channels of 24-bit, 96-kHz capable analog input, with adjustable input sensitivity. • 2 channels of 24-bit, 96-kHz capable analog output, with selectable operating level. • 2 channels of 24-bit, 96 kHz-capable digital S/PDIF RCA input and output. • Loop Sync In and Out for connecting Pro Tools|HD interfaces and peripherals. • External Clock In and Out receive or send 1x Word clock. For more information, see the 96i I/O Guide. Optional Legacy I/O Audio Interfaces For additional input and output channels, older Pro Tools|24 MIX™ audio interfaces (or Legacy I/Os) can be connected to the 192 I/O, 192 Digital I/O, or 96 I/O (HD OMNI, HD I/O, HD MADI, and 96i I/O do not support Pro Tools|24 MIX audio interfaces). The following supported legacy interfaces can only be used with 44.1 kHz or 48 kHz sessions: 8 Pro Tools|HD User Guide • Analog: 8 channels, 1/4-inch TRS (balanced or unbalanced) connectors, selectable between +4 dBu and –10 dBV • Digital: 2 channels, RCA (S/PDIF) connectors 1622 I/O Audio Interface • Analog: 16 input channels and 2 output channels, 1/4-inch TRS (balanced or unbalanced) connectors. Inputs are selectable from +4 dBu to –10 dBV line levels and higher in 2 dB gain steps; outputs are selectable between +4 dBu or –10 dBV. • Digital: 2 channels, RCA (S/PDIF) connectors. 24-bit ADAT Bridge I/O • Optical: 16 channels, a pair of Lightpipe (ADAT) connectors. • Analog output: 2 channels, 1/4-inch TRS (balanced) connectors, selectable between +4 dBu and –10 dBV. • Digital: 2 channels, XLR (AES/EBU); 2 channels RCA (S/PDIF) connectors. Additional Pro Tools|HD Hardware Hard Drive Requirements Pro Tools HD also supports the following Pro Tools|HD hardware options. For optimal audio recording and playback, all Pro Tools|HD systems require one or more qualified hard drives. • Synchronization peripherals: • SYNC HD™ • SYNC I/O™ • PRE™ (Eight-channel microphone preamp) • MIDI I/O™ (10 x 10 USB MIDI interface) • Worksurfaces and control surfaces: • D-Command ® • D-Control® • C|24™ • Command|8® System Requirements and Compatibility Pro Tools|HD systems can be used with a qualified Windows or Mac computer running Pro Tools HD software. A DVD drive is required to use the Pro Tools Installer disc. Avid can only assure compatibility and provide support for hardware and software it has tested and approved. Initialize your hard drives with the Disk Utility application included with Apple System software (Mac) or using Windows Disk Management (Windows). For general hard drive maintenance and configuration information, see Appendix A, “Hard Drive Configuration and Maintenance.” Avoid Recording to the System Drive Recording to your system drive is not recommended. Recording and playback on a system drive may result in lower track counts and fewer plug-ins. If you have multiple hard drives in your system, use DigiBase to designate the system drive as a Playback or Transfer only drive for optimal performance. For more information about using DigiBase, see the Pro Tools Reference Guide (Help > Pro Tools Reference Guide). Registration For complete system requirements and a list of qualified computers, operating systems, hard drives, and third-party devices, visit: www.avid.com/compatibility MIDI Requirements Pro Tools works with most USB and FireWire MIDI interfaces and controllers. For a list of supported USB and FireWire MIDI interfaces and controllers, visit: Review the enclosed Registration Information Card and follow the instructions on it to quickly register your purchase online. By registering, you become eligible to receive the following: • Information regarding technical support • Software update and upgrade notices • Limited warranty on hardware www.avid.com/compatibility Chapter 1: Welcome to Pro Tools|HD 9 Conventions Used in This Guide All of our guides use the following conventions to indicate menu choices and key commands: Convention Action File > Save Choose Save from the File menu Control+N Hold down the Control key and press the N key Control-click Hold down the Control key and click the mouse button Right-click Click with the right mouse button The names of Commands, Options, and Settings that appear on-screen are in a different font. The following symbols are used to highlight important information: User Tips are helpful hints for getting the most from your Pro Tools system. Important Notices include information that could affect your Pro Tools session data or the performance of your Pro Tools system. Shortcuts show you useful keyboard or mouse shortcuts. Cross References point to related sections in the Pro Tools Guides. 10 Pro Tools|HD User Guide chapter 2 Installing Pro Tools Hardware This chapter provides information on installing and connecting Pro Tools|HD cards and audio interfaces. Install your Pro Tools|HD hardware before installing Pro Tools HD software. To install Pro Tools|HD hardware, first install Pro Tools|HD cards. For systems with more than one card, connect the cards using TDM FlexCables. Once the cards are installed, connect Pro Tools|HD audio interfaces. To install cards into an expansion chassis, see the Expanded Systems Guide. Installing Pro Tools|HD Cards in a Mac Pro The PCI Express-equipped Mac Pro has three PCI Express (PCIe) slots (named slots 2, 3, and 4). The PCI Express slot numbers increase from bottom to top as you face the open computer case from the side. Install the Pro Tools|HD Core card into PCIe slot 2. SATA drive trays and drives PCIe slot 4 (hidden) PCIe slot 3 PCIe slot 2 PCIe slot 1 (video card) Figure 1. Mac Pro Follow these instructions carefully to avoid damaging the card and its components. Chapter 2: Installing Pro Tools Hardware 11 To install Pro Tools cards in a Mac Pro: 1 Turn off your computer and any peripherals. Leave your computer’s power cable plugged in so the computer is grounded. Do the following: • Hold the card above slot 2 at a slight angle so that the front of the card is higher than the back of the card (where the card’s DigiLink connector is located), as in Figure 2. 2 Disconnect all cables attached to the com- puter (such as hard drives, displays, USB and FireWire devices) except for the power cable. 3 Lay the computer on its side so the access panel is facing up 4 Open the computer case using the latch lo- cated on the back of the computer. 5 Remove the clamp that secures the metal ac- cess port covers to the chassis. Figure 2. Holding the card above the slot at an angle 7 Remove your computer’s SATA drive trays. If • With the card at an angle, rest the card’s back bracket against the edge of the chassis, where the computer’s slot access port is located. any extra SATA drives are installed, remove them also. Refer to your computer’s documentation for information on removing SATA drives and SATA drive trays. • Carefully slide the front of the card down into slot 2’s grey plastic PCIe card support (where the slot numbers appear), as in Figure 3. 6 Remove the metal access port covers for the slots you want to use. Before handling any card, discharge static electricity from your clothes or body by touching a grounded metal surface, such as the power supply case inside your computer with the power cable connected. 8 Install the Pro Tools|HD Core card into the lowest-numbered slot in the computer (slot 2). This will be the slot closest to the video card, as shown in Figure 1 on page 11. Figure 3. Sliding the front of the card into PCIe card support 12 Pro Tools|HD User Guide • With the card’s PCIe connectors facing down, carefully slide the card straight down and firmly seat the PCIe connector into the slot 2 PCIe slot, making sure that all card components on the front of the card have clearance from the grey plastic PCIe card support, as in Figure 4. 13 Reattach the clamp that secures the cards and the slot covers to the chassis. The card’s PCIe connectors will not seat completely until you have replaced the clamp that secures the cards and the metal access port covers to the chassis. Installing Pro Tools|HD Cards in a Windows Computer This section shows how to install Pro Tools|HD cards into a PC. Disabling Driver Signing Warnings Figure 4. PCIe card installed Do not force the card into the PCIe card support slot. When you have the correct installation angle, the card should slide in easily. If you do not have the correct angle, reposition the card. Before you install Pro Tools|HD cards, temporarily disable the Driver Signing warning option for Windows XP. This expedites and automates much of the installation process. If you do not temporarily disable this option, warning messages (that you are installing an unsigned driver) will appear for each DSP chip detected during software installation. 9 Install the first Pro Tools|HD Accel card (if To disable the warning option on Windows: any) in the second slot (slot 3). 1 Right-click on My Computer and choose Proper- 10 Install the second Pro Tools|HD Accel card (if ties. any) in slot 4. 2 Click the Hardware tab in the System Properties dialog. 11 Check to be sure that your cards are installed in the proper order for your system, starting with the lowest numeric slot: • Display card for your computer monitor • Pro Tools|HD Core card 3 Click the Driver Signing button. 4 Select “Ignore—Install the software anyway and don’t ask for my approval.” • Any additional Pro Tools|HD Accel cards (optional) 5 Click OK to close the Driver Signing Options window. • Avid-approved video capture card (optional) 6 Click OK to close the System Properties dialog. • Host Bus Adapter (HBA) card (optional) 7 Shut down the computer. 12 Replace the SATA drives. Chapter 2: Installing Pro Tools Hardware 13 Installing Pro Tools|HD Cards in a PC To install Pro Tools cards: For the latest slot order and configurations for Windows computers, visit www.avid.com. 1 Turn off your computer and any peripherals. 6 If you are installing additional Pro Tools cards Leave your computer’s power cable plugged in so the computer is grounded. (or other cards), do the following, otherwise, skip to the next step. 2 Disconnect all cables attached to the com- puter (such as hard drives, displays, USB and FireWire devices) except for the power cable. 3 Open the computer case. • Install the first Pro Tools|HD Accel card in the next consecutive PCIe slot. • Install any remaining Pro Tools|HD Accel cards in the remaining consecutive PCIe slots. 4 Remove the metal access port cover behind the slot you want to use by removing the screw and sliding the cover out from the access port. Before handling any card, discharge static electricity from your clothes or body by touching a grounded metal surface, such as the power supply case inside your computer. 5 Install the HD Core card in the recommended PCIe slot (typically this is the first PCIe slot, closest to the video card). Installing an HD Accel card in your PC 7 If you have no additional cards to install, do the following: • Secure the card in place with the slot access port screw you removed earlier. • Close the computer case. • Skip to “Connecting Audio Interfaces” on page 16. Installing the HD Core card in your PC 14 Pro Tools|HD User Guide 8 Check to be sure that your cards are installed in the proper order for your system (note that this may vary depending on your machine): • Display card for your computer monitor • HD Core card • HD Accel cards (optional) • Host Bus Adapter (HBA) card (optional) To connect Pro Tools|HD cards: 1 Shape the FlexCable before installing it on the card by holding the cable with its printed side facing you, and moving the Port B portion of the cable away from you and outwards, as shown below. Do not bend the cable more than you need to, as you may damage the traces in the cable. 9 Secure each card in place with the slot access port screws you removed earlier. Connecting TDM Flex Cables In systems that include more than one card, you must connect all the Pro Tools|HD cards to each other with TDM FlexCables. Each Pro Tools|HD card has two ports along the top of the card, labeled Port A and Port B. The FlexCable has two connectors, also labeled Port A and Port B, to ensure proper connection. Data communication across multiple cards is achieved by connecting Port B of the first card to Port A of the next card with a TDM FlexCable. Preparing TDM FlexCable for installation 2 Slide the FlexCable into the notch of the core card, so that the Port B connector of the FlexCable can be aligned with Port B of the core card; and the Port A connector of the FlexCable can be aligned with Port A of the second card, as shown below. The first FlexCable always goes from Port B on the core card to Port A on the first expansion card, as described in the following steps. The slot numbering in your computer determines whether you will be working right-to-left or left-to-right when connecting cards. Refer to the instructions below for your model of computer. PORT B Inserting TDM FlexCable Chapter 2: Installing Pro Tools Hardware 15 3 Connect the Port A connector of the FlexCa- ble to Port A on the second card. Push gently but firmly until the cable is fully connected to the card. Attach the other end of the FlexCable (labeled Port B) to Port B on the core card. HD Core PORT A PORT B PORT A PORT B HD Accel Top view of two cards connected with TDM FlexCable Connecting Audio Interfaces Each Pro Tools|HD audio interface provides several different input and output options. For example, HD OMNI supplies up to 8 channels of input and output to your Pro Tools system, HD I/O supplies up to 16 channels of input and output, and HD MADI provides up to 64 channels. Audio interfaces can be connected directly to Pro Tools|HD cards, or through the Expansion ports on other Pro Tools|HD audio interfaces. At least one Pro Tools|HD audio interface must be connected to the Pro Tools|HD Core card for Pro Tools to launch. 4 Verify the connection. Make sure the FlexCa- ble ports seat flat against the sockets on the cards, and are firmly attached. 5 For systems with more than two cards, con- nect each additional card to its preceding card. Use FlexCables to connect card pairs together, as described above, until all cards are connected. (Each Pro Tools|HD card is packaged with a FlexCable.) 6 Close the computer case. Each Pro Tools|HD card supports up to 32 channels. To get a full 32 channels of I/O from one card, you can connect, or daisy-chain, a second 16-channel Pro Tools|HD I/O to the first 16channel Pro Tools|HD I/O that is connected directly to the Pro Tools|HD card. Refer to the HD OMNI Guide, HD I/O Guide, HD MADI Guide, 192 I/O Guide, 192 Digital I/O Guide, 96 I/O Guide, or 96i I/O Guide for specific details regarding: • Front and back panel connectors and indicators • Installation of optional expansion I/O cards (HD I/O and 192 I/O only) 16 Pro Tools|HD User Guide Pro Tools|HD supports up to a maximum combination of ten total of the following audio interfaces: • HD OMNI (only one HD OMNI is supported in a single Pro Tools|HD system) • HD I/O • HD MADI (up to three HD MADI can be used simultaneously—requires six HD cards) • 192 I/O • 192 Digital I/Os • 96 I/Os • 96i I/Os (up to five 96i I/Os can be used simultaneously) For examples of connecting multiple I/Os, see Figure 5 and Figure 6 on page 19. Pro Tools|HD audio interfaces need room at their sides to maintain proper air flow for cooling. Do not block the sides of the unit or disconnect the internal fan. If the units are rack-mounted in a case, remove the case lids or doors before operating the system. Failure to do so can result in the units overheating very quickly, which can permanently damage sensitive components. To connect Pro Tools|HD audio interfaces: 1 Do one of the following depending on the au- dio interface you are connecting: • If you are using a single HD OMNI, HD I/O, 192 I/O, 192 Digital I/O, 96 I/O, or 96i I/O, connect its Primary Port to the HD Core card with the DigiLink cable provided with the card (for HD OMNI and HD I/O you must also use the included DigiLink to DigiLink Mini adapter cable). You must attach at least one HD OMNI, HD I/O, 192 I/O, 192 Digital I/O, 96 I/O, or 96i I/O to your system in order for Pro Tools to launch. Pro Tools HD supports only one HD OMNI per system. If you are connecting HD OMNI to your Pro Tools|HD system, it is generally recommended that you connect it directly to the Pro Tools|HD Core card. • If you are connecting HD MADI to your system, connect HD MADI Primary Port 1 to the DigiLink Port on the first available Pro Tools|HD card using the DigiLink cable provided with the card and the DigiLink Mini to DigiLink adapter cable included with HD MADI. If you have a Pro Tools|HD 2 or greater system, connect HD MADI Primary Port 2 to the DigiLink Port on the next available Pro Tools|HD card using the DigiLink cable provided with the card and the DigiLink Mini to DigiLink adapter cable included with HD MADI. 2 Connect additional Pro Tools|HD audio inter- faces to subsequent Pro Tools|HD cards, or daisy-chain the interfaces (by connecting the Primary Port of the secondary interface to the Expansion Port of the primary interface). Chapter 2: Installing Pro Tools Hardware 17 If you are connecting 96 I/O or 96i I/O audio interfaces to your system in addition to HD OMNI, HD I/O, 192 I/O (or 192 Digital I/O), be sure to connect the HD OMNI, HD I/O, 192 I/O, or 192 Digital I/O to your HD Core card as the primary interface, followed by any additional HD I/O, 192 I/O, or 192 Digital I/O connected to subsequent Pro Tools|HD cards. Then connect 96 I/O interfaces to subsequent cards, or to other interfaces, then connect 96i I/O interfaces. You can also connect a single Pro Tools|HD interface to each Pro Tools|HD card in your system using the provided DigiLink cables. (Note that there is no advantage or disadvantage to this configuration over daisy-chaining interfaces.) 12-foot DigiLink Mini to DigiLink cable Connecting Loop Sync If you are using two or more Pro Tools|HD audio interfaces or a SYNC peripheral, Loop Sync must be connected to maintain proper clock among the devices. To make Loop Sync connections: 1 Connect the Loop Sync Out of each interface to the Loop Sync In of the next interface with the BNC cables included in your I/O packaging. 2 Connect the Loop Sync Out of the last inter- face to the Loop Sync In of the primary interface or SYNC peripheral. Loop Sync cables 18-inch DigiLink Mini cable Figure 5. Making DigiLink and Loop Sync connections with HD OMNI and HD I/O. 18 Pro Tools|HD User Guide Pro Tools|HD Core card 12-foot DigiLink Mini to DigiLink cable Pro Tools|HD Core card 18-inch DigiLink Mini cable Loop Sync cables Pro Tools|HD Accel card Figure 6. Making DigiLink and Loop Sync connections with HD OMNI and three HD I/Os Connecting Legacy I/O Each 192 I/O, 192 Digital I/O, and 96 I/O can support up to 16 channels of audio to and from Pro Tools|24 MIX™ audio interfaces using the built in Legacy I/O port. Compatible Legacy I/Os include the 888|24 I/O™, 882|20 I/O™, 1622 I/O™, and the 24-bit ADAT Bridge I/O™. HD OMNI, HD I/O, and HD MADI do not provide a Legacy I/O port for Pro Tools|24 MIX audio interfaces. Note that the 96i I/O also does not provide a Legacy I/O port. The original 888 I/O and 882 I/O interfaces are not supported with Pro Tools|HD. Chapter 2: Installing Pro Tools Hardware 19 To connect Pro Tools|24 MIX audio interfaces: 1 Connect the “MIX card” end of the peripheral cable that came with your Pro Tools|24 MIX audio interface (60-pin side) to the Legacy Port on the primary Pro Tools|HD audio interface (192 I/O, 192 Digital I/O, or 96 I/O only). Connect the other end to the Computer Port on the Pro Tools|24 MIX audio interface. 2 Do one of the following: • Connect any additional Pro Tools|24 MIX audio interfaces in the same manner, to Pro Tools|HD audio interfaces connected directly to Pro Tools|HD cards. – or – • If you are using a Y cable (Legacy 16-channel peripheral cable adapter), connect this to the Legacy port first, then connect the audio interface peripheral cables to Port A and Port B of the Y cable. “A” to first Legacy I/O “B” to second Legacy I/O To Legacy Port on Pro Tools|HD audio interface Optional 16-channel peripheral cable adapter 3 To properly clock the Pro Tools|24 MIX audio interface, connect the Ext. Clock output port on the Pro Tools|HD audio interface to the Slave Clock In on the Pro Tools|24 MIX audio interface. The Pro Tools|24 MIX audio interface will switch to Slave mode once the proper clock is outputting from the Pro Tools|HD audio interface. Always use the Ext. Clock Out port of the same audio interface to which the Pro Tools|24 MIX audio interface is attached. 20 Pro Tools|HD User Guide If you are using the Y cable to connect multiple Pro Tools|24 MIX audio interfaces, you must also connect the Slave Clock Out of the first Legacy interface to the Slave Clock In of the second Legacy interface with the provided BNC cable. You cannot clock more than two Pro Tools|24 MIX audio interfaces from a single Pro Tools|HD audio interface. If you have a third Pro Tools|24 MIX audio interface, supply its 256x clock from the Pro Tools|HD audio interface to which its 60-pin cable is attached. To ensure the proper functioning of Pro Tools|24 MIX audio interfaces (such as an 888|24 I/O or 882|20 I/O), launch Pro Tools and initialize the Pro Tools|24 MIX audio interfaces in the Hardware Setup dialog before turning them on (See “Configuring Legacy I/Os” on page 59). Then quit Pro Tools and shut down your computer. When relaunching your Pro Tools system, turn on your Pro Tools|24 MIX audio interfaces first and allow them to complete powering on before turning on your Pro Tools|HD audio interfaces. Then start up your computer. Before you turn on and configure your Pro Tools|24 MIX audio interfaces, turn down the volume of output devices. Very loud digital noise may be emitted before any connected Pro Tools|24 MIX audio interfaces are initialized. chapter 3 Installing Pro Tools on Mac This chapter contains information for Mac systems only. If you are installing Pro Tools on a Windows computer, see Chapter 4, “Installing Pro Tools on Windows.” Before installing this version of Pro Tools, refer to the Read Me information included on the Pro Tools Installer disc. 3 On the Installer disc, locate and double-click the Install Pro Tools HD.mpkg file. 4 Follow the on-screen instructions to proceed with installation. 5 Click Continue each time you are prompted. 6 At the Installation Type page, do one of the following: Installing Pro Tools HD Software After your Pro Tools|HD hardware is installed and connected, you are ready to install Pro Tools software. Do not install or operate Pro Tools while logged in as a root-level user. File permissions of a root-level user make it possible to perform actions that may conflict with Pro Tools file management tasks. To install Pro Tools HD software: 1 Make sure you are logged in as an Administra- tor for the account where you want to install Pro Tools. For details on Administrator privileges in Mac OS X, refer to your Apple OS X documentation. • To install all Pro Tools application files and free plug-in suites (and associated content), leave the default Installation options selected and click Continue. – or – • Select (or deselect) a custom configuration of Installation options (see “Installation Options” on page 22) and click Continue. 7 Click Install. 8 If prompted, enter your Administrator pass- word and click OK to accept the installation. 9 Select your work environment. This loads an initial set of Pro Tools Preferences that include some of the more popular settings for the selected work environment: • Post Production • Music Production (Audio and MIDI) • Music Production (Audio Only) 2 Insert the Pro Tools Installer disc in your DVD drive. Preference settings can be customized at any time in Pro Tools. See the Pro Tools Reference Guide for more information. Chapter 3: Installing Pro Tools on Mac 21 10 Click Continue. 11 When installation is complete, click Restart. Installation Options Pro Tools HD Options To install a subset of Pro Tools software and plug-ins (and associated content), click the reveal triangle for the Pro Tools HD 8.1 option in the installer, and deselect any of the following options that you do not want installed. Eleven Rack Driver The Eleven Rack Driver is required if you are using an Eleven Rack with your Pro Tools|HD system. (For more information about Eleven Rack, see the Eleven Rack User Guide.) MIDI I/O Driver The MIDI I/O Driver is required if you are using the MIDI I/O™ interface. Application Files (Required for Pro Tools) Installs the Pro Tools application and the necessary supporting library files. Launching Pro Tools DigiRack Plug-Ins Installs free plug-ins including DigiRack plug-ins, free Bomb Factory plug-ins, Eleven Free, TL Utilities, and D-Fi and Maxim plug-ins. (For more information, see the Audio Plug-ins Guide.) To use Pro Tools HD, you must have an iLok with a valid authorization for Pro Tools HD inserted into any available USB port on your computer. One pre-authorized iLok is included with your Pro Tools|HD system. Pro Tools Creative Collection Installs a set of free RTAS effects plug-ins and virtual instrument plug-ins (including 4.4 GB of associated sample content). (For more information, see the Audio Plug-ins Guide.) Pro Tools Utilities Installs Calibration Mode Templates for Pro Tools|HD systems, DigiTest, and firmware updaters for SYNC I/O and SYNC HD. Additional Options The Pro Tools installer provides the following additional options to install along with Pro Tools software and plug-ins. Core Audio Driver This option installs the Core Audio Driver, which lets you use Pro Tools audio interfaces with third-party applications that support the Core Audio Driver standard. 22 Avid Video Engine The Avid Video Engine is required to use Pro Tools with Avid video peripherals such as the Avid Mojo or the AVoption|V10. Pro Tools|HD User Guide To launch Pro Tools HD software: 1 Ensure that Pro Tools|HD hardware is cor- rectly installed and connected to your computer system. 2 Insert the pre-authorized iLok into an avail- able USB port on your computer. Do not remove the iLok during Pro Tools launch or use. 3 Do one of the following: • Click the Pro Tools HD icon in the Dock. – or – • Locate and double-click the Pro Tools HD application on your hard drive. 4 Use the Quick Start dialog to do one of the fol- lowing: • Create a new session from a template. • Create a new blank session. • Open a session. For more information on the Quick Start dialog and session templates, see the Pro Tools Reference Guide. Additional Software on the Pro Tools Installer Disc The Pro Tools HD Installer disc provides additional software for your system, including the HD Pack collection of plug-ins, third-party applications and plug-ins, audio drivers (for playing other audio applications through your Pro Tools|HD hardware) and a Pro Tools demo session. See your Pro Tools Installer disc for additional software and installers. HD Pack Plug-ins Your Pro Tools package includes the HD Pack collection of plug-ins from Avid and Avid Development Partners. Once you've completed your Pro Tools installation, you can install the contents of HD Pack. HD Pack installers are located on the Pro Tools Installer disc in the Additional Files\HD Pack Installers folder. Third-Party Applications and Plug-ins Your Pro Tools package also includes several free applications and plug-ins from selected Avid Third Party Development Partners. Once you've completed your Pro Tools installation, you can install these separately. Installers are located on your Pro Tools Installer disc in the Additional Files\3rd Party Content folder. CoreAudio Driver The CoreAudio Driver is a multi-client, multichannel sound driver that lets Core Audio–compatible applications record and play back through Pro Tools hardware. The CoreAudio Driver is installed by default when you install Pro Tools. For information on configuring the CoreAudio Driver, see the CoreAudio Driver Guide. Standalone CoreAudio Driver The CoreAudio Driver can be installed as a standalone driver on Mac systems that do not have Pro Tools software installed. For information on installing and configuring the standalone version of the CoreAudio Driver, see the CoreAudio Drivers Guide. If you uninstall Pro Tools, the CoreAudio Driver is automatically uninstalled at that time. Chapter 3: Installing Pro Tools on Mac 23 Pro Tools Demo Session The Pro Tools HD Installer disc includes a demo session that you can use to verify that your system is working. The demo session for Pro Tool HD is named Meant To Be. Removing Pro Tools If you need to remove Pro Tools software from your computer, follow the instructions below. To remove Pro Tools from your computer: Before installing the demo session to your audio drive, make sure the drive is configured as described in Appendix A, “Hard Drive Configuration and Maintenance.” 1 Make sure you are logged in as an Administrator for the account where Pro Tools is installed. 2 Go to Applications/Digidesign/Pro Tools/ To install the demo session: Pro Tools Utilities and double-click the “Uninstall Pro Tools” file. 1 Insert the Pro Tools HD Installer disc into your 3 Click Continue to proceed with the uninstall. DVD drive. 2 On the installer disc, in the Additional Files folder, locate and open the Pro Tools Demo Session Installer folder. 3 Double-click the HD Demo Session Setup.pkg file. 4 Follow the on-screen instructions to proceed with installation. 5 When prompted, select your audio drive as the install location and click Continue to begin the install. 6 Click Install. 7 When installation is complete, click Close. The demo session can be opened by doubleclicking the Meant To Be.ptf file found in the Pro Tools Demo Session folder. 24 Pro Tools|HD User Guide 4 Choose the type of uninstall you want to perform: Safe Uninstall Leaves certain plug-ins and system files needed for compatibility with some Avid products. Clean Uninstall Removes all Pro Tools files, including system files, plug-ins, and MIDI patch names. 5 Click Uninstall. 6 Enter your Administrator password and click OK. 7 Click Finish to close the Installer window. Optimizing a Mac System for Pro Tools To ensure optimum performance with Pro Tools, configure your computer before using Pro Tools software. Before configuring your computer, make sure you are logged in as an Administrator for the account where you want to install Pro Tools. For details on Administrator privileges in Mac OS X, see your Apple OS X documentation. Do not use the Mac OS X automatic Software Update feature, as it may upgrade your system to a version of Mac OS that has not yet been qualified for Pro Tools. For details on qualified versions of Mac OS, visit www.avid.com/compatibility. Disable or Reassign Mac Keyboard Shortcuts Used by Pro Tools To have the full complement of Pro Tools keyboard shortcuts, you need to disable or reassign any conflicting Mac OS X Keyboard Shortcuts in the Apple System Preferences, including the following: • “Show Help menu” • Under “Keyboard Navigation” • “Move focus to the window drawer” • Under “Dock, Exposé, and Dashboard” • “Automatically hide and show the Dock” • “All windows” • “Application windows” • “Desktop” • “Dashboard” • “Spaces” Turning Off Software Update To turn off the Software Update feature: • Under “Spotlight” • “Show Spotlight search field” • “Show Spotlight window” 1 Choose System Preferences from the Apple menu and click Software Update. 2 Click the Scheduled Check tab. For a complete list of Pro Tools keyboard shortcuts, see the Keyboard Shortcuts Guide (Help > Keyboard Shortcuts). 3 Deselect “Check for Updates.” Turning Off Energy Saver To turn off the Energy Saver feature: 1 Choose System Preferences from the Apple menu and click Energy Saver. 2 Do the following: To disable or reassign Mac OS X keyboard shortcuts: 1 Choose System Preferences from the Apple menu and click Keyboard. 2 Click the Keyboard Shortcuts tab. 3 Do one of the following: • Set the computer sleep setting to Never. • Deselect the Mac OS X options that conflict with Pro Tools keyboard shortcuts. • Set the display sleep setting to Never. – or – • Deselect “Put the hard disk(s) to sleep when possible.” • Assign different, non-conflicting keyboard shortcuts to the corresponding Mac OS X options. Chapter 3: Installing Pro Tools on Mac 25 Reassign Spaces Keyboard Shortcuts Disabling Spotlight Indexing If you want to use Spaces, you should reassign the Spaces keyboard shortcuts to avoid conflicts with important Pro Tools keyboard shortcuts. You can reassign Spaces keyboard shortcuts to use a combination of modifier keys (Command+Option+Control+Shift) in addition to the default Spaces keyboard shortcut assignments to avoid these conflicts. The Mac OS X Spotlight feature automatically indexes files and folders on local hard drives in the background. In most cases, this is not a concern for normal Pro Tools operation. However, if Spotlight starts indexing drives while recording in a Pro Tools session with high track counts for an extended period of time, it can adversely affect Pro Tools system performance. You may want to disable Spotlight indexing for all local drives before using Pro Tools for big recording projects. To reassign Spaces keyboard shortcuts to use modifier key combinations that do not conflict with Pro Tools keyboard shortcuts: 1 Choose System Preferences from the Apple menu and click Exposé & Spaces. Disabling Spotlight indexing also disables the Find function in Mac OS X. 2 Click the Spaces tab. To disable Spotlight indexing: 3 Ensure that Enable Spaces is selected. 1 Choose System Preferences from the Apple menu and click Spotlight. 4 Press and hold Command+Option+Con- trol+Shift and select “Control+Option+Shift+Command+F8” from the “To activate Spaces” pop-up menu. 2 In the Spotlight window, click the Privacy tab. 3 To prevent indexing of a drive, drag its icon from the desktop into the list. 5 Press and hold Command+Option+Con- trol+Shift and select “Control+Option+Shift+Command+Arrow Keys” from the “To switch between spaces” pop-up menu. Enabling Journaling for Audio Drives To yield higher performance from audio drives, enable journaling. 6 Press and hold Command+Option+Con- trol+Shift and select “Control+Option+Shift+Command+Number Keys” from the “To switch directly to a space” pop-up menu. To enable journaling: 1 Launch the Disk Utility application, located in Applications/Utilities. 2 Select the volume in the left column of the Disk Utility window. 3 Select Enable Journaling in the toolbar. 26 Pro Tools|HD User Guide chapter 4 Installing Pro Tools on Windows This chapter contains information for Windows systems only. If you are installing Pro Tools on a Mac computer, see Chapter 3, “Installing Pro Tools on Mac.” Before installing this version of Pro Tools, refer to the Read Me information included on the Pro Tools Installer disc. 3 Insert the Pro Tools Installer disc in your DVD drive. 4 On the Installer disc, locate and double-click the Setup.exe file. 5 Follow the on-screen instructions to proceed with installation and click Next when prompted. 6 Follow the on-screen instructions to proceed with installation and click Next when prompted. Installing Pro Tools HD Software After your Pro Tools|HD hardware is installed and connected, you are ready to install Pro Tools software. On Windows XP, make sure you have disabled Driver Signing warnings before beginning software installation. This will reduce the number of warning messages you see during installation. See “Disabling Driver Signing Warnings” on page 13. To install Pro Tools HD software: 1 Start Windows, logging in with Administrator 7 To install the complete compliment of Pro Tools software and plug-ins, leave Pro Tools selected. 8 At the Select Features page, do one of the fol- lowing: • To install all Pro Tools application files and free plug-in suites (and associated content), leave the default Installation options selected and click Continue. – or – • Select (or deselect) a custom configuration of Installation options (see “Installation Options” on page 28) and click Continue. 9 Click Next. privileges. For details on Administrator privileges, refer to your Windows documentation. 2 Wait for the Found New Hardware Wizard di- alog to appear and leave it open: Do not click Next. Chapter 4: Installing Pro Tools on Windows 27 10 Select your work environment. This loads an initial set of Pro Tools Preferences that include some of the more popular settings for the selected work environment: • Post Production • Music Production (Audio and MIDI) • Music Production (Audio Only) Preference settings can be customized at any time in Pro Tools. See the Pro Tools Reference Guide for more information. 11 Click Next. 12 Click Install. Several messages are displayed during installation that can be ignored, including multiple “Found New Hardware” dialogs and “A Problem Occurred During Hardware Installation.” Additionally, if you get a warning dialog about the driver not passing Windows Logo testing, click Continue Anyway. 13 Wait for the installer to finish installing all software components, drivers, and PACE System files before proceeding to the next step. 14 When installation is complete, click Finish. Installation Options Pro Tools HD Options To install a subset of Pro Tools software and plug-ins (and associated content), click the plus (+) next to Pro Tools HD 8.1 option in the Select Features page of the installer, and deselect any of the following options that you do not want installed. 28 Pro Tools|HD User Guide Application Files (Required for Pro Tools) Installs the Pro Tools application and supporting library files needed to run Pro Tools. This option must be selected to install Pro Tools. DigiRack Plug-Ins Installs free plug-ins including DigiRack plug-ins, free Bomb Factory plug-ins, Eleven Free, TL Utilities, and D-Fi and Maxim plug-ins. (For more information, see the Audio Plug-ins Guide.) Pro Tools Creative Collection Installs a set of free RTAS effects plug-ins and virtual instrument plug-ins (including 4.4 GB of associated sample content). (For more information, see the Audio Plug-ins Guide.) Pro Tools Utilities Installs Calibration Mode Templates for Pro Tools|HD systems, DigiTest™, and firmware updaters for SYNC I/O™ and SYNC HD™. Additional Options The Pro Tools installer provides the following additional options to install along with Pro Tools software and plug-ins. Mac HFS+ Disk Support Option This option lets your Pro Tools system read, write, record, and play back using Mac-formatted HFS+ disks. HFS+ disks are commonly referred to as Mac OS Extended disks. Avid Video Engine The Avid Video Engine is required to use Pro Tools with Avid video peripherals such as the Avid Mojo® or the AVoption|V10. Eleven Rack Driver The Eleven Rack Driver is required if you are using an Eleven Rack with your Pro Tools|HD system. (For more information about Eleven Rack, see the Eleven Rack User Guide.) Command|8 Controller and Driver The Command|8® Driver is required if you are using the Command|8 control surface. To launch Pro Tools HD software: 1 Ensure that Pro Tools|HD hardware is cor- rectly installed and connected to your computer system. Installing QuickTime 2 Insert the pre-authorized iLok into an avail- QuickTime is required for Pro Tools if you plan to include movie files, or import MP3 or MP4 (AAC) files in your sessions. QuickTime for Windows is available as a free download from the Apple website. For information on which version of QuickTime is compatible with your version of Pro Tools, visit the compatibility pages of our website (www.avid.com/compatibility). To install QuickTime: able USB port on your computer. Do not remove the iLok during Pro Tools launch or use. 3 Do one of the following: • Double-click the Pro Tools HD shortcut on the desktop. – or – • Locate and double-click the Pro Tools HD application on your hard drive. 1 Visit www.apple.com and download the 4 Use the Quick Start dialog to do one of the fol- QuickTime for Windows installer application to your computer. lowing: • Create a new session from a template. 2 Double-click the QuickTime installer applica- • Create a new blank session. tion and follow the on-screen installation instructions. • Open a session. 3 Restart your computer. If you turned off Driver Signing Warning on your computer, be sure to enable it once Pro Tools hardware and software have been installed. Launching Pro Tools To use Pro Tools HD, you must have an iLok with a valid authorization for Pro Tools HD inserted into any available USB port on your computer. One pre-authorized iLok is included with your Pro Tools|HD system. For more information about the Quick Start dialog and session templates, see the Pro Tools Reference Guide. Additional Software on the Pro Tools Installer Disc The Pro Tools HD Installer disc provides additional software for your system, including the HD Pack collection of plug-ins, third-party applications and plug-ins, audio drivers (for playing other audio applications through your Pro Tools|HD hardware) and a Pro Tools demo session. See your Pro Tools Installer disc for additional software and installers. Chapter 4: Installing Pro Tools on Windows 29 HD Pack Plug-ins ASIO Driver Your Pro Tools package includes the HD Pack collection of plug-ins from Avid and Development Partners. Once you've completed your Pro Tools installation, you can install the contents of HD Pack. The ASIO (Audio Sound Input Output) Driver is a single-client multichannel sound driver that allows third-party audio programs that support the ASIO standard to record and play back through Pro Tools hardware. HD Pack installers are located on the Pro Tools Installer disc in the Additional Files\HD Pack Installers folder. Third-Party Applications and Plug-ins Your Pro Tools package also includes several free applications and plug-ins from selected Avid Third Party development partners. Once you've completed your Pro Tools installation, you can install these separately. Installers are located on your Pro Tools Installer disc in the Additional Files\3rd Party Content folder. Windows Audio Drivers The ASIO Driver and WaveDriver Windows System Audio Driver let you use your Pro Tools audio interfaces with third-party applications that support the ASIO Driver or WaveDriver MME (Multimedia Extension). The ASIO Driver and WaveDriver for your Pro Tools hardware are automatically installed when you install Pro Tools. For detailed information on configuring the ASIO Driver, see the Windows Audio Drivers Guide. WaveDriver The WaveDriver Windows System Audio Driver is a single-client, stereo sound driver that allows third-party audio programs that support the WaveDriver MME (Multimedia Extension) standard to play back through Pro Tools hardware. For detailed information on configuring the WaveDriver, see the Windows Audio Drivers Guide. Standalone Windows Audio Drivers Windows Audio Drivers can be installed on Windows systems that do not have Pro Tools software installed. For information on installing and configuring the standalone version of the Windows Audio Drivers, see the Windows Audio Drivers Guide. Pro Tools Demo Session The Pro Tools HD Installer disc includes a demo session that you can use to verify that your system is working. The demo session for Pro Tool HD is named Meant To Be. Before installing the demo session to your audio drive, make sure the drive is configured as described in Appendix A, “Hard Drive Configuration and Maintenance.” 30 Pro Tools|HD User Guide To install the demo session: 1 Insert the Pro Tools HD Installer disc into your DVD drive. 2 On the installer disc, in the Additional Files folder, locate and open the Pro Tools Demo Session Installer folder. 3 Double-click the HD Demo Session Setup.exe file. 4 Follow the onscreen instructions to proceed with installation. 5 When prompted, select your audio drive as the install location and click Next to begin the install. 6 When installation is complete, click Finish. The demo session can be opened by doubleclicking the Meant To Be.ptf file found in the Pro Tools Demo Session folder. Removing Pro Tools If you need to remove Pro Tools software from your computer, use the Uninstaller application. To remove Pro Tools from your computer: 1 Make sure you are logged in as an Administra- tor for the account where Pro Tools is installed. 2 Go to C:\Program Files\Digidesign\ Pro Tools\Pro Tools Utilities. 3 Double-click Uninstall Pro Tools Setup.exe. 4 Click Next to proceed with the uninstall. 5 Click Uninstall. 6 If prompted, enter your Administrator pass- word and click OK. 7 Click Finish to restart your computer and com- plete the uninstallation. Chapter 4: Installing Pro Tools on Windows 31 Optimizing a Windows System for Pro Tools To configure Windows Power Management: 1 Choose Start > Control Panel. 2 Double-click Power Options. To ensure optimum performance with Pro Tools|HD, configure your computer before using Pro Tools hardware and software. Before configuring your computer, make sure you are logged in as an Administrator for the account where you want to install Pro Tools. For details on Administrator privileges, see your Windows documentation. 3 Click the Power Schemes tab. 4 From the Power Schemes pop-up menu, select Always. 5 Verify that the following settings are set to Never: • Turn off hard disks • System standby • System hibernates Required Optimizations To ensure optimum performance with Pro Tools, configure the following settings before using Pro Tools hardware and software. When you are finished changing Windows system settings, restart your computer. Disabling System Standby and Power Management When using Pro Tools, the Windows System Standby power scheme must be set to Always On. This helps prevent long record or playback passes from stopping due to system resources powering down. 6 Click OK. Recommended Optimizations Pro Tools can also be affected by other software and hardware drivers installed on your computer. For best possible performance, it is recommended (but not required) that you do the following: • Avoid running any unneeded programs at the same time as Pro Tools. • Turn off any software utilities that run in the background, such as Windows Messenger, calendars, and disk maintenance programs. • Turn off any non-essential USB devices while running Pro Tools. 32 Pro Tools|HD User Guide Optional Optimizations The following system optimizations may help Pro Tools perform better on some systems. It is recommended that you only try these optimizations if necessary, as they may disable or adversely affect the functionality of other programs on your system. Disabling Network Cards If applicable, disable any networking cards (other than a FireWire card that you might use to connect an external drive to your system). Adjusting Processor Scheduling To adjust Processor Scheduling performance: 1 Right-click My Computer (Windows XP) or Computer (Windows 7) and choose Properties. 2 in the System Properties window, click the Advanced tab. 3 Under the Performance section, click the Settings button. 4 In the Performance Options window, click the Advanced tab. 5 Under the Processor Scheduling section, select To disable a network card: the Background Services option. 1 Right-click My Computer (Windows XP) or 6 Under the Memory Usage section, select the Computer (WIndows 7) and choose Manage. System cache option. 2 Under System Tools, select Device Manager. 7 Click OK to close the Performance Options window. 3 In the Device Manager window, double-click Network adapters, then double-click the Network Adapter card you want to disable. 8 Click OK to close the System Properties window. 4 Under the General tab, choose “Do not use this device (disable)” from the Device Usage pop-up menu, and click OK. 9 Restart the computer for the changes to take effect. 5 Close the Computer Management window. Chapter 4: Installing Pro Tools on Windows 33 Disabling System Startup Items The fewer items in use by your computer, the more resources are available for Pro Tools. Some startup applications may be consuming unnecessary CPU resources, and can be turned off. If you disable any of the following startup items, do so carefully: • Portable media serial number (required for some applications that utilize a copy protection key) • The Plug and Play service • Event log • Cryptographic services To Disable System Startup Items: 1 From the Start menu, type “msconfig” in Run and click OK to open the System Configuration Utility. 2 Under the General tab, choose Selective Startup. 3 Deselect Load Startup Items and click OK. 4 Click Restart to restart the computer. 5 After restarting, the computer displays a Sys- tem Configuration message. Check to see if Pro Tools performance has increased before you deselect the “Don't show this message again” option. If performance has not changed, run “msconfig” and return your computer Startup Selection back to Normal Startup - load all device drives and services. Alternatively, try disabling Startup items and non-essential processes individually. 34 Pro Tools|HD User Guide chapter 5 Making Studio Connections This chapter provides information on making common studio connections—including including analog and digital sources, effects devices, MIDI gear, and SMPTE synchronization devices. Refer to the HD OMNI Guide, HD I/O Guide, HD MADI Guide, 192 I/O Guide, 192 Digital I/O Guide, 96 I/O Guide, or 96i I/O Guide for specific details regarding: Setting Up Your Studio Figure 7 on page 36 illustrates a typical studio setup, with HD I/O connected to a mixing console, effects, and other equipment. Figure 8 on page 37 and Figure 9 on page 38 illustrate a setup without a mixer, where effects and monitoring gear are connected directly to HD OMNI. • Front and back panel connectors and indicators • Installation of optional expansion I/O cards (HD I/O and 192 I/O only) Pro Tools|HD audio interfaces need room at their sides to maintain proper air flow for cooling. Do not block the sides of the unit or disconnect the internal fan. If the units are rack-mounted in a case, remove the case lids or doors before operating the system. Failure to do so can result in the units overheating very quickly, which can permanently damage sensitive components. Chapter 5: Making Studio Connections 35 Example Studio Setup with a Mixing Console Optical in/out to ADAT Digital Inputs/Outputs to DAT recorder Analog Inputs Analog Outputs Digital Effects Device (set to external sync) Effects Devices Channel Outputs Tape Returns or Inputs Instruments Connected to Console Figure 7. Example studio configuration using HD I/O with analog mixer connections 36 Pro Tools|HD User Guide Power Amp and Speakers Example Studio Setup without a Mixing Console Figure 8. Example studio configuration using HD OMNI without a mixer, front panel connections shown Chapter 5: Making Studio Connections 37 Optical in/out to ADAT Analog Output Digital Inputs/Outputs to DAT recorder Hardware Inserts Power Amp and Speakers Figure 9. Example studio configuration using HD OMNI without a mixer, back panel connections shown 38 Pro Tools|HD User Guide Connecting Equipment with Digital Audio Ins and Outs Each Pro Tools|HD audio interface includes at least one AES/EBU, S/PDIF, or Optical (ADAT) digital option. For example, the HD I/O (with an HD I/O Digital Expansion Card) includes additional AES/EBU and optical ports, as well as TDIF, AES/EBU at 192 kHz, and sample rate conversion on input. The 96i I/O provides two channels of S/PDIF only. (See the documentation for your audio interface for details.) The following example provides basic setup guidelines for connecting Pro Tools to a DAT recorder. To connect your Pro Tools system to a DAT recorder: 1 Connect the AES/EBU or S/PDIF output on the enclosure of your Pro Tools|HD audio interface to the AES/EBU or S/PDIF input of your DAT deck. By default, this port is assigned to Pro Tools Output 1–2. 2 Connect the AES/EBU or S/PDIF input on the enclosure to the AES/EBU or S/PDIF output of your DAT deck. Route the digital input to Pro Tools inputs in the Hardware Setup dialog. You can route any of the physical input or output pairs to any of the input and output channel assignments in the Pro Tools mixer. (The 96i I/O does not support input mapping, however.) For more information see the Pro Tools Reference Guide. Connecting Effects Units The HD I/O, HD OMNI, HD MADI, 192 I/O, 192 Digital I/O, and 96 I/O let you connect analog or digital effects units to your Pro Tools system, and use them as inserts or make them the destination for effects sends and returns. (The 96i I/O supports a single pair of hardware inserts using channels 1–2. See the 96i I/O Guide for more information.) In Pro Tools, up to ten inserts are available on each audio channel. Each insert can be a hardware insert (or software plug-in), and can be mono or stereo. When using a hardware insert, you must connect the device to matching inputs and outputs on your system. For example, a stereo insert could use outputs 7–8 and inputs 7–8 for the sends and returns, respectively. Routing the physical inputs and outputs of the interface to Pro Tools inputs and outputs can be done in either the Hardware Setup dialog or I/O Setup dialog. From I/O Setup, inserts can also be defined, and their channels mapped to audio interface channels (for more information, see the Pro Tools Reference Guide). You can also connect effects units to your system by using any analog or digital inputs and outputs as Auxiliary Inputs and Outputs for effects sends and returns. Once an effects unit is attached this way, you can send a variable amount of a track’s output to the effects unit using a send in Pro Tools. Ten separate send controls on each Pro Tools track allow you to route audio to any of the available outputs connected to your system or through any of the 128 internal busses in the Pro Tools Mixer. Outputs can be returned to Auxiliary Inputs for automated mixing or processing. Chapter 5: Making Studio Connections 39 When you are using an effect in this send and return type of configuration, make sure the unit’s internal mix or balance between direct (unprocessed) and wet (effected) signal is set so that only the processed signal is returned to Pro Tools. On most effect units, a balance setting of 100% (completely wet) is the appropriate setting. If you’ve been using an effects unit in an instrument setup, such as a guitar effects rack, you’ll probably find the balance to be below 50%. If the unit has separate dry and effect level knobs, turn dry level control off. If you don’t do this, the dry, unprocessed signal will be present in an effect’s output along with the processed sound, and you’ll have trouble accurately controlling the effect balance in your final mix. Connecting Effects Units Digitally To use your audio interface’s inputs and outputs as effects sends and returns to a digital effects device, set your interface’s Clock Source to Internal in the Hardware Setup dialog (unless it is referenced to another clock source or peripheral). You should then set your digital effects devices to accept an external digital clock so that they will synchronize themselves to Pro Tools. Make sure you set the channel pair to the digital input in the Hardware Setup dialog (or the I/O Setup dialog). 40 Pro Tools|HD User Guide Connecting MIDI Devices By adding a compatible MIDI interface to your system, you can take advantage of all the MIDI features of Pro Tools, including recording and editing MIDI tracks, and synchronizing to MIDI Time Code or MIDI beat clock. See Appendix C, “Configuring MIDI Studio Setup (Windows Only)”or Appendix B, “Configuring AMS (Mac OS X Only)” for detailed information on how to identify external MIDI devices connected to your MIDI interface and configure your MIDI studio for use with Pro Tools. To connect MIDI devices to your system: 1 Connect the MIDI interface to your computer according to the MIDI interface’s documentation. 2 Install any MIDI driver software required by the MIDI interface. (Once you have installed your MIDI interface hardware and software, confirm that it is working properly using the procedure given in the interface’s documentation.) 3 Connect the MIDI OUT of your MIDI device to the MIDI IN of your MIDI interface. 4 Connect the MIDI IN of your MIDI device to the MIDI OUT of your MIDI interface. Connecting SMPTE Synchronization Devices Connecting Ethernet Work Surfaces If you intend to synchronize Pro Tools to external devices with SMPTE, your system must be connected properly. For details on SMPTE and synchronization, see the Pro Tools Reference Guide or the SYNC HD Guide. If you are using a direct Ethernet connection (rather than across a network) to a Pro Tools Work Surface—such as D-Control®, D-Command®, or C|24™—the TCP/IP address must be set manually. The default manual settings work in most cases. Do not use DHCP unless your computer is connected to a network that provides DHCP services. SYNC Peripherals SYNC peripherals provide all the functions and connections needed to synchronize to a variety of devices with Pro Tools|HD. SYNC peripherals support all Pro Tools sample rates, and synchronize to most major time code and clock reference standards used in audio, video, film, and multimedia production. SYNC peripherals integrate into the Loop Sync configuration of a Pro Tools|HD system, offering extremely fast lockup, near-sample accurate synchronization, and an exceptionally low-jitter clock. These features provide professional performance and maximum audio fidelity under a wide range of synchronization conditions. For more information, refer to the SYNC HD Guide. Chapter 5: Making Studio Connections 41 42 Pro Tools|HD User Guide chapter 6 Configuring Your Pro Tools System Starting Up or Shutting Down Your System Whenever you start your system, turn on all of your system components in a specific order. 8 With the volume of all output devices low- ered, turn on your Pro Tools|HD audio interfaces. Wait at least fifteen seconds for the audio interface to initialize and the status LEDs to stop flashing. 9 Turn on your computer. Start up your Pro Tools system in this order: 1 Make sure all your equipment (including your 10 Launch Pro Tools or any third-party audio or MIDI applications. computer) is off. 2 Lower the volume of all output devices in your system. 3 For Pro Tools|HD systems with an expansion chassis, turn on the expansion chassis. 4 Turn on any external hard drives. Wait ap- proximately ten seconds for them to spin up to speed. 5 Turn on any control surfaces. 6 Turn on any MIDI interfaces and devices, or synchronization peripherals. 7 With the volume of all output devices low- ered, turn on any Pro Tools|24 MIX audio interfaces (such as an 888|24 I/O or 882|20 I/O). Wait at least fifteen seconds for the audio interface to initialize and the status LEDs to stop flashing. Shut down your Pro Tools system in this order: 1 Quit Pro Tools and any other running applica- tions. To quit Pro Tools, choose Pro Tools > Quit (Mac) or File > Exit (Windows). 2 Turn off or lower the volume of all output devices in your system. 3 Turn off your computer. 4 Turn off your Pro Tools audio interfaces. 5 For Pro Tools|HD systems with an expansion chassis, turn off the chassis. 6 Turn off any MIDI interfaces, MIDI devices, or synchronization peripherals. 7 Turn off any control surfaces or worksurfaces. 8 Turn off any external hard drives. Chapter 6: Configuring Your Pro Tools System 43 Configuring the Pro Tools Playback Engine In the Playback Engine dialog, Pro Tools lets you adjust the performance of your system by changing system settings that affect its capacity for processing, playback, and recording. These system settings are available in the Playback Engine dialog (Setup > Playback Engine). In most cases, the default settings for your system provide optimum performance, but you may want to adjust them to accommodate large or processing-intensive Pro Tools sessions. • Higher Hardware Buffer Size settings are useful for sessions that are using more RTAS plugins for playback. These settings allow for more audio processing. They can also be useful to reduce errors on machines that require a higher buffer size. To change the Hardware Buffer Size: 1 Choose Setup > Playback Engine. 2 From the H/W Buffer Size pop-up menu, select the audio buffer size, in samples. Hardware Buffer Size The Hardware Buffer Size (H/W Buffer Size) controls the size of the buffer used to handle host processing tasks such as processing with RealTime AudioSuite™ (RTAS) plug-ins. • Lower Hardware Buffer Size settings are useful for improving latency issues in certain recording situations or for improving certain system performance problems: • On all Pro Tools systems, lower settings reduce RTAS MIDI-to-audio latency (such as when playing an RTAS virtual instrument live and monitoring the instrument’s output). Lower settings can also improve screen response or the accuracy of plug-in and mute automation data. • On Pro Tools|HD systems specifically, lower settings reduce monitoring latency that occurs on tracks that have one or more RTAS plug-ins. Lower settings can also improve the accuracy of MIDI track timing on systems without a MIDI interface that supports time stamping. Lower settings also improve MIDI track timing on tracks using MIDI virtual instruments that do not support time stamping. 44 Pro Tools|HD User Guide Playback Engine dialog for Pro Tools|HD system 3 Click OK. Host Processors The Host Processors setting determines the number of processors in your computer allocated for RTAS (Real-Time AudioSuite) plug-in processing and other host processing tasks. With computers that have multiple processors, or that feature multi-core processing or hyperthreading, this setting lets you enable multiprocessor support for RTAS plug-in processing and other host processing tasks. Used in combination with the CPU Usage Limit setting, the Host Processors setting lets you control the way RTAS processing and other Pro Tools tasks are handled by the system. For example: • For sessions with large numbers of RTAS plugins, you can allocate 2 or more processors to RTAS processing and set a high CPU Usage Limit. • For sessions with few RTAS plug-ins, you can allocate fewer processors to RTAS processing and set a low CPU Usage Limit to leave more CPU resources available for automation accuracy, screen response, and video. • Increase these settings to accommodate TDM to RTAS plug-in conversion. Conversely, decrease these settings if you are only using TDM plug-ins or are converting RTAS plug-ins to TDM. TDM/RTAS conversion can be desirable during recording, depending on latency, voicing needs, and record-monitoring capabilities of the specific TDM and RTAS plug-ins. • Depending on the importance of video and overall screen response, and on the density of automation being employed, try different combinations of Host Processors and CPU Usage Limit settings to achieve the best results. For example, to improve screen response in a medium-sized session using a moderate number of RTAS plug-ins, try reducing the number of RTAS plug-ins, but keep the CPU Usage Limit set to the maximum (up to 99% on a single processor system). To set the number of Host Processors: 1 Choose Setup > Playback Engine. 2 From the Host Processors pop-up menu, select the number of available processors you want to allocate. The number of processors available varies depending on how many processors are available on your computer: • Select 1 Processor to limit host processing for Pro Tools to one CPU in the system. • Choose 2 Processors to enable load balancing across two available processors for Pro Tools host processing tasks. • On systems running four or more processors, choose the number of processors for Pro Tools host processing tasks. 3 Click OK. System Usage Window and Host Processing The System Usage window (Windows > System Usage) displays the combined amount of host processing occurring on all enabled processors with a single indicator, regardless of how many processors are available in the system. If the System Usage Window shows that you are at the limit of available resources, increase the number of Host Processors and adjust the CPU Usage Limit setting. Chapter 6: Configuring Your Pro Tools System 45 CPU Usage Limit Host Engine (Error Suppression) The CPU Usage Limit setting controls the percentage of CPU resources allocated to Pro Tools host processing tasks. Used in combination with the Host Processors setting, the CPU Usage Limit setting lets you control the way Pro Tools tasks are carried out by the system. The Host Engine option determines RTAS error reporting during playback and recording. This is especially useful when working with instrument plug-ins. • Lower CPU Usage Limit settings limit the effect of Pro Tools processing on other CPU-intensive tasks, such as screen redraws, and are useful when you are experiencing slow system response, or when running other applications at the same time as Pro Tools. • Higher CPU Usage Limit settings allocate more processing power to Pro Tools, and are useful for playing back large sessions or using more RTAS plug-ins. The maximum available CPU Usage Limit depends on the number of processors in your computer and on the number of processors you specify for host processing. This value can range from 85% for single-processor computers, and 99% for multiprocessor computers (which dedicate one entire processor to Pro Tools). On multiprocessor computers, the maximum CPU Usage Limit is reduced when you use all your processors (as selected in the RTAS Processing pop-up menu). For example, on dual-processors, the limit is 90%. On four-processor computers, the limit is 95%. Increasing the CPU Usage Limit may slow down screen responses on slower computers. To change the CPU Usage Limit: 1 Choose Setup > Playback Engine. 2 From the CPU Usage Limit pop-up menu, select the percentage of CPU processing you want to allocate to Pro Tools. 3 Click OK. 46 Pro Tools|HD User Guide You should only enable error suppression if you are experiencing frequent errors that are interrupting your creative workflow. When error suppression is enabled, you can experience a degradation of audio quality. However, this may be acceptable in order to avoid interrupting playback and recording when working with instrument plug-ins. Be sure to disable error suppression when you need to ensure the highest possible audio quality, such as for a final mix. To enable error suppression: 1 Choose Setup > Playback Engine. 2 Select Ignore Errors During Playback/Record. 3 Click OK. Error Suppression Option On Pro Tools|HD systems, there is a single Host Engine option: Ignore Errors During Playback/Record When enabled, Pro Tools continues to play and record even if the host processing requirements exceed the selected CPU Usage Limit. This can result in pops and clicks in the audio, but does not stop the transport. Number of Voices The Number of Voices setting lets you control the number of voices available on your system. For example, the default number of voices on an Pro Tools|HD 1 system is 48 voices, using one DSP (at sample rates of 44.1 kHz or 48 kHz). Changing the number of voices affects DSP usage, the total number of voiceable tracks, and overall system performance. Depending on the current sample rate and the number of cards in your system, and whether you are using an expansion chassis, you will have different choices for voice count. For additional information on voice count, see the Pro Tools Reference Guide. To change the Number of Voices and DSP to allocate for voicing: 1 Choose Setup > Playback Engine. • Select higher voice numbers when your Pro Tools|HD cards are the only PCIe cards in your computer, or when you are using an expansion chassis to run higher track counts (such as 64 tracks at 96 kHz) and you want more voices per DSP (such as 16 voices per DSP at 96 kHz). These settings use fewer DSP chips for mixing (leaving more available for plug-ins) but place the highest processing load on each. 3 Click OK. Default Sample Rate The Sample Rate setting determines the default sample rate when you create a new session. This setting is available only when there is no session open. Otherwise, the current session sample rate is displayed, but cannot be changed. The Sample Rate setting can affect the number of available voices. 2 Select the number of voices and DSPs to allo- cate for voicing by choosing a value from the Number of Voices pop-up menu. • Select minimum voice numbers if you are using high-bandwidth PCI or PCIe cards (such as video capture cards) along with your Pro Tools|HD cards. These settings place the lightest processing load on each allocated DSP chip, but generally require more DSP chips be dedicated to voicing and mixing (leaving fewer available for plug-ins). • Select medium voice numbers when your Pro Tools|HD cards are in an expansion chassis, or when you are using other PCI or PCIe cards along with Pro Tools|HD cards. These settings generally provide an optimum balance between number of chips needed for voicing, and the processing load placed on each. You can change the sample rate when creating a new Pro Tools session by selecting a different sample rate in the New Session dialog. You can also change the default Sample Rate in the Hardware Setup, as long as no session is open. To change the default Sample Rate in the Playback Engine: 1 Choose Setup > Playback Engine. 2 Select the sample rate from the Sample Rate pop-up menu. 3 Click OK. Chapter 6: Configuring Your Pro Tools System 47 Delay Compensation Engine Delay Compensation Settings The Delay Compensation Engine setting determines how much DSP resources are dedicated for Delay Compensation. There are three settings in the Playback Engine dialog for dedicating DSP resources for Delay Compensation: To maintain phase coherent time alignment, Pro Tools adds the exact amount of delay to each track necessary to make that particular track’s delay equal to the total system delay. The System Delay is shown in the Session Setup window (Setup > Session). None Allocates no DSP resources for Delay Compensation. Delay Compensation should be enabled during mixing and playback for phase coherent time alignment between track outputs. With Delay Compensation enabled, it is recommended that you do not use any inserts on any Auxiliary Input or Master Fader tracks you may be using to control the cue mix volume. Also, you should avoid using inserts on any record tracks. (Some low latency inserts may be acceptable depending on the recording situation.) When recording, in most cases Delay Compensation can be enabled. However, it is still recommended that you disable Delay Compensation for certain dubbing workflows (such as when recording to multiple audio tracks in series). For more information on using Delay Compensation, see the Pro Tools Reference Guide. To configure the Delay Compensation Engine: 1 Choose Setup > Playback Engine. 2 From the Delay Compensation Engine pop-up menu, select a Delay Compensation setting. 3 Click OK. 48 Pro Tools|HD User Guide Short Allocates minimum DSP resources of Delay Compensation for each channel. This is the most efficient setting for Pro Tools|HD Accel systems. For sessions with only a few plug-ins that do not induce too much delay, this setting should be sufficient. Long Allocates maximum resources for Delay Compensation for each mixer channel. For sessions with a lot of plug-ins resulting in a large amount delay, select this setting. DAE Playback Buffer Size The DAE Playback Buffer Size determines the amount of memory DAE allocates for disk buffers. In addition to levels, the DAE Playback Buffer Size shows values in milliseconds, which indicates the amount of audio buffered when the system reads from disk. The optimum DAE Playback Buffer Size for most disk operations is 1500 msec (Level 2). • DAE Playback Buffer Size settings lower than 1500 msec (Level 2) may improve playback and recording initiation speed. However, a lower setting may make it difficult to play or record tracks reliably with sessions containing a large number of tracks or a high density of edits, or with systems that have slower or heavily fragmented hard drives. • DAE Playback Buffer Size settings higher than 1500 msec (Level 2) allow higher track count, higher density of edits in a session, or the use of slower hard drives. However, a higher setting may increase the time lag when starting playback or recording, or cause a longer audible time lag while editing during playback. Using a larger DAE Playback Buffer Size leaves less system memory for other tasks. The default setting of 1500 msec (Level 2) is recommended unless you are encountering -9073 (“Disk too slow or fragmented”) errors. To change the DAE Playback Buffer Size: • A Cache Size of Large improves performance when using Elastic Audio features, but it also decreases the amount of memory available for other system tasks, such as RTAS processing. Using a larger Cache Size leaves less system memory for other tasks. The default setting of Normal is recommended unless you are encountering -9500 (“Cache too small”) errors. To change the Cache Size: 1 Choose Setup > Playback Engine. 2 From the Cache Size pop-up menu, select a disk cache size. 3 Click OK. 1 Choose Setup > Playback Engine. 2 From the DAE Playback Buffer pop-up menu, se- lect a buffer size. Memory requirements for each setting are shown at the bottom of the Playback Engine dialog. 3 Click OK. If Pro Tools needs more system memory for the DAE Playback Buffer, it will prompt you to restart your computer. Cache Size Plug-in Streaming Buffer Size (Structure Plug-in Only) This setting appears in the Playback Engine dialog only if the Structure sampler instrument plug-in is installed on your system (Structure or Structure Free). The Plug-in Streaming Buffer Size determines the amount of memory DAE allocates for streaming playback from disk with the Structure plug-in. This setting only affects playback if disk streaming is activated in Structure’s plug-in controls. The Cache Size setting determines the amount of memory DAE allocates to pre-buffer audio for playback and looping when using Elastic Audio. For more information on Structure, see the AIR Virtual Instruments Guide. The optimum Cache Size for most sessions is Normal. For more information on Structure Free, see the Audio Plug-ins Guide (Help > Audio Plug-ins Guide). • A Cache Size setting of Minimum reduces the amount of system memory used for disk operations and frees up memory for other system tasks. However, using Elastic Audio features at this setting may decrease performance. Chapter 6: Configuring Your Pro Tools System 49 The optimum Plug-in Streaming Buffer Size for most sessions is 250 ms (Level 2). Optimizing the Plug-in Streaming Buffer Size • Plug-in Streaming Buffer Size settings lower than 250 msec (Level 2) reduce the amount of system memory used for sample playback and frees up memory for other system tasks. However, reliability of sample playback may decrease. (Structure Plug-in Only) • Plug-in Streaming Buffer Size settings higher than 250 msec (Level 2) improve the reliability of sample playback, but they also decrease the amount of memory available for other system tasks, such as RTAS processing. Using a larger Plug-in Streaming Buffer Size leaves less system memory for other tasks. The default setting of 250 ms (Level 2) is recommended unless you are experiencing problems with the reliability of streaming playback from disk. To set Pro Tools to automatically optimize the Plug-in Streaming Buffer Size: 1 Choose Setup > Playback Engine. To change the Plug-in Streaming Buffer Size: 2 Select the Optimize for Streaming Content on Audio Drives option. 1 Choose Setup > Playback Engine. 3 Click OK. 2 From the Plug-in Streaming Buffer Size pop-up menu, select a buffer size. 3 Click OK. 50 This option appears in the Playback Engine dialog only if the Structure sampler instrument plug-in is installed on your system. This option is useful when you are playing samples from the same drive that contains audio for the current session. When this option is selected, Pro Tools automatically optimizes the size of the Plug-in Streaming Buffer to facilitate disk access from both Pro Tools and Structure. The Plug-in Streaming Buffer Size pop-up menu is unavailable when this option is selected. Pro Tools|HD User Guide Configuring Pro Tools Hardware Settings In the Hardware Setup dialog, Pro Tools lets you set the default sample rate and clock source for your system, as well as a range of controls specific to each type of audio interface.) The Hardware Setup dialog can be opened and configured whether or not a Pro Tools session is open. Default Sample Rate The Sample Rate setting appears as the default sample rate when you create a new session. (This setting is available in the Hardware Setup dialog only when no session is open.) You can change the sample rate when creating a new Pro Tools session by selecting a different sample rate in the New Session dialog. To change the default Sample Rate: 1 Choose Setup > Hardware. High Sample Rates and Expanded Systems With 176.4 kHz and 192 kHz sample rates, as many as four Pro Tools|HD cards can be used. Any additional cards (up the total system maximum of seven cards) will switch to Inactive mode. The cards and any attached peripherals will become active again when the sample rate is set to 96 kHz or lower. See the Expanded Systems Guide for more information. Clock Source The Pro Tools Hardware Setup dialog lets you select the Clock Source for the system. Internal If you are recording an analog signal directly into Pro Tools, you will usually use the Pro Tools Internal clock source. External If you are transferring material into Pro Tools from an external digital device, or if you utilize a common house clock signal, you will synchronize Pro Tools to that digital device or common signal. Depending on your audio interface, external options can include AES/EBU [Encl], S/PDIF, Optical [Encl], AES/EBU 1–8, TDIF, ADAT, and Word Clock. For details, see the Pro Tools Reference Guide or the guide for your audio interface. To select the Clock Source: 1 Choose Setup > Hardware. 2 Choose the clock source from the Clock Source pop-up menu. 3 Click OK. Hardware Setup dialog, Main page 2 Choose the sample rate from the Sample Rate pop-up menu. 3 Click OK. Your digital input device must be connected and powered on for Pro Tools to synchronize to it. If your input device is not powered on, leave the Clock Source set to Internal. Chapter 6: Configuring Your Pro Tools System 51 Configuring Audio Interfaces Identifying Audio Interfaces HD I/O, 192 I/O, 192 Digital I/O, 96 I/O, and 96i I/O audio interfaces support sixteen channels of simultaneous I/O in multiple formats (such as analog, AES/EBU, ADAT Optical, S/PDIF, and TDIF). HD OMNI supports up to eight channels of I/O in multiple formats. MADI I/O supports up to 64 channels of I/O. If you have multiple audio interfaces of the same type connected to your system, before you make audio connections to them, you should confirm the identity of each interface. This ensures that you choose the appropriate interface in the Peripherals list when you define its inputs and outputs in the Hardware Setup dialog. The Main page of the Hardware Setup dialog is where you define which physical inputs and outputs on your audio interface are routed to available inputs and outputs in Pro Tools. You can think of this window as a patchbay that allows you to route any of the inputs or outputs on your Pro Tools|HD audio interfaces to channel assignments in the Pro Tools mixer. To identify audio interfaces in your system: 1 Choose Setup > Hardware. 2 From the Peripherals list, select an audio interface connected to your system. 3 Make sure the Main page is shown. 4 Select the Identify option, located in the lower left corner of the Hardware Setup dialog. This illuminates all the LEDs on the front panel of the selected audio interface. 5 Make a note of which interface in your studio setup corresponds to the identified interface. 6 Repeat the above steps for each additional audio interface in your setup. Hardware Setup dialog, Main page The Main page also provides controls for defining whether Expansion Port or Legacy Port peripherals are active (with 192 I/O, 192 Digital I/O, or 96 I/O primary audio interfaces only). Additional pages are available to configure other controls for each audio interface (such as setting operating levels). 52 Pro Tools|HD User Guide Legacy I/Os must be initialized in the Peripherals list before they can be identified. See “Configuring Legacy I/Os” on page 59. To configure Pro Tools|HD audio interfaces: 1 Choose Setup > Hardware. 2 From the Peripherals list, select the Pro Tools|HD audio interface connected to the first card in your system. This will be the interface at the top of the list. 3 Click the Main tab. Press Command+Left or Right Arrow keys (Mac) or Control+Left or Right Arrow keys (Windows) to move though the different pages of the Hardware Setup dialog. You can also press Command (Mac) or Control (Windows) and the number keys (1, 2, 3, 4, or 5) at the top of the QWERTY keyboard to select the corresponding page of the Hardware Setup. For example, press Command+4 (Mac) or Control+4 (Windows) to select the Monitor page for HD OMNI. 4 From the Clock Source pop-up menu, select the appropriate clock source for the interface. In many cases, you will use Internal. The other choices are for resolving Pro Tools to external clock sources. Depending on your audio interface, Clock Source options can include: AES/EBU [Encl], S/PDIF, Optical [Encl], AES/EBU 1–8, TDIF, ADAT, and Word Clock (optional Word Clock rates are available when operating at higher sample rates). 5 If you want to send clock output to other de- vices attached to the audio interface, select the appropriate output from the Ext. Clock Output pop-up menu. If the Legacy I/O Port is enabled (and not the Expansion I/O Port) then the Ext. Clock Output automatically switches to Slave Clock (256x sample rate). To reset the Ext. Clock Output to Word Clock, change the Port Settings back to Expansion I/O, then select the Legacy I/O in the Peripherals list, and set it to No Interface in the Interface pop-up menu. (The HD OMNI, HD I/O, HD MADI, and 96i I/O do not support Legacy I/O.) 6 Select which digital I/O port on your audio in- terface enclosure is active by selecting an option under Digital Format. Depending on the type of interfaces in your system, choices include AES/EBU, S/PDIF, and Optical (S/PDIF). Selecting Optical (S/PDIF) resets the Optical I/O port (which is, by default, eight channels of ADAT Optical I/O) to two channels of S/PDIF Optical I/O. 7 For S/PDIF compatibility with Tascam DA-30 DAT recorders, select the Tascam option under S/PDIF Format. 8 From the Input and Output channel pop-up menus, select the physical ports (such as Analog 1–2 or Optical 1–2), that will be routed to the corresponding Pro Tools input and output channels (such as Ch 1–2, Ch 3–4), listed on the left side of the Main page. Inputs and outputs of similar format are differentiated in the input and output channel popup menus. For example, the AES/EBU inputs and outputs in the HD I/O enclosure are listed as AES/EBU [Encl], while the AES/EBU inputs and outputs on the factory-installed Digital I/O card are listed (in pairs) as AES/EBU 1–2, AES/EBU 3–4, AES/EBU 5–6, and AES/EBU 7–8. For HD I/Os equipped with the optional Digital I/O Card, the additional AES/EBU I/O ports on the optional card are listed as AES/EBU 9–10, AES/EBU 11–12, AES/EBU 13–14, and AES/EBU 15–16. See your peripheral’s guide for configuration details and restrictions. Chapter 6: Configuring Your Pro Tools System 53 9 Configure any specific controls for your audio interface: • “Configuring HD OMNI Controls” on page 54. • “Configuring HD I/O Controls” on page 55. Configuring HD OMNI Controls For detailed information about configuring HD OMNI, see the HD OMNI Guide. To configure HD OMNI in Pro Tools: • “Configuring HD MADI Controls” on page 56. 1 Choose Setup > Hardware. • “Configuring 192 I/O and 192 Digital I/O Controls” on page 57. audio interface. • “Configuring 96 I/O Controls” on page 58. • “Configuring 96i I/O Controls” on page 59. 2 From the Peripherals list, select the HD OMNI 3 Click the Monitor tab and configure the options. When working with HD OMNI, you should always configure the Monitor page first. 10 For additional Pro Tools|HD interfaces, choose the interface in the Peripherals list, and repeat the above steps. See your peripheral’s guide for configuration details and restrictions. For example, the Optical 1–8 channels (on the 192 I/O enclosure) will not be available at session sample rates of 88.2 kHz or higher, while the ports on the 192 I/O Digital I/O card will still be available. HD OMNI Hardware Setup, Monitor page 4 Click the Analog Out tab and configure the op- tions. HD OMNI Hardware Setup, Analog Out page 54 Pro Tools|HD User Guide 5 Click the Analog In tab and configure the options. Configuring HD I/O Controls For detailed information about configuring HD I/O, see the HD I/O Guide. To configure controls for HD I/O: 1 Choose Setup > Hardware. 2 From the Peripherals list, select the HD I/O au- dio interface. 3 Click the Main tab and configure the options. HD OMNI Hardware Setup, Analog In page 6 Click the Main tab and configure the options. HD I/O Hardware Setup, Main page HD OMNI Hardware Setup, Main page 7 Click the Mixer tab and configure the options. 4 If you have at least one HD I/O AD card, click the Analog In tab and configure the options. If you have two HD I/O AD cards, this tab is labeled Analog In 1–8. HD I/O Hardware Setup, Analog In page HD OMNI Hardware Setup, Mixer page 8 When you are finished, click OK. Chapter 6: Configuring Your Pro Tools System 55 5 If you have two HD I/O AD cards, click the An- Configuring HD MADI Controls alog In 9–16 tab and configure the options. For detailed information about configuring HD MADI, see the HD MADI Guide. To configure controls for HD MADI: 1 Choose Setup > Hardware. 2 From the Peripherals list, select either HD MADI Port 1 or HD MADI Port 2 and configure the options. HD I/O Hardware Setup, Analog In 9–16 page 6 If you have at least one HD I/O Digital card, click the Digital tab and configure the options. HD MADI Hardware Setup HD I/O Hardware Setup, Digital page 7 If you have two HD I/O Digital cards, click the second Digital tab and configure the options. 8 When you are finished, click OK. 56 Pro Tools|HD User Guide The settings for HD MADI Port 1 and HD MADI Port 2 are linked, any changes are global regardless of which is selected in the Peripherals list. 3 When you are finished, click OK. Configuring 192 I/O and 192 Digital I/O Controls For detailed information about configuring 192 I/O or 192 Digital I/O, see the 192 I/O Guide. To configure controls for a 192 I/O: 1 With the 192 I/O selected in the Peripherals list, click the Analog In tab for the following options: • You can set your operating level on a channel-by-channel basis by selecting Reference Level +4 dBu or –10 dBV. These settings correspond to two different input connectors on the back of the 192 I/O. Refer to the 192 I/O Guide for more information on setting operating levels. • Each of the analog channels in the 192 I/O has two Input Trims, labeled A and B, for precisely calibrating and switching levels. You can select Input Trim A or B on a channel-by-channel basis. Refer to the 192 I/O Guide for information on setting the rear panel trims. Hardware Setup dialog for 192 I/O, Analog In page 2 Click the Analog Out tab. Each of the analog channels in the 192 I/O has two Output Trims, labeled A and B, respectively. You can select Output Trim A or B on a channel-by-channel basis. Hardware Setup dialog for 192 I/O, Analog Out page • You can select Soft Clip on a channel-bychannel basis. The Soft Clip limiter attenuates the incoming analog signal, providing extra protection from temporary clipping transients that can cause digital distortion when they exceed the maximum input of the unit. With Soft Clip enabled, 192 I/O supports an additional 4 dB of headroom by rounding off the top 4 dB to the clip point. This is useful for eliminating stray transients or for emulating analog tape saturation. Chapter 6: Configuring Your Pro Tools System 57 To configure controls for a 192 Digital I/O or 192 I/O with an optional Digital I/O card: On the 192 Digital I/O or a 192 I/O with an optional Digital I/O card, click the Digital tab to set the Input Format (AES/EBU, TDIF, or ADAT Optical) and enable real-time sample rate conversion (in channel pairs, with the SR Conversion option). • You can set your operating level on a channel-by-channel basis by selecting Reference Level +4 dBu or –10 dBV. Refer to the 96 I/O Guide for more information on setting operating levels. At session sample rates above 48 kHz, sample rate conversion for the TDIF and Optical (ADAT) inputs on the Digital I/O card is automatically enabled on all eight inputs of the selected format. Hardware Setup dialog for 96 I/O, Analog In page 3 Click the Analog Out tab for the following op- tion: • You can set your output level on a channelby-channel basis by selecting Reference Level +4 dBu or –10 dBV. Refer to the 96 I/O Guide for more information on setting operating levels. Hardware Setup dialog for 192 I/O, Digital page Configuring 96 I/O Controls For detailed information about configuring 96 I/O, see the 96 I/O Guide. To configure controls for a 96 I/O: 1 With the 96 I/O selected in the Peripherals list, configure your I/O front panel meters for input or output metering from the Meters pop-up. 2 Click the Analog In tab for the following op- tion: 58 Pro Tools|HD User Guide Hardware Setup dialog for 96 I/O, Analog Out page Configuring 96i I/O Controls For detailed information about configuring 96i I/O, see the 96i I/O Guide. To configure controls for a 96i I/O: 1 With the 96i I/O selected in the Peripherals list, configure your I/O front panel meters for input or output metering from the Meters pop-up. 2 Set input sensitivity by doing the following: • For Inputs 1–4, set the input trim slider to match the output level of the connected instrument. Choices range from –12 dBV to +4 dBu. If you do not know the output level of the device, use the default input trim level, then fine tune the input level sensitivity. • For each input 5–16 being used, select –8 dBV or +4 dBu as appropriate to best match the output level of the connected instrument. 3 Set Output levels (select –10 dBV or +4 dBu). 4 Click Done. To select analog or digital input for channels 1-2: 1 Choose Setup > Hardware, and select 96i I/O in the Peripherals list to display the 96i I/O window. 2 Click to set Ch 1–2 Input to Analog or S/PDIF, as appropriate. The 96i I/O only supports analog and digital switching for channels 1–2, and only from within the Hardware Setup and I/O Setup dialogs. The 96i I/O does not support path remapping within I/O Setup. Configuring Legacy I/Os Before you can configure a Legacy I/O, it must first be initialized in Hardware Setup. To initialize a Legacy I/O on a Pro Tools|HD system: 1 Lower the volume of your output devices. 2 Start up your Pro Tools system (see “Starting Up or Shutting Down Your System” on page 43). Before turning on your Legacy I/O, make sure to lower the volume of your output devices. Very loud digital noise may be emitted before the Legacy I/O is initialized. 3 In Pro Tools, choose Setup > Hardware. 4 From the Peripherals list, choose the primary audio interface (the interface to which your Legacy I/O is connected). Hardware Setup for 96i I/O You can select analog or digital input as sources for 96i I/O channels 1–2. Only channels 1–2 can access the S/PDIF inputs. 5 In the Main page of the Hardware Setup dia- log, select the Legacy I/O option under Port Settings. 6 In the Peripherals list, No Interface is listed twice, directly below the primary audio interface. Click the first No Interface. An Interface pop-menu appears in the Hardware Setup dialog, listing supported I/O choices. Chapter 6: Configuring Your Pro Tools System 59 7 From the Interface pop-up, select the type of Legacy I/O you connected. After you select the type of Legacy I/O, the Main page updates with controls that can be configured. If your Legacy interface does not appear, check connections and repeat from step 1, above. 8 Repeat the above steps for each additional Legacy I/O. 9 Click OK to close the Hardware Setup dialog. For information on Hardware Setup controls for each Legacy I/O, refer to the guide for that interface. To remove a Legacy I/O: 1 Lower the volume of your output devices. 2 Turn off your Legacy I/O. 3 In Pro Tools, choose Setup > Hardware. 4 In the Peripherals list, select the name of a Legacy interface. 5 From the Interface pop-up menu, choose No Interface. 6 Repeat steps 4–5 for each additional Legacy I/O. 7 In the Peripherals list, select the name of the the Pro Tools|HD audio interface to which the Legacy I/O was connected. 8 Select the Expansion I/O option under Port Set- tings. 9 Click OK to close the Hardware Setup dialog. 60 Pro Tools|HD User Guide Offline Peripherals When a Legacy I/O and Pro Tools|HD peripheral are connected to your primary Pro Tools|HD peripheral, only one can be online at a time. An offline peripheral is indicated by brackets in the Peripherals list of the Hardware Setup dialog. For example, if you have a 96 I/O and an 882|20 connected to a 192 I/O, and the 96 I/O is offline, it will appear in the Peripherals list as “[96 I/O].” Peripherals will also go offline if the audio interface or card to which they are attached is made inactive. Configuring I/O Setup The I/O Setup provides a graphical representation of the signal routing for internal mix bussing, output bussing, hardware inserts, and the physical inputs and outputs for each connected audio interface in the form of a cross-point matrix. I/O Setup controls let you route physical ports on the audio interface to Pro Tools input and output channels. The controls for assigning physical inputs and outputs mirror the routing controls in the Hardware Setup dialog—changes made to audio path routing in one dialog are always reflected in the other. The I/O Setup dialog lets you label and map Pro Tools input, output, insert, and bus signal paths. The I/O Setup dialog also provides important audition, meter, and surround monitoring settings. See the Pro Tools Reference Guide for more about I/O Setup. Opening the I/O Setup Dialog I/O Settings Pages The I/O Setup dialog can be opened and configured whether or not a Pro Tools session is open. The I/O Setup dialog provides tabs to open pages for configuring the following I/O Settings: To open the I/O Setup dialog: 1 Make sure your audio interfaces are enabled and configured properly in the Hardware Setup dialog. See “Configuring Audio Interfaces” on page 52. 2 Choose Setup > I/O. Input Configure input signal path names, formats, and source channel (analog or digital). Multichannel input paths (stereo or greater) can have any number of sub-paths. You can have overlapping Input signal paths. Input names, channel widths, and physical input mappings are saved with the system. Output Configure output signal path names and formats. You can have overlapping Output paths. Output names, channel widths, and physical output mappings are saved with the system. Insert Configure insert signal path names, formats, and destinations (audio interface channels). You can have overlapping Insert paths. Insert names, channel widths, and physical input and output mappings are saved with the system. I/O Setup dialog for a Pro Tools|HD system with HD OMNI Closing the I/O Setup Dialog To close the I/O Setup dialog and save changes: Click OK. When you click OK, Pro Tools checks several settings for routing validity (to prevent feedback loops) and notifies you if there is a problem. Bus Configure internal and output bus signal path names and formats, and map output busses to output paths (defined on the Output page). Multichannel busses (stereo or greater) can have any number of sub-paths. Output bus and internal mix bus names and channel widths are saved with the session. Output bus paths to output channel mappings are automatically generated depending on the defined session output bus paths and the available system output channel paths. Mic Preamps Map PRE outputs to an audio interface’s inputs to establish communication between Pro Tools and PRE. PRE channel mappings are saved with the system. To close the I/O Setup dialog without saving changes: Click Cancel. Chapter 6: Configuring Your Pro Tools System 61 H/W Insert Delay Set the amount of Delay Compensation (in milliseconds) for each external device. These times will be used by the Delay Compensation Engine to time align input paths when the hardware insert is in use and Delay Compensation is enabled. The H/W Insert Delay settings are saved with the system. To open any specific I/O Settings page: Click the corresponding tab at the top of the I/O Setup dialog. Press Command+Left or Right Arrow keys (Mac) or Control+Left or Right Arrow keys (Windows) to move though the different pages of the I/O Setup dialog. Default I/O Settings Pro Tools comes with default I/O Setup settings to get you started. You should only need to open the I/O Setup if you want to remap the default I/O paths or if you change your system hardware (for example, adding an expansion card to HD I/O). Also, after customizing the I/O Setup, you can always return to the default settings for an I/O Settings page by clicking the Default button. Customizing I/O Settings When you first install and configure your Pro Tools system, observe the following procedure for customizing your I/O Setup. To customize I/O Settings: 1 Open the I/O Setup (Setup > I/O). 2 In the I/O Setup, click the Input tab. 3 Create input paths with appropriate widths and mapping to physical inputs that match your studio configuration. 62 Pro Tools|HD User Guide 4 Name the input paths (use the default naming scheme if you can). 5 Click the Output tab. 6 Create output paths with appropriate widths and mapping to physical outputs that match your studio configuration. 7 Name output paths using standard industry terminology, such as “Main,” “Cue A,” “Cue B,” and so on (“Recommended Output Path Naming Schemes” on page 66). This will facilitate session exchange with other Pro Tools systems. 8 If you plan on using hardware inserts, click the Insert tab and create insert paths with appropriate widths and mappings to physical inputs and outputs matching your studio configuration. Name insert paths using standard industry terminology if possible, such as “Compressor,” “Reverb,” “EQ,” and so on. 9 If you are using hardware inserts, click the H/W Insert Delay tab. Enter the correct insert delay in milliseconds for each input/output pair that you are using for hardware inserts. 10 If you are using one or more PRE peripherals, click the Mic Preamps tab and configure it accordingly (see the PRE Guide). 11 Click the Bus tab. 12 Ensure that the output busses are mapped to the correct output paths (see “Output Busses” on page 63). 13 Click OK. You should not have to open the I/O Setup again unless you add or remove hardware to or from your system. Output Busses Pro Tools audio outputs—from tracks and sends—are routed to output busses, which in turn are mapped to Pro Tools output paths. Pro Tools output paths are then routed to physical outputs on your Pro Tools audio interfaces. Output busses are in addition to the 128 available internal mix busses. 3 In the New Path dialog, specify the number of new paths you want to create, the channel width for each path, and the path name. New Paths dialog The advantage of output busses is that when you take a session from one system to another, track and send output assignments are maintained within the session and automatically re-map to the available Pro Tools Output channels on the new system where possible. Pro Tools checks the following criteria in order to automatically re-map the output busses when opening a session from another Pro Tools system: • System ID • Path name and format 4 Click Create to create the new paths. Unmapped “MAIN” output bus 5 If necessary, enable Mapping To Output for the Output path. 6 If necessary, select the output path from the Mapping To Output selector. • Path format only Configuring Output Busses Before creating custom output busses, be sure to configure the Output page with the desired number of output paths with the correct channel widths for your needs. To create a new output bus and map it to an output path: 1 If necessary, on the Output page of the I/O Setup, create an output path of the corresponding channel width for the output bus you want to create. 2 On the Bus page of the I/O Setup, click New Mapping the “MAIN” output bus to output path “A 1–2” To map all output busses of the same format to an output path: Option-click (Mac) or Alt-click (Windows) any Mapping To Output selector and select an Output Path (mono or stereo). All mapped output busses of the same format (such as stereo) are all assigned to the same Output Path. For example, you can assign all stereo output busses to output path A 1–2. Path. You can click the Default button to create automatically assigned output busses for each defined output path. Chapter 6: Configuring Your Pro Tools System 63 To map all output busses of the same format to an output path: 1 Do one of the following: • Shift click to select contiguous Output busses. Figure 10 on page 65 shows the signal path from the output of an audio track, through the output bus mapped to a physical output on an HD I/O. – or – Example: • Command-click (Mac) or Control-click (Windows) to select noncontiguous Output busses. 1 Audio is played back from disk and routed 2 Option-Shift click (Mac) or Alt-Shift-click (Windows) the Mapping To Output selector for one of the selected Output busses and select an Output Path (mono or stereo). Only the selected mapped output busses of the same format (such as stereo) are all assigned to the same Output Path. For example, you can assign only the selected stereo output busses to output path A 1–2. To automatically map all output busses of the same format to unique ascending output paths (cascading): Command-Option-click (Mac) or Control-Altclick (Windows) the Mapping To Output selector of the top-most Output path and select the first Output Path. All mapped output busses of the same channel format are automatically assigned to unique Output Path assignments in ascending order. For example, for a stereo output path, Output Bus A 1–2 is assigned to output path A1–2, A 3–4 to A 3–4, A 5–6 to A 5–6, and so on. 64 Signal Path Routing for Audio Output Pro Tools|HD User Guide from the Track Main Output to Output Bus “B 1–2.” The Output Bus is defined on the Bus page of the I/O Setup. 2 On the Bus page of the I/O Setup, the Output Bus “B 1–2” is mapped to Output “B 1–2,” which is defined on the Output page of the I/O Setup. Also, the Bus page is where you can create sub-paths for output busses. 3 On the Output page of the I/O Setup dialog, the Output to which the Bus Output is mapped is routed to physical outputs on your audio interface. 4 The physical outputs on your audio interface that are available to Pro Tools outputs are set on the Main page of the Hardware Setup dialog. 1. 2. 4. 3. Figure 10. Output signal path from an audio track to a physical output Chapter 6: Configuring Your Pro Tools System 65 Recommended Output Path Naming Schemes Generally, you will want to use standard naming schemes for output paths in your Pro Tools sessions. This facilitates session exchange between different Pro Tools systems. Here are some examples of standard industry naming schemes: To route a Pro Tools output channel pair to multiple audio interface output ports: 1 Choose Setup > Hardware. 2 From the Peripherals list, select an interface. 3 Click the Main tab. 4 Select an output pair from an Output pop-up menu. • Main A, Main B 5 Control-click (Mac) or Start-click (Windows) • Studio A, Studio B the same pop-up menu a second time to choose an additional output port pair. • Stereo A, Stereo B • Meter • Monitor • Aux A, Aux B • Cue A, Cue B, Cue C, Cue D, Cue E, Cue F, Cue G, Cue H, Cue I, Cue J The output name updates with a plus sign (“+”) before it to indicate that multiple output ports are selected. In the pop-up menu, each physical port pair assigned to that Pro Tools output pair is indicated by a check mark. • Dial Main, Dial A, Dial B, Dial C, Dial B, Dial E • Efx Main, Efx A, Efx B, Efx C, Efx D, Efx E • Music Main, Music A, Music B, Music C, Music D, Music E Routing a Pro Tools Output Pair to Multiple Destinations Pro Tools channel pairs can be routed to multiple outputs on your Pro Tools|HD audio interface through the Hardware Setup dialog. For example, if you assign both Analog 1–2 and Analog 3–4 interface outputs to Pro Tools Output pair 1–2, when you send a signal to Pro Tools Output pair 1–2, that signal will be routed simultaneously to both pairs of output ports on your audio interface. This lets you send the same signal (such as a stereo pair, a stem mix, or a multichannel mix) to multiple destinations (such as multiple mastering devices). 66 Pro Tools|HD User Guide Hardware Setup dialog for HD OMNI, Main page 6 Repeat the above steps to select additional output destinations. The only limit to output choices is the number of outputs available in your system. Pro Tools output pairs can also be routed to multiple audio interface outputs in the I/O Setup dialog. For more information, see the Pro Tools Reference Guide. Backing Up Your System Configuration After configuring your system and Pro Tools, you should save an image of your system drive using a backup utility such as Bombich Carbon Copy Cloner or Time Machine (Mac) or Acronis True Image or Norton Ghost (Windows). By doing this, you can quickly restore your system configuration and settings if you encounter any problems. Configuring MIDI Setup If you plan to use any MIDI devices with Pro Tools, do one of the following: On Windows, configure your MIDI setup with MIDI Studio Setup. See Appendix C, “Configuring MIDI Studio Setup (Windows Only)” for details. – or – On Mac, configure your MIDI setup with Audio MIDI Setup. See Appendix B, “Configuring AMS (Mac OS X Only)” for details. Chapter 6: Configuring Your Pro Tools System 67 68 Pro Tools|HD User Guide appendix a Hard Drive Configuration and Maintenance It is recommended that you start with a newly formatted external or secondary internal audio drive. You should also periodically defragment your audio drive to ensure continued system performance. Always back up any important data on your drive before formatting it, as it will erase all data on the drive. Avoid Recording to the System Drive Recording to your system drive is not recommended. Recording and playback on a system drive may result in lower track counts or fewer plug-ins. Supported Drive Formats and Drive Types Drive Formats Mac Mac systems should use drives formatted with HFS or HFS+ file system only. HFS drives are supported as Transfer drives only. Windows Windows systems should use drives formatted as NTFS only. Windows systems can also support Mac drives formatted using the HFS+ system (also commonly referred to as Mac OS Extended). See the Pro Tools Reference Guide for more information. Hard drive performance depends on factors including system configuration, number of tracks, session sample rate, density of edits, and the use of crossfades and other processes (such as Beat Detective in a session). For complete hard drive requirements, visit our website (www.avid.com). Appendix A: Hard Drive Configuration and Maintenance 69 SCSI Hard Drives To format an audio drive: Avid recommends qualified SCSI hard drives and a qualified SCSI host bus adapter (HBA) card or (on Windows systems) a qualified built-in SCSI HBA connector on the motherboard. 1 Right-click My Computer and choose Manage. 2 Under Storage, choose Disk Management. For complete information on track count and the supported number and configuration of SCSI drives, visit our website (www.avid.com). FireWire Hard Drives Avid recommends qualified FireWire drives for all systems. On systems without FireWire ports, a qualified FireWire host bus adapter is recommended. For complete information on track count and the supported number and configuration of FireWire drives, visit our website (www.avid.com). SAS, SATA, ATA, and IDE Hard Drives Qualified SAS, SATA, ATA, and IDE hard drives may be used as dedicated audio drives. For complete information on track count with supported hard drives, visit www.avid.com. Disk Management window 3 If the volume is “Healthy,” do the following: Healthy volumes are volumes that have previously been partitioned and formatted. • In the Disk Management window, rightclick the hard drive you will use for audio and choose Format. • In the Format window, name the volume. • Choose a file system. For optimum performance, audio drives should be formatted as NTFS. • Select “Perform a quick format.” Formatting Audio Drives • Make sure “Enable file and folder compression” is not selected. Formatting Windows Audio Drives • Click OK. • Set the Allocation unit size to Default. For optimal performance, audio drives should be formatted as NTFS. 70 Pro Tools|HD User Guide Pro Tools only supports Basic drive types. Do not convert the drive to a Dynamic type. 4 If the volume is “Unallocated,” do the following: • In the Disk Management window, rightclick the hard drive you will use for audio and choose New Partition. To format an audio drive: 1 Launch the Disk Utility application, located in Applications/Utilities. • In the New Partition Wizard window, click Next. • When prompted, select the partition type. Avid recommends using Primary partitions, instead of Extended partitions. • Follow the on-screen instructions to select a partition size and other partition settings. • When prompted, choose a file system. For optimum performance, audio drives should be formatted as NTFS. • Select “Perform a quick format.” • Make sure “Enable file and folder compression” is not selected. • Set the Allocation unit size to Default. • Click OK. Pro Tools only supports Basic drive types. Do not convert the drive to a Dynamic type. Formatting Mac Audio Drives For optimum performance, audio drives should be formatted as Mac OS Extended (Journaled). Disk Utility (Mac OS X) 2 Click the Erase tab. 3 Select the drive you want to initialize in the column on the left side of the window. 4 Choose Mac OS Extended (Journaled). Do not choose the “Case-Sensitive” format option. Pro Tools will not operate properly with case-sensitive formatted drives. 5 Type a name for the new volume. 6 Click Erase. The drive appears on the Desktop with the new volume name. Appendix A: Hard Drive Configuration and Maintenance 71 Partitioning Drives Partitioning creates a logical volume or volumes on a physical drive, almost as if you were creating virtual hard drives. Partitions can then be formatted with the appropriate file system (NTFS for Windows, HFS+ for Mac). The NTFS file system allows drives to be seen as whole volumes. Single Pro Tools audio files cannot exceed 3.4 GB in size. Defragmenting an Audio Drive Mac Systems When working with larger files (such as video), you can limit fragmentation by backing up your important files to another disk, erasing the files from the original hard disk, then copying the files back, instead of doing a defragmentation. Windows Systems Mac OS allows drives larger than 4096 MB to be seen as whole volumes. Drives must be initialized with a disk utility that recognizes the 2 terabyte limit. Single Pro Tools audio files cannot exceed 3.4 GB in size. Seek Times on Partitioned Drives Seek times are actually faster on partitioned drives (assuming that reads and writes are performed on a single partition), since the heads only have to seek within the partition boundaries, rather than the whole capacity of the drive. Smaller partitions perform faster than larger partitions, but this comes at the expense of contiguous storage space. When you partition a drive, you will need to find the compromise that best suits your performance and storage requirements. Avoid distributing audio files within a session over different partitions on the same drive since this will adversely affect drive performance. 72 Pro Tools|HD User Guide Periodically defragment audio drives to maintain system performance. For maximum recording and playback efficiency, data should be written to your hard drive in a contiguous fashion—minimizing the seek requirements to play back the data. Unfortunately, your computer can’t always store the sound files in this way and must write to disk wherever it can find space. In multitrack recording, audio tracks are written in discrete files, spaced evenly across the disk. While fragmentation of individual files may be zero, the tracks may be far enough apart that playback will still be very seek-intensive. Also, the remaining free space on the disk will be discontiguous, increasing the likelihood of file fragmentation on subsequent record passes. Increased fragmentation increases the chance of disk errors, which can interfere with playback of audio, and result in performance errors. Defragmenting Windows Audio Drives To defragment an audio drive: 1 Right-click My Computer (Windows XP) or Computer (Windows 7) and choose Manage. 2 Under Storage, choose Disk Defragmenter. 3 In the Disk Defragmenter window, choose the drive you want to defragment 4 Click the Defragment button and follow the on-screen instructions. When defragmenting is complete, close the Computer Management window. Using Mac Drives on Windows Systems Pro Tools for Windows lets you record and play back sessions directly from a Mac-formatted (HFS+) drive connected to a Windows system. This functionality requires that all Mac session and audio files be stored on Mac-formatted drives. During Pro Tools installation, make sure to select the Mac HFS+ Disk Support option. This option lets your Pro Tools system read, write, record, and play back using Mac-formatted HFS+ disks. For information on sharing sessions between Mac and Windows systems, see the Pro Tools Reference Guide. Formatting and Maintaining HFS+ Drives To format and partition any drives as HFS+, connect the drives to a Mac computer and use the Apple OS X Disk Utility. Hard Disk Storage Space Mono audio tracks recorded with 16-bit resolution at 44.1 kHz (CD quality) require approximately 5 MB of hard disk space per minute. The same tracks recorded with 24-bit resolution require about 7.5 MB per minute. Table 1. Required hard drive space for audio tracks (44.1 kHz and 48 kHz sessions shown) Number of Tracks and Length 16-bit at 44.1 kHz 16-bit at 48 kHz 24-bit at 44.1 kHz 24-bit at 48 kHz 1 mono track, 1 minute 5 MB 5.5 MB 7.5 MB 8.2 MB 1 stereo track (or two mono tracks), 5 minutes 50 MB 55 MB 75 MB 83 MB 1 stereo track (or two mono tracks), 60 minutes 600 MB 662 MB 900 MB 991 MB 24 mono tracks, 5 minutes 600 MB 662 MB 900 MB 991 MB 7 GB 7.8 GB 10.5 GB 11.6 GB 32 mono tracks, 5 minutes 800 MB 883 MB 1.2 GB 1.3 GB 32 mono tracks, 60 minutes 9.4 GB 10.4 GB 14 GB 15.4 GB 24 mono tracks, 60 minutes Appendix A: Hard Drive Configuration and Maintenance 73 74 Pro Tools|HD User Guide appendix b Configuring AMS (Mac OS X Only) Audio MIDI Setup Pro Tools recognizes the ports on your MIDI interface as generic ports. With Mac OS X, you use Apple’s Audio MIDI Setup (AMS) utility to identify external MIDI devices connected to your MIDI interface and configure your MIDI studio for use with Pro Tools. 2 Click the MIDI Devices tab. AMS scans your system for connected MIDI interfaces. If your MIDI interface is properly connected, it appears in the window with each of its ports numbered. To ensure optimum performance, do not change the AMS configuration while Pro Tools is playing back. Stop the Pro Tools transport before launching AMS. To configure your MIDI studio in AMS: 1 Do one of the following: • Launch Audio MIDI Setup (located in Applications/Utilities). – or – • In Pro Tools, choose Setup > MIDI > MIDI Studio. Audio MIDI Setup (MIDI Devices tab) 3 For any MIDI devices connected to the MIDI interface, click Add Device. A new external device icon with the default MIDI keyboard image will appear. 4 Drag the new device icon to a convenient lo- cation within the window. Appendix B: Configuring AMS (Mac OS X Only) 75 5 Connect the MIDI device to the MIDI inter- face by clicking the arrow for the appropriate output port of the device and dragging a connection or “cable” to the input arrow of the corresponding port of the MIDI interface. To configure an external MIDI device: 1 Select the external device icon and click Show Info (or double-click the new device icon). External Device Icon Making MIDI input and output connections 2 Select a manufacturer and model for the new device from the corresponding pop-up menus. (If the Manufacturer and Model pop-up menus do not provide a name for your particular device, you can type a name.) 6 Click the arrow for the appropriate input port of the device and drag a cable to the output arrow of the corresponding port of the MIDI interface. To remove a connection, select the cable and press Delete. Naming a new MIDI device 7 Repeat steps 3–6 for each MIDI device in your MIDI setup. 76 Pro Tools|HD User Guide For Manufacturer and Model names, AMS refers to one or more files with the suffix “.middev” in the directory Root/Library/ Audio/MIDI Devices. Pro Tools installs a file that contains information for many commercially available MIDI devices, named “Digidesign Device List.middev.” If the Manufacturer or Model names for any of your external MIDI devices is not available in the AMS Manufacturer and Model pop-up menus, you can add them by editing the .middev file in any text editor (such as TextEdit). 3 Click the More Information arrow to expand the dialog, then enable the appropriate MIDI channels (1–16) for the Transmits and Receives options. (These determine which channels the device will use to send and receive MIDI.) 4 Click the device image. The window expands to show images for various MIDI devices (such as keyboards, modules, interfaces, and mixers). Select an icon for your device. Selecting a device icon Enabling MIDI channels To use your own custom icons, you can place TIFF image files in /Library/ Audio/MIDI Devices/Generic/Images, and they will appear as choices in the AMS device window. 5 Select a device image and click Apply. 6 Close the AMS window to quit the AMS application. The device names you enter appear as MIDI input and output choices in Pro Tools. Appendix B: Configuring AMS (Mac OS X Only) 77 MIDI Patch Name Support Pro Tools supports XML (Extensible Markup Language) for storing and importing patch names for you external MIDI devices. Pro Tools installs MIDI patch name files (.midnam) for the factory default patch names of many common MIDI devices. These files reside in directories, sorted by manufacturer, in /Library/Audio/MIDI Patch Names/Digidesign. 4 In the Patch Select dialog, click Change. Change button Patch Select dialog To import MIDI patch names into Pro Tools: 1 Verify the MIDI Device name in the Audio 5 In the Open dialog, navigate to /Library/Au- MIDI Setup window (see “Audio MIDI Setup” on page 75). dio/MIDI Patch Names/Digidesign/<name of manufacturer>, and select the MIDI Patch Name file (.midnam) for the MIDI device. 2 Verify the Instrument or MIDI track output is correctly assigned to the MIDI device. 6 Click Open. 3 Click the Instrument or MIDI track Patch Se- lect button. Patch Select button The Patch Select dialog is populated with patch names and the Patch Name Bank pop-up menu appears in the upper left hand corner of the window. Once patch names have been imported into Pro Tools, they are available for that MIDI device in all sessions. To clear patch names: Patch Select button, Edit window Patch Select button Patch Select button, Mix window 78 Pro Tools|HD User Guide In the Patch Select dialog, click Clear, and the click Done. MIDI patch name files (.midnam) can be edited in any text editor, or you can use third-party patch librarian and editor software to create your own custom patch names. appendix c Configuring MIDI Studio Setup (Windows Only) MIDI Studio Setup MIDI Studio Setup (MSS) lets you configure the MIDI controllers and sound modules that are connected to your system, and control the routing of MIDI data between your MIDI equipment and Pro Tools. MSS automatically finds MIDI interfaces, and lets you specify a custom name for each of the MIDI ports within the MIDI Studio Setup document. MIDI Studio Setup Window The MIDI Studio Setup window is organized into three sections. Interface controls are at the top of the window. All the currently defined instruments are displayed in the Instrument Name list on the left side of the window. A detailed view of MIDI parameters is shown in the Properties section on the right. MSS also supports XML-based patch file names for storing and importing patch names for your external MIDI devices. Entire MIDI Studio Setup configurations created within MSS can be imported and exported. MIDI Studio Setup window Appendix C: Configuring MIDI Studio Setup (Windows Only) 79 Interface Controls Properties Section Create Adds a new instrument to the Instrument Name list. The Properties section lets you edit information for new instruments, or instrument currently selected in the Instrument list. Delete Deletes the instrument or instruments selected in the Instrument Name list. Import Imports an existing MIDI Studio Setup file. Export Exports the current MIDI Studio Setup file. Show Duplicate Emulated Ports When this option is selected and you are using a MIDI interface that supports timestamping (such as MIDI I/O), in addition to the MIDI ports on Mbox 2, the MIDI Studio setup window shows both the DirectMusic time-stamped output ports, and non-stamped duplicate emulated output ports. Some MIDI Interfaces will not properly load or unload their drivers unless you quit and re-launch Pro Tools. Check the documentation that came with your MIDI interface for more information. Instrument List The Instrument list contains all the currently defined instruments. Selecting an instrument in the list displays that instrument’s properties in the Properties section of the window. MIDI Studio Setup Properties section When a previously defined instrument is selected in the Instrument list, the Properties section changes to reflect the properties of the selected instrument. To define an instrument with MIDI Studio Setup: 1 Choose Setup > MIDI > MIDI Studio. 2 Click Create. 3 In the Instrument Name field, type the name of your instrument, and press Enter. If you do not enter an instrument name, the Instrument Name field will automatically inherit information from the Manufacturer and Model pop-up menu. 4 Set a manufacturer and model for the new device from the corresponding pop-up menus. If the Manufacturer and Model pop-up menus do not provide a name for your particular device, choose None. 5 From the Input pop-up menu, choose the in- put port on your MIDI interface that is connected to the MIDI Out of your instrument. 80 Pro Tools|HD User Guide 6 From the Output pop-up menu, choose the output port on your MIDI interface that is connected to the MIDI In of your instrument. 7 Enable the appropriate MIDI channels (1–16) for the Send Channels and Receive Channels options (These determine which channels send and receive MIDI.) Instrument Name The Instrument Name field shows the user-definable instrument name for the currently selected instrument. Manufacturer The Manufacturer pop-up menu provides a list of MIDI equipment manufacturers. This list is derived from the XML-based MIDI device files. For more information, see “MIDI Patch Name Support” on page 81. Output Port The Output Port pop-up menu displays a list of available MIDI interface output ports. The port set and displayed here is the port through which MIDI data is sent from your MIDI interface to the MIDI device specified in the Instrument Name field. If you set the output port to None, the defined instrument will not appear as a choice in a MIDI Output Selector. Send Channels The Send Channels grid sets the send channels for the MIDI device specified in the Instrument Name field. Receive Channels The Receive Channels grid sets the receive channels for the MIDI device specified in the Instrument Name field. Model The Model pop-up menu provides a list of MIDI devices, filtered by the manufacturer name. This list is derived from the XML-based MIDI device files provided with your Pro Tools installation. For more information, see “MIDI Patch Name Support” on page 81. Input Port The Input Port pop-up menu displays a list of available MIDI interface input ports. The MIDI interface port that is set and displayed here is the port through which MIDI data is sent from the external MIDI device specified in the Instrument Name field into your MIDI interface. If you set the input port to None, the defined instrument will not appear as a choice in a MIDI Input Selector. MIDI Patch Name Support Pro Tools supports XML (Extensible Markup Language) for storing and importing patch names for your external MIDI devices. Pro Tools installs MIDI patch name files (.midnam) for the factory default patch names of many common MIDI devices. These files reside in directories, sorted by manufacturer, in Program Files\ Common Files\Digidesign\MIDI Patch Names\ Digidesign. To import MIDI patch names into Pro Tools: 1 Verify the MIDI Device name in the MIDI Stu- dio Setup window (see “MIDI Studio Setup” on page 79). 2 Verify the Instrument or MIDI track output is correctly assigned to the MIDI device. Appendix C: Configuring MIDI Studio Setup (Windows Only) 81 3 Click the Instrument or MIDI track Patch Se- lect button. The Patch Select dialog is populated with patch names and the Patch Name Bank pop-up menu appears in the upper left hand corner of the window. Patch Select button Patch Select button, Edit window Patch Select button Patch Select dialog with patch names Patch Select button, Mix window Once patch names have been imported into Pro Tools, they are available for that MIDI device in all sessions. 4 In the Patch Select dialog, click Change. To clear patch names: In the Patch Select dialog, click Clear, and then click Done. Change button Patch Select dialog 5 In the Open dialog, navigate to Program Files\Common Files\Digidesign\MIDI Patch Names\Digidesign\<name of manufacturer>, and select the MIDI Patch Name file (.midnam) for the MIDI device. 6 Click Open. 82 Pro Tools|HD User Guide MIDI patch name files (.midnam) can be edited in any text editor, or you can use third-party patch librarian and editor software to create your own custom patch names. appendix d DSP-Induced Delays in Mixing This appendix provides an overview of DSP-induced mixer delays, and explains how you can compensate for these delays to improve time and phase alignment of audio in complex or critical mixing situations. Introduction to DSP-Induced Delay In all digital systems, DSP processing causes signal delays of varying amounts. These DSP-induced delays can vary from as short as several microseconds to as long as several milliseconds, depending on the type of processing or routing being performed. Do not confuse signal processing-induced delays with monitoring latency or time domain effects processing (such as delay, echo, reverb, and other desirable delay effects). Each plug-in, hardware insert, and mixer assignment on a track delays that track by an amount equal to the total of all DSP-delay factors. In some cases, signal processing delays matter only if you use a real-time TDM plug-in on one channel of a stereo or multichannel signal but not the others. This imparts an unequal amount of delay to the signals on that channel, which subsequently may cause undesirable cancellation of certain frequencies. Audible symptoms of phase issues include comb-filtering and loss of high frequencies. In simple terms, DSP-induced delay can cause audio to arrive at the main output (or a submix output) at different times. To maintain time alignment, you can compensate for DSP-induced delays. When to Compensate You may only really need to compensate for delays between tracks where phase coherency must be maintained (as with instruments recorded with multiple microphones or stereo pairs). If you are working with mono signals, and the accumulated delays are small (just a few samples, for example), you probably do not need to worry about compensating for delays. However, larger sessions with higher track and voice counts, many plug-ins, and/or complex mixer routing can benefit when DSP-induced delays are compensated to maintain phase coherent time alignment. Appendix D: DSP-Induced Delays in Mixing 83 In any session, if you want to maintain absolute time alignment across all tracks you should always compensate for signal processing delays. Delay Compensation should be enabled during playback and mixing so that all tracks’ outputs are correctly time-aligned. Using Delay Compensation Pro Tools provides automatic Delay Compensation for managing DSP delays from plug-in and hardware inserts, and mixer routing (bussing and sends). With Delay Compensation enabled, Pro Tools maintains phase coherent time alignment between tracks that have plug-ins with differing DSP delays, tracks with different mixing paths, tracks that are split off and recombined within the mixer, and tracks with hardware inserts. To maintain phase coherent time alignment, Delay Compensation should always be enabled during playback and mixing. Delay Compensation should also be enabled in most recording situations. For more information on using Delay Compensation, see the Pro Tools Reference Guide (Help > Pro Tools Reference Guide). 84 Pro Tools|HD User Guide appendix e TDM Mixing and DSP Usage Benefits of TDM II TDM (or time division multiplexing) technology is based on the concept of a single, high-speed data highway, or bus that transmits data between your Pro Tools CPU, Pro Tools cards, and the DSP chips on the cards. Pro Tools|HD cards feature enhanced TDM II architecture. The TDM II architecture provides many advantages over the original TDM (or TDM I) architecture in terms of its mixing capacity and flexibility. In TDM systems, individual channels from sources such as audio tracks, sends, or busses are sent out from Pro Tools audio cards, and combined together or multiplexed onto the TDM bus so that all signals can travel simultaneously and can be accessed within a single sample period. At the receiving end, the audio cards can listen to any connection on the bus, and take whatever data they need. The TDM bus runs fast enough to accommodate many audio signals at the same time. Each separate audio signal or stream, takes up a single time slot on this multiplexed bus. One of most powerful features of the TDM architecture is that a single time slot can be used to “broadcast” data to many destinations simultaneously. With TDM II, not only can it send data to many destinations simultaneously, but it can also send signals both bi-directionally and “privately” between DSP chips, which effectively provides a much greater number of available time slots. This provides a greater potential number of connections for routing, processing and mixing audio signals within Pro Tools. TDM II With TDM II, there is a separate TDM I/O bus between each DSP chip on the Pro Tools cards, each with up to 512 bi-directional time slots at a session sample rate of 44.1 or 48 kHz (both between DSPs on each card, and between the DSPs that communicate between cards). The DSP chips are arranged serially, with a TDM I/O bus connecting one chip to the next. This means that every TDM II connection need only use time slots between the two DSPs that are being connected. See Figure 11 on page 86. So, using the same example as above, if an audio track has a Reverb One plug-in insert, a time slot is used between the Engine DSP (sending out the audio track) and the DSP with the Reverb One instance. If the Reverb One insert is handled by a DSP that is physically next to the DSP handling mixing tasks, as shown in the illustration below, this leaves time slot 2 available for use between DSP 3 through DSP 9, and subsequent Pro Tools|HD cards. Appendix E: TDM Mixing and DSP Usage 85 Time slot usage on Pro Tools|HD hardware The maximum consumption of the time slots for a single connection occurs when the audio must be sent between the first and last DSP in the system. In this instance, a time slot between each DSP is used to reach the last DSP in the chain. Figure 11. TDM bus on Pro Tools|HD hardware 86 Pro Tools|HD User Guide Another example of how TDM II is more efficient than TDM I is to imagine a single HD Core card with one Engine chip and two Mixer chips. The DSPs with plug-in instances associated with the first Mixer do not need to communicate with the second Mixer, therefore the time slot numbers used can be re-used by the second Mixer to communicate with other DSPs loaded with other plug-ins. DSP Allocation Digital Signal Processing (or DSP) capability is one of the most powerful elements of your system. The DSP chips in your system provide the real-time processing power for your TDM Mixer and plug-ins. There is a limit, depending on your system, to how many functions a single DSP chip can power at once. This section contains some guidelines for getting the most from your available DSP capacity. Mixing and DSP Usage Pro Tools builds a TDM mixer every time a session is opened. Note that the term “mixer channel” applies to audio tracks (total voiceable tracks), Auxiliary Input tracks, and sends and returns that use any of the 128 internal busses. When you go beyond a certain number of mixer channels, Pro Tools will use another DSP to create additional mixer capacity. Master Faders do not use additional DSP power. DSP Allocation Basics DSP Manager As in the analog world, every send bus or output mix that you use demands that a summing mixer exist for that group. On an analog console, the number of these summing mixers is fixed by the physical layout of the console. In the Pro Tools mix environment, this number is variable, and depends on the number of output mixes or sends that you choose to create. Pro Tools allocates DSP power as it is needed to build the mixers for each session. Pro Tools software includes the DSP Manager, a software component that optimizes the use of DSP capacity on Pro Tools|HD systems. We describe certain mixing or signal processing functions as “using one DSP” or “using two DSPs.” This refers to the fact that there are 9 DSP chips on each HD card. When you have an Pro Tools|HD card in your system, if your current DSP usage is approaching the capacity of the card, and you then try to add a mixer channel or assign a plug-in, the DSP Manager will automatically try to make room for the new mixer or plug-in on the Pro Tools|HD card. It does this by reallocating the existing TDM mixers and plug-ins to use the available DSP capacity on the Pro Tools|HD card as efficiently as possible. Each chip on a card can only power a certain number of processing functions. If you have a single Pro Tools|HD card, and you create a big enough TDM mixer and use enough sends or plug-ins, you will eventually use up or “max out” the DSP capacity of that card. Appendix E: TDM Mixing and DSP Usage 87 Monitoring DSP Usage The System Usage window provides a display of DSP usage. With these indicators as your guide, you can try different mixer setups and different arrangements of plug-ins, sends, and Auxiliary Inputs to maximize your use of available DSP power. Pro Tools HD also maintains a Plug-in and Mixer cache for allocated DSP when closing and opening sessions. While this does not change the time it takes to open the first session after you launch Pro Tools, it does result in being able to open and close all subsequent Pro Tools sessions quickly, especially when using the Revert To Saved command or when opening similarly configured sessions. As long as Pro Tools is running, the DSPs will only be completely purged if you open a session with a different sample rate or one with different Playback Engine settings. CPU (Elastic) Displays the amount of processing activity for Real-Time Elastic Audio processing. Disk Displays the amount of hard disk processing activity. Additional Meters TDM Voices Allocated Displays the total number of TDM voices that can be allocated and the number of voices currently allocated. This includes all voices whether they are allocated explicitly or dynamically, as well as any voices used for routing RTAS processing. TDM Time Slots Used Displays the total number of TDM Time Slots available and the number of TDM Time Slots currently used. DSP Usage (HD Accel Core, HD Core, HD Accel, and HD Process) Displays the percentage of how much of each DSP chip on each Pro Tools|HD card is currently being used for mixer configurations and TDM plug-ins. About Processing Bandwidth Meters in the System Usage window indicate how much of your system’s processing power is being used in processing audio, and when writing and playing back automation. System Activity TDM DSP As these meters approach their limits, native processing and recording, or playback of automation data can be affected. If CPU or PCI Activity are high, a system error may occur. If Disk Activity is high, Pro Tools may miss playback of some automation data during particularly dense periods of activity, such as while using the Bounce to Disk command. Cache DSP Usage System Activity Meters PCI Displays the amount of PCI bus activity. CPU (RTAS) Displays the amount of CPU processing activity for RTAS processing. 88 Pro Tools|HD User Guide System Usage window To monitor the usage of DSP resources during a Pro Tools session: Choose Window > System Usage. DSP Cache Pro Tools HD also maintains a Plug-in and Mixer cache for allocated DSP when closing and opening sessions. While this does not change the time it takes to open the first session after you launch Pro Tools, it does result in being able to open and close all subsequent Pro Tools sessions quickly, especially when using the Revert To Saved command or when opening similarly configured sessions. As long as Pro Tools is running, the DSPs will only be completely purged if you open a session with a different sample rate or one with different Playback Engine settings. When using DSP caching, the System Usage window may not always accurately show the DSP resources your session is currently using. For an accurate display of current DSP usage, you can either disable DSP caching or purge the DSP cache. To enable (or disable) DSP Caching: 1 Open the System Usage window (Windows > System Usage). 2 Click the DSP Cache pop-up menu and select (or deselect) Use DSP Cache. To purge the DSP cache: 1 Open the System Usage window (Windows > System Usage). 2 Click the DSP Cache pop-up menu and select (or deselect) Purge Cache. This refreshes the System Usage display. Another feature available for DSP management is Active and Inactive switching. See the Pro Tools Reference Guide for more information. Setting Up Sessions to Use DSP Efficiently The dynamically configurable mixing environment in Pro Tools lets you make choices based on the type of setup you want to have—such as how many inputs you want for your mixer, how many plug-ins you want to use, or how many sends you need. For example, you could allocate all of your DSP power to create a large mixer with dozens of channels—but you would not be able to use as many busses, sends, or TDM plug-ins. Alternatively, you could create a mixer with a smaller number of mixer channels plus some sends and Auxiliary Inputs for returns, and TDM plug-ins on several tracks. RTAS (Real-Time AudioSuite) plug-ins, as well as AudioSuite plug-ins, do not use DSP and are always available. Refer to the Audio Plug-Ins Guide for more information. You can set up your session by choosing one of the session templates supplied with your system as a starting point, or by building it from scratch. If you are starting from scratch, a good rule of thumb is to start by building your mixer first, since at least one of the DSPs in your system is automatically dedicated to mixing. Start Appendix E: TDM Mixing and DSP Usage 89 with audio tracks, then add sends and Auxiliary Inputs, and finally add plug-ins as available DSP allows. Master Faders do not use additional DSP power. Each Pro Tools|HD card has nine DSPs, which can power a certain number of signal processing tasks. DSP resources are dynamically allocated as the number of mixers and inputs increases. DSP Usage and Mixer Plug-Ins The TDM mixer provides basic building blocks by which applications such as Pro Tools can create a wide variety of mixer configurations. Understanding Mixers Mono and Stereo Pro Tools|HD systems include two types of mixer plug-ins: stereo and surround (both of which are available with dither or without). Pro Tools uses these plug-ins to create “dynamic mixers,” meaning that the mixer size can expand or contract as mix channels are added or deleted in Pro Tools. More channels take up more DSP power from your Pro Tools hardware. This is different from hardware mixing consoles where hardware (analog or digital) creates “fixed” mix configurations consisting of an unchangeable number of master outputs, busses or sends. Each TDM mono or stereo mixer is of the dimensions “N x 2,” meaning that it mixes a variable number of inputs to an output pair. For example: A session with six tracks routed to Output 1–2 would require a single 6 x 2 mixer. If one of the six tracks is assigned to Output 3–4, however, two mixers are required—one 5x2 mixer routed to Output 1–2, and one 1x2 mixer routed to Output 3–4. DSP allocation for mixing in a Pro Tools|HD system is based on the concept of DSP summing mixers. Every send bus or output mix that you use requires that a summing mixer exists for those signals. Every single signal path that is mixed together requires the use of a mixer plugin (whether a main output that goes to hardware, a bus or a send). This is even true for an individual signal that travels from hard disk to an individual hardware output. These individual dynamic mixers are created using the appropriate TDM mixer plug-in (stereo or surround) that is installed in your Plug-Ins folder. An “input” can be an audio track, send, or internal bus connection. Adding an output or bus path (mono or multichannel) adds the requirement for DSP power to mix the signals together. 90 Pro Tools|HD User Guide Multichannel Surround Each Surround mixer can have a variable number of outputs as well as a variable number of inputs. For example, the 7.1 format requires eight outputs. A single mono track assigned to a 7.1 Output or Bus path would require a 1x8 mixer, while one mono and one stereo track assigned to a 7.1 Output or Bus path would require a 3x8 mixer. The important concept here is that every output (whether they are I/O or bus outputs) requires that a mixer exists for that output. This means that creating a send to bus 1 requires that a mixer be created for the bus 1–2 outputs, and that mixer will have one input. Mixing with Sends and Busses Each send will add an input to the destination output pair. For example, a send to output 1 will add another input to the output 1–2 mixer. If the send destination doesn’t already have a mixer for its output pair, then a new mixer will be created. A send to bus 3 will make a 1x2 mixer for bus 3 if no other bus 3 sources have been created yet. In addition, adding a new track and assigning its input to a bus source will create a mixer for that bus pair if there is not one already. For example, creating a new Auxiliary Input track and setting its input to bus 5 will create a 1x2 mixer for bus 5, even if no sources have been created yet. Mixers and DSP Hardware Different mixer plug-ins are available, each of which uses DSP power at slightly different rates on the different audio cards (and their DSP chips), as shown in the following tables. See “Mixer Plug-ins” on page 93. In Pro Tools|HD systems, the number of available mixers per DSP chip is based on the type of card and session sample rate. HD Accel card, Standard mixers Submixing Mixer Sample Rate (kHz) Usage per Chip When the number of channels that must be mixed exceeds the capacity of a single DSP, additional “main” mixers are created automatically, along with summing submixers (which sum together the “main” mixers). The use of submixers allows large mix configurations to be created. Stereo 44.1 and 48 124x2 88.2 and 96 54x2 176.4 and 192 16x2 44.1 and 48 46x6 88.2 and 96 34x6 176.4 and 192 8x6 44.1 and 48 34x8 88.2 and 96 25x8 176.4 and 192 4x8 For example, on a Pro Tools|HD system, when a Stereo mixer running at 44.1 kHz needs to grow to more than 68 inputs, a submixer is created along with another “main mixer” that provides “n” number of inputs beyond 68. Both the original 68x2 mixer and the new “N x 2” mixer which provides additional inputs are routed to a submixer, and its outputs are sent to their final destination (such as Output 1–2 on your main audio interface). Note that any small delays (on the order of a few samples) that are created remain equal between these main mixers because they are summed together by means of submixers, and are not cascaded. The total number of voiceable tracks supported by your particular Pro Tools configuration will ultimately determine the maximum number of channels for your TDM mixer. Surround, 5.1 Surround, 7.1 HD Accel card, Dithered mixers Mixer Stereo Dithered Surround Dithered, 5.1 Sample Rate (kHz) Usage per Chip 44.1 and 48 113x2 88.2 and 96 54x2 176.4 and 192 16x2 44.1 and 48 44x6 88.2 and 96 27x6 Appendix E: TDM Mixing and DSP Usage 91 HD Accel card, Dithered mixers Mixer Surround Dithered, 7.1 Sample Rate (kHz) Usage per Chip 176.4 and 192 8x6 44.1 and 48 34x8 88.2 and 96 20x8 176.4 and 192 4x8 48-Bit Mixing Precision The Pro Tools mixer plug-ins use a register area inside of the DSPs on the hardware to hold a full 48-bits of precision when mixing signals together. This allows a fader to be lowered in level without any loss of resolution. (Even if the fader is lowered almost to the bottom, all 24 of the original 24 bits of the signal are preserved.) Mixer Headroom Use of 48-bit precision when mixing allows the mixer to be designed to provide a very large amount of headroom, which allows the faders on the Pro Tools mixer to be placed in the “sweet spot” position without clipping. Mixer plug-ins provided with Pro Tools|HD systems provide 48-bit precision with 48 dB of headroom. This means that on the “input” side of the bus (where signals are summed together), signals can never clip (even if channel faders are set to a full +12 dB of gain). However, the “output” side of the summing mixer (where the signal is sent in the 24-bit world of a digital output or onto the TDM bus) can clip. You can use a Master fader (which does not “cost” any DSP) to scale the output level of any mix summing point (a bus or physical out- 92 Pro Tools|HD User Guide put). The master fader's meters will tell you if you are clipping the mix bus, and the fader can be used to safely scale the level to avoid clipping, with no loss of quality. If you are mixing larger numbers of signals together, always use a master fader so that you can monitor levels for the bus (using the master fader meter), and to trim the result to avoid clipping. Since Master faders cost no DSP, there is no reason not to use them. Note that clipping the “input” side of a mixer is not a concern on Pro Tools|HD systems. It is virtually impossible to clip the input of any Pro Tools|HD mixer plug-in, because the 48 dB of headroom provided prevents any possibility of overload, even with a maximum number of inputs being fed by full-code signals with fader gains at maximum. While it is possible to clip the “output” side of the mixer, you can safely use a Master Fader to trim your mix bus back to avoid clipping (by simply examining the Master Fader meter for clipping, and pulling back the fader until it disappears; make sure that any plug-ins you may have on the Master Fader inserts are not the cause as well). The 48-bit precision of the mixer allows gain adjustment on the Master Fader with no loss of data integrity or audio quality, so there is no need to trim the individual input faders back to avoid clipping. Mixer Automatiion Volume automation on all mixer versions is near sample-accurate (as is pan automation on the stereo versions). In addition, DAE provides 24-bit interpolated values between mix breakpoints, which provides near “analog-like” resolution. This process of interpolation means that a smooth “data series” is created between any two breakpoints that you specify in Pro Tools. DAE calculates these smooth transitions on the DSP hardware with 24-bit precision, which pro- vides extremely smooth volume changes. In addition, DAE “de-zippers” any “live input” to the mixer so that fast, real-time fader changes that come in from fader movements (on the Pro Tool user interface or control surfaces), do not cause audible artifacts as the mixer tries to “catch up” to fast changes that it receives. Stereo and Surround Dithered Mixers The Stereo Dithered and Surround Dithered mixer plug-ins provide non-correlated dither in addition to other basic attributes of the mixers described above. Every output summing point (whether to an internal bus or an physical output) is dithered in these mixers. This technique is used to avoid any possibility of audible artifacts caused by truncation of extremely low level data that occurs when signals pass from the 48-bit world of a TDM mixer to the 24-bit world of a TDM bus connection or a hardware output. Any material that is truncated, lies below –144 dBFs (reflecting 24-bit of dynamic range). There is dissension in the audio community as to whether or not artifacts that fall within this area are actually audible in some way. (The normal dynamic range of human hearing is generally accepted to fall within a range of around 120 dB, from the threshold of audibility to the threshold of pain.) Avid has developed a mixer that provides all of the benefits of the standard stereo and surround mixer plug-ins, but also provide uncorrelated dither on any summed output. This provides a steady dither “noise floor” at extremely low level, which causes any truncation artifacts to be converted into steady white noise. However, the addition of uncorrelated dither requires more DSP horsepower. As a result, the channel in- stance count from the dithered versions of the mixers is around 15% lower (or more) than the non-dithered standard versions (this varies with sample rate and mixer type). For this reason, we offer both types of mixer plug-in. You may want to use the standard nondithered mixer in most applications because of its greater efficiency (allowing you to mix more channels without running out of DSP power), or the dithered mixer because of its theoretical advantages. A Note About Dithering to 16-Bit and Dither Plug-ins The Dithered mixers provide 24-bit dither at their summing points. When creating a final mix that results to 16-bits (for example, for CD mastering), final dithering should still be handled by plug-ins that provide dither. To properly dither the final mix result, insert a dither plug-in on the post-fader inserts of a Master fader. Details about dither and proper usage of the dither plug-ins can be found in the Pro Tools Reference Guide. Mixer Plug-ins Pro Tools|HD systems come with four different mixers: Stereo, Surround, Stereo Dithered, and Surround Dithered. The standard Stereo and Surround Mixer plugins are installed by default. When you run your Pro Tools Installer, a copy of the Stereo Dithered and Surround Dithered mixers are placed in the folder “Plug-ins (Unused).” Appendix E: TDM Mixing and DSP Usage 93 Plug-in Features Switching Mixer Plug-ins Standard Surround and Stereo Mixers To switch TDM Mixer plug-ins: Both the Surround and Stereo Mixer plug-ins provide the following: • 24-bit digital output, from an audio interface output or Bounce to Disk. Mix level scaling stores 48-bit results, using a 56-bit accumulator for maximum precision. • 48 dB of mix headroom. • Output clip indication. • Multichannel mixing formats for surround (Surround Mixer only). Surround Dithered and Stereo Dithered Mixers Both the Surround Dithered and Stereo Dithered Mixer plug-ins provide the following: 1 Quit Pro Tools. 2 Do one of the following: • On Windows systems, open the “Plug-ins (Unused)” folder (Program Files\ Common Files\Digidesign\DAE). – or – • On Mac systems, open the “Plug-ins (Unused)” folder on your Startup drive (Library/Application Support/Digidesign). 3 Locate the Mixer plug-in that you want to use, and drag it to the Plug-ins folder. 4 Open the “Plug-ins” folder, locate the Mixer plug-in version that you no longer want to use, and drag it to the “Plug-ins (Unused)” folder. 5 Launch Pro Tools. • The same features as the standard Pro Tools|HD Stereo and Surround mixers, with the addition of non-correlated dither to any output or bus send. When using Dolby Digital encoders or Dolby E, you can only use the non-dithered mixer. The Dithered mixer will not allow proper playout of Dolby Digital or Dolby E out of an output. Mixer Usage Guidelines The following conditions apply to mixing with Pro Tools|HD systems. One DSP chip is automatically dedicated to mixing in the TDM environment. As you reach the basic mixer limits for a single DSP chip, the system will automatically begin allocating DSP resources from another chip (if available), making it unavailable for plug-ins. Each bus or send connection requires DSP to mix signals. This means that each send or Auxiliary Input that you create will require DSP power to mix the results. 94 Pro Tools|HD User Guide DSP Usage with TDM Plug-Ins To get the best results when using TDM plugins, keep in mind the following guidelines Pro Tools|HD systems use MultiShell™ technology, that lets any MultiShell compatible plug-in share DSP chips HD cards. Up to five types of MultiShell compatible plug-ins can share a single DSP chip. Refer to the Audio Plug-Ins Guide for details on MultiShell plug-ins. Stereo DSP plug-ins generally use up twice as much DSP as mono plug-ins. Master Faders do not require additional DSP. Use them freely to control submix levels, send/bus output levels, and the master output level of your session. The session templates provided with your system include several useful preconfigured session setups that make efficient use of DSP resources. If your computer has unused slots, you can always increase your available DSP resources by adding additional HD cards to your Pro Tools|HD system. Appendix E: TDM Mixing and DSP Usage 95 96 Pro Tools|HD User Guide appendix f Troubleshooting Backing Up Your Work It is highly recommended that you back up your work on a regular basis, and especially before making changes to your system configuration. Backing Up Your Session Data Back up your session and audio data frequently. There are a variety of media that are suited to back up projects of various sizes, from automated tape backup systems to high-capacity optical drives, to CD/DVD burners. The best way to back up an entire session is to use the Save Copy In command. This command lets you save the session file and all of its associated files to a new location. You can also use the Auto Save Backup feature (in the Operation Preferences page) to have Pro Tools automatically save backups of the session file while you work. Backing Up Your System Configuration After configuring your system and Pro Tools, you should save an image of your system drive using a backup utility such as Norton Ghost (Windows) or Bombich Carbon Copy Cloner (Mac). By doing this, you can quickly restore your system configuration and settings if you encounter any problems. Common Issues Pro Tools Won’t Launch Problem When you double-click the Pro Tools application or a Pro Tools session file, Pro Tools doesn’t launch, or displays an error message. Possible Solutions Check to be sure your computer has the required amount of RAM to launch Pro Tools. visit www.avid.com. Try a complete restart. Turn off your audio interfaces, computer peripherals and your computer, and then turn them on again in the proper sequence. Appendix F: Troubleshooting 97 If you tried to launch Pro Tools by doubleclicking a Pro Tools session file, do the following: • Close any error message. • Double-click the Pro Tools application. • In Pro Tools, choose File > Open Session to open the session. Reinstall the Pro Tools application, using the Pro Tools Installer disc. Audio Interface Is Not Recognized Problem When you launch Pro Tools it does not recognize an audio interface, or a connected audio interface is not available. Possible Solutions Turn off your computer and check to be sure your cables are properly and securely connected to your computer and to your audio interface. Verify that your Hardware Setup dialog settings are correct. If you only have one interface, make sure it is connected to the HD Core card. Make sure Loop Sync, SuperClock or other synchronization connections to your audio interface are correct. Disconnect the clock source from the interface and see if the problem persists. Checking Your System with DigiTest Before you use Pro Tools, you may want to run the DigiTest diagnostic application to ensure that all Pro Tools|HD cards in the system are recognized, installed in the proper order, and have valid TDM FlexCable connections. The DigiTest utility performs diagnostic tests on the Pro Tools cards in your system. If DigiTest reports that any of your cards have failed, click the Info button next to that card. Write down the information that appears and report it to your local dealer or to Avid Customer Success. Running DigiTest DigiTest is installed with Pro Tools and resides in the following folder on your hard drive: Digidesign/Pro Tools/Pro Tools Utilities. Before you run DigiTest, lower the volume of all output devices. Very loud digital noise may be emitted during the test. For more information on the DigiTest application, see the DigiTest Guide. To run DigiTest: 1 Quit Pro Tools if it is running. 2 Lower the volume of all output devices on your system. 3 Locate and double-click the DigiTest icon on your hard drive. DigiTest opens and lists the supported cards it finds in your system, showing their corresponding slot locations. 98 Pro Tools|HD User Guide If you have a large number of cards or audio interfaces, it may take a while for the DigiTest window to appear, as DigiTest scans for all cards and interfaces connected to the system. The more cards and audio interfaces in your system, the longer the test will take. 6 When prompted, power cycle all Pro Tools pe- ripherals in your system. Click Continue. 7 To test the interfaces connected to your sys- tem, check “Test I/O Box.” LEDs on your digital interfaces may light up during this test. This is normal. 8 When the test is finished, you can view the test results by doing one of the following: • Click the Get Results button next to a card name. • Click the Results tab and choose a card slot from the pop-up menu. 9 In the Results page of the DigiTest window, click Show Failures Only to display failed tests for the selected card, or click Show All Results to display all test results for the selected card. For descriptions of error codes, see “DigiTest Error Codes” on page 100 DigiTest main test window The order in which cards are listed within DigiTest may not match the actual slot locations of cards installed in your computer or expansion chassis. This is normal, and does not affect DigiTest operations in any way. 4 Select the cards in your system you want to test by selecting Test in the left hand column for each card. 10 Click Quit to close DigiTest. 11 Restart your computer. Errors and Undetected Cards Complete the steps below if any of the following occur: DigiTest fails to launch. An error message has been displayed for a card in DigiTest. 5 Click Run. If cards are not installed in the proper order, DigiTest will display error codes in the Status box of each card identified as being misconfigured. A supported card is installed but not automatically detected during DigiTest. Appendix F: Troubleshooting 99 If a supported card is installed and is not automatically detected: 1 Quit DigiTest. DigiTest Error Codes DigiTest Error Codes Code Description Err3 Cards from different Pro Tools systems are incorrectly mixed. See the configuration chapters. Err4 Cards marked with this error are installed in the wrong order. See the configuration chapters. Err5 Too many cards of this type are installed in the system. Visit our website for compatibility information. Err6 A card is installed in a reserve slot. For example, a Pro Tools|HD card is installed in the slot reserved for the Expansion Chassis Host Interface card. Refer to the configuration chapters, as well as related installation guides. Err1220 SCSI Accelerator card is installed in the wrong slot. See the configuration chapters for correct location of the card. Err1221 Expansion Chassis Host Interface card is installed in the wrong slot. See Expanded Systems Guide for correct location of the card. 2 Turn off the entire Pro Tools system. 3 Reinstall the Pro Tools|HD cards. 4 Check the card seating. 5 Check the TDM FlexCable connections. Check the orientation of the cable from card to card (ports B to A), and check the integrity of the FlexCable connections to the cards. 6 Turn on the system. 7 Run DigiTest again. 100 Pro Tools|HD User Guide Identifying Pro Tools|HD Cards with DigiTest Updating Audio Peripheral Firmware with DigiTest You can use DigiTest to identify which cards are in which slots in your system. This is especially useful if you have multiple Pro Tools|HD cards of the same type installed in your system. If firmware updates are available for any of your Pro Tools|HD audio interfaces (HD I/O, HD OMNI, HD MADI, 192 I/O, 192 Digital I/O, 96 I/O, or 96i I/O), you can use DigiTest to perform the update. Within DigiTest, the Firmware Update page tells you the firmware version for the selected peripheral and lets you update to a newer version, if necessary. To identify Pro Tools|HD cards with DigiTest 1 Quit Pro Tools if it is running. 2 Locate and double-click the DigiTest icon on your hard drive. To update the firmware in a Pro Tools|HD audio interface: DigiTest opens and lists the supported cards it finds in your system. 1 Quit Pro Tools if it is running. 3 Open your computer case or expansion chas- 2 Locate and double-click the DigiTest applica- sis so you can see the top edge of the cards installed in your system. tion on your hard drive. 3 Click the Firmware tab. 4 In the DigiTest window, select the ID check 4 Choose a card slot from the pop-up menu. If box next to a card name. The green LED near the top edge of the corresponding card flashes. any Pro Tools|HD audio interfaces are connected to the card, the Primary or Secondary options will become available in the HD Peripheral section of the Firmware page. Viewing Card Information with DigiTest DigiTest can display identifying information such as serial number, date of manufacture, and firmware ROM version for each card in your system. This information is useful if you need to contact Avid Technical Support about your Pro Tools hardware. To display information for a card in your system: If any connected interfaces are not recognized, check the connections and power to each interface and click Re-Scan. 5 Under HD Peripheral, select Primary or Second- ary to view the firmware version for the corresponding interface. The firmware version is displayed just below the HD Peripheral section of the Firmware page. 1 Quit Pro Tools if it is running. 6 If the firmware version is not current, click Be2 Locate and double-click the DigiTest icon on your hard drive. 3 Click the Slot Info tab. 4 Choose a card slot from the pop-up menu. gin Update to update the firmware in the selected audio interface. The status of the firmware update process is displayed in the status area at the bottom of the Firmware page. 7 After the update process is complete, click Quit to close DigiTest. Appendix F: Troubleshooting 101 Performance Factors There are several conditions that may adversely affect the performance of Pro Tools. These include: Network Connections Close any network connections unless you are using them for network interchange of audio data. Background Applications Any software utilities that run in the background or generate disk activity, such as virus protection, disk optimization, or file savers, should be turned off or removed. Screen Savers Screen saver software should be completely disabled on your computer before running Pro Tools. Power Saver Features Some automatic power saver features, such as those that spin down the system hard drive, can affect Pro Tools performance. These features should be turned off. Gather Important Information Avid wants to help you resolve problems as quickly and efficiently as possible. If you have the following information handy when you contact Customer Success (technical support), it will make the diagnosis of your problem easier. Take a few minutes to collect the following basic information: System Information Computer • Make, model, processor speed • Amount of system RAM • Operating system (version of Windows or Mac OS) • Any Drivers, Disk Utilities, or other systemrelated applications you may have installed Hardware • Type of cards, interfaces, or peripherals • Where the cards are installed • PCIe card order in computer or chassis • Interfaces connected to each card Before You Call Avid Customer Success Hard Drives • Make, Model Register Your System • Drive size (GB) • Drive speed (RPM) Register your purchase immediately after reviewing the Registration Information Card included with every Pro Tools system. Registering your purchase is the only way you become eligible to receive information about technical support and future upgrade offers. • Drive type (SCSI, FireWire, IDE/ATA) • Utility used to format the drive • Number and size of partitions on the drive Software • Pro Tools software version • Plug-in versions • Other Avid software • Additional plug-ins from Avid Development Partners 102 Pro Tools|HD User Guide Other Hardware Refer to the manufacturer’s documentation for operational details. The most common hardware additions include: • SCSI host bus adapter (HBA) cards (manufacturer, model, settings) • 1394 (FireWire) cards for Windows systems (manufacturer, model) • Expansion Chassis (manufacturer, model, bridge chip type) • Video Capture cards (manufacturer, model) To verify that your hardware is qualified for use with your system, visit www.avid.com. Other Software If you are using other audio or video applications, refer to the manufacturer’s documentation for operational details. Make note of any other software that was running when a problem occurred. Diagnostic Information DigiTest If you run DigiTest, be sure to make a note of any error codes or messages it generates. Other Information Note any DAE errors or other error codes you encounter. Additionally, note the ability to reproduce the problem under different conditions, for example, with another session, or after changing settings (such as the Hardware Buffer Size). Appendix F: Troubleshooting 103 104 Pro Tools|HD User Guide appendix g Resources Whether you are new to Pro Tools or just starting out with your new system, we encourage you to read and utilize the many guides that Pro Tools provides. There are also useful online resources available, giving you everything from Pro Tools tips to Pro Tools answers. Pro Tools|HD User Guide This Pro Tools|HD User Guide provides detailed instructions for setting up and configuring Pro Tools|HD hardware and software for optimum performance. Pro Tools Reference Guide About the Pro Tools Guides In addition to any printed guides included with your system, PDF versions of the printed guides and many additional Pro Tools guides and Read Mes are installed automatically during Pro Tools installation. PDFs of the Pro Tools guides are located in the /Digidesign/Documentation folder on your local drive. Printed copies of the Pro Tools Reference Guide and other guides in the Pro Tools guide set can be purchased separately from the Avid Store (http://shop.avid.com). The Pro Tools Reference Guide (printed copy available separately) provides detailed descriptions of all Pro Tools software features, as well as helpful workflows for performing tasks in Pro Tools (a PDF only copy is available from with Pro Tools: Help > Pro Tools Reference Guide). Expanded Systems Guide The Expanded Systems Guide (PDF only) provides instructions for expanding a Pro Tools|HD system with additional Pro Tools|HD cards and audio interfaces, with or without an expansion chassis. Appendix G: Resources 105 Guides Accessible in Pro Tools PDF versions of the main Pro Tools guides are accessible from the Pro Tools Help menu. These include: • Pro Tools Shortcuts, provides a complete list of keyboard and Right-click shortcuts for Pro Tools. • Audio Plug-ins Guide, describes the audio plugins included with Pro Tools for both real-time and file-based audio processing as well as many other paid plug-in option offered from Avid. • Pro Tools Menus Guide, covers all the Pro Tools on-screen menus. • Pro Tools Reference Guide, provides detailed information about Pro Tools features and usage. The Avid website (www.avid.com) is your best online source for information to help you get the most out of your Pro Tools system. The following are just a few of the services and features available. Product Registration Register your purchase online. Support and Downloads Contact Avid Customer Success (technical support); download software updates and the latest online manuals; browse the Compatibility documents for system requirements; search the online Knowledge Base or join the worldwide Pro Tools community on the User Conference. Documentation Installed Automatically with Pro Tools Training and Education Study on your own using courses available online or find out how you can learn in a classroom setting at a certified Pro Tools training center. When you install Pro Tools, you get useful PDF versions of many Pro Tools guides and Read Mes. This documentation can be found in the following locations: Products and Developers Learn about Avid products; download demo software or learn about our Development Partners and their plug-ins, applications, and hardware. Mac Applications/Digidesign/Documentation News and Events Get the latest news from Avid or sign up for a Pro Tools demo. Windows C:\Program Files\Digidesign\Documentation To view or print PDF guides, you can use Adobe Reader or Apple Preview (Mac only). Read Me Files These contain late-breaking information and known issues pertaining to Pro Tools software and hardware configurations. Read Me files are installed in Documentation folder when you install Pro Tools. 106 About www.avid.com Pro Tools|HD User Guide appendix h Compliance Information Environmental Compliance Disposal of Waste Equipment by Users in the European Union Proposition 65 Warning This product contains chemicals, including lead, known to the State of California to cause cancer and birth defects or other reproductive harm. Wash hands after handling. Perchlorate Notice This product may contain a lithium coin battery. The State of California requires the following disclosure statement: “Perchlorate Material – special handling may apply, See www.dtsc.ca.gov/hazardouswaste/perchlorate.” This symbol on the product or its packaging indicates that this product must not be disposed of with other waste. Instead, it is your responsibility to dispose of your waste equipment by handing it over to a designated collection point for the recycling of waste electrical and electronic equipment. The separate collection and recycling of your waste equipment at the time of disposal will help conserve natural resources and ensure that it is recycled in a manner that protects human health and the environment. For more information about where you can drop off your waste equipment for recycling, please contact your local city recycling office or the dealer from whom you purchased the product. Recycling Notice Appendix H: Compliance Information 107 EMC (Electromagnetic Compliance) Australian Compliance Avid declares that this product complies with the following standards regulating emissions and immunity: • FCC Part 15 Class A • EN55103-1 E4 • EN55103-2 E4 • AS/NZS 3548 Class A • CISPR 22 Class A Canadian Compliance FCC Compliance for United States This Class A digital apparatus complies with Canadian ICES-003 Radio and Television Interference This equipment has been tested and found to comply with the limits for a Class A digital device, pursuant to Part 15 of the FCC Rules. Avid Cet appareil numérique de la classe A est conforme à la norme NMB-003 du Canada CE Compliance (EMC and Safety) DECLARATION OF CONFORMITY We, Avid, 2001 Junipero Serra Boulevard Daly City, CA 94014-3886, USA 650-731-6300 declare under our sole responsibility that the product HD Accel, HD Accel Core, HD Core, or HD Process complies with Part 15 of FCC Rules. Operation is subject to the following two conditions: (1) this device may not cause harmful interference, and (2) this device must accept any interference received, including interference that may cause undesired operation. Communication Statement NOTE: This equipment has been tested and found to comply with the limits for a Class A digital device, pursuant to Part 15 of the FCC Rules. These limits are designed to provide reasonable protection against harmful interference in a residential installation. This equipment generates, uses, and can radiate radio frequency energy and, if not installed and used in accordance with the instructions, may cause harmful interference to radio communications. However, there is no guarantee that interference will not occur in a particular installation. If this equipment does cause harmful interference to radio or television reception, which can be determined by turning the equipment off and on, the user is encouraged to try and correct the interference by one or more of the following measures: • Reorient or locate the receiving antenna. • Increase the separation between the equipment and receiver. • Connect the equipment into an outlet on a circuit different from that to which the receiver is connected. • Consult the dealer or an experienced radio/TV technician for help. Any modifications to the unit, unless expressly approved by Avid, could void the user's authority to operate the equipment. 108 Pro Tools|HD User Guide Avid is authorized to apply the CE (Conformité Europénne) mark on this compliant equipment thereby declaring conformity to EMC Directive 89/336/EEC and Low Voltage Directive 2006/95/EEC. Safety Compliance Safety Statement This equipment has been tested to comply with USA and Canadian safety certification in accordance with the specifications of UL Standards: UL60065 7th /IEC 60065 7th and Canadian CAN/CSA C22.2 60065:03. Avid Inc., has been authorized to apply the appropriate UL & CUL mark on its compliant equipment. Warning 12) For products that are not rack-mountable: Use only with a cart, stand, tripod, bracket, or table specified by the manufacturer, or sold with the equipment. When a cart is used, use caution when moving the cart/equipment combination to avoid injury from tip-over. 13) Unplug this equipment during lightning storms or when unused for long periods of time. 14) Refer all servicing to qualified service personnel. Servicing is required when the equipment has been damaged in any way, such as power-supply cord or plug is damaged, liquid has been spilled or objects have fallen into the equipment, the equipment has been exposed to rain or moisture, does not operate normally, or has been dropped. 15) For products that are a Mains powered device: The equipment shall not be exposed to dripping or splashing and no objects filled with liquids (such as vases) shall be placed on the equipment. Warning! To reduce the risk of fire or electric shock, do not expose this equipment to rain or moisture. 16) For products containing a lithium battery: CAUTION! Danger of explosion if battery is incorrectly replaced. Replace only with the same or equivalent type. Important Safety Instructions 17) The equipment shall be used at a maximum ambient temperature of 40° C. 1) Read these instructions. 2) Keep these instructions. 3) Heed all warnings. 4) Follow all instructions. 5) Do not use this equipment near water. 6) Clean only with dry cloth. 7) Do not block any ventilation openings. Install in accordance with the manufacturer’s instructions. 8) Do not install near any heat sources such as radiators, heat registers, stoves, or other equipment (including amplifiers) that produce heat. 9) Do not defeat the safety purpose of the polarized or grounding-type plug. A polarized plug has two blades with one wider than the other. A grounding type plug has two blades and a third grounding prong. The wide blade or the third prong are provided for your safety. If the provided plug does not fit into your outlet, consult an electrician for replacement of the obsolete outlet. 10) Protect power cords from being walked on or pinched particularly at plugs, convenience receptacles, and the point where they exit from the equipment. 11) Only use attachments/accessories specified by the manufacturer. Appendix H: Compliance Information 109 110 Pro Tools|HD User Guide index Numerics 1622 I/O 8 16-channel peripheral cable adapter 20 192 Digital I/O 7, 57, 58 192 I/O 6, 57, 58 24-bit ADAT Bridge I/O 8 882|20 I/O 8 888|24 I/O 8 96 I/O 7, 58 96i I/O 8, 59 A Accel Core (for PCIe) 3 allocating DSP 87, 89 ASIO driver (Windows) 30 audio connections 39 audio drivers ASIO driver (Windows) 30 Core Audio driver (Mac) 23 WaveDriver (Windows) 30 audio interfaces connecting 16 connection 17 firmware (Windows) 101 heat and ventilation 17 Legacy 8 Audio MIDI Setup (AMS) (Mac) 75 automatic delay compensation 48 Auxiliary Inputs and DSP usage 94 C C|24 9 Cache Size 49 Clock Source 51 Command|8 9 connecting digital recorders 39 Pro Tools cards 15 SMPTE synchronization devices 41 Core Audio driver (Mac) 23 CPU Usage Limit 45, 46 D DAE Playback Buffer Size 48 DAT recorder connecting to Pro Tools 39 D-Command 9 D-Control 9 Delay Compensation 48, 84 enabling 84 Demo session Mac 24 Windows 31 DigiSerial port 3 digital signal processing (see DSP) DigiTest 98 troubleshooting 99 drive formatting Mac 71 Windows 70, 71 drive maintenance 69 drive requirements 9 DSP 87 allocating 87, 89 and Auxiliary Inputs 94 and Master Faders 95 and mixing 87 and TDM plug-ins 95 monitoring usage 89 DSP Cache 89 DSP delays 83 automatic compensation 48 DSP Manager 87 Index 111 E Energy Saver (Mac), turning off 25 error codes DigiTest 99 error suppression 46 Ext. Clock Output 53 Ignore Errors During Playback/Record option 46 installing Pro Tools 21, 27 installing Pro Tools|HD cards 12, 14 installing QuickTime (Windows) 29 J journaling (Mac), enabling 26 F firmware audio interfaces (Windows) 101 H hard drives drive formats 69 formatting 70, 71 IDE/ATA requirements 70 maintenance 69, 72 partitioning 72 requirements 9 SCSI requirements 70 space requirements 73 Hardware Buffer Size 44 Hardware Setup Ext. Clock Output 53 HD Accel (for PCIe) 3 HD I/O 5 Analog Expansion cards 5 analog I/O 5 configurations 5 Digital Expansion cards 5 Digital I/O 5 synchronization 5 HD MADI 6 HD OMNI 4 analog I/O 4 configuring Hardware Setup 54 digital I/O 4 features 4 monitoring 4 synchronization 5 Host Engine 46 Host Processors setting 45 I I/O Setup 60 dialog 61 IDE/ATA requirements 70 112 Pro Tools|HD User Guide L latency Hardware Buffer Size 44 Legacy I/Os 59 M Master Faders and DSP usage 95 MIDI connections 40 setup (Mac) 75 setup (Windows) 79 MIDI I/O 9 MIDI Studio Setup (MSS) (Windows) 79 Mixer plug-ins 93 mixing and DSP usage 87 MultiShell 95 N network cards (Windows), disabling 33 Number of Voices setting 47 P partitioning hard drives 72 Peripherals list 52 phase 83 Playback Engine CPU Usage Limit 46 H/W Buffer Size 44 Host Processors setting 45 Plug-in Streaming Buffer 50 Plug-in Streaming Buffer Size 49 plug-ins Host Processors setting 45 multiprocessors 45 power management settings (Windows) 32 PRE 9 Pro Tools capabilities 2 configuration 44 demo session (Mac) 24 demo session (Windows) 31 installing 21, 27 launching (Mac) 22 launching (Windows) 29 preferences 28 removing (Mac) 24 removing (Windows) 31 Pro Tools software installation Mac 21 Windows 27 Pro Tools|24 MIX 8 Pro Tools|HD control surfaces 9 synchronization peripherals 9 worksurfaces 9 Pro Tools|HD cards installing 12, 14 Processor Scheduling performance (Windows) 33 Program Change dialog 78, 82 Q QuickTime installing (Windows) 29 R Registration Information Card 9 removing Pro Tools (Mac) 24 removing Pro Tools (Windows) 31 routing digital effects 40 S sample delays (see DSP delays) Sample Rate 47, 51 screen savers 102 SCSI requirements 70 Setup menu I/O Setup 61 Software Update (Mac), turning off 25 Spotlight indexing (Mac), disabling 26 Startup items (Windows), disabling 34 Stereo Mixer plug-in 94 studio setup with a mixer 36 without a mixer 37 Surround Mixer 93, 94 SYNC I/O 3 System 88 system optimization (Mac) 25 optional optimizations (Windows) 33 recommended optimizations (Windows) 32 required optimizations (Windows) 32 shutting down 43 starting up 43 system optimization Mac 25 Windows 33 system settings Cache Size 49 Clock Source 51 CPU Usage Limit 46 Hardware Buffer Size 44 Host Engine 46 I/O Setup 60 Number of Voices 47 Plug-in Streaming Buffer 50 Plug-in Streaming Buffer Size 49 Sample Rate 47, 51 System Usage window 88, 89 DSP Cache 89 T TDM FlexCable 3 TDM Mixer plug-ins 94 TDM plug-ins and DSP usage 95 MultiShell 95 time alignment 83 W WaveDriver (Windows) 30 website 106 Window menu System Usage window 89 Word Clock 53 Index 113 Avid Technical Support (USA) Product Information 2001 Junipero Serra Boulevard Daly City, CA 94014-3886 USA Visit the Online Support Center at www.avid.com/support For company and product information, visit us on the web at www.avid.com