1
1
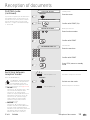
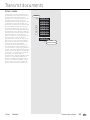
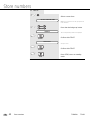
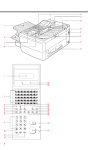
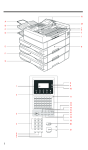
Welcome to your fax machine
A
Document guides
H
Paper load lever
O
Left paper guide release lever
B
Document tray
I
Right envelope guide
P
Left envelope guide
C
Document tray cover
J
Right paper release lever
Q
Left paper guide
D
Access door for PC
K
Right paper guide
R
Document exit tray
E
Access door for memory
L
Paper support
S
Recording paper exit tray
F
Top Cover
M Automatic sheet feed
T
Operation panel
G
Manual feed
N
U
Ink cartidge storage unit
1
2
3
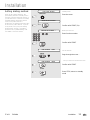
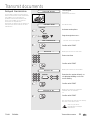
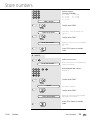
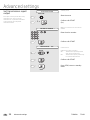
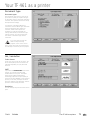
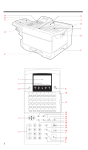
LCD Display
Displays indications about the
operating modes of your fax
machine. Your control monitor for
all function settings.
10
11
Alarm-LED
Flashes when a machine error
occurs.
Busy LED
Flashes or lights up when the fax
machine connects to the line or is
just transmitting or receiving
Left paper guide
Printer reset
Ejects the sheet drawn into the machine,
and cancels the print job.
Change cartridge
Press to change the ink cartridge. The
printhead moves to the change position.
When the cartridge has been replaced,
press to return to the ready position.
12
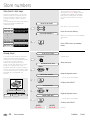
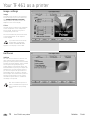
Group
Press the key to use the group facilty.
This enters a space during programming.
Job Status
Queries the status of the entered
jobs.
13
One Touch Dialing keys
Sends documents at the push of a
button.
5
Function
Initiates all machine settings.
14
Copy
Makes a copy of your original.
6
Job cancel
Deletes jobs in the memory or
deletes the last entry during
programming.
15
Option
When document hsa been inserted into
machine, press to select special settings
for document transmission.
4
7
Draft quality/letter quality LED
Switches between draft quality
and letter quality when documents
are printed from the PC.
8
PC printing LED
Lights up when data are received
from the PC or when a fax
document is printed out.
9
Feed
Ejects the paper drawn into the
machine when a document is
printed from the PC. Draws sheets
into the single sheet feeder.
GB
2
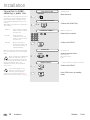
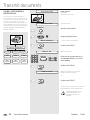
16
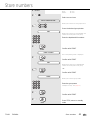
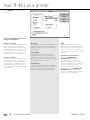
Start
Indicates the sending and receiving
options, confirms entries.
17
Stop
Clears error messages and terminates
input.
18
Redial/pause
Activates the last number dialled, inserts
a dialling pause and pages forwards in
the menu.
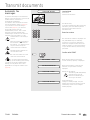
Welcome to your fax machine
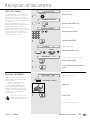
19
Handset
Used for on-hook dialling.
20
”*” and”#” Key
Used to move the cursor to the left
or right.
21
Dial Keypad
Used for entering telephone
numbers.
22
R Key
Key for obtaining public line in
PABXs. Pages backwards in the
menu.
23
ABB. DIAL /ALPHABET
Press this key in order to select a
stored alphabet dial number or a
name.
24
AUTO RCV KEY
Switches between automatic and
manual reception.
25
Resolution Key
Changes the scan resolution of the
loaded originals.
TOSHIBA
TF 461
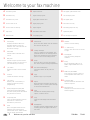
Contents
Preparation
Unpacking ................................................... 4
Connection to the mains ............................. 4
How to insert the recording paper: ............. 5
To install the accessories: ........................... 5
Insert the inkcartridge ................................. 6
Delayed transmission ................................
Single multi-address transmission .............
Stored broadcast ......................................
Polling .......................................................
Reserve polling ..........................................
Reduce transmission speed ......................
Stop transmission .....................................
Installation
Store numbers
Set language .............................................. 8
Enter terminal ID ......................................... 9
Enter the user name ................................. 10
Connection to PABX,
obtaining a public line ............................... 12
Connection to PABX, further settings ........ 14
Set date and time ..................................... 15
Alphabet dial memory ............................... 38
One-touch dial keys ................................... 40
Group keys ................................................ 40
Reception of documents
Set standby mode .....................................
Automatic reception .................................
Manual reception ......................................
Manual reception (continued) ...................
TEL/FAX mode: ..........................................
FAX/TAD mode: .........................................
Switching between reception modes ........
FAX/TAD mode: (continued) ......................
Reception reduction .................................
Local copy ................................................
Set call counter ........................................
Memory reception .....................................
16
16
16
17
18
18
19
19
20
20
21
21
Transmit documents
Document format ..................................... 22
Stack mode .............................................. 23
Direct transmission ................................... 24
Automatic fax messages ........................... 25
Transmission with alphabet dialling ........... 26
Transmission with one-touch dialling ......... 26
Transmission with telephone (manual
transmission) ............................................. 27
Transmission with directory function ......... 28
Monitoring ................................................ 29
Set resolution ........................................... 30
Redial ....................................................... 30
31
32
33
34
35
36
37
Report prints
Activate printing report .............................
Transmission report ...................................
Transmission and reception journal ...........
The multitransmission report .....................
Number list ...............................................
Group list ..................................................
Jobs in progress ........................................
The function list ........................................
43
43
44
45
45
45
45
46
Advanced settings
Functions ..................................................
Connection to PABX ..................................
Receive footer on/off ................................
Change speaker volume ............................
Adjust ringing tone/key beeps ...................
Set transmission report output ..................
47
51
51
52
53
54
Possible problems
Error codes in journal ................................
Error messages in the Display ...................
Transmission problems ..............................
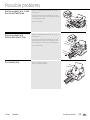
Remove paper jam in the
document feed area .................................
Remove paper jam before document tray
Document jam ..........................................
Your TF 461 as a printer
System requirements ................................ 60
Connecting the fax machine
to the computer ........................................ 60
Changing the ink cartridge ........................ 61
Loading the paper ..................................... 61
Paper formats ........................................... 61
The automatic sheet feed ......................... 62
The automatic envelope feed ................... 62
The manual single sheet guide ................. 63
Installing the printer driver sofware ........... 63
Printer setup (colour printer) ..................... 69
Paper ........................................................ 70
Media / quality .......................................... 70
Document type ......................................... 71
Ink / resolution .......................................... 71
Image settings .......................................... 72
Halftones .................................................. 72
Printer setup (monochrome) ..................... 73
The printer statusdisplay ........................... 75
The spool manager ................................... 76
The Toolkit ................................................ 78
Setting the standard printer ...................... 81
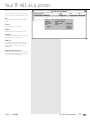
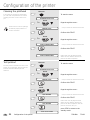
Configuration of the printer ....................... 82
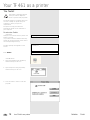
Draft/ LQ printing ...................................... 82
Paper orientation ...................................... 82
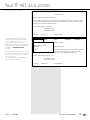
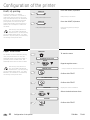
Configuration of the printer
Adjust alignment ....................................... 83
Cleaning the printhead .............................. 84
Test printout .............................................. 84
Hex dump mode ....................................... 85
Handling faxes on your PC
55
56
57
59
59
59
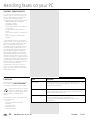
System requirements ................................
Features ....................................................
Connection to the PC ................................
Scanning documents into the PC .............
Sending fax messages from the PC ..........
Sending faxes to the PC ...........................
86
86
87
88
88
89
UK Connection information
UK Connection information ....................... 90
Index
Index ......................................................... 91
TF 461
TOSHIBA
Contents
3
GB
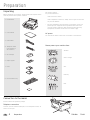
Preparation
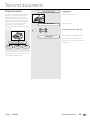
Unpacking
When unpacking your machine, please check that all parts shown
here are present and in perfect condition.
1. Fax machine
The correct location
for your fax machine is:
• near a 230 V AC socket*,
• near a telephone connection, ideally with a single line reserved
for your fax machine.
* No other equipment with high power consumption (such as a
photocopier) or equipment which generates electrical noise
(such as a radio, computer, radio transmitting and receiving
equipment) should be connected to this mains supply.
2. User manual
AC power
You will find the mains connection on the back of the machine.
3. Powercable
Please protect your machine from:
4. Telephone cable
(not supplied in
all Countries)
vibration
5. Ink cartridge
direct sunlight
6. Paper support
7. Discs
dust
humidity
8. Exit document tray
heat
Connection to the mains
Ensure contact and operating voltage.
Telephone connection
Connect your fax machine (LINE jack) to the telephone socket, as
shown on the right.
GB
4
Preparation
TOSHIBA
TF 461
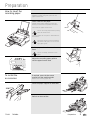
Preparation
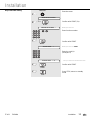
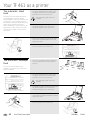
How to insert the
recording paper:
Adjust the left paper guide as illustrated in the
diagram. To adjust the guide, press the left
paper release lever.
Insert a stack of A4 paper.
Prepare the recording paper by flexing and
fanning out the stack to separate the sheets.
Press back the paper release lever.
Do not insert any paper before pushing
back the release lever.
Insert the paper. Do not push it underneath the
feed rollers.
The paper cassette holds a maximum
150 sheets (80 g/sm). Do not use the
right paper guide.
Pull the paper release lever to the
front.
Do not use damp, wrinkled on torn
paper.
Adjust the recording paper guide to
suit the paper format used
To install the
accessories:
If required, press the document
support into the retaining holes
Remove the recording paper tray.
Insert the paper support as illustrated
Switch on the machine
TF 461
TOSHIBA
Preparation
5
GB
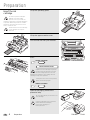
Preparation
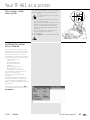
Insert the ink
cartridge
Lift up the operating panel
In order to prevent transport
damage, the high-quality
process unit of your new fax
machine is delivered in special packaging
to provide additional protection. Please
follow the enclosed instructions. This is
how to install the unit:
Please remove the ink cartridge
if you transport or ship the
machine.
Lift up the upper machine cover
You can now look into your machine
Press
CHANGE CARTRIDGE
CHECK CARTRIDG M100%
Replace the ink cartridge only when
the print unit has moved to the left
into the change position. You will
damage the machine if you change the ink
cartridge in any other position!
If the print unit is not in this position,
press the following again:
CHANGE CARTRIDGE
Open the packaging. Remove the
protective strip
Do not open before you intend to use
the cartridge!
Hold the cartridge only on the blue
(black-and-white cartridge),
red (colour cartridge) or
black positions !
GB
6
Preparation
TOSHIBA
TF 461
Preparation
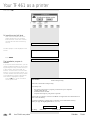
Insert the new cartridge
You must be able to see the gold
contact strip!
Click the cartridge into position. Do not worry,
you will hear a loud “click” when the cartridge
is pressed into position.
CHANGE CARTRIDGE
Press ...
NEW CARTRIDGE ?
A
NEW
USED
Go to A
Go to B
Is the cartridge new or was it used ?
NEW
Confirm the new cartridge
START
CLEAR INK COUNTER
B
The print counter is set to zero
USED
STOP
15-03 19:56 M 100%
The print unit returns to the starting
position
Buy a spare cartridge or a colour cartridge
directly from your dealer. You can store both
cartridges in the special cartridge compartment,
even if the cartridge has already been opened.
TF 461
TOSHIBA
Preparation
7
GB
Installation
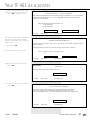
Set language
Your fax machine is set to English. Please
carry out the following menu steps if you
wish to use another language for the
menu and the list prints.
15-03 19:56 M 100%
Standby mode
FUNCTION
Start the menu
PROGRAM SETUP DATA
Confirm with START (2x)
2x
START
PARAMETER NUMBER =
Make your selection
Enter function number
Confirm with START
START
LANGUAGE
ENGLISH
Set language
REDIAL
Page through the menu...
PAUSE
LANGUAGE
ENGLISH
...until you reach this menu item
Confirm with START
START
Press STOP, return to standby
mode
STOP
GB
8
Installation
TOSHIBA
TF 461
Installation
Enter terminal ID
The terminal ID which is part of the
transmissing header contains the number
under which your fax machine can be
reached. The number should be entered
in the international format:
15-03 19:56 M 100%
Standby mode
FUNCTION
Start the menu
PROGRAM SETUP DATA
Confirm with START
Example:
+44-1932 - 12345678
Fax number
Space
(to improve legibilitly)
Area code (without initial
0)
Country code (here:
Germany)
Plus symbol (for the
international form)
To enter the characters:
START
REDIAL
5x
Page through the menu...
PAUSE
LOCAL ID NUMBER
...until you reach this menu item.
Confirm with START
START
ID:
Character Key to be pressed
+
Public line key /
Hyphen
Alphabet dialling/ALPHA key
Make your selection
Enter the terminal ID
(see Infotext)
Enter the actual figures via the dial keypad
(as usual).
If you have entered a wrong number, you
can delete this number by means of the
CANCEL key.
In Germany, the terminal ID must
be entered!
*) If there is a pause of more than one
minute between each entry, the fax
machine automatically switches over to
the standby mode. In this case, the
contents which are entered are NOT
stored.
TF 461
TOSHIBA
+44 1932 12345678
Terminal ID is complete
Confirm with START*)
START
Press STOP, return to standby
mode
STOP
Installation
9
GB
Installation
Enter the user name
The transmission header not only contains
the terminal ID but also the user name.
This can contain up to 20 characters.
Each digit features several characters
which can be activated by repeatedly
pressing the corresponding key. If you
have found a character of your choice,
press the „#“ key to got to the next
position. Use the „*“ key to got back one
letter and make any corrections. Use the
„0“ key to select special characters.
If you enter too many characters, press
the CANCEL key to delete the unwanted
characters.
When the name is complete, press the
START key.
Example: TOSHIBA
15-03 19:56 M 100%
FUNCTION
Standby mode
Start the menu
PROGRAM SETUP DATA
Confirm with START
START
REDIAL
6x
Page through the menu...
PAUSE
LOCAL NAME
...until this menu item appears
Confirm with START
START
NAME:
Make your selection
Enter the name
Example: TOSHIBA
1x8=T# 3x4=I#
3x6=O# 2x2=B#
4x7=S# 1x2=A
2x4=H#
NAME: TOSHIBA
Name is complete
Confirm with START
START
Press STOP, return to standby
mode
STOP
GB
10
Installation
TOSHIBA
TF 461
Installation
Setting dialling method
There are two dialling methods. The
pulse-dialling method is normally used in
the public switched telephone network. If
your fax machine is connected to a PABX,
the DTMF dialling method may also be
used. As the public network is
modernised, this dialling method may also
be used in the public network. If you are
in any doubt, first try the pulse-dialling
method (basic setting). If the dialling
procedure fails, try DTMP dialling. How
ever DTMF is the most efficient.
15-03 19:56 M 100%
FUNCTION
Standby mode
Start the menu
PROGRAM SETUP DATA
2x
Confirm with START (2x)
START
PARAMETER NUMBER =
Make your selection
Enter function number
Confirm with START
START
DIAL METHOD TONE
Set dial method
REDIAL
Page through the menu...
PAUSE
DIAL METHOD 10PPS
...until you reach the desired menu item
Confirm with START
START
Press STOP, return to standby
mode
STOP
TF 461
TOSHIBA
Installation
11
GB
Installation
Connection to PABX,
obtaining a public line
The TF 461 can be connected not only to
the public switched telephone network
(public line) but also to a PABX. In this
case, additional parameters have to be
entered.
With PABXs, the public line is obtained in
various ways:
15-03 19:56 M 100%
FUNCTION
Standby mode
Start the menu
PROGRAM SETUP DATA
Confirm with START (2x)
2x
START
• Number
Dial one digit (or several
digits) in order to obtain
the public line
PARAMETER NUMBER =
Make your selection
Enter function number
•Earth key
Earth potential is
connected to the voice
wire(s) in order to obtain
the public line
• Flash key
With this method of
obtaining the public line,
the connection circuit is
interrupted briefly.
With this method of obtaining the public
line, the connection circuit is interrupted
briefly.
When the method of obtaining a
public line has been entered,
you must always press the key
”R” before the actual number when you
dial your fax partner. This is also
applicable for saving the fax numbers
(see page 38).
If you have problems if your
machine is connected to an
extension, please read the
“Comments concerning connection to
PABXs” under “Further settings” (page 61)
Confirm with START
START
ACCESS OFF
Set public line
REDIAL
Page through the menu...
PAUSE
Flash function
Earth key function
Code
REGISTER RECALL
...until you reach the desired menu item
Confirm with START
START
Press STOP, return to standby
mode
STOP
GB
12
Installation
TOSHIBA
TF 461
Installation
Only with CODE setting
FUNCTION
Start the menu
PROGRAM SETUP DATA
2x
Confirm with START (2x)
START
PARAMETER NUMBER =
Make your selection
Enter function number
Confirm with START
START
ACCESS CODE =
Make your selection CODE
Enter the code(s)
(Example: 0)
ACCESS CODE = 0
...until you reach the desired menu item
Confirm with START
START
Press STOP, return to standby
mode
STOP
TF 461
TOSHIBA
Installation
13
GB
Installation
Connection to PABX,
further settings
If you wish to connect your fax machine
to a PABX, further settings are necessary.
The following menu procedure sets
default values for connecting a fax
machine to PABXs. If the machine does
not operate perfectly, please refer to
page 61 for explanations concerning
connection to PABXs.
FUNCTION
Start the menu
PROGRAM SETUP DATA
Confirm with START (2x)
2x
START
PARAMETER NUMBER =
Make your selection
Enter function number
Confirm with START
START
LINE = PUBLIC LINE
Current setting
REDIAL
Page through the menu...
PAUSE
LINE =
PBX
...until you reach the desired menu item
Confirm with START
START
Enter function number
Confirm with START
START
PAUSE WAIT
TONE
REDIAL
Page through the menu...
PAUSE
PAUSE WAIT 3.0SEC
...until you reach the desired menu item
Confirm with START
START
Press STOP, return to standby
mode
STOP
GB
14
Installation
TOSHIBA
TF 461
Installation
Set date and time
Enter the current date and time at this
point so that all details relating to date
and time is correct. The internal clock of
your fax machine then runs automatically
- even in the event of a power failure.
15-03 19:56 M 100%
Standby mode
FUNCTION
Start the menu
PROGRAM SETUP DATA
Confirm with START
START
REDIAL
4x
Page through the menu...
PAUSE
DATE & TIME
...until this menu item appears
Confirm with START
START
DD-MM-YY HH:MM
Make your selection date & time
Enter date and time
Example: March 15th, 19.56 hours
Input sequence: year, month,
day, hour, minute
15.03.95 19:56
Confirm with START
START
15-03 19:56 M 100%
TF 461
TOSHIBA
Standby mode
Installation
15
GB
Reception of documents
Set standby mode
If your fax machine is connected to the
PSTN or the PABX, there are four different
ways of receiving documents.
Automatic reception
If the line is reserved exclusively for fax
operation.
LED “reception” is lit
Manual reception
If the line is used primarily for telephone traffic
Refer to the parameter setting, other wise
malfunktion will appear.
• Parameter-No. 38
Please read page 48, 49.
GB
16
Reception of documents
LED “reception” off
RCV MODE = TEL
The fax machine switches over to
reception as soon as the line rings (see
page 21).
The fax machine is always
activated, even if the call is
initiated by a voice partner.
The call must be accepted manually; the
fax machine is not activated when the
line rings. If you wish to transmit a
document, you must press the START key
of the fax machine.
Ensure that any fax calls can
indeed be accepted; it is always
necessary to press the START
key.
TOSHIBA
TF 461
Reception of documents
Manual reception
(continued)
If you have connected a cordless
telephone to your fax line as described on
page 4, you may collect a call which was
destined for your fax machine. This is
indicated in the form of periodic beeps.
You can then use a two-digit key code
(user-definable) to activate the fax
machine, by remote control. You can
activate or deactivate this facility:
15-03 19:56 M 100%
Standby mode
FUNCTION
Start the menu
PROGRAM SETUP DATA
2x
Confirm with START (2x)
START
PARAMETER NUMBER =
Make your selection
Enter function number
Confirm with START
START
RMT ACTIVATION OFF
Set remote reception
REDIAL
Page through the menu...
PAUSE
RMT ACTIVATION ON
...until you reach the desired menu item
Confirm with START
START
PARAMETER NUMBER =
Make your selection
Enter function number
Confirm with START
START
ACTIVATION CODE =**
Preset key code
Enter the 2-digit key code
(Delete the preset code with the CANCEL
key)
Confirm with START
START
Press STOP, return to standby
mode
STOP
TF 461
TOSHIBA
Reception of documents
17
GB
Reception of documents
TEL/FAX mode:
If the line is used for telephone and fax traffic.
LED “reception” off
For TEL/FAX setting:
• Function no. 38,
activate the TEL/FAX mode
• Function no. 39,
ringing signals: number of ringing
signals before your fax machine
collects the call (1-10)
• Function no. 36,
synthetic ringing signal: number of
ringing signals (synthetic ringing tone)
from the loudspeaker (1-10)
RCV MODE = TEL/FAX
TEL DELAY
01
CALLING TIMES
Please read page 48, 49.
In the event of a call, the fax machine
takes a fully automatic decision
concerning subsequent procedures:
If a caller wishes to conduct a telephone
conversation, the fax machine generates
ringing signal via the loudspeaker so that
this call is indicated as a telephone
conversation. At the same time, the
caller receives an indication that the
desired number is ringing.
Proceed as follows to collect the call:
Lift the handset, and press the STOP key
on your fax machine.
If another fax machine is attempting to
reach your fax machine, your machine
remains silent and automatically receives
the document.
Ensure that somebody who is
able to accept the call is always
present in this mode. As soon
as the ringer sounds, the connection is
made and the caller incurs charges.
FAX/TAD mode:
If the line is used with a call answering
equipment
For FAX/TAD setting:
• Function no. 38,
activate the FAX/TAD mode
• Function no. 44,
FAX/TAD duration: indication of the
time during which the fax machine
detects another fax machine (TAD
timer / 1-99 sec.).
Please read page 48, 49.
GB
18
Reception of documents
LED “reception” off
RCV MODE = FAX/TAD
FAX MONITOR TIME =
This mode enables you to receive
incoming fax messages and also to
answer telephone calls. There are two
situations:
You are present:
Switch off the call answering equipment
and collect the call at any point. If the
caller is a fax machine, your fax machine
will take over the call and print out the
fax message.
You are absent:
Switch on the call answering equipment.
The call answering equipment records all
telephone calls. Your fax machine
automatically receives any incoming fax
messages.
TOSHIBA
TF 461
Reception of documents
FAX/TAD mode:
(continued)
If you wish to operate your fax machine in
the FAX/TAD mode, you also have to set
the TAD time. This is the period in which
the fax machine reacts to a fax signal.
TAD time = length of recorded message
+ 10 seconds.
15-03 19:56 M 100%
FUNCTION
Standby mode
Start the menu
PROGRAM SETUP DATA
2x
Confirm with START (2x)
START
PARAMETER NUMBER =
Make your selection
Enter function number
Confirm with START
START
FAX MONITOR TIME =35
Set TAD time
Enter the new time
Confirm with START
START
Press STOP, return to standby
mode
STOP
Switching between
reception modes
Press the RECEPTION key
The MANUAL, TEL/FAX and FAX/
TAD modes are all represented
by the MANUAL mode. The
mode which is selected depends on the
setting of the functions: (see page 16-18)
For TEL/FAX setting:
• Function no. 38, reception type =TEL/
FAX: activate the TEL/FAX mode
• Function no. 39, ringing signals:
number of ringing signals before your
fax machine collects the call (1-10)
• Function no. 36, synthetic ringing
signal: number of ringing signals
(synthetic ringing tone) from the
loudspeaker (1-10)
For FAX/TAD setting:
• Function no. 38, reception type =
FAX/TAD: activate the FAX/TAD mode
• Function no. 44, FAX/TAD duration:
indication of the time during which the
fax machine detects another fax
machine (TAD timer / 1-99 sec.).
TF 461
TOSHIBA
LED “reception” is lit
Automatic reception is activated
AUTO RCV
Switch over the mode
LED “reception” off
Manual reception is activated
Reception of documents
19
GB
Reception of documents
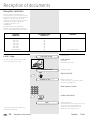
Reception reduction
Your fax machine uses A4 paper. For
technical reasons, the entire length of this
page cannot be used. So the fax machine
reduces the length of the incoming
document. This means that the received
image may be slightly compressed.
In general, this effect is not
problematical.
The following ratios are applicable
between the original and the incoming
copy (for A4 incoming document format):
Document
Length (mm)
Incoming document
reduction (%)
Comments
0 - 300
300 - 313
313 - 320
320 - 334
334 - 347
347 - 400
400 - 403
longer than 403
96
92
90
86
83
72
72
96
Print on one page
,
,
,
,
,
,
Print on two pages
Local copy
15-03 19:56 M 100%
Standby mode
Load original
You can use your fax machine to make
one or more copies (up to 99).
Remember:
Printed side face down
DOCUMENT READY
COPY
Document ready
PRESS COPY KEY
NUMBER OF COPY = 1
Make your selection
(if only one copy is to be made, please
now press the START key)
Enter number of copies
Confirm with START
START
COPY
*) The copy is reduced to 96% due to
technical considerations.
GB
20
Reception of documents
Copies are printed *)
The FINE resolution is used for the copy. If
you wish to copy a photograph or a
colour document, please select the
PHOTO resolution (see page 30).
TOSHIBA
TF 461
Reception of documents
Set call counter
If your fax machine is set to automatic
reception (FAX, TEL/FAX, see page 19), it
will switch on as soon as it is called.
Under these circumstances, it is thus not
possible for the call to be intercepted by
the telephone.
However, it is possible for your fax
machine to be set in such a way that - in
the event of a telephone call - it is
activated after a specific delay. The call
counter is used for this purpose. You can
use this facility to set the number of
incoming calls (max. 10) before the fax
machine connects to the line.
15-03 19:56 M 100%
FUNCTION
Standby mode
Start the menu
PROGRAM SETUP DATA
2x
Confirm with START (2x)
START
PARAMETER NUMBER =
Make your selection
Enter function number
Confirm with START
START
AUTO DELAY
01
Set number of rings
REDIAL
R
Page through the menu...
/
PAUSE
AUTO DELAY
XX
...until you reach the desired value
Confirm with START
START
Press STOP, return to standby
mode
STOP
Memory reception
Under certain circumstances, the
machine cannot print out any further
incoming copies:
• If there is no recording paper
• If there is a paper jam
In order to prevent problems with
reception, the remaining pages are
buffered in the memory of your fax
machine. Once the problem has been
solved, the document is printed out
automatically.
Do not switch off the power
supply as otherwise the contents
of the memory will be lost.
PAPER ERROR
M86%
No paper, memory full
LED "ERROR" is blinking
Paper out
Press STOP
STOP
Incoming copy is printed out
TF 461
TOSHIBA
Reception of documents
21
GB
Transmit documents
Document format
The following table gives you an idea of
which documents your fax machine can
handle.
Please note:
• Documents longer than 381 mm can
only be loaded manually.
• If you load severeal sheets at one
time, they should all be of the same
size and paper quality.
Document size (max)
Single sheet
2 or more sheets
216 mm (W) x 1000 mm (L)
216 mm (W) x 382 mm (L)
Document size (min)
148 mm (W) x 105 mm (L)
How many sheets
can be loaded at
one time?
Thickness of paper
stacks up to
20 sheet A4
0,06 ~ 0,15 mm
Quality of paper
0,065 ~ 0,1 mm
Uncoated on both sides
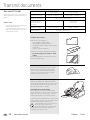
Problem documents ...
May not feed. This applies to
• torn, wrinkled or damp pages
• folded pages or pages with holes
• transparent pages or pages with a smooth,
shiny finish
• textile or metallic douments
There are two ways of avoiding this problem:
... by photocopying or using a carrier
sheet.
Your TOSHIBA dealer can supply you with the
necessary carrier sheets.
How to use carrier sheets:
Place your document face-up on the carrier
sheet under the transparent cover. Carrier
sheets can be used like normal documents
except for one restriction: only one carrier
sheet can be fed at one time.
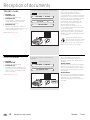
How to load documents correctly
Remove any paper-clips, staples and similar
objects before transmitting the document. Now
place your documents on the document tray up to 20 at one time - as shown.
Automatic document feeder
Most important: Only the document sheets
placed facedown on the document tray can be
read. If you can still read your text, you’ll be
sending empty pages or the back of pages!
Adjust the document guides to the edges of the
sheets. After 2 seconds, your document will be
automatically pulled in by about 2 cm.
If the machine pulls in more than one
document insert only the first
document. When this document has
been pulled into the machine, place the
remaining documents on top.
GB
22
Transmit documents
TOSHIBA
TF 461
Transmit documents
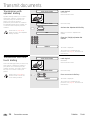
Stack mode
TF 461
TOSHIBA
INPUT
JOB NR. 45
MAX. 50 JOBS
A frequently encountered problem with
fax machines is that the document tray is
blocked while a document is being
transmitted; no other documents can be
transmitted while the fax machine is
transmitting or receiving documents. This
is different with your fax machine: All
documents are read into the memory and
are then transmitted from this memory.
Incoming documents are also read into
the momory before they are printed aout.
The advantage of this method is that the
document tray is virtually always free and
that documents can be transmitted
almost irrespective of the transmission or
receiving status of the fax machine.
Each procedure is known as a job. A job
may consist of one or more documents
which you can transmit to your partners.
A job can also be a multi-address
transmission or a delayed transmission.
Your fax machine is able to manage 10
such jobs. Each of these jobs is placed on
a stack, from where they are processed in
sequence. Your fax machine accepts jobs
even while it is transmitting or receiving
documents; this means that the
document tray is always ready. With every
procedure, the fax machine assigns a
reference number (job number 01-50) to
the job; this number is available via the
job list (see page 45). This number can
also be used for deleting a specific job.
JOB NR. 44
JOB NR. 43
JOB NR. 42
JOB NR. 41
JOB NR. 40
JOB NR. 39
JOB NR. 38
JOB NR. 37
JOB NR. 36
JOB NR. 35
AUSGABE
LINE
TRANSMISSION
Transmit documents
23
GB
Transmit documents
Direct transmission
In the normal transmission mode your fax
machine reads all documents into the
memory before they are transmitted. If
the documents are too large for the
memory or if you have too many
documents, you can also send directly
from the document tray without reading
the documents into the memory.
15-03 19:56 M 100%
Load original
Remember:
Printed side face down
DOCUMENT READY
COMM.OPT.
If you find that the memory is
frequently too small, ask your
dealer for a memory expansion!
Document ready
Activate send options
TRAY SEND
Confirm with START
START
DOC. READY TRAY
Enter fax number
or enter alphabet dialling or one-touch
dialling
TEL: 123456789
Confirm with START
START
Document is transmitted
GB
24
Transmit documents
TOSHIBA
TF 461
Transmit documents
Automatic fax
messages
To send fax messages in the traditional
manner: Insert document(s), enter the fax
number and the connection is
automatically established.
Your benefit: Your documents will leave
the fax immidiately. (Refer to page 23)
If you decide to use the listening-in
version (see page 29) , you can also
acoustically monitor the call
establishment process. This is useful
whenever you have problems with
establishing a connection. The reason is
frequently a wrong number, or a fax
machine which is not ready to
receive.
With the listening-in alternative,
the document is not read into
the memory; it is retained on the
tray until the receiving fax
mchine has been contacted.
15-03 19:56 M 100%
Remember:
Printed side face down
DOCUMENT READY
If you have entered the public
line facility, you must always press the key
“R” before the actual number before
dialling your fax partner. This is also
applicable for storing fax numbers (see
page 38).
TEL: 123456789
TOSHIBA
The entered fax number is displayed. Use
the JOB CANCEL keys to make any
corrections, or press the STOP key to
delete the complete number. Press the
STOP key again if you wish the machine
to eject the document(s) without being
processed.
Confirm with START
START
DOC.READING M98%
While the document is being read:
current memeory capacity is displayed.
JOB ACCEPTED NO.007
When the document is read into the
machine, the job number is briefly
displayed.
15-03 19:56 M 98%
Dialling the fax partner
The flashing LINE lamp always
indicates when your fax
machine is transmitting or
receiving a document.
15-03 19:56 M 100%
TF 461
Document ready
If you have inadvertently taken the wrong
document, press the STOP key before
removing the document from the
document feed.
Enter fax number
Residual memory depends on
the size ofthe stack!
You can also enter the number first and
then insert the document.
Load original
After transmission:
Change to standby display: the job is
deleted from the stack memory (can be
identified by means of the changed
memory display).
Transmit documents
25
GB
Transmit documents
Transmission with
alphabet dialling
Alphabet dialling enables you to enter a
double-digit “address” instead of the
(frequently-long) fax number of your
partner. The real fax number is
permanently stored under this “address”.
The alphabet dialling facility enables you
to save time with frequently used fax
numbers.
Please refer to page 38 for
details of how to save alphabet
dialling numbers.
15-03 19:56 M 100%
Load original
Remember:
Printed side face down
DOCUMENT READY
Document ready
ABB.DIAL
Activate the alphabet dial facility
ALPHA.DIAL
ABB:
Make your selection: alphabet dial
number
Enter the (2-digit) alphabet dial
number
TOSHIBA
The name is displayed
The connection is established (for
procedure, see page 25, Automatic fax
transmission).
Transmission with onetouch dialling
One-touch dialling provides you with a very
easy method of dialling the number of
your partner. Your can assign any fax
numbers to 8 keys. You need to press a
key only once in order to reach your
partner.
Please refer to page 40 for
details of how to store onetouch dialling numbers.
15-03 19:56 M 100%
Load original
Remember:
Printed side face down
DOCUMENT READY
Document ready
Press a one-touch dial key
TOSHIBA
The name is displayed
The connection is established (for
procedure, see page 25, Automatic fax
transmission).
GB
26
Transmit documents
TOSHIBA
TF 461
Transmit documents
Transmission with
telephone (manual
transmission)
The call in this case is established with a
telephone which is additionally connected
to the wall socket. You can thus speak to
the other party before you send the fax
message.
15-03 19:56 M 100%
Load original
Remember:
Printed side face down
DOCUMENT READY
Document ready
Dialling with telephone
If you have agreed the transmission with
your fax partner, or if you hear the fax
tone at the other end:
Confirm with START
START
Transmission commences
(You can replace the handset, as the fax
machine has now assumed control).
TF 461
TOSHIBA
Transmit documents
27
GB
Transmit documents
Transmission with
directory function
This type of dialling is similar to searching
in a telephone directory. Enter the initial
letter of your partner to search for the
corresponding fax number in the alphabet
dialling memory. This type of dialling is
particularly useful if you know the name of
a specific partner
15-03 19:56 M 100%
Load original
DOCUMENT READY
Document ready
ABB.DIAL
Activate directory function
2x
Remember:
Printed side face down
ALPHA.DIAL
SELECT NAME
You can now enter the initial letter of
your fax partner.
(see letter input, page 10) *).
(Example: ,B“)
Key „2“
ANDREWS
The first name of the corresponding letter
(here "A") is displayed.
Key „2“
BOND
BROWN
Presse the key "2" to display the next
letter (here "B") which is stored under this
key.
Use the keys „R“ and „REDIAL“ to select
the desired fax partner with identical
starting letters.
Confirm with START
The connection is established (for
procedure, see page 25, Automatic fax
transmission).
START
NO ENTRY
GB
28
Transmit documents
*) This display appears if no name is
stored under the selected letter.
TOSHIBA
TF 461
Transmit documents
Monitoring
15-03 19:56 M 100%
Remember:
Printed side face down
In case of transmission problems, this
function is very helpfull. Check dialling by
this method allows you to detect wrong
numbers and busy parties also.
With the listening-in alternative,
the document is not read into
the memory; it is retained on the
tray until the receiving fax machine has
been contacted.
Load original
DOCUMENT READY
HOOK
Document ready
Activates monitoring
TEL
Make your selection
Your entry
(or alphabet dial number, or one-touch
dial number)
TEL: 12345
Dialling starts
If another fax machine can be heard
(beep)
Confirm with START
START
The connection is established (for
procedure, see page 25, Automatic fax
transmission).
If no connection is established,
press the STOP key to
disconnect the fax machine
from the line.
TF 461
TOSHIBA
Transmit documents
29
GB
Transmit documents
Set resolution
In its basic setting, your fax machine uses
high resolution for transmitting or copying
your documents. You can however also
adjust the resolution to suit the particular
documents. Use the following as a rough
guide:
STD
For hand-written or typewritten
documents
FINE
For documents with small type
such as newspapers and
diagrams
SF
For documents with very small
and detailed diagrams
GREY
64 grey stages for photographs
or colour documents
Higher resolution has an impact
on transmission time!
To change the resolution, press
the RESOLUTION key several
times. The LEDs above this key
indicate the set mode:
Lamp
Mode
FINE off
GREY off
Standard mode
FINE on
GREY off
Fine mode
FINE on
GREY on
Superfine mode
FINE off
GREY on
Grey stage mode
Redial
If it was not possible for your fax message
to be sent, this may be due to various
reasons (please read page 55). One
reason may be that the other fax machine
is busy. In this case, it would make sense
to call your partner again at a later time.
This is done automatically by your fax; it
attempts to send the fax message again
approx. every three minutes.
If you have established a
connection via the HOOK key,
you can redial a number using
the REDIAL/PAUSE key.
GB
30
Transmit documents
TOSHIBA
TF 461
Transmit documents
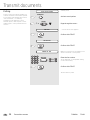
Delayed transmission
You are able to define a certain time at
which the documents will be transmitted;
this enables you to overcome the
problems involved with different time
zones or will enable you to transmit
documents at off-peak rates
The benefit of reading into the memory is,
that your ADF can be used for the next
transmission.
15-03 19:56 M 100%
Load original
DOCUMENT READY
Document ready
Remember:
Printed side face down
COMM.OPT.
Activate send options
REDIAL
Page through the menu...
5x
PAUSE
TIMER TRANSMISSION
...until this menu item appears
Confirm with START
START
ENTER TIME --:--
Make your selection for start time
Enter start time
Confirm with START
START
ENTER TEL NO.
ABB.DIAL
ALPHA.DIAL
Make your selection for fax number
Enter the fax number directly, or
via alphabet dialling or via onetouch dialling
Confirm with START
START
START OR TEL NO.
Make your selection for further fax
numbers (max. 20 numbers)
-or-
Confirm with START
START
The documents are read into the memory
and sent to the various users.
Only one job can be
programmed for delayed
transmission.
TF 461
TOSHIBA
Transmit documents
31
GB
Transmit documents
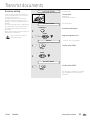
Single multi-address
transmission
If you wish to send one document to
several partners without spending a lot of
time, this function can be used to create
a group on one single occasion. The
group is deleted after the procedure has
been completed. Up to 20 users can be
grouped together from one-touch dialling
numbers, alphabet dialling numbers or
standard numbers.
15-03 19:56 M 100%
Load original
Remember:
Printed side face down
DOCUMENT READY
COMM.OPT.
Document ready
Activate send options
REDIAL
Page through the menu...
PAUSE
MANUAL BROADCAST
...until this menu item appears
Confirm with START
MANUAL BROADCAST
START
FAXNO. + FAXNO. + FAXNO.
or
or
or
ABB
ABB
ABB
or
or
or
ONE
TOUCH
ONE
TOUCH
ONE
TOUCH
ENTER TEL NO.
ABB.DIAL
ALPHA.DIAL
Make your selection
Enter the fax number directly, or
via alphabet dialling, or via onetouch dialling
Confirm with START
START
START OR TEL NO.
Make your selection for further fax
numbers (max. 20 numbers)
-or-
Confirm with START
START
The documents are read into the memory
and transmitted to the individual users.
If delayed transmission has
been programmed, the
broadcast facility is not
available.
GB
32
Transmit documents
TOSHIBA
TF 461
Transmit documents
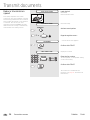
Stored broadcast
15-03 19:56 M 100%
If you have a fixed group of fax partners
to whom you frequently have to send
broadcast fax messages, the stored
broadcast facility is just what you need.
You can use two methods of setting up
groups of your choice. It is also possible
to store four of these groups on four
special keys so that a broadcast
transmission can be actiivated at the push
of a button.
Load original
Remember:
Printed side face down
DOCUMENT READY
Document ready
Press the one-touch dial key
SUPERGROUP
GROUP BROADCAST 1
ABB 1
+
ABB 2
+
The group name is displayed briefly
The connection is established (for
procedure, see page 25, Automatic fax
transmission).
ABB 3
Please refer to page 40 for details of how
to program permanent groups.
TF 461
TOSHIBA
Transmit documents
33
GB
Transmit documents
Polling
15-03 19:56 M 100%
A type of self-service facility enables you
to fetch documents from another partner
if your partner has prepared this function.
“Fax on demand”, i.e. obtaining
information from mailboxes such as
weather reports, traffic reports or stock
market reports, is also possible with this
function.
Standby mode
COMM.OPT.
Activate send options
REDIAL
Page through the menu...
5x
PAUSE
POLLING
...until this menu item appears
Confirm with START
START
RX POLLING
Confirm with START
START
ENTER TEL NO.
ABB.DIAL
ALPHA.DIAL
Make your selection for fax number (from
which a document is to be polled)
Enter the fax number
via the keyboard, or via alphabet dialling,
or one-touch dialling
Confirm with START
START
The document is polled
GB
34
Transmit documents
TOSHIBA
TF 461
Transmit documents
Reserve polling
Other fax partners can poll information
from your fax machine if you set up this
facility with this function.
Your document which you reserve for
polling is read into the memory of the
machine so set the document tray is not
blocked.
This reserve polling facility is unprotected.
This means that any fax machine with a
polling facility will be able to poll the
document.
When the document has been polled, it is
deleted from the memory.
Only one document can be
reserved for polling
15-03 19:56 M 100%
Standby mode
Load original
Remember:
Printed side face down
DOCUMENT READY
COMM.OPT.
Document ready
Activate send options
REDIAL
Page through the menu...
5x
PAUSE
POLLING
...until this menu item appears
Confirm with START
START
REDIAL
PAUSE
POLLING STANDBY
Confirm with START
START
The document is read into the memory
and is available for the next polling
procedure
TF 461
TOSHIBA
Transmit documents
35
GB
Transmit documents
Reduce transmission
speed
Poor quality telephone lines or bad
connections can cause problems. Sending
and receiving problems are most common
when sending documents to long distance
or overseas. You can set your unit's
transmission speed to 4800BPS for safer
data transfer. This setting is automatically
canceled after the sending session.
15-03 19:56 M 100%
Load original
Remember:
Printed side face down
DOCUMENT READY
COMM.OPT.
Document ready
Activate send options
R
2x
Page through the menu...
TX 4800BPS
...until this menu item appears
Confirm with START
START
DOC. READY 4800
ABB.DIAL
ALPHA.DIAL
Display of set mode
Enter the fax number
via the keyobard, or via alphabet dialling
or one-touch dialling
Confirm with START
START
The connection is established (for
procedure, see page 25, Automatic fax
transmission).
GB
36
Transmit documents
TOSHIBA
TF 461
Transmit documents
Stop transmission
You may inadvertently dial the wrong
partner or you may enter a wrong
number. You then have to interrupt this
procedure. It is possible for this procedure
to be situated between other jobs. As a
result of stack mode, it is possible for the
current transmission not to be directly
related to the actions of the operator.
These procedures are deleted by „paging“
through the job stack; search for the
appropriate job and delete the specific
job.
As the display indicates only the job
numbers and the time, it is advisable for
the job list to be printed out (see page 45)
in order to obtain a more precise
allocation.
15-03 19:56 M 100%
CANCEL
Standby mode
Activate CANCEL
JOB NO.: 005 18:11
The first job is displayed
The time indicated after the job
number is the time at which the
job was entered.
REDIAL
Page through the various jobs
PAUSE
...until you reach the desired job
JOB NO.: 005 18:11
Confirm with START
JOB DELETE
JOB NBR. 45
JOB NBR. 44
JOB NBR. 43
JOB NBR. 42
JOB NBR. 41
JOB NBR. 40
JOB NBR. 39
JOB NBR. 38
JOB NBR. 37
JOB NBR. 36
START
Are you sure?
CANCEL OK ?
Confirm with START
START
The job is cancelled
CANCELED
JOB CANCELED
TF 461
TOSHIBA
Transmit documents
37
GB
Store numbers
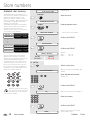
Alphabet dial memory
The alphabet dial facility enables you to
enter a two-digit „address“ instead of the
(frequently long) fax number of your
partner. The real fax number is stored
under this „address“. With frequently used
fax numbers, the alphabet dial facility
enables you to save time.
70 alphabet dial memories are available
and the name as well as the number of
your partner can be stored in this
memory. You can use up to 15 characters
of your choice in this memory.
ABB NO. 70
ABB NO. 69
15-03 19:56 M 100%
FUNCTION
Standby mode
Start the menu
PROGRAM SETUP DATA
REDIAL
Page through the menu...
PAUSE
ENTER DIAL NUMBER
...until this menu item appears
09154/87823 BROWN
024/8768
EVENS
Confirm with START
•
•
•
START
ENTER ABB DIAL
ABB NO. 003
054/938734 IRVING
ABB NO. 002
04544/6723 MARKS
ABB NO. 001
054/376014
Confirm with START
START
MILES
ENTER:1 DELETE:2
Use the numeric keys for entering the
alpha-numeric characters. Each digit
features several characters which can be
activated by repeatedly pressing the
corresponding key. If you have found a
character of your choice, press the „#“
key to go to the next position. Use the „*“
key to go back one letter and make any
corrections. Use the JOB CANCEL key to
delete the left-hand character.
ENTER
DELETE
Go to A
Go to B
Decision:
Enter:
Delete:
Go to A
Go to B
A ENTER
Select a menu item
ENTER ABB NUMBER =
Make your selection for alphabet dial
number
Enter alphabet dial number
Example: 01
Confirm with START
Please note that you must press
the „R“ button before the actual
fax number if your fax machine
is connected to a PABX.
START
TEL:_
Make your selection for fax number *)
Enter fax number
Confirm with START
START
NAME:_
GB
38
Store numbers
Make your selection for the name
(press START to skip)
TOSHIBA
TF 461
Store numbers
Enter the name
(Example TOSHIBA)
T= 1 x 8 #
O= 3 x 6 #
S= 4 x 7 #
H= 2 x 4 #
I= 3 x 4 #
B= 2 x 2 #
A= 1 x 2 #
NAME: TOSHIBA
Confirm with START
START
PRESS OT OR START
Input option: one-touch dial key (see
page 26)
-or-
Confirm with START
START
ENTER ABB NUMBER =
Make your selection for the next alphabet
dial number
-or-
Press STOP, return to standby
mode
STOP
B DELETE
Select a menu item
ENTER ABB NUMBER =
Make your selection for the alphabet dial
number to be deleted
Enter alphabet dial number
Example: 01
Confirm with START
START
TOSHIBA
The name is displayed
Confirm with START
START
ENTER ABB NUMBER =
Make your selection for further alphabet
dial numbers to be deleted
Press STOP, return to standby
mode
STOP
TF 461
TOSHIBA
Store numbers
39
GB
Store numbers
One-touch dial keys
The procedure is the same as that
described on page 38 (alphabet dialling)
If alphabet dial numbers have already
been entered, simply press the START
key until you arrive at this point in the
menu:
The one-touch dial facility is a very easy
method of dialling your partner. You can
store fax numbers on 8 keys. You need
only press one key in order to dial your
partner.
It is essential that the number has already
been stored under an alphabet dial
number previously.
PRESS OT OR START
Input option: one-touch dial key
ABB NBR. 70
ONE TOUCH NBR. 8
ABB NBR. 69
ONE TOUCH NBR. 7
Press one-touch dial key
ENTER ABB NUMBER =
•
•
•
Make your selection for the next alphabet
dial number
-or-
ABB NBR. 003
ONE TOUCH NBR. 2
ABB NBR. 002
ABB NBR. 001
ONE TOUCH NBR. 1
Press STOP, return to standby
mode
STOP
15-03 19:56 M 100%
Group keys
If you have a fixed number of partners to
whom you frequently send broadcast
transmissions, the stored broadcast facility
is just what you need. There are 2
methods of creating groups of your
choice. You can also assign four of these
groups to four special keys so that a
broadcast transmission can be initiated at
the push of a button. If a permanent group
is to be defined, all users of a group must
be already be in the alphabet dial
directory.
FUNCTION
Standby mode
PROGRAM SETUP DATA
Start the menu
REDIAL
PAUSE
ENTER DIAL NUMBER
Page through the menu...
...until this menu item appears
Confirm with START
START
ENTER ABB DIAL
REDIAL
GROUP BROADCAST 1
PAUSE
ABB 1
+
ABB 2
+
ABB 3
Page through the menu...
ENTER GROUP DIAL
...until this menu item appears
START
GB
40
Store numbers
Confirm with START
ENTER
DELETE
Go to A
Go to B
Decision:
TOSHIBA
TF 461
Store numbers
A ENTER
Enter:
Delete:
Go to A
Go to B
Select a menu item
SELECT GROUP BUTTON
Make your selection for the group button
Press the desired group button
ABB:
Make your selection for the alphabet dial
number to be assigned to the group
Enter the alphabet dial numbers
Confirm with START
START
NAME: TOSHIBA
The corresponding name is displayed
Confirm with START
START
ABB:
Make further selection of alphabetdial
number to be assigned to the group
-orSTART
Confirm with START
NAME:
Make your selection group name
Enter the group name
(Example of entry: see page 10)
TF 461
TOSHIBA
START
Confirm with START
STOP
Press STOP, return to standby
mode
Store numbers
41
GB
Store numbers
B DELETE
Select a menu item
SELECT GROUP BUTTON
Make your selection for the group button
to be deleted
Press the desired group button
TOSHIBA
The corresponding name is displayed
Confirm with START
START
DELETE OK ?
Are you sure?
START
STOP
GB
42
Store numbers
Confirm with START
Press STOP, return to standby
mode
TOSHIBA
TF 461
Report prints
Activate printing report
Not all reports are printed out
automatically; they have to be requested
specially. These lists can provide
information concerning the current state
of the fax machine. The following reports
can be printed:
•
•
•
•
•
•
•
Transmission report
Multitransmission report
Transmission and reception journal
ABB Number list
Group list
Function list
List of jobs in memory
The lists are retrieved as follows:
15-03 19:56 M 100%
Standby mode
FUNCTION
Start the menu
REDIAL
2x
Page through the menu...
PAUSE
REPORTS
...until you reach the desired menu item
Confirm with START
START
ACTIVITY REPORT
REDIAL
The first menu item is displayed
Page through the menu...
PAUSE
ABB DIAL LIST
...until you reach the desired menu item
Confirm with START
START
The list is printed out
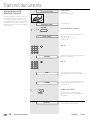
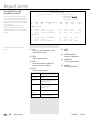
Transmission report
This report can be printed after every
transmission or in the event of a defective
transmission. It provides information about
the most important transmission data.
Please refer to page 44 for switching ON/
OFF.
TF 461
TOSHIBA
***
31-10-95
JOB NBR.
START TIME
ID No.
RESOLUTION
TOTAL PAGE
MACHINE ENGAGED
INFORMATION
ERROR PAGE
TRANSMISSION REPORT
01:19
***
ID:+44193212345678
TEG FT TF461
-------------------------------------------------------------------------------------------------
001
01:19
111
HALF TONE
00
00'28
OK
Report prints
43
GB
Report prints
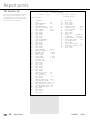
Transmission and
reception journal
***
30-11-95
Your fax machine will record messages
which you transmit or receive in the form
of transmission and reception journals.
These lists are printed out automatically
after every 40 transmissions or receptions
or at your request.
The journal also informs you of the
number of scanned pages and the
remaining contents in the ink cartridge.
Five marks means full, one mark indicates
storage.
No.
a
DATE
b
TIME
c
ACTIVITY REPORT
15:02
***
ID: +44 1932 12345678
FAX/TELECOM MKTG
INK LEVEL:LLLL
SCAN PAGE: 000091
IDENTIFICATION
d
PAGE
e
TIME
f
INFO
g
JOB No.:
h
TRANSMISSION
01
02
03
11-08
11-10
11-00
08:00
09:17
09:24
12345678
987654321
00
00
01
00'00
00'35
00'30
008
001
STOP
002
OK
ECM 004
01
00
04
00'36
00'45
01'58
OK
011
OK
RECEPTION
04
05
06
To activate printout press JOURNAL
button.
11-08
21-08
15-10
14:17 +04965321
06:00
14:30 5432101
a NO:
Lists the communications in the
order they occurred.
c TIME:
Start of transmission
e PGS:
Gives the number of pages per
transmission or reception.
ECM
ECM
b DATE:
Date
d IDENTIFICATION:
Number pf faxpartner
f DURATION:
Time of transmission
h JOB-NO.:
Current job number
g INFO:
result of transmission
GB
44
Report prints
OK
Group without any errors
OK_ECM
ECM
STOP
the operator has stopped
the transmission
001-360
description of the
transmission error
(see page 55)
OK-PC
OK PEC
transmission as PC Fax
OK ROC
Comline transmission
TOSHIBA
TF 461
Report prints
The multitransmission
report
After a broadcast transmission (group
dialling), the machine prints out a list of
fax partners who have been reached or
who have not been reached by group
dialling. This list is always printed out
when group dialling has been completed.
Number list
This list contains all numbers and
corresponding names in the alphabet dial
memory. The list also sets out the
assignation of the various one-touch dial
keys.
***
01-18-00
No.
01
02
03
04
05
06
01:16
OT No.
OT01
OT02
OT03
OT04
***
01-18-00
This is a list of the alphabet dial numbers
allocated to the particular groups.
GROUP1
No.
01
02
03
GROUP2 NAME:
No.
ENTRY
01
02
This list indicates which jobs are still
stored by the fax machine or which jobs
still have to be progressed. This
information may be useful if you have
stored any urgent jobs or if you wish to
delete a particular job.
TF 461
TOSHIBA
***
01-18-00
GROUP LIST
01:18
NAME: SUPER
ENTRY
ABB01
ABB02
ABB03
***
ID: +44 1932 12345678
TOSHIBA TF461
NAME
ALBRECHT
BAUER
BLUME
MEIER
Group list
Jobs in progress
ABBRIVATED DIAL LIST
TELEPHONE NUMBER
01010101
02020203
03030303
04040404
***
ID: +44 1932 12345678
TOSHIBA TF461
NAME
ALBRECHT
BAUER
BLUME
TELEPHONE NUMBER
0123456
6543210
987654321
NAME
TELEPHONE NUMBER
PENDING JOBS LIST
01:15
***
ID: +44 1932 12345678
TOSHIBA TF461
JOB No. CONTENTS TIMER ACCEPT REMOTE TELEPHONE NUMBER /NAME
003
TRANSMISSION
16:14
OT02
BAUER
004
BROADCAST
16:15
GROUP1
SUPER
007
POLLING STANBY 16:21
Report prints
45
GB
Report prints
The function list
This list provides information concerning
all settings of the fax machine. They
correspond with the settings which you
have made. Keep this list for any service
work which may be necessary.
GB
46
Report prints
***
01-18-00
OPTIONS REPORT
01:21
***
ID: ++44 1932 12345678
TOSHIBA TF461
USER OPTIONS
No.
01
02
03
04
05
06
07
08
09
10
11
12
13
14
15
16
17
18
19
20
21
22
23
24
25
26
27
28
29
30
31
32
33
34
35
36
37
38
39
40
41
42
43
44
45
46
47
48
49
50
CONTENTS
ECM
ON
CONFIRMATION
ON
NOT USED
HEADER PRINT
ON
RECEIVE FOOTER
ON
XMT SPEED
9600
RCV SPPED
9600
NOT USED
NOT USED
NOT USED
NOT USED
NOT USED
RDC ACCEPTANCE
RDC CENTER ID
NOT USED
NOT USED
NOT USED
NOT USED
NOT USED
DIAL METHOD
10PPS
REDIAL TIMES
05
REDIAL INT.
2 MIN
TRAIN INT.
5 MIN
BUSY TONE
INIT WAIT
3 SEK
PAUSE WAIT
3 SEK
ACCESS OFF
ACCESS CODE
= 1
NOT USED
NOT USED
NOT USED
NOT USED
NOT USED
NOT USED
NOT USED
CALLING TIMES
04
AUTO DELAY
01
RCV MODE= TEL
TEL DELAY
05
NOT USED
RMT ACTIVATION
OFF
ACTIVATION CODE = **
DEACTIVATION CODE = ##
FAX MONITOR TIME =35
SILENT DETECTION =08
PC TRANSFER DEF. OFF
NOT USED
NOT USED
NOT USED
NOT USED
51
52
53
54
55
56
57
58
59
60
61
62
63
64
65
66
67
68
69
70
NOT USED
NOT USED
NOT USED
NOT USED
PAPER SIZE
A4
DEFAULT RES.
STD
COPY REDUCT.
96%
NOT USED
NOT USED
NOT USED
DATE
DD-MM-YY
LANGUAGE
ENGLISH
SCAN CONT.
NORMAL
INK SAVE MODE
OFF
RX REDUCTION
NOT USED
INK END DITECT
ON
BIDIRCT. PRINT
ON
NOT USED
NOT USED
TOSHIBA
TF 461
Advanced settings
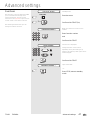
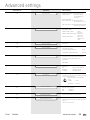
Functions
The functions of your fax machine enable
you to customise the settings of the
various procedures. You can use the
function list (see page 46) to print out the
current status of the various functions.
The following illustrates how you can
change the various functions:
15-03 19:56 M 100%
Standby mode
FUNCTION
Start the menu
2x
Confirm with START (2x)
START
PARAMETER NUMBER =
Make your selection for the function
number
Enter function number
and
START
Confirm with START
SELECT OPTIONS
R
REDIAL
The function is displayed
Change the value of the function,
depending on the particular type, by
paging or by entering a new figure via the
numeric keypad
PAUSE
Confirm with START
START
PARAMETER NUMBER =
Input further data
-or-
STOP
TF 461
TOSHIBA
Press STOP, returnto standby
mode
Advanced settings
47
GB
Advanced settings
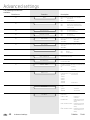
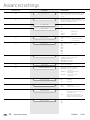
The following functions are
available:
Function no.
Function
01
ECM
Error correction (ECM) is as follows:
ON:
Activated
OFF:
Deactivated
02
TRANSMISSION REPORT
Transmission report is produced:
ON:
After every transmission
OFF:
Only when a transmission
error occurs
04
HEADER PRINT
ON:
OFF:
Is transmitted
Is not transmitted
05
RECEIVE FOOTER
ON:
OFF:
Is printed
Is not printed
06
XMT SPEED
Preset transmission speeds, transmission
9600 BPS
4800 BPS
7200 BPS
2400 BPS
07
RCV SPEED
Preset transmission speed, reception
9600 BPS
4800 BPS
13
RDC ACCEPTANCE
14
RDC CENTER ID
20
DIAL METHOD
DTMF
PULSE DIALLING
21
REDIAL TIMES
Number of redial attempts if transmission
is not successful
02
2 twice
~
10
10 times
22
REDIAL INT.
23
TRAIN INT.
25
GB
48
Description
Advanced settings
INIT WAIT
Session is possible:
ON:
always
OFF:
not allowed
A additional password can be stored to
have better security.
Period between redial attempts if
transmission is not successful
30 SEC
30 seconds
~
1 MIN
2 MIN
3 MIN
10 MIN
20 MIN
20 minutes
Period between redial attempts if line is
busy
1 MIN
1 minute
~
10 MIN
10 minutes
Type of connection at start of dialling
procedure
PUBLIC LINE
Dialtone is
checked
EXTENSION
Dialling procedure
starts after 3 sec.
delay
DIAL AFTER 4.0 SEC Dialling procedure
starts after 4 sec.
delay
~
DIAL AFTER 6.0 SEC Dialling procedure
starts after 6 sec.
delay
TOSHIBA
TF 461
Advanced settings
TF 461
Function no:
Function
26
PAUSE WAIT
Dialling procedure after pause button
TONE CHECK
Number dialled
when dialtone is
received
PAUSE BUTTON
DIAL PAUSE 3.0 SEC Number dialled
after pause of 3 sec.
~
DIAL PAUSE 6.0 SEC Number dialled after
pause of 6 seconds
27
ACCESS OFF
Procedure for obtaining public line
NO PUBLIC LINE
PUBLIC LINE FLASH
FlashFunction
PUBLIC LINE EARTH KEY Earth keyFunction
PUBLIC LINE DIGIT
Public line
obtained via
code
28
ACCESS CODE
Enter a (max.) 4-digit code for obtaining
public line
36
CALLING TIMES
Number of synthetic ring signals set in
the TEL/FAX mode
1 SYNTH. RING TEL/FAX
1 ring
~
10 SYNTH. RINGS TEL/FAX
10 rings
37
AUTO DELAY
Number of rings before the fax machine
connects to the line in the automatic
receive mode (AUTO lamp is lit)
1st RING
~
10th RING
38
RCV MODE=
Receive type in manual mode (AUTO
lamp off)
TEL
purely manual mode
TEL/FAX
TEL/FAX mode
FAX/TAD
FAX/TAD mode
39
TEL DELAY
41
RMT ACTIVATION
Activate the fax machine with a DTMF
remote control code
ON
Enabled
OFF
Disabled
42
ACTIVATIONCODE=
Enter the sequence of characters to be
used as the remote control code
43
DEACTIVATION CODE
Enter the sequence of characters to be
used to disconnect the fax machine from
the line.
*Not in all countries.
TOSHIBA
Description
Number of rings before the fax machine
connects to the line in the manual receive
mode (AUTO lamp off).
Effective only in the TEL/FAX
mode
1 RING
1 ring
~
10 RINGS 10 rings
Advanced settings
49
GB
Advanced settings
Function no:
Function
44
FAX MONITOR TIME =
Period during which the fax machine can
detect another fax machine (in FAX/TAD
mode)
45
SILENT DETECTION=
Minimum length of pause in speech
before fax machine switches into the FAX
mode (with FAX/TAD mode)
46
PC TRANSFER
55
PAPER SIZE
Description
ON
OFF
Paper sizes for PC printer operation:
A4
LETTER
LEGAL
56
DEFAULT RES
Preset resolution
STD
Standard resolution
FINE
Fine resolution
57
COPY REDUC.
Reduction for copy
OFF
96%
92%
90%
86%
83%
72%
CALENDAR
Format of date in display and in the lists
(example: March 15th, 1995)
YY-MM-DD95-03-15
DD-MM-YY15-03-95
MM-DD-YY03-15-95
62
LANGUAGE
Choice of language
63
SCAN CONTRAST
Contrast setting for scanning
BRIGHTER Low coverage on
document
NORMAL Normal coverage on
document
DARKER High coverage on
document
64
INK SAVE MODE
Saving mode is
ON
enabled
OFF
disabled
65
RX REDUCTION
Printout of received document reduced:
AUS
fixed 90%
AUTO
varaible, 96% to 72%
67
INK END DETECT
ON
68
50
100%
61
OFF
GB
DIN A4 size
Letter size
Legal size
Advanced settings
BIDIRCT. PRINT
Documents printed out despite
empty ink cartridge, until the
last drop of ink
When the ink cartridge is
empty, the printer stops and
displays an error message
Bidirectional (two-way) printing
ON
OFF
TOSHIBA
TF 461
Advanced settings
• Does the PABX have public line
capability?
• Does the PABX have DDI capability?
• Have you entered the ”*” key before
the actual fax number?
• How is the public line obtained (earth
key, flash, number)?
• What dialling method is used (pulsedialling, DTMF dialling)?
Connection to PABX
If the TF 461 is connected to a PABX, the
functions have to be modified. The
standard setting for this case is described
starting on page 7. If any problems or
malfunctions occur, please consider the
following items; you may have to discuss
these items with the operator of the PABX:
• Is function 25 set to EXTENSION?
• Is function 26 set to TONE CHECK
PAUSE BUTTON*?
• Is the correct dialling method set in
function 20?
• Has the correct method of obtaining
a public line been set in function 27?
• Have the correct codes for obtaining
a public line been set in function 28
(if the public line is obtained via a
code)?
*) Alternatively, you can set function 26
to 4 seconds.
Receive footer on/off
As proof of the date on which the
document is received, your fax machine
can print the local date and time as an
additional line on the received document.
If this facility has been activated, the
receive footer is printed at the bottom of
the received document.
15-03 19:56 M 100%
Standby mode
FUNCTION
Start the menu
Confirm with START
(press 2x)
2x
START
PARAMETER NUMBER =
Make your selection for the function
number
Enter function number
Confirm with START
START
RECEIVE FOOTER OFF
REDIAL
Change the value of the function
PAUSE
RECEIVE FOOTER OFF
Confirm with START
START
Press STOP, return to standby
mode
STOP
TF 461
TOSHIBA
Advanced settings
51
GB
Advanced settings
Change speaker volume
If you listen into a fax transmission
process, the call establishment procedure
is relayed via the built-in speaker. This
means that you can also listen to the
actual call establishment process. The
volume can be adjusted as follows:
15-03 19:56 M 100%
Standby mode
FUNCTION
Start the menu
PROGRAM SETUP DATA
Confirm with START
START
REDIAL
Page through the menu...
PAUSE
SPEAKER VOLUME
...until you reach the desired menu item
Confirm with START
START
SPEAKER VOL.
Current volume is displayed and indicated
acoustically
REDIAL
Change the volume
PAUSE
R
Confirm with START
START
GB
52
Advanced settings
TOSHIBA
TF 461
Advanced settings
Adjust ringing tone/key
beeps
The volume of the ringing signal (synthetic
ringing) in the TEL/FAX mode can be
adjusted as follows. This setting also
affects the key beep. No beeps are
generated if the volume is set to
minimum.
15-03 19:56 M 100%
Standby mode
FUNCTION
Start the menu
PROGRAM SETUP DATA
Confirm with START
START
REDIAL
Page through the menu...
PAUSE
RINGER VOLUME
...until you reach the desired menu item
Confirm with START
START
RINGER VOL.
The current volume is displayed and
indicated acoustically
REDIAL
Adjust the volume
PAUSE
R
Confirm with START
START
TF 461
TOSHIBA
Advanced settings
53
GB
Advanced settings
Set transmission report
output
This report can be printed after every
transmission or only for errored
transmissions. It provides information
concerning the most important
transmission data.
15-03 19:56 M 100%
FUNCTION
Standby mode
Start the menu
Confirm with START
(2x)
2x
START
PARAMETER NUMBER =
Make your selection for the function
number
Enter function number
Confirm with START
START
CONFIRMATION
REDIAL
PAUSE
ON
Current status
Change the status as follows
ON
Transmission reported printed
after every transmission
OFF
Transmission report printed only
for errored transmissions
Confirm with START
START
Press STOP, return to standby
mode
STOP
GB
54
Advanced settings
TOSHIBA
TF 461
Possible problems
Error codes in journal
The display message transmission error is
expained by the indicated error code.
The same code if shown also in the in the
jounal and transmission repot.
Press STOP to clear error
messages.
Code Nummer
Cause
How to correct
The transmission is interrupted by the stop
button.
Try again
OK
The document has been transmitted without
any errors.
This is how it should be
001
Top cover or rear cover open
Close all parts
002
Paper jam or document too long. Is the memory
full? Ask your dealer for a memory extension.
Remove the document. See also page 59
Send the document from the document
feed
003
Recording paper jam or recording paper
cassette is empty
Remove jammed paper or load new
paper without switching off the machine,
see page 59
Line error
Repeat transmission, try switching over to
4800 BPS.
014
Printing error
Check toner, process unit and paper
transport
020
Errors on the line mean that parts of the
document are difficult to read; however, the
document is transmitted completely.
No special measures necessary. If this
frequently occurs with one particular fax
partner, switch over to 4800 BPS.
100-103
Line error
Repeat transmission, try switching over to
4800 BPS.
104-106
Unsuccessful polling
An incorrect password has been used, or
no document was loaded for polling
111
Mailbox transmission
An attempt has been made to transmit a
document to a box or relay. Check
whether a TF 851 is installed at the far
end.
Line error
Repeat transmission, try switching over to
4800 BPS.
The other party’s fax machine is not copatible
Connect the other party and check
compatibility
128-156
Line error
Repeat transmission, try switching over to
4800 BPS.
353-354
A remote control error occurs
Consult your dealer
STOP
005-011
112-123
127
TF 461
TOSHIBA
Possible problems
55
GB
Possible problems
Error messages in the
Display
Your fax machine reports an operating
error or fails to perform the required
function. Before you make an unnecessary
call on your service technician, take your
time and see if you can help yourself. This
checklist will help
you recognise and eliminate errors.
Display
Cause
Corrective action
DOCUMENT JAM
Documents are jammed in the document tray.
Press STOP key and remove the paper
Paper error
No recording paper, or recording paper has not
been pulled into the machine correctly.
Read the instructions on page 5.
Check Cartridge M100%
There is no ink cartridge, or the ink cartridge
has not been inserted correctly.
Insert the cartridge correctly. See page 5.
Ink low S 100%
The ink cartridge will soon be empty.
Contact your Toshiba dealer to order a
new ink cartridge.
The ink cartridge is empty
Replace the cartridge. Pay attention to
the instructions in the memory display. Do
not switch off the fax machine!
No document
No document present
The action requires a document
PC comm. error M100%
Communication to the PC has failed
Try to remedy by pressing the STOP
button
System error xxx
The fax machine has malfunctioned
Contact your TOSHIBA dealer
comm. fx xxx
The fax machine has malfunctioned
Attempt to clarify the problem unsing the
following pages.
Ink empty
GB
56
M100%
M 80%
Possible problems
TOSHIBA
TF 461
Possible problems
Transmission problems
Your fax machine reports an operating error or
fails to perform the required function. Before
you make an unnecessary call on your service
technician, take your time and see if you can
help yourself. This checklist will help
you recognise and eliminate errors.
Problem
possible causes ...
... and solutions
Your document is not automatically pulled
into the feeder.
Your machine displays an error.
If the display gives an error message,
clear the fault and delete the display with
STOP.
The display is blank.
Check there is power on the machine.
The machine must be switched on (see
page 4).
Document size or thickness of paper are not
acceptable.
Use acceptable documents only (see
page 22).
The operator control panel is not firmly locked.
Close the cover. It should be firmly locked
in place on both sides.
The line LED does not flash when you
press the START button
You replaced the receiver before pressing
START.
Try again. Replace the receiver only when
you have pressed START.
The document is damaged during sending
or copying.
Document format or paper thickness not as
specified.
Use acceptable documents only (see
page 22).
The document guides are not properly adjusted
to the paper size.
Adjust the document guides accordingly.
Your fax machine performed transmission
correctly but the message was not
received by the receiver.
The other machine is out of paper.
Ask the receiver to put paper in his
machine.
The receiver received a blank sheet
instead of the document sent.
You loaded your document in the machine with
the image face-up.
Send your document again: the image
must be face-down on your document
feeder.
The receiver reports: The document
transmitted is difficult to read.
Your machine’s document reader is dirty or
damaged.
Make a copy of your document on your
fax machine (see Ppage 20). If your copy
is also difficult to read, clean the
document reader.
RESOLUTION and CONTRAST are not set
correctly.
Make a copy on your fax machine (see
page 20) and adjust the settings to your
document. You can also improve
document quality: By making the print on
the photocopy darker, enlarging or
reducing. (see page 30/31). Then send
again.
The telephone connection is poor.
Redial. You may get a better connection.
Abbreviated or one-touch dialling do not
work.
Abbreviated or one-touch dialling number is not
correctly stored.
Check and correct stored numbers (see
page 38).
No dial tone is heard when handset is offhook.
The telephone is not correctly connected.
Check that your telephone is connected
correctly to the socket (see page 4).
The fax machine is not correctly connected.
Plug the connecting cable of your fax
machine into the socket (see page 4).
Your fax machine has been set to the wrong
dialling mode.
Switch to the correct dialling procedure:
DTMF or pulse-dialling (see page 11).
If you are connected to a PABX: You have set
the wrong line type.
Set the line types to EXTENSION (see
page 12).
Your fax machine is not connected to the PSTN.
Plug the connecting cable of your fax
machine into the socket (see page 4).
Your call does not arrive although you
have dialled the correct number.
TF 461
TOSHIBA
Possible problems
57
GB
Possible problems
Receiving problems
Your fax machine reports an operating error or
fails to perform the required function. Before
you make an unnecessary call on your service
technician, take your time and see if you
can help yourself. This checklist will help
you recognise and eliminate errors.
Problem
possible causes ...
... and solutions
You press START to receive an document.
But you receive nothing.
Your have an error displayed.
If the display shows an error message,
eliminate the fault and delete the display
with STOP.
The fax machine is not correctly connected.
Check the wiring. See page 4.
The display is blank.
Check there is power to the machine.
The machine must be switched on (see
page 4).
There is still a document in the feeder.
Press STOP and remove the document.
Your fax machine is set in manual receiving
mode and you replaced the handset before
pressing START.
When receiving the next fax, be sure to
replace the handset only after you have
pressed START.
The operator control panel is not closed.
Close the cover. Both sides of the cover
must be firmly locked in place.
Your recording paper is not fed out.
The recording paper in your machine is
jammed.
Remove the jammed paper (see
page 59).
The dcoument received is difficult to read.
Document quality is poor.
Ask the sender to reset the resolution and
contrast or improve the quality of the
document e.g. by making the print on the
photocopy darker, enlarging or reducing.
Then have it send again.
The telephone connection is poor.
Ask the sender to transmitt the document
again (see page 6).
You receive a completely blank document.
The sender made a mistake when loading the
document.
Check whether the sender loaded in the
correct manner.
The document received is partially printed.
The operator control panel of your fax machine
is not closed properly on both sides.
Close the cover. Both sides of the cover
must be firmly locked in place.
You can send fax messages without any
problem, although you cannot receive any.
Receiving protection is activated.
Switch off receiving protection (see
page 17).
GB
58
Possible problems
TOSHIBA
TF 461
Possible problems
Remove paper jam in the
document feed area
Open the operating panel and the top cover of
the machine
On the left-hand side in the machine, you will
find a blue lever. Pull this lever forwards and pull
out the paper upwards.
Close the machine.
Remove paper jam
before document tray
Open the operating panel and the top cover of
the machine
On the left-hand side in the machine, you will
find a blue lever. Pull this lever forwards, and
pull the paper out of the front of the machine.
Close the machine.
Document jam
TF 461
TOSHIBA
Open the operating panel.
Pull out the paper upwards
Possible problems
59
GB
Your TF 461 as a printer
System requirements
Connect your TF 461 to a computer which
meets the following system requirements:
CPU:
• i80386SX (or higher)
RAM:
• min. 4 MB
Hard disk space:
• min. 5 MB free space
Software:
• MS-DOS version 5.0 or higher;
• Microsoft Windows version 3.0/3.1
or higher (in extended -386 enhancedmode)
• Microsoft Windows 95
• IBM OS/2 1.3/2.0 or higher
If you would like additional information for
installing the printer drivers, you can read
or print out the README.TXT file. After
the printer driver has been installed, this
file can be found in the directory
\PRTCIJP.
Connecting the fax
machine to the
computer
The TF 461 has an 8-bit Centronics
parallel interface. Perform the following
steps to connect the TF 461 to your
computer:
1. Disconnect the TF 461 from the main
supply.
2. Switch your computer off.
3. Connect a parallel cable to the
corresponding socket on the rear of hte
TF461.
Parallel printer cable not supplied.
4. Secure the connector on the parallel cable
by means of the wire clips.
5. Connect the other and of the parallel cable
to a spare parallel port on your PC.
Parallel cables should be no longer
then 2 meters.
GB
60
Your TF 461 as a printer
TOSHIBA
TF 461
Your TF 461 as a printer
Changing the ink
cartridge
Your TF 461 can print monochrome as
well as color documents. A monochrome
ink cartridge is used for fax operation. You
will have to replace the ink cartridge if the
machine is also to be used as a color
printer. The following diagram shows you
how to change the ink cartridge. The
replaced ink cartridge can easily be stored
in the cartridge compartment.
Press
CHANGE CARTRIDGE
CHECK CARTRIDG M100%
Ensure that the printhead has moved
to the left into the changing position
before replacing the ink cartridge. You
will damage the machine if you try to replace
the cartridge in another position!
The color ink cartridge can also
be used for printing monochrome documents. However, if
large monochrome areas are to be
printed, it is recommended that the color
ink cartridge be replaced by a monochrome cartridge.
Press the following again if the
printhead is not in this position.
CHANGE CARTRIDGE
Loading the paper
Your TF 461 offers various options of
loading the printer paper
• Automatic sheet feed (max. 150
sheets)
• Automatic envelope feed
• Manual single sheet feed
Automatic feed
Manual feed
Length
127 - 364 mm
127 - 364 mm
Width
89 - 216 mm
76 - 228 mm
Weight
60 - 90 g
60 - 129 g
0,071 - 0,191 mm
0,071 - 0,191 mm
Paper formats
The following paper formats can be used
as printer paper in your TF 461:
Thickness
TF 461
TOSHIBA
Your TF 461 as a printer
61
GB
Your TF 461 as a printer
The automatic sheet
feed
The best print results are achieved with
high quality paper. However, special
recycled paper is now also suitable for ink
jet printing. It is also possible for film to
be loaded into the sheet feeder. Max. 150
sheets can be inserted in the sheet
feeder, depending on the thickness of the
paper which is used. Please ensure that
only one type of paper is inserted in the
sheet feed.
1. Using your thumb and index finger, press
the paper release lever of the left paper
guide and move it to the left stop.
The right paper guide cannot be
changed.
2. Push back the paper release lever and insert
the stack of paper. Do not exceed the
maximum capacity of the sheet feed.
3. Move the left paper guide to the left edge
of the sheet so that the paper rests flush
against the guide.
4. To set the paper release lever to its working
position, pull the lever towards you.
The automatic envelope
feed
1. Turn the two envelope guides towards the
rear of the machine until they snap into
position.
You can also load envelopes in the
automatic sheet feed. Do not use more
than 15 envelopes.
2. Using your thumb and index finger, press
the paper release lever of the left paper
guide and move it to the left stop.
The right paper guide cannot be
changed.
3. Push back the paper release lever and insert
the stack of paper. Do not exceed the
maximum capacity of the sheet feed.
4. Move the left paper guide to the left edge
of the sheet so that the envelopes rest flush
against the guide.
5. To set the paper release lever to its working
position, pull the lever towards you.
GB
62
Your TF 461 as a printer
TOSHIBA
TF 461
Your TF 461 as a printer
The manual single
sheet guide
The manual feed enables you to print separate
sheets irrespective of what is already in the
printer.
The printer always prints on the side
facing you.
1. Insert the paper as detailed by the symbol
on the single-sheet feed.
• Always ensure that sheets of paper are flush
against the right edge of the sheet feed.
• Always ensure that envelopes are flush
against the marked envelope edge of the
sheet feed.
2. Press the ”VORSCHUB” button until the
sheet is drawn into the machine.
3. Start to print
Insert only one sheet in the manual sheet feed
Installing the printer
driver sofware
Every program which controls a printer
requires a printer driver. This is a special
program which converts the print data
into the correct form which can be
understood by your printer. Printer drivers
are provided for the following programs:
• Harvard Graphics 3.0
• Lotus 1-2-3
• Microsoft Windows 3.X
• Microsoft Windows 95
• IBM OS/2
• Microsoft Works 2.0, 3.0
• Microsoft Word 5.5, 6.0
• Wordperfect 5.1, 6.0 for DOS
The installation program helps you to
perform the correct steps.
Switch the computer and the fax
machine on.
The following installation procedure
should be performed at the DOS level.
If your computer automatically loads
Windows, please exit Windows and enter
the DOS level.
For this purpose, open the menu File in
the program manager and then click on
Exit Windows.
TF 461
TOSHIBA
Your TF 461 as a printer
63
GB
Your TF 461 as a printer
Then click on OK
To install from the DOS level
• Now insert the SETUP DISK in the
floppy disk drive of your computer.
• Enter the letter of the drive in which
the disk has now been inserted (e.g.
drive A).
a: ↵
The DOS prompt is now displayed on the
screen:
A:\>_
• Enter SETUP:
setup ↵
The installation program is
started:
If you require further information, you can
obtain an additional HELP text at any time
by pressing the F1 key; this will assist you
in any situation. The green fields are
buttons; use the mouse to click on these
buttons. If you do not have a mouse, you
can also activate these buttons by means
of a combination of the ALT key and the
letter which is highlighted in yellow.
• Click on OK or, if you do not have a
mouse, press ALT-O.
Information
Printer Setup Utility
Welcome to the Printer Setup Utility.
This utility will:
-
check that your printer is properly connected to your computer
install printer drivers
install the Printer Toolkit
complete the setup of your printer’s options
Choose OK to continue. Choose TUTORIAL to begin with some instructions on
how to use this utility.
To choose a button if you don’t have a mouse, press and hold the Alt key
while you type the highlighted letter ( O or T ).
OK
F1 Help
GB
64
Your TF 461 as a printer
AltF4 Exit
TUTORIAL
F10 Menu Bar
TOSHIBA
TF 461
Your TF 461 as a printer
• Accept the current setting (parallel
cable) and click on OK.
Information
Default Printer Port Selection
Select the PC output port where your printer is connected.
This utility will use the selected port to communicate with your printer, as well as to
update your applications when drivers are installed.
Choose OK to continue after selection, or choose RETURN to return
to the previous screen.
Port
Parallel Cable (LPT1)
Serial Cable (COM1)
Serial Cable (COM2)
OK
F1 Help
Your are now able to check whether your
TF 461 has been correctly connected by
means of a test printout. If you do not
require a test printout, select ”Skip”.
A sample document can only be
printed with a color cartridge!
Select ”Skip” if a color
cartridge has not been installed.
AltF4 Exit
RETURN
F10 Menu Bar
Information
Printing a Sample Document
Let’s see if your printer is properly connected to your computer.
First, be sure your printer is turned on.
Then, choose OK and a sample document will be sent to your printer.
Default Port: LPT1
OK
F1 Help
The system starts to copy the printer
driver
• To select Express, use the mouse to
fill the field ( ).
• Then click on OK.
AltF4 Exit
SKIP
F10 Menu Bar
Information
Choosing Setup Method
You are now ready to choose between two methods of setup: Express and
Custom. ‘Express’ is the quickest and easiest method. ‘Custom’ offers more
flexibility if you have special requirements. If you want to choose how
your system is set up, you should select the ‘Custom’ method.
Choose a setup method from the menu below.
If you need help deciding which method to choose, press F1.
Methods
(") Express
( ) Custom
OK
F1 Help
TF 461
TOSHIBA
AltF4 Exit
RETURN
F10 Menu Bar
Your TF 461 as a printer
65
GB
Your TF 461 as a printer
At this point, the setup program checks all
installed hard disks for programs for which
you require the printer.
• Click on OK
Information
Installing Printer Drivers
You are now ready to install printer drivers for the software applications
you use. A printer driver allows your application to send data to a
specific printer.
The utility will first search your hard drives for selected applications and
list the applications it found. You can then proceed to install the
drivers, or you can skip driver installation.
OK
F1 Help
The system displays a list of the programs
which the system is looking for on your
hard disk or hard disks. Depending on the
size of the hard disk(s), this search can
take quite some time.
• Click on OK
AltF4 Exit
RETURN
F10 Menu Bar
Information
Application Search
Choose OK to tell the utility to begin searching your hard drives for the
applications in the box on the left. Choose SKIP if you do not want to
install drivers for any of these applications.
Looking For:
Applications Found:
Harvard Graphics v3.0 <empty>
Lotus 123 v2.32.4
Lotus 123 v3.13.4
Microsoft Windows v3.1
Microsoft Word v5.5
Microsoft Word v6.0
Microsoft Works v2.0
OK
F1 Help
At this point, you can see the result of the
search. In this example, the system has
found Microsoft Windows as the
application.
• Click on OK to confirm the result.
AltF4 Exit
SKIP
F10 Menu Bar
Information
Application Search
Search Complete!
The box on the right lists the applications that were found.
Choose OK to continue with driver installation, or choose SKIP if you do
not want to install drivers for these applications.
Looking For:
Applications Found:
Harvard Graphics v3.0 Microsoft Windows v3.1
Lotus 123 v2.32.4
Lotus 123 v3.13.4
Microsoft Windows v3.1
Microsoft Word v5.5
Microsoft Word v6.0
Microsoft Works v2.0
OK
F1 Help
GB
66
Your TF 461 as a printer
AltF4 Exit
SKIP
F10 Menu Bar
TOSHIBA
TF 461
Your TF 461 as a printer
The path of the application(s) which has
(have) been found is listed at this point.
• Click on OK to confirm the result.
Information
Microsoft Windows v3.1 Driver Installation
The utility has found directories containing Microsoft Windows v3.1. If you want to
install a Microsoft Windows v3.1 driver, highlight a directory and choose OK.
Otherwise, choose SKIP.
Directories with Microsoft Windows v3.1
D:\WINDOWS\
E:\WINDOWS\
OK
F1 Help
The required drivers are now downloaded
from the driver disk. When prompted,
replace the floppy disk in the drive by the
DRIVER DISK.
• Then click on OK
AltF4 Exit
SKIP
F10 Menu Bar
Information
INSERT ANOTHER DISKETTE
Please insert Driver Disk 1 into a drive, specify that drive below, and then choose
OK to continue.
If the default drive is shown correctly, simply choose OK to continue.
The required drivers are now copied.
Drive or Path location to find driver files
A:\
OK
F1 Help
Replace the setup disk into your drive
• Click on OK
AltF4 Exit
CANCEL
F10 Menu Bar
Information
Information
Please reinsert your Setup Disk into drive A:
OK
F1 Help
The result of the action is now displayed.
• Click on OK
AltF4 Exit
F10 Menu Bar
Information
Driver Installation Complete!
The drivers listed on the right have been installed and the applications
have been updated. Drivers Installed Microsoft Windows v3.1 PCL
You are now ready to use your Color Inkjet Printer with these applications.
OK
F1 Help
TF 461
TOSHIBA
AltF4 Exit
F10 Menu Bar
Your TF 461 as a printer
67
GB
Your TF 461 as a printer
When you install Toolkit (see page 78),
you obtain useful applications with which
you can set and check your printer. You
can specify the directory at this point.
However, we recommend that you use the
default path.
• Click on OK
Information
Install Printer Toolkit
The Printer Toolkit is a set of useful PC utilities customized for your Color Inkjet
Printer. Choose Help for a description of the tools.
Once installation is complete, DOS users can type TOOLKIT from the prompt
to start the Printer Toolkit. Windows users can start the Printer Toolkit from the
Printer Toolkit icon.
Please confirm the path location where you want the Printer Toolkit installed and
choose OK, or choose SKIP to skip installation of the Printer Toolkit.
Path Location for the Printer Toolkit
C:\PRTCIJP
OK
F1 Help
If you would also like to use the Toolkit
under Windows, you will have to insert a
program group and an icon. This section
of the setup procedure performs this task
for you.
• Click on OK
AltF4 Exit
SKIP
F10 Menu Bar
Information
Microsoft Windows Location
If you have Windows and would like an icon added to the Windows desktop to start
the Printer Toolkit, choose OK.
If Windows is not stored at the location shown below, type the correct path and
choose OK.
Choose CANCEL if you don’t want to add a Windows icon for the Toolkit.
Windows path:
C:\WINDOWS\
OK
F1 Help
The setup procedure is complete.
• Click on OK
All drivers identified by the search result
and your specifications have now been
loaded and activiated. From now onwards,
you can operate your TF 461 as a printer.
AltF4 Exit
CANCEL
F10 Menu Bar
Information
Printer Setup Complete
Printer Setup is complete!
Don’t forget, if you installed the Toolkit on your hard drive, you can use it any time
you need it! It offers you a variety of tools you might find
handy for your printer.
To use the Toolkit:
Choose EXIT to end the Printer Setup Utility.
Reboot your computer to activate changes in your system files.
Type TOOLKIT at the DOS prompt.
EXIT
F1 Help
GB
68
Your TF 461 as a printer
AltF4 Exit
F10 Menu Bar
TOSHIBA
TF 461
Your TF 461 as a printer
Printer setup
(colour printer)
You can adapt the function of the
selected printer (here: colour ink jet
printer on LPT1) to suit your specific
requirements. Open the window Printers,
as detailed in the section ”Setting the
Default Printer”” (page 81).
Click on the button Setup..., in order to
open the printer setup dialog.
The printer facilities consist of six pages:
These pages contain setting options
assigned to the various overall terms.
They are activiated by clicking on the
corresponding ”flap” with the mouse.
The various pages are described in the
following:
General:
Meaning of buttons:
The buttons at the bottom of the screen
are identical for all files.
OK:
Confirm the settings of the particular
file.
Cancel: The settings are not changed.
Defaults: Default values (factory settings) are
activated for the particular page.
Help:
Extensive help menu for the
corresponding file is opened.
About..: This details information concerning
copyright and version.
In addition, you can consult a context-sensitive
help facility by pressing the F1 key in any menu
level.
TF 461
TOSHIBA
Your TF 461 as a printer
69
GB
Your TF 461 as a printer
Paper
Paper size
This sets the print area depending on the
type of inserted paper.
Paper source
Describes the paper feed source.
Copies
Number of copies. Multiple copies are
sorted. If reverse sequence is used, the
final page is printed first.
Media / quality
Media type
Select the print medium at this point.
Depending on the choice which you make
at this point, the system changes the
setting for the print quality so that the
print quality on special print media is the
same as that achieved on paper (e.g.
transparent film, coated or glossy paper).
Print quality
This option enables you to define the
quality of the printout. The setting may
also affect the speed of the printing
process.
Ink saver
This setting controls the quantity of ink
used on the paper during the printing
process. With ink saver selected, the
machine "omits" some dots. You can save
ink with this facility and improve the
quality of printing on recycled paper.
GB
70
Your TF 461 as a printer
TOSHIBA
TF 461
Your TF 461 as a printer
Document type
Document types
The document type option is used to set
up the driver quickly for a particular type
of document. Once a document has been
selected, other options within driver setup
are adjusted accordingly.
For instance: If desktop publishing is
selected as the document type, maximum
resolution and best print quality are
selected, and all other options are
retained. You can also changed the
settings affected by the document type
setting yourself; if you do this however,
the choice of document type will be
cancelled.
If you only want to print text
from a word processing
program, select ”Text” at this
point. Please note that the monochrome
ink cartridge is necessary for this purpose.
Ink / resolution
Colour format
Select the colour mode at this point. You
must subsequently insert the correct ink
cartridge depending on your particular
decision.
PQET
If you have set monochrome under colour
format, you can also activate edge
enhancement at this point. The PQET
facility (Print Quality Enhancement
Technology) improves the print quality. A
resolution of 300 x 600DPI is then used for
printing. In this way, the edges of letters
and most graphics are enhanced, and the
printout is more sharply focussed.
Resolution
You can change the print resolution at this
point.
TF 461
TOSHIBA
Your TF 461 as a printer
71
GB
Your TF 461 as a printer
Image settings
Image
Consider these settings in the same way
as the settings for your colour television.
The ”Enable ink density correction”
facility enables the printer result to be
adapted to the screen display.
Colour
Use this facility to influence the individual
colour components. If the components
are not equal, the printout is given a
corresponding colour cast.
You can simultaneously assess the results
of the manipulations on the adjacent
colour diagram.
If you have inserted the wrong
ink cartridge, the message
"CHECK CARTRIDG M100%"
appears in the display of the TF 461.
Halftones
Halftone
You can use this feature to influence the
type of dither pattern when halftone
printing. The dither pattern method usually
provides structured images, and is suitable
for word processing and printing out
simple graphics. The halftone option can
be deactivated for printing out simple nondithered text. Use the air brush option if
you wish to improve the reproduction of
photographs and if you want to achieve
softer images. This method also produces
excellent output quality for text. Select
the halftone option which is suitable for
the image to be printed.
Test various halftone options in
order to establish which option is
most suitable for your printing
needs.
GB
72
Your TF 461 as a printer
TOSHIBA
TF 461
Your TF 461 as a printer
Printer setup (monochrome)
This printer driver is the best
option if you only want to print in
monochrome. In this way, you
do not have to make any unnecessary
settings for colour printing.
You are able to adjust the function of the
selected printer (ink jet printer - mono on
LPT1) to suit your own specific
requirements. Open the window Printers,
as described in the section ”Setting the
Default Printer” (page 81).
Click on the button Setup... in order to
open the printer setup dialog field.
The following setting options are
displayed:
Paper size
This sets the print area depending on the
type of inserted paper.
Paper source
Describes the corresponding paper feed
source
Graphics resolution
You can influence the print resolution at
this point.
Orientation
Set landscape or portrait format at this
point.
TF 461
TOSHIBA
Your TF 461 as a printer
73
GB
Your TF 461 as a printer
Click on Options ... to make further
settings.
The following additional setting
options are displayed:
Pattern resolution
Ink saver
PQET
The setting of the dither pattern has an
effect on the way in which details in
graphic illustrations are displayed. The
combination of the settings for the
graphics resolution, the sample resolution
and the contrast control influences the
general appearance of the graphics.
The ink saver mode reduces the amount of ink
used for printing in letter quality (not draft
quality); this facility ensures that certain dots
are not printed.
The PQET method (Print Quality
Enhancement Technology) improves the
print quality. If you activate PQET, the
edges of letters and most graphics are
enhanced, and the print is more sharply
focussed.
Contrast control
The contrast control settings specify how
much difference there is between the
various grey stages. The combination of
the settings for the graphics resolution,
the pattern resolution and the contrast
control influences the general appearance
of the graphics.
GB
74
Your TF 461 as a printer
Print quality
This setting defines the printout quality.
Maximum density is used for printing letter
quality, and the density is reduced for draft
quality. This facility produces a weaker image
but increases the printing speed.
Fast printing ...
This option uses the protocol of the parallel
interface which enables data to be sent to the
printer more quickly. This option should be
marked in order to optimise performance.
Optimise for performance ...
If you select ”Optimise for
performance”, the printer driver is
configured in such a way that the
amount of system time used for the
printer driver application is restricted to a
minimum. The print performance is
increased in most cases. However, in
some applications the ”Optimise for
performance” option can result in
missing text and/or graphics or incorrect
overlay of text and/or graphics.
TOSHIBA
TF 461
Your TF 461 as a printer
The printer status
display
Each printout contains the status display
of the printer driver:
This provides you with an online check of
the current printer status.
The following information is provided:
• File name
• Time printing
• Processed area
• Page number
You can influence the current print job
with the buttons:
Delete the current job.
Stop the current job.
Display the following menu:
The buttons have the following
meaning:
Page
The page which is currently being printed
is rejected, and the printing process
resumes at the start of this page.
Document
The document which is currently being
printed is rejected, and printing of this
document starts again from the
beginning.
Requeue
The document which is currently being
printed is rejected and requeued; it is
then printed at a later time.
TF 461
TOSHIBA
Your TF 461 as a printer
75
GB
Your TF 461 as a printer
The printer status display also notifies you
of any problems in the printer:
The following problems are displayed:
• Wrong ink cartridge
• Empty ink cartridge
• Paper jam
• Paper out
• Transmission cable defective
• Printer not ready
The status display then changes as
follows:
The spool manager
Once you have printed for the first time,
the icon of the spool manager is displayed
in the bottom left corner of Windows.
The spool manager controls the handling
of incoming print jobs; it sorts the various
print files and monitors the process of
sending the files to the printer.
Double click on the icon to open the spool
manager.
You can see the function of the spool
manager in this example. Two print jobs
are present, and the first job
(Druck461.DOC) is currently being
processed. The resulting queue of print
jobs can be edited quite easily:
GB
76
Your TF 461 as a printer
TOSHIBA
TF 461
Your TF 461 as a printer
Double click on a print job of your choice:
The system opens a small menu where
you can influence the selected print job.
OK
Confirm the settings which have been
made
Cancel
The situation is not changed
Delete
Deletes the print job from the stack
Requeue
The corresponding print job is requeued
and printed out at a later time.
Hold job
If a job is currently being printed, it is
immediately stopped; if a print job has
been placed in the queue, it is not
carried out.
Keep job after printing ...
When this job has been printed out, the
system creates a file in which the print
job is stored on the hard disk.
TF 461
TOSHIBA
Your TF 461 as a printer
77
GB
Your TF 461 as a printer
The Toolkit
The Toolkit is generally required
when you want to adapt the
driver to specific DOS programs!
The printer Toolkit is a program which you
can use to adapt the printer and your
computer to meet your specific
requirements.
The previous setup procedure has
installed the Toolkit on the hard disk of
your computer.
To select the Toolkit
• under DOS
Change to the current directory where the
Toolkit is located:
(If you have selected a different directory
during the setup procedure, please select
the corresponding directory).
cd \prtcijp ↵
The DOS prompt now appears on the
screen:
C:\PRTCIJP>_
Enter Toolkit:
TOOLKIT ↵
• under Windows
1. Open the program group Toolkits by
double-clicking on the icon.
2. Open the printer utility program by
double-clicking on the icon.
3. Click on Toolkit in order to start the
program.
GB
78
Your TF 461 as a printer
TOSHIBA
TF 461
Your TF 461 as a printer
The Toolkit program is started:
Information
Basic
Fonts
Advanced
Defaults
Printer Toolkit
This is the Printer Toolkit main menu.
Start a utility by selecting an item from the menu bar at the top of the screen. Press
F1 at any time while using these utilities to obtain HELP, or press F1 NOW to get a
summary of available toolkit functions.
To Exit this utility, press Alt F4.
Available Printers:
Color Inkjet Printer
F1 Help
The individual program points can be
selected by means of pulldown menus.
For this purpose, click on the
corresponding terms in the top line, or
simultaneously press the ALT key and the
corresponding red letter. The example
illlustrates the information menu
(window):
Once you have opened the menu, you can
click on the desired menu item, or go to
the menu item using the cursor keys and
then press Return.
You can again obtain a special help text
via the F1 key in every level.
Information
TOSHIBA
Basic
F10 Menu Bar
Fonts
Advanced
Defaults
Printer Toolkit
Help Phone Numbers
Read Me
oolkit main menu.
About
lecting an item from the menu bar at the top of the
any time while using these utilities to obtain
HELP, or press F1 NOW to get a summary of available toolkit functions.
To Exit this utility, press Alt F4.
Available Printers:
Color Inkjet Printer
F1 Help
TF 461
AltF4 Exit
AltF4 Exit
F10 Menu Bar
Your TF 461 as a printer
79
GB
Your TF 461 as a printer
The individual menus are described in the following:
Information
Read Me
This contains the latest information concerning the Toolkit which you are just using. Technical
changes which were too late to be included in this manual are also contained in this
information. We recommend that you print out this part, and you will find the appropriate
menu item at that point.
Here you will find the version number of this software.
About
Basic
Update Application Printer Driver
Print Sample Document
If new applications have been added after your printer driver has been installed, you can use
this item to update the printer driver.
Here you can print out the technical data of your printer in the form of a sample printer (color
or monochrome)
Advanced
Install Toolkit
Send Printer Commands
Download Demos
If you are using the Toolkit program from a floppy disk, you are able to copy Toolkit to your
hard disk.
Your printer reacts to special print commands which the printer driver normally provides. You
are able to ”manually” send these commands to your printer.
If you have any print files, this item enables you to print them out via the printer.
The following details relate only to Windows applications and it is thus assumed that the Windows user interface has been installed.
GB
80
Your TF 461 as a printer
TOSHIBA
TF 461
Your TF 461 as a printer
Setting the standard
printer
When the printer driver has been installed,
you are able to select two different types.
• Color ink jet printer (color printer)
• Ink jet printer mono (monochrome
printer)
The corresponding printer driver may be
useful depending on a specific
application. Please also ensure that the
ink cartridges have been installed correctly
(see page 6, 7).
Please perform the following steps in
order to select the standard printer:
In the program manager window, double
click on the Main icon..
Double click on the Control Panel icon in
the Main window.
Double click on the Printer icon in the
Control Panel window.
The printer selection window is opened:
The easiest way to define the standard
printer is to double click on the name of
the driver in the field Installed Printers.
Then click on the button Close.
TF 461
TOSHIBA
Your TF 461 as a printer
81
GB
Configuration of the printer
Draft/ LQ printing
A high print quality is not always
necessary. For instance, if you want to
make a test printout which is also quite
large, then draft printing is an alternative.
Fewer ink jets are used during the draft
printing mode; this reduces the print
quality and increases the print speed. In
addition, ink consumption is reduced in
this mode.
Press the DRAFT/LQ button
DRAFT/LQ
Lamp DRAFT/QUALITY is lit
DRAFT/LQ
Press the DRAFT/LQ button
Lamp DRAFT/QUALITY isnt lit
The setting is only effective if
you use the PRN command at
the DOS level. If you are printing
via the installed printer driver, e.g. under
Windows, the print quality is controlled by
the settings of the printer driver.
Paper orientation
Draft printing is activated
Letter printing (factory setting) is
activated
FUNCTION
To start the menu
You are able to choose between printing
using the portrait format or using the
landscape format. The portrait format is
generally used for normal letters, and
landscape format can be used for tables.
PROGRAM SETUP DATA
REDIAL
3x
Page through the menu...
PAUSE
The setting is only effective if
you use the PRN command at
the DOS-level. If you are printing
via the installed printer driver, e.g. under
Windows, the orientation is controlled by
the settings of the printer driver.
PRINTER SETUP
...until you reach the desired menu item
Confirm with START
START
SET ORIENTATION
Confirm with START
START
LANDSCAPE
REDIAL
Display the current orientation
Select the desired menu item
PAUSE
PORTRAIT
Confirm with START
START
GB
82
Configuration of the printer
TOSHIBA
TF 461
Configuration of the printer
Open the TF 461 as if you wanted to
replace the printer cardridge. Ensure that
the inside of the machine is well lit (use a
torch).
Adjust alignment
In the bi-directional print mode (see
page 49 for setting the function
{function 68}), the printhead operates in
both directions. It is particularly difficult
for the printhead to print vertical lines in
this mode. If vertical lines are therefore
not completely straight, you can adjust
the alignment of the printhead as follows:
FUNCTION
To start the menu
PROGRAM SETUP DATA
REDIAL
Scheme:
3x
Page through the menu...
PAUSE
Right correction necessary:
PRINTER SETUP
...until you reach the desired menu item
Confirm with START
Left correction necessary:
START
REDIAL
Page through the menu...
3x
PAUSE
BIDIRECT. ALIGNMENT
Optimum alignment:
...until you reach the desired menu item
Confirm with START
START
ADJUST ALIGNMENT
Please wait until the page has been
drawn into the machine and the initial
printing process has been completed (this
will take some time)...
Now look at the section which has just
been printed in your TF 461. A number of
vertical lines has been printed. If you can
see that the lines are not perfectly
straight, you can adjust the machine
using the following buttons:
* - Button = Left correction
# - Button = Right correction
A test printout is made after every
adjustment. Check the new result, and
repeat the correction if necessary.
When the printed lines are perfectly
straight:
Press STOP to return to the
standby mode
STOP
15-03 19:56 M 100%
TF 461
TOSHIBA
Configuration of the printer
83
GB
Configuration of the printer
Cleaning the printhead
FUNCTION
To start the menu
If the quality of the printout deteriorates,
you can clean the printhead. An internal
cleaning procedure is then used for the
jets.
PROGRAM SETUP DATA
REDIAL
3x
Page through the menu...
PAUSE
Please use this function sparingly
as relatively large quantities of
ink are consumed.
PRINTER SETUP
...until you reach the desired menu item
Confirm with START
START
REDIAL
2x
Page through the menu...
PAUSE
HEAD CLEANING MODE
...until you reach the desired menu item
Confirm with START
START
HEAD CLEANING MODE
Test printout
Please wait until the page has been
drawn into the machine and the test
printout has been completed.
FUNCTION
To start the menu
The test printout illustrates the fonts in the
printer on a single page. The grey bar also
indicates whether individual jets are
defective.
PROGRAM SETUP DATA
REDIAL
3x
PAUSE
PRINTER SETUP
Page through the menu...
...until you reach the desired menu item
Confirm with START
START
REDIAL
Page through the menu...
PAUSE
TEST PRINTING
...until you reach the desired menu item
Confirm with START
START
TEST PRINTING
STOP
15-03 19:56 M 100%
GB
84
Configuration of the printer
Please wait until the page has been
drawn into the machine and the test
printout has been completed. The test
printout continues until you...
press STOP to return to the
standby mode
TOSHIBA
TF 461
Configuration of the printer
Hex dump mode
This function is only meaningful if you
wish to adapt a DOS driver. The data
which are sent to the printer are normally
interpreted as equivalent characters by
the printer. If you wish to identify the
specific data which are being sent to your
printer, you can switch over the mode of
the printer. The data are now no longer
interpreted, and are printed instead in the
form of hexadecimal characters.
FUNCTION
To start the menu
PROGRAM SETUP DATA
REDIAL
3x
Page through the menu...
PAUSE
PRINTER SETUP
...until you reach the desired menu item
Confirm with START
The Hex dump mode is
deactivated as soon as a list is
printed, a copy is made or a fax
message is received.
START
REDIAL
4x
Page through the menu...
PAUSE
SET HEX DUMP MODE
...until you reach the desired menu item
Confirm with START
START
15-03 19:56 M 100%
Ready
The printer remains in the Hex dump
mode until you...
press STOP to return to the
standby mode
STOP
15-03 19:56 M 100%
TF 461
TOSHIBA
Configuration of the printer
85
GB
Handling faxes on your PC
System requirements
You can also use the features of your fax
machine your PC. The fax functions can
also be used in addition to the printer
function. The following minimum
requirements are essential in this respect:
• IBM compatible PC with i80486
processor or higher
• 4 MB RAM or higher
• Serial (V.24) interface for connection
to the TF 461
• MS-DOS 5.0 operating system or
higher
• Class 1 fax software (e.g. WinFax Pro
4.0)
• Serial interface with 16550 UART
module*)
*) The UART-module controls the data
transfer process of the serial interface. At
transmission speeds of more than 9600
bit/s, the UART 8250 module and
compatible modules frequently used in a
PC do not always operate perfectly. As
your fax machine transports data via its
serial interface at approx. 19200 bit/s,
there may be problems with the UART
8250. If data transmission from your fax
machine to the PC (and vice versa) does
not function perfectly, it maybe necessary
to replace the existing UART module with
a UART 16550 (manufacturer: National
Semiconductor) or compatible module. In
most PCs, the serial interface is
implemented in the form of a plug-in
card. In this case, replace the existing
plug-in card with a new card featuring a
UART 16550 module.
Features
Mode
Desription
With this system, you are able to operate
your TF 461 as a Class 1 faxmodem..
The following modes can then be used:
PC-Scanner
Reads documents into the PC from the sheet feed of the TF 461.
A document is stored as an image file in the PC with a
resolution of 200x200 dpi.
Send PC-Fax
Files which are created in the PC ( e.g. from a word
processing program) can be sent directly via the fax machine
without having to be printed out.
Receive PC-Fax
Incoming faxes are transferred via the fax machine to the
PC as an image file without being printed out.
The pages are automatically printed out if the PC is not
switched on.
Please ensure that, when the fax
software is installed (e.g. WinFax
PRO), the modem type is set to
Generic CLASS 1 (Hardware Flow
Control).
The following features of WinfaxPro 4.0
are not supported:
• Polling
• Secure transmission/reception
• Broadcast
• File transmission
• Modem functions
• Network operation
GB
86
Handling faxes on your PC
TOSHIBA
TF 461
Handling faxes on your PC
Connection to the PC
1. Switch off the PC and the TF 461.
2. Open the panel on the right-hand side of the
fax machine.
3. Connect the 25-pin sub-D connector to the
corresponding socket on the fax machine,
and secure the connection with the
connector screws.
This cable is not supplied.
Pin assignment of serial cable
Sub-D 9 pin socket (female)
Sub-D 25 pin socket (male)
4. Connect the cable to the serial interface of
your PC.
Install the software before connecting
the TF461 to your PC. The PC does not
need to scan the interface of the fax
machine!
TF 461
TOSHIBA
Handling faxes on your PC
87
GB
Handling faxes on your PC
Insert document with text side
down
Scanning documents
into the PC
You can transfer your documents to your
PC via the sheet feed of your TF 461. The
document is then available as an image
file in your PC, and can be processed as
required.
DOCUMENT READY
Document is ready
COMM.OPT.
Select communication option
*) This display indicates whether your PC
is actually ready to receive.
The following conditions must be fulfilled:
• Ensure that the cable has been
connected correctly
• The PC must be switched on
• The fax program must be loaded and
active (e.g. WinFax PRO)
• The fax program must be set to
automatic reception
Otherwise, the TF 461 will display the
following after a certain amount of time:
TRAY SEND
R
1x
Page through the menu...
PC SCANNER
Confirm with START
START
PC COMM. ERROR #001
In this case, clear the error message by
pressing the STOP button, and remedy the
problem
Documents scanned in this way
are stored in the form of image
files in your PC. An OCR program
must process this file if it is to be
integrated within a word processing
program. This process is essential if the
file is to be used as a text file ( contained
in WinFax PRO).
Sending fax messages
from the PC
If you have for instance created text or
graphics via a word processing program,
you do not need to print out the text or
graphics in order to send a fax document.
Winfax PRO Software transfers your
document via the cable from your PC to
the fax machine together with the fax
number which you have specified when
you were processing the document.
Following internal transmission, the job is
then handled as a normal job in your fax
machine.
GB
88
Handling faxes on your PC
...until you reach the desired menu item
PC READY ?
START
PC ready? *)
Confirm with START
DOC.READING M98%
TRANSMITTING TO PC
15-03 19:56 M 100%
Return to the standby mode
RECEIVING FROM PC
PC is transmitting the fax data to the fax
machine
JOB ACCEPTED NO.007
PC transfer complete: the job is stored as
a new job in the stack
15-03 19:56 M 89%
Return to the standby mode
Depending on the contents of the stack,
the job is soon sent by the fax machine.
TOSHIBA
TF 461
Handling faxes on your PC
Sending faxes to the PC
If you have connected a PC to your fax
machine, you can send documents
directly to your PC.
The following requirements are essential
for this process:
• Function number 46 (receive to PC) is
set to ON (for setting, see page 49).
• The fax software (e.g. WinFax PRO) is
loaded and activated.
• The fax software is set to automatic
reception.
• The connection to the PC has been
established.
The following error message is displayed if
your fax machine cannot reach the PC:
PC COMM. ERROR #001
In this case, the incoming fax document
is printed out on the fax machine. The
error message does not affect the ability
of the fax machine to receive further
documents.
A fax document received in this
way is stored in the form of an
image file in the PC. An OCR
program must process a file before any
received text can be integrated in a word
processing program. This is essential if
this file is to be used as a text file
(contained in WinFax PRO) .
It is essential to ensure that the
fax software is set to automatic
reception!
TF 461
TOSHIBA
Handling faxes on your PC
89
GB
UK Connection information
This toshiba Facsimile Transceiver
is intended for connection to
public telecommunications
services as follows:
By using the cable described as
TEL LINE CABLE in the packaging
list of the instruction manual. This
cable plugs into the socket on the
left hand side of the TF 461 which
is marked LINE and the other end
into the standard PSTN analogue
socket found in the UK.
This terminal equipment complies with
the following requirements:
Group 3 Fax modem
Automatic call initiation
Storage of telephone numbers for
retrieval by a predetermined code
Automatic dialling
Automatic repeat attempts
Call progress monitor
Series connection facility
LD or MF dialling
Operation with or without dial tone
being present.
Any other usage will invalidate
the approval of the apparatus if as
a result, it then ceases to
conform to the standards against
which approval was granted.
We declare, that Toshiba is using
mark in compliance with
EN 50 082-1, EN 55 022/B and
EN 60 950
GB
90
UK Connection information
TOSHIBA
TF 461
Index
ABB number .............................................. 38
ABB number list ........................................ 45
Acess digit ................................................ 12
Job cancel ................................................ 37
Job handling ............................................. 23
Journal ..................................................... 44
Bell times .................................................. 21
Broadcasting ............................................. 32
Language .................................................... 8
Line access ............................................... 17
Line problems ........................................... 57
Local copy ................................................ 20
Cable ................................................... 60,87
Cancel transmission .................................. 37
Communication failure .............................. 55
Connecting fax ............................................ 4
Copy ......................................................... 20
Date .......................................................... 15
Delayed transmission ................................ 31
Delete ABB numbers ................................. 39
Dialling ...................................................... 25
Dialling method ......................................... 11
Direct transmission ................................... 24
Document jam .......................................... 59
Earth key ...................................................
Error codes ...............................................
Error messages .........................................
Extension ..................................................
12
55
56
12
Fax transportation ....................................... 6
Faxmodem ................................................ 86
Flash ......................................................... 12
Function list ............................................... 46
Greyscales ................................................ 30
Groups ...................................................... 32
Individual group ......................................... 33
Ink refill ....................................................... 6
Ink cartridge, change ................................ 61
Inserting receiving paper ............................. 5
Installation .................................................. 8
Interface, parallel ...................................... 60
Interface, serial ......................................... 86
TF 461
TOSHIBA
Machine overview ....................................... 1
Main station .............................................. 12
Memory extension ..................................... 24
Memory reception ..................................... 21
Monitoring ................................................ 29
One touch key ........................................... 40
Operation panel .......................................... 1
Optional memory ...................................... 24
Overseas communication .......................... 57
Overview ..................................................... 1
Paper handling ............................................ 5
Paper jam ................................................. 59
Parameter list ........................................... 46
PBAX ......................................................... 12
PC fax ....................................................... 86
Polling ....................................................... 39
Polling reservation ..................................... 35
Pinter ..................................................... 6,60
Printer, spool manager .............................. 76
Printer status ............................................. 75
Printer driver ............................................. 63
Printhead, change ..................................... 61
Printhead, adjustment ............................... 83
Printhead, cleaning ................................... 84
Problems ................................................... 55
Prohibit memory ........................................ 24
PSTN ........................................................ 12
Puls dial .................................................... 11
Receiving documents ................................ 16
Receiving reduction .................................. 20
Reception problems .................................. 58
Redial ....................................................... 30
Reduction speed ....................................... 36
Remote Diagnostic ................................... 48
Resolution ................................................. 30
RTI ............................................................ 51
Scanning .................................................. 88
Supstitute reception ................................. 21
Sending documents .................................. 25
Software, fax-software ............................. 86
Stack handling .......................................... 23
Station name ............................................ 10
Storing ABB numbers ................................ 38
Storing groups .......................................... 40
Storing name ............................................ 10
Storing numbers ....................................... 38
Temporary group ....................................... 32
Terminal identification ................................. 9
Time ......................................................... 15
Tone dial ................................................... 11
Toolkit ....................................................... 69
Transmission without memory ................... 24
Transportation ............................................. 6
Troubleshooting ......................................... 55
TTI .............................................................. 9
TX problems .............................................. 57
TX report ................................................... 43
UART ........................................................ 86
Unpacking ................................................... 4
Wall socket ................................................. 4
Windows, default printer ........................... 81
WinfaxPro ................................................. 86
Index
91
GB