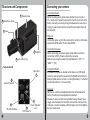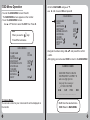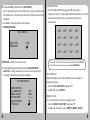
1
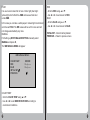
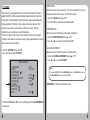
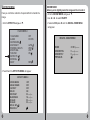
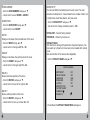
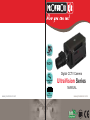
OSD
WDR
Digital CCTV Camera
Digital ZOOM
X6
UltraVision Series
MANUAL
www.provision-isr.com
High
Resolution
www.provision-isr.com
General
Content
General
Precautions
Features
Structure and Components
Connecting your camera
OSD Menu
OSD Menu Operation
1) Camera Name
2) Lens
3) Exposure
4) Day/Night Settings
5) WDR/BLC/ECLPS
6) White Balance Settings
7) 3D-DNR
8) Effects Menu
9) Special Menu
Specifications
WARNING
RISK OF ELECTRIC SHOCK
DO NOT OPEN
Note: Only professional technicians is
allowed to open the front or back cover
of this camera.
1
2
2
3
5
6
7
9
9
12
14
17
20
24
27
29
35
44
Note:
In order to avoid electrical
shock or fire, please use
proper power according to
the manual.
Thank you for using our products. Before use, please read this
manual carefully to ensure correct use of this series of products.
Please keep the manual properly for future use.
This series of cameras take high-sensitivity CCD as the image
sensor, all circuits have long work life and high reliability.
Excellent image will be top choice for your camera.
Precautions
1. Do not install the camera in places where the temperature is
above 50°C or under -10°C.
2. Do not touch the CCD surface with your finger. If cleaning is
needed, please wipe it using a soft cloth with a little bit of
alcohol.
3. Do not install in places with high humidity, it can seriously
damage the quality of the picture.
4. Do not drop the camera and avoid physical shock.
5. Do not face your camera to a strong light, it can damage the
CCD.
6. Do not expose the camera to rain or dusty surroundings.
7. Its highly important to use the correct and suitable power
supply(DC12V) for the camera.
8. Only professional and qualified technician can install and test
9. During use, if any errors occur, cut off the power immediately
and contact your local distributor.
2
Features
WDR (Wide Dynamic Range):
Provides a powerful Wide Dynamic Range solution, allows the
camera to provide vivid colors without losing details. The difficult
lighting is automatically compensated to extract the details in both
bright and dark areas, without having cutoff or saturation.
The UltraVision DSP enhanced WDR performance has strong light
compensation, so it always shows clear and perfect contrast
picture in any environment.
D-DNR (Digital Noise Reduction):
Equipped with the most advance Motion compensated 3D-DNR
(3-Dimensional Digital Noise Reduction) function.
With this powerful DSP image noise can be removed efficiently
and it shows clean and obvious image in low luminance.
The result is a superior noise reduction with less motion blurring
artifacts even in extreme low-light situations.
TVL2 – Ultra High H&V Resolution:
Both Vertical and Horizontal resolutions are ultra-high. While
high-resolution cameras improve the horizontal resolution only,
UltraVision DSP cameras achieve horizontal resolution of 600 TV
Lines at color mode, and up to 700 TV Lines with Black/White
sensors, and at the same time also reach a vertical resolution of
580TVL. All of these provide clean, noiseless and reliable pictures.
Eclipse:
The Eclipse function blocks out high-brightness areas and
enables better visibility of other areas. An example of the eclipse
function usage is an ability to recognize the number plates on a
vehicle at night, where the headlights are too bright.
3
DIS (Digital Image Stabilization):
Performs digital image stabilization to allow stable and pleasant
video even in situations where the camera is shaking. This
feature is especially important for the high-zoom cameras where
every small movement of the camera is highly noticeable and
disturbing for the observer.
D Zoom x1-x10:
Advance digital zooming technology enables a programmable
magnification of up to factor of 10, and scales the region of
interest to the whole screen.
Vertical and Horizontal flip:
Built-in mechanism enables the vertical and horizontal flipping of
the image, to allow an easy installation of the camera regardless
of its holding position.
Bad Pixel Correction:
Supports bad pixels correction for compensating the CCD
non-uniform, blemish pixels. Up to 64 defects can be fixed. The
result is clear image with no white spots even at long integration
time (DSS).
Privacy Masking:
Protects the privacy of the pictured area by placing a mask over
the video output at the defined privacy zones. The camera allows
the size and position of masking area to be freely defined within
the frame. Up to 8 AREAS can be masked. Mask color is
programmable
4
Structure and Components
Connecting your camera
- Connecting the lens
Before mounting a lens, please check whether it is a C-mount or
CS - mount lens. The back focus is set for the CS-mount lens at the
factory. Connect your lens by turning it clockwise to the Lens mount
ring (4), In case of auto iris lens, connect the lens cable to the Auto
iris socket (6).
1 Mount screw
2 Back focus screw
3 Lens
- Video out
Connect the video out (8) of the camera to the monitor or other video
equipments (DVR) with a 75 ohm cable (RG59).
5 Tailplate
4 Lens mount ring
Tailplate Sketch
Video Out
7
6
Auto-Iris Socket
9
RS-485 Interface
5
8
Power Indicator
Led
10
12V Power In
- Connecting the power
Before connecting your power supply, please make sure it’s the
correct one (12VDC). Power is connect by two wires.
Make sure you plug the power in the right direction "+12V" = "+”,
“GND" = "-"(10).
- Connection RS845
If you want to connect an external control device or a DVR stand
alone. You can connect the two wires to the RS485 on the Terminal
Block (9). Make sure to connect +/- in the right sockets (“+” is the first
one from the left and “-“ in the one after).
- Focusing
Back focus – back focus is adjusted when the camera leaves the
factory, Therefore no more adjustments is needed.
However, in case you can’t reach optimize focus by the lens focus
ring(4), untie the back focus screw(2), then turn the lens mount ring
clockwise or counter clockwise until the image is clear, then retighten
the lens mount screw.
6
OSD Menu
OSD Main Menu
Main Menu
This camera utilizes an on-screen user MENU. To set items on
the menu, use the following buttons on the OSD panel.
Cam Name
On/Off
Lens
DC IRIS/Manual
Exposure
AGC / Shutter / Sens-Up / Initial Set / Previous
Day/Night
Day / Night / EXT – WDR Level / Auto – D/N Level, Filter Dly, Night Burst,
Initial Set.
WDR/BLC/ECLPS
WDR Level / BLC Level / Eclipse – Area Settings, All Area Set, Mask Color,
Eclps Level, Gain Control.
White Bal
▲ – Moves the cursor upwards.
▼ – Moves the cursor downwards.
◄ – Moves the cursor to the left.
► – Moves the cursor to the right.
O – Display the MAIN MENU, press to make selections and
display a submenu for an item with the
ATW / Col Roll / Push / Manual – Color Temp, Red, Blue, Initial Set.
3D-DNR
ON/OFF
Effects
mark.
Dzoom mode, Image Freeze, D-Effect, Color, Contrast, Sharpness,
CR Gain, CB Gain, Initial Set.
Special
Motion Det', Privacy Mask, Language, Stabilizer, L/L Sync, Monitor Type,
Factory Reset, Comm Set.
Exit
7
8
OSD Menu Operation
- To enter the MAIN MENU screen Press O.
The MAIN MENU screen appears on the monitor.
- To exit the MAIN MENU screen.
Use ▲ or ▼ button to select the EXIT then Press O.
Note:
When you see the
sign
Press O for sub-menus.
< MAIN MENU>
1.CAM NAME
2.LENS
3.EXPOSURE
4.DAY/NIGHT
5.WDR/BLC/ECLPS
6.WHITE BAL
7.3D-DNR
8.EFFECTS
9.SPECIAL
0.EXIT
OFF
DC IRIS
AUTO
WDR
ATW
ON
RET
1) Camera Name
You can set a name for your camera which will be displayed on
the monitor.
9
- Scroll to CAM NAME using ▲ or ▼.
- use ◄ or ► to select ON and press O.
< MAIN MENU>
1.CAM NAME
2.LENS
3.EXPOSURE
4.DAY/NIGHT
5.WDR/BLC/ECLPS
6.WHITE BAL
7.3D-DNR
8.EFFECTS
9.SPECIAL
0.EXIT
OFF
DC IRIS
AUTO
WDR
ATW
ON
RET
- Navigate the letters Using ◄ ►▲▼ and press O to confirm
a letter.
- After typing your name select END to return to the MAIN MENU.
<CAMERA NAME>
ABCDEFGHIJKLM
NOPQRSTUVWEYZ
abcdefghIjklm
nopqrstuvwxyz
_- 0 1 2 3 4 5 6 7 8 9
◄►
CLR
POS
END
-----------------------
CLR: Clear the selected name.
END: Return to MAIN MENU.
10
- You can also adjust the position of the name on your monitor.
For adjusting select POS and press O.
- Use ▲▼◄► to move your name across the monitor and press
O when finished.
◄ ►▲▼ MOVE AND PRESS SET
2) Lens
Iris is mechanism which closes and opens allowing more or less
light into the lens.
The camera supports two types of lens:
* MANUAL Iris lens, where the aperture is fixed or set manually
by the user
* DC Iris Lens, in which the aperture is continuously controlled by
the camera to automatically set to the desired level of brightness.
The LENS menu allows you to set the lens which attached to
your camera, and to adjust the desired brightness if DC lens is
used.
- Scroll to LENS using ▲ or ▼
- Use ◄ or ► to select between MANUAL and DC IRIS.
- When selected MANUAL there is no need for more settings.
< MAIN MENU>
1.CAM NAME
2.LENS
3.EXPOSURE
4.DAY/NIGHT
5.WDR/BLC/ECLPS
6.WHITE BAL
7.3D-DNR
8.EFFECTS
9.SPECIAL
0.EXIT
11
OFF
DC IRIS
AUTO
WDR
ATW
ON
RET
12
- When selected DC IRIS you can press O for entering
DC IRIS MENU
In order to set the BRIGHTNESS level.
- Use ◄ or ► to select the BRIGHTNESS level 0-100.
<DC IRIS MENU>
BRIGHTNESS
PREVIOUS
50 -----|-----
3) Exposure
To compensate for the lighting conditions, the exposure control
can be adjusted.
Use this menu to set the means for the camera to automatically
control the brightness.
Available means include automatic gain control (AGC), electronic
light control (ELC or SHUTTER) and slow-shutter (SENS-UP).
These settings determine how the cameras will behave at various
light levels and affect video image quality.
- Scroll to EXPOSURE using ▲ or ▼.
< MAIN MENU>
PREVIOUS – Return to previous menu
1.CAM NAME
2.LENS
3.EXPOSURE
4.DAY/NIGHT
5.WDR/BLC/ECLPS
6.WHITE BAL
7.3D-DNR
8.EFFECTS
9.SPECIAL
0.EXIT
OFF
DC IRIS
AUTO
WDR
ATW
ON
RET
- Press O to enter the EXPOSURE MENU.
13
14
<EXPOSURE MENU>
AGC
SHUTTER
SENS UP
INITIAL SET
PREVIOUS
OFF
OFF
OFF
AGC (Automatic Gain Control)
At low-lighting conditions, if the image is too dark, select between
OFF/LOW/MIDDLE/HIGH. Higher AGC level means the camera
would amplify the CCD input signal more, and the image would
become brighter, but noisier.
- Scroll to AGC using ▲ or ▼.
- Use ◄ or ► for selecting the allowed gain level.
SENS-UP
When this mode enabled, the camera would use digital slow
shutter of over a field-time when needed. Field time is equal to
1/50 sec (PAL) or 1/60 (NTSC). The menu allow the setting of the
shutter limitation, where x2 refers to 1/50 sec, x50 is 1second, etc.
- Scroll to SENS-UP using ▲ or ▼.
- Use ◄ or ► to set SENS-UP limit OFF/X2 – X512.
Values of more than X16 will cause objects in motion to look
blurred at low light condition.
Note:
SENS-UP settings will be available only if selected AUTO / A.FLK in the
SHUTTER menu. If not available, SENS-UP will be marked with
- - - sign.
INITIAL SET – Back to factory default.
PREVIOUS – Return to previous menu
SHUTTER
Controls the amount of light according to your own environmentIncrease shutter value in dark places for a brighter picture
Decrease shutter value in places with more light for reducing
amount of light.
- Scroll to SHUTTER using▲ or ▼.
- Use ◄ or ► to change the shutter speed: AUTO / OFF / A.FLK /
1/160 – 1/90000, X2 – X512.
15
16
4) Day/Night Settings
a) If selected AUTO press O to enter D/N AUTO MENU
Day/Night refers to the mechanism of changing of the optical filter
between IR-cut filter to non-IRC filter. AUTO - set the filter
automatically, DAY - force the usage of the IRC filter (color), and
NIGHT- force usage of IR-PASS filter (and display B&W image).
EXT- is used for Smart-IR mode when the IR-LED board provides
the light info to the camera.
- Scroll to DAY/NIGHT using ▲or▼.
- Choose DAY/NIGHT/EXT/AUTO using ◄ or ►.
< MAIN MENU>
1.CAM NAME
2.LENS
3.EXPOSURE
4.DAY/NIGHT
5.WDR/BLC/ECLPS
6.WHITE BAL
7.3D-DNR
8.EFFECTS
9.SPECIAL
0.EXIT
OFF
DC IRIS
AUTO
WDR
ATW
ON
RET
<D/N AUTO MENU>
D/N LEVEL
FILTER DLY
NIGHT BURST
INITIAL SET
PREVIOUS
LOW
1 SEC
ON
D/N LEVEL
Level of darkness in which the camera would switch the IR filter
from Day to Night
- Scroll to D/N LEVEL using ▲or▼.
- Use ◄ or ► to change between LOW/MIDDLE/HIGH.
FILTER DLY
Time (in seconds) to wait before switching between Day/ Night
modes.
- Scroll to FILTER DLY using ▲or▼.
- Use ◄ or ► change Value from 1sec – 60sec.
NIGHT BURST
Allow disable the color burst in the video signal at Night mode.
- Scroll to NIGHT BURST using ▲or▼.
- Use ◄ or ► to switch ON/OFF.
17
18
b) If Selected EXT press O to enter D/N EXT Menu.
This is related to the Smart-IR when working with IR-LED
camera. It refers to the level of saturation the camera should
allow at night when the IR LED works.
5) WDR/BLC/ECLPS
WDR is used when your want to see BOTH bright and dark zones
of the image. In the mode, you will see the details in both the dark
and bright; however, the image sometimes looks a little 'flat'.
- Use ◄or► to select level between LOW/MIDDLE/HIGH.
- Scroll to WDR/BLC/ECLPS using▲ or ▼.
- Use ◄ or ► to switch between .
<D/N EXT MENU>
WDR LEVEL
PREVIOUS
LOW
INITIAL SET – Back to factory default
PREVIOUS – Return to previous menu
Note:
If selected AGC OFF options in the EXPORURE menu the AUTO option
in DAY/NIGHT menu won't be available and the --- sign will be displayed.
< MAIN MENU>
AUTO
WDR
ATW
ON
RET
a) If selected WDR press O to enter WDR MENU.
- Use ◄or► to select WDR level between LOW/MIDDLE/HIGH.
<WDR MENU>
WDR LEVEL
PREVIOUS
19
OFF
DC IRIS
1.CAM NAME
2.LENS
3.EXPOSURE
4.DAY/NIGHT
5.WDR/BLC/ECLPS
6.WHITE BAL
7.3D-DNR
8.EFFECTS
9.SPECIAL
0.EXIT
LOW
20
b) If selected BLC press O to enter BLC MENU.
BLC is used when you have a WDR scene, and you want to see
the DARK zone, and you do not mind if the bright zone would be
saturated.
- Use ◄or► for selecting BLC level between
LOW/MIDDLE/HIGH.
<BLC MENU>
BLC LEVEL
PREVIOUS
LOW
PREVIOUS – Return to previous menu
c) If selected Eclipse press O for entering ECLIPSE MENU.
ECLIPSE is mainly used when you want to see cars at night,
and want to mask the car strong head-lights.
<ECLIPSE MENU>
AREA SETTING
ALL AREA SET
MASK COLOR
ECLPS LEVEL
GAIN CONTROL
PREVIOUS
21
OFF
GRAY
1----|---OFF
AREA SETTING
- Scroll to AREA SETTING using ▲ or▼ and press O.
Inside you have 16 in depended ON/OFF areas that you can set
manually according to the requirements of the actual
environment.
ON
OFF
OFF
OFF
OFF
OFF
OFF
OFF
OFF
OFF
OFF
OFF
OFF
OFF
OFF
OFF
Use ◄ or ► to move across the screen and use ▲or▼ to set ON/OFF.
Press O anywhere on the screen to return to ECLIPSE MENU.
ALL AREA SET
Instead of setting each area individually you can select or
deselect all areas.
- Scroll to ALL AREA SET using ▲ or ▼.
- Use◄ or ► to set ON/OFF.
MASK COLOR
You can choose the color of the eclipse mask.
- Scroll to MASK COLOR SET using ▲ or ▼.
- Use◄ or ► to select a color - GREY, D.GREY, BLACK.
22
6) White Balance Settings
<ECLIPSE MENU>
AREA SETTING
ALL AREA SET
MASK COLOR
ECLPS LEVEL
GAIN CONTROL
PREVIOUS
OFF
GRAY
1----|---OFF
ECLPS LEVEL
You can choose the ECLIPSE LEVEL between 1–5.
Higher values will increase start the masking at higher level.
- Scroll to ECLPS LEVEL using ▲ or ▼.
- Use◄ or ► to set a level between 1-5.
GAIN CONTROL
You can set an automatic control for the ECLIPSE LEVEL gain.
- Scroll to GAIN CONTROL ▲ or ▼.
- Use◄ or ► to select ON/OFF.
PREVIOUS – Return to previous menu
23
White balance setting can be adjusted according to the color
temperature of object.
- Scroll to WHITE BAL using ▲ or ▼.
- Use◄ or ► to select between ATW / COL-ROLL / PUSH /
MANUAL.
< MAIN MENU>
1.CAM NAME
2.LENS
3.EXPOSURE
4.DAY/NIGHT
5.WDR/BLC/ECLPS
6.WHITE BAL
7.3D-DNR
8.EFFECTS
9.SPECIAL
0.EXIT
OFF
DC IRIS
AUTO
WDR
ATW
ON
RET
ATW
In outdoor environment the color temperature is between
2500°K~9500°K,
For that it's recommended to use ATW.
COL-ROLL
In indoor environment, the color temperature is between
2000°K~20000°K.
For that it's recommended to use COL-ROLL.
24
PUSH
It is use in environment full of none “white” light (like bright
yellow light) which affect the AWB and cause a falls color
under AWB.
In this case you can take a white paper in natural light environment
and choose PUSH. The WB values will be set from now and will
not change automatically any more.
MANUAL
For Setting up WHITE BALACE SETTING manually select
MANUAL and press O,
The WB MANUAL MENU will appear
RED
- Scroll to RED using ▲ or ▼.
- Use ◄ or ► to set amount of RED.
BLUE
- Scroll to BLUE using ▲ or ▼.
- Use ◄ or ► to set amount of BLUE.
INITIAL SET – Back to factory default.
PREVIOUS – Return to previous menu
<WB MANUAL MENU>
COLOR TEMP
RED
BLUE
INITIAL SET
PREVIOUS
INDOOR
0-----|-----0-----|------
COLOR TEMP
- Scroll to COLOR TEMP using ▲ or ▼.
- Use ◄ or ► to set INDOOR/OUTDOOR according to
environment conditions.
25
26
7) 3D-DNR
The camera is equipped with the most advance Motion compensated 3D-DNR (3-Dimensional Digital Noise Reduction) function;
it operates in both spatially and temporally, while calculating and
compensating for motion in the image to minimize ghosts. The
result is a superior noise reduction with less motion blurring
artifacts even at extreme low-light situations.
This menu allows the tuning of the camera behavior at low light
condition and balance between image quality parameters as noise
level versus bluer and ghost.
DESTINATION
Set the level of brightness at low-light conditions.
- Scroll to DESTINATION using ▲ or ▼.
- Use ◄ or ► to select level between 0-63.
GLOBAL MOVMENT
Allows more or less Movement vs. Motion blurs.
- Scroll to GLOBAL MOVMENT using ▲ or ▼.
- Use ◄ or ► to select ON/OFF.
- Scroll to 3D-DNR using ▲ or ▼.
- Use ◄ or ► to select OFF/ON.
< MAIN MENU>
1.CAM NAME
2.LENS
3.EXPOSURE
4.DAY/NIGHT
5.WDR/BLC/ECLPS
6.WHITE BAL
7.3D-DNR
8.EFFECTS
9.SPECIAL
0.EXIT
DNR LEVEL
Set the level of noise reduction. The more reduction is set, the
image would be more blurry, but with less noise.
- Scroll to LEVEL using ▲ or ▼.
- Use ◄ or ► to select level between 0-63.
OFF
DC IRIS
AUTO
WDR
ATW
ON
Note:
If selected AGC OFF in the EXPOSURE menu, the 3D-DNR function on
the MAIN MENU will be automatically OFF!
PREVIOUS – Return to previous menu.
RET
- If Selected ON press O for more settings and the 3D-DNR MENU
will appear.
27
28
8) EFFECTS MENU
Here you can find a collection of special effects to handle the
image.
- Scroll to EFFECTS using▲ or ▼.
DZOOM MODE
Allows you to digitally zoom the image and tour inside it.
- Scroll to DZOOM MODE using ▲ or ▼.
- Use ◄ or ► to select ON/OFF.
- If selected ON press O and the DIGITAL ZOOM MENU
will appear.
< MAIN MENU>
OFF
DC IRIS
1.CAM NAME
2.LENS
3.EXPOSURE
4.DAY/NIGHT
5.WDR/BLC/ECLPS
6.WHITE BAL
7.3D-DNR
8.EFFECTS
9.SPECIAL
0.EXIT
AUTO
WDR
ATW
ON
<DIGITAL ZOOM MENU>
ZOOM
DZOOM PAN
DZOOM TILT
PREVIOUS
X1.00 |-------0 ------|-----0 ------|------
RET
- Press O and the EFFECTS MENU will appear
<EFFECTS MENU>
DZOOM MODE
IMAGE FREEZE
D-EFFECT
COLOR
CONTRAST
SHARPNESS
CR GAIN
CB GAIN
INITIAL SET
PREVIOUS
29
OFF
OFF
OFF
ON
50 -----|---50 -----|---50 -----|---50 -----|----
30
ZOOM
- Scroll to ZOOM using▲ or ▼.
- Use ◄ or ► to select zoom level X1.00 - X6.13.
DZOOM PAN
- Scroll to DZOOM PAN using ▲ or ▼.
- Use◄ or ► to select PAN LEVEL -100 - +100.
- Use◄ for left, ► for right.
DZOOM TILT
- Scroll to DZOOM TILT using ▲ or ▼.
- Use ◄ or ► to select TILT LEVEL -100 - +100
- Use◄ for up, ► for down.
PREVIOUS – Return to previous menu
IMAGE FREEZE
Pausing the live image.
- Scroll to IMAGE FREEZE using▲ or ▼.
- Use ◄ or ► to select ON/OFF.
Note:
When selected IMAGE FREEZE- ON DZOOM MODE
won't be available and the --- Sign will appear.
D-EFFECT
Help you with extreme mounting of the camera
- Scroll to D-EFFET using ▲ or ▼.
- Use ◄ or ► to select between OFF/V-FLIP/MIRROR/ROTATE.
Example:
OFF
V-FLIP
<EFFECTS MENU>
DZOOM MODE
IMAGE FREEZE
D-EFFECT
COLOR
CONTRAST
SHARPNESS
CR GAIN
CB GAIN
INITIAL SET
PREVIOUS
31
OFF
OFF
OFF
ON
50 -----|---50 -----|---50 -----|---50 -----|----
MIRROR
ROTATE
32
CR GAIN
Set CR GAIN level.
- Scroll to CR GAIN using ▲ or ▼.
- Use ◄ or ► to select CR Gain level between 0 – 100.
COLOR
Set Color/Black & White picture.
- Scroll to COLOR using ▲ or ▼.
- Use ◄ or ► to set ON/OFF.
<EFFECTS MENU>
DZOOM MODE
IMAGE FREEZE
D-EFFECT
COLOR
CONTRAST
SHARPNESS
CR GAIN
CB GAIN
INITIAL SET
PREVIOUS
OFF
OFF
OFF
ON
50 -----|---50 -----|---50 -----|---50 -----|----
CB GAIN
Set CB GAIN level.
- Scroll to CB GAIN using ▲ or ▼.
- Use ◄ or ► to select CB Gain level between 0 – 100.
INITIAL SET – Back to factory default.
PREVIOUS – Return to previous menu
CONTRAST
Set the CONTRAST of the picture.
- Scroll to CONTRAST using ▲ or ▼.
- Use ◄ or ► to select contrast level between 0 – 100.
SHARPNESS
Set the SHARPNESS of the picture.
- Scroll to SHARPNESS using ▲ or ▼.
- Use ◄ or ► to select sharpness level between 0 – 100.
33
34
9) SPECIAL MENU
Here
- Scroll to SPECIAL using ▲ or ▼.
< MAIN MENU>
OFF
DC IRIS
1.CAM NAME
2.LENS
3.EXPOSURE
4.DAY/NIGHT
5.WDR/BLC/ECLPS
6.WHITE BAL
7.3D-DNR
8.EFFECTS
9.SPECIAL
0.EXIT
AUTO
WDR
ATW
ON
RET
- Press O and the SPECIAL MENU will appear.
MOTION DETECT
Your camera transmits an alert signal when it detects motion of an
object on the screen. You can connect the camera to an external
alarm or recording system, and activate it when the camera
detects motion.
The camera allows up to 8 independently-defined zones to be
monitored for motion.
You can control ON/OFF/WIDTH/HEIGHT/MOVE X/MOVE Y of
each zone independently to define if the motion detection
mechanism would be active at the zone or not, and to set the
zone location in the image and its sensitivity.
- Scroll to MOTION DET using ▲ or ▼.
- Use ◄ or ► to set ON/OFF.
- If select ON press O for more settings and the
MOTION DET MENU will appear.
<SPECIAL MENU>
MOTION DET
PRIVACY MASK
LANGUAGE
STABILIZER
L/L SYNC
MONITOR TYPE
FACTORY RESET
COMM SET
PREVIOUS
35
OFF
OFF
ENG
OFF
INT
LCD
<MOTION DET MENU>
ZONE NUMBER
ZONE STATE
WIDTH
HEIGHT
MOVE X
MOVE Y
SENSITIVITY
INITIAL SET
PREVIOUS
ZONE1
OFF
30-----|----30-----|----30-----|----30-----|----30-----|-----
36
ZONE NUMBER
- Scroll to ZONE NUMBER using ▲ or ▼.
- Use ◄ or ► to select ZONE1 – ZONE 8.
ZONE STATE
- Scroll to ZONE STATE using ▲ or ▼.
- Use ◄ or ► to set ON/OFF.
WIDTH
Enlarge or decrease the horizontal size of the zone
- Scroll to WIDTH using ▲ or ▼.
- Use ◄ or ► to change width 16 – 90.
HEIGHT
Enlarge or decrease the vertical size of the zone.
- Scroll to HEIGHT using ▲ or ▼.
- Use ◄ or ► to change height 12 – 54.
MOVE X
Moves horizontal position of the zone.
- Scroll to MOVE X using ▲ or ▼.
- Use ◄ or ► to move left or right 8 – 92.
MOVE Y
Moves vertical position of the zone
- Scroll to MOVE Y using ▲ or ▼.
- Use ◄ or ► to move up or down 26 - 74.
37
SENSITIVITY
You can set different sensitivity level to each zone. The more
sensitive the detection is, it would detect even smaller motion, but
it might cause more false alarms, and vise versa.
- Scroll to SENSITIVITY using ▲ or ▼.
- Use ◄ or ► to change sensitivity level 0 – 100.
INITIAL SET – Back to factory default
PREVIOUS – Return to previous me
PRIVACY MASK
This function is aiming at the protection of personal privacy, You
can select up to 8 parts on the screen to be masked with colored
cover.
Size and location of the area is also adjustable.
- Scroll to PRIVACY MASK using▲ or ▼
<SPECIAL MENU>
MOTION DET
PRIVACY MASK
LANGUAGE
STABILIZER
L/L SYNC
MONITOR TYPE
FACTORY RESET
COMM SET
PREVIOUS
OFF
OFF
ENG
OFF
INT
LCD
- Press O and,the PRIVACY MASK MENU will appear.
38
<PRIVACY MASK MENU>
MASK NUMBER
MASK STATE
MASK COLOR
WIDTH
HEIGHT
MOVE X
MOVE Y
INITIAL SET
PREVIOUS
MASK1
OFF
GRAY
30-----|----30-----|----30-----|----30-----|-----
MASK NUMBER
- Scroll to MASK NUMBER using ▲ or ▼.
- Use ◄ or ► to select MASK 1 – MASK 8.
MASK STATE
- Scroll to MASK STATE using ▲ or ▼.
- Use ◄ or ► to set ON/OFF.
MASK COLOR
- Scroll to MASK COLOR using ▲ or ▼.
- Use ◄ or ► to select a color
GRAY/WHITE/RED/GREEN/BLUE/YELLOW/BLACK.
WIDTH
Enlarge or decrease the horizontal size of the mask.
- Scroll to WIDTH using ▲ or ▼.
- Use ◄ or ► to change width 4 - 60.
HEIGHT
Enlarge or decrease the vertical size of the mask.
- Scroll to HEIGHT using ▲ or ▼.
- Use ◄ or ► to change height 4 - 50.
39
MOVE X
Moves horizontal position of the mask.
- Scroll to MOVE X using ▲ or ▼.
- Use ◄ or ► to move left or right 2 - 98.
MOVE Y
Moves vertical position of the mask
- Scroll to MOVE Y using ▲ or ▼.
- Use ◄ or ► to move up or down 2 - 98.
INITIAL SET – Back to factory default
PREVIOUS – Return to previous menu
LANGUAGE
You can select a language for the OSD MENU.
- Scroll to LANGUAGE using ▲ or ▼.
- Use ◄ or ► to set a language:
ENGLISH/ CHINES/RUSSIAN/SPANISH/FRENCH.
<SPECIAL MENU>
MOTION DET
PRIVACY MASK
LANGUAGE
STABILIZER
L/L SYNC
MONITOR TYPE
FACTORY RESET
COMM SET
PREVIOUS
OFF
OFF
ENG
OFF
INT
LCD
STABILIZER
This function helps to stabilize the picture and reduce the
image shake when the camera physically moves. This
function is useful especially when using a high-zoom lens,
where every small movement of the camera results in shake
of the image.
40
- Scroll to STABILIZER using ▲ or ▼.
- Use ◄ or ► to set ON/OFF.
L/L SYNC
The Line-Lock (L/L) feature allows the camera to synchronize its
frame rate to the power line phase. The function is only available
when the camera is operated by AC power. It allows the reduction
of the fluorescent lights color rolling effect. When using 12v DC
power, the camera is automatically set to internal (INT) synchronization mode.
- Press O and the COMM SETTING MENU will appear.
<COMM SETTING MENU>
PROTOCOL
CAMERA ID
BAUD RATE
SAVE/REBBOT
PREVIOUS
PELCO-D
4800
MONITOR TYPE
You can choose the type of screen you are working with between
CRT/LCD.
- Scroll to MONITOR TYPE using ▲ or ▼.
- Use ◄ or ► to select CRT/LCD.
PROTOCOL – PELCO-D (Unchangeable setting).
FACTORY RESET
Restore all settings to factory default settings.
- Scroll to FACTORY RESET using ▲ or ▼.
- Press O for resetting.
Camera ID
You can set an ID number for your camera.
- Scroll to CAMERA ID using ▲ or ▼ and press O, the
SET CAMERA ID menu will appear.
COMM SETTINGS
- Scroll to SPECIAL MENU using ▲ or ▼.
<SPECIAL MENU>
MOTION DET
PRIVACY MASK
LANGUAGE
STABILIZER
L/L SYNC
MONITOR TYPE
FACTORY RESET
COMM SET
PREVIOUS
41
<SET CAMERA ID>
CAMERA ID
DISPLAY ID
ID POSITION
PREVIOUS
001 |-----------ON
OFF
OFF
ENG
OFF
INT
LCD
Camera ID - Default 001
- Scroll to CAMERA ID using ▲ or ▼.
- Use ◄ or ► to select an ID number 0 – 255.
42
DISPLAY ID
You can choose if your camera ID will be displayed or not.
- Scroll to DISPLAY ID using ▲ or ▼.
- Use ◄ or ► to select ON/OFF.
ID POSITION
You can choose the position where your camera ID will be
displayed on the monitor.
- Scroll to ID POSITION using ▲ or ▼and press O.
- Use ◄ or ► to select a position and press O when finished.
Specifications
Model No.
BX-361UV
Power
DC12±10% Max 2.0W
Sensor
1/3 inch Sony SuperHAD CCD II
Total Pixels
NTSC:811(H)×508(V)
PAL:795(H)×595(V)
Effective Pixels
2:1 Interlace
Sync. System
Internal/Line lock
PREVIOUS – Return to previous menu.
BAUD RATE - Default 9600
- Scroll to BAUD RATE using ▲ or ▼.
- Use ◄ or ► to set baud rate value
4800/9600/19200/38400/57600.
SAVE/REBOOT
Saves settings and reboots the camera.
- Scroll to SAVE/REBOOT using ▲ or ▼.
- Press O to SAVE/REBOOT.
PREVIOUS – Return to previous menu.
43
Available
Dynamic Range
52dB(×128)
Backlight Compensation
WDR/BLC/OFF selectable
Resolution
Color 600TVL
S/N(Y Signal)
52dB(AGC OFF)
Minimum Illumination
◄ ► MOVE AND PRESS SET
PAL:752(H)×582(V)
Scanning System
O.S.D
001
NTSC:768(H)×494(V)
Color Model: 0.003(0.6) Lux(Sens-up OFF)
B/W Model: 0.0001(0.1) Lux(Sens-up OFF)
White Balance
ATW/AWC/Manual/Outdoor(1,800°K~10,500°K)Indoor(4,500°K~8,500°K)
Electronic Shutter Speed
NTSC:1/60sec-1/120,000sec PAL:1/50sec-1/120,000sec
Sense-up
Auto/Fixed/Off(selectable limit ×2~×512)
Gain Control
Low/Middle/High/Off selectable
3D-DNR
Off/On(1~63 level adjustable)
Motion Detection
On/Off(8Zone, Alarm output)
Privacy
On/Off(8Zone)
Mirror(H-REV)
ON/OFF
FLIP(V-REV)
ON/OFF
Freeze
ON/OFF
SHARPNESS
ON/OFF(Level Adjustable)
D/N Selection
Color/Black White/Auto/Exit
STABILIZER
ON/OFF
Digital Zoom
On(×6)/Off
Blemish compensation
64 Point(Even 32 point, ODD 32 point)
Iris Control
DC / Manual
Dimension
42(H)×42(V)×1.2(T)mm
Weight
410g
44