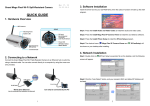
1
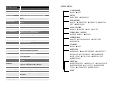
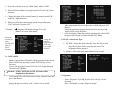
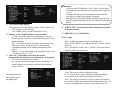
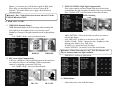
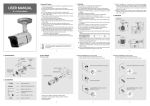
ES-6030SWR72810
USER MANUAL
SPECIFICATION
ITEM
Power Source
Image Sensor
DESCRIPTION
Operating Temp.
650TVL WDR CAMERA
DC 12V & AC 24V ( Option )
1/3” Sony Super HAD II (ICX638/639BK)
NTSC : 811(H) X 508(V), PAL : 795(H) X
596(V)
NTSC : 768(H) X 494(V), PAL : 752(H) X
582(V)
2 : 1 Interlace
Internal / Line Lock
650 TVL
0.05Lux (Color ,[email protected]), 0.
0001Lux(Sens-Up:Auto:X512)
52dB (AGC Off, Weight Off)
BUILT – IN
Off / Low / Middle / High
OFF / A.FLK / 1/160~1/90000 / X512 ~ X2 /
AUTO Selectable
OFF / AUTO (X2~X512)
DAY / NIGHT / EXT / AUTO Selectable
On/ Off Level Adjustable, More than 72dB
with Dual Channel Operation
On / Off (Level Adjustable)
High Light Compensation, Area selectable,
Level Adjustable
ON / OFF Level Adjustable (2D+3D Filtering
System)
DZoom / Image Freeze / D-Effect / Color /
Contrast / Sharpness/CR_CB Gain
ON / OFF (8 Programmable Zone)
ON / OFF (8 Programmable Zone)
ON / OFF (Digital Image Stabilizer)
L/L, Monitor Type, Multi-Languages
Selectable
-10º C to +50º C / 30% to 80% RH
Storing Temp.
-20º C to +60º C / 30% to 80% RH
Total Pixel
Effective Pixel
Scanning System
Synchronization
H. Resolution
Min. Illumination
S/N Ratio
OSD
AGC
Shutter
Sens- Up
Day / Night
WDR
BLC
ECLPS
3D-DNR
EFFECTS
Motion Detection
Privacy Masking
Stabilizer
Miscellaneous
SETUP MENU
CAM NAME
z ON z OFF
LENS
z DC IRIS z MANUAL
EXPOSURE
z AGC z SHUTTER z SENS-UP zINITIAL
SET zPREVIOUS
DAY / NIGHT
z DAY z NIGHT z ISC z AUTO
WDR / BLC / ECLPS
z WDR z BLC zECLPS
WHITE BAL
z ATW z COLOR-ROLL z AWC-SET
z MANUAL
3D DNR
z ON z OFF
EFFECTS
z DZOOM z IMAGE FREEZE z D-EFFECT
z COLOR z CONTRAST z SHARPNESS
z CR_GAIN z CB_GAIN zINITIAL SET
z PREVIOUS
SPECIAL
z MOTION DET. z PRIVACY z LANGUAGE
z STABILIZER z L/L SYNC z MONITOR
TYPE z COMM SET z PREVIOUS
EXIT
1. Press the set button to access “Main Setup” mode of OSD.
2. Select the desired feature by using Joystick S/W with Up / Down
direction.
3. Change the status of the selected feature by using Joystick S/W
with Left / Right direction.
4. When you finish the camera setup, put the arrow indicator to
“Exit” and press “Joystick S/W”
-
* Remark : “
-
” indicates Sub-Menu existing. Press “Set
Button” to access “Sub-Menu”.
Select the
function by
using
Joystick S/W
with Up /
Down
direction
Change the
status by
using Joystick
W/W with
Left / Right
direction.
After entering the title, move the cursor to POS and press SET
Button.
Select the position to display the title on the screen by using
Joystick S/W with 4 directions.
Press Set Button. When the position is determined, select END
and press SET Button, to return the SPECIAL Manu.
2) LENS : Select Lens Type
1. DC IRIS : Select this mode when DC Auto Iris lens is used.
- Press the Joystick S/W to enter the sub menu. The
brightness can be adjusted.
2. Manual : Select this mode when Manual Lens is used.
1) CAM NAME
-
Entitle Camera Name (ID) and it will be appeared on the screen.
Select CAM Name by using Joystick S/W with Up / Down
direction.
Set it to ON by using Joystick S/W with Left / Right direction.
Then Press SET Button.
9 Remark : If the CAM Name is OFF, no Name will be
displayed on the monitor.
-
Use Joystick S/W with 4 directions to select a desired letter and
press “Set Button”.
Repeat the process each by each, 15 letters can be edited.
3) Exposure
-
Select “Exposure” by using Joystick S/W with Up / Down
direction.
Press “Set Button” to enter “Exposure Setup”
9 Remarks :
- If you press the SET Button in “Auto” mode, you can adjust
the brightness by increasing or decreasing the shutter speed (x2
~ x512).
- The higher the Zoom level, the brighter the screen, but the
more likely it is that an after-image will appear.
- Although Noise, Spots and Whitish, Symptoms may occur in
Sens-up operation when the zoom level is increased. But this is
normal.
1. AGC (Auto Gain Control) :
The higher gain level, the brighter pictures, but the higher noise.
- Off : Deactivate AGC function
- Low / Middle / High : Set the desired AGC Level.
2. Shutter : Auto / Manual Shutter can be selectable
- A. FLK : Select this when picture flickering. The picture
flickering can be caused by a clash with the frequency of the
installed lighting.
- ESC : Select this to control the shutter speed automatically.
Inter terms of ESC, the shutter speed is automatically
controlled depending on the ambient illumination of the
subject.
- Manual : You can control shutter speed manually from 1/160
~ 1/90000 or from x2 ~ x512.
3. SENS-UP : If this mode is activated, the camera
automatically detect light level and maintains a clear picture.
- Off : Deactivate the Sens-up function
- On : Activate the Sens-up function. Press “Set Button” to
adjust brightness by increasing or decreasing the shutter
speed (x2~x512)
The higher gain level,
the brighter pictures,
but higher noise.
4. INITIAL SET: To return the default setting which is defined
in Exposure Menu.
5. PREVIOUS : Go to Main Menu.
4) Day / Night
-
-
This is to display pictures in color or black and white.
Select “DAY / NIGHT” by using Joystick S/W with Up / Down
Direction.
Press “Set Button” to enter “DAY / NIGHT”. Select the desired
mode for displaying the pictures.
Color: The picture is always displayed in color.
B / W : The pictures is always displayed in Black and White.
You can turn on or off the burst signal on B/W mode.
Auto : The mode is switched in Color in a normal environment,
but switched to B/W mode when ambient illumination is low. To
set up the switching time or speed for Auto mode, press “Set
-
Button”, you can turn on or off the burst signal on B/W mode.
Filter delay is to dwelling time to convert Color to B/W.
External : This mode allows you to apply a desired filter to
External signals.
3. ECLPS (ECLIPSE : High Light Compensation)
If the scene contains extremely bright light areas such as from
car headlight, the light can mask out much of the on-screen detail.
Press “Joystick S/W” in ECLPS mode to enter the sub menu.
9 Remark : Day / Night will not be activated when AGC in the
EXPOSURE menu is OFF.
ESLPS Masking
Area
5) WDR / BLC / ECLPS
1. WDR (Wide Dynamic Range)
WDR Illuminates darker areas of an image while retaining the
same light level for brighter areas to even out the overall
brightness of images with high contrast between bright and dark
areas.
- Low / Middle / High : select your desired mode.
ECLPS ON
-
WDR ON
WDR OFF
AREA SETTING : Select the desired area where you want to
activate this feature.
ALL AREA SET : Enable to set all areas as ON or OFF.
MASK COLOR / TONE : Change the color / brightness of the
masking area. (Black, Grey, Dark Grey).
ECLPS Level : Adjust the level of Eclipse.
GAIN CONTROL : On and Off. Select the desired mode.
9 Remark : When Gain control is “ON”, ECLIPS function will
only be activated under low light condition.
-
PREVIOUS : Go back to Main Menu.
2. BLC (back Light Compensation)
It delivers a distinctive subject and background at the same time,
even when the subject is in backlight. Unlike conventional
cameras, by adopting a proprietary DSP chip.
- Low / Middle / High : select your desired mode.
6) White Balance
BLC ON
BLC OFF
ESLPS OFF
-
Adjust the picture color with this feature.
-
Select “White Bal.” by using Joystick W/W with Up / Down
direction.
Press “Set Button” to enter “White Bal”. Select one of the
following 4 modes for your purpose.
This is to reduce the background noise in a low luminance
environment with 2D + 3D filtering system.
-
-
-
ATW : Select this when the color temperature is between
1700°K and 11000°K.
COL-ROLL : Select this when the color rolling is occurred.
AWC Æ SET : To find the optimal setting for the current
luminance environment in this mode. Set the point the
camera towards a sheet of white paper and press the SET
Button. If the environment changes, readjust it.
Manual : Select this to fine-tune white balance manually.
Set White Balance first by using ATW or AWC mode.
After that switch to Manual mode, fine-tune the Whtie
Balance and the press “Set Button”. Also you can se the
color temp. between Indoor and Outdoor modes.
9 Remark : White Balance may not work properly under the
following conditions, in this case, select AWC mode.
1.
When the color temperature of environment
surrounding the subject is out of the control range (e.g.
Clear Sky or Sunset)
2.
When the ambient illumination of the subject is dim.
3.
If the camera is directed towards a fluorescent light or
is installed in a place where illumination changes
dramatically, the White Balance operation my become
unstable.
7) 3D DNR
Select “3D DNR” by using Joystick S/W with Up / Down
direction.
Press “Set Button” to enter “3D-DNR”. Select the desired mode
for your purpose.
-
Off : Deactivates DNR. Noise is not reduced.
On : Activate DNR so that noise is reduced.
Set “DNR” mode to ON and Press “SET Button” for
adjusting the noise reduction level.
•
Destination (Option):
Set the desired brightness at low-light situation. It overrides the
general brightness slider. If 3D-DNR level and the Destination
Level is high, an after-image symptom (“Ghost Effect”) will be
occurred.
•
GLOBAL MOVEMENT (Option):
Operates the feature that detects the camera global motion,
upon which it prompt reacts to the camera movement by
reducing significantly the 3D-DNR temporal filter.
•
Pls check whether your camera can support this feature.
9 Remark : if AGC if OFF mode, 3D-DNR will not be activated.
8) EFFECTS
-
Select “EFFECTS” by using Joystick S/W with Up / Down
direction.
-
Press “Set Button” to enter “EFFECTS”. Select the desired mode
for your purpose.
9) SPECIAL
-
1.
2.
3.
4.
5.
6.
7.
8.
9.
10.
Select “SPECIAL” by using Joystick S/W with Up / Down
direction.
Press “Set Button” to enter “SPECIAL”. Select desired mode for
your purpose.
DZOOM : Digital Zoom. Select this and set a desired zoom
level to obtain an extended focal length.
Image Freeze : To hold the image to analyze precisely.
D-Effect : Change the video direction. Vertical Flip, Mirror,
Rotate are supported.
Color : Set the video mode color or B/W.
Contrast : Adjust Contrast Level that you desired.
Sharpness : Adjust Sharpness Level. Increasing this value,
the picture outline becomes stronger and clear.
CR Gain : Adjust “Red Color Portion” in the video.
CB Gain : Adjust “Blue Color Portion” in the video.
Initial Set : To return the default setting, which is defined in
“EFFECT” Menu.
Previous : Go back to “Main Menu”.
9 Remark : The Picture may be distorted or noise may appear if
SHARPNESS level is increased too high. If the VFLIP or MIRROR mode is enabled, the text on the
screen does not flip.
1. MOTION DET. : A signal is generated by the camera
whenever motion is detected.
- Zone Number : Select MD area to activate. 8 Areas can be
programmable.
- Zone STAT : Determine MD area selected.
- Width / Height : Set the size of MD.
- Move X/Y : Determine the coordinate of Horizontal /
Vertical Axis for MD Position.
- Sensitivity : 8 Areas can be activated. When Sensitivity
number is high, motion detection sensitivity is increased to
recognize even small movement.
2. PRIVACY MASK (PM) : Masking an area that you want to
hide on the screen.
- Mask Number : Select PM area to activate. 8 Areas can be
programmable.
- Mask STAT : Determine PM area selected.
- Mask Color : Determine area color, Gray, White, Red,
Green, Blue, Yellow, Black colors are available.
- Width / Height : Set the size of PM
- Move X/Y : Determine the coordinate of Horizontal /
Vertical Axis for PM Position.
-
Initial Set : To return the default setting, which is detined in
“PM” Menu.
PREVIOUS : Go back to “Main Menu”.
6. MONITOR TYPE
-
Change the setting value of video appropriate to your monitor.
LCD / CRT Monitor types are selectable.
7. FACTORY RESET
Go back to Factory Defaults for all setting values of OSD.
8. COMM SET (COMMUNICATION SETTING)
To set up the camera communication status when controlling the
camera with external control device.
3. LANGUAGE
a) PROTOCOL : Pelco D protocol is supported as default.
- You can select the menu language according to your requirements.
4. STABILIZER (DIGITAL IMAGE STABILIZER)
- Mitigate any picture movement by external factors as wind.
5. L/L SYNC (LINE LOCK SYNCHRONIZATION)
In areas where the supply is at 60Hz, you can synchronize the
output phase of multiple cameras using the power
synchronization function (Line-Lock) without using a
synchronization signal generator.
-
b) CAMERA ID : You can give Camera ID from 0 ~ 255 with
your desired position.
c) BAUD RATE : You can select Baud Rate form 4800 ~ 57600.
d) SAVE / REBOOT : In order to activate this function, save your
desired setting value and reboot the
camera in order.
e) PREVIOUS : Go back to “Main Menu”.
INT : Internal Synchronization
L/L : Power Synchronization type, Line-Lock.
9 Remark : In case of using DC 12V, SYNC menu is fixed to INT
mode. In case of using AC 24V at 60Hz frequency,
you can use the L/L.
9. EXIT
-
Press Set Button in the EXIT menu to save the current settings
and exit Main Menu.