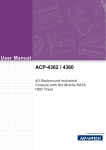
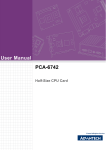
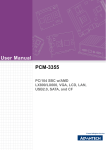
1
User Manual
PCM-9342
Copyright
This document is copyrighted, © 2008. All rights are reserved. The original manufacturer reserves the right to make improvements to the products described in this manual at any time without notice.
No part of this manual may be reproduced, copied, translated or transmitted in any
form or by any means without the prior written permission of the original manufacturer. Information provided in this manual is intended to be accurate and reliable.
However, the original manufacturer assumes no responsibility for its use, nor for any
infringements upon the rights of third parties that may result from such use.
Acknowledgements
Award is a trademark of Award Software International, Inc.
VIA is a trademark of VIA Technologies, Inc.
IBM, PC/AT, PS/2 and VGA are trademarks of International Business Machines Corporation.
Intel and Pentium are trademarks of Intel Corporation.
Microsoft Windows® is a registered trademark of Microsoft Corp.
RTL is a trademark of Realtek Semi-Conductor Co., Ltd.
ESS is a trademark of ESS Technology, Inc.
UMC is a trademark of United Microelectronics Corporation.
SMI is a trademark of Silicon Motion, Inc.
Creative is a trademark of Creative Technology LTD.
CHRONTEL is a trademark of Chrontel Inc.
All other product names or trademarks are properties of their respective owners.
PCM-9342 User Manual
Part No. 2006934210
Edition 1
Printed in China
November 2008
ii
Product Warranty (2 years)
Warranty Period
ADVANTECH aims to meet the customer’s expectations for post-sales service and
support; therefore, in addition to offering 2 years global warranty for ADVANTECH’s
standard products, a global extended warranty service is also provided for customers
upon request. ADVANTECH customers are entitled to a complete and prompt repair
service beyond the standard 2 years of warranty.
Standard products manufactured by ADVANTECH are covered by a 2 year global
warranty from the date of shipment. Products covered by extended warranty and
cross-region repair services against defects in design, materials, and workmanship,
are also covered from the date of shipment. All key parts assembled into ADVANTECH system products such as LCD, Touch Screen, Power Supply, and peripherals
etc, will be also covered by the standard 2 year warranty.
Repairs under Warranty
It is possible to obtain a replacement (Cross-Shipment) during the first 30 days of
purchase (45 days for Channel Partners), if the products were purchased directly
from ADVANTECH and the product is DOA (Dead-on-Arrival).
DOA Cross-Shipment excludes any customized and/or build-to-order products. The
Cross-Shipment agreement signed by customers is required for initiating/releasing
cross shipment with ADVANTECH confirmation and verification. The only conditions
for Cross-Shipment are: a) the return must not be damaged, altered or marked, b) all
parts and accessories must be included as originally shipped; and c) proof of purchase must be included. Any returns that do not meet mentioned requirements
above, or any wrong user settings/configurations will be denied, or subject to additional handling/service charges as determined by the ADVANTECH Repair Service
Department.
For those products which are not DOA, the return fee to an authorized ADVANTECH
repair facility will be at the customers’ expense. The shipping fee for reconstructive
products from ADVANTECH back to customers’ sites will be at ADVANTECH’s
expense.
Exclusions from Warranty
The product is excluded from warranty if:
The product has been found to be defective after expiry of the warranty period.
Warranty has been voided by removal or alternation of product or part identification labels.
The product has been misused, abused, or subjected to unauthorized disassembly/modification; placed in an unsuitable physical or operating environment;
improperly maintained by the customer; or failure caused which ADVANTECH is
not responsible whether by accident or other cause. Such conditions will be
determined by ADVANTECH at its sole unfettered discretion.
The product is damaged beyond repair due to a natural disaster such as a lighting strike, flood, earthquake, etc.
Product updates/upgrades and tests upon the request of customers who are
without warranty.
iii
PCM-9342 User Manual
Declaration of Conformity
FCC
This device complies with the requirements in part 15 of the FCC rules: Operation is
subject to the following two conditions:
1. This device may not cause harmful interference, and
2. This device must accept any interference received, including interference that
may cause undesired operation.
This equipment has been tested and found to comply with the limits for a Class A digital device, pursuant to Part 15 of the FCC Rules. These limits are designed to provide reasonable protection against harmful interference when the equipment is
operated in a commercial environment. This equipment generates, uses, and can
radiate radio frequency energy and, if not installed and used in accordance with the
instruction manual, may cause harmful interference to radio communications. Operation of this device in a residential area is likely to cause harmful interference in which
case the user will be required to correct the interference at his/her own expense. The
user is advised that any equipment changes or modifications not expressly approved
by the party responsible for compliance would void the compliance to FCC regulations and therefore, the user’s authority to operate the equipment.
Caution! There is a danger of a new battery exploding if it is incorrectly installed.
Do not attempt to recharge, force open, or heat the battery. Replace the
battery only with the same or equivalent type recommended by the manufacturer. Discard used batteries according to the manufacturer's
instructions.
Technical Support and Assistance
For more information about this and other Advantech products, please visit our website at:
http://www.advantech.com/
http://www.advantech.com/ePlatform/
For technical support and service, please visit our support website at:
http://support.advantech.com.tw/support/
Additional Information and Assistance
1.
2.
Visit the Advantech web site at http://www.advantech.com/ where you can find
the latest product information.
Contact your distributor, sales representative, or Advantech’s customer service
center for technical support if you need additional assistance. Please have the
following information ready before you call:
Product name and serial number
Description of your peripheral attachments
Description of your software (operating system, version, application software, etc.)
A complete description of the problem
The exact wording of any error messages
PCM-9342 User Manual
iv
Packing List
Before installation, please ensure the following items have been shipped:
Item Part Number
1 PCM-9342 SBC
1 Startup manual
1 Utility CD
1 mini jumper pack
Cables
Part Number
Description
1700008894
1 SATA cable
1700060202
1 PS/2 Y cable
1700100250
2 COM3/COM4 cable
1700260250
1 x LPT port cable
1701140201
1 COM2 cable
1703100121
1 USB 2 port cable
Optional accessories
Model Number Description
1700001531
1 Floppy cable
Ordering information
Model Number Description
PCM-9342F-64A1E EVA-X4150 SBC, 64 MB, VGA, LCD, PC/104
PCM-9342L-64A1E EVA-X4150 SBC, 64 MB, w/o Graphic, PC/104
v
PCM-9342 User Manual
PCM-9342 User Manual
vi
Contents
Chapter
1
General Introductin .............................1
1.1
1.2
Introduction ............................................................................................... 2
Product Feature ........................................................................................ 2
1.2.1 General ......................................................................................... 2
1.2.2 I/O ................................................................................................. 2
1.2.3 Ethernet ........................................................................................ 2
1.2.4 Display .......................................................................................... 2
Chipset ...................................................................................................... 3
1.3.1 Functional Specification ................................................................ 3
1.3.2 Mechanical Specification .............................................................. 4
1.3.3 Electrical Specification .................................................................. 4
1.3.4 Environmental Specification.......................................................... 5
1.3
Chapter
2
H/W Installation....................................7
2.1
2.3
Jumpers .................................................................................................... 8
2.1.1 Jumper list..................................................................................... 8
2.1.2 Jumper Settings ............................................................................ 8
2.1.3 Jumper description...................................................................... 10
Connectors.............................................................................................. 11
2.2.1 Connector list .............................................................................. 11
2.2.2 Connector Settings ..................................................................... 11
Mechanical .............................................................................................. 14
2.3.1 Jumper and Connector Location................................................. 14
Figure 2.1 Jumper and Connector Layout (Component Side) ... 14
Figure 2.2 Jumper and Connector Layout (Solder Side) ........... 14
2.3.2 Board Dimension ........................................................................ 15
Figure 2.3 Board Dimension Layout (Component Side) ............ 15
Figure 2.4 Board Dimension Layout (Solder Side) .................... 15
Figure 2.5 Board Dimension Layout (Side)................................ 16
3
BIOS Operation ..................................17
3.1
3.2
BIOS Introduction.................................................................................... 18
BIOS Setup ............................................................................................. 18
3.2.1 Main Menu .................................................................................. 19
3.2.2 Standard CMOS Features .......................................................... 20
3.2.3 Advanced BIOS Features ........................................................... 21
3.2.4 Advanced Chipset Features........................................................ 22
3.2.5 Integrated Peripherals................................................................. 23
3.2.6 PC Health Status ........................................................................ 24
3.2.7 Load Optimized Defaults............................................................. 25
3.2.8 Set Password.............................................................................. 25
3.2.9 Save & Exit Setup ....................................................................... 27
3.2.10 Quit Without Saving .................................................................... 27
4
PC/104.................................................29
4.1
PC/104 .................................................................................................... 30
Appendix A
Pin Assignments ...............................31
2.2
Chapter
Chapter
vii
PCM-9342 User Manual
A.1
A.2
A.3
A.4
A.5
A.6
A.7
A.8
A.9
A.10
A.11
A.12
A.13
A.14
A.15
A.16
A.17
A.18
A.19
A.20
A.21
VGA (CN5).............................................................................................. 32
Table A.1: CN5 .......................................................................... 32
SATA (CN6) ............................................................................................ 33
Table A.2: CN6 .......................................................................... 33
SATA (CN7) ............................................................................................ 34
Table A.3: CN7 .......................................................................... 34
Internal USB (CN9) ................................................................................. 35
Table A.4: CN9 .......................................................................... 35
COM2 (CN11) ......................................................................................... 36
Table A.5: CN11 ........................................................................ 36
LPT (CN12)............................................................................................. 37
Table A.6: CN12 ........................................................................ 37
COM3 (CN14) ......................................................................................... 38
Table A.7: CN14 ........................................................................ 38
COM4 (CN15) ......................................................................................... 39
Table A.8: CN15 ........................................................................ 39
24 bits TTL Panel (CN16) ....................................................................... 40
Table A.9: CN16 ........................................................................ 40
24 bits TTL Panel (CN16) ....................................................................... 41
Table A.10:CN16 ........................................................................ 41
Inverter Power Output (CN17) ................................................................ 42
Table A.11:CN17 ........................................................................ 42
18 bits LVDS Panel (CN18) .................................................................... 43
Table A.12:CN18 ........................................................................ 43
LAN (CN19) ............................................................................................ 44
Table A.13:CN19 ........................................................................ 44
ISA -5 V & -12 V Input (CN20) ................................................................ 45
Table A.14:CN20 ........................................................................ 45
PC104 (CN21) ........................................................................................ 46
Table A.15:CN21 ........................................................................ 46
Table A.16:CN21 ........................................................................ 47
Table A.17:CN21 ........................................................................ 48
Table A.18:CN21 ........................................................................ 49
AT Power Input (CN25)........................................................................... 50
Table A.19:CN25 ........................................................................ 50
GPIO (CN32) .......................................................................................... 51
Table A.20:CN32 ........................................................................ 51
Battery (CN33) ........................................................................................ 52
Table A.21:CN33 ........................................................................ 52
PS2 (CN34)............................................................................................. 53
Table A.22:CN34 ........................................................................ 53
CF (CN35)............................................................................................... 54
Table A.23:CN35 ........................................................................ 55
COM1 (CN36) ......................................................................................... 56
Table A.24:CN36 ........................................................................ 56
Appendix B
Watchdog Timer................................ 57
B.1
Watchdog Timer Sample Code............................................................... 58
PCM-9342 User Manual
viii
Chapter
1
1
General Introductin
This chapter gives background
information on the PCM-9342.
Sections include:
Introduction
Specifications
1.1 Introduction
The PCM-9342 is an 3.5” SBC (Single Board Computer) with low power based on
Advantech EVA-X4150 SoC (System on Chip). The PCM-9342, in conjunction with
EVA-X4150 SoC and onboard 64MB SDRAM, supports two USB 2.0 compatible
ports, one 10/100Base-T Ethernet interface, LVDS and TTL interface, and one PC/
104 expansion connector. The PCM-9342 also supports two SATA (transfer from
IDE) and four COM ports.
1.2 Product Feature
1.2.1 General
CPU: Advantech EVA-X4150 SoC
System Chipset: Advantech EVA-X4150 SoC
BIOS: AWARD® 4 Mbit Flash BIOS
System Memory: 64MB onboard SDRAM
SSD: Supports CompactFlash® Card TYPE I/II (shared 1st IDE Channel)
Watchdog Timer: Single chip Watchdog 255-level interval timer, setup by software
Expansion Interface: Supports 8/16 bit ISA bus for standard PC/104 device
Battery: 2-pin wafer box for external Battery on board I/O
1.2.2 I/O
I/O Interface: 2 x SATA (100MB/S Transfer from IDE), 1 x KB/mouse, 3 x
RS232, 1 x RS232/422/485, 1 x LPT, 1 x FDD(share with LPT)
USB: 2 x USB 2.0 compliant Ports
IrDA: N/A
GPIO: 8-bit general purpose input/output
1.2.3 Ethernet
Chipset: Realtek RTL 8100CL
Speed: 10/100 Mbps
Interface: 1 x RJ45
Standard: IEEE 802.3/802.3u compliant
1.2.4 Display
Chipset: SMI SM712 2D graphic Chip (built-in 4MB display memory)
Memory Size: Built-in 4MB display memory on SMI SM712
Resolution: CRT Display mode: pixel resolution up to 1024 x 768 at 85-Hz and
1024 x 768 at 75-Hz LCD Display mode
LCD Interface: 1 x 24-bit TTL (Alternative with LVDS)
LVDS: 1x18-bit LVDS (Alternative with TTL)
Dual Simultaneous Display: CRT+TTL or CRT + LVDS
PCM-9342 User Manual
2
Chapter 1
1.3
Chipset
1.3.1 Functional Specification
1.3.1.1 Processor Chipset
Advantech Em’Core EVA-X4150 SoC
27 mm * 27 mm * 2.23 mm PBGA 456balls
1.3.1.2 Other Chipsets
Graphic and
Video Controllers
SMI SM712 2D graphic Chip
CRT:SMI 2D graphic chip supports 1024 x 768 @ 24 bit true
color
TTL: SMI 2D graphic chip supports 1024 x 768 @ 18 bit TFT
LCD Panel
LVDS:TTL to 18 bit LVDS
LVDS connector: Hirose DF13 type 20 pin
TTL connector: Hirose DF13 type 40 pin
CRT connector: D-SUB15 at coastline
LAN
Realtek RTL 8100CL
Integrated IEEE 802.3/802.3u compliant
Support 10 Mbps/100 Mbps
Connectors:
Phone Jack RJ45 8P 90D(F)
Serial Ports
Advantech EV-X4150 SoC and SMSC SCH 3114 supports (LPC
Super I/O).
2 full function serial ports by EVA-X4150 SoC
2 full function serial ports by SMSC SCH 3114
High Speed NS16C550A Compatible UARTs with Data rates
to 1.5 Mbps
Support IRQ Sharing among serial ports
Connectors:
COM1: (RS-232) 1x DB9 at coastline
COM2: (RS-232/422/485) 1 x 2.0 mm box header
COM3~4: (RS-232) 2 x 2.0 mm box header
Parallel Port
SMSC SCH 3114 supports (LPC Super I/O)
One Parallel Port.
SPP/EPP (1.7,1.9) / ECP (IEEE 1284 Compliant) mode.
Connector:
Box header 13 * 2P (M) 2.0 mm
3
PCM-9342 User Manual
General Introductin
Processor
Embedded 32-bit X86-based SoC
Build-in PCI, ISA, IDE, Ethernet Mac,USB on Chip
Operating frequency 133 MHz
Core Voltage: 1.8 V ± 5%
Power consumption approximates 0.8 Watt
SMSC SCH 3114 supports (LPC Super I/O)
PS/2 Keyboard and Mouse interface
Connector: Mini-Din 6P at coastline
Keyboard/Mouse
Connectors
SMSC SCH 3114 supports (LPC Super I/O)
8 I/O Pins
5 V tolerance I/Os
GPIO
Connectors:
10 pins 2.0 mm pin header
Battery Backup
2 pin wafer box for external Battery on board
1.3.2 Mechanical Specification
1.3.2.1 Dimension(mm)
L146.12 mm * W101.57 mm
1.3.2.2 Height on Top(mm)
13 mm (PS/2 Connector)
1.3.2.3 Height on Bottom(mm)
8.1 mm (CF Socket)
1.3.2.4 Weight
Net weight: 137 g
Gross weight: 453 g
1.3.3 Electrical Specification
1.3.3.1 Power Supply Voltage
Voltage requirement with AT Power:
+12 V DC +/-5%
+5 V DC +/-5%
1.3.3.2 Power Supply Current
Supply Current (Typical)
CPU: Advantech Em’Core EVA-X4150 RAM:133 MHz 64 MB SDRAM
AT
DOS
5V
12 V
3.3 V
1.18 A
0A
0A
1.3.3.3 RTC Battery
Typical Voltage: 3.0 V
Nomal discharge capacity: 210 mAh
PCM-9342 User Manual
4
Chapter 1
1.3.4 Environmental Specification
1.3.4.1 Operating Humidity
0% ~ 90% Relative Humidity, non-condensing
1.3.4.2 Operating temperature
Operating temperature: 0 ~ 60° C (32 ~ 140° F)
General Introductin
1.3.4.3 Storage Humidity
Standard products (0~60° C)
Relative Humidity: 95% @ 60° C
1.3.4.4 Storage temperature
Standard products (0~60° C)
Storage temperature: -20 ~ 70° C
5
PCM-9342 User Manual
PCM-9342 User Manual
6
Chapter
2
2
H/W Installation
This chapter explains the setup
procedures of the PCM-9342 hardware, including instructions on
setting jumpers and connecting
peripherals, switches, indicators
and mechanical drawings. Be sure
to read all safety precautions
before you begin the installation
procedure.
2.1 Jumpers
2.1.1 Jumper list
J1
LCD Power
J2
COM2 Setting
J3
HDD & PWR LED Setting
J4
CPU CLK Setting
J5
CPU CLK Setting
J6
CPU CLK Setting
2.1.2 Jumper Settings
J1
LCD Power
Part Number
1653003101
Footprint
JH3X1V-2M
Description
PIN HEADER 3*1P 180D(M) 2.0mm DIP SQUARE W/O Pb
Setting
Function
(1-2)
+5 V
(2-3)*
+3.3 V
*: Default
J2
COM2 Setting
Part Number
1653003260
Footprint
JH3X2S-2M
Description
PIN HEADER 3*2P 180D(M) 2.0mm SMD SOUARE PIN
Setting
Function
(1-2)*
RS232
(3-4)
RS485
(5-6)
RS422
*: Default
PCM-9342 User Manual
8
Part Number
1653000014
Footprint
JH2X2S-2M
Description
PIN HEADER 2*2P 180D SMD MALE SQUARE 2.00mm
Setting
Function
(1-2) (3-4)*
IDE (Yellow) Power (Green)
(1-3) (2-4)
IDE(Green) Power (Yellow)
H/W Installation
HDD & PWR LED Setting
*: Default
J4-J6
CPU CLK Setting
Part Number
1653003101
Footprint
JH3X1V-2M
Description
PIN HEADER 3*1P 180D(M) 2.0mm DIP SQUARE W/O Pb
Setting
Function
(2-3)(2-3)(2-3)
66MHz CPU/SDRAM Frequency
(2-3)(2-3)(1-2)
100 MHz
(2-3)(1-2)(2-3)*
133 MHz
(2-3)(1-2)(1-2)
150 MHz w 37.5 MHz PCI
(1-2)(2-3)(2-3)
150 MHz w 30 MHz PCI
(1-2)(2-3)(1-2)
166 MHz
*: Default
9
Chapter 2
J3
PCM-9342 User Manual
2.1.3 Jumper description
You may configure your card to match the needs of your application by setting jumpers. A jumper is a metal bridge used to close an electric circuit. It consists of two
metal pins and a small metal clip (often protected by a plastic cover) that slides over
the pins to connect them. To .close. a jumper, you connect the pins with the clip. To
.open. a jumper, you remove the clip. Sometimes a jumper will have three pins,
labeled 1, 2 and 3. In this case you would connect either pins 1 and 2, or 2 and 3.
The jumper settings are schematically depicted in this manual as follows.
1
2
3
A pair of needle-nose pliers may be helpful when working with jumpers. If you have
any doubts about the best hardware configuration for yourm application, contact your
local distributor or sales representative before you make any changes. Generally,
you simply need a standard cable to make most connections.
Setting
Function
1-2
+5 V
2-3
+3.3 V
Warning! To avoid damaging the computer, always turn off the power supply
before setting .Clear CMOS. Before turning on the power supply, set the
jumper back to .3.0 V Battery On.
PCM-9342 User Manual
10
Chapter 2
2.2 Connectors
2.2.1 Connector list
CN5
VGA
CN6
SATA
SATA
CN9
Internal USB
CN11
COM2
CN12
LPT
CN14
COM3
CN15
COM4
CN16
24 bits TTL Panel
CN17
Inverter Power Output
CN18
18 bits LVDS Panel
CN19
LAN
CN20
ISA -5V & -12V Input
CN21
PC104
CN25
AT Power Input
CN32
GPIO
CN33
Battery
CN34
PS2
CN35
CF
CN36
COM1
H/W Installation
CN7
2.2.2 Connector Settings
2.2.2.1 VGA/LCD/LVDS interface connections
The board’s PCI VGA interface can drive conventional CRT displays and is capable
of driving a wide range of flat panel displays, including passive LCD and active LCD
displays. The board has connectors to support these displays: one for standard CRT
VGA monitors, one for flat panel displays, and one for LVDS type LCD panels.
2.2.2.2 CRT display connector (CN5)
The CRT display connector is a 15-pin D-SUB connector used for conventional CRT
displays.
2.2.2.3 SATA Connector (CN6, CN7)
PCM-9342 supports Serial ATA via two connectors (CN6, CN7). Data transfer rates
up to 100 MB/s are possible, enabling very fast data and file transfer, and independent DMA operation on two ports.
2.2.2.4 USB connectors (CN9)
The board provides up to two USB (Universal Serial Bus) ports. This gives complete
plug and play capability. The USB interfaces comply with USB specification Rev.
2.0which supports 480 Mbps transfer rate, and are fuse protected 5 x 2 pin 180D (M)
connectors for internal 2 x USB connectors at CN9.You will need an adapter cable if
you use a standard USB connector. The adapter cable has a 5 x2-pin connector with
foolproof protection for incorrect plug-in on one end and a USB connector on the
other.
11
PCM-9342 User Manual
2.2.2.5 Parallel port connector (CN12)
Normally, the parallel port is used to connect the card to a printer. The board includes
a multi-mode (ECP/EPP/SPP) parallel port accessed via CN12 and a 26-pin flatcable connector. You will need an adapter cable if you use a traditional DB-25 connector. The adapter cable has a 26-pin connector on one end, and a DB-25 connector on the other.
The parallel port is designated as LPT1, and can be disabled in the system BIOS
setup.
The parallel port interrupt channel is designated to be IRQ7.
You can select ECP/EPP DMA channel via BIOS setup.
2.2.2.6 TTL LCD panel connector (CN16)
The board supports 24bit TTL LCD panel displays.
Users can connect to an 24bit TTL LCD on it.
2.2.2.7 LVDS LCD panel connector (CN18)
The board supports 18bit LVDS LCD panel displays.
Users can connect to an 18bit LVDS LCD on it.
2.2.2.8 COM port connector (CN11, CN14, CN15, CN36)
The PCM-9342 provides 4 serial ports (COM1, COM3 & COM4: RS-232; COM2: RS232/422/485) in one DB-9 connector (CN36) for COM1 and one 7*2P pin header
(CN11) for COM2 and two 5*2P pin header(CN14, CN15) for COM3 & COM4. It provides connections for serial devices (a mouse, etc.) or a communication network.
You can find the pin assignments for the COM port connector in Appendix A.
2.2.2.9 COM RS-232/422/485 setting (J2)
COM2 can be configured to operate in RS-232, RS-422, or RS-485 mode.
This is done via J2.
J2
COM2 Setting
Setting
Function
(1-2)
RS232
(3-4)
RS485
(5-6)
RS422
2.2.2.10 Ethernet configuration
The board is equipped with 1 high performance 32-bit PCI-bus Ethernet interface
which is fully compliant with IEEE 802.3 10/100Mbps. It is supported by all major network operating systems.
2.2.2.11 100Base-T connector (CN19)
100Base-T connections are made via the on-board RJ-45 connector.
2.2.2.12 PC/104 Connector (CN21)
PCM-9342 supports full ISA compatible functions via PC/104 connector (CN21).
Socket2: 20 x 2 (F) 2.54 mm 51.86 mm x 5.01 mm x 11.45 mm p = 3.40 mm
Socket3: 32 x 2 (F) 2.54 mm 82.34 mm x 5.01 mm x 11.45 mm p = 3.40 mm
PC/104 negative voltage: One 3 x 1-pin wafer box (CN20) supports -5 V/-12 V power
input for ISA devices.
2.2.2.13 Power connectors
Main power connector, +5 V, +12 V (CN25).
PCM-9342 User Manual
12
2.2.2.14 GPIO (General Purpose Input Output) (CN32)
The board supports 8-bit GPIO through GPIO connector. The 8 digital in and out-puts
can be programmed to read or control devices, with input or output defined. The
default setting is 4 bits input and 4 bits output.
2.2.2.16 Solid State Disk
The board provides a CompactFlash card type I/II socket.
CompactFlash (CN35)
The CompactFlash card shares a secondary IDE channel which can be
enabled/disabled via the BIOS settings.
Compact Flash set as fix master mode.
2.2.2.17 Power & HDD LED Indicator (D1)
The HDD LED indicator for hard disk access is an active low signal (24mA sink rate).
Power supply activity LED indicator.
2.2.2.18 Power Reset button (SW1)
Momentarily pressing the reset button will activate a reset. The switch should be
rated for 10 mA, 5 V.
13
PCM-9342 User Manual
H/W Installation
2.2.2.15 Keyboard and PS/2 mouse connector (CN34)
The board provides a keyboard connector that supports both a keyboard and a PS/2
style mouse. In most cases, especially in embedded applications, a keyboard is not
used. If the keyboard is not present, the standard PC/AT BIOS will report an error or
fail during power-on self-test (POST) after a reset. The product’s BIOS standard
setup menu allows you to select “All, But Keyboard” under the “Halt On” selection.
This allows no-keyboard operation in embedded system applications, without the
system halting under POST.
Chapter 2
Supplies main power to the PCM-9342 (+5 V), and to devices that require +12 V.
2.3 Mechanical
2.3.1 Jumper and Connector Location
J6
J5 CN17 CN7 CN6
J4
CN16
CN18 J1
CN20
CN25
CN12
CN21
CN14
CN33
CN15
J2
J3
CN32
CN9 CN11
CN19 CN34
CN36 LAN LED
CN5
Reset
Power & HDD LED
Figure 2.1 Jumper and Connector Layout (Component Side)
CN35
Figure 2.2 Jumper and Connector Layout (Solder Side)
PCM-9342 User Manual
14
Chapter 2
2.3.2 Board Dimension
H/W Installation
Figure 2.3 Board Dimension Layout (Component Side)
Figure 2.4 Board Dimension Layout (Solder Side)
15
PCM-9342 User Manual
Figure 2.5 Board Dimension Layout (Side)
PCM-9342 User Manual
16
Chapter
3
BIOS Operation
Sections include:
BIOS Introduction
BIOS Setup
3
3.1 BIOS Introduction
Advantech provide full-featured AwardBIOS 6.0 and delivers the superior performance, compatibility and functionality that manufactures of Industry PC and Embedded boards, it’s many options and extensions let you customize your products to a
wide range of designs and target markets.
The modular, adaptable AwardBIOS 6.0 supports the broadest range of third-party
peripherals and all popular chipsets, plus Intel, AMD, nVidia, VIA, and compatible
CPUs from 386 through Pentium and AMD Geode, K7 and K8 (including multiple processor platforms), and VIA Eden C3 and C7 CPU.
You can use Advantech’s utilities to select and install features to suit your designs for
customers need.
3.2 BIOS Setup
The PCM-9342 Series system has build-in AwardBIOS with a CMOS SETUP utility
which allows user to configure required settings or to activate certain system features.
The CMOS SETUP saves the configuration in the CMOS RAM of the motherboard.
When the power is turned off, the battery on the board supplies the necessary power
to the CMOS RAM.
When the power is turned on, press the <Del> button during the BIOS POST (PowerOn Self Test) will take you to the CMOS SETUP screen.
.
CONTROL KEYS
< ↑ >< ↓ >< ← >< → > Move to select item
<Enter>
<Esc>
Select Item
Main Menu - Quit and not save changes into CMOS
Sub Menu - Exit current page and return to Main Menu
<Page Up/+>
Increase the numeric value or make changes
<Page Down/->
Decrease the numeric value or make changes
<F1>
General help, for Setup Sub Menu
<F2>
Item Help
<F5>
Load Previous Values
<F6>
Save all CMOS changes to BIOS
<F7>
Load Optimized Default
<F9>
Menu in BIOS
<F10>
Save all CMOS changes
PCM-9342 User Manual
18
Press <Del> to enter AwardBIOS CMOS Setup Utility, the Main Menu will appear on
the screen. Use arrow keys to select among the items and press <Enter> to accept or
enter the sub-menu.
Chapter 3
3.2.1 Main Menu
BIOS Operation
Standard CMOS Features
This setup page includes all the items in standard compatible BIOS.
Advanced BIOS Features
This setup page includes all the items of Award BIOS enhanced features.
Advanced Chipset Features
This setup page includes all the items of Chipset configuration features.
Integrated Peripherals
This setup page includes all onboard peripheral devices.
PC Health Status
This entry displays the current system temperature, and Voltage.
Load Optimized Defaults
This setup page includes Load system optimized value, and the system would
be in best performance configuration.
Set Password
Establish, change or disable password.
Save & Exit Setup
Save CMOS value settings to CMOS and exit BIOS setup.
Exit Without Saving
Abandon all CMOS value changes and exit BIOS setup.
19
PCM-9342 User Manual
3.2.2 Standard CMOS Features
Date
The date format is <week>, <month>, <day>, <year>.
Week From Sun to Sat, determined and display by BIOS only
Month From Jan to Dec.
Day
From 1 to 31
Year
From 1999 through 2098
Time
The times format in <hour> <minute> <second>, base on the 24-hour time
IDE Channel 0 Master/Slave
IDE HDD Auto-Detection Press "Enter" for automatic device detection.
IDE Channel 1 Master
IDE HDD Auto-Detection Press "Enter" for automatic device detection.
Drive A [1.44m, 3.5 in.]
Select the type of floppy disk drive installed in your system.
Drive B [None]
Select the type of floppy disk drive installed in your system.
Base Memory
The POST of the BIOS will determine the amount of base (or conventional)
memory installed in the system.
Extended Memory
The POST of the BIOS will determine the amount of extended memory (above
1MB in CPU’s memory address map) installed in the system.
Total Memory
This item displays the total system memory size.
PCM-9342 User Manual
20
Chapter 3
3.2.3 Advanced BIOS Features
21
PCM-9342 User Manual
BIOS Operation
Hard Disk Boot Priority
This item allows user to select boot sequence for system device HDD, SCSI,
RAID.
USB Boot Priority
This item allows user to select USB Boot Device Priority.
First / Second / Other Boot Drive
Floppy
Select boot device priority by Floppy.
LS120
Select boot device priority by LS120.
Hard Disk
Select boot device priority by Hard Disk.
CDROM
Select boot device priority by CDROM.
USB Device Select boot device priority by USB Device.
ZIP100
Select boot device priority by ZIP100.
USB-FDD
Select boot device priority by USB-FDD.
USB-ZIP
Select boot device priority by USB-ZIP.
USB-CDROM Select boot device priority by USB-CDROM.
LAN
Select boot device priority by LAN.
Disabled
Disable this boot function.
Swap Floppy Drive [Disabled]
This item allows user to swap drive A and driver B sequence.
Fast Boot [Disabled]
This item enable/disable Fast Boot feature.
Blank Boot [Disabled]
This item enable/disable Blank Boot feature.
Console Redirection [Enabled]
This item allows user to enabled / disable console redirection mode.
Baud Rate [19200]
This item allows user to set baud rate modes.
Agent Connect via [NULL]
This item allows user to set agent connect modes.
Agent wait time(min) [1]
This item allows user to set agent wait time(min).
Agent after boot [Disabled]
This item allows user to set agent running after boot mode.
Delay For HDD (Secs) [0]
This item allows user to set delay for HDD(secs).
USB Device Setting [Press Enter] (Show Only)
This item allows users to set USB related features.
3.2.4 Advanced Chipset Features
Note!
This "Advanced Chipset Features" option controls the configuration of
the board's chipset, this page is developed by Chipset independent, for
control chipset register setting and fine tune system performance. It is
strongly recommended only technical users make changes to the
default settings.
EVA4150 IO Config [Press Enter] (Show Only)
This item allows user to set EVA4150 UART, LPT resources.
EVA4150 PowerDown Setting [Press Enter] (Show Only)
This item allows user to set IDE, USB2.0, COM1 ,COM2 powerdown function.
EVA4150 GPIO Config [Press Enter] (Show Only)
This item allows user to set all of the GPIO resources.
SMI712 VGA Setting [Press Enter] (Show Only)
This item allows users to set VGA related features.
SDRAM:Write Recovery Time [2T]
This item allows users to set the DRAM Write Recovery Time.
Watch Dog Timer reset [Disabled]
This item allows user to set watch dog timer.
Do CMOS Clear [Disabled]
This item allows user to clear CMOS.
I/O Cycle Control [Disabled]
This item allows users to set I/O cycle control mode.
CPU Fast Decode Cycle [Normal]
This item allows users to set CPU of decode cycle mode.
PCM-9342 User Manual
22
3.2.5 Integrated Peripherals
Chapter 3
LPC 80H port decode [Disabled]
This item allows users to set LPC of 80H port decode function.
BIOS Operation
Note!
This "Integrated Peripherals" option controls the configuration of the
board's chipset, includes IDE, ATA, this page is developed by Chipset
independent.
ADVSOC IDE Legacy mode [Enabled]
This item enables ADVSOC IDE as legacy IDE controller or PCI IDE controller.
On-Chip Primary IDE / On-Chip Secondary IDE [Enabled]
This item enables chipset IDE device 1 or 2 of controller.
Master PIO [Auto]
This item allows user to adjust master IDE mode of type for modification purpose. Bios default value suggest to “Auto”.
Slave PIO [Auto]
This item allows user to adjust slave IDE mode of type for modification purpose.
Bios default value suggest to “Auto”.
Master Ultra DMA [Auto]
This item allows user to enable/disable primary master IDE ultra DMA mode.
Bios default value suggest to “Enabled”.
Slave Ultra DMA [Auto]
This item allows user to enable/disable primary slave IDE ultra DMA mode.
Bios default value suggest to “Enabled”.
Master UDMA [Auto]
This item allows user to adjust primary master IDE mode of type for modification purpose. Bios default value suggest to “Auto”.
Slave UDMA [Auto]
This item allows user to adjust primary slave IDE mode of type for modification
purpose. Bios default value suggest to “Auto”.
23
PCM-9342 User Manual
IDE HDD Block Mode [Enabled]
This item allows enabled or disabled that IDE block data transfer mode. It will
speed up HDD data transfer of efficiency. Bios default value suggest to
“Enabled”.
Onboard FDC Controller [Enabled]
This item specifices onboard floppy disk drive controller.
Onboard Serial Port 1 [3E8]
This option is used to assign the I/O address and IRQ for the onboard serial
port.
Serial Port 1 Use IRQ [IRQ3]
This option is used to assign the Serial Port 3 Use IRQ.
Onboard Serial Port 2 [2E8]
This option is used to assign the I/O address and IRQ for the onboard serial
port.
Serial Port 2 Use IRQ [IRQ4]
This option is used to assign the Serial Port 4 Use IRQ.
Onboard Parallel Por [378/IRQ7]
This item allows you to determine onboard parallel port controller I/O address
and IRQ.
Parallel Port Mode [Standard]
Select an operating mode for the onboard parallel port.
ECP Mode Use DMA [3]
When the onboard parallel is set to ECP mode, the parallel port can use DMA3
or DMA1.
3.2.6 PC Health Status
Note!
This entry displays the current system temperature, and Voltage.
PCM-9342 User Manual
24
Chapter 3
Current SYS Temperature
VCC
1.8 V
5V
12 V
3.2.7 Load Optimized Defaults
BIOS Operation
Note!
Load Optimized Defaults loads the default system values directly from
ROM. If the stored record created by the Setup program should ever
become corrupted (and therefore unusable).
These defaults will load automatically when you turn the PCM-9342
Series system on.
3.2.8 Set Password
25
PCM-9342 User Manual
Note!
To enable this feature, you should first go to the Advanced BIOS Features menu, choose the Security Option, and select either Setup or System, depending on which aspect you want password protected. Setup
requires a password only to enter Setup. System requires the password
either to enter Setup or to boot the system. A password may be at most
8 characters long.
To Establish Password
1. Choose the Set Password option from the CMOS Setup Utility main menu and
press <Enter>.
2. When you see”Enter Password”, enter the desired password and press
<Enter>.
3. At the “Confirm Password” prompt, retype the desired password, then press
<Enter>.
4. Select Save to CMOS and EXIT, type <Y>, then <Enter>.
To Change Password
1. Choose the Set Password option from the CMOS Setup Utility main menu and
press <Enter>.
2. When you see “Enter Password”, enter the existing password and press
<Enter>.
3. You will see “Confirm Password°”. Type it again, and press <Enter>.
4. Select Set Password again, and at the “Enter Password” prompt, enter the new
password and press <Enter>.
5. At the “Confirm Password” prompt, retype the new password, and press
<Enter>.
6. Select Save to CMOS and EXIT, type <Y>, then <Enter>.
To Disable Password
1. Choose the Set Password option from the CMOS Setup Utility main menu and
press <Enter>.
2. When you see “Enter Password”, enter the existing password and press
<Enter>.
3. You will see “Confirm Password”. Type it again, and press <Enter>.
4. Select Set Password again, and at the “Enter Password” prompt, please don’t
enter anything; just press <Enter>.
5. At the “Confirm Password” prompt, again, don’t type in anything; just press
<Enter>.
6. Select Save to CMOS and EXIT, type <Y>, then <Enter>.
PCM-9342 User Manual
26
Type "Y" will quit the BIOS Setup Utility and save user setup value to
CMOS.
Type "N" will return to BIOS Setup Utility.
3.2.10 Quit Without Saving
Note!
Type "Y" will quit the BIOS Setup Utility without saving to CMOS.
Type "N" will return to BIOS Setup Utility.
27
PCM-9342 User Manual
BIOS Operation
Note!
Chapter 3
3.2.9 Save & Exit Setup
PCM-9342 User Manual
28
Chapter
4
PC/104
4
4.1 PC/104
Aim the pin connector to the
footprint and apply force evenly.
After apply force to the
IPC connector. The footprint
of the module / CPU board need
to be inserted correctly.
After apply force to the
connector. The footprint of
the modle / CPU board need
to be inserted correctly.
PCM-9342 User Manual
30
Appendix
A
A
Pin Assignments
A.1 VGA (CN5)
Table A.1: CN5
CN5
VGA
Part Number
1654515304
Footprint
SUYIN_070207FR015S221CA
Description
D-SUB CONN. 15P 90D (F) DIP 5 mm BLUE W/O Pb
Pin
Pin Name
1
RED
2
GREEN
3
BLUE
4
NC
5
GND
6
GND
7
GND
8
GND
9
NC
10
GND
11
NC
12
DDAT
13
HSYNC
14
VSYNC
15
DCLK
PCM-9342 User Manual
32
Matching Cable: 1700006291
Table A.2: CN6
CN6
SATA
Part Number
1654000172
Footprint
SATA
Description
Serial ATA 7P 180D (M) DIP WO/Pb LD1807V-S51P
Pin
Pin Name
1
GND
2
TX+
3
TX-
4
GND
5
RX-
6
RX+
7
GND
33
PCM-9342 User Manual
Appendix A Pin Assignments
A.2 SATA (CN6)
A.3 SATA (CN7)
Matching Cable: 1700006291
Table A.3: CN7
CN7
SATA
Part Number
1654000172
Footprint
SATA
Description
Serial ATA 7P 180D (M) DIP WO/Pb LD1807V-S51P
Pin
Pin Name
1
GND
2
TX+
3
TX-
4
GND
5
RX-
6
RX+
7
GND
PCM-9342 User Manual
34
Matching Cable: 1703100121
Table A.4: CN9
CN9
Internal USB
Part Number
1653005260
Footprint
HD_5x2P_79_N10
Description
PIN HEADER 5*2P 180D (M) 2.0 mm SMD IDIOT-PROOF
Pin
Pin Name
1
+5 V
2
+5 V
3
A_D-
4
B_D-
5
A_D+
6
B_D+
7
GND
8
GND
9
GND
35
PCM-9342 User Manual
Appendix A Pin Assignments
A.4 Internal USB (CN9)
A.5 COM2 (CN11)
Matching Cable: 1701140201
Table A.5: CN11
CN11
COM2
Part Number
1653207260
Footprint
HD_7x2_79_BOX
Description
BOX HEADER SMD 7*2P 180D (M) 2.0 mm
Pin
Pin Name
1
DCD#
2
DSR#
3
RXD
4
RTS#
5
TXD
6
CTS#
7
DTR#
8
RI#
9
GND
10
GND
11
422/485TX+
12
422/485TX-
13
422RX+
14
422RX-
PCM-9342 User Manual
36
Matching Cable: 1700260250
Table A.6: CN12
CN12
LPT
Part Number
1653213260
Footprint
BH13X2SV
Description
BOX HEADER 13*2P 180D (M) 2.0 mm SMD
Pin
Pin Name
1
STROBE#
2
AUTOFEED#
3
D0
4
ERROR#
5
D1
6
INIT#
7
D2
8
SLCT IN#
9
D3
10
GND
11
D4
12
GND
13
D5
14
GND
15
D6
16
GND
17
D7
18
GND
19
ACK#
20
GND
21
BUSY
22
GND
23
PE
24
GND
25
SLCT
26
NC
37
PCM-9342 User Manual
Appendix A Pin Assignments
A.6 LPT (CN12)
A.7 COM3 (CN14)
Matching Cable: 1700100250
Table A.7: CN14
CN14
COM3
Part Number
1653205260
Footprint
BH5X2SV
Description
BOX HEADER SMD 5*2 180D (M) 2.0 mm
Pin
Pin Name
1
DCD#
2
DSR#
3
RXD
4
RTS#
5
TXD
6
CTS#
7
DTR#
8
RI#
9
GND
10
GND
PCM-9342 User Manual
38
Appendix A Pin Assignments
A.8 COM4 (CN15)
Matching Cable: 1700100250
Table A.8: CN15
CN15
COM4
Part Number
1653205260
Footprint
BH5X2SV
Description
BOX HEADER SMD 5*2 180D (M) 2.0 mm
Pin
Pin Name
1
DCD#
2
DSR#
3
RXD
4
RTS#
5
TXD
6
CTS#
7
DTR#
8
RI#
9
GND
10
GND
39
PCM-9342 User Manual
A.9 24 bits TTL Panel (CN16)
Table A.9: CN16
CN16
24 bits TTL Panel
Part Number
1653920200
Footprint
SPH20X2
Description
*CONN. 40P 90D 1.25 mm SMD WO/Pb DF13-40DP-1.25 V
Pin
Pin Name
1
+5 V
2
+5 V
3
GND
4
GND
5
+3.3 V
6
+3.3 V
7
NC
8
GND
9
PD0
10
PD1
11
PD2
12
PD3
13
PD4
14
PD5
15
PD6
16
PD7
17
PD8
18
PD9
19
PD10
20
PD11
21
PD12
22
PD13
23
PD14
24
PD15
25
PD16
26
PD17
PCM-9342 User Manual
40
Appendix A Pin Assignments
A.10 24 bits TTL Panel (CN16)
Table A.10: CN16
CN16
24 bits TTL Panel
Part Number
1653920200
Footprint
SPH20X2
Description
*CONN. 40P 90D 1.25 mm SMD WO/Pb DF13-40DP-1.25 V
Pin
Pin Name
27
PD18
28
PD19
29
PD20
30
PD21
31
PD22
32
PD23
33
GND
34
GND
35
SHFCLK
36
FLM (V-SYNC)
37
M/DE
38
LP (H-SYNC)
39
NC
40
ENVEE
41
PCM-9342 User Manual
A.11 Inverter Power Output (CN17)
Table A.11: CN17
CN17
Inverter Power Output
Part Number
1655305020
Footprint
WHL5V-2M
Description
WAFER BOX 2.0 mm 5P 180D (M) W/LOCK
Pin
Pin Name
1
+12 V
2
GND
3
ENABKL
4
VBR
5
+5 V
PCM-9342 User Manual
42
Table A.12: CN18
CN18
18 bits LVDS Panel
Part Number
1653910261
Footprint
SPH10X2
Description
*CONN. SMD 10*2P 180D (M) DF13-20DP-1.25 V HRS
Pin
Pin Name
1
GND
2
GND
3
LVDS0_D0+
4
NC
5
LVDS0_D0-
6
NC
7
LVDS0_D1+
8
NC
9
LVDS0_D1-
10
NC
11
LVDS0_D2+
12
NC
13
LVDS0_D2-
14
NC
15
LVDS0_CLK+
16
NC
17
LVDS0_CLK-
18
NC
19
+5 V or +3.3 V
20
+5 V or +3.3 V
43
PCM-9342 User Manual
Appendix A Pin Assignments
A.12 18 bits LVDS Panel (CN18)
A.13 LAN (CN19)
Table A.13: CN19
CN19
LAN
Part Number
1652508200
Footprint
RJ45-677088D06
Description
PHONE JACK RJ45 8P 90D (F) DIP 677-088-D06
Pin
Pin Name
1
TX+
2
TX-
3
RX+
4
NC
5
NC
6
RX-
7
NC
8
NC
PCM-9342 User Manual
44
Table A.14: CN20
CN20
ISA -5 V & -12 V Input
Part Number
1653003101
Footprint
JH3X1V-2M
Description
PIN HEADER 3*1P 180D (M) 2.0 mm DIP SQUARE W/O Pb
Pin
Pin Name
1
-12 V
2
-5 V
3
GND
45
PCM-9342 User Manual
Appendix A Pin Assignments
A.14 ISA -5 V & -12 V Input (CN20)
A.15 PC104 (CN21)
Table A.15: CN21
CN21
PC104
Part Number
165313222A 165312022A
Footprint
PC104A
Description
PC104
Pin
Pin Name
A1
IOCHCK
A2
SD7
A3
SD6
A4
SD5
A5
SD4
A6
SD3
A7
SD2
A8
SD1
A9
SD0
A10
IOCHRDY
A11
AEN
A12
SA19
A13
SA18
A14
SA17
A15
SA16
A16
SA15
A17
SA14
A18
SA13
A19
SA12
A20
SA11
A21
SA10
A22
SA9
A23
SA8
A24
SA7
A25
SA6
A26
SA5
PCM-9342 User Manual
46
Appendix A Pin Assignments
Table A.16: CN21
CN21
PC104
Part Number
165313222A 165312022A
Footprint
PC104A
Description
PC104
Pin
Pin Name
A27
SA4
A28
SA3
A29
SA2
A30
SA1
A31
SA0
A32
GND
B1
GND
B2
RSTDRV
B3
+5 V
B4
IRQ9
B5
-5 V
B6
DRQ2
B7
-12 V
B8
0WS#
B9
+12 V
B10
GND
B11
SMEMW#
B12
SMEMR#
B13
IOW#
B14
IOR#
B15
DACK3#
B16
DRQ3
B17
DACK1#
B18
DRQ1
B19
REFRESH#
B20
SYSCLK
47
PCM-9342 User Manual
Table A.17: CN21
CN21
PC104
Part Number
165313222A 165312022A
Footprint
PC104A
Description
PC104
Pin
Pin Name
B21
IRQ7
B22
IRQ6
B23
IRQ5
B24
IRQ4
B25
IRQ3
B26
DACK2#
B27
TC
B28
ALE#
B29
+5 V
B30
OSC
B31
GND
B32
GND
C1
GND
C2
BHE#
C3
LA23
C4
LA22
C5
LA21
C6
LA20
C7
LA19
C8
LA18
C9
LA17
C10
MEMR#
C11
MEMW#
C12
SD8
C13
SD9
C14
SD10
PCM-9342 User Manual
48
Appendix A Pin Assignments
Table A.18: CN21
CN21
PC104
Part Number
165313222A 165312022A
Footprint
PC104A
Description
PC104
Pin
Pin Name
C15
SD11
C16
SD12
C17
SD13
C18
SD14
C19
SD15
C20
NC
D1
GND
D2
MEMCS16#
D3
IOCS16#
D4
IRQ10
D5
IRQ11
D6
IRQ12
D7
IRQ15
D8
IRQ14
D9
DACK0#
D10
DRQ0
D11
DACK5#
D12
DRQ5
D13
DACK6#
D14
DRQ6
D15
DACK7#
D16
DRQ7
D17
+5 V
D18
MASTER#
D19
GND
D20
GND
49
PCM-9342 User Manual
A.16 AT Power Input (CN25)
Table A.19: CN25
CN25
AT Power Input
Part Number
1655204030
Footprint
PWR-4PV-508
Description
HOUSING 5.08 mm 4P 180D MALE W/O LOCK
Pin
Pin Name
1
+12 V
2
GND
3
GND
4
+5 V
PCM-9342 User Manual
50
Table A.20: CN32
CN32
GPIO
Part Number
1653005261
Footprint
HD_5x2P_79_BOX
Description
PIN HEADER SMD 5*2P 180D (M) 2.0 mm
Pin
Pin Name
1
+5 V
2
GPIO4
3
GPIO0
4
GPIO5
5
GPIO1
6
GPIO6
7
GPIO2
8
GPIO7
9
GPIO3
10
GND
51
PCM-9342 User Manual
Appendix A Pin Assignments
A.17 GPIO (CN32)
A.18 Battery (CN33)
Table A.21: CN33
CN33
Battery
Part Number
1655902032
Footprint
WHL2V-125
Description
WAFER 2P 180D (M) 1.25 mm DIP 53047-0210
Pin
Pin Name
1
+3 V
2
GND
PCM-9342 User Manual
52
Table A.22: CN34
CN34
PS2
Part Number
1654606317
Footprint
MINIDIN6
Description
MINI DIN 6P 90D (F) DIP W/Shielded Purple w/o cd
Pin
Pin Name
1
KBDAT
2
MSDAT
3
GND
4
+5 V
5
KBCLK
6
MSCLK
53
PCM-9342 User Manual
Appendix A Pin Assignments
A.19 PS2 (CN34)
A.20 CF (CN35)
PCM-9342 User Manual
54
Appendix A Pin Assignments
Table A.23: CN35
CN35
CF
Part Number
1653002086
Footprint
SPEED_N016-0140-104
Description
Pin
Pin Name
1
GND
2
D03
3
D04
4
D05
5
D06
6
D07
7
CS0#
8
GND
9
GND
10
GND
11
GND
12
GND
13
+5V
14
GND
15
GND
16
GND
17
GND
18
A02
19
A01
20
A00
21
D00
22
D01
23
D02
24
NC
25
CD2#
26
CD1#
55
PCM-9342 User Manual
A.21 COM1 (CN36)
Table A.24: CN36
CN36
COM1
Part Number
1654409108
Footprint
SUYIN_070205MR009S202BA
Description
D-SUB CONN 9P 5 mm GRN 90D (F) 070205MR009S202BA
Pin
Pin Name
1
DCD#
2
RXD
3
TXD
4
DTR#
5
GND
6
DSR#
7
RTS#
8
CTS#
9
RI#
PCM-9342 User Manual
56
Appendix
B
Watchdog Timer
B
B.1 Watchdog Timer Sample Code
;The SCH3114 Runtime base I/O address is 800h
;Setting WatchDog time value location at offset 66h
;If set value "0", it is mean disable WatchDog function.
Superio_GPIO_Port = 800h
mov dx,Superio_GPIO_Port + 66h
mov al,00h
out dx,al
.model small
.486p
.stack 256
.data
SCH3114_IO EQU 800h
.code
org 100h
.STARTup
;====================================================
;47H
;enable WDT function bit [3:2]=11
;====================================================
mov dx,SCH3114_IO + 47h
mov al,0ch
out dx,al
;====================================================
;65H
;bit [1:0]=Reserved
;bit [6:2]Reserve=00000
;bit [7] WDT time-out Value Units Select
;Minutes=0 (default) Seconds=1
;====================================================
mov dx,SCH3114_IO + 65h ;
mov al,080h
out dx,al
;====================================================
;66H
;WDT timer time-out value
;bit[7:0]=0~255
;====================================================
mov dx,SCH3114_IO + 66h
mov al,01h
out dx,al
;====================================================
;bit[0] status bit R/W
;WD timeout occurred =1
;WD timer counting = 0
PCM-9342 User Manual
58
59
PCM-9342 User Manual
Appendix B Watchdog Timer
;====================================================
mov dx,SCH3114_IO + 68h
mov al,01h
out dx,al
.exit
END
www.advantech.com
Please verify specifications before quoting. This guide is intended for reference
purposes only.
All product specifications are subject to change without notice.
No part of this publication may be reproduced in any form or by any means,
electronic, photocopying, recording or otherwise, without prior written permission of the publisher.
All brand and product names are trademarks or registered trademarks of their
respective companies.
© Advantech Co., Ltd. 2008