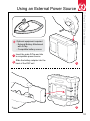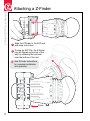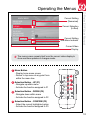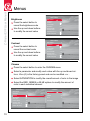
1
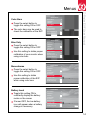
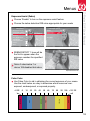
Z-Finder EVF User Manual
Precautions and Care
Do not allow sunlight to enter the Z-Finder
while it is attached to the EVF. The light can
be magnified by the lens and potentially
cause damage to the EVF screen.
Do not use batteries, power cords, or accessories that are not specified for
use with this product. Use only canon LP-E6 batteries or equivalent. Check
Zacuto.com/zfinderevf for complete list of compatible accessories.
When using a power cord, be sure to plug it in completely. Do not handle
power plugs when your hands are wet. When unplugging the power cord,
grasp the plug body or adapter instead of the cord.
Do not disassemble or modify the EVF, as this may damage the product.
Do not store the product in a dusty, humid or hot environment as damage
may occur.
When the product is mounted on a camera, do not lift or move the camera by
grabbing the product. This may cause damage to the product or the camera
mount.
This product is not waterproof. If the product is dropped in water, do not turn
on the unit. Contact Zacuto for service.
Do not apply cleaning fluid or liquid directly to the screen. Apply cleaner to
the included cloth or a soft cotton cloth before wiping screen.
Do not apply excess pressure to the screen while cleaning or otherwise.
Misuse of this product by the owner may void the warranty.
1
Precautions and Care
Table of Contents
Included Components
Optional Accessories
Physical Features
EVF Controls
Connecting the EVF to your camera
Connecting the EVF to an external monitor
Attaching the Hot-Shoe Mount
Adjusting the Hot-Shoe Mount
Using a rechargeable power source
Using an external power source
Attaching a Z-Finder
Operating The Menus
Brightness
Contrast
Chroma
Color Bars
Blue Only
Monochrome
Battery Level
Scaling
Frame Lines
Anamorphic
Focus Assist (Peaking)
Exposure Assist (Zebra)
False Color
Image Flip
Pixel to Pixel (Zoom)
Assigned Function Buttons
Audio Meters
Update
Possible Error Messages
Specifications
Limited Warranty
01
02
03
04
05
05
06
06
07
08
09
10
11
12
13
13
13
14
14
14
14
15
16
17
17
18
18
19
20
20
21
21
22
23
24
Z-Finder EVF User Manual
Table of Contents
2
Z-Finder EVF User Manual
3
Included Components
1
Zacuto EVF Unit w/ Dust Cover
3
18” HDMI to HDMI Mini Cable
5
1/4”-20 Hot-Shoe Mount
2
4
6
Li-ion Battery Pack
Li-ion Battery Charger
Zacuto Protective Carrying Pouch
*
*
These optional accessories may be purchased from the Zacuto
web store at www.Zacuto.com or from any Zacuto authorized
dealer.
External Battery Attachment
with D-Tap
*
*
*
Zacuto Tri-Mount System with
Zud and additional 8” rod
*
Z-Finder EVF User Manual
Optional Accessories
Zacuto Z-Finder Pro (Standard
with Z-Finder EVF Pro)
Zacuto Z-Finder Jr.
(Standard w/ Z-Finder EVF)
Zacuto cable stay monitor
attachments
4
Z-Finder EVF User Manual
EVF Controls
1
Front
2
OUT
3
IN
Right
4
Bottom
5
1
2
3
4
5
6
7
8
HD LCD Screen
HDMI Out
HDMI In
1/4”-20 Screw Hole
USB Port
Battery
Function Buttons
Power Button
7
F1
F2
6
F3
8
Back
5
Left
Camera to EVF
1
2
Z-Finder EVF User Manual
Connections
Plug the included HDMI cable
into the input of the EVF unit
Plug the mini end of the HDMI
cable into your camera
EVF to Ext. Monitor (Optional)
1
2
Plug the optional HDMI cable
into the output of the EVF unit
Plug the other end of the HDMI
cable into your external monitor
6
Z-Finder EVF User Manual
7
Attaching the Hot-Shoe Mount
1
Screw the Hot-Shoe Mount into the bottom of the EVF unit
2
Slide the mount into your
camera’s hot-shoe
3
Tighten the knurled knob to secure
the mount in the hot-shoe
1
Loosen the knob on the Hot-Shoe
Mount to free the apparatus
Z-Finder EVF User Manual
Adjusting the Hot-Shoe Mount
Loosen
Tighten
2
Position the EVF to your desired
position and tighten the knob
8
Z-Finder EVF User Manual
Using the Included Battery
A
A
Insert the battery into the compartment
on the back of the EVF and slide it to
the right to lock
B
When battery power is depleted,
slide the battery into the included
charger
*
9
Note: Only use LP-E6 type
batteries with the EVF unit.
Doing otherwise may damage the unit and cause a
malfunction.
B
*
Optional equipment required
- External Battery Attachment
with D-Tap
- Compatible battery source
A
Insert the male D-Tap end into
a compatible power source
B
Slide the battery adapter into the
back of the EVF unit
Z-Finder EVF User Manual
Using an External Power Source
A
B
10
Z-Finder EVF User Manual
Attaching a Z-Finder
A
Align the Z-Finder to the EVF unit
and snap onto frame
B
If using an EVF Flip, the Z-Finder
may be flipped up and out of the
way by releasing the red lever
near the bottom of the unit
*
See Z-Finder instructions
for complete installation
and operation.
F1
F2
F3
Press
11
MAIN MENU
BRIGHTNESS
CONTRAST
CHROMA
COLOR BARS
BLUE ONLY
MONOCHROME
BATTERY LEVEL
SCALING [Preset - 4]
FRAME LINE [1.66:1 (15x9)]
57
85
OFF
OFF
ON
OFF
Current Setting
(Numerical)
Current Selection
(In Red)
Current Setting
Sub-Menu Indicator
Current Video
Display
*
1
Z-Finder EVF User Manual
Operating the Menus
The menu screen reveals itself over the current video display to
show real-time updates of changes made.
Menu Button
- Display home menu screen
- Return to top menu at any point from within the menu tree
2
Selection Button - UP (F1)
- Navigate up within menu
- Activate the function assigned to F1
3
Selection Button - DOWN (F2)
- Navigate down within menu
- Activate the function assigned to F2
4
Selection Button - CONFIRM (F3)
- Select the current highlighted option
- Activate the function assigned to F3
F1
F2
F3
1
2
3
4
12
Z-Finder EVF User Manual
Menus
MAIN MENU
Brightness
Press the select button to
reveal the brightness scale
Use the up and down buttons
to modify the current value
BRIGHTNESS
CONTRAST
CHROMA
COLOR BARS
BLUE ONLY
MONOCHROME
BATTERY LEVEL
SCALING [Preset - 4]
FRAME LINE [None]
10
-2
OFF
OFF
ON
OFF
MAIN MENU
Contrast
Press the select button to
reveal the contrast scale
Use the up and down buttons
to modify the current value
BRIGHTNESS
CONTRAST
CHROMA
COLOR BARS
BLUE ONLY
MONOCHROME
BATTERY LEVEL
SCALING [Preset - 4]
FRAME LINE [None]
10
-2
OFF
OFF
ON
OFF
Chroma
Press the select button to enter the CHROMA menu
Select a parameter and modify each value with the up and down buttons. Zero (0) is the factory preset and can be modified + or Select SATURATION to modify the overall amount of color in the image
Select the RED, GREEN or BLUE options to modify the amount of
color in each individual channel
MAIN MENU
BRIGHTNESS
CONTRAST
CHROMA
COLOR BARS
BLUE ONLY
MONOCHROME
BATTERY LEVEL
SCALING [Preset - 4]
FRAME LINE [None]
13
CHROMA
10
-2
OFF
OFF
ON
OFF
SATURATION
RED
GREEN
BLUE
MAIN MENU
+10
0
-26
+3
Color Bars
Press the select button to
toggle this setting ON or OFF
The color bars may be used to
check the calibration of the EVF
Blue Only
Press the select button to
toggle this setting ON or OFF
Use this setting to obtain proper
calibration of your monitor when
using color bars
Monochrome
Press the select button to
toggle this setting ON or OFF
Use this setting to obtain
proper calibration of the EVF
when using color bars
Battery Level
Toggle this setting ON to
constantly display the battery
meter on the screen
If turned OFF, the low battery
icon will appear when a battery
change is necessary
MAIN MENU
BRIGHTNESS
CONTRAST
CHROMA
COLOR BARS
BLUE ONLY
MONOCHROME
BATTERY LEVEL
SCALING [Preset - 4]
FRAME LINE [None]
10
-2
ON
OFF
ON
OFF
MAIN MENU
BRIGHTNESS
CONTRAST
CHROMA
COLOR BARS
BLUE ONLY
MONOCHROME
BATTERY LEVEL
SCALING [Preset - 4]
FRAME LINE [None]
10
-2
Z-Finder EVF User Manual
Menus
ON
ON
ON
OFF
MAIN MENU
BRIGHTNESS
CONTRAST
CHROMA
COLOR BARS
BLUE ONLY
MONOCHROME
BATTERY LEVEL
SCALING [Preset - 4]
FRAME LINE [None]
10
-2
OFF
OFF
ON
OFF
MAIN MENU
BRIGHTNESS
CONTRAST
CHROMA
COLOR BARS
BLUE ONLY
MONOCHROME
BATTERY LEVEL
SCALING [Preset - 4]
FRAME LINE [None]
10
-2
OFF
OFF
ON
ON
14
Z-Finder EVF User Manual
Menus
Scaling (See tutorial video at Zacuto.com/zfinderevf)
Choose AUTO to allow the EVF to scale and format the image by
automatically detecting the camera output
Choose MANUAL to change the image size to fit the screen as desired
Scaling while in 480p must be set for both standby and record modes
MAIN MENU
BRIGHTNESS
CONTRAST
CHROMA
COLOR BARS
BLUE ONLY
MONOCHROME
BATTERY LEVEL
SCALING [Preset - 4]
FRAME LINE [None]
SCALING
10
-2
OFF
OFF
ON
OFF
AUTO
MANUAL
RECALL PRESET
ON
MAIN MENU
Non-scaled 5D image
Auto Scaling
MANUAL
SCROLL
RECALL PRESET
CANON 5D MK II
CANON 7D
CANON 1D MK IV
CANON T2i (550D)
CANON 60D
NIKON D7000
NIKON D3S
NIKON D3100
NIKON D300
PRESET - 1
PRESET - 2
PRESET - 3
PRESET - 4
PREVIOUS MENU
MAIN MENU
SCALE UP
SCALE DOWN
POSITION LEFT
POSITION RIGHT
POSITION UP
POSITION DOWN
LOCK FRAME LINE
SAVE
SHOW SCALING
PREVIOUS MENU
MAIN MENU
SAVE
Choose RECALL PRESET to
access a previously stored
setting or to activate one of the
included camera presets
Choose SHOW SCALING to
display the current settings
15
PRESET - 1
PRESET - 2
PRESET - 3
PRESET - 4
PREVIOUS MENU
MAIN MENU
ON
Custom Scaling
Choose LOCK FRAME LINE to either lock or unlock the frame lines
to the image when being scaled. This feature is only necessary when
employing frame lines.
When frame lines are needed, first choose the desired frame line.
Second, scale (size) the image to match the frame lines. Next, toggle
LOCK FRAME LINE to ON. Now continue scaling (sizing) the locked
image and frame lines to the desired size.
Frame Lines
Choose the frame lines that you wish to display on screen
Z-Finder EVF User Manual
Menus
Within each selection you are able to toggle On or OFF the frame lines
and/or action safe.
*
Manual scaling is necessary to match the frame lines to the image
MAIN MENU
BRIGHTNESS
CONTRAST
CHROMA
COLOR BARS
BLUE ONLY
MONOCHROME
BATTERY LEVEL
SCALING [Preset - 4]
FRAME LINE [None]
FRAME LINE
10
-2
OFF
OFF
ON
OFF
1.33:1 (4x3)
1.66:1 (15x9)
1.78:1 (16x9)
1.85:1
2.35:1 (CINEMASCOPE)
CENTER CROSS
GRID
OFF
OFF
MAIN MENU
1.33:1 (4x3)
ENABLE
ACTION SAFE
OFF
OFF
PREVIOUS MENU
MAIN MENU
4:3 Frame Lines with Action Safe
16
Z-Finder EVF User Manual
Menus
Anamorphic
Choose the correct anamorphic setting for your lens from the list
MAIN MENU
ANAMORPHIC [Normal]
FOCUS ASSIST (Peaking) OFF
EXPOSURE ASSIST (Zebra)
IMAGE FLIP
OFF
PIXEL TO PIXEL (Zoom)
ON
AUDIO METERS
OFF
FUNCTION BUTTONS
UPDATE
ABOUT
ANAMORPHIC
1.33x
1.5x
2x
NORMAL
MAIN MENU
Uncorrected
Focus Assist (Peaking)
Press the select button to enter
the peaking menu
Toggle ENABLE ON or OFF by
selecting it from the menu
Corrected
FOCUS ASSIST (PEAKING)
ENABLE
LEVEL
ON
2
MAIN MENU
Select the LEVEL option and
use the arrows to choose the
peaking intensity
Peaking OFF
Peaking ON
The EVF uses a sharpening method to enhance hard edges to aid
in focusing the image. When an object is in focus the edges will be
intensified.
17
Exposure Assist (Zebra)
Choose “Enable” to turn on the exposure assist feature
Choose the zebra detection IRE value appropriate for your needs
MAIN MENU
EXPOSURE (Zebra)
ANAMORPHIC [Normal]
FOCUS ASSIST (Peaking) OFF
EXPOSURE ASSIST (Zebra)
IMAGE FLIP
OFF
PIXEL TO PIXEL (Zoom)
ON
AUDIO METERS
OFF
FUNCTION BUTTONS
UPDATE
ABOUT
ENABLE
ZEBRA DETECT 1
ZEBRA DETECT 2
ON
70
100
MAIN MENU
Z-Finder EVF User Manual
Menus
ZEBRA DETECT 1 lines will be
the first to appear when the
exposure reaches the specified
IRE value
*
Note: A value below 1 or
above 109 disables that zebra
Exposure Assist ON
False Color
Use False Color to aid in obtaining the correct exposure of your scene.
Use the chart below as a key to determine which areas are overexposed, underexposed, or exposed properly.
40
50
60
70
80
90 100 >101 IRE
RED
30
YELLOW
20
PINK
10
GREEN
0
BLUE
FUCHSIA
<0 IRE
18
Z-Finder EVF User Manual
Menus
Overexposed: Objects will be displayed RED
Properly Exposed: Objects will display in PINKS and GREENS
Underexposed: Objects will display BLUE to DARK BLUE
Image Flip
Press the select button to toggle the image flip ON or OFF
Use if mounting the EVF upside down
MAIN MENU
19
ANAMORPHIC [Normal]
FOCUS ASSIST (Peaking) OFF
EXPOSURE ASSIST (Zebra)
IMAGE FLIP
ON
PIXEL TO PIXEL (Zoom)
OFF
AUDIO METERS
OFF
FUNCTION BUTTONS
UPDATE
ABOUT
MAIN MENU
ANAMORPHIC [Normal]
FOCUS ASSIST (Peaking) OFF
EXPOSURE ASSIST (Zebra)
IMAGE FLIP
OFF
PIXEL TO PIXEL (Zoom)
OFF
AUDIO METERS
OFF
FUNCTION BUTTONS
UPDATE
ABOUT
Pixel To Pixel (Pixel to Pixel not active while in 480p)
Press the select button to toggle Pixel To Pixel ON or OFF
MAIN MENU
ANAMORPHIC [Normal]
FOCUS ASSIST (Peaking) OFF
EXPOSURE ASSIST (Zebra)
IMAGE FLIP
OFF
PIXEL TO PIXEL (Zoom)
OFF
AUDIO METERS
OFF
FUNCTION BUTTONS
UPDATE
ABOUT
Z-Finder EVF User Manual
Menus
Assigned Function Buttons
MAIN MENU
FUNCTION BUTTONS
ANAMORPHIC [Normal]
FOCUS ASSIST (Peaking) OFF
EXPOSURE ASSIST (Zebra)
IMAGE FLIP
OFF
PIXEL TO PIXEL (Zoom)
OFF
AUDIO METERS
OFF
FUNCTION BUTTONS
UPDATE
ABOUT
CURRENT SETTINGS
To change the function assigned to each button, first
select the button you wish to
change from the list
From the subsequent menu,
choose the desired function
and select it. It can now be
activated by pressing the appropriate function button on the
side of the EVF unit without the
use of the menu system.
MAIN MENU
F1
BRIGHTNESS
CONTRAST
CHROMA
COLOR BARS
BLUE ONLY
MONOCHROME
BATTERY LEVEL
SCALING
FRAME LINE
ANAMORPHIC
FOCUS ASSIST (PEAKING)
EXPOSURE ASSIST (ZEBRA)
IMAGE FLIP
PIXEL TO PIXEL (ZOOM)
SCROLL
Enter the menu to reveal the
current button settings
F1 FOCUS ASSIST
F2 EXPOSURE (ZEBRA)
F3 FRAME LINE
PREVIOUS MENU
MAIN MENU
20
Z-Finder EVF User Manual
Menus
Audio Meters
Press the select button to toggle the Audio Meters ON or OFF
MAIN MENU
ANAMORPHIC [Normal]
FOCUS ASSIST (Peaking) OFF
EXPOSURE ASSIST (Zebra)
IMAGE FLIP
OFF
PIXEL TO PIXEL (Zoom)
OFF
AUDIO METERS
OFF
FUNCTION BUTTONS
UPDATE
ABOUT
-20dB
1
2
-12dB
0dB
Update (For more information visit Zacuto.com/zfinderevf)
MAIN MENU
UPDATE
ANAMORPHIC [Normal]
FOCUS ASSIST (Peaking) OFF
EXPOSURE ASSIST (Zebra)
IMAGE FLIP
OFF
PIXEL TO PIXEL (Zoom)
OFF
AUDIO METERS
OFF
FUNCTION BUTTONS
UPDATE
ABOUT
USB DRIVE
RESTORE FACTORY DEFAULTS
Format your USB thumb drive
to FAT32 for compatibility
Download the firmware update
from zacuto.com, click on the
PRODUCTS tab and choose
EVF FIRMWARE UPDATE.
Once downloaded, drag the file
onto your thumb drive
MAIN MENU
UPDATE
EVF Version X.XX.XX
USB Version X.XX.XX
START UPDATE
PREVIOUS MENU
MAIN MENU
Insert the thumb drive into your EVF, select UPDATE from the menu
and select USB DRIVE. Choose START UPDATE. The current firmware version may be confirmed in the ABOUT menu
Factory settings may be restored with RESTORE FACTORY DEFAULTS
21
Possible Error Messages
*
You may receive these messages if there is a critical error during
the update process. Contact Zacuto customer support If your
problem persists after following these recommendations.
Problem: Invalid USB Drive
Your USB drive has been detected
but the EVF cannot recognize it
Solution:
Remove the drive and re-insert
or attempt to use a different USB
drive that has been properly
formatted
Problem: No USB Drive Detected
Your USB drive cannot be detected
by the EVF
Solution:
Check if the USB drive is completely inserted and/or attempt to
use a different USB drive that has
been properly formatted
Problem: No Valid Image Detected
An invalid firmware image has
been detected on your USB
Solution:
Your image has been corrupted.
Try downloading the image again
and retry. Use a different USB
drive if the action continues to fail.
UPDATE
INVALID USB DRIVE
INSERT USB DRIVE
CONTINUE
PREVIOUS MENU
MAIN MENU
Z-Finder EVF User Manual
Menus
UPDATE
NO USB DRIVE DETECTED
INSERT USB DRIVE
CONTINUE
PREVIOUS MENU
MAIN MENU
UPDATE
NO VALID IMAGE DETECTED
INSERT USB DRIVE
CONTINUE
PREVIOUS MENU
MAIN MENU
22
Z-Finder EVF User Manual
Specifications
LCD
Size
Resolution
Color
Viewing Angle
View Area
3.2” TFT LCD IPS LED
800x480
16.7 Million
H: 170 Degrees V: 170 Degrees
70.6mm (H) x 42.76mm (V)
POWER
Battery
7.2v Canon LP-E6 or Equivalent
External
12 Volt Power Adapter (Optional)
Consumption
2.5W (5.2 Hours w/ 1800mAH Battery)
VIDEO INPUT / OUTPUT
HDMI
480i / 480p / 576p / 720p / 1080i
TEMPERATURES
Operating
Storage
-4F to +158F / -20C to +70C
-22F to +176F / -30C to +80C
All LCD panels have dead pixel or dots if you look with a magnifier. With our
EVF both situations apply. When the Z-Finder is on the EVF screen, we are
magnifying so dead pixels become more noticeable and with the EVF up we
are not magnifying so dead pixels or dots are un-noticeable.
Our policy is:
Without Magnification: 0 dead white pixels and 0 dead Red, Green or Blue
dots visible with the naked eye.
With 2.5x or 3x Magnification: No more than 2 dead white pixels outside
the critical middle third or 5 dead Red, Green or Blue dots.
23
Zacuto USA electronic devices come with a limited one year hardware
warranty. The limited hardware warranty covers defects in workmanship
and materials of our products for up to one year. This warranty does not
cover any damage to this product that results from improper installation, accidents, abuse, misuse, negligence, natural disaster, insufficient
or excessive electrical supply (if applies), abnormal mechanical or environmental conditions, dust or any unauthorized disassembly, repair or
modification.
Z-Finder EVF User Manual
Limited Warranty
For the most up to date manual, features, firmware and tutorial
videos go to the Zacuto EVF page at Zacuto.com/zfinderevf
Zacuto USA, Z-Finder and Z-Finder EVF are trademarks of
Zacuto USA
24
www.zacuto.com