1
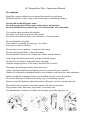
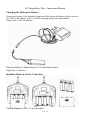
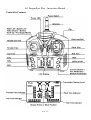
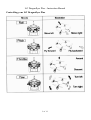
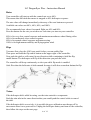
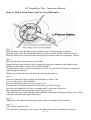
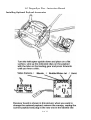
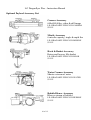
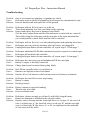
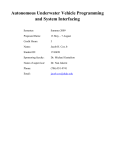
Lil’ Draganflyer Plus
Instruction Manual
Lil’ Draganflyer Plus – Instruction Manual
Precautions
Install the canopy with the nose pointing between the two red rotors.
Hold helicopter by center/canopy when removing or installing the battery.
Do not pull on the helicopter arms.
If a motor pod pulls off of an arm contact us for instructions.
Do not push the motor pod back on or it will break the wires internally.
Use caution when operating this product.
Fly only in safe areas away from other people.
Do not fly near electrical lines, near obstacles, or in bad weather.
Do not dismantle or modify.
This product is intended for users age 15 or older.
Keep out of reach of children.
Do not short, reverse polarity, or puncture the battery.
Do not crush, disassemble, or burn the battery.
Prevent metallic objects from coming into contact with the battery.
Only charge the helicopter battery with the included charger.
Do not leave the battery unattended while charging.
Stop the charging process if the battery becomes hot or swells.
Disconnect the helicopter battery when not in use.
Always disconnect the helicopter battery before you turn off your controller.
Dispose of exhausted or damaged batteries in accordance with local laws and ordinances.
Make sure that the controller batteries are installed with the correct orientation.
Do not mix batteries of different chemistry, age, or remaining capacity.
Remove controller batteries when the product will not be used for extended periods.
Do not allow the product to come into contact with water or moisture.
Keep product away from heat, open flame, or extreme cold.
The manufacturer assumes no liability for damages caused by improper use.
2 of 12
Lil’ Draganflyer Plus – Instruction Manual
Charging the Helicopter Battery
Connect the battery to the included charger and fully charge the battery before each use.
The LED on the charger will be red while charging and green when finished.
Charge time is 45 to 60 minutes.
Helicopter Battery: Lithium Polymer 3.7V 500mAh (included)
Flight time: 10 minutes
Installing Batteries in the Controller
Controller Battery: 6 AA 1.5V (not included)
3 of 12
Lil’ Draganflyer Plus – Instruction Manual
Controller Features
4 of 12
Lil’ Draganflyer Plus – Instruction Manual
Controlling your Lil’ Draganflyer Plus
5 of 12
Lil’ Draganflyer Plus – Instruction Manual
Rates
Your controller will start up with the control rate set to 40%.
This means that full stick movement is mapped to 40% helicopter response.
The rate value will change immediately when any of the rate buttons are pressed.
Available rate values are 40%, 60%, 80%, and 100%.
The recommended rate values for normal flight are 60% and 80%.
Press the button for the rate you wish to use each time you turn on your controller.
40% is for very slow control response and maximum smoothness when filming video.
60% is for moderately slow control response.
80% is for normal control response and maneuvering.
100% is for high maneuverability and flying against wind.
Flips
You must first select the 100% rate mode before you can enable flips.
Then press and hold the flip enable button on the upper right of the controller.
Now push the pitch or roll control in any direction while continuing to hold the flip
enable button. The helicopter will flip in the direction you push the stick.
The controller will beep continuously to alert you while flip mode is enabled.
Only flip when the helicopter is high enough, because it will drop somewhat during the flip.
Trims
If the helicopter drifts while hovering, use the trim controls to compensate.
Push the trim tabs in the same direction that you would push the control sticks to cancel
the drift.
If the helicopter drifts excessively, it is possible the gyro calibration was thrown off by
movement when it was powered on. Unplug the helicopter battery and turn off the controller,
then follow the steps on the next page.
6 of 12
Lil’ Draganflyer Plus – Instruction Manual
Steps to Follow Each Time You Use Your Helicopter
Step 1:
Slide the battery into the battery tray on the bottom of the helicopter as shown.
Push the battery into the tray further until it is centered in the middle of the helicopter.
With the battery not connected, place the helicopter upside down on a stationary surface.
Step 2:
Move the throttle stick to the lowest position.
Plug in the helicopter battery while keeping the helicopter stationary and upside down.
Within less than three seconds, turn on the controller.
The helicopter needs to remain stationary for a few seconds after the battery is connected
while the gyros calibrate.
Make sure you do not move the helicopter during this process.
Step 3:
Once the controller stops beeping, the helicopter is ready to fly.
It is now ok to move the helicopter.
Place the helicopter right side up in front of you.
Point the nose of the helicopter in the direction you will be facing.
Press the rate button for 60% rate (recommended), or the rate you prefer.
Move the throttle stick up until the rotors begin to spin.
If the helicopter does not respond to the controller, unplug the helicopter battery, turn off the
controller, and then start again from step 1.
Step 4:
When done, disconnect the helicopter battery before turning off the controller.
Step 5:
Turn off the controller last.
If it will not be used again soon, remove the batteries from the controller for storage.
7 of 12
Lil’ Draganflyer Plus – Instruction Manual
Flight Training
Exercise #1 - Hover:
Set your helicopter on the floor in the center of your practice area and slowly increase the
throttle to around 50%. The helicopter should take off and start rising. Back off on the throttle
a small amount and try to maintain a hover. If required use the trim tabs for roll, pitch and
yaw to try to keep the helicopter hovering in one spot. When setting the trims make only
small adjustments then see how the helicopter reacts to the adjustment. Don't use any of the
other flight controls unless the helicopter starts to drift. Hold the helicopter in a steady hover
for a few minutes, then slowly decrease the throttle and allow it to settle to the ground.
Exercise #2 - Roll:
Once you are confident hovering in one place, you can try moving the helicopter around.
Begin by hovering above a fixed spot, and then gently push the right transmitter stick to the
left. This will cause the helicopter to tilt slightly and begin moving left. As long as you apply
inputs the helicopter will continue moving in the direction you are pushing the stick. Return
the joystick to center; this should cause the helicopter to again be level and the helicopter
should coast to a halt. Now move the joystick to the right and practice returning to where you
started from.
Exercise #3 - Pitch:
Start in a hover like before, and push the right transmitter stick forward slightly. This will
cause the helicopter's nose to drop, and the helicopter will start to travel forward. To
eliminate forward movement re-centre the right joystick, this will cause forward motion to
cease once any momentum is depleted. If you move the joystick back past centre it will cause
the helicopter to fly backward. Practice moving back and forth to become familiar with the
pitch control.
Exercise #4 - Pitch & Roll:
Set up markers on the ground in the shape of a square. Practice moving to each point and
establish hover, then return to the center and establish hover before moving on to the next
point in the cross pattern. Practice moving from the center directly to each corner, and then
back to the center.
Exercise #5 - Yaw:
Your helicopter can rotate, pointing the nose in a new direction. Control yaw (rotational
motion) by nudging the left transmitter stick left or right. Practice flying around the perimeter
of a square keeping the nose pointing in these positions: left, right, towards you, and away
from you.
When you feel confident using all of the controls, practice flying it to any desired location
and land there. Continue to practice until you have mastered all of the exercises and your
control of the helicopter feels natural and instinctive.
8 of 12
Lil’ Draganflyer Plus – Instruction Manual
Installing Optional Payload Accessories
9 of 12
Lil’ Draganflyer Plus – Instruction Manual
Optional Payload Accessory List
Camera Accessory
640x480 60fps, video & still image
LIL-DRAGANFLYER-PLUS-CAMERA
$29.95
Missile Accessory
6 missile capacity, single & rapid fire
LIL-DRAGANFLYER-PLUS-MISSILE
$19.95
Hook & Basket Accessory
Raises and lowers, lifts basket
LIL-DRAGANFLYER-PLUS-HOOK
$19.95
Water Cannon Accessory
Shoots a stream of water
LIL-DRAGANFLYER-PLUS-WATER
$19.95
Bubble Blower Accessory
Blows a stream of bubbles
LIL-DRAGANFLYER-PLUS-BUBBLE
$19.95
10 of 12
Spare Parts
Spare 600mAh battery
Replacement rotor set
Replacement canopy
Spare plastic missiles
LIL-DRAGANFLYER-BATT
LIL-DRAGANFLYER-PLUS-ROTORS
LIL-DRAGANFLYER-CANOPY
LIL-DRAGANFLYER-PLUS-MISSILE-SPARES
Contact Draganfly Innovations
Online
www.rctoys.com
Email Contacts
[email protected] (Sales Inquires)
[email protected] (Package Tracking)
[email protected] (Set-up Questions)
[email protected] (Press/Media)
[email protected] (Repair and Returns)
Phone Contacts
Toll Free: 1-800-979-9794
Int: 1-306-955-9907
Fax: 1-306-955-9906
Address
Draganfly Innovations Inc
2108 St. George Avenue
Saskatoon, SK S7M0K7
Canada
Business Hours
Monday-Friday 7:30am - 4:30pm CST
$14.95
$14.95
$14.95
$9.95
Lil’ Draganflyer Plus – Instruction Manual
Troubleshooting
Problem: One or two motors not spinning, or spinning too slowly
Helicopter needs to lift off of ground before all motors are commanded to spin
Cause:
Solution: Increase throttle until helicopter lifts off the ground
Problem: Helicopter will not fly level once it is in the air
Trims need adjusting, or a bent rotor blade needs replacing
Cause:
Solution: Inspect and replace any bent or damaged rotor blades
Zero the trims (adjust them until the trim indicators on each stick are centered)
Then while flying the helicopter push the trim tabs in the same direction that
you would push the control sticks until the drift is canceled
Problem: Helicopter will not fly level, even after adjusting trims and replacing bent rotors
Cause:
Helicopter was not perfectly stationary after the battery was plugged in
Solution: Unplug helicopter battery & turn controller off, repeat steps 1-5 from page 7
Problem: Helicopter mainboard LED blinks continuously and no response to control input
Cause:
Helicopter did not bind with controller
Solution: Unplug helicopter battery & turn controller off, repeat steps 1-5 from page 7
Problem: Helicopter does not power up and mainboard LED does not light
Battery is empty or not fully connected
Cause:
Solution: Charge battery and reconnect battery plug firmly
Problem: No LED on controller after it is switched on
Cause:
Batteries are depleted or have bad contact
Solution: Replace all six AA batteries with fresh ones and verify battery orientation
Problem: Helicopter does not lift or rotors stop turning
Cause:
Battery is empty
Solution: Recharge battery
Problem: Rotors continue to spin after landing
Cause:
Throttle trim is too high
Solution: Decrease throttle trim
Problem: Helicopter vibrates strongly or will not fly with fully charged battery
Rotors are damaged or installed in the wrong locations
Cause:
Solution: Replace rotors, ensuring that the front-right rotor is a red type 'A', the rear-left
rotor is a black type 'A', the front-left rotor is a red type 'B', and the rear-right
rotor is a black type 'B' (the letters ‘A’ or ‘B’ are imprinted on the underside
of each rotor near the shaft)
12 of 12