1
Specialty Plants
User Manual
Quanser Qball-X4
Quanser Qball-X4: User Manual
Table of Contents
1. Introduction..........................................................................................................................1
2. Operator Warnings...............................................................................................................1
3. Prerequisites.........................................................................................................................3
4. References............................................................................................................................4
5. System Hardware and Software Description.......................................................................4
5.1. Main Components........................................................................................................4
5.2. X4 Diagram..................................................................................................................4
5.3. Qball-X4 Components.................................................................................................5
5.3.1. Qball-X4 frame....................................................................................................8
5.3.2. HiQ DAQ.............................................................................................................9
5.3.3. Qball-X4 Power..................................................................................................10
5.3.4. Qball-X4 Motors and Propellers........................................................................10
5.4. Qball-X4 Model.........................................................................................................10
5.4.1. Actuator Dynamics.............................................................................................10
5.4.2. Roll/Pitch Model................................................................................................11
5.4.3. Height Model......................................................................................................12
5.4.4. X-Y Position Model...........................................................................................13
5.4.5. Yaw Model.........................................................................................................13
6. System Setup.....................................................................................................................15
6.1. Establishing Wireless Connection..............................................................................15
6.2. Qball-X4 Vehicle Setup.............................................................................................17
6.3. QuaRC: Quanser Real-Time Control.........................................................................18
6.4. Qball-X4 Sensors.......................................................................................................20
7. Troubleshooting Guide.....................................................................................................23
7.1. The model fails to build/connect or the QuaRC console does not successfully open.. .
24
7.2. The Qball-X4 sensors are not being read correctly or they are stuck at some constant
value..................................................................................................................................25
7.3. The Simulink model appears to run slowly (i.e., the simulation time runs slower than
actual time), or the console displays the message “Sampling rate is too fast for base
rate”...................................................................................................................................25
7.4. Trying to start the Qball-X4 model results in the error “Unable to locate the dynamic
link library or shared object.”...........................................................................................26
7.5. Building a model fails with the error “Not enough system resources are available to
perform the operation.” The hard disk is full on the Gumstix computer..........................26
Document Number: 829 Revision: 12 Page: i
Quanser Qball-X4: User Manual
1. Introduction
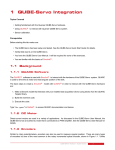
The Quanser Qball-X4 (Figure 1) is an innovative rotary wing vehicle platform suitable for
a wide variety of UAV research applications. The Qball-X4 is a quadrotor helicopter design
propelled by four motors fitted with 10-inch propellers. The entire quadrotor is enclosed
within a protective carbon fiber cage (Patent Pending). The Qball-X4’s proprietary design
ensures safe operation as well as opens the possibilities for a variety of novel applications.
The protective cage is a crucial feature since this unmanned vehicle was designed for use in
an indoor laboratory, where there are typically many close-range hazards (including other
vehicles). The cage gives the Qball-X4 a decisive advantage over other vehicles that would
suffer significant damage if contact occurs between the vehicle and an obstacle.
To measure on-board sensors and drive the motors, the Qball-X4 utilizes Quanser's onboard avionics data acquisition card (DAQ), the HiQ, and the embedded Gumstix computer.
The HiQ DAQ is a high-resolution inertial measurement unit (IMU) and avionics
input/output (I/O) card designed to accommodate a wide variety of research applications.
QuaRC, Quanser's real-time control software, allows researchers and developers to rapidly
develop and test controllers on actual hardware through a MATLAB Simulink interface.
QuaRC's open-architecture hardware and extensive Simulink blockset provides users with
powerful controls development tools. QuaRC can target the Gumstix embedded computer,
automatically generating code and executing controllers on-board the vehicle. During
flights, while the controller is executing on the Gumstix, users can tune parameters in realtime and observe sensor measurements from a host ground station computer (PC or laptop).
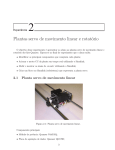
The interface to the Qball-X4 is MATLAB Simulink with QuaRC. The controllers are
developed in Simulink with QuaRC on the host computer, and these models are
downloaded and compiled into executables on the target (Gumstix [2]) seamlessly. A
diagram of this configuration is shown in Figure 2.
Section 2 outlines operator warnings found throughout this manual, Section 3 goes through
the prerequisites, and Section 4 lists various documents that are referenced in this manual.
The general system description, component nomenclature, specifications, and model
parameters are all given in Section 5. Section 6 goes into detail on how to setup the QballX4. Lastly, Section 7 contains a troubleshooting guide.
2. Operator Warnings
This symbol marks specific safety warnings and operating procedures that are
important for the safety of the Qball-X4 and users. Read these warnings carefully.
The Qball-X4 is a powerful and potentially dangerous vehicle if used improperly. Always
Document Number: 829 Revision: 12 Page: 1
Quanser Qball-X4: User Manual
follow safe operating procedures when using the Qball-X4. Quanser is not responsible for
damages and injury resulting from improper or unsafe use of the Qball-X4. Before
connecting batteries or attempting to run the Qball-X4, be sure to read this document and
become familiar with the safety features and operating procedures of the Qball-X4.
When handling the Qball-X4, always make sure there are no models running and
the power is turned off. It is recommended that users wear safety goggles to protect
the eyes.
Figure 1: Quanser Qball-X4
Document Number: 829 Revision: 12 Page: 2
Quanser Qball-X4: User Manual
Figure 2: Communication Hierarchy
3. Prerequisites
To successfully operate the Qball-X4, the prerequisites are:
i) To be familiar with the wiring and components of the Qball-X4.
ii) To have QuaRC version 2.0 installed and properly licensed.
iii) To be familiar with using QuaRC to control and monitor the vehicle in real-time, and
in designing a controller through Simulink. See Reference [2] for more details.
Document Number: 829 Revision: 12 Page: 3
Quanser Qball-X4: User Manual
4. References
[1] Gumstix: http://gumstix.com/
[2] QuaRC User Manual (type doc quarc in Matlab to access)
[3] Park 400 Brushless motor - 740Kv: http://hobbyhobby.com/store/product/68199/Park400-Brushless-Outrunner-Motor--740Kv/
[4] Propellers description and technical information:
http://www.rctoys.com/rc-products/APC-10-047-SF-CR.html
5. System Hardware and Software
Description
5.1. Main Components
To setup this experiment, the following hardware and software are required:
●
Qball-X4:
Qball-X4 as shown in Figure 1 above
●
HiQ:
QuaRC aerial vehicle data acquisition card (DAQ).
●
Gumstix:
The QuaRC target computer. An embedded, Linuxbased system with QuaRC runtime software installed
[1]
●
Batteries:
Two 3-cell, 2500 mAh Lithium-Polymer batteries
●
Real-Time Control Software: The QuaRC-Simulink configuration, as detailed in
Reference [2]
5.2. X4 Diagram
Figure 3 below is a basic diagram of the Qball-X4, showing the axes and angles. Note that
the axes follow a right-hand rule with the X axis aligned with the front of the vehicle.
The tail or back of the vehicle is marked with colored tape. When flying the
vehicle it is common to orient the vehicle such that the tail is pointing towards
the operator with the positive X axis pointing away from the operator.
Document Number: 829 Revision: 12 Page: 4
Quanser Qball-X4: User Manual
Figure 3: Qball-X4 axes and sign convention
5.3. Qball-X4 Components
The components comprising the Qball-X4 are labeled in Figures 4 to 11 and described in
Table 1.
Document Number: 829 Revision: 12 Page: 5
Quanser Qball-X4: User Manual
Figure 4: Qball-X4 cage and frame
Figure 5: HiQ DAQ
Figure 6: HiQ cover
Document Number: 829 Revision: 12 Page: 6
Quanser Qball-X4: User Manual
Figure 7: HiQ daughterboard with optional receiver inputs
Figure 8: Battery switch and connector
Figure 9: ESCs and batteries
Figure 10: Optional sonar and sonar mount
Figure 11: Motor and propeller
Document Number: 829 Revision: 12 Page: 7
Quanser Qball-X4: User Manual
ID #
Description
ID #
Description
1
Qball-X4 protective cage
10
GPS serial input
2
Qball-X4 frame
11
Battery switch
3
HiQ DAQ with Gumstix
12
Battery connector
4
HiQ inertial measurement unit
13
Speed controllers (ESCs)
5
HiQ servo PWM outputs
14
LiPo batteries
6
HiQ cover
15
Optional sonar
7
HiQ daughterboard with optional
receiver
16
8
Receiver inputs
17
9
Sonar inputs
Propeller (10x4.7)
Motor
Table 1 Qball-X4 components
5.3.1. Qball-X4 frame
The Qball-X4 frame (#2 in Figure 4) is the crossbeam structure to which the Qball-X4 components are mounted including the HiQ DAQ, motors and speed controllers. The frame
rests inside the Qball-X4 protective cage (#1 in Figure 4). The Qball-X4's protective cage is
a carbon fiber structure designed to protect the frame, motors, propellers, and embedded
control module (HiQ and Gumstix) during minor collisions. The cage is not intended to
withstand large impacts or drops from heights greater than 2 meters.
Do not pick up the Qball-X4 from the cage as this may stress the cage and
cause damage. Instead, when transporting the Qball-X4 lift it from the ends of
the frame as in Figure 12, using both hands to lift the frame from both sides.
Document Number: 829 Revision: 12 Page: 8
Quanser Qball-X4: User Manual
Figure 12: Pick up the Qball-X4 from both ends of the frame
5.3.2. HiQ DAQ
The HiQ DAQ is the Qball-X4's data acquisition board. Together with the Gumstix
embedded computer, the HiQ controls the vehicle by reading on-board sensors and
outputting motor commands. Each motor speed controller (#13 in Figure 9) is connected to
a PWM servo output on the HiQ (#5 in Figure 5). There are 10 PWM servo output channels
available on the HiQ and they are labeled 0 to 9 with the ground pins (black wire on the
servo cable) located closest to the outer edge of the HiQ board. Each motor speed controller
should be connected in a specific order for the provided Qball-X4 controllers to function.
Table 2 lists the motors and their standard corresponding servo channels.
Motor
Servo output channel
Back
0
Front
1
Left
2
Right
3
Table 2: Motor servo channels
The HiQ may have an optional daughterboard that contains additional I/O such as receiver
inputs (#8 in Figure 7), sonar inputs (#9 in Figure 7), and a TTL serial input used for a GPS
receiver (#10 in Figure 7). If the Qball-X4 is provided with a sonar (#15 in Figure 10) it
should be connected to sonar input channel 0 as labeled on the daughterboard.
Document Number: 829 Revision: 12 Page: 9
Quanser Qball-X4: User Manual
5.3.3. Qball-X4 Power
The Qball-X4 uses two 3-cell 2500mAh LiPo batteries (#14 in Figure 9) to power the HiQ
and motors. These batteries are held in place below the center of the frame using two velcro
straps. The batteries should be stacked vertically and aligned with the aluminum plate on
the bottom side of the frame and secured tightly with the velcro straps.
Make sure the batteries are firmly connected to the frame before attempting to
fly the Qball-X4.
Secure the batteries to the frame before connecting the batteries to the Qball-X4 battery
connectors (#12 in Figure 8) and always turn off the power using the switches (#11 in Figure 8) before changing batteries.
LiPo batteries can be dangerous if charged improperly. Review the battery
charging procedures and monitor battery levels frequently during flight. The
3-cell LiPo batteries can become damaged and unusable if discharged below 10 V. It is
recommended that the batteries be fully charged once they reach 10.6 V or less.
5.3.4. Qball-X4 Motors and Propellers
The Qball-X4 uses four E-Flite Park 400 (740 Kv) motors [3] (#17 in Figure 11) fitted with
paired counter-rotating APC 10x4.7 propellers [4] (#16 in Figure 11). The motors are mounted to the Qball-X4 frame along the X and Y axes and connected to the four speed controllers, which are also mounted on the frame. The motors and propellers are configured so that
the front and back motors spin clockwise and the left and right motors spin counter-clockwise.
5.4. Qball-X4 Model
This section describes the dynamic model of the Qball-X4. The nonlinear models are described as well as linearized models for use in controller development. For the following
discussion, the axes of the Qball-X4 vehicle are denoted (x, y, z) and are defined with respect to the vehicle as shown in Figure 3. Roll, pitch, and yaw are defined as the angles of
rotation about the x, y, and z axis, respectively. The global workspace axes are denoted (X,
Y, Z) and are defined with the same orientation as the Qball-X4 sitting upright on the
ground.
5.4.1. Actuator Dynamics
The thrust generated by each propeller is modeled using the following first-order system
Document Number: 829 Revision: 12 Page: 10
Quanser Qball-X4: User Manual
(1)
u
s
where u is the PWM input to the actuator, is the actuator bandwidth and K is a positive
gain. These parameters were calculated and verified through experimental studies and are
stated in Table 3. A state variable, v, will be used to represent the actuator dynamics, which
is defined as follows
F =K
v=
u
s
(2)
5.4.2. Roll/Pitch Model
Assuming that rotations about the x and y axes are decoupled, the motion in roll/pitch axis
can be modeled as shown in Figure 13. As illustrated in this figure, two propellers contribute to the motion in each axis. The thrust generated by each motor can be calculated from
Eq. (1) and using its corresponding input. The rotation around the center of gravity is produced by the difference in the generated thrusts. The roll/pitch angle, , can be formulated using the following dynamics
¨
J =
FL
(3)
where
J =J roll =J pitch
(4)
are the rotational inertia of the device in roll and pitch axes and are given in Table 3. L is
the distance between the propeller and the center of gravity, and
F =F 1− F 2
represents the difference between the forces generated by the motors.
(5)
Figure 13: A model of the roll/pitch axis
Document Number: 829 Revision: 12 Page: 11
Quanser Qball-X4: User Manual
By combining the dynamics of motion for the roll/pitch axis and the actuator dynamics for
each propeller the following state space equations can be derived
[][
0 1
0
˙
KL
¨ = 0 0
J
v˙
0 0 −
][ ] [ ]
0
˙ 0 F
v
To facilitate the use of an integrator in the feedback structure a fourth state can be added to
the state vector, which is defined as follows
s˙ =
After augmenting this state into the state vector, the system dynamics can be rewritten as
[][
0 1
˙
¨ = 0 0
v˙
0 0
s˙
1 0
0
KL
J
−
0
0
][ ] [ ]
0 ˙
v
0
s
0
0
0
F
0
5.4.3. Height Model
The motion of the Qball-X4 in the vertical direction (along the Z axis) is affected by all the
four propellers. The dynamic model of the Qball-X4 height can be written as
M Z¨ =4 F cos r cos p−M g
where F is the thrust generated by each propeller, M is the total mass of the device, Z is the
height and r and p represent the roll and pitch angles, respectively. The total mass, M, is
given in the Table 3. As expressed in this equation, if the roll and pitch angles are nonzero
the overall thrust vector will not be perpendicular to the ground. Assuming that these angles
are close to zero, the dynamics equations can be linearized to the following state space form
[][
0
Z˙
Z¨ = 0
v˙
0
s˙
1
1
0
4K
0
M
0 −
0 0
0
][ ] [ ] [ ]
0
Z
0
0 Z˙
0
u −g
v
0
0
s
0
0
0
Document Number: 829 Revision: 12 Page: 12
Quanser Qball-X4: User Manual
5.4.4. X-Y Position Model
The motion of the Qball-X4 along the X and Y axes is caused by the total thrust and by
changing roll/pitch angles. Assuming that the yaw angle is zero the dynamics of motion in
X and Y axes can be written as
M X¨ =4 F sin p
M Y¨ =−4 F sin r
Assuming the roll and pitch angles are close to zero, the following linear state space equations can be derived for X and Y positions
[ ][
[][
0
X˙
X¨ = 0
v˙
0
s˙
1
1
0
Y˙
Y¨ = 0
v˙
0
˙s
1
1
0
0
0
0
4K
p
M
−
0
0
0
0
0
0
−4 K
0
r
M
0
−
0
0
][ ] [ ]
][ ] [ ]
0
0
X
˙X
0
u,
v
s
0
Y
0 Y˙
v
0
s
0
0
0
u
0
5.4.5. Yaw Model
The torque generated by each motor, , is assumed to have the following relationship
with respect to the PWM input, u
= K y u
where K y is a positive gain and its value is given in Table 3. The motion in the yaw axis
is caused by the difference between the torques exerted by the two clockwise and the two
counter-clockwise rotating propellers. The model of the yaw axis is shown in Figure 14.
The motion in the yaw axis can be modeled using the following equation
J y ¨ y =
In this equation, y is the yaw angle and J y is the rotational inertia about the z axis,
which is given in Table 3. The resultant torque of the motors, , can be calculated from
Document Number: 829 Revision: 12 Page: 13
Quanser Qball-X4: User Manual
= 12− 3−4
The yaw axis dynamics can be rewritten in the state-space form as
[ ] [ ][ ] [
]
0
˙ y
0 1 y
=
K y
0 0 ˙ y
¨ y
Jy
Figure 14: A model of the yaw axis with propeller direction of rotation shown.
Document Number: 829 Revision: 12 Page: 14
Quanser Qball-X4: User Manual
Parameter
Value
K
120 N
15 rad/sec
J roll
0.03 kg. m2
J pitch
0.03 kg. m2
M
1.4 kg
Ky
4 N.m
J yaw
0.03 kg. m2
L
0.2 m
Table 3: System parameters
6. System Setup
Section 6.1 walks through setting up a wireless connection with Windows. Section 6.2 describes setting up the vehicle hardware. Section 6.3 explains how to properly setup the
QuaRC-Simulink interface and create a new Simulink model that will run on the vehicle.
Finally, Section 6.4 describes the blockset and tools used to read the vehicle sensors and
write motor outputs.
6.1. Establishing Wireless Connection
The Qball-X4 uses an ad-hoc peer-to-peer wireless TCP/IP connection for communicating
with the host computer and/or other Quanser unmanned vehicles. The Qball-X4 package
comes with a USB wireless adapter to setup the host computer with a wireless connection
for use with the Qball-X4 and other Quanser unmanned vehicles. These steps outlined below for setting up the host computer wireless connection only need to be performed once.
1. After installing the USB wireless adapter that is provided, Windows should detect a network called GSAH, an “Unsecured Computer-to-Computer Network”. This is the peerto-peer network used by the vehicle.
2. Open the Status of the wireless network, then click on Properties.
3. Under “This connection uses the following items:”, scroll down to Internet Protocol
(TCP/IP), then double click on it.
4. Instead of obtaining an IP address of the computer automatically, enter the following:
IP address: 182.168.1.xxx (any unused number)
Document Number: 829 Revision: 12 Page: 15
Quanser Qball-X4: User Manual
Subnet mask: 255.255.255.0
Default gateway: 182.168.1.xxx (same as IP)
Figure 15: Wireless USB adapter settings
5. Connect to the GSAH network through the Windows network connections list.
6. If the Qball-X4 is powered on, the Qball-X4 can be pinged by typing “ping {IP of QballX4}” in the Run box in Windows (go to the Start menu and click Run).
Figure 16: Pinging the Qball-X4
Document Number: 829 Revision: 12 Page: 16
Quanser Qball-X4: User Manual
6.2. Qball-X4 Vehicle Setup
1. First, check that all motors are securely fastened to the vehicle frame. Check that the
propellers are firmly attached to the motors in the correct order: clockwise propellers
(viewed from the top) on the front and back motors, counter-clockwise propellers on the
left and right motors. Note that the back motor is indicated by a bright colored marking
on the Qball-X4 frame.
Check that the motors are firmly secured to the frame regularly (after every
2 hours of flight). Over time, vibrations in the frame may loosen the motor
mounts. If a motor or mount feels loose, tighten it immediately.
If a propeller is loose, use an allen key to remove the cap holding the propeller to the
motor and ensure the propeller mounting shaft is pushed fully down onto the motor shaft.
Replace the propeller on the mounting shaft and replace the motor cap and tighten it with
an allen key. Never change propellers or other components of the Qball-X4 with
batteries connected.
2. Install the batteries. Placing the Qball-X4 upsidedown so that it rests on the top of the
cage. Align the two Qball-X4 batteries with the plate located on the bottom of the frame
and secure the batteries tightly using the two velcro straps as shown in Figure 17.
Connect the batteries to the battery connectors and place the Qball-X4 upright again so it
rests on the bottom of the cage.
Figure 17: Batteries secured with velcro straps.
3. Power on the Qball-X4 using the two power switches connected to the battery cables
Document Number: 829 Revision: 12 Page: 17
Quanser Qball-X4: User Manual
(#11 in Figure 8). After 1 minute the Gumstix wireless module should be active. Connect
to the GSAH ad-hoc network on the host PC (see section 6.1. Establishing Wireless
Connection).
6.3. QuaRC: Quanser Real-Time Control
Simulink should have a new menu item called QuaRC once QuaRC has been installed. The
following steps are required to setup a new QuaRC model for the Qball-X4:
1. Create a new Simulink model, or open an existing model to be run on the Gumstix.
2. Click on the QuaRC menu, then select Options.
3. The System target file under Real-Time Workshop should be quarc_linux_arm.tlc.
Browse through the system target list to locate the proper file if necessary (Figure 18).
Figure 18 QuaRC Option Menu.
4. In order to run the QuaRC model on the target vehicle, the target's IP address must be
specified. To setup the default target address for all linux-ARM targets, go to the
Document Number: 829 Revision: 12 Page: 18
Quanser Qball-X4: User Manual
QuaRC menu and select Preferences. The Target type parameter should be set to
linux_arm. Replace the Default Model URI with the IP address of the desired target
vehicle, e.g., “tcpip://182.168.1.200:17001” without quotes.
Alternatively, to set the target address for the current model only open the model
options under the QuaRC/Options menu and choose Interface on the left hand pane.
Under the MEX-file arguments, type '-w -d /tmp -uri %u', 'tcpip://{IP of
Gumstix}:17001'. Include the single quotation marks (Figure 19). Replace {IP of
Gumstix} with the IP of your Gumstix, e.g. 'tcpip://182.168.1.200:17001'.
Figure 19: Configuring MEX-file arguments
5. Select “External” for simulation mode, instead of “Normal”, which indicates that the
model is to be run on the target machine (Gumstix) rather than simulating the model on
the host machine.
6. The model is now ready to be compiled on the target vehicle. If the wireless connection
to the vehicle has been established, a QuaRC console can be opened to show additional
messages and progress during model compilation by going to the menu item
QuaRC/Console for all. Building the model (QuaRC/Build) will begin the code generation and compiling steps. Output from the compilation is shown in the QuaRC console.
This step may take a few minutes to complete.
Document Number: 829 Revision: 12 Page: 19
Quanser Qball-X4: User Manual
6.4. Qball-X4 Sensors
This section describes the blocks that are used to read the Qball-X4 sensors in Simulink and
write outputs to the motors. The QuaRC Hardware-In-the-Loop (HIL) blockset it used to
communicate with Quanser data acquisition cards, including the HiQ. For detailed information on the HIL blockset see the QuaRC HIL user guide in the MATLAB help under QuaRC
Targets/User's Guide/Accessing Hardware. Table 4 lists the HIL blocks used to communicate with the Qball-X4's data acquisition hardware.
Block
Description
The HIL Initialize block selects the DAQ board and configures the board parameters. The HIL Initialize block is named via the Board name parameter, and all
other HIL blocks reference the corresponding HIL Initialize through its name.
For the HiQ, there is a board-specific option for selecting the gyroscope model
installed on the HiQ. The gyro model is specified by typing
“gyro_model=16405” in the HIL Initialize Board-specific options parameter or
by selecting the model from the board-specific options dialog. The valid values
for the gyro_model option are: 16350, 16360, 16400, and 16405. The gyroscope
number is found on the label of the gyroscope (#4 in Figure 5).
The HIL Read Write block is used to read sensor measurements from the HiQ
and write motor commands to the four Qball-X4 motors. The inputs and outputs
are specified with numeric channel numbers given in Table 5 and Table 6, respectively.
Table 4: HIL blocks used by the Qball-X4.
To initialize the HiQ board, a HIL Initialize block must be placed in the model. The HIL
Initialize block is used to initialize a data acquisition card and setup the I/O parameters. In
the HIL Initialize block, select the board type 'hiq_aero' to configure the HiQ DAQ and, if
desired, enter a name in the Board name field as shown in Figure 20.
Next, to read and write from the HiQ, add a HIL Read Write block to the model (note that
the HiQ is optimized for best performance when a single HIL Read Write block is used in a
model, adding more HIL I/O blocks may reduce the performance, particularly the maximum
sample rate). In the HIL Read Write block, select the board name corresponding to the
board name given in the HIL Initialize block. The channels available for reading and writing for the HiQ are listed in Table 5 and Table 6 below. Enter the channel numbers to be
read/written or use the browse buttons to open a channel selection dialog as shown in Figure 21.
Document Number: 829 Revision: 12 Page: 20
Quanser Qball-X4: User Manual
Figure 20: HIL Initialize block with the HiQ board
selected.
Channel type
Read channel
numbers
Description
Analog
none
-
Encoder
none
-
Digital
none
-
Other
3-6
Sonar inputs 0 to 3
3000-3002
Gyroscope inputs: X, Y, Z axis
4000-4002
Accelerometer inputs: X, Y, Z axis
8000-8002
Magnetometer inputs: X, Y, Z axis
11000
Operating capacity (battery)
Table 5: HiQ input channels
Document Number: 829 Revision: 12 Page: 21
Quanser Qball-X4: User Manual
Channel type
Write channel
numbers
Description
Analog
none
-
PWM
0-9
Servo outputs 0 to 9
Digital
none
-
Other
none
-
Table 6: HiQ output channels
Figure 21: Channel selection dialog for the HiQ.
For the Qball-X4, PWM outputs 0-3 are used to command the four motors. The range of
PWM output values is 0.05 to 0.10 (5% to 10% of a 20ms duty cycle), which corresponds
to a 1ms to 2ms pulse, respectively. A command of 0.05 corresponds to zero throttle, which
will cause the motors to stop. A command of 0.10 corresponds to full throttle.
Document Number: 829 Revision: 12 Page: 22
Quanser Qball-X4: User Manual
The 3-axis gyroscope and accelerometer measurements are used to measure the Qball-X4
dynamics and orientation (roll, pitch and yaw). The magnetometer can be used as a digital
compass to measure the Qball-X4 heading (yaw angle). These IMU inputs are crucial for
controlling the flight of the Qball-X4.
The operating capacity input measures the battery capacity as a percentage (0-1) of the
Qball-X4's input voltage operating range from 10V minimum to 20V maximum. Since the
LiPo batteries used to power the Qball-X4 should be charged at 10.6V, the operating
capacity should be monitored (note that 10.6V corresponds to an operating capacity of 0.06
or 6%). Figure 22 shows an example of how the operating capacity can be monitored so that
a low battery warning will be displayed on the host PC if the operating capacity reaches 8%
or less (corresponding to 10.8V or less) using the Show Message on Host block (found in
the Simulink library under QuaRC Targets\Sinks\Error Handling). Note that the HiQ input
voltage measurement can be calculated according to the formula V = 10x + 10, where x is
the operating capacity.
Figure 22: Monitoring the HiQ battery level.
Note that the HiQ operating capacity measures only the battery used to power the
HiQ. It is recommended that the Qball-X4 batteries are always changed in pairs.
Follow the directions of the charging system that is supplied to ensure the batteries are
charged properly and safely.
7. Troubleshooting Guide
For any issue, the first and easiest troubleshooting solution on any electronic device is to reboot the device. Turn off the Qball-X4, then turn it back on again. For troubleshooting any
Document Number: 829 Revision: 12 Page: 23
Quanser Qball-X4: User Manual
problem with the Qball-X4, it is always a good idea to open the QuaRC console in case additional information is printed to the console by going to the QuaRC menu and clicking on
“Console for all…”. The console must be opened after the Qball-X4 has booted and established a wifi connection. If the console is opened successfully it establishes a connection to
the target and the console window has the title “QuaRC Console for * at
tcpip://182.168.1.xxx:17000”, where xxx corresponds to the IP address of the Qball-X4.
7.1. The model fails to build/connect or the QuaRC
console does not successfully open.
1. Remove the Qball-X4 cover so that the HiQ is visible. Plug in the battery to the battery
connector (Figure 8). Turn on the power switch and look at the bottom of the Gumstix
(attached to the bottom of the HiQ) for the orange power LED. After approximately 30
seconds, a blue LED will flash to indicate the wifi module is powering on, and is attempting to connect to another computer on the ad-hoc wifi network. If the blue LED
flashes and remains on, then the wifi module is functioning and is able to find another
node on the ad-hoc wireless network. If the blue LED flashes and then turn off, the
Gumstix is not able to detect other nodes (e.g., the host PC) on the ad-hoc wireless network. Check that the USB wifi adapter is inserted properly in the host PC and is configured according to the network configuration procedure outlined in this manual (Section 6.1. Establishing Wireless Connection). Verify that the host PC is connected to the
wireless ad-hoc (GSAH) network and try to successfully ping the Gumstix by going to
the Windows Start → Run and typing “ping 182.168.1.xxx” (without quotation marks),
where xxx corresponds to the IP address of your vehicle. If the blue LED never flashes,
the wireless antenna or wireless module may be disconnected. Turn off the power and
verify that the Gumstix wireless module and antenna are properly connected. The wireless module shown in Figure 23 is located on the bottom side of the green Gumstix computer. Make sure the wireless module and antenna are secured and retry the above steps
to establish a wireless connection.
Document Number: 829 Revision: 12 Page: 24
Quanser Qball-X4: User Manual
Figure 23: Wifi Module
7.2. The Qball-X4 sensors are not being read correctly or
they are stuck at some constant value.
1. Using the HIL Read block, output all possible channels. Check these outputs using
scopes and displays, and determine if the problem lies with a particular sensor, or set of
sensors, or if the issue is global across all sensors.
7.3. The Simulink model appears to run slowly (i.e., the
simulation time runs slower than actual time), or the
console displays the message “Sampling rate is too fast
for base rate”.
1. The maximum sample rate recommended for the Gumstix is 500 Hz (0.002 s). However,
if there are complex calculations (such as image processing) performed within the model,
then this could potentially limit the sample rate of the model. Try reducing the model
sample rate in the menu QuaRC\Options\Solver by increasing the “Fixed-step size (fundamental sample time)” parameter or change sample rates of blocks that take longer to run.
2. The HIL Read Write block should only be used once in a diagram. These blocks perform
large data transfers between the HiQ and the controllers, so placing more than one of these
blocks will cause multiple reads to be performed in the same sample instant, which is unnecessary. To achieve the optimal performance, use only one HIL Read Write block for the entire model.
3. To determine the execution time of blocks or subsystems within the model, use the Computation Time block found in the library under QuaRC Targets\Sources\Time. This block
outputs the computation time of a function call subsystem, measured using an independent
high-resolution time source. Blocks can be placed inside a function call subsystem and connected to the Computation Time block to determine their execution time during each sample
Document Number: 829 Revision: 12 Page: 25
Quanser Qball-X4: User Manual
instant. This helps identify the bottlenecks in the model (blocks/subsystems with the highest
execution time) and can identify blocks/subsystems whose computation time is greater than
the sample time of the model. Try increasing the sample time of those blocks whose computation time is greater than the sample time of the model so that the blocks run in a slower
rate thread.
7.4. Trying to start the Qball-X4 model results in the error
“Unable to locate the dynamic link library or shared
object.”
1. This error indicates that the Qball-X4 driver is not found on the target. Make sure that
the model target type is set to Linux ARM by navigating to the QuaRC menu QuaRC\Options\Real-Time Workshop pane and changing the System target file to quarc_linux_arm.tlc.
Open a console through the QuaRC menu QuaRC\Console for all, and verify that the console window displays the target IP of your vehicle in the window title.
7.5. Building a model fails with the error “Not enough
system resources are available to perform the operation.”
The hard disk is full on the Gumstix computer.
1. When several models are compiled, the disk space on the Gumstix may become full, and
you will no longer have space to build models. Using the clean option in the QuaRC
menu under QuaRC\Clean all will remove all generated code and compiled code for the
current model, but this will only free up the space used by the current model. Clearing
all models from the Gumstix hard disk must be done manually using PuTTY, or any ssh
client. Using PuTTY, log into the Gumstix by connecting to it using the IP listed on the
vehicle, and use the user name “root”, and password “quanser” (without quotation
marks). Navigate to the /var/spool/quarc directory, which is where all generated code
and compiled models reside. Use the “ls” command to list all contents of this directory to
see all models that have been downloaded to the Gumstix. Note: be careful executing
any remove/delete command on your Gumstix, as incorrect usage could permanently damage the file system, rendering the Gumstix unusable. Individual
models/code can be manually removed from the /var/spool/quarc directory. To remove
all generated code and controllers, run the command “rm -rf /var/spool/quarc/*” (without
quotation marks). To confirm there are no longer any models on the Gumstix, execute
the command “ls /var/spool/quarc” and there should be nothing listed.
Document Number: 829 Revision: 12 Page: 26