1
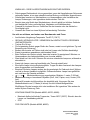
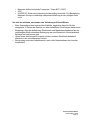
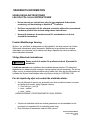
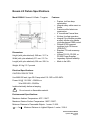
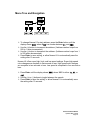
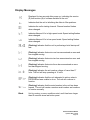
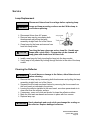
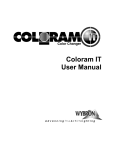
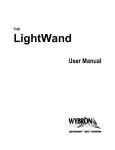
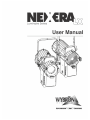
TABLE OF CONTENTS Declaration of Conformity ....................................................................... 3 Safety Notice............................................................................................. 4 Introduction ............................................................................................ 19 Quick Start .............................................................................................. 19 Nexera LX Fixture Specifications ......................................................... 21 Model 2560LX: Wash – Tungsten....................................................... 21 Model 2570LX: Profile – Tungsten...................................................... 22 Model 2580LX: Wash – CDM ............................................................. 23 Model 2600LX: Profile – CDM ............................................................ 24 Model 2640LX: 19º-26º Profile – Tungsten......................................... 25 Model 2650LX: 19º-26º Profile – CDM................................................ 26 Fixture Setup and Configuration .......................................................... 27 Installing the Lamp.............................................................................. 27 Lamp Optimization .............................................................................. 28 Mounting and Adjusting the Fixture .................................................... 28 Attaching Accessories to the Front Accessory Holder ........................ 29 Connecting AC Power......................................................................... 29 Adjusting Field Angle .......................................................................... 29 The Nexera LX system ....................................................................... 30 Head-Feet Restrictions ....................................................................... 31 Head-Feet Example ............................................................................ 31 DMX Setup and Operation ..................................................................... 32 Controls and Indicators ....................................................................... 32 Menu Tree and Navigation.................................................................. 34 Display Messages............................................................................... 35 Service..................................................................................................... 36 Lamp Replacement............................................................................. 36 Cleaning the Reflector ........................................................................ 36 Cleaning the Color Module ................................................................. 37 Cleaning the Lenses ........................................................................... 37 Replacing Fuses ................................................................................. 38 Error Messages/Troubleshooting........................................................ 38 Appendix 1 – Color Table ...................................................................... 39 Warranty Information ............................................................................. 41 Nexera LX User Manual Updated March 2009 Page 2 Nexera LX User Manual Updated March 2009 Page 3 Safety Notice SAVE THESE INSTRUCTIONS READ AND FOLLOW ALL INSTRUCTIONS • This manual gives step-by-step instructions for preparation, setup, and operation of the Nexera LXTM luminaire. • There is a potential risk of fire, electric shock, or injury to persons if the product is not used as instructed. • The Nexera LX luminaire is to be used in an indoor environment only and is not intended for residential use. Product Modification Warning Wybron, Inc. products are designed and manufactured to meet the requirements of United States and International safety standards. Modifications to the products could affect safety and render the product non-compliant to relevant safety standards. Important Safety Instructions CAUTION This product is for professional use only. It is not for residential use. Read this manual before powering or installing the fixture. Follow the safety precautions and observe all warnings in this manual and on the fixture. If you have questions about how to operate the fixture safely, please contact your Wybron dealer or call Wybron directly at 1-800-624-0146 or go to www.wybron.com. To protect yourself and others from electric shock: • THE MAINS LEADS ARE COLORED IN ACCORDANCE WITH THE FOLLOWING CODE AND MUST BE CONNECTED IN THE FOLLOWING SCHEME: TUNGSTEN UNITS (Models 2560, 2570, 2640): green and yellow – ground/earth tan – neutral tan – line CDM UNITS (Models 2580, 2600, 2650): green and yellow – ground/earth blue – neutral brown – line WARNING – THIS EQUIPMENT MUST BE EARTHED. Nexera LX User Manual Updated March 2009 Page 4 • • • • • Protection against electric shock is assured only if the mains connected cord set is connected to a properly earthed grounding type receptacle. Disconnect the fixture from AC power before removing or installing the lamp, fuses, or any electronic parts. Use a good source of AC power that complies with local building and electrical codes and has both overload and ground fault protection. Suitable for dry locations only. Do not expose the fixture or power supply to rain or moisture. Refer all service to a Wybron certified service technician. To protect yourself and others from burns and fire: • • • • • • • • • • • • • Maximum ambient temperature Ta=40º C (104º F). DANGER: INTENSE HEAT. AVOID CONTACT BY PERSONS AND MATERIALS. For continued protection against risk of fire, replace only with same type and rating of fuse. Do not operate the fixture with missing or damaged lenses or reflector. Replace any cracked protective shield. When replacing the lamp, allow the fixture to cool for at least five minutes before removing the lamp holder from the fixture. Do not stare directly into the light. Never look at an exposed lamp while it is illuminated. Replace the lamp if it becomes damaged or thermally deformed. A hot lamp may be an explosion hazard. Do not open the fixture for five minutes after power has been disconnected. Wear eye and hand protection when re-lamping. Do not use any lamps other than those approved for use by Wybron and listed in this manual. Use of any other lamp may be hazardous and may void the warranty. ------1m Minimum distance to lighted objects: 1 meter (3.28 feet). Minimum distance to flammable objects (fabric, wood, paper, etc): 1 meter (3.28 feet). Nexera LX fixtures are convection cooled. Provide a minimum clearance of 0.1 meter (4 inches) around all air vents. Do not modify the fixture or install any parts other than genuine Wybron replacement parts. FOR TUNGSTEN UNITS (Models 2560, 2570, 2640): • Maximum exterior surface temperature Tmax=180ºC (356ºF). Allow the fixture to cool before handling. • IP20. FOR CDM UNITS (Models 2580, 2600): • Maximum exterior surface temperature Tmax=90ºC (194ºF). • IP20. • CAUTION: Risk of exposure to excessive ultraviolet (UV) radiation. Do not operate without complete lamp enclosure in place. To protect yourself and others from injury due to falls: • When suspending the fixture above ground level, verify that the structure can hold at least 10 times the weight of all installed devices. Nexera LX User Manual Updated March 2009 Page 5 • • • Verify that all external accessories and rigging hardware are securely fastened and use an approved means of secondary attachment such as a safety cable. Always hang the Nexera LX fixture with the front accessory retaining clip in the locked position. Block access below the work area whenever installing or removing the fixture. Nexera LX User Manual Updated March 2009 Page 6 Notes de Sécurité EPARGNER CES INSTRUCTIONS LIRE ET SUIVRE TOUTES NOTES DE SÉCURITÉ • Ce manuel donne des instructions pour la preparation, l’organisation, et l’opération du NexeraLX Luminaire. • Il y a un risqué de feu, décharge électrique, ou la blessure aux gens si le produit n’est pas utilize comme instruit. • Le NexeraLX Luminaire va être utilize à la maison seulement et pas pour l’usage residential. L’Avertissement de Modification de Produit Les produits de Wybron, Inc. sont conçus et a fabriqué pour rencontrer les conditions d’Etats-Unis et de norms de sûreté internationals. Les modifications aux produits pourraient affecter la sûreté et rendent le produit non-conciliant aux normes de sûreté pertinentes. Les Instructions Importantes de Sûreté ATTENTION Ce produit est pour l’usage professionnel seulement. Ce n’est pas pour l’usage residential. Lire ce manuel avant d'alimenter ou l'installation de l'accessoire. Suivre les précautions de sûreté et observer tous avertissements dans ce manuel et sur l'accessoire. Si vous avez des questions sur la manière de fonctionner l'accessoire sans accident, s'il vous plaît contacter votre négociant de Wybron ou Wybron d'appel directement à 1-800-624-0146. Pour vous protéger et les autres de la décharge électrique : LES AVANCES PRINCIPAUX SONT CONFORMEMENT COLORES AU CODE SUIVANT ET DOIVENT ETRE CONNECTES DANS L'ARRANGEMENT SUIVANT : UNITES DE TUNGSTENE (Modèles #2560, #2570, #2640): vert et jaune– terre bronzage – neutre bronzage – ligne UNITES DE CDM (Modèles #2580, #2600, #2650): vert et jaune– terre bleu – neutre marron – ligne Nexera LX User Manual Updated March 2009 Page 7 L'AVERTISSEMENT – CET EQUIPEMENT DOIT ETRE FONDE. • • • • • La Protection contre la décharge électrique est seulement assurée si la série de corde connectée principale est connectée à un convenablement earthed fonde la prise de type. Débrancher l'accessoire de l'alimentation avant d'enlever ou l'installation de la lampe, les fusibles, ou les parties électroniques. Toujours fonder (la terre) l'accessoire électriquement. Convenable pour les emplacements secs seulement. Ne pas exposer l'accessoire ou l'alimentation pour pleuvoir ou l'humidité. Référer tout service à un Wybron a certifié le technicien d'entretien. Pour vous protéger et les autres des brûlures et du feu : • • • • • • • • • • • • • • • La température ambiante Maximum Ta= 40º C (104ºF). ADVERTISSEMENT: LA CHALEUR INTENSE. EVITER LE CONTACT PAR LES PERSONNES ET LES MATERIELS. Sécher l'emplacement seulement. Vous devez débrancher de l'électricité avant de réparer. Pour la protection continuée contre le risque de feu, remplacer seulement avec le même type et le même classement de fusible. Ne pas fonctionner l'accessoire avec manquer ou les lentilles ou le réflecteur endommagées. Remplacer la protection protective craquée. En remplacant la lampe, permettre à l'accessoire pour refroidir pour au moins 5 minutes avant d'enlever le porte-lampe de l'accessoire. Ne pas dévisager directement dans la lumière. Ne jamais regarder une lampe exposée pendant qu'il est illuminé. Remplacez la lampe s'il devient endommagé ou thermiquement déformé. Une lampe chaude peut être un danger d'explosion. Ne pas ouvrir l'accessoire pour 5 minutes après le pouvoir a été débranché. L'oeil d'usure et transmet la protection en changant la lampe. Ne pas utiliser de lampe autrement que ces approuvé pour l'usage par Wybron et énuméré dans ce manuel. L'usage d'aucune autre lampe peut être hasardeux et peut annuler la garantie. ------1m La distance minimum aux objets allumés: 1 meter (3.28 feet) La distance Minimum aux objets inflammables (le tissu, le bois, le papier, etc.): 1 mètre (39 pouces) Les accessoires de NexeraLX sont des convections refroidis. Fournir un dégagement minimum de 0,1 mètre (4 pouces) autour de toutes prises d'air. Ne pas modifier l'accessoire ou installer des parties autrement que les parties de remplacement de Wybron authentiques. UNITES DE TUNGSTENE (Modèles #2560, #2570, #2640): • • La température de surface extérieure Maximum, Tmax=180ºC (356ºF). Permettre à l'accessoire pour refroidir avant de contrôler. IP20 Nexera LX User Manual Updated March 2009 Page 8 UNITES DE CDM (Modèles #2580, #2600): • • • La température de surface extérieure Maximum, Tmax=90ºC (194ºF). IP20 AVERTIR : le Risque d'exposition à excessif ultraviolet (UV) le rayonnement. Ne pas fonctionner sans compléter la clôture de lampe à sa place. Pour vous protéger et les autres de la blessure en raison des chutes: • • • • En suspendant l'accessoire au-dessus du niveau de sol, vérifier que la structure peut tenir au moins 10 fois le poids de tous appareils installés. Utiliser un câble secondaire de sûreté en montant cet accessoire. Toujours pendre l'accessoire de NexeraLX avec l'accessoire de devant retenant le trombone dans la position fermée à clef. L'accès de Bloc au dessous du secteur de travail quand installant ou enlever l'accessoire. Nexera LX User Manual Updated March 2009 Page 9 Aviso Sobre Seguridad SALVE ESTAS INSTRUCCIONES LEA Y SIGA TODAS INSTRUCCIONES • Este manual da el paso por paso las instrucciones para la preparación, para arreglo, y para la operación del NexeraLXTM Luminaire. • Hay un riesgo potencial del fuego, el calambre o la herida a personas si el producto no se utiliza como instruido. • El NexeraLX Luminaire deberá ser utilizado en un ambiente interior sólo y no es pensado para el uso residencial. Advertencia de Modificación de Producto Wybron, los productos S.a. se diseñan y son fabricados para encontrar los requisitos de Estados Unidos y estándares Internacionales de seguridad. Las modificaciones a los productos podrían afectar la seguridad y rendir el producto no conformista a estándares pertinentes de seguridad. Instrucciones importantes de Seguridad CUIDADO Este producto es para el uso profesional sólo. No es para el uso residencial. Lea este manual antes de accionar o instalar la instalación fija. Siga las precauciones de la seguridad y observe todas advertencias en este manual y en la instalación fija. Si usted tiene las preguntas acerca de cómo operar la instalación fija seguramente, contacta por favor su comerciante de Wybron o la llamada Wybron directamente en 1-800-624-0146. Para protegerlo y los otros del calambre: • EL PRINCIPAL DIRIGE SON COLORADOS DE ACUERDO CON EL CODIGO SIGUIENTE Y se DEBE CONECTAR EN EL ESQUEMA SIGUIENTE: Las UNIDADES del TUNGSTENO (los Modelos #2560, #2570, #2640) : verde y amarillo – molió/la tierra bronceado – neutral bronceado – línea Las UNIDADES de CDM (los Modelos #2580, #2600, #2650) : verde y amarillo – molió/la tierra azul – neutral brown – línea Nexera LX User Manual Updated March 2009 Page 10 La ADVERTENCIA – ESTE EQUIPO DEBE SER EARTHED. • • • • • La Protección contra calambre se asegura sólo si el conjunto conectado principal de cuerda es conectado a un apropiadamente earthed que muele receptáculo de tipo. Desconecta la instalación fija del poder de C.A. antes de quitar o instalar la lámpara, antes de los fusibles, o antes de alguna parte electrónica. Utiliza una fuente buena del poder de C.A. que se conforma con edificio local y códigos eléctricos y tiene tanto la sobrecarga como la protección del defecto del suelo. Conveniente para ubicaciones secas sólo. No exponga la instalación fija ni la alimentación a la humedad. Se Refiere todo servicio a un Wybron certificó a técnico de servicio. Para protegerlo y los otros de quemaduras y fuego: • • • • • • • • • • • • • • • Máximo ambiente temperatura,Ta=40º C (104º F) El PELIGRO: el CALOR INTENSO. EVITE el CONTACTO POR PERSONAS Y MATERIAS. Seque ubicación sólo. Desconecta el poder antes de atender a. Para la protección continuada contra el riesgo del fuego, reemplaza sólo con mismo tipo y calificación de fusible. No opere la instalación fija con perder ni lentes ni con el reflector dañados. Reemplaza algún protector protector agrietado. Al reemplazar la lámpara, permite la instalación fija refrescar para por lo menos 5 minutos antes de quitar al poseedor de lámpara de la instalación fija. No mira fijamente directamente en la luz. Nunca mire una lámpara expuesta mientras se ilumina. Reemplaza la lámpara si llega a ser dañado o térmicamente deformado. Una lámpara caliente puede ser un peligro de la explosión. No abra la instalación fija durante 5 minutos después que el poder se ha desconectado. El ojo del uso y entrega la protección al cambiar la lámpara. No utiliza ninguna lámpara de otra manera que esos aprobado para el uso por Wybron y listado en este manual. El uso de cualquier otra lámpara puede ser peligroso y poder vacío la garantía. La distancia mínima a encendió objetos: 1 meter (3.28 feet) ------1m La distancia mínima a objetos (la tela, la madera, el papel): 1 meter (3.28 feet) Instalaciones fijas de NexeraLX son la convecciones refrescadas. Proporcione un espacio libre mínimo de 0,1 metro (4 pulgadas) alrededor de todos respiraderos. No modifica la instalación fija ni instala cualquiera despide de otra manera que el reemplazo genuino de Wybron despide. Las UNIDADES del TUNGSTENO (los Modelos #2560, #2570, #2640): • • Temperatura en la superficie exterior Máxima, Tmax=180ºC (356ºF). Permita la instalación fija refrescar antes de manejar. IP20 Nexera LX User Manual Updated March 2009 Page 11 Las UNIDADES de CDM (los Modelos #2580, #2600): • • • Temperatura en la superficie exterior Máxima, Tmax=90ºC (194ºF). IP20 ADVIERTE: el Riesgo de la exposición a excesivo ultravioleta (UV) la radiación. No opere sin cerco completo de lámpara en el lugar. Para protegerlo y los otros de la herida debido a caídas: • • • • Al suspender la instalación fija encima de nivel del suelo, verifica que la estructura puede tener por lo menos 10 veces el peso de todos dispositivos instalados. Verifica que todos accesorios externos y aparejar hardware se abrocha seguramente y utiliza un medios aprobados de la fijación secundaria tal como un cable de la seguridad. Siempre cuelga la instalación fija de NexeraLX con el accesorio anterior que retiene clip en la posición cerrada. El acceso del Bloque debajo del área del trabajo siempre que instalando o para quitar la instalación fija. Nexera LX User Manual Updated March 2009 Page 12 Sicherheitshinweise BEHALTEN SIE DIESEN ANWEISUNGEN LESEN SIE UND GEHORCHEN SIE ALLEN ANWEISUNGEN • Dieses Handbuch gibt Schritt für Schritt Anweisungen zur Vorbereitung, Aufstellung, und Betrieb dem NexeraLXTM Luminaire. • Es gibt ein potenzielles Risiko des Feuers, Elektroschocks oder Verletzung zu Personen, wenn das Produkt nicht benutzt ist, als unterrichtet ist. • Der NexeraLX Luminaire soll in einer Hallenumwelt nur benutzt werden und ist für Heimumwelt nicht vorgehabt. Produktänderungswarnung Wybron, Inc. Produkte sind entworfen und sind hergestellt, die Voraussetzungen von Vereinigten Staaten und Internationalen Sicherheitsstandards zu erfüllen. Änderungen zu den Produkten könnten Sicherheit beeinflussen und könnten das Produkt leisten das verordnungswidrig ist zu relevanten Sicherheitsstandards. Wichtige Sicherheitsanweisungen VORSICHT Dieses Produkt ist für beruflichen Gebrauch nur. Es ist nicht für Heimumwelt. Lesen Sie dieses Handbuch vor Betreiben oder Installieren des Inventar. Folgen Sie den Sicherheitsmaßnahmen und beobachten Sie alle Warnungen in diesem Handbuch und auf dem Inventar. Wenn Sie Fragen haben, um wie zu bedienen das Inventar sicher, bitte Ihren Wybron Händler oder Ruf Wybron direkt an 1-800-624-0146 kontaktiert. Um sich zu schützen, und andere von Elektroschock: • DIE HAUPTLEITUNGEN BLEIE SIND GEMÄSS DEM FOLGENDEN CODE GEFÄRBT UND MÜSSEN IM FOLGENDEN SCHEMA VERBUNDEN WERDEN: WOLFRAM EINHEITEN (Modelle #2560, #2570, #2640): Grün und Gelb – Erden Sie/Erde Sonnenbräunung – neutral Sonnenbräunung – linie CDM EINHEITEN (Modelle #2580, #2600, #2650): Grün und Gelb – Erden Sie/Erde Blau – neutral Braun – linie Nexera LX User Manual Updated March 2009 Page 13 WARNUNG – DIESE AUSRÜSTUNGEN MUSS EARTHED WERDEN. • • • • • Schutz gegen Elektroschock ist nur gezusichert, wenn die Hauptleitungen Schnursatz verbunden haben, ist an eine ordentlich earthed Erdung von Behälter angeschlossen. Schaltet das Inventar von Wechselstrom vor Herausnehmen oder Installieren der Lampe, Sicherungen, oder irgendeiner elektronischen Teile Ab. Benutzt eine gute Quelle des Wechselstroms, die sich anhält an örtliches Gebäude und elektrische Codes und beide lässt, überlasten und Erdfehlerschutz. Passend für trockene Orte nur. Entblößen Sie das Inventar oder das Netzteil zu Feuchtigkeit nicht. Verweist alle Dienst zu einem Wybron hat bescheinigt Techniker. Um sich zu schützen, und andere von Brandwunden und Feuer: • • • • • • • • • • • • • • Am höchsten Umgebungs Temperatur Ta=40º C (104º F) GEFAHR: INTENSIVE HITZE. VERMEIDEN Sie KONTAKT DURCH PERSONEN UND MATERIALIEN. Trocken Sie Ort nur. Für fortgesetzten Schutz gegen Risiko des Feuers, ersetzt nur mit gleichem Typ und Bewertung der Sicherung. Bedient das Inventar mit Fehlen nicht oder hat Linsen oder Reflektor beschädigt. Ersetzt irgendeinen gespaltenen schützenden Schild. Beim Ersetzen der Lampe, erlaubt, dass das Inventar für wenigstens 5 Minuten vor Herausnehmen des Lampenbehälters vom Inventar abkühlt. Starrt direkt ins Licht nicht. Schauen Sie nie eine unbedeckte Lampe an, während es erleuchtet ist. Ersetzt die Lampe, wenn es beschädigt oder Thermal entstellt wird. Eine heiße Lampe ist eine Explosiongefahr. Tragen Sie beim Austausch der Lampen einen Augenschutz und Handschuhe. Benutzen Sie keine Lampen anders als die genehmigte für Gebrauch durch Wybron und hat in diesem Handbuch aufgeführt. Gebrauch anderer Lampe kann gefährlich sein und kann die Garantie aufheben. Mindestentfernung zu angezündeten Objekten: 1 meter (3.28 feet) ------1m Mindestentfernung zu brennbaren Objekten (Stoff, Holz, Papier, usw):1 meter (3.28 feet) NexeraLX Inventar sind Konvektion, die abgekühlt wird. Versorgen Sie eine Mindestlichtweite von 0,1 Meter (4 inches) um alle Lüftebelüftungsschlitze. Modifizieren Sie das Inventar nicht oder installieren Sie irgendeine Teile anders als echter Wybron Ersetzung Teile. WOLFRAM EINHEITEN (Modelle #2560, #2570, #2640): • • Maximale Außen äußerliche Temperatur, Tmax=180ºC (356ºF). Erlaubt, dass die Lampe vor Handhabung abkühlt. IP20 FOR CDM UNITS (Modelle #2580, #2600): Nexera LX User Manual Updated March 2009 Page 14 • • • Maximale Außen äußerliche Temperatur, Tmax=90ºC (194ºF). IP20 VORSICHT: Risiko der Aussetzung zu übermäßig ultraviolett (UV) Bestrahlung. Bedienen Sie ohne vollständige Lampeneinschließung an der richtigen Stelle nicht. Um sich zu schützen, und andere von Verletzung auf Grund Stürze: • • • • Beim Suspendieren des Inventar über Erdhöhe, beglaubigt, dass die Struktur wenigstens 10 Zeiten das Gewicht von allen installierten Vorrichtungen halten kann. Beglaubigt, dass alle äußerlichen Zubehörteile und Manipulierenhardware fest ein genehmigtes Mittel sekundärer Befestigung wie zum Beispiel ein Sicherheitskabel befestigt und sind benutzt sind. Hängt Immer das NexeraLX Inventar mit dem vorderen Zubehörteil behaltend Klammer in der verschlossenen Position. Blockzugang unter dem Arbeitsbereich, wenn oder Herausnehmen des Inventar installierend. Nexera LX User Manual Updated March 2009 Page 15 SÄKERHETS INFORMATION SPARA DESSA INSTRUKTIONER LÄS OCH FÖLJ ALLA INSTRUKTIONER • Denna manual ger instruktioner steg för steg angående förberedelse, montering, och användning av NexeraLXTM Luminaire. • Det finns en potential risk för eldsvåda, elektriska stötar eller personskada om denna produkt inte används enligt dessa instruktioner. • NexeraLX Armaturen är endast avsedd för inomhusbruk och är inte avsedd för hemmabruk. Produkt Modifierings Varning Wybron, Inc. produkter är designade och tillverkade för att möta kraven från United States and International safety standards. Modifiering av produkten kan påverka säkerheten och resultera i att produkten inte längre uppfyller de krav som sätts av denna säkerhets standard. Viktiga Säkerhets Instruktioner VARNING Denna produkt är endast för proffesionelt bruk. Ej avsedd för privatbruk. Läs denna manual innan installerar eller använder denna armatur. Följ säkerhets åtgärderna och observera alla varningar i denna manual och på armaturen. Om du har frågor om hur du ska använda armaturen på ett säker sätt, känn dig då välkommen att kontakta din Wybron återförsäljare eller ring Wybron direkt på 1-800-624-0146. För att skydda dig själv och andra från elektriska stötar: Om din NexeraLX armatur var levererad utan stick kontakt monterad, montera en lämlig stick kontakt enligt följande schema: Grön och gul – jord brun – neutral brun – ström VARNING-DENNA UTRUSTNING MÅSTE VARA JORDAD • • • Skydd mot elektriska stötar kan endast garanteras om strömsladden är rätt monterad och anslutend till ett ordentligt jordat uttag. Bryt strömmen till armaturen innan du utför service. Nexera LX User Manual Updated March 2009 Page 16 • • • Använd en säker strömkälla som överenstämmer med lokala bygg och el föreskrifter och som har både överlast och jorfelsbrytare. Endast avsedd för torra utrymmen. Utsätt inte armatur eller strömförsörjning för fukt. Överlämna all service en Wybron certifierad service tekniker. För att skydda dig själv och andra från brännskador och eldsvåda: • • • • • • • • • • • • VARNING: INTENSIV HETTA. UNVIK KONTAKT MED PERSONER OCH MATERIAL. För fortsatt skydd mot eldsvåda, använd endast rekomenderade säkringar. Använd inte armaturen om någon lins eller reflektor saknas eller är skadad. Byt ut skadade skydds sköldar omedelbart. Titta aldrig rakt in i ljuskällan. Titta aldig direkt på en blottad glödlampa när den är tänd. Byt ut glödlampa om den går sönder eller värme skadas. Varma glödlampor innebär explosionsrisk.Vänta minst 5 minuter innan du öppnar armaturen efter det att strömmen har slagits av. Använd skyddsglasögon och skyddshandskar vid glödlamps byte. ------1m Minimum avstånd till belyst objekt: 1 meter (3.28 feet) Minimum avstånd till brandfarligt material (tyg, trä, papper, etc): 1 meter (3.28 feet) nNexeraLX armaturer kyls genom bakåtriktad värmeströmning. Försäkra dig om ett minimum avstånd på 0.1 meter (4 inches) runt alla luft öppningar. Maximal yttre temperatur på armatur, Tmax=180ºC (356ºF). Maximal rums temperatur Ta= 40º C (104ºF). Gör inga modifieringar på denna armatur och installera inget annat än Wybron orginal reservdelar. FÖR ARMATURER MED TUNGSTEN ( Modell #2560, #2570, #2640) • • Maximal yttre temperatur på armatur, Tmax=180ºC (356ºF). Låt armaturen svalna innan du rör den. IP20 FÖR ARMATURER MED CDM ( Modell #2580, #2600, #2650) • • • Maximal yttre temperatur på armatur, Tmax=90ºC (194ºF). IP20 VARNING: Risk för Ultraviolett (UV) strålning. Använd inte armaturen när glödlampan är öppet exponerad. För att skydda dig själv och andra från skador vid fall: • Vid monteringar av armaturen over marknivå, försäkra dig om att strukturen kan hålla för mer än 10 gånger vikten av det som har monterats Nexera LX User Manual Updated March 2009 Page 17 • • • Försäkra dig om att alla tillbehör och rigging hårdvara är fastsatta på ett korrekt och säkert sätt och använd dig av säkerhets wire vid alla tillfällen. Häng alltid NexeraLX armaturer med den främre tillbehörs hållarens clips I låst läge. Spärra av området under armaturen vid riggning eller service av armaturen. Nexera LX User Manual Updated March 2009 Page 18 Introduction Nexera LXTM is Wybron's family of affordable dichroic CMY color-mixing luminaires designed to complement your current equipment. Nexera LX wash lights and profile spots operate just like the conventional theatrical fixtures you're using already, but with the addition of Wybron CMY dichroic color mixing. Nexera LX fixtures are offered with the Philips® GLC/GLA 575W compact tungsten sources (the preferred source for theater and television) or CDM lamps, and provide superb light output and beam uniformity. All Nexera LX fixtures are convection-cooled, utilizing no fans for silent operation. The patent-pending Wybron CMY color-mixing module produces a wide color palette, featuring an exceptional range of control over the most subtle theatrical colors like bastard amber, light pink and no-color blue, all with seamless transitions between colors. Color consistency over time is assured, because the glass filters will not fade with heat or age. Tungsten units require three DMX channels, making them easy to use and patch, even on the simplest control consoles. The chosen color is easily selected using any two of the three DMX control channels. CDM units utilize a fourth DMX channel for built-in dimming capability. Color fades are gracefully accomplished with your choice of color path from one color to the next. The Wybron CMY dichroic color-mixing module also allows designers to make color choices and changes in real time. All Nexera LX fixtures share a common lamp housing, borosilicate cold mirror reflector, and Wybron CMY dichroic color-mixing module for ease of service and flexibility. The Wybron CMY module offers a menu display for DMX addressing and operational info. The Nexera LX has a front accessory frame, allowing for standard sized accessories like gel frames, snoots, barn doors, and donuts to be fitted to the fixtures. The profiles accept standard M size patterns and accessories. Quick Start 1. Connect the Equipment a. Install the C-clamp onto the yoke using the yoke bolt. b. Mount luminaire on mounting pipe using the C-clamp and safety cable. c. Connect Nexera LX to the PS Power Supply by using the 4-pin power/data cable. d. Connect the PS Power Supply to a DMX source with a 5-pin cable. e. Connect the PS Power Supply to a 115/230V AC power. f. Connect the Nexera LX to AC power (115V or 230V depending upon lamp installed). CAUTION Metal parts of the lamp and reflector housing get hot! Nexera LX User Manual Updated March 2009 Page 19 2. Set Up Nexera LX a. Set Nexera LX channel to 1 (factory default). b. Set Nexera LX to low speed color change mode (factory default). 3. Control Nexera LX with DMX a. b. c. d. DMX channel 1 controls Cyan (0% = no color, 100% = full saturation). DMX channel 2 controls Magenta (0% = no color, 100% = full saturation). DMX channel 3 controls Yellow (0% = no color, 100% = full saturation). DMX channel 4 controls Dimming (CDM only, 0%=off, 100%=full on). CAUTION: Risk of exposure to excessive ultraviolet (UV) radiation. Do not operate without complete lamp enclosure in place. Nexera LX User Manual Updated March 2009 Page 20 Nexera LX Fixture Specifications Model 2560LX: Nexera LX Wash - Tungsten Features: • • • • • • • • Dimensions: Height (with yoke attached): 549 mm / 21.7 in. • Width (with yoke attached): 271 mm / 10.7 in. • • Length (with yoke attached): 524 mm / 20.6 in. Precise, tool-free lamp optimization. Integral safety cable mount on fixture. Precision milled aluminum construction. 6” borosilicate Fresnel lens. No fans for silent operation. Integral Color Module provides a nearly infinite color palette via three-channel DMX control. Philips® 575W compact tungsten, high CRI source (GLA/GLC). Standard 7.5-inch accessory holders. Utilizes PS-150, PS-300, or PS-600 Power Supplies. Legendary Wybron reliability. Made in the USA. Weight: 8.9 kg / 19.7 pounds Electrical Specifications: CAUTION: RISK OF FIRE Use MAX 600 watt, type G9.5 lamp rated 110-120V or 220-240V. Power: 6A @ 110-120V ~ 50/60Hz or 3A at 220-240V~ 50/60Hz. Isolate electrically before re-lamping. F X Do not mount on flammable material. Environmental Specifications: Maximum Ambient Temperature: 40ºC / 104ºF. Maximum Exterior Surface Temperature: 180ºC / 356ºF. Minimum Distance to Flammable Objects: 1 meter / 3.28 ft. ------1m Minimum Distance to Lighted Objects: 1 meter / 3.28 ft. Nexera LX User Manual Updated March 2009 Page 21 Model 2570LX: Nexera LX Profile - Tungsten Features: • • • • • • • • Dimensions: Height (with yoke attached): 549 mm / 21.7 in. • Width (with yoke attached): 302 mm / 11.9 in. • Length (with yoke attached): 525 mm / 20.7 in. Weight: 9.8 kg / 21.5 pounds • • 25º-40º beam adjustment. Precise, tool-free lamp optimization. Integral safety cable mount on fixture. Precision milled aluminum construction. Zoom adjust detents at 30° and 36° for quick setup. No fans for silent operation. Integral Color Module provides a nearly infinite color palette via three-channel DMX control. Philips® 575W compact tungsten, high CRI source (GLA/GLC). Standard 6.25-inch accessory holders. Utilizes PS-150, PS-300, or PS600 Power Supplies. Legendary Wybron reliability. Made in the USA. Electrical Specifications: CAUTION: RISK OF FIRE Use MAX 600 watt, type G9.5 lamp rated 110-120V or 220-240V. Power: 6A @ 110-120V ~ 50/60Hz or 3A at 220-240V~ 50/60Hz. Isolate electrically before re-lamping. F X Do not mount on flammable material. Environmental Specifications: Maximum Ambient Temperature: 40ºC / 104ºF. Maximum External Surface Temperature: 180ºC / 356ºF. Minimum Distance to Flammable Objects: 1 meter / 3.28 ft. ------1m Minimum Distance to Lighted Objects: 1 meter / 3.28 ft. Nexera LX User Manual Updated March 2009 Page 22 Model 2580LX: Nexera LX Wash - CDM Features: • • • • • • Dimensions: • Height (with yoke attached): 549 mm / 21.7 in. • Width (with yoke attached): 271 mm / 10.7 in. • Length (with yoke attached): 525 mm / 20.7 in. Weight: 10.5 kg / 23 pounds • • Precise, tool-free lamp optimization. Integral safety cable mount on fixture. Precision milled aluminum construction. 6” borosilicate Fresnel lens. No fans for silent operation. Integral Color Module provides a nearly infinite color palette plus mechanical dimming via fourchannel DMX control. 150W compact CDM light source. Standard 7.5-inch accessory holders. Utilizes PS-150, PS-300, or PS600 Power Supplies. Legendary Wybron reliability. Made in the USA. Electrical Specifications: CAUTION: RISK OF FIRE Use MAX 150 watt, type M142 lamp rated 110-120V or 220-240V. Power: 4A @ 110-120V ~ 50/60Hz or 2A at 220-240V~ 50/60Hz. Isolate electrically before re-lamping. F X Do not mount on flammable material. Environmental Specifications: Maximum Ambient Temperature: 40ºC / 104ºF. Maximum Exterior Surface Temperature: 90ºC / 194ºF. Minimum Distance to Flammable Objects: 1 meter / 3.28 ft. ------1m Minimum Distance to Lighted Objects: 1 meter / 3.28 ft. Nexera LX User Manual Updated March 2009 Page 23 Model 2600LX: Nexera LX Profile – CDM Features: • • • • • • • Dimensions: Height (with yoke attached): 549 mm / 21.6 in. Width (with yoke attached): 302 mm / 11.9 in. • • Length (with yoke attached): 526 mm / 20.7 in. • Weight: 11.3 kg / 24.9 pounds • • 25º-40º beam adjustment. Precise, tool-free lamp optimization. Integral safety cable mount on fixture. Precision milled aluminum construction. Zoom adjust detents at 30° and 36° for quick setup. No fans for silent operation. Integral Color Module provides a nearly infinite color palette plus mechanical dimming via fourchannel DMX control. 150W compact CDM light source. Standard 6.25-inch accessory holders. Utilizes PS-150, PS-300, or PS600 Power Supplies. Legendary Wybron reliability. Made in the USA. Electrical Specifications: CAUTION: RISK OF FIRE Use MAX 150 watt, type M142 lamp Power: 4A @ 110-120V ~ 50/60Hz or 2A at 220-240V~ 50/60Hz Isolate electrically before re-lamping F X Do not mount on flammable material Environmental Specifications: Maximum Ambient Temperature: 40ºC / 104ºF Maximum External Surface Temperature: 90ºC / 194ºF Minimum Distance to Flammable Objects: 1 meter / 3.28 ft Minimum Distance to Lighted Objects: 1 meter / 3.28 ft Nexera LX User Manual Updated March 2009 Page 24 Model 2640LX: Nexera LX 19º-26º Profile – Tungsten 22.6” (573mm) 20.9” (532mm) Features: • • • • • • • Dimensions: • Height (with yoke attached): 549 mm / 21.6 in. • Width (with yoke attached): 302 mm / 11.9 in. Length (with yoke attached): 573 mm / 22.6 in. • • 19º-26º beam adjustment Precise, tool-free lamp optimization. Integral safety cable mount on fixture. Precision milled aluminum construction. No fans for silent operation. Integral Color Module provides a nearly infinite color palette via three-channel DMX control. Philips® 575W compact tungsten, high CRI source (GLA/GLC). Standard 6.25-inch accessory holders. Utilizes PS-150, PS-300, or PS600 Power Supplies. Legendary Wybron reliability. Made in the USA. Weight: 11.3 kg / 24.9 pounds Electrical Specifications: CAUTION: RISK OF FIRE Use MAX 600 watt, type G9.5 lamp rated 110-120V or 220-240V. Power: 6A @ 110-120V ~ 50/60Hz or 3A at 220-240V~ 50/60Hz. Isolate electrically before re-lamping. F X Do not mount on flammable material. Environmental Specifications: Maximum Ambient Temperature: 40ºC / 104ºF. Maximum External Surface Temperature: 180ºC / 356ºF. Minimum Distance to Flammable Objects: 1 meter / 3.28 ft. ------1m Minimum Distance to Lighted Objects: 1 meter / 3.28 ft. Nexera LX User Manual Updated March 2009 Page 25 Model 2650LX: Nexera LX 19º-26º Profile - CDM 22.6” (573mm) 20.9” (532mm) Features: • • • • • • • • • Dimensions: Height (with yoke attached): 549 mm / 21.6 in. Width (with yoke attached): 302 mm / 11.9 in. • • 19º-26º beam adjustment. Precise, tool-free lamp optimization. Integral safety cable mount on fixture. Precision milled aluminum construction. No fans for silent operation. Integral Color Module provides a nearly infinite color palette plus. mechanical dimming via fourchannel DMX control. 150W compact CDM light source. Standard 6.25-inch accessory holders. Utilizes PS-150, PS-300, or PS-600 Power Supplies. Legendary Wybron reliability. Made in the USA. Length (with yoke attached): 573 mm / 22.6 in. Weight: 12.0 kg / 26.5 pounds Electrical Specifications: CAUTION: RISK OF FIRE Use MAX 150 watt, type M142 lamp. Power: 4A @ 110-120V ~ 50/60Hz or 2A at 220-240V~ 50/60Hz. Isolate electrically before re-lamping. F X Do not mount on flammable material. Environmental Specifications: Maximum Ambient Temperature: 40ºC / 104ºF. Maximum External Surface Temperature: 90ºC / 194ºF. Minimum Distance to Flammable Objects: 1 meter / 3.28 ft. ------1m Minimum Distance to Lighted Objects: 1 meter / 3.28 ft. Nexera LX User Manual Updated March 2009 Page 26 Fixture Setup and Configuration Installing the Lamp DANGER Disconnect fixture from line voltage before replacing lamp. CAUTION Lamp and lamp mounting surfaces are hot! Allow lamp to cool before replacing. Lamp Specifications Nexera LX Tungsten Units Lamp socket / base: G9.5 Part # ANSI Watts Volts Lumen Output Life(h) Color Temp 287391 GLC 575 115 15,500 400 3200º K 294322 GLA 575 115 13,500 1500 3100º K 363721 GKV 600 230 15,000 400 3200º K 363739 GLB 600 230 13,000 1500 3100º K Nexera LX CDM Units: Part # CDM150T6830 Lamp, CDM 150W with UV Fade Block. Disconnect fixture from AC power. Remove lamp cap by unscrewing both thumbscrews and pulling the lamp assembly straight back out of the fixture. Grasp lamp by the base and remove from heat sink lamp holder. CAUTION Touching the lamp glass can reduce lamp life. Handle new lamps with a clean cloth. Fingerprints can be cleaned off lamp glass with alcohol and a clean cloth. Install a new lamp by firmly inserting the lamp into the lamp socket. Verify lamp is fully seated by looking through the hole in the side of the lamp socket. Nexera LX User Manual Updated March 2009 Page 27 Lamp Optimization The Nexera LX lamp position system consists of four knobs. This system allows changes made to the Z axis to occur without disturbing the X \ Y axis settings. Turn on Nexera LX and aim at a flat surface. Use the three X \ Y axis adjustment knobs to center the lamp in the reflector. Rotating one of the X \ Y knobs clockwise will draw the lamp closer to the knob. Using two knobs together moves the lamp along a vector between the knobs. Use the center knob to adjust the lamp Z axis for a maximally flat field. Mounting and Adjusting Fixture Adjusting the C-clamp The C-clamp provides a means for installing Nexera LX on a mounting pipe. It also allows the user to rotate the position of the fixture. Connect C-clamp to the yoke with the yoke bolt and washer. Hang C-clamp on mounting pipe and secure with the C-clamp pipe bolt. Nexera LX can be rotated to the desired position by loosening the pan screw, setting the position, and tightening the pan screw to hold the position. Adjusting the Yoke The Nexera LX yoke provides two height positions and allows pitch adjustment of the fixture. To adjust yoke height, remove both yoke adjustment knobs and spacers. Set desired yoke height and install spacers and adjustment knobs. Set desired tilt position and secure by tightening the yoke adjustment knobs. Nexera LX User Manual Updated March 2009 Page 28 Attaching Accessories to the Front Holder Nexera LX can accept up to two standard accessories (7.5” for the wash, 6.25” for the profile). Accessories are safely held in place with a standard spring-loaded latch. From the front of the fixture, push the accessory retaining latch to the right. After the latch locking pin clears, move the latch up. Load the accessory then push the latch to the right and down to hold the accessory in place. The spring will engage the locking pin in the fixture. Retaining latch Connecting AC Power CAUTION Be sure the fixture is properly grounded. Don’t touch the sparking parts. Accessory holder Use a good source of AC power that complies with local building and electrical codes and has both overload and ground fault protection. If the Nexera LX fixture was received without an AC lamp cord plug attached, attach the appropriate lamp cord plug according to the following code: Tungsten units (Model 2560, 2570, 2640, 2650) CDM units (Model 2580, 2600) green and yellow – ground/earth green and yellow – ground/earth tan – neutral blue – neutral tan – line brown - line Be sure that the AC power source is appropriate for the lamp being used. Adjusting Field Angle Field angle can be adjusted on the Nexera LX wash light. Loosen the Fresnel adjustment knob. Move the Fresnel back to increase field angle, or forward to reduce the field angle. Tighten the Fresnel adjustment knob to secure desired field angle. Fresnel adjustment knob Nexera LX User Manual Updated March 2009 Page 29 The Nexera LX System The Nexera LX gets power from the PS-150, PS-300, or PS-600 Power Supply. The DMX512 control signal from the lighting board is connected to the Power Supply and can be daisy-chained to additional PS Power Supplies or other DMX-controlled devices. The Power Supply sends both power and control signal to the Nexera LX and any other devices on a single cable. The Power Supplies listed below can power the corresponding number of Nexera LX units. Description Nexera LX - Tungsten Nexera LX - CDM Model 2560, 2570, 2640 2580, 2600, 2650 PS-150 8 6 PS-300 16 12 PS-600 32 24 See the following section on Head-Feet Restrictions for maximum number of units and distances for a single daisy chain. CAUTION The Nexera LX is not compatible with the RAM system! DO NOT connect Nexera LX to RAM Power Supplies, or RAM products to PS Power Supplies. The warranties will not cover damage from such action. PS-150 Power Supply Nexera LX Nexera LX Nexera LX Nexera LX Nexera LX AC Power DMX512 DMX control console Nexera LX User Manual Updated March 2009 Page 30 Head-Feet Restrictions Head-Feet is defined as “the sum of cable lengths from each Nexera LX unit to a single power supply output.” The Head-Feet parameter is a method of accounting for the voltage drop in the power/signal cable caused by the current drawn by each color module. To help understand this issue, think of it as water pressure (voltage) in a hose (cable) where you have multiple water sprinkler heads (Nexera LX units). If the hose (cable) is too long, or there are too many sprinkler heads (color modules), the water pressure (voltage) will be too low. Use the following equation to determine total Head-Feet: Head-Feet = [(A)+(A+B)+(A+B+C)+….] where: A = Cable length from power supply to first color module B = Cable length between first and second color module C = Cable length between second and third color module and so on. The maximum Head-Feet for each of the Nexera LX fixtures is as follows Model 2560Nexera LX Wash - Tungsten Model 2570Nexera LX Profile - Tungsten Model 2640Nexera LX 19º-26º Profile - Tungsten Model 2580Nexera LX Wash - CDM Model 2600Nexera LX Profile - CDM Model 2650Nexera LX 19º-26º Profile - CDM Head-Feet Example A 100 feet 1500 Head-Feet max. 1500 Head-Feet max. 1500 Head-Feet max. 1500 Head-Feet max. 1500 Head-Feet max. 1500 Head-Feet max. Nexera LX Nexera LX Nexera LX B 25 feet C 20 feet D 25 feet Nexera LX In the figure above, four Nexera LX fixtures are daisy-chained off of the same power supply output. Using the equation given above, total Head-Feet can be calculated as follows: Nexera LX User Manual Updated March 2009 Page 31 Head-Feet = [(A)+(A+B)+(A+B+C)+(A+B+C+D)] = [(100) + (100 + 25) + (100 + 25 + 20) + (100 + 25 + 20 + 25)] = [100 + 125 + 145 + 170] = 540 Head-Feet Since total Head-Feet (540) is less than the maximum (1500), this is a valid configuration. DMX Setup and Operation Controls and Indicators Nexera LX has controls and indicators as follows: A three character seven-segment display. Four push buttons: Menu, (+), (-), and Enter. Power (red) and signal (green) indicator LEDs. The seven-segment display shows the address number (1 – 509) and the speed mode (hi S – lo S). It also displays any error messages, which will be covered in a later section. The Menu button allows you to switch between address and mode select. Pressing the Enter button saves the current address or mode setting before switching. The (+) button allows you to increment Nexera LX’s address when in address mode or toggle between high and low speed in speed mode. Changes are recorded in non-volatile memory immediately, and the display flashes for 10 seconds to indicate that a change has been made. The (-) button allows you to decrement Nexera LX’s address when in address mode or toggle between high and low speed in speed mode. Changes are recorded in non-volatile memory when the ENTER button is pressed. Nexera LX User Manual Updated March 2009 Page 32 The Enter button stops the display from flashing after changing the address or speed. The red LED power indicator remains lit as long as there is power at the PC board. The green LED flashes when a signal is present. It turns off 60 seconds after the last button press. The ISP programming port allows the user to reprogram the unit as new software revisions become available without having to disassemble the unit. See “Reprogramming via the ISP port” in the Service section of the manual for instructions on upgrading Nexera LX software. Nexera LX User Manual Updated March 2009 Page 33 Menu Tree and Navigation loS … hiS … SHi To change Nexera LX’s start address, press the Enter button until the display shows XXX, where XXX is a number between 01 and 509. Use the (+) button to increment the address. (Address number loops from 509 to 1 when incremented.) Use the (-) button to decrement the address. (Address number loops from 1 to 509 when decremented.) Press Enter to save setting, or allow Nexera LX to automatically save the setting after 10 seconds. Nexera LX offers super high, high, and low speed settings. Super high speed color changes are complete in one second or less. High speed color changes are complete in two seconds or less. Low speed is completed in four seconds or less. Press Enter until the display shows XXX, where XXX is either lo, hi, or shi. Use the (+) or (-) buttons to toggle between the speeds. Press Enter to save the setting, or allow Nexera LX to automatically save the setting after 10 seconds. Nexera LX User Manual Updated March 2009 Page 34 Display Messages Displayed for two seconds after power up, indicating the version (F) and revision (9) of software installed in the unit. Indicates that the unit is initializing the dichroic filter positions. Indicates the unit’s starting channel. Channel number flashes when changed. Indicates Nexera LX is in high-speed mode. Speed setting flashes when changed. Indicates Nexera LX is in low speed mode. Speed setting flashes when changed. (Flashing) Indicates that the unit is performing a brief startup self test. (Flashing) Indicates that motor one has encountered an error and has stopped moving. (Flashing) Indicates that motor two has encountered an error and has stopped moving. (Flashing) Indicates that motor three has encountered an error and has stopped moving. (Flashing) Indicates the unit reads a voltage of lower than 17 volts. The unit will stop operating at 16 volts. (Flashing) Indicates that the unit attempted to write a value to EEPROM and was unable to do so. The unit will continue to function. (Flashing) Indicates that the serial number in the unit has been erased. The unit will create a random serial number and continue to function normally. Blank Unit is running, no error conditions exist, and it has been longer than 60 seconds since last button press. Nexera LX User Manual Updated March 2009 Page 35 Service Lamp Replacement DANGER Disconnect fixture from line voltage before replacing lamp. WARNING Lamp and lamp mounting surfaces are hot! Allow lamp to cool before replacing. Disconnect fixture from AC power. Remove lamp cap by unscrewing both thumbscrews and pulling the lamp assembly straight back out of the fixture. Grasp lamp by the base and remove from heat sink lamp holder. CAUTION Touching the lamp glass can reduce lamp life. Handle new lamps with a clean cloth. Fingerprints can be cleaned off lamp glass with alcohol and a clean cloth. Install a new lamp by firmly inserting the lamp into the lamp socket. Verify lamp is fully seated by looking through the hole in the side of the lamp socket. Cleaning the Reflector ! WARNING ▲ To avoid burns or damage to the fixture, allow fixture to cool before cleaning. Remove the lamp cap by unscrewing both thumbscrews and pulling the lamp assembly straight back out of the fixture. Separate the front and rear barrel halves by removing the four screws from the front barrel as indicated in the picture. Leaving the reflector installed in the rear barrel, use clean pressurized air to clean dust from the reflector surface. If necessary, use a soft cloth and alcohol to clean the reflector surface. Mate the front and rear barrels and secure in place with four screws. Replace lamp cap. ! CAUTION ▲ Harsh chemicals and rough cloth can damage the coating on the reflector. Replace damaged reflectors. Nexera LX User Manual Updated March 2009 Page 36 Cleaning the Color Module Remove the color module from the front barrel by removing four screws indicated in the figure. Use a DMX source and a PS Power Supply to command all color filters to 0% DMX. Using the DMX source command the magenta filter up into the color module aperture so the top of the filter is at the top of the aperture. Clean the exposed filter surfaces with a clean cloth and alcohol. Command the magenta filter higher to expose more of the filter and clean with alcohol. After the entire magenta filter has been cleaned, command it back to 0% and repeat for the remaining color filters. Install the color module in the front barrel with the XLR connectors facing the rear of the unit. Replace the four mounting screws. Cleaning the Lenses Remove the color module from the front barrel by removing four screws indicated in the figure in the “Cleaning the Color Module” section above. Set the color module aside. Separate the front and rear barrel halves by removing the four screws from the front barrel as indicated in the picture. Set the rear barrel aside. Remove the Fresnel lens screw and washers. Back the Fresnel knob 90% out. Using the knob, tilt the Fresnel lens out toward the front of the fixture. Grasp the edge of the Fresnel lens and back the knob the rest of the way out. Tilt the Fresnel lens between the accessory brackets and remove the lens. The accessory brackets can be removed to ease extraction of the Fresnel lens. Use clean pressurized air to remove dust from the lenses. Clean the condenser and Fresnel lens with a soft cloth and an ammonia based cleaner. Reinstall the Fresnel lens by tilting lens back into position in the barrel. Nexera LX User Manual Updated March 2009 Page 37 Start the Fresnel lens washers and screw while holding the lens in alignment with the range slot. Start the Fresnel knob, then tighten the Fresnel screw, and finally tighten the knob. Mate the front and back barrels and secure with four screws. Replacing the Fuse The fuse is located on the same panel as the XLR connectors. Check the fuse if the unit does not operate and the red power indicator LED does not light when connected to a power supply. Use a 1.5A slow blow fuse only. Damage caused to the unit with the incorrect fuse installed is not covered under the warranty. Error Messages/Troubleshooting ErX Where X is 1,2, or 3. The indicated motor has encountered a problem that prevents it from completing the commanded move. Check for broken motor or encoder wires. Check for any foreign objects in the color module that might impede motion of the color filter. Check condition of the motor/lead screw belt. Check condition of the lead screw and lead screw nut. lo dc The processor is reading low board voltage. Check that Head-Feet restrictions are not exceeded. Check for damaged cable between the power supply and fixture. SEr Err The serial number was erased. Most likely occurred during reprogramming. Call Wybron technical support. EEP Err Nexera LX is unable to store channel and mode information in nonvolatile memory. Unit will operate, but will not remember settings after cycling power. Call Wybron technical support. Nexera LX User Manual Updated March 2009 Page 38 Appendix 1 Color Table DMX decimal Color # ---G110 G120 G155 G160 G180 G325 G330 G335 G450 G540 G650 G660 G690 G725 G790 G815 G847 G940 G950 G990 G995 L101 L105 L106 L110 L111 L115 L117 L118 L124 L126 L128 L132 L161 L179 L181 L201 L203 L204 R02 R09 R14 Color Name NO COLOR DARK ROSE BRIGHT PINK LIGHT PINK CHORUS PINK CHERRY BASTARD AMBER SEPIA CORAL SAFFRON PALE GREEN GRASS GREEN MED GREEN BLUEGRASS PRINCESS BLUE ELECTRIC BLUE MOODY BLUE CITY BLUE LIGHT PURPLE PURPLE DARK LAVENDER ORCHID YELLOW ORANGE PRIMARY RED MIDDLE ROSE DARK PINK PEACOCK BLUE STEEL BLUE LIGHT BLUE DARK GREEN MAUVE BRIGHT PINK MEDIUM BLUE SLATE BLUE CHROME ORANGE CONGO BLUE FULL CT BLUE 1/4 CT BLUE FULL CT ORANGE BASTARD AMBER PALE AMBER GOLD MEDIUM STRAW Cyan Chan 1 0 0 0 0 0 0 0 0 0 41 122 255 175 198 178 107 171 171 140 169 101 80 0 0 0 0 0 186 109 182 220 92 0 255 166 0 255 125 61 0 0 0 0 Magenta Chan 2 0 173 188 78 97 193 80 89 145 0 0 0 0 0 0 0 70 104 127 163 157 255 0 136 255 115 153 0 0 29 0 255 205 118 80 108 255 60 41 76 63 60 58 Yellow Chan 3 0 69 92 42 56 146 88 96 175 155 130 255 173 111 92 0 0 0 0 0 0 0 183 224 255 60 94 98 33 0 182 0 86 0 0 255 0 0 0 140 76 105 185 DMX% Cyan Chan 1 0% 0% 0% 0% 0% 0% 0% 0% 0% 16% 48% 100% 68% 78% 70% 42% 67% 67% 55% 66% 39% 31% 0% 0% 0% 0% 0% 73% 42% 71% 86% 36% 0% 100% 65% 0% 100% 49% 24% 0% 0% 0% 0% Magenta Chan 2 0% 68% 74% 30% 38% 76% 31% 35% 57% 0% 0% 0% 0% 0% 0% 0% 27% 40% 50% 64% 61% 100% 0% 53% 100% 45% 60% 0% 0% 11% 0% 100% 80% 46% 31% 42% 100% 23% 16% 29% 24% 23% 22% Yellow Chan 3 0% 27% 36% 16% 22% 57% 34% 37% 68% 61% 51% 100% 68% 43% 36% 0% 0% 0% 0% 0% 0% 0% 72% 88% 100% 23% 37% 38% 13% 0% 71% 0% 33% 0% 0% 100% 0% 0% 0% 55% 29% 41% 72% Nexera LX User Manual Updated March 2009 Page 39 R15 R21 R23 R26 R312 R318 R33 R344 R36 R383 R39 R44 R46 R48 R52 R55 R60 R64 R68 R69 R73 R83 R86 R89 DEEP STRAW GOLDEN AMBER ORANGE LIGHT RED CANARY MAYAN SUN NO COLOR PINK FOLIES PINK MEDIUM PINK SAPPHIRE BLUE EXOTIC SANGRIA MIDDLE ROSE MAGENTA ROSE PURPLE LIGHT LAVENDER LILAC NO COLOR BLUE LIGHT STEEL BLUE SKY BLUE BRILLIANT BLUE PEACOCK BLUE MEDIUM BLUE PEA GREEN MOSS GREEN 0 0 0 0 0 0 0 0 0 207 0 0 0 58 75 106 83 160 204 200 178 255 163 183 82 141 164 255 0 139 86 155 134 166 255 162 231 157 113 78 44 72 119 35 0 177 0 0 239 231 216 255 181 160 48 37 84 0 106 71 153 0 0 0 0 0 0 0 86 0 174 179 0% 0% 0% 0% 0% 0% 0% 0% 0% 81% 0% 0% 0% 22% 29% 41% 32% 63% 80% 78% 70% 100% 64% 72% 32% 55% 64% 100% 0% 54% 33% 61% 52% 65% 100% 63% 91% 61% 44% 30% 17% 28% 46% 14% 0% 69% 0% 0% 94% 91% 85% 100% 71% 63% 18% 14% 33% 0% 41% 27% 60% 0% 0% 0% 0% 0% 0% 0% 33% 0% 68% 70% R90 DARK YELLOW GREEN 212 0 192 83% 0% 75% Nexera LX User Manual Updated March 2009 Page 40 Warranty Information WYBRON, INC. warrants to the original owner or retail customer that for a period of one year from date of delivery of a portable system or energization of a permanently installed system (up to a maximum of 18 months from delivery) its products will be free from defects in materials and workmanship under normal use and service. Warranty does not cover any product or part of a product subject to accident, negligence, alteration, abuse, misuse or any accessories or parts not supplied by WYBRON, INC. Warranty does not cover "consumable" parts such as fuses, lamps, or color media. WYBRON, INC.'s warranty does not extend to items not manufactured by us. Freight terms on warranty repairs are FOB WYBRON, INC. factory or designated repair facility. Collect shipments or freight allowances will not be accepted. WYBRON, INC.'s sole responsibility under this warranty shall be to repair or replace at WYBRON, INC.'s option such parts as shall be determined to be defected on WYBRON, INC.'s inspection. WYBRON, INC. will not assume any responsibility for any labor expended or materials used to repair any equipment without WYBRON, INC.'s prior written authorization. WYBRON, INC. shall not be responsible for any incidental, general or consequential damages to property, damages for loss of use, time, profits or income, or any other charges. The owner's obligations during the warranty period under this warranty are to notify WYBRON, INC. at WYBRON, INC.'s address within one week of any suspected defect, and return the goods prepaid to WYBRON, INC. at their factory or authorized service center. This warranty is contingent on the customer's full and timely compliance with the terms of payment set forth in said purchase order. This warranty is expressly in lieu of any and all other warranties expressed or implied including the warranties of merchantability and fitness for a particular purpose and of other obligations and liabilities on our part. The owner acknowledges that no other representations were made to him or relied upon him with respect to the quality and function of the goods sold. This written warranty is intended as a complete and exclusive statement of the terms thereof. Prior dealings or trade usage shall not be relevant to modify, explain or vary this warranty. Acceptance of, or acquiescing in, a course of performance under this warranty shall not modify the meaning of this agreement even though either party has knowledge of the performance and a chance to object. Nexera LX User Manual Updated March 2009 Page 41