1
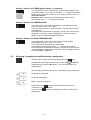
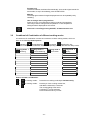
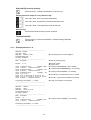
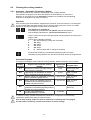
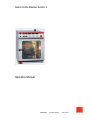
Salvis Combi-Steamer Evolino II Operation Manual SALVIS AG CH-4665 Oftringen www.salvis.ch Table of contents 1. Hints on operational safety .........................................................................................................4 1.1 Installation..................................................................................................................4 1.2 Operation ...................................................................................................................4 1.3 Exhaust air .................................................................................................................5 1.4 Condenser hood Option.............................................................................................5 1.5 Hand shower..............................................................................................................5 2. Control panel and functional description ....................................................................................6 2.1 Control panel Evolino II..............................................................................................6 2.2 Functional description of operating elements ............................................................6 2.3 Selecting / changing the multifunction key assignment.............................................8 3. Starting the Combi Steamer .......................................................................................................9 3.1 Input of operating data and start with only one cooking mode ..................................9 3.2 Combitronic® Combination of different cooking modes ............................................10 3.3 Core temperature control...........................................................................................11 3.4 Function: Delay start programming ...........................................................................11 4. Special Programs .......................................................................................................................12 4.1 HACCP (Option) ........................................................................................................12 4.1.1 Serial interface – connecting cable........................................................................... 12 4.1.2 Printing of protocols .................................................................................................. 12 4.1.3 Printed protocol in °C................................................................................................ 13 4.2 Cleaning the cooking chamber ..................................................................................14 4.2.1 Autoclean – Automatic self-cleaning (Option) .......................................................... 14 4.2.2 Delay start of Autoclean............................................................................................ 15 4.2.3 Manual Cleaning ....................................................................................................... 15 4.2.4 Hints on operational safety ....................................................................................... 16 5. Preheat – Cool Down Active Temp ...........................................................................................18 6. Unit parameters ..........................................................................................................................19 6.1 Adjustment of operational parameters.......................................................................19 7. Valuable information ...................................................................................................................20 7.1 Error Message ...........................................................................................................20 7.2 Trouble Shooting........................................................................................................21 8. End of operation .........................................................................................................................21 9. Cleaning and maintenance .........................................................................................................22 10. Accessories - Optional Extras ....................................................................................................23 Legend = LED = Pilot lamp Version 1.0 Part No. 502483 12/07 Execution as from 1.4.2008 Oftringen, 12.8.2008 kus -2- Dear customers, Please read these operation instructions carefully, before starting to work with the Combi-Steamer. They contain important information on correct installation and operation. Functional method of the convection steamer Combi-steamers work with steam, combi-steam (combining the two media hot air and steam) or convection (hot circulating air) depending on the cooking mode selected with steam. The combi-steamer enables you to prepare all food items carefully, economically and simultaneously. COOKING MODES Steaming Steaming is the best, most delicate and protective cooking mode. Food is cooked gently in a constant temperature, surrounded by steam. Combi Cooking A combination of the two modes steaming and convection. This means less shrinkage especially with roasts. Convection The convection cooking mode is suitable for cooking all food which should be crispy and brown. Roasting, grilling, baking. Multifunction key „M“ Assignment options for multifunction key: Regeneration, LT Cooking, Delta-T Cooking , -3- 1. Hints on operational safety Use for intended purpose The appliance shall only be used for its intended purpose, namely the professional preparation of food. 1.1 Installation Follow the local regulations of the electricity supply companies and observe the instructions for the installation of kitchen equipment in accordance with the actual standard specifications. Electrical connection must be performed by an approved electrician. 1.2 Operation Caution: The outer surfaces become hot in operation The convection steamer shall only be operated by trained staff for its intended purpose, as outlined in this operation manual when there are no defects. Danger of burning: When opening the door hot air and steam escapes. Caution! Hot fluid in container CAUTION! When loading containers with liquids or cooking products which become liquid during cooking, ensure you use a level that you can look into the container. If the protecting glass cover of the illumination is defective, the appliance shall not be started. Call the after-sales service. In case of operating trouble, disconnect the convection steamer from mains, close water tap and call the after-sales service. Repair and maintenance work on the unit shall only be performed by technical service staff trained by factory. Please call the factory and ask for name and address of a competent after-sales service. To avoid accidents the door lock must be removed when dismantling the appliance. -4- 1.3 Exhaust air A built-in cooling device cools down the water of condensation to the correct temperature and then it is drained. It is not imperative to install the appliance under a ventilation hood. In case, however, such a ventilation hood is used, its design and power ranges should comply with the appropriate regulations. If, in such case an exhaust air hose is connected, it must not be longer than 4 m. Make sure that no water trap is developing. Excessive steam should escape freely, consequently do not block the exhaust air pipe. 1.4 Condenser hood Option The condenser hood is controlled fully automatically by the combi steamer. During the cooking process cooking vapours are condensed by passing air-cooled platecondensers. 1.5 Hand shower The appliance is equipped with a hand shower, fixed underneath the door. Water runs only when the oven is switched on. How to work the shower: Pull it out. Hold the hose with one hand and press the push button with the other hand whilst cleaning. How to roll the shower back: Let it slowly roll up, it winds up automatically. Push button Hand shower with hose The shower should only be used for rinsing the oven cavity. Do not ever use it for cleaning the outer surfaces. Water stop The water supply to the hand shower can be interrupted as follows: 1. Switch off the appliance 2. Keep the following keys pressed simultaneously , and restart with . The hand shower is switched off and appears as 313 as acknowledgeable message. 3. If you want to change again, switch off and repeat the procedure as describe – see 2. It is possible to continue working with the combi steamer if the shower is switched off. Call the after-sales service for repair. -5- 2. Control panel and functional description 2.1 Control panel Evolino II ON / OFF Steaming ON / OFF Man. Steaming / PreHeat/Cool down 2.2 Combi-Cooking Convection Clima Aktiv® M-Key Time Temperature Core temperature Knobs Functional description of operating elements ON/OFF Press key, Combi-steamer now ready for work, key is lit oven chamber illuminated, Displays indicate: LED cooking mode "steaming" is lit Time 0:00, Temperature 99°C / 210°F Core temperature - OFF If you press again, Combi-steamer is switched off, this key is dark and all LEDs and displays are off as well. Start/Stop This key starts or stops cooking processes. LED is flashing in program flow. Cooking mode STEAMING Press this key to select steaming. LED is lit. Temperature display indicates automatic basic setting of 99°C / 210°F Temperature range 30° - 130°C / 85° - 260°F Cooking mode COMBI STEAMING Press this key to select combi-cooking. LED is lit. Temperature display indicates automatic basic setting of 130°C / 260°F Temperature range 30° - 250°C / 85° - 480°F Cooking mode CONVECTION Press this key to select convection, LED is lit, Temperature display indicates automatic basic setting of 150°C / 300°F Temperature range 30° - 300°C / 85° - 570°F . -6- “Manual steaming”/ “Active Temp” As long as the key is pressed, water evaporates in the cooking compartment. Selection possible in the modes Combi steaming, Convection, and LT Cooking. With the Active Temp function, the cooking compartment of the combisteamer is brought to a preselected set point temperature. If the cooking compartment temperature is below the set point value, the heating is switched on. If the temperature is too high for the subsequent cooking program, the steamer is cooled down. “Clima-Aktiv®” Clima-Aktiv® de-humidification control can be activated during every operating mode except Steaming. Briefly press the active operating mode. Press the “Clima-Aktiv®” key – the LED lights up. With Clima-Aktiv® activated, steam escapes from the cooking compartment, and the cooking climate becomes drier. The key for humidity control can be used in the operating modes Combi steaming and the special modes Banquet / Regeneration, LT Cooking, and DeltaT Cooking. Pressing the key several times permits various stages between 1 and 5 to be selected. Higher stages give higher humidity. “M” Multifunction Selection: Manual steaming / Active Temp key together with 'M' key Assignment options: Regeneration LT Cooking Delta-T Cooking Key assignment is done as described in Section 2.3. “M” key assigned for “Regeneration” rE Press key. LED lights up. The temperature display shows 140°C (automatic default setting). Temperature range: 90°C to 180°C. Additional functions Steaming and humidifying. “M” key assigned for “LT Cooking” Lt Press key. LED lights up. The temperature display shows 80°C (automatic default setting). Temperature range: 30°C to 120°C. Additional functions Steaming and humidifying. “M” key assigned for “DeltaT Cooking” dt Press key. LED lights up. The temperature display shows 40°C (automatic default setting). Entry field: Temp. 20°C to 80°C; Core temp. 0°C to 99°C. Additional functions Steaming and humidifying. -7- Display + Rotary knob TIMER (digital display, 3 characters) Turn rotary knob to set the cooking time of the selected cooking mode from 0:00 minutes to 24.0 hours. Turn left for * ---* continuous operation. Display up to 10 hours in minutes 10.0), from 10.1 (10 hours 10 min.) in 10-minute intervals. B models: When working with core temperature control, time is automatically set to * - - - * Continuous operation. Display + Rotary knob TEMPERATURE Turn rotary knob to set cooking temperature of the selected cooking mode from 30° to 300°C / 85° - 570°F As long as the heating is on, a red dot down in the right hand corner of the display is lit. Once this knob is turned while a program is running down, the ACTUAL temperature in the oven cavity is displayed for 3 seconds. Then the display returns to the set DESIRED temperature. Display + Rotary knob CORE TEMPERATURE Core temperature control can be used with all cooking modes. Temperature range 20° - 99°C / 70° - 210°F Turn rotary knob to set desired core temperature. Time display indicates automatically * - - - * Continuous operation. Once this knob is turned while a program is running down, the ACTUAL core temperature is displayed for 3 seconds. Then the display returns to the set DESIRED temperature. 2.3 Selecting / changing the multifunction key assignment Selection and changing the required assignment of the key is possible within the range for manual entry. Press the and M keys simultaneously to open the M memory – this is accompanied by an audible signal. Use the rotary knob time to select one of the following key assignments: rE Lt dt Regeneration: display rE NT Cooking: display Lt, Delta-T Cooking: display dt Pressing the M key saves the selected assignment, which is confirmed by an audible signal. memory is possible at any time by means of the An exit from the ON/OFF key. -8- 3. Starting the Combi Steamer Prior to start: Open water tap! In case the ambient temperature is lower than + 5°C / +41°F, the oven must be warmed to room temperature. Press ON/OFF, key is lit, oven chamber illuminated, the oven is ready for work. Program display indicates c1, basic setting is steaming, temperature display indicates 99°C. 3.1 Input of operating data and start with only one cooking mode Select desired mode by pressing corresponding key, LED is lit. Steaming, Combi-Steaming, Convection, Multifunction key Set TIME with corresponding rotary knob. Set TEMPERATURE with corresponding rotary knob Upon selection of cooking mode corresponding basic setting is displayed Core temperature control Core temperature control can be used with all cooking modes. Temperature range 20° - 99°C / 70° - 210°F Set desired core temperature with rotary knob. The time display indicates * - - -*. Charge the oven Stick core probe into the centre of the product Function Clima-Aktiv® (Humidity Control) Can be used with all cooking modes except "steaming" Press mode key briefly, then key Clima-Aktiv ® , LED is lit. Press Start/Stop LED Start/Stop is flashing, LED of cooking mode starts flashing. As occasion demands press touch key for manual humidification Not with cooking mode steaming. Program under process Time runs down backwards, the colon in the time display is lit. If available and in use (B-models) , core temperature display indicates the DESIRED core temperature. Time display shows *---* continuous operation. If the door is opened during program flow, fan motor and heating switch off, the timer stops. Program continues if door is shut again. Program flow may be stopped by pressing Start/Stop key. A broken off program restarts with the originally set data. -9- Program end The Combi-steamer switches off automatically. An acoustic signal sounds for 30 seconds, to stop it immediately, press START/STOP. Memory The last program entered is again displayed and can be repeated just by restarting. How to change data in program flow Press touch key of corresponding cooking mode and change data: Use rotary knobs to change time, temperature or core temperature. Changed data is displayed but not stored.. If the unit is cut off by pressing ON/OFF, all data entered is lost. 3.2 Combitronic® Combination of different cooking modes A Combitronic ® combination consists of a maximum of three cooking modes, which run down in the following fixed sequence. Steaming, Combi-Steaming, Convection, Multifunction key Whatever cooking mode is selected, set the corresponding cooking data with the rotary knobs. Cooking mode 1 Steaming x x x x x Cooking mode 2 Combi steaming x x x x x Cooking mode 3 Cooking mode 4 Convection x x x x x x x M-Key x x x x x x x x x x x How to activate a combination: + 2 Cooking modes: Press the two cooking mode keys simultaneously. + 3 Cooking modes: Press keys of two cooking modes first, + and add the third within 5 seconds. The corresponding LEDs are lit. Combitronic® is now activated. Press START/STOP key to start. - 10 - 3.3 Core temperature control Core temperature control can be used with all cooking modes. However, make sure to enter always higher core temperatures in following steps, since the oven switches automatically off, once the highest core temperature is reached. 3.4 Function: Delay start programming This function allows to have an entered or stored program or a combination automatically started within a period of up to 24 hours. Enter or call a program or Combitronic ® combination and load the oven. Program "delay start" Keep START/STOP key pressed (about 3 seconds) until 0:00 in the time display is flashing. Use the rotary knob "time" to set the period of time after which this program is supposed to start. Example: set to 5.00 = the oven will start the entered program after 5 hours. Press START/STOP. While the time is running down backwards, the LED in this key is flashing. The oven starts the entered program automatically once the time has run down. Cancel "delay start" Keep START/STOP key pressed (about 3 seconds) until the indication on the display returns to normal program mode. For hygienic reasons do not keep food too long at room temperature! - 11 - 4. Special Programs 4.1 HACCP (Option) The integrated HACCP control facilities care for recording during the cooking process for each program the exact actual data for time, temperature and core temperature. All processed cooking programs are stored, once the selected cooking time has run down or if the cooking process was terminated by pressing the Start/Stop key. Programs which were broken off are not stored and programs with cooking times of less than one minute are not stored either. A standard serial interface connector has been mounted under the control panel and data may be printed by means of connecting the steamer to a printer capable of printing at least 40 characters per line. Printer adjustment: 9600, N, 8, 1. The port for the cable connection is on the right side of the control panel. 4.1.1 Serial interface – connecting cable Controls Plug No. EXTERN 9pin. Min-D bushing Function: RS 232 C Serial Interface (9600, N, 8, 1) 9600 BAUD, 8 databit, EVEN PARITY, 1 STOPBIT Bushing top view TxD (send data) Paper end Î GND Connect printer Init. Printer DRT n.b. Setting of DIP Switch Thermal Printer NP 104 1. Parallel Interface (DIP Switch 1) 1 2 3 4 5 6 7 8 2. Serial Interface (DIP Switch 2) 1 2 3 4 ON ON OFF OFF Switch 1 2 3 4 5...7 8 4.1.2 SOLL CR/LF: Carriage Return + LineFeed 40 Columns Normal Character Normal Zero German Not defined Switch 1 2 3, 4 SOLL Parity Check Even Parity 9600 bps Printing of protocols The connecting cable shall only be plugged or unplugged if both, the steamer and the printer, are switched off, otherwise the control unit or the printer may be damaged The appliance must be switched on with no program in progress. Any exact HACCP recording presupposes the correct setting of the real time. Refer to Sec. 6.1. - 12 - Start HACCP protocol printing: Press touch key “manual humidification“ for about 3 sec Printing protocols always for one production day. Turn rotary knob “time“ and set the desired day. Turn rotary knob “temperature“ and set the desired month. Turn rotary knob “core temperature“ and set the year. Start printing: Press START/STOP and the protocol is printed Terminate HACCP: Press touch key “manual humidification“, the basic setting reappears automatically. 4.1.3 Printed protocol in °C ----------------------------------------------------------------Serial No. :100100 Unit type : GXC Print date : 15.09.07 16:00 Total operating hours : 1 CT every 3 minutes ----------------------------------------------------------------Date : 15.09.2007 Product: : 8 15:00 15:10 15:20 15:30 15:40 15:40 15:45 16:00 16:30 9 1 Nominal 99°C 1 00:10 h Hold time 2 Nominal 130°C 2 00:10 h Hold time 3 Nominal 150°C 3 CT °C :67 3 CT °C 20 23 26 29 3 CT °C 43 46 49 51 3 00:00 h Hold time Humidity 100% 00:10 h Humidity 15% 00:10 h Humidity 0% 31 34 37 40 54 57 60 63 66 00:45 h Total energy consumption: 1,4 kWh ----------------------------------------------------------------- Î Total operating hours of the appliance Î Date of cooking program ÎProgram number Î Program start Î Cooking mode Steaming = 100% Humidity Î Cooking mode Combisteaming = 15% Humidity Î Cooking mode Convection = 0% Humidity Î Recording of core temperature every 3 minutes Î Hold time - period the set temperature was hold. Î Energy consumption of the program ----------------------------------------------------------------Serial No. 100100 Unit type GXB Print date 15.07.07 16:00 Total operating hours 1 CT every 3 minutes ----------------------------------------------------------------Date : 15.09.2007 Product LT 15:00 1 Nominal 99°C Humidity 15% 15:10 1 00:10 h Hold time 00:10 h Total energy consumption: 0,5 kWh ----------------------------------------------------------------- - 13 - Î Cooking mode LT cooking = 15% Humidity 4.2 Cleaning the cooking chamber 4.2.1 Autoclean – Automatic self-cleaning (Option) Autoclean provides a fully automatic self-cleaning of the cooking chamber. Once started, the program runs down and switches off automatically. As soon as the appliance is connected and once Autoclean is installed in accordance with the following instructions, the appliance is ready for cleaning. Operation Prior to starting the combi-steamer equipped with Autoclean, open the water tap. A sound signal announces that either the water supply is shut or else the water pressure is too low. For safety reasons do not start the appliance under these circumstances. + The appliance is switched off At first keep de-humidification and ON/OFF pressed simultaneously until the display indicates A1. The function Autoclean is active. Use the rotary knob to select the appropriate cleaning program according to the degree of dirt. Choose from 6 different programs 1. A 1 Quick washing, rinsing with clear water 2. A 2 Step 1 3. A 3 Step 2 4. A 4 Step 3 5. A 5 Step 4 6. In Start-up (after refill or change of canisters) Press START/STOP key, the selected cleaning program runs down. Start/Stop key keep pressed, the start time Autoclean can be pre-programmed. Autoclean Programs According to the degree of dirt inside the cooking chamber, different programs can be chosen Display indicates Degree of dirt inside the cooking chamber Approximate Duration Program steps A1 Quick rinse in case of very light soiling or during the day in between. 2 min. Quick rinsing with clear water A2 Light soiling from preparation of several lots of vegetables and meat products s. 45 min. Soak, 1x Clean, Rinse, Dry A3 Medium soiling from preparation of several lots of roasted and grilled product. 1 hour 15 min. Soak, 2x Clean, Rinse, Dry A4 Heavy soiling from repeated cooking of vegetables and repeated preparation of roasted and grilled products. 1 hour 45 min. Soak, 3x Clean, Rinse, Dry A5 Extreme soiling from practically constant preparation of roasted and grilled products with burnt-in food remainders. 2 hours 15 min. Soak, 4x Clean, Rinse, Dry In In case of first installation or exchange/refilling of canisters. 2 minutes In case the cooking chamber temperature exceeds 80°C, the appliance is automatically cooled down thanks to its safety cool-down function. Prior to start cooking, make sure that no remainders of cleaning and rinsing agent are left inside. If necessary, use the hand shower for a final rinsing! - 14 - 4.2.2 Delay start of Autoclean It is possible to have the cleaning started automatically within a period of up to 24 hours. Start/Stop key keep pressed. Start Time can be pre-programmed. The Autoclean program is recorded. Preparing of Autoclean protocols presupposes the correct setting of the real time and date. See Sec. 6.1 and make sure, the correct date and time is set. 4.2.3 Manual Cleaning Perfect and regular cleaning of the combi steamer is of utmost importance. Reheating old grease and/or food leftovers will impair taste and smell of fresh dishes considerably. How to start the cleaning program Keep key pressed and switch on by pressing Indication in the display of the core temperature control. Press to start the cleaning program. The unit is cooled down or heated up to prescribed values (temperature max. 60°C/140°F) and softens leftovers. Is flashing in the time display, an acoustic signal announces that the prescribed values are reached. Open the door, the sound signal stops. Spray special cleaner into the oven cavity. We recommend using only special Salvis cleaning agent. This product was developed especially for the use in combi steamers, it was tested and approved. If you use other products, the sealing and the interior of the cooking chamber may be damaged by corrosion. Please observe the manufacturer's operating instructions. Close the door and leave the cleaner to work. Burnt-in fat and food leftovers are moistened. Is flashing in the time display as soon as the softening time has run down, there is again a sound signal. Open the door and rinse the cooking chamber thoroughly with clear water, use the hand shower. Is indicated in the time display, once the door is closed. The cooking chamber is drying. Is indicated in the time display, a sound signal announces that the oven cavity is dry Is indicated in the core temperature field, announcing the end of the cleaning program. Is indicated in the core temperature display in case of a power failure. Turn the corresponding rotary knob, the indication disappears. Press to switch on and continue working Combi steamers Evolino may be equipped with a hand shower. This should only be used for rinsing the interior but not for outer surfaces. Do not spray into a hot oven cavity. In case cleaning agent remains in the cooking chamber, this may cause corrosion problems. It may also influence food products. Dry the inside, and then leave the door open by a small gap, so that the cooking chamber is well ventilated. Do not damage thermostat sensor when cleaning! - 15 - 4.2.4 Hints on operational safety Please do observe carefully the detailed installation instructions. We prescribe to use cleaner MULTI-CLEAN special and the rinse-agent MULTI-CLEAN. These products have been produced and tested especially for this use. All safety devices inside the unit have been designed to the use of these products in order to comply with the standard specifications of the drinking water supply. The factory bears no liability for any damages caused by the use of any other cleaning products (cleaner and rinse agent) than mentioned above. Exchange of canisters respectively refilling of cleaner and rinse agent Observe the directions of the manufacturer and wear suitable protective clothing, gloves and glasses. For safety reasons, the door must not be opened during an Autoclean cleaning program. Cleaner, rinse agent, hot water and steam may escape. If it is absolutely necessary to open the door, the Autoclean program must be stopped. If the oven is not used for a longer period of time, rinse the whole Autoclean system thoroughly with lukewarm water to avoid cloggings caused by cleaner and rinseagent remainders. Remove screwing from the canisters and clean the tube ends and the filter in a warm water basin. Start Autoclean step Start-up and rinse the appliance until no more cleaner is remaining inside the tubes and the cabinet. Preparation for cleaning Prior to starting a cleaning program make sure that there is sufficient cleaner and rinse agent in the respective canisters. Visual control. If not, the canisters must be exchanged or refilled. Make sure to use the correct connections, red to cleaner, blue to rinse agent. Make sure that the cooking chamber is empty. - 16 - Connections Refer to the dimensioned sketch for connections of cleaning and rinse agent. This label on the unit marks the position of these connections. Cleaner Rinse agent ª ª Use the supplied clamp straps to attach the hoses of the canisters to the prepared connections of the unit. Red for the cleaner and blue for the rinse-agent. Place the canisters so that they are easily accessible for replacement or refilling. Connection of cleaner and rinse agent: Observe the directions of the manufacturer and wear suitable protective clothing, gloves and glasses. In case you need longer hoses than supplied, order them under Article No. (on request) Make sure to place the two canisters lower or at the same level as the combisteamer. Maximum vertical range from canister to connection = 1,50 m. Maximum hose length = 10 m. Remove the lids of the two canisters (cleaner and rinse agent) and screw the screw cap with hose to the respective canister. Red for the cleaner and blue for the rinse agent. Exchange of canisters If not enough cleaner or rinse agent is left in the canisters, these must be refilled or exchanged. Make sure to connect correctly. Red to cleaner and blue to rinse-agent ! Interruption of a cleaning program The following safety precautions are taken to prevent that residues of cleaner and rinse-agent remain in the cooking chamber, in case a program is interrupted. Once a cleaning program was interrupted, the appliance can only be re-started after having finished a rinsing process. Interruption due to power failure or disconnection with key START/STOP AC Once the power is back, the display indicates AC. Press START/STOP key now, to start an extra rinsing . Door For safety reasons, the door must not be opened during the cleaning program. Cleaner, rinse-agent, hot water and steam may escape. If exceptionally the door has to be opened, Autoclean must be stopped beforehand. - 17 - 5. Preheat – Cool Down Active Temp The steamer should always be pre-heated or cooled down before cooking. The Preheat function is used to bring the cooking compartment of the combi-steamer to a preselected temperature. If the compartment temperature is below the set value, the heating is switched on. If the temperature is too high for the subsequent cooking program, the unit is cooled down. In the following procedural description, the shorter term Preheat will be used instead of Preheat - Cool. Manual preheating Manual preheating is done at a temperature that is 10 % above the setpoint temperature of the cooking program. − The function is selected via the Preheat key. − After selection of a cooking program (standard or customized), Preheat is selected by pressing the key. Now press the Start/Stop key; the Preheat LED flashes, the time display shows “Prh”, and the temperature display shows the active setpoint temperature (including the +10%). − When the higher PreHeat temperature has been reached, an acoustic signal is given, the time display shows Prh, and the temperature display shows End. − The acoustic signal is repeated regularly until the door is opened. − Place food in the steamer and close the door; the program starts automatically. − If the door is opened during preheating, the Preheat sequence is interrupted. − After closing the door again, Preheat is continued until the required temperature is reached. − The preheat temperature is maintained for max. 1 hour. − Aborting the preheating procedure with the Preheat key will start the first cooking step immediately. - 18 - 6. Unit parameters 6.1 Adjustment of operational parameters All operational parameters are correctly set when the Combi-Steamer is delivered. However, if it is necessary to change time and date (summer/winter time, incorrect setting) proceed as follows: The unit must be switched on but with no program Set the time to 1:23 and press the key “Manual humidification“ for about 2 seconds. Adjust the different parameters at the panel in accordance with the table below. Display time Knob Level Pos Description Display temperature Knob Min Max 1 1 1 1 1 1 1 1 1 1 1 1 1 1 1 101 Hours 102 Minutes 103 Day 104 Month 105 Year 106 Format Date 107 Summer/winter time switch 108 Notation °C,°F 109 Language 110 Beep duration Program end 111 Beep duration cooking step end 112 Show Mode 113 Internal light off – door open 114 Address of appliance 115 Protocol core temperature 0 0 1 1 0 0 0 0 0 0 0 0 0 0 0 23 59 31 12 99 1 1 1 1 999 10 1 1 99 30 1 117 No Cool-Down 0 1 1 118 Disconnectible hand shower 0 1 Display core temperature Knob Standard ServicePrg sec sec Adjustment 00-23 00-59 1-31 1-12 0-99 0 = DMY24; 1:DMY2 0: off; 1: Europe 0: °C ; 1: °F 0: German; 1: English 30 sec 0 0: off; 1: on 0: off; 1: on sec Protokoll Typ 1 0: Cool-Down enabled 1: Cool-Down disabled 1= Hand shower on 0= Hand shower off After all parameters have been set, respectively changed, press START/STOP. The unit is again ready for work, time display indicates 0:00 and temperature display 99°C. - 19 - 7. Valuable information 7.1 Error Message Error Description Reaction, error remedy Err001 Doors open Pause! Close doors or remedy defect on door switch. Err113 Core temperature sensor no signal. Warning! (Delete by turning knob) Remedy sensor interruption on 1. Emergency operation with core temperature measurement is possible! Err114 Core temperature sensor no signal. Warning! (Delete by turning knob) Remedy sensor interruption on 2. Emergency operation with core temperature measurement is possible! Err115 Core temperature sensor no signal. Warning! (Delete by turning knob) Remedy sensor interruption on 3. Emergency operation with core temperature measurement is possible! Err116 Core temperature sensor no signal. Warning! (Delete by turning knob) Remedy sensor interruption on 4. Emergency operation with core temperature measurement is possible! Err117 Water vapour elimination sensor, no signal Warning! Remedy sensor interruption on sensor. Operation with a defective sensor is possible! Err311 No water pressure. Cooking operation: Warning / autoclean: Pause Open water valve. Remedy too low customer-side water pressure. Check the pressure switch for proper functioning.Attention!. The appliance pauses in autoclean!. The appliance can be used without water in cooking operation! Err313 Hand shower is switched off. The hand shower is switched off and appears as acknowledgable message. - 20 - 7.2 Trouble Shooting If your Combi-steamer should not work properly, take the following list and try to help yourself. If you do not succeed, switch off, disconnect from mains, close water tap. Call the after-sales-service Failure Possible Cause ON/OFF touch does not Mains switched off light up, no interior lighting, Mains fuse has tripped the oven cannot be switched on Switch on mains fuse No steam generation Water tap closed Open water tap Water in the cooking chamber does not run off Drain clogged Remove drain-sieve and clean it, flush the drain Calcareous deposits on inner panels Water too hard. Watersoftener exhausted Correct installation Connect the oven to a watersoftener Regenerate water softener. Formation of rust in the cooking chamber Poor water quality Filter the water, follow the installation instructions Wrong cleaning agent Use the original product Remains of cleaning agent in the cooking chamber Wash the interior thoroughly and regularly. There are iron chips in the water supply system Remove all parts of unalloyed steel Steam escapes from door Switch on Door sealing exhausted, not Readjust the door latch enough contact pressure to the oven Door sealing defect. 8. Remedy Call the after-sales service End of operation Switch off, by pressing ON/OFF touch key. Close water tap. Disconnect the oven from the mains, if it is not to be used for a longer period of time. Attention when opening the door !! Hot steam is escaping. Open the door slowly and only a few centimetres first to let the steam escape. - 21 - 9. Cleaning and maintenance Perfect and regular cleaning of the Combi-steamer is of utmost importance. Reheating old grease and/or food leftovers will impair taste and smell of fresh dishes considerably. We recommend to use only special cleaning agents, in this case MULTI CLEAN special. This product was developed especially for the use in combi steamers, we tested and approved it. If you use other products, the sealing and the interior of the cooking chamber may be damaged by corrosion. Caring for the door sealing A door sealing is subject to wear. Proper care of sealing prolongs service life. − Grease and caustic cleaning agents attack and weaken the sealing material and thereby accelerate the rate of wear. − Chicken and pork grease are very aggressive. Please observe the following care instructions: − Manually clean the sealing daily with a mild grease solvent. − Use fresh water to remove any remaining cleaning agent. − Leave the door open overnight to allow the door sealing to relax. The door should also be left open when the appliance is not in use. − Inspect the sealing regularly for damage. Replace damaged sealing to prevent steam/air from escaping. − The sealing of appliances with Autoclean cleaning systems must also be cleaned by hand. Grease and cleaner deposits often collect on the outer side of the sealing. If these are not removed, the sealing decomposes at those places. − Use original cleaner when cleaning. Cleaning of door glasses The door is made of two parts. The inner glass can be opened for cleaning. Clean only with a soft cloth. Never use scouring agents. Cleaning of glass panes Clean only with a soft rag, do not ever use scouring agents. Cleaning of outer surfaces Use fat/grease dissolving cleaning agents or special stainless steel cleaners. Do not use water hose or high pressure sprayer on outer surfaces! A water jet may damage parts of the appliance or else water may get in touch with electric live parts. DANGER – personal injury caused by an electric shock. Cleaning of the grease/fat filter Cleaning the grease/fat filter should be daily routine. If heavily contaminated we recommend a cleaning bath or cleaning in a dishwasher. We strongly recommend to work with 2 filters, so that one filter can be immersed in a cleaning bath or dishwasher, while using the other one. Always rinse it thoroughly with fresh water. Cleaning of drip trays Clean both drip trays, the one on the door and the one underneath, at least weekly, respectively when necessary. - 22 - Cleaning the cooking chamber behind the air conducting sheet Clean weekly respectively according to contamination Switch off the appliance and allow to cool down Remove the grease/fat filter Remove the hang-in racks Remove the fixing screws of the air conducting sheet Remove the air conducting sheet Clean the drain filter. Clean the now accessible interior thoroughly After cleaning replace all parts removed in reverse order Autoclean nozzle Fastening screw Air conducting sheet Fat filter Hang-in rack Drip tray The appliance must not be started without the air conducting sheet.! 10. Accessories - Optional Extras Lower rack/support 6x2/3 open, 10 levels Wall brackets 6x2/3 1 pair Fat/grease filter Recommendation: Additional filter for changing Cleaning agent Original MULTI CLEAN special 1 l spray-pistol bottle 10 l refill bin Pressure pump sprayer Contents 1,5 l Grids GN 2/3 chromium plated or stainless steel Baking trays GN 2/3 20 mm stainless steel or enamelled aluminium perforated and/or silicone coated Pans GN 2/3 40, 65, 100 mm deep stainless steel or enamelled, perforated or closed - 23 - SALVIS AG Nordstrasse 15 CH-4665 Oftringen Phone +41 62 788 1818 Fax +41 62 788 1895 www.salvis.ch [email protected]