1
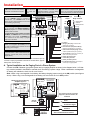
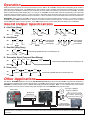
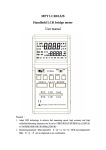
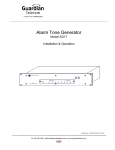
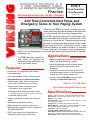
TECHNICAL
Practice
TELECOM SOLUTIONS
Practice
FOR THE
CTG-1
Clock Controlled
Tone Generator
2 1 S T C E N T U RY
January 9, 2004
Add Time Controlled Alert Tones and
Emergency Tones to Your Paging System
Viking's model CTG-1 is a clock controlled tone generator designed to provide accurately timed alert tones
or buzzer sounds over an existing paging system.
The CTG-1 can be programmed to output single, double or triple alert tones or buzzer sounds with up to 128
events in a 24 hour period. These tone/buzzer sounds
are ideal for indicating the start and end of shifts, break
times, lunch periods, etc. for factories, schools, or any
business requiring an audible indication of specified
times. Each day of the week can be programmed to
either on or off, allowing you to turn off the alert tones during specific days of the week
(weekends, etc.)
The CTG-1 has three contact closure inputs for triggering an
emergency siren, evacuation signal or a door bell sound.
Features
• Accurate 24 hour digital time clock displays
hours and minutes
• User programmable 24 hour, 128 event timer
• Programmable day of week on/off feature
• Programmable single, double or triple alert
sound output (selectable tone or buzzer)
• Three contact closure controlled sounds:
1) Emergency siren (yelp) sound
2) Temporal (slow whoop) evacuation signal
*NFPA/ANSI compliant when used with supporting equipment
3) Doorbell (chime) sound
• Volume controllable, 600 ohm line level audio
output
• Non-volatile programming memory
• Battery backup for maintaining clock time
• Battery backup charging circuit for charging 9V
NiCad/NiMh batteries
• DPDT relay contacts for muting paging or
background music during event tones
Applications
• Signal the beginning and end of class periods,
breaks, and lunch periods for schools
• Signal the beginning and end of shifts, breaks,
and lunch periods for factories and other
businesses
• Provides a door bell and/or alarm sounds over
an existing paging system, for such applications
as door entry, fire, severe weather, etc.
• Use with Viking's DVA-2WA to provide timed
messages (Fax Back Document 110)
Phone...715.386.8861
h t t p : / / w w w. v i k i n g e l e c t r o n i c s . c o m
Specifications
Power: 120V AC/13.8V AC 1.25A UL listed adapter provided
Dimensions: 133mm x 91mm x 44mm (5.25” x 3.6” x 1.75”)
Weight: 0.9 Kg (2 lbs)
Environmental: 0°C to 32°C (32°F to 90°F) with 5% to 95%
non-condensing humidity
Connections: 10 position cage clamp terminal strip
Battery Backup: 9V alkaline or NiCad rechargeable battery
(not included) maintains clock time for over 8 hours
Time Base: 60Hz AC power line
Time Base Battery Backup Accuracy: +/- .001%
Audio Output: 600 ohm with volume adjust potentiometer, maximum level = 0.4 dBm/1.05Vrms across 600 ohm load
Relay Output: DPDT rated 125V AC, 30 W (resistive load)
Installation
Internal Battery Charge Jumper:
Factory set default is OFF. Note: For rechargeable batteries, move the Battery
Charge shunt to the ON position.
Display: Shows
clock, event time
and mode settings.
Mode Button: Press to place the
CTG-1 in the Lock, Set Time, Set Day,
Set Events or Review/Cancel modes.
Clock and Event Time Setting Buttons: Press
the + or -/CANCEL buttons to increase or
decrease time. The -/CANCEL switch is also
used to cancel an alert tone/buzzer sound event
when reviewing programming.
VIKING ©
CLOCK CONTROLLED
TONE GENERATOR
MODEL CTG-1
PM
+
MODE
Battery Charge
Secondary
Jumper
Relay Contacts
J6
ON
12:00
TIME
-/CANCEL
Internal Secondary Relay Contacts:
These activate in conjunction with pins 3, 4
and 5. You may solder to these PCB pads if
a second set of relay contacts are required.
OFF
3 Normally Open
1 Common
2 Normally Closed
LOCK
Alert Tones Programming Buttons: After setting an event time, press SINGLE, DOUBLE or
TRIPLE to program 1, 2 or 3 alert tones/buzzer
sounds for that event time.
Secondary Button Functions While in the SET
DAY Mode: The SINGLE button is used to select
between day (1-7) or on/off. The DOUBLE button is used as a one time setup to program
today’s day of the week.
SET TIME
SET DAY
ALERT TONES
SINGLE
DOUBLE
SET EVENTS
TRIPLE
REVIEW/CANCEL
1
9V BATTERY
BACKUP
2
3
4
5
6
7
8
9 10
ALERT TONE
VOLUME
10 - Common
9 - Emergency Siren (Yelp): Continuous while
shorted to pin 10 (common).
9V Battery Backup Connection: A standard
alkaline or rechargeable (NiCad/NiMh) 9V battery must be installed here to maintain the clock
time during power outages.
8 - Evacuation Sound (Temporal Slow Whoop):
Continuous while shorted to pin 10 (common).
7 - Doorbell Chime Sound (Ding Dong): Repeated
continuously while shorted to pin 10 (common).
6 - Alert Tone/Buzzer*: Short to pin 10 (common) for
buzzer sound, leave open for tones.
5 - Normally Open Relay Contact
CTG-1 Output Volume Control: Turn clockwise
to increase volume of alert tones/buzzer sounds,
emergency and door bell (chime) sounds (see
diagram below).
4 - Common Relay Connection
3 - Normally Closed Relay Contact
1 & 2 - 600 Ohm Audio Out Pair: Line level output,
connect to input of paging amplifier.
* Note: When the alarm buzzer is selected (pin 6 shorted to pin 10),
a double or triple programmed event will be sounded twice, approximately three seconds apart.
A. Typical Installation on the Paging Port of a Phone System
Connect the CTG-1 between your phone system and your paging amplifier as shown in the diagram below. A 9V battery must be installed in the CTG-1 to maintain clock time during a power outage. Either a standard or rechargeable
9V battery will maintain the clock time for over 8 hours.
Note: When using a rechargeable 9 volt battery, the battery charging jumper must be in the ON position (see diagram
above). When using a non-rechargeable 9 volt battery, this shunt must be in the OFF position.
PA-2A Paging/Loud Ringing
Amplifier System
VIKING ©
VIKING ©
CLOCK CONTROLLED
TONE GENERATOR
MODEL CTG-1
PM
PAGING
VOLUME
-/CANCEL
+
MODE
RINGING
VOLUME
LOCK
VIKING
ELECTRONICS
HUDSON, WI 54016
MIN
SET TIME
MIN
MAX
MAX
TRUNK / PAGING
PORT
PAGING
HORN
SINGLE
600 OHM
AUDIO OUTPUT
DRY CONTACT
CLOSURE INPUT
NIGHT TRANSFER
SWITCH INPUT
POWER 13.8V AC
1 2 3 4
5 6
7 8
9 10
POWER
4-6
DOUBLE
SET EVENTS
TRIPLE
REVIEW/CANCEL
9V
Battery
JP1
9V BATTERY
BACKUP
RINGING LINES
1-3
SET DAY
ALERT TONES
PAGING - LOUD RINGING
AMPLIFIER SYSTEM
TALK BATTERY
ALERT TONE
WARBLE / CHIME
12:00
TIME
MODEL PA-2A
1 2 3 4
1
2
ALERT TONE
VOLUME
3
4
5
6
7
8
9 10
Dry Contact Closures from Alarm
Equipment, Doorbell Switch, Etc.
Common
Volume
Control
Siren
Evacuation Signal
-or-
Doorbell
Input of
Paging Amp
Paging port
output of
PABX/KSU
Alert Tone/Buzzer Sound Select
(open = tones, closed = buzzer sounds)
Programming
A. Setting the Clock Time
1. Press the MODE button repeatedly until the SET TIME indicator lights.
2. Increase or decrease the clock time by pressing the + or -/CANCEL button until the desired time is displayed.
3. Leave the set time mode by pressing the MODE button.
Note: Either the + or -/CANCEL button MUST be pressed at least once prior to leaving the set time mode. The clock
will then start to run the moment you leave the set time mode, allowing you to synchronize the CTG-1 with your building clocks.
B. Setting the Day of the Week
Note: This step is only required if you want to turn off the Alert Tones on certain days of the week.
1. Press the MODE button repeatedly until the SET DAY indicator lights.
2. A flashing “A” indicates all 7 days of the week are “on” and today’s week day has not been set. The day of the week
has already been set if a flashing number (1-7) and “on” or “of” are displayed.
3. Select today’s day of the week using the TIME (+ and -/CANCEL) buttons. As a general rule, Sunday is day 1 and
Saturday is day 7. When the correct day of the week is flashing on the display, set it by pressing the DOUBLE alert
tone button. The week day number and “on” will now be displayed.
Note: The day of the week setting is a one time set up and does not need to be reset unless you have experienced a
brown out long enough to discharge the 9V battery backup (approximately 8 hours). To reset the day of the week, you
must power down the CTG-1, remove the 9V battery and repeat steps 1-3 above.
C. Turning the Alert Tones On/Off for Specific Days of the Week
1. Press the MODE button repeatedly until the SET DAY indicator lights. The current day of the week and “on” or “of”
will be displayed. “on” = alert tones are ON and “of” = alert tones are OFF for that day of the week .
2. Pressing the SINGLE button will toggle between flashing the day of the week and flashing “on” or “of”. The flashing portion of the display is the section that can be changed.
3. With the day of the week flashing, use the TIME (+ and -/CANCEL) buttons to select the day of the week you would
like to set to ON or OFF. When the correct day of the week is displayed, press the SINGLE button to flash “on” or
“of”. The day can then be set to ON or OFF by using the TIME (+ and -/CANCEL) buttons.
4. Review your day of the week programming by pressing the SINGLE button until the weekday (1-7) is flashing, then
increment through each day of the week with the TIME (+) button and monitor each day for its on or off setting.
Exit the SET DAY mode by simply pressing the MODE button.
D. Setting Timed Alert Tones
1. Press the MODE button repeatedly until the SET EVENTS indicator lights.
2. Increase or decrease the event time by pressing the TIME (+ or -/CANCEL) button until the desired time is shown.
3. Press one of the single, double, or triple ALERT TONES buttons to program that selected tone you wish to output
at the specific event time. A single, double, or triple confirmation beep should be heard.
Note: If more than 128 events have been entered, a long beep will be heard indicating that the event memory is full.
E. Reviewing and/or Cancelling Timed Alert Tones
1. Press the MODE button repeatedly until the REVIEW/CANCEL indicator lights.
2. Press one of the ALERT TONES buttons (single, double, or triple) repeatedly to rotate through the event times
associated with that alert tone button.
Note: Event times are stored in the order of programming, not chronologically.
3. Press the -/CANCEL button to permanently cancel an event tone. The next consecutive event for that specific
alert tone will then be displayed.
F. Adjusting Output Volume
1. Short pins 7 and 10 together. The door bell sound will then begin to chime.
2. Adjust the volume control potentiometer (see Installation section A).
G. Activating Contact Closure Alarm Tones
To activate different sounds, short the corresponding pins with a
dry contact closure as shown right (see Installation, section A).
Sound
Door Bell (Dong Dong)
...7 to 10
Note: While the appropriate contact closure is maintained the
sounds will be repeated continuously.
Evacuation Sound (Slow Whoop)
...8 to 10
Siren (Yelp)
...9 to 10
Short Pins...
H. Locking the CTG-1 for Operation
When finished programming, press the MODE button until the LOCK indicator lights. In the lock mode, the time and
alert tone keys will be disabled and the current time will be displayed with the colon flashing once per second.
Operation
When the clock time matches an event time and that day is set to “ON” or “A”, the CTG-1 will output the corresponding single, double or
triple alert tone or buzzer sound. The CTG-1 will also open terminals 3 and 4 (normally closed) and close terminals 4 and 5 (normally
open), allowing the capability of switching out the audio from the phone system and switching in the alert tone from the CTG-1. Similarly,
while a contact closure is made shorting pins 7, 8 or 9 to pin 10, the CTG-1 will continuously output the corresponding sound (door bell,
evacuation signal or emergency siren). In case of the siren or evacuation signal, terminals 3 and 4 will open, and terminals 4 and 5 will
close for the duration of the contact closure input. Terminals 3, 4 and 5 will return to their normal states at the end of each doorbell tone.
IMPORTANT: While operating, the CTG-1 continuously checks the event time information stored in memory. If a problem is detected,
the CTG-1 displays “EEE” to indicate an error. Normal clock function continues in the background. To clear the error, press any button
and the CTG-1 will return to normal operation. If the “EEE” display persists, contact Viking Technical Support at 715-386-8666.
Sound Output Specifications
A. Alert Tone (Bong)
1.2 sec
2.5 sec
2.5 sec
1.2 sec
1.2 sec
540
Hz
540
Hz
2.5 sec
On
Off
540
Hz
540 Hz
Single
540 Hz
B. Alert Buzzer
On
Off
3.4 sec
.8 sec
60 Hz
60 Hz
Single
.8 sec
.8 sec
3 second break
then repeated
a second time
60 Hz
540 Hz
Triple
Double
.6
sec
.6
sec
.6
sec
60
Hz
60
Hz
60
Hz
3 second break
then repeated
a second time
Triple
Double
C. Door Bell (Ding Dong)
On
Off
.8 sec
.3 sec
Continuously repeated while pin 7 is shorted to pin 10.
800 Hz
540 Hz
D. Evacuation Signal (Temporal Slow Whoop)
300 ms
300 ms
300 ms
1.5 second
Break
300 ms
On
Continuously repeated while pin 8 is shorted to pin 10.
Off
230 Hz
560 Hz
E. Siren (Yelp)
300 ms
300 ms
300 ms
On
Continuously repeated while pin 9 is shorted to pin 10.
Off
290 Hz
2500 Hz
290 Hz
2500 Hz
Other Applications
Use Viking's DVA-2WA Digital Voice Announcer (Fax Back Document # 110) in conjunction with a CTG-1 to provide time activated promotional voice messages over an existing paging system. The CTG-1 will be used only to provide time activated contact closures to the
DVA-2WA for initiating multiple (up to 7.5 minutes total length) promotional messages. Note: It is recommended that a UPS (uninterruptable power source) be used to maintain the proper message order in the DVA-2WA during a power outage.
Model CTG-1
Model DVA-2WA
Up to (3) 8 Ω Speakers
or (16) 45 Ω Speakers
Background
Music Source
The store will be closing
in 10 minutes. Please bring
all items to the check out...
- or To Input of Paging
Amplifier, Model M15W
shown (not included)
Due to the dynamic nature of the product design, the information contained in this document is subject to change without notice. Viking Electronics, and its affiliates and/or
subsidiaries assume no responsibility for errors and omissions contained in this information. Revisions of this document or new editions of it may be issued to incorporate
such changes.
Fax Back Doc 460
Printed in the U.S.A.
ZF300500 Rev E