1
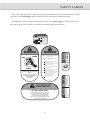
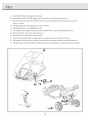
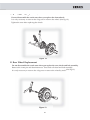
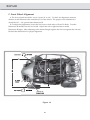
Owner's Manual Parts Manual READ THIS MANUAL CAREFULLY, IT CONTAINS IMPORTANT SAFETY INFORMATION. Dune Buggy MINIMUM RECOMMENDED OPERATOR AGE: 16 FOR OFF-ROAD USE ONLY This vehicle is designed and manufactured for off-road use only. USA only: It does not conform to Federal Motor Vehicle Safety Standards, and in regards to operation on public streets, roads, or highways is illegal. Hammerhead Off-Road Warranty Policy Limited Warranty for Dune Buggies Only Should warranty service be required on your unit during the warranty period, please contact your nearest authorized dealer for repairs. IMPORTANT! ALL UNITS MUST BE REGISTERED WITHIN 14 DAYS OF PURCHASE OR WARRANTY IS VOID. To register your product a copy of the Warranty Registration Card, Buyer Safety Agreement, and sales receipt must be forwarded to Hammerhead Off-Road. Your dealer, with your assistance, will complete and forward these items to Hammerhead Off-Road. A copy of the Warranty Registration Card and Buyer Safety Agreement is attached. It is your responsibility to confirm with your dealer within 14 days of purchase that your product has been registered. If you are unable to confirm with your dealer within 14 days of purchase that your product has been registered please contact Hammerhead Off-Road within 14 days of purchase or your warranty will be void. GENERAL WARRANTY POLICY Labor Warranty is covered for the first 90 days (THREE MONTHS) from the end consumer’s date of purchase. Most parts covered under your warranty, except for the frame and engine, are covered for 30 or 90 days. Not all parts are covered. Contact your dealer for details or questions about a specific part. Warranty Parts are covered according to the schedule below from the end consumer’s date of purchase. All warranty paperwork must be received within 14 days of repair. WARRANTY PARTS COVERAGE Warranty starts from the date of purchase by end consumer: FRAME: ENGINE: CARBURETOR: MUFFLER: A-ARM, SPINDLES, AXLES: ELECTRONICS: BATTERY: SPEAKERS: SPEEDOMETER: TIRES & WHEELS: FENDERS: BRAKES: CLUTCH: SEATS: 1 year 180 days 90 days 90 days 90 days 90 days 30 days 30 days 30 days 30 days 30 days 30 days 30 days 30 days WHAT PARTS ARE NOT COVERED? GENERAL EXCLUSION: The warranty does not cover consumable and normal wear and tear items such as, but not limited to, throttle cables, brake cables, chains, bikini tops, fasteners, air filters, brake pads, tires, oil changes, and/or problems occurring due to a lack of scheduled maintenance or consumer abuse. Modification to the vehicle, including the use of performance parts or non-original parts, will void the warranty in its entirety, unless express written approval stating that the warranty will not be voided is obtained from Hammerhead. Defective parts are subject to recall by Hammerhead Off-Road upon failure and are required to be held by the dealer for 30 days from the time of the initial repair date. The warranty does not cover damage or faults caused by misuse, negligence, alterations, accidents or any abnormal use including the use of non genuine parts, renting or leasing, competition or racing. This warranty does not cover loss of use of the unit or loss of time, or inconvenience. NOTICE: All warranties are voided if the vehicle has been altered for use in racing or competition, rented, used under abnormal conditions, or subject to abuse, misuse, neglect or improper maintenance. Hammerhead Off-Road is not liable for any damage claim or liability claim, personal or otherwise resulting from operation of the vehicle in any way. All warranty parts nd will be shipped using UPS or Fed Ex ground ONLY. If the warranty part needs to shipped 2 day air or shipped overnight, the ordering dealership will be responsible for all shipping fees. NOTICE: Hammerhead Off-Road reserves the right to change product specifications, designs, and standard equipment without notice and without incurring obligation. These vehicles are not designed or manufactured for racing or use on rental tracks, public streets, public roads, highways, paved surfaces, or right-of-ways. Always wear an approved helmet and eye protection when riding. Always secure loose clothing and long hair. Always utilize seatbelts. Please read the operators manual before usage and go over the Buyer Safety Agreement. FAQ’s: 1. FOR WHAT REASONS CAN MY WARRANTY CLAIM BE DISPUTED OR DENIED? Warranty can be denied because of an out of warranty date, the unit was not a Hammerhead Off-Road unit or the Warranty Registration Card was not submitted to Hammerhead Off-Road within 14 days of purchase. The warranty does not apply to any part, which in opinion of seller was defective because of improper maintenance, improper assembly, alterations, abuse, negligence, or accident. The warranty does not cover loss of use of the seller vehicle, loss of time, inconvenience, or any other consequential damage which includes, but is not limited to, loss or damage to person or property or any expense of returning any damaged units to the seller, distributor, or its authorized dealer. Also, see above. 2. DOES HAMMERHEAD OFF-ROAD OFFER AN EXTENDED WARRANTY? No, Hammerhead Off-Road does not offer any type of extended warranty. 3. IS MY KART STILL UNDER WARRANTY IF I HAVE OWNED IT FOR 1 YEAR BUT PUT ONLY 6 HOURS OF DRIVING TIME ON IT? Warranty is base on the exact date of purchase, not based on how many hours it has been used. Hammerhead Off-Road Warranty Registration Form Registration Terms & Conditions: In order to activate the warranty, please follow the instructions below: 1) Make a copy of the Bill of Sale 2) Make a copy of Pre-Delivery Checklist 3) Make a copy of Buyer-Safety Agreement 4) Fill out warranty card and send with all above documents to: Hammerhead Off-Road Attn: Warranty Registration 1200 Lakeside Parkway Ste. 325 Flower Mound, TX 75028 Or, Fax to 214-513-1738 Or, ON-LINE at www.hammerheadoffroad.com under dealer’s only section Hammerhead Off-Road Warranty Registration Card (Must be sent in with a copy of sales receipt and Buyers Safety Agreement) VIN# _____________________________________Model: ______________ Dealer Name: __________________________________________________ Dealer Address: ________________________________________________ City: _________________________ State: ________ Zip:_______________ Customer Name: ________________________________________________ Customer Address: ______________________________________________ Customer City: __________________ State: __________________________ Customer Phone: ________________ Email: _________________________ Date of Purchase: ______________________________________________ I Certify that all information provided is true and correct to the best of my knowledge. I understand the exceptions and limitations of the warranty coverage. Customer Signature:_________________________ Date: _______________ Hammerhead Buyers Safety Agreement (1/2) - ______Always read the owner’s manual carefully before riding and follow the operating procedures described in the owner’s manual. - ______Pay close attention to all warnings contained in the manual and on all labels. - ______These vehicles are designed for riders of ages 5 through 8 for 50cc, 9 through 15 for 80cc, 16 and older for 150cc, 18 and older for 250cc, 400cc, 500cc. - ______Both the parent and the child must fully understand everything in the owners manual before riding. - ______Always wear a helmet, face shield, boots, gloves, and protective clothing while riding. - ______Beginners should receive training from a certified instructor. - ______It is illegal to ride this vehicle on public roads or highways. - ______Do not allow your child to ride without supervision. - ______Do not ride under the influence of drugs or alcohol. They can affect your judgment and slow your reaction time. - ______Always maintain a safe distance between your vehicle and vehicles around you. - ______Never ride this vehicle unless it has been properly adjusted and maintained. - ______Never run the engine in closed areas. The exhaust gas contains poisonous carbon monoxide. - ______Do not touch any part of the engine, muffler, or the exhaust system during or immediately after operation of the vehicle. - ______Always check for obstacles before operating in a new area. - ______It is highly recommended that this vehicle should not be driven at night or during dark periods - ______Never attempt to operate over large obstacles, such as large rocks, or fallen trees. Always follow proper procedures when operating over obstacles as described in this manual. Hammerhead Buyers Safety Agreement (2/2) - ______Always be careful when skidding or sliding. On extremely slippery surfaces such as ice, go slow and be very cautious in order to reduce the chance of skidding or sliding out of control. - ______Never do wheelies, jumps or any stunts. - ______Never operate the vehicle in fast flowing water. Remember that wet brakes may reduce your stopping ability. Test your brakes after leaving the water. If necessary, apply those several times to let friction dry out the linings. - ______Always use the size and type of tires specified in this manual. proper tire pressure as described in this manual. - ______All modifications to this vehicle should be made by a qualified mechanic. Modification to the vehicle, including the use of performance parts or non-original parts, will void the warranty in its entirety, unless express written approval stating that the warranty will not be voided is obtained from Hammerhead. - ______When transporting the machine in another vehicle, be sure that it is kept upright and that the fuel cock is in the “off” position. Otherwise, fuel may leak out of the carburetor or the fuel tank. - ______Always follow the break-in-period as described in the owner’s manual. Not following the break-in period will void the engine warranty. - ______Always clean the air filter as described in the owner’s manual. Improper maintenance of the air filter will void the engine warranty. Always maintain Failure to follow all warnings and unsupervised or irresponsible operation can cause serious injury or death. By initialing each item on the above checklist, I have indicated my complete understanding of these points, and I acknowledge my responsibilities regarding the contents. I also agree to explain the points on this checklist to anyone besides myself who will be operating the vehicle now and/or in the future. __________________________________ Dealer’s Signature __________________________________ Print Store Name _________________________________ Buyer’s Signature _________________________________ Print Buyer’s Name __________________________________ _________________________________ Date Date __________________________________ _________________________________ VIN Number Model CONTENTS OWNER' S MANUAL Page 1. FOREWORD ------------------------------------------------------------------------------------------------------------------------------------------------------------------ 1 2. A FEW WORDS ABOUT SAFETY --------------------------------------------------------------------------------------------------------------------------------------- 2 3. IMPORTANT SAFETY INFORMATION --------------------------------------------------------------------------------------------------------------------------------- 3 4. SAFETY LABELS ------------------------------------------------------------------------------------------------------------------------------------------------------------- 5 5. ARE YOU READY TO DRIVE ? ------------------------------------------------------------------------------------------------------------------------------------------ 6 6. SAFE DRIVING PRECAUTIONS ---------------------------------------------------------------------------------------------------------------------------------------- 8 7. P.D.L------------------------------------------------------------------------------------------------------------------------------------------------------------------------------ 10 8. SPECIFICATIONS ------------------------------------------------------------------------------------------------------------------------------------------------------------ 11 9. OPERATION -------------------------------------------------------------------------------------------------------------------------------------------------------------------- 13 10. OPERATION/SERVICE INSTRUCTIONS------------------------------------------------------------------------------------------------------------------------------ 17 11. SERVICE INSTRUCTIONS------------------------------------------------------------------------------------------------------------------------------------------------- 18 12. REPAIR-------------------------------------------------------------------------------------------------------------------------------------------------------------------------- 21 13. PERIODICAL CHECK AND SERVICES ------------------------------------------------------------------------------------------------------------------------------ 23 PARTS MANUAL Fig 1. CYLINDER HEAD ASSY. -------------------------------------------------------------------------------------------------------------------------------------------------- Fig. 1 2. CYLINDER ASSY. ----------------------------------------------------------------------------------------------------------------------------------------------------------- Fig. 2 3. CRANKCASE ASSY. ------------------------------------------------------------------------------------------------------------------------------------------------------- Fig. 3 4. CRANKCASE ASSY.(2) ---------------------------------------------------------------------------------------------------------------------------------------------------- Fig. 4 5. CRANKSHAFT CON'ROD &PISTON ASSY. -------- ---------------------------------------------------------------------------------------------------------------- Fig. 5 6. CAMSHAFT ASSY. ---------------------------------------------------------------------------------------------------------------------------------------------------------- Fig. 6 7. LEFT COVER ASSY. ------------------------------------------------------------------------------------------------------------------------------------------------------ Fig. 7 8. FAN COVER AND SHROUD ASSY. ----------------------------------------------------------------------------------------------------------------------------------- Fig. 8 9. OIL PUMP ASSY. ----------------------------------------------------------------------------------------------------------------------------------------------------------- Fig. 9 10. DRIVEN PULLEY AND CLUTCH SUBASSY. ----------------------------------------------------------------------------------------------------------------------- Fig.10 11. TRANSMISSION ASSY. -------------------------------------------------------------------------------------------------------------------------------------------------- Fig.11 12. ELECTRIC SYSTEM ----------------------------------------------------------------------------------------------------------------------------------------------------- Fig.12 13. ELECTRIC STARTER ASSY. ------------------------------------------------------------------------------------------------------------------------------------------- Fig.13 14. DRIVE PULLEY SUBASSY. -------------------------------------------------------------------------------------------------------------------------------------------- Fig.14 15. CARBURETOR ------------------------------------------------------------------------------------------------------------------------------------------------------------ Fig.15 16. FRAME GROUP ---------------------------------------------------------------------------------------------------------------------------------------------------------- Fig.16 17. STEERING SHAFT ASSY. --------------------------------------------------------------------------------------------------------------------------------------------- Fig.17 18. SUSPENSION ARM ASSY. -------------------------------------------------------------------------------------------------------------------------------------------- Fig.18 19. REAR CARGO RACK/SEAT/BELT ---------------------------------------------------------------------------------------------------------------------------------- Fig.19 20. REAR SWING ARM ASSY. UPPER --------------------------------------------------------------------------------------------------------------------------------- Fig.20 21. ENGING/MUFFLER/AIR CLEANER -------------------------------------------------------------------------------------------------------------------------------- Fig.21 22. REAR SWING ARM ---------------------------------------------------------------------------------------------------------------------------------------------------- Fig.22 23. REAR HOUSING -------------------------------------------------------------------------------------------------------------------------------------------------------- Fig.23 24. WIRE HARNESS/ELECTRICAL ------------------------------------------------------------------------------------------------------------------------------------- Fig.24 25. REVERSE ASSY. --------------------------------------------------------------------------------------------------------------------------------------------------------- Fig.25 FOREWORD Thank you for purchasing our dune buggy. We hope you will enjoy it. Before you start to operate the Dune Buggy, please read through this Owner's Manual carefully as it contains important safety and maintenance information. Failure to follow the warnings contained in this manual can result in serious injuries or death. Be sure to follow the recommended maintenance schedule and service your Dune Buggy accordingly. Preventive maintenance is extremely important to the longevity of your Dune Buggy. ȱȱȱȱȱȱȱȱ¢ȱȱȱęȱȱ before and during initial use of the dune buggy. It is also recommended to practice in a large open area and familiar with operations of this dune buggy. We hope you will have a pleasant experience with our products and thanks again for choosing our Dune Buggy. 1 A FEW WORDS ABOUT SAFETY In order to keep everyone safe, you must take responsibility for the safe operation of your Dune Buggy. To help you make informed decisions about safety, we have provided operating procedures and other information on labels and in this manual. This information alerts you to potential hazards that could hurt you or others. It is not practical or possible to warn you about all hazards associated with operating or maintaining a Dune Buggy. You must use your own good judgment. ȱȱȱȱȱ ȱęȱȱ¢ȱȱȱȱ¢ȱȱǰȱDZ Safety Labels _ On the Dune Buggy. Safety Messages _ Preceded by a safety alert symbol and one of two signal DZȱWARNING, or CAUTION. These signal words mean: WARNING Physical harm may result from failure to adhere to the instructions that are described within the WARNING labels. Safety Headings — such as Important Safety Reminders or Important Safety Precautions. Safety Section — such as Dune Buggy Safety. Instructions — how to use this Dune Buggy correctly and safely. ȱȱȱȱęȱ ȱȱ¢ȱ—please read it carefully. 2 IMPORTANT SAFETY INFORMATION Your Dune Buggy will provide you with many years of service and pleasure.Providing you take responsibility for your own safety and understand the challenges you can meet while driving. There is much that you can do to protect yourself while operating your dune buggy. You'll ȱęȱ¢ȱȱȱȱȱǯȱȱ ȱȱȱ ȱ we consider most important. Follow the Age Recommendation Adult Supervision should be present for all people under the age of 16. Always Wear a Helmet ȱȱȱȱȇȱȱȱDZȱȱę¢ȱȱȱȱȱ¢ȱȱȱǯȱ Always wear an approved motorcycle helmet. We also recommend that you wear eye protection, sturdy boots, gloves, and other protective gear. ȱěȬȱ¢ ȱȱȱȱȱȱ¢ȱȱȱȱȱȱěȬȱȱ¢ǯȱȱȱȱȱ made for pavement, and the Dune Buggy does not have turn signals and other features ȱȱȱȱȱǯȱȱ¢ȱȱȱȱȱȱȱȱǰȱȱěȱȱ walk your Dune Buggy across. Take Time to Learn & Practice Even if you have driven other Dune Buggies, take time to become familiar with how this Dune Buggy works and handles. Practice in a safe area until you build your skills and get accustomed to this Bune Buggy’s size and weight. Because many accidents involve inexperienced or untrained drivers, we urge all drivers to take a training course approved by the Dune Buggy Safety Institute. Check with your dealer for more information on training courses. ȱȱȱěȬȱ £ ȱȱȱȱȱȱȱȱȱ¢ȱȱȱ ȱ¢ȱȱěȬǯȱ¢ȱ ȈȈȱȱȱȱ¡ȱǰȱȬěǰȱǰȱǰȱȱȱ£ǯȱ ¢ȱ keep your speed low enough to allow time to see and react to hazards. 3 IMPORTANT SAFETY INFORMATION Drive within Your Limits Pushing limits is another major cause of Dune Buggy accidents. Never drive beyond your personal abilities or faster than conditions warrant. Remember that alcohol, drugs, fatigue, ȱĴȱȱę¢ȱȱ¢ȱ¢ȱȱȱȱȱȱȱ safely. Don't Drink and drive ȱȱȱȱȱȱȱȇȱ¡ǯȱȱȱȱȱȱ¢ȱ¢ȱȱȱȱ ȱǰȱȱ¢ȱȱȱȱ ȱ ȱ¢ȱȱǯȱȱ ȇȱȱȱǰȱȱȇȱȱ¢ȱȱȱȱȱǯ Do not operate this Dune Buggy at night. ȱȱȱȱȱȱȱ¢ȱȱȱȇȱ¢ȱȱǯȱȱȱȱ is dangerous and can increase the possibility for an accident. Never run your Dune Buggy indoors. The exhaust from the engine contains a tasteless, odorless and poisonous gas called carbon monoxide. Keep away from moving parts of the Dune Buggy The operator of the Dune Buggy should never place their hands or other parts of their body near any moving part of the Dune Buggy. Failure to adhere to this warning will cause physicalharm to your body. Skidding or Sliding ȱȱȱȱȱȱȱȱȱȱȱȱěȱǯȱȱȱȱȱȱȱ¢ȱȱ ȱȱ¢ȱȱȱȱ ǰȱǰȱȱȱȱǯȱȱ¢ȱȱȱǰȱ¢ȱ ¢ȱȱȱȱǯȱȱȱȱȱ¢ȱǰȱȱ¢ȱȱ ȱ and drive carefully. 4 SAFETY LABELS This section presents some of the most important information and recommendations to help you drive your Dune Buggy safely. Please take a few moments to read these pages. The labels should be considered permanent parts of the Dune Buggyǯȱȱȱȱȱěȱȱ becomes hard to read, contact your dealer for warning label replacements. WARNING LONG NO WARNING THIS DUNE BUGGYCAN BE HAZARDOUS TO OPERATE if driven carelessly. INJURIES can result if you do not follow these instructions: NO RIDING WARNING Moving parts can crush and cut. Keep hands clear. Do not operate with guard removed. WARNING 3031112 READ OWNER'S MANUAL AND ALL LABELS BEFORE YOU OPERATE THIS DUNE BUGGY. NEVER OPERATE THIS DUNE BUGGY WITHOUT PROPER INSTRUCTIONS. Beginners require adult supervision. NEVER OPERATE THIS DUNE BUGGY ON PUBLIC ROADS. It is intended for off-road use only. ALWAYS WEAR AN APPROVED MOTORCYCLE HELMET, eye protection and protective clothing. WARNING 3031107 Loss of control, collision,or getting caught in moving parts can result in serious injuries. Adult supervison for under 16 years old Wear a D.O.T. approved motorcycle helmet Secure long hair and loose clothing Wear protective eye wear and clothing Keep arms, legs and feet inside dune buggy Do not use alcohol or drugs 5 3031105 303115 Seat Belt Must Be Worn At All Times NEVER ATTEMPT WHEELIES, JUMPS, OR OTHER STUNTS. CAUTION NEVER OPERATE THIS DUNE BUGGY AT EXCESSIVE SPEEDS. You increase your risk of losing control if you operate it at speeds too fast for the terrain, visibility conditions or your experience. THIS DUNE BUGGY MANUFACTURED FOR OFF-ROAD USE ONLY. DO NOT OPERATE ON PUBLIC STREETS, ROADS OR HIGHWAYS. ALL HAIR MUST BE TIED UP AND SECURED AT OR ABOVE SHOULDER LENGTH. ALL LOOSE CLOTHING MUST BE SECURED. ALL NECKLACES AND SCARVES MUST BE SECURED. WARNING HAIR ARE YOU READY TO DRIVE ? Before each drive, you need to make sure that you and your dune buggy are both ready to drive. To help get you prepared, this section discusses how to evaluate your driving readiness, what items you should check on your dune buggy, and adjustments to make for your comfort, convenience, or safety. ȱ¢ȱȱ¢ȱȱ¢ȱȱȱęȱǰȱ ȱȱ¢ȱDZ Read this owner's manual and the labels on your dune buggy carefully. Make sure you understand all the safety messages. Know how to operate all the controls. ȱȱǰȱȱDZ You wear your seat belt at all times while driving your dune buggy. You feel well and are in good physical and mental condition. You are wearing an approved motorcycle helmet (with chin strap tightened securely), eye protection, and other protective clothing. You don't have any alcohol or drugs in your system. Protective Apparel For your safety, we strongly recommend that you always wear an D.O.T. approved motorcycle helmet, eye protection, boots, gloves, long pants, and long-sleeved shirt or jacket whenever you drive. Although complete protection is not possible, wearing proper gear can reduce the chance of injury should you have an accident. The following suggestions will help you choose the proper protective gear. Helmets and Eyes Protection ȱȱȱȱȱȱȱ¢ȱȱȱȱȱȱȱȱȱěȱȱȱ ȱȱȱǯȱȱȱȱęȱ¢ȱȱ¢ȱȱ¢ǯ ȱȱȱȱȱȬȱȱěȱȱǰȱȱȱȬȱȱěȱǯȱȱ of the style, look for a D.O.T. (Department of Transportation) sticker on any helmet you buy. Always wear a face shield or goggles to protect your eyes and help your vision. WARNING Operating this dune buggy without wearing an approved motorcycle helmet, eye protection, and protective clothing could increase your chances of head and/or eye injury, and the possibility of death in the event of a severe accident. Always wear an approved motorcycle helmet that fits properly and wear eye protection (goggles or face shield), gloves, boots, long-sleeved shirt or jacket and long pants. 6 ARE YOU READY TO DRIVE ? Additional Driving Gear In addition to a helmet and eye protection, we also recommend: ȱȱȱȱ¢ȱěȬȱ¢ȱȱȱȱȱ¢ȱǰȱǰȱȱ ȱǯ ȱȱȱȱěȬȱ¢ȱȱȱȱȱ¢ȱǯ ȱȱȱȱȱȱ ȱȱȱȱǰȱȱȱ¢ȱ ȱȱ ǰȱȱȱ ȱȱȱȱȦȱǯ Driver Training ȱȱȱȱȱ¢ȱȱȱȱȱȬȱǯȱȱȱ¢ȱȱȱȱȱ ǰȱȱȱȱȱȱȱ ȱ ȱȱȱ¢ȱ ȱȱǯȱ ȱȱȱȱ¢ȱȱȱȱȱȱȱ¢ȱǯȱȱȱȱȱȱ ȱȱ¢ȱȱȱȱȱȱ¢ȇȱǰȱȱȱȱ ȱȱ £ȱȱ ǯ WARNING Operating this dune buggy without your seat belt could cause you to be thrown from the dune buggy, causing serious injury or death. No Alcohol or Drugs ȱȱȱȱǰȱȱȱȱȱȇȱ¡ǯȱȱȱȱȱȱȱȱȱ¢ȱ¢ȱ ȱȱȱȱ¢ȱ¢ǯȱ ǰȱȬȱȱȱȱ¢ȱȱ¢Ȭȱȱ ȱ ȱȱȱȱ¢ǯȱȱ¢ȱȱȱȱȱȱȱȱȱȱȱ ȱ¢ȱĞȱȱǯ WARNING Operating this dune buggy after consuming alcohol or drugs can seriously affect your judgment, cause you to react more slowly, affect your balance and perception, and could result in serious injury or death. Never consume alcohol or drugs before or while operating this dune buggy. IS YOUR DUNE BUGGY READY TO DRIVE? ȱȱȱȱȱȱǰȱȱȱȱȱȱ¢ȱȱ¢ȱȱȱȱ¢ȱȱ¢ȱ ęȱȱǯȱȱȬȱȱȱȱǰȱȱ¢ȱȱ¢ǰȱȱȱȱȱ ǰȱȱȱȱĚȱǰȱȱȱȱȱǯ ȱȱȱȱȱ¢ȱȱ¢ȱȱȱȱȱȱȱȱȱǰȱȱȱȱȱȱ¢ȱ ȱ¢ȱȱȱȱ¢ȱ¢ȱǯȱȱ¢ȱȱȱȱȱȱȱ¢ȱ ȱȱǯ WARNING Improperly maintaining this dune buggy or failing to correct a problem before driving can cause a crash in which you can be seriously hurt or killed. Always perform a pre-drive inspection before every drive and correct any problems. 7 SAFE DRIVING PRECAUTIONS ěȬȱȱ¢ ȱȱȱȱȱȱ¢ȱȱȱȱȱȱȱȱȱěȬȱȱ¢ǰȱȱȱȱ ȱǯȱȱȱȱȱȱěȱȱȱ¢ȱȱȱǯȱȱ should not drive your dune buggy on paved surfaces. WARNING Operating this dune buggy on paved surfaces may seriously affect handling and control of the dune buggy, and may cause the dune buggy to go out of control. Never operate the dune buggy on any paved surfaces, including pavements, driveways, car parks and streets. ȱȱȱȱȱȱěȬǰȱȱȱȱ ¢ȱ¢ȱȱěȬȱȱ ȱȱ regulations. Obtain permission to drive on private property. Avoid posted areas and obey "no trespassing" signs. You should never drive your dune buggy on public streets, roads or highways, even if they are ȱǯȱȱȱȱȱ¢ȱȱĜ¢ȱȱȱȱ¢ǰȱ ȱȱȱ to a collision. In many states it is illegal to operate dune buggies on public streets, roads and highways. WARNING Operating this dune buggy on public streets, roads or highways could cause a collision with another vehicle. Never operate this dune buggy on any public streets, roads or highways, whether they are dirt, gravel or paved surfaces. Keep Hands and Feet on Controls When driving your dune buggies, always keep both hands on the steering wheel and both feet on the foot controls. It is important to maintain your balance and to control the Dune Buggy. Removing hands or feet away from the controls can reduce your ability to react and control the dune buggy. WARNING Removing your hands from the steering wheel or feet from the foot controls during operation can reduce your ability to control the dune buggy or could cause you to lose your balance and fall off the dune buggy. Always keep both hands on the steering wheel and both feet on the foot controls of your dune buggy during operation. Control Speed Driving at excessive speed increases the chances of an accident. In choosing an appropriate speed, you need to consider the capability of your dune buggy, the terrain, visibility and other operating conditions, plus your own skill and experience. WARNING Operating this dune buggy at excessive speeds increases your chances of losing control of the dune buggy, which can result in an accident. Always drive at a speed that is appropriate for your dune buggy, the terrain, visibility and other operating conditions, and your experience. 8 SAFE DRIVING PRECAUTIONS Use Dune Buggy on Unfamiliar or Rough Terrain ȱȱȱȱȱȱȱȱ ȱǰȱ ¢ȱȱȱȱ¢ǯȱȇȱȱȱ ȱȱȱ ȱ¢ȱȱȱǻȇȱȱĜȱȱȱ ȱȱǰȱǰȱȱȱȱȱȱǼǯȱȱȱȱ WARNING Failure to use extra care when operating this dune buggy on unfamiliar terrain could result in the dune buggy overturning or going out of control. Go slowly and be extra careful when operating on unfamiliar terrain. Always be alert to changing terrain conditions when operating the dune buggy. Never drive past the limit of visibility. Maintain a safe distance between your dune buggy ȱȱȱěȬȱǯȱ ¢ȱ¡ȱȱȱȱ¡ȱȱȱǰȱ¢ȱ and loose terrain. WARNING Failure to use extra care when operating on excessively rough, slippery or loose terrain could cause loss of traction or vehicle control, which could result in an accident, including an overturn. Do not operate on excessively rough, slippery or loose terrain until you have learned and practiced the skills necessary to control the dune buggy on such errain. Always be especially cautious on these kinds of terrain. Do Not Perform Stunts ȱȱȱȱȱȱ ¢ȱȱ¢ȱȱ¢ȱȱȱȱȱȱǯȱȱ ǰȱ ¢ȱȱȱȱ ȱȱȱǯ WARNING Attempting wheelies, jumps, and other stunts increases the chance of an accident, including an overturn. Never attempt stunts, such as wheelies or jumps. Don't try to show off. Radiator Indicator Lamp ȱȱȱȱȱȱǰȱ¢ȱȱ ¢ȱȱȱȱ ȱȱȱȱǯ ȱȱȱ ȱȱ¢ȱ ȱ¢ȱȱȱ¢ȱȱĴȱȱǯȱȱ ȱȱȱ¢ȱǰȱ¢ȱȱȱȱȱ¢ȱȱȱȱ¢ȱěǯȱȱ ȱȱ¢ȱǯȱȱȱȱȱȱȱȱȱǰȱ ȱ¢ȱȱ¢ȱȱ engine to cool down before opening the radiator cap. ȱȱȱȱȱ¢ȱęȱȱȱ¢ȱǰȱ¢ȱȱȱȱȱǰȱȱȱ ȱȱǯ 9 11 12 IGNITION KEY SWITCH & HEADLAMP SWITCH ENGINE START BUTTON First, insert the key into the key-switch, turn the key clockwise to “ON” position. Secondly, push the “Engine Start Button”, (the illuminate button) in for 5 seconds to start the engine. If the engine does not start, release the button for 5 seconds and try again. Once the engine starts, let it warm up for 5 minutes or until the engine idles at the normal speed (1500-1700 RPM) before operation. 13 ENGINE STOP BUTTON 14 OPERATION Component locations STEERING WHEEL SEAT BELT REAR CARGO RACK TANK COMP. FUEL FUEL TANK CAP Figure 2 15 OPERATION C. Passengers The dune buggy allows for two riders only. Combine maximum weight of driver and the passenger should not exceed 180kg or 400lbs. D. Seat Adjustment The seat must always be securely fastened in the ȱ ȱȱěȱȱȱȱȱ the foot pedals, steering wheel, and the remote ȱĴǯ a. Pull seat adjustment handle upward to disengage seat slide. b. Move seat to desired position. c. Be sure seat adjustment handle snaps back into Figure 3 place and that seat is locked into position. WARNING Before attempting to adjust the seat, ensure that dune buggy engine is stopped. WARNING Never operate this Dune Buggy when the provided seat is not securely fastened, to do so could result in a strong possibility of severe personal injury or loss of life. Before attempting to adjust the seat, ensure the dune buggy engine is stopped. E. Reverse Adjustment R a. Push forward the reverse lever to the "D" position so that the unit can move forward, pull back the lever to "R" so that the unit can move backward. (See Fig.4) ADJUSTING NUT #1, REVERSE CABLE b. When reverse lever is in the drive position, ADJUSTING NUT #2, REVERSE CABLE there need to be 1/2 inch of freeplay in the reverse level. If the adjustment is not correct, then loosen the lock nut #2, then adjust lock nut #1 to the proper amount of freeplay. Figure 4 Always stop the dune buggy befor changing gears. 16 D OPERATION/SERVICE INSTRUCTIONS F. Starting And Operating Instructions aǯȱȱȱȱǰȱȱȱȱȱȱȱȱ¢ȱȱȱȱ¢ȱ ȱȱ ȱǯ bǯȱȱȱȱ¢ȱȱȱȱȱȱȱȱȱȱ ȱȱǰȱȱȱǯ cǯȱȱȱȱ¢ȱ ¢ȱȱ¢ȱȱȱ ȱǯ dǯȱȱȱȱȱȱȱ¢ȱȱȱȱǰȱȱȱȱȱȱ¢ȱȱ ȱ ȱȱȱȱȱȱȱǯȱȱ ȱ ȱȱȱȱȱȱ ȱȱȱȱȱ ȱȱȱȱ¢ȱȱȱǯ eǯȱȱȱȱ¢ȱȱȱǰȱȱȱ ȱȱȱȱȱ¢ȱȱȱȱ¢ȱȱȱ ȱȱȬ ȱȱȱȱȱǯȱȱ ȱȱȱȱȱȱȱȱ ȱȱȱȱȱ ȱǯȱǻȱǯśǼȱȱ¢ȱȱ¢ ȱȱȱȱȱȱǰȱ¢ȱȱȱȱȱ¢ȱȱ ȱȱȱȱȱȱȱ¢ȱȱȱȱ ȇȱ ȱȱȱȱǯȱ Figure 5 SERVICE INSTRUCTIONS A. Service Air Cleaner Service air cleaner every 20 hours ȱȱȱȱDZȱȱȱĞȱȱ¢ȱ ȱȱȱȱǯ aǯȱȱȱ 2 bǯȱȱȱȱȱŘȱȱǻȱǯŜǼ cǯȱȱȱȬĚȱȱȱ ȱȱȱȱȱȱȱȱȱȱȱȱǯ dǯȱ¢ȱȱĞȱǯ Figure 6 17 SERVICE INSTRUCTIONS B. Engine Lubrication ȱȱȱȱȱȱȱȱȱȱȱȱĞȱȱęȱśȱȱȱȱȱ¢ȱ ȱ ȱǻȱǯȱŝǼȱȱĞȱŗŖȱȱȱȱĞǯȱȱȱ ȱȱȱȱȱ ȱȱȱȱ¢ȱȱȱȱ¡ȱ ǯ WARNING Used Oil Must Be disposed of at a proper collection Center aǯȱȱȱȱȱȱȱȱȱȱȱȱ ȱǯȱȱȱȱ¢ȱ ȱ¢ȱ¢ȱȱȱȱ ȱȱȱȱȱȱȱȱǯ ȱǯȱȱȱȱȱǯ cǯȱȱȱȱȱȱ¢ǯȱȱȱ ENGINE OIL PLUG, COVER ȱȱ¢ȱȱȱȱǯ dǯȱęȱȱǻ¡¢ȱŗȱŗȦŚȱǼȱȱȱ ȱȱęȱȱ ȱȱŗŖŚŖȱǯȱȱȱȱȱȱ ȱȱȱȱ¢ǯ eǯȱȱȱȱȱȱȱȱȱ¢ȱȱĞȱ ȱȱŗŖȱȱȱǯȱȱȱȱȱȱȱ ȱȱǯȱȱȱ¡ȱȱȱȱǯ Figure 7 C. Spark Plug aǯȱȱȱȱȱȱȱȱȱȱ¢ȱ SEAM,DIRT,CARBON VERIFY 0.6-0.7mm ȱȱǯȱǻȱȱȱȱ Ǽȱȱȱ ȱȱȱȱȱȱȱǯȱȱȱȱ ȱȱ¡ȱȱ ȱ¢ȱȱȱȱ WASHER VERIFY ǯȱȱǰȱȱȱȱȱȱ ǻȱ ȱǼȱȱȱ ȱȱǯȱ ȱęȱȱŖǯŜDžŖǯŝǯ bǯȱȱȱȱȱȱȱ¢ȱ SEAM VERIFY ȱȱȱȱǰȱȱȱ¢ȱȱ ¡ȱȱȱȱȱȱǯ cǯȱȱȱȱȱȱȱȱȱȱȱȱ ȱ¢ȱȱȱ¢ȱȱȱȱȱǯ 18 Figure 8 SERVICE INSTRUCTIONS E. Cleaning Instructions ȱȱȱȱȱ¢ȱȱ¢ȱǯȱȱȱȱǰȱ ȱěȱȱȱȱȱȱȱǯȱ ȱěȱ¢ȱȱȱȱǯȱȱȱȱȱȱȱǰȱȱȱȱȱȱ ȱȱȱȱȱȱȱȱȱȱǯ F. Dune Buggy Lubrication ȱȱȱȱȱȱ¢ȱşŖȱ¢ȱȱǯȱȱȱȱȱǰȱȱȱ¢ȱȱ everyday. G. Chain Lubrication ȱȱȱȱȱȱȱǰȱȱȱȱȱ ȱȱ¢ȱȱ¢ȱȱǯȱ (See Fig. 10) DRIVE CHAIN ADJUSTMENT NUT 1 NUT 2 3/8"-1/2" DRIVE CHAIN Figure 10 19 SERVICE INSTRUCTIONS H. Chain Adjustment ȱȱȱȱȱȱȱȱĞȱęȱ ȱȱȱǯȱȱȱȱȱȱȱŗȦŘȄȱĚ¡ǯ aǯȱȱȱǛŗ bǯȱȱȱǛŘǯȱȱȱȱǛŘȱ ȱȱŗȦŘȱȱǰȱȱȱȱǛŗȱȱǯȱȱ ȱȱȱȱȱȱ ȱȱȱȱȱȱȱȱȱǻȱǯȱŗŖǼǯ cǯȱȱȱȱ ȱȱȱȱȱȱȱȱęǯ I. Adjustment of Front And Rear Shock ȱȱȱȱȱȱęȱȱȱȱȱǯȱȱ ȱȱȱȱȱȱȱȱ¢ȱ ȱǻȱǯȱŗŗǼ ȱȱȱȱȱȱȱȱ ȱȱ¢ȱȱȱ ǰȱȱȱȱȱȱ ȱ ȱȱ¢ȱ ȱȱĞǰȱȱȱ¢ȱ ȱȱȱǯȱȱȱȱȱ ȱȱȱǯ LEFT ROTATE RIGHT ROTATE J. Storage Instruction ȱȱȱȱȱȱȱ¢ȱȱ¢ȱȱȱȱȱ SPRING ADJUSTMENT CAM ȱȱȱȱȱ¡ȱȱřŖȱ¢ȱȱȱ Figure 11 ȱȱȱȱȱȱȱȱ ȱȱ DZ aǯȱȱȱȱȱȱ¢ȱ ȱȱȱȱȱȱǰȱȱȱȱȱ£ǯ bǯȱȱȱ¢ȱ¢ȱȱȱȱǰȱȱ¢ȱȱȱȱ ȱȱȱȱǯ cǯȱȱȱȱȱȱȱȱ ǯȱȱȱǰȱ ȱȱȱȱ ȱȱȱȱȱȱȱȱǰȱ ȱȱȱȱȱěȱȱǯ WARNING WARNING Do not drain fuel while engine is hot. Be sure to move ȱ¢ outside before draining fuel. 20 REPAIR A. Front Wheel Replacement Do not disassemble the castle nuts when you replace the front wheels. It is only necessary to remove the 4 lug nuts to remove the wheel. (See Fig. 12) ȱȱȱȱȱȱĞȱȱȱ ǯ Figure 12 B. Rear Wheel Replacement Do not disassemble the castle nuts when you replace the rear wheels and hub assembly. ȱȱȱȱȱȱĴȱȱȱȱŘŚȱǯȱȱȱěȱ ȱȱȱ¢ǯ ȱȱȱȱȱȱ¢ȱ¢ȱȱȱȱŚȱȱȱȱȱȱ ȱ¢ȱǯ (See Fig.13) Figure 13 21 REPAIR C. Front Wheel Alignment a. The front wheels should be “toe-in” from 1/8” to 1/4”. To check for alignment, measure distance A and B between the centerline (CL) of the wheels. The proper toe-in dimension A should be 1/8” – 1/4” greater than dimension B. b. To adjust the alignments, loosen the lock nuts on both sides of Front Tie Rods. To make ȱȱǰȱȱȱȱȱĞǯȱȱȱȱȱȱȱȱȱȱ ȱȱǯȱȱĞȱȱȱȱȱǰȱȱȱȱȱȱȱȱǯȱȱ Recheck the dimensions for proper alignment. RIGHT ROATE LEFT ROATE CL A B FR. WHEEL TIE ROD RIGHT ROATE LEFT ROATE LOOK NUT, FR. WHEEL TIE ROD Figure 14 22 PERIODICAL CHECK AND SERVICES The maintenance intervals in the following table are based upon average driving conditions. Driving in unusually dusty areas, require more frequent servicing. Time of service Items Initial service (first week) Monthly I I I I I I Tire pressure/wear Brake performance Tightness of screws Air cleaner Carburetor Spark plug I Drive chain Brake oil Replace gearbox oil I Quarterly Yearly C I C A C, A C, A, L I R L I I C, I I Chassis Fuel switch/fuel tank Battery C I Valve clearance of engine A A: adjust C: clean I: inspect, clean or replace if necessary. L: lubricate R: replace WIRING DIAGRAM GTS150 START PELAY R/W Chock Assembly BRAKE SWITCH START SWITCH 12V8AH Y/R IGNITION SWITCH Start Magneto G B/R B G/Y - + R G Fuse G/Y Y/R 15A P Rear Lamp B R G/Y Br G Br SPEEDO Y/B SPEEDO SENSOR G/W B/Y Head Lamp Y G Br G P G B/W Y R B/R G L/W B/R L/W Ignition Coil B/W B/Y G G P B Spark plug Br CDI G STOP SWITCH Rectifier Magneto 23 RED BLACK YELLOW GREEN R B Y G purple PU WHITE W BROWN BR BLUE L Geason Enterprises, LLC dba Geason Powersports Emission Control System Warranty Statement YOUR WARRANTY RIGHTS AND OBLIGATIONS The U.S. Environmental Protection Agency and Geason Enterprises, LLC dba Geason Powersports (hereinafter “Geason Powersports”) are pleased to explain the emission control system warranty on your 2012 Off-Road ATV. New off-road motor vehicles must be designed, built and equipped to meet U.S. EPA Federal anti-smog standards. Geason Powersports must warrant the emission control system on your vehicle for 5,000 km, or at least 30 months, whichever comes first, provided that there has been no abuse, neglect or improper maintenance of your vehicle. This ATV was designed to meet the emission standards for 10,000 km, or five years, whichever comes first. Your emission control system may include parts such as the carburetor or fuel injection system, the ignition system, catalytic converter and engine computer, if it is equipped. Also included may be hoses, belts, connectors and other emission-related assemblies. Where a warrantable condition exists, Geason Powersports will repair your vehicle at no cost to you, including diagnosis, parts and labor. If an emission-related part on your vehicle is defective, the part will be repaired or replaced by Geason Powersports. This is your emission control system DEFECTS WARRANTY. NOTICE! Use of any Geason Powersports vehicle in any type of competitive event completely and absolutely voids this and all other warranties offered by Geason Powersports. OWNER’S WARRANTY RESPONSIBILITIES As the vehicle owner, you are responsible for the performance of the required maintenance listed in your owner’s manual. Geason Powersports recommend that you retain all receipts covering maintenance on your vehicle, but Geason Powersports cannot deny warranty solely for the lack of receipts or for your failure to ensure the performance of all scheduled maintenance. You are responsible for presenting your vehicle to the Geason Powersports dealer as soon as a problem exists. The warranty repairs should be completed in a reasonable amount of time, not to exceed 30 days. As the vehicle owner, you should be aware that Geason Powersports may deny your warranty coverage if your vehicle or a part has failed due to abuse, neglect, improper maintenance or unapproved modifications. If you use your vehicle in any type of competitive event, this warranty is immediately and completely void. If you have any questions regarding your warranty rights and responsibilities, you should contact Geason Enterprises, LLC dba Geason Powersports, 1200 Lakeside Parkway #325, Flower Mound, TX 75028, Phone: 214-513-1700 or the U.S. Environmental Protection Agency, 2000 Traverwood Drive, Ann Arbor, MI 48105. Geason Enterprises, LLC dba Geason Powersports Limited Warranty on Emission Control System YOUR WARRANTY RIGHTS AND OBLIGATIONS Geason Enterprises, LLC dba Geason Powersports (hereinafter “Geason Powersports”) warrants that each new 2012 and later Geason Powersports off-road vehicle: A. is designed, built and equipped so as to conform at the time of initial retail purchase with all applicable regulations of the United States Environmental Protection Agency, and; B. is free from defects in material and workmanship which cause such vehicle to fail to conform to applicable regulations of the United States Environmental Protection Agency for the periods specified above. I. Coverage. Warranty defects shall be remedied during customary business hours at any authorized Geason Powersports dealer located within the United States of America in compliance with the Clean Air Act and applicable regulations of the United States Environmental Protection Agency. Any part or parts replaced under this warranty shall become the property of Geason Powersports. II. Limitations A. Repair or replacement as a result of (1) accident, (2) misuse, (3) repairs improperly performed or replacements improperly installed, (4) use of replacement parts or accessories not conforming to specifications set forth by Geason Powersports, which adversely affect performance and/or (5) use in competitive racing or related events. B. Inspections, replacement of parts and other services and adjustments required for required maintenance. Any vehicle equipped with an odometer or hour meter on which the odometer mileage or hour meter reading has been changed so that actual mileage cannot be readily determined. C. III. This Emission Control System Warranty shall not cover any of the following: Limited Liability A. The liability of Geason Powersports under this Emission Control System Warranty is limited solely to the remedying of defects in material or workmanship by an authorized Geason Powersports dealer at its place of business during customary business hours. This warranty does not cover inconvenience or loss of use of the vehicle or transportation of the vehicle to or from the Geason Powersports. Geason Powersports shall not be liable for any other expenses, loss or damage, whether direct, indidental, consequential or exemplary arising in connection with the sale or use of or inability to use the Geason Powersports vehicle for any purpose. Some states do not allow the exclusion or limitation of any incidental or consequential damages, so the above limitations may not apply to you. Geason Enterprises, LLC dba Geason Powersports Limited Warranty on Emission Control System B. No express emission control system warranty is given by Geason Powersports, except as specifically set forth herein. Any emission control system warranty implied by law, including any warranty of mechanability or fitness for a particular purpose, is limited to the express emission control system warranty terms stated in this warranty. The foregoing statements of warranty are exclusive and in lieu of all other remedies. Some states do not allow limitations on how long an implied warranty lasts, so the above limitations may not apply to you. C. No dealer is authorized to modify this Limited Emission Control System Warranty issued by Geason Powersports. IV. LEGAL RIGHTS. This warranty gives you specific legal rights, and you may also have other rights which vary from state to state. V. This warranty is in addition to the Geason Powersports limited vehicle warranty. VI. ADDITIONAL INFORMATION. Any replacement part that is equivalent in performance and durability may be used in the performance of any maintenance or repairs. However, Geason Powersports are not liable for these parts. The owner is responsible for the performance of all required maintenance. Such maintenance may be performed at a service establishment or by any individual. The warranty period begins on the date the ATV is delivered to an ultimate purchaser. Geason Enterprises, LLC dba Geason Powersports 1200 Lakeside Parkway #325 Flower Mound, TX 75028 Phone: 214-513-1700 Fax: 214-513-1711