1
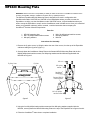
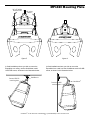
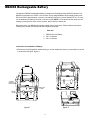
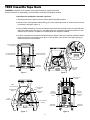
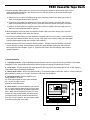
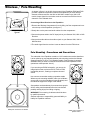
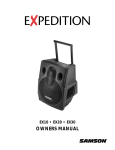
ACCESSORIES
• MP1020
Mounting Plate
• RB2030
Rechargeable Battery
• TD30
Cassette Tape Deck
• Pole Mounting
Procedures and Precautions
-20 -10
-3
0dB +6
5
0
PLAYER /
R EC O R D ER
REW
F. F W D
REC/PLAY DECK
10
RECORD
LEVEL
AU TO L E V E L C O N T RO L
5
AU TO S TO P
O N E TO U C H
100
50
0
0
SOFT
EJECT
10
PLAY
LEVEL
PITCH
CONTROL
REC
PLAY
REW
F.FWD
ST/EJ
OWNERS MANUAL
PAUSE
STEREO PITCH CONTROLLED CASSETTE RECORDER/PLAYER
®
Table of Contents
Introduction
1
MP1020 Mounting Plate Kit
2
RB2030 Rechargeable Battery
4
TD30 Cassette Tape Deck
6
Wireless Option
8
Pole Mounting - Procedures and Precautions
8
Specifications
9
Copyright 2000, Samson Technologies Corp.
Printed October, 2000
Samson Technologies Corp.
575 Underhill Blvd.
P.O. Box 9031
Syosset, NY 11791-9031
Phone: 1-800-3-SAMSON (1-800-372-6766)
Fax: 516-364-3888
www.samsontech.com
Introduction
Welcome to Samson Expedition—the portable audio system for the new millennium! This exceptionally
versatile system offers the perfect solution wherever you need portable, high-quality audio: as a main PA
system or as onstage monitors in clubs and performance halls; in houses of worship; as a sound system
for business presentations, mobile DJs at parties, or aerobics instruction; and for use in outdoor environments such as parks, beaches and flea markets. What’s more, every Expedition system comes with a
built-in telescoping handle and wheels, making it easy to take professional audio with you wherever you
go!
There are three different Samson Expedition systems detailed in this manual. All utilize the same lightweight yet rugged two-way speaker enclosure that pairs a custom designed 12" woofer with a matched
1" compression driver. The Expedition EX10 is a passive 8-ohm enclosure that can be used with any
external power amplifier rated at up to 250 watts. The Expedition EX20 is a powered version that
includes a bi-amped power cell along with an active crossover, speaker protection circuitry and built-in
limiting. And the Expedition EX30 is designed as a total all-in-one portable PA system, adding a fourchannel stereo mixer—complete with digital effects—to the equation. In addition, a number of expansion
options are available, including a 500-watt active subwoofer (our EX500); a rechargeable Lead-Acid
GelCel battery pack; and a rear-panel mountable cassette recorder with pitch control. There's even a
prewired custom compartment that accommodates any of three different Samson wireless receivers!
In this manual, you’ll find a more detailed description of the features of all Expedition series Accessories,
as well as step-by-step instructions for installation and full specifications. If your Expedition Accessory
was purchased in the United States, you’ll also find a warranty card enclosed—don’t forget to fill it out
and mail it! This will enable you to receive online technical support and will allow us to send you updated
information about this and other Samson products in the future. If your Expedition Accessory was purchased outside of the U. S., contact your local distributor for warranty details. Also, be sure to check out
our website (http://www.samsontech.com) for complete information about our full product line.
Serial number:
Date of purchase:
Should your unit ever require servicing, a Return Authorization number (RA) must be obtained before
shipping your unit to Samson. Without this number, the unit will not be accepted. Please call Samson at
1-800-3SAMSON (1-800-372-6766) for a Return Authorization number prior to shipping your unit. Please
retain the original packing materials and if possible return the unit in the original carton and packing.
1
MP1020 Mounting Plate
WARNING! Samson assumes no responsibility or liability for either the structure or OmniMount® hardware for the
mounting of Expedition cabinets. Installation should be done by qualified personnel.
The Samson Expedition MP1020 Mounting Plate is designed to be used in configuration with
OmniMount® models 100-STMP and 100-WB. In fixed installations where you wish to mount the
Expedition to a ceiling, use the OmniMount® model 100-STMP mount. In fixed installations where you
wish to mount the Expedition to a wall, use the OmniMount® model 100-WB mount. Once you’ve decided
where your Expedition cabinet(s) will be mounted, read the instructions that accompany the
OmniMount® and then follow the steps below.
Parts list:
1
4
4
MP1020 mounting plate
M6 x 25 phillips head machine screws
M6 spring washers
4
4
4
M8 x 20 phillips head machine screws
M8 spring washers
M8 nuts
Instructions for Assembly
1. Remove the fly point covers, by lifting the tab at the rear of the covers, from the top of the Expedition
cabinet revealing the fly points. (figure 1)
2. Securely fasten the OmniMount® Clamp Plate to the Samson MP1020 Mounting Plate with the four
M8x20 phillips head machine screws, four M8 spring washers and four M8 nuts supplied with the
MP1020 as in figure 2.
M8 nut
Fly Point Cover
Fly Point
M8 spring
washer
OmniMount®
clamp plate
Samson MP1020
mounting plate
M8 x 20 phillips
machine screw
figure 1
figure 2
3. Using the four M6 phillips head machine screws and four M6 spring washers supplied with the
MP1020, securely fasten the MP1020 Mounting Plate to the top of the Expedition as in figures 3 and 4.
4. Follow the OmniMount® instructions to complete installation.
2
MP1020 Mounting Plate
M6 x 25 phillips
machine screw
M6 spring
washer
figure 3
figure 4
In fixed installations where you wish to mount the
Expedition to a ceiling, use the OmniMount model
100-STMP mount, as shown in the illustration below:
In fixed installations where you wish to mount the
Expedition from a wall, use the OmniMount model 100-WB
mount, as shown in the illustration below:
OmniMount®
Samson MP1020
mounting plate
OmniMount®
Samson MP1020
mounting plate
OmniMount® can be reached at 1-800-MOUNT-IT (1-800-668-6848) or www.omnimount.com
3
RB2030 Rechargeable Battery
The Samson RB2030 Rechargeable Battery is designed for Expedition EX20 and EX30 cabinets. The
RB2030 incorporates four 12VDC, 3.3A Gel Cells. A fully charged RB2030 should supply power to the
EX20 or EX30 for approximately 3–4 hours at a relatively high level of volume. Battery life of 7–8 hours
can be obtained if a relatively low level of volume is used. NOTE: It is the actual volume (audio you are
hearing), not the position of the volume controls, that is relative to battery life.
With proper care, your RB2030 will operate trouble free for many years. Please read the instructions
carefully and note that your battery has been shipped uncharged.
Parts list:
1
4
4
RB2030 Gel Cell Battery
M4 x 14 Screws
M6 x 12 Screws
Instructions for Installation of Battery
1 With the rear of the Expedition cabinet facing you, lie the cabinet face down on a soft surface so as not
to scratch the front grille. (figure 1)
M4 x10
Battery
Connector
Cover Plate
Cover Plate
Screws
Thumb
Screw
figure 1
figure 2
4
RB2030 Rechargeable Battery
2 Using a phillips screwdriver, remove the two screws and the Battery Connector Cover Plate.
Note: retain the cover plate and screws for future use. Remove the two M4 x 10 lower rear panel
screws (to be re-used in step 6) and pole mount thumb screw (figure 1).
3 Align the battery as in figure 2 and set its legs in the bottom of the EX20 or EX30 as in figure 3.
4 Connect the Battery supply cable as in figure 3. IMPORTANT! Both the connectors on the supply cable
(from the battery) and connector plug (on the cabinet) are keyed. Be sure to connect the cable correctly or you’ll risk shorting the battery which may result in fire and/or internal amplifier failure.
5 Lift the battery into place and screw the two M4 x 14 screws into the two outer holes and the two M6 x
12 screws in the inner holes on the battery lip. Use the two M4 x 10 screws (from step 2) to secure the
bottom of the battery to the cabinet.
Charging the Battery
Before using the RB2030, the Battery must be fully charged. After following the instructions for installation, connect the EX20 or EX30 to an outlet and turn the unit on. The battery will take 8 hours to fully
charge initially. Subsequent full charges can be achieved in 4 hours. The battery level meter on the rear
panel of your EX20 or EX30 will show a level only when the AC cord is disconnected.
IMPORTANT: The RB2030 Battery must be fully charged after each use.
M4 x14
M6 x12
Battery
Connection
Plug
Battery
Supply
Cable
M4 x10
figure 3
figure 4
5
TD30 Cassette Tape Deck
WARNING! Installation of the cassette deck should be done by qualified personnel.
Samson assumes no responsibility, personal liability or liability for Expedition cabinets.
Instructions for Installing the Cassette Tape Deck
1 Disconnect the power cord from the AC source and the Expedition cabinet.
2 With the rear of the Expedition cabinet facing you, lie the cabinet face down on a soft surface so as not
to scratch the front grille. (figure 1)
3 Using a Phillips screwdriver, remove the Cassette Connection Access Plate screws, Access Plate and
lower rear panel screws as in figure 1. Set aside screws for re-assembly and save the plate if the cassette has to be removed. The plate is not needed when the cassette is installed.
4 Lift the mixer panel from the bottom and disconnect the Switch Cable from connector marked CN206A,
located on the lower circuit board, as in figure 2. This will allow you to lift the mixer higher giving you
better access to the circuit boards.
Cassette Connection
Access Plate
Cassette Connection
Access Plate Screw
Cassette Connection
Access Plate Screw
CH1
CH2
CH3/4
Lower Rear
Panel Screw
Lower Rear
Panel Screw
Switch Cable
Connector
CN206A
figure 1
figure 2
Upper Cassette
Screws
Upper
Circuit Board
-10 -3 0 +4+12
6-pin Connector
CN501
Cassette Cable
Channel
PLAYER
RECORDRER
RECORD
LEVEL
AUTO STOP
ONE TOUCH
SOFT
EJECT
2-pin Connector
CN513
Lower
Circuit Board
REC/PLAY DECK
AUTO LEVEL CONTROL
Cassette
Connection
Access Plate
Screw
2-pin Connector
CN207A
REC
PLAY
REW
FFWD
ST/EJ
PAUSE
STEREO PITCH CONTROL CASSETTE RECORDER/PLAYER
CH1
CH2
Lower Rear
Panel Screw
figure 4
6
Cassette
Connection
Access Plate
Screw
CH3/4
Lower Rear
Panel Screw
figure 3
PLAY
LEVEL
PITCH
CONTROL
TD30 Cassette Tape Deck
5 Feed the cassette cables under the top of the mixer through the Cassette Cable Channel (figure 3) and
make the following connections. (Be careful not to force the connections as all connectors are keyed
and should only fit one way.)
a) Connect the 6 pin cable from cassette to the 6 pin connector located in the lower right corner of
upper circuit board labeled CN501 (figure 3).
b) connect the 2 pin cable from cassette to the 2 pin connector located in the lower right corner of
upper circuit board labeled CN513 (figure 3) This cable should be shorter of the two 2 pin cables
c) connect the 2 pin cable from cassette to the 2 pin connector located in the lower right corner of
lower circuit board labeled CN207A. (figure 3).
6 While lowering the mixer into place reconnect the Switch Cable (removed in step 4, figure 2) to connector CN206A located on the lower circuit board.
7 Lie the mixer in place making sure the cables are contained within the mixer cavity. Lie the cassette in
place (the lower cassette bracket should lie on top of the upper mixer bracket) making sure the cables
from the cassette pass through the Cassette Cable Channel.
8 Partially screw the two lower rear panel screws into place . Partially screw the Cassette Connection
Access Screws into place. Lift the handle revealing the upper cassette screw holes and screw the
three supplied screws into place. (figure 4). Tighten all the screws. See the following instructions for
cassette operation.
Cassette Operation
1: Transport controls - A set of standard transport controls, from left to right: Record, Play, Rewind, Fast Forward,
Stop/Eject, Pause. Both the Record and Play buttons must be pressed in simultaneously to record .
2: Level meter - This five-segment bar meter shows the TD30 input level. Excursions into the red “+6 dB” segment
may indicate tape overloading and distortion.
3: Record level control - Active only when recording. For optimum signal-to-noise ratio, set this control so that program material is usually at or around 0 VU on the Level meter (see #2 below).
4: Play level control - Sets the playback level.
When installed in an EX30,
the TD30 output signal arrives at mixer channels
3/4. See #6 on page 9 in this
manual for more information.
-20 -10
-3
0dB +6
5
0
PLAYER/
RECORDER
5: Pitch control - In normal operation, leave this at
the 12 o’clock position. When at the 12 o’clock position, the tape is played back at standard speed and
pitch. When moved clockwise from the 12 o’clock
position, the tape is played back at a faster speed
(and higher pitch); when moved counterclockwise
from the 12 o’clock position, the tape is played back
at a slower speed (and lower pitch).
REW
F.FWD
REC/PLAY DECK
10
RECORD
LEVEL
AUTO LEVEL CONTROL
5
AUTO STOP
ONE TOUCH
100
50
0
0
SOFT
EJECT
10
PLAY
LEVEL
PITCH
CONTROL
REC
PLAY
REW
F.FWD
ST/EJ
PAUSE
STEREO PITCH CONTROLLED CASSETTE RECORDER/PLAYER
7
Wireless / Pole Mounting
As shown in figure 1 on the left, the top panel of the Expedition EX20 and EX30
provides a prewired compartment that accommodates any of three different
Samson wireless receivers: the UM1 or M32 UHF models or the VM1 VHF
model. Output signal from a wireless receiver mounted in an EX30 arrives at
channel 2 of the onboard mixer.
Connecting a Micro Receiver to the Expedition
1 Remove the Wireless Compartment Cover by lifting it off the compartment located on the top of the Expedition. (see figure 1)
2 Gently take out the power and audio cables from the compartment.
figure 1
3 Connect the power cable to the DC input jack on your Samson VM1, UM1 or M32
Receiver.
4 Connect the audio cable to the audio out jack on your Samson VM1, UM1 or
M32 Receiver.
5 The audio signal from the receiver is sent to channel 2 on the EX30 mixer.
Pole Mounting - Procedures and Precautions
The underside of the Expedition contains a 1-3/8" stand mount socket that allows
it to be raised up on any standard speaker pole mounting (such as the Ultimate
Support Systems TS-30 or TS-33 speaker stands). Pole-mounting is generally
advisable when you want to maximize the distance that the Expedition covers
(sometimes called speaker “throw”).
If you are using an EX500 subwoofer, you can use its
integral pole mount to place an EX10, EX20 or EX30
immediately above it, creating a complete column of
sound.
Use common sense when setting up speaker stands.
Whenever pole mounting cabinets, make sure all fasteners are tight (or to the manufacturers specifications) and
the stand can support the weight of the cabinet.
Set speakers and stands away from areas where people
will be, taking care that stands will not be knocked into
possibly causing injury from falling or tipping.
WARNING! Pole mounting of cabinets should be done
by qualified personnel.
Samson assumes no responsibility, personal liability or
liability for Expedition cabinets.
EX30 pole mounted on an EX500
EX30 pole mounted on a
speaker stand
8
Specifications
Specifications
MP1020 Mounting Plate
Dimensions
Weight
RB2030 Rechargeable Battery
Type
4 x 12VDC, 3.3 Amp/Hours Gel Cell
Charging time
Initial charge
Additional charges
8 hours
4 hours
Pin out for Cable and Charger (figure 1)
Pin 1 NC
Pin 2 CONTB (control one pin of relay for battery supply on/off)
Pin 3 CONTA (control another pin of relay for battery supply on/off)
Pin 4 VDC (Voltage supply for battery charging)
Pin 5 AGND (Ground of Charger)
Pin 6 -VBAT (Negative battery supply to power mon.)
Pin 7 +VBAT (Plus battery supply to Power mon.)
Dimensions
8.25 in. (w) x 12.5 (d) x 5.25 (h)
209.5 mm (w) x 317.5 (d) x 133.35 (h)
Weight
12.8 lbs.
5.8 kg
CABLE (From Battery)
Key
PIN 1
CHARGER (Cabinet)
Key
2 3 4 5 6 7
PIN 7 6 5 4 3 2
1
figure 1
TD30 Cassette Tape Deck
Transport Controls
Record, Play, Rewind, Fast Forward, Stop/Eject, Pause
Pitch
±12%
Dimensions
7.125 in. x 6.378 x 2.75
Weight
1 lb 13.4 oz
0.83 kg
Pole Mounting Specifications:
EX10
EX20
EX30
28.5 lbs • 12.9 kg
42.0 lbs • 19.0 kg
45.0 lbs • 20.4 kg
9
Samson Technologies Corp.
575 Underhill Blvd.
P.O. Box 9031
Syosset, NY 11791-9031
Phone: 1-800-3-SAMSON (1-800-372-6766)
Fax: 516-364-3888
www.samsontech.com
exac