1
TD30 Cassette Tape Deck
WARNING! Installation of the cassette deck should be done by qualified personnel.
Samson assumes no responsibility, personal liability or liability for Expedition cabinets.
Instructions for Installing the Cassette Tape Deck
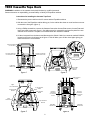
1 Disconnect the power cord from the AC source and the Expedition cabinet.
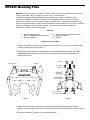
2 With the rear of the Expedition cabinet facing you, lie the cabinet face down on a soft surface so as not
to scratch the front grille. (figure 1)
3 Using a Phillips screwdriver, remove the Cassette Connection Access Plate screws, Access Plate and
lower rear panel screws as in figure 1. Set aside screws for re-assembly and save the plate if the cassette has to be removed. The plate is not needed when the cassette is installed.
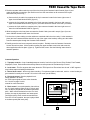
4 Lift the mixer panel from the bottom and disconnect the Switch Cable from connector marked CN206A,
located on the lower circuit board, as in figure 2. This will allow you to lift the mixer higher giving you
better access to the circuit boards.
Cassette Connection
Access Plate
Cassette Connection
Access Plate Screw
Cassette Connection
Access Plate Screw
CH1
CH2
CH3/4
Lower Rear
Panel Screw
Lower Rear
Panel Screw
Switch Cable
Connector
CN206A
figure 1
figure 2
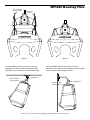
Upper Cassette
Screws
Upper
Circuit Board
-10 -3 0 +4+12
6-pin Connector
CN501
Cassette Cable
Channel
PLAYER
RECORDRER
RECORD
LEVEL
AUTO STOP
ONE TOUCH
SOFT
EJECT
2-pin Connector
CN513
Lower
Circuit Board
REC/PLAY DECK
AUTO LEVEL CONTROL
Cassette
Connection
Access Plate
Screw
2-pin Connector
CN207A
REC
PLAY
REW
FFWD
ST/EJ
PAUSE
STEREO PITCH CONTROL CASSETTE RECORDER/PLAYER
CH1
CH2
Lower Rear
Panel Screw
figure 4
6
Cassette
Connection
Access Plate
Screw
CH3/4
Lower Rear
Panel Screw
figure 3
PLAY
LEVEL
PITCH
CONTROL