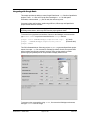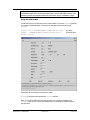
1
WOW Software 5000.0.1.11 Release Notes and Administration Manual Contents Third Party Applications ................................................................................................................. 2 International Trade Compliance .................................................................................................... 3 Introduction ..................................................................................................................................... 4 Enhancements and Fixes .............................................................................................................. 5 Known Problems .......................................................................................................................... 13 Pre-Installation Planning .............................................................................................................. 14 Installation ..................................................................................................................................... 16 Configuring Security Options ....................................................................................................... 23 Configuring Other Landmark Applications .................................................................................. 26 Configuring Subscription Tools and Email .................................................................................. 30 Customizing the WOW Interface ................................................................................................. 32 Accessing WOW pages from other applications ........................................................................ 36 Configuring KRS ........................................................................................................................... 37 OpenWorks QC/QA Queries ....................................................................................................... 38 Command-Line Utilities ................................................................................................................ 40 The WOW GUI ............................................................................................................................. 45 Coordinate Conversion ................................................................................................................ 47 MD/TVD Conversion .................................................................................................................... 49 Integrating with Google Earth ...................................................................................................... 51 Creating OpenWorks WGS84 Shapefiles in Batch .................................................................... 53 Creating Projected Navigation Shapefiles in Batch .................................................................... 54 Creating Horizon Images in Batch............................................................................................... 56 Creating ‘Live Trace’ Outlines...................................................................................................... 57 Updating Seismic and Horizon Statistics .................................................................................... 61 Seismic Polygon Clipping ............................................................................................................ 62 Using ZGF Backdrops.................................................................................................................. 64 Converting ZGF Pictures to Shapefiles/Images in Batch ........................................................... 64 Integrating with ESRI GIS ............................................................................................................ 66 Customizing Choice of Color Maps ............................................................................................. 67 Viewing CGMs in WOW............................................................................................................... 68 Integrating with CDA .................................................................................................................... 69 Additional Customization Options ............................................................................................... 70 Maintenance and Troubleshooting .............................................................................................. 74 Appendix 1: Example wow.env File ............................................................................................ 75 Appendix 2: Summary of Important Files .................................................................................... 78 Appendix 3: WOW Architecture................................................................................................... 80 Appendix 4: Apache Installation Options .................................................................................... 81 Appendix 5: Background on the Devkit Shells............................................................................ 89 Appendix 6: WOW Functionality Checklist ................................................................................. 91 Appendix 7: WOW Documenter Attributes Migration to R5000 ................................................ 98 Contacting Landmark Customer Support ................................................................................. 102 WOW 5000.0.1.11 Release Notes March 2014 Third Party Applications Halliburton uses various third-party applications in the development of its software. Halliburton acknowledges that certain third party code has been bundled with, or embedded in, its software. The licensors of this third party code, and the terms and conditions of their respective licenses, may be found at the following locations: $OWHOME/docs/third_party.pdf $OWHOME/WebApps/tcltk/license.terms WOW is part of Halliburton’s WebApps technology framework. WebApps is the shared architecture and directory name for the following products: WOW, Corporate Data Archiver (CDA), and Project Administrator (PA). The following table lists the third party applications in WebApps 5000.0. Product Tcl/Tk mod_auth_pam.so shapelib DGNLib Centera® SDK SDI cgm2png EarthVision® EVGridIO api Version List of Tcl modules: • Tcl 8.4.14 • Tk 8.4.14 • Tbcload 1.6.1 • Oratcl 4.5 • TkTable 2.9 • TclXML 2.6 • Cgi.tcl 1.10 • BWidget 1.8 • Tcllib 1.9 • Tklib 0.4.1 1.1.1 1.2.10 1.5 3.1 1.0 1.2 Company Open Source (Code from SourceForge) Open Source Open Source (MapTools.org) Open Source (MapTools.org) EMC® System Development, Inc Dynamic Graphics® WebApps uses software developed by the Apache Software Foundation (http://www.apache.org). Apache is not distributed with WOW; the product uses the version of Apache 2.x delivered with the operating system. Dynamic Graphics and EarthVision are registered trademarks of Dynamic Graphics, Inc. in the United States and other countries. EMC is a registered trademark of EMC Corporation. Centera is a trademark of EMC Corporation. Freeware source code INPOLY.C: Copyright (c) 1995-1996 Galacticomm, Inc. WOW 5000.0.1.11 Release Notes Page 2 of 104 March 2014 International Trade Compliance This application is manufactured or designed using U.S. origin technology and is therefore subject to the export control laws of the United States. Any use or further disposition of such items is subject to U.S. law. Exports from the United States and any re-export thereafter may require a formal export license authorization from the government. If there are doubts about the requirements of the applicable law, it is recommended that the buyer obtain qualified legal advice. These items cannot be used in the design, production, use, or storage of chemical, biological, or nuclear weapons, or missiles of any kind. The ECCN’s provided in Release Notes represent Halliburton’s opinion of the correct classification for the product today (based on the original software and/or original hardware). Classifications are subject to change. If you have any questions or need assistance please contact us at: [email protected] Under the U.S. Export Administration Regulations (EAR), the U.S. Government assigns your organization or client, as exporter/importer of record, responsibility for determining the correct authorization for the item at the time of export/import. Restrictions may apply to shipments based on the products, the customer, or the country of destination, and an export license may be required by the Department of Commerce prior to shipment. The U.S. Bureau of Industry and Security provides a website to assist you with determining the need for a license and with information regarding where to obtain help. The URL is: http://www.bis.doc.gov Definitions CCATS (Commodity Classification Automated Tracking System) - the tracking number assigned by the U.S. Bureau of Industry and Security (BIS) to products formally reviewed and classified by the government. The CCATS provides information concerning export/reexport authorizations, available exceptions, and conditions. ECCN (Export Control Classification Number) -The ECCN is an alpha-numeric code, e.g. 3A001, which describes a particular item or type of item, and shows the controls placed on that item. The CCL (Commerce Control List) is divided into ten broad categories, and each category is further subdivided into five product groups. The CCL is available on the EAR Website (http://www.access.gpo.gov/bis/ear/ear_data.html#ccl). The WebApps Software, including WOW, Corporate Data Archiver (CDA) and Project Administrator (PA) are classified as follows: ECCN number: 5D002, License type: ENC, CCATS number: G055789. This information was last updated on 2/11/2008. WOW 5000.0.1.11 Release Notes Page 3 of 104 March 2014 Introduction WOW provides dynamic access to E&P data over the company intranet. The product addresses one of the biggest challenges facing the E&P business: making information available to business users in time to facilitate decisions. Because subsurface professionals spend too much time on non-productive data management tasks, WOW allows users to quickly find, document, manage and QC vital project data: • Find data fast: rapid web-based browsing of projects – great for familiarizing users with a new project area. • Find data easily: a simple, uniform interface means users don’t need to know all the underlying applications, databases and systems. • Capture knowledge: allow users to document projects, providing context to enhance the content. • Cleanup project data: a number of functions for managing the underlying data. WOW is a 'thin client' application, which means that the majority of content is generated dynamically on the Web server by reading the underlying databases, formatting and then sending results to the Web browser. This means also that there are no client-side dependencies, i.e. plug-ins to be downloaded or installed, considerably simplifying maintenance. WOW coverage is considerable and is constantly expanding in both depth and breadth: see Appendix 6 for a functionality checklist. • OpenWorks • SeisWorks • Z-MAP Plus • GeoProbe • VIP • ProMAX • AssetJournal • SEG-Y, LAS and CGM files • ESRI shapefiles and DBF files • Archives (from Corporate Data Archiver - licensed separately) • Project data analysis (from Project Administrator - licensed separately) WOW 5000.0.1.11 Release Notes Page 4 of 104 March 2014 Enhancements and Fixes Version 5000.0.1.11 Important note: WOW 5000.0.1.11 is an update, which does not require re-installation of the WebApps software tree. See Patching the Installation for patch location and installation instructions. WebApps 5000.0.1.11 is compatible with OpenWorks 5000.8.3.01 and above. 1. OpenWorks/SeisWorks: change default project listing to display project hierarchy rather than just PDBs by default. For SeisWorks-mode projects change default grouping to be per project. These defaults can be set using environmental variables WOW_OW_LISTING, WOW_SW_LISTING and WOW_SW_GROUPING. Also add SeisWorks-mode project links to the OpenWorks project summary (defect 932012). 2. OpenWorks: rename 'Data Map' to 'District View' and add option to display 3D surveys across all districts/projects (defect 932012). 3. OpenWorks: various improvements to the Survey summary page: separate out a corner coordinate table, replace fault segments with planes, and display external files referenced in OpenWorks (defect 932012). 4. OpenWorks: add a multi-survey side-by-side horizon view with options to display navigation basemap and 2D horizon panes (defect 930062). 5. OpenWorks: add 3D survey legend/colors to navigation map (defect 930062). 6. OpenWorks: explain curve units displayed on RTM page (defect 921500). 7. OpenWorks: add option to display IP AOI in X/Y or Lat/Lon (defect 907346). 8. OpenWorks: correct IP CRS name in IP selection criteria (defect 929974). 9. OpenWorks: fix remark entry for interpretation projects (defect 929974). 10. OpenWorks: add view unassigned segments link on faults page (defect 929974). 11. OpenWorks: merge VC/R list viewing on project summary page (defect 929974). 12. OpenWorks: add link to browse all external data directories (defect 929974). 13. OpenWorks: trap issue with WGS84 shapefiles on newly-created projects (defect 929868). 14. Info/Errors: fix OpenWorks version determination (defect 933725). 15. Subscriptions: add option to filter by data source (defect 923013). 16. Z-MAP Plus / Other Data: add link to configure directories (defect 929974). 17. TvdConvert GUI: fix error when there is only one numeric column in the input file (defect 930846). 18. SeisWorks/SeisLTO: change live trace outline ZGF picture names to use seismic data set name/version rather than seismic file name (defect 910040). WOW 5000.0.1.11 Release Notes Page 5 of 104 March 2014 Version 5000.0.1.10 WOW 5000.0.1.10 is an update, which does not require re-installation of the WebApps software tree. This update is compatible with OpenWorks 5000.8.3.01 and above. 1. Shapefiles: also copy .prj file if it exists when creating shapefiles from ZGF files in OpenWorks project directories (defect 919765). 2. SeisLTO3D: add seismic line/trace to ASCII output option (defect 912486). 3. PickReport: fixed error running on projects with over 15 characters in their name (defect 920331). 4. General: fixed issue overwriting during patch of existing project_keyfacts.dat or survey_keyfacts.dat files (defect 917776). 5. Apache: include instructions and media for performing NIS authentication using mod_auth_external.so and pwauth (see WebApps/dso/external.README). Version 5000.0.1.9 WOW 5000.0.1.9 is an update, which does not require re-installation of the WebApps software tree. This update is compatible with OpenWorks 5000.8.3.01 and above. 1. General: port to OpenWorks 5000.8.3.01 (version 9.1) libraries. 2. OpenWorks: changed well list 'Save to ASCII file' and picks 'Download in Petrel format' to use plain text rather than Excel mime type. 3. Shapefiles: create and allow download of a zip file containing shape file contents for all browser-based shapefile generators (defect 908626). 4. Shapefiles: also copy .prj file if it exists when creating shapefiles from dts and zcm files in OpenWorks project directories (defect 912706). 5. OpenWorks: fixed 3D survey list handling when generating WGS84 or projected shapefiles (defects 912955 and 912956). 6. OpenWorks: do not check 2D line list type when generating shapefiles, allow both 'SL' and '2D' (defect 912081). 7. OpenWorks: fixed error displaying velocity model I3DV header / contents (907813). 8. PickReport: fixed error running on interpretation projects (defect 908039). 9. Subscriptions: fixed issue processing subscriptions with multiple districts (911720). 10. SeisWorks: change live trace outline png images to display seismic data set name rather than file name (defect 910040). 11. SeisWorks: fixed issue with inverted dts fault polygon images (defect 912700). 12. HrzImage: fixed issue with 2D horizon image generation (defect 912208). 13. Z-MAP Plus: fixed error creating world file for ZGF picture GIS images (911633). 14. Z-MAP Plus: provide command-line zgfImage utility to generate GIS images for one or all pictures in a ZGF (defect 911551). 15. General: fixed documentation error on changing between dark/light color schemes (defect 914425). WOW 5000.0.1.11 Release Notes Page 6 of 104 March 2014 Version 5000.0.1.8 WOW 5000.0.1.8 is an update, which does not require re-installation of the WebApps software tree. This update is compatible with OpenWorks 5000.8.0.0 and above. 1. General: new dark color scheme used by default, original light scheme still available. 2. OpenWorks: added new cross-district OpenWorks project data map to display data counts, remarks, CRS, measurement system and other information for all projects in the WOW instance. 3. OpenWorks: allow addition/modification/deletion of a multi-part 'key facts' record per project. 4. OpenWorks: allow addition/modification/deletion of multiple typed remarks per project. 5. OpenWorks: allow editing of the single main project remark. 6. OpenWorks: provide option to convert XY and Lat/Lon coordinates on the Well Header Table display for IPs with a different CRS to the parent PDB. 7. Comparison: display and color-code differences on the well header comparison (defect 899834). 8. QC/QA: new queries for detecting 2D/3D horizon data duplicates, horizon headers without data, and empty horizon data (defect 903476). 9. QC/QA: updated queries for orphaned grid and vector data to reference GRID_HDR_ALL rather than GRID_HDR (defect 901708). 10. Directory browsing: support drill-down for .dts (mapping) and .zcm (zone control) files (defect 906357). 11. SeisWorks: for 3D projects display horizon data rather than header table; for individual horizons display the full path to the external file and its owner (defect 890578). 12. SeisWorks: provide a link at top of page to view thumbnails if generated; change logic to use thumbs generated for either the IP or the parent PDB (defect 907311). 13. SeisLTO3D: added fields Attribute, Version, File and RecordDate to shapefile dbf output (defect 904045/6). Note that this change requires preexisting shapefiles to be recreated. 14. SEG-Y Viewer: fix to correctly handle 8-bit integer files (defect 901722). 15. General: improve handling of single-district instances. 16. General: refresh top bar every 10 minutes to pick up district changes. 17. General: standardize all Save to Excel links to specify .xls content with a default file name (defect 885201). WOW 5000.0.1.11 Release Notes Page 7 of 104 March 2014 Version 5000.0.1.7 WOW 5000.0.1.7 is an update, which does not require re-installation of the WebApps software tree. This update is compatible with OpenWorks 5000.8.0.0 and above. 1. QC/QA: provide option to save results for all projects to a single table when running in cross-project mode (defect 900846). 2. Shapefiles: allow user to specify top or bottom hole location for OpenWorks well shapefiles (defect 899015). 3. Shapefiles: copy project-specific .prj file (if present) when creating polygon shapefiles (defect 898889). 4. Shapefiles: replace file stem spaces with underscores on OpenWorks and ZGF shapefile creation. 5. Shapefile viewer: fixed issue with stringing polygons together incorrectly. 6. OpenWorks: fixed issue with reversed grid color legend (defect 899898). 7. OpenWorks: allow deletion of KRS documents by any member of the WOW_ADMIN_GROUP (defect 901114). 8. SeisLTO: when run in exact mode was not creating .asc files correctly. 9. All GUI utilities: prevent popup dialogs from being covered by the main window. Version 5000.0.1.6 WOW 5000.0.1.6 is an update, which does not require re-installation of the WebApps software tree. This update is compatible with OpenWorks 5000.8.0.0 and above. 1. Utilities: added a command-line and GUI TvdConvert utility for converting between MD and TVD depths in formatted ASCII files (defect 886392). 2. Utilities: added a command-line and GUI SeisPoly utility to spatially clip a 3D seismic volume to specified OpenWorks polygon set (defect 896695). 3. OpenWorks: added external curve name to the real-time monitoring curves report (defect 896394). 4. Shapefiles: corrected .prj contents for WGS84 shapefiles (defect 896658). 5. QC/QA: report count of rows returned in all cases including where reports are truncated to WOW_MAXPOINTS rows. Version 5000.0.1.5 WOW 5000.0.1.5 is an update, which does not require re-installation of the WebApps software tree. This update is compatible with OpenWorks 5000.8.0.0 and above. 1. OpenWorks: added option to display fault centerline sets with image, data values, and optional shapefile generation (defect 878980). 2. OpenWorks: added original coordinates and CRS to the well header page and dropped DMS attributes. Also added original CRS to 2D line pages (defect 873464). WOW 5000.0.1.11 Release Notes Page 8 of 104 March 2014 3. OpenWorks: added additional queries to check for well header denormalization issues for spud/completion dates and formation at TD. 4. OpenWorks: added additional attributes to well location page (country, state, county, on/offshore flag) and to the real-time monitoring curves report (increment, depth units and mode). 5. OpenWorks: fixed issue when displaying well coordinates for IPs with a geographically-projected PDB (defect 886789). 6. OpenWorks: fixed issue saving results in Project Comparison module for log/pick/checkshot comparison types (defect 887649). 7. OpenWorks: fixed error displaying symbols outside of the default Z01-Z110 range (defect 891470). 8. GeoProbe: change project/survey header page to not display entries for data types without directories (defect 889315). 9. HrzImage: added horizon name to output file name (defect 888693). 10. SeisWorks: fixed error in creating live trace outlines for very large bricked/compressed seismic volumes (defect 891791). Version 5000.0.1.4 WOW 5000.0.1.4 is an update, which does not require re-installation of the WebApps software tree. This update is compatible with OpenWorks 5000.8.0.0 and above. 1. Shapefiles: added option to generate WGS84 shapefiles of all IP outlines in WOW or via command-line ’ow2shp OWSYS‘ utility (defect 885936). 2. Shapefiles: added WOW URL to well/line/survey WGS84 shapefiles and line/survey projected shapefiles (defect 880552). 3. Ow2shp: fix issues where surveys have different original CRS to the project (defect 875566). 4. OW: improve Project Summary page performance by changing count queries for VC/R tables (defect 883065). 5. KRS: added loadKRSDocuments script to load simple well/line/survey document URLs (defect 882980). 6. SeisWorks: changed selection and labels to use seismic volume name and version rather than file name, in multiple locations (defect 872340). 7. SeisWorks: added optional SEISWORKS_GROUPING to wow.env: set to 'project' to group by project, 'survey' to group by survey type, which is the default (defect 879695). 8. SeisWorks: fix issue generating live trace outline in browser for surveys with spaces in the name. 9. SeisLTO: added <all> option to GUI to process all surveys for a project; for command-line version, specify survey as 'All3D' (defect 880941). 10. ZM: added options to show all MFD internal files / ZGF internal pictures within a directory, in a single page (defect 880109). WOW 5000.0.1.11 Release Notes Page 9 of 104 March 2014 Version 5000.0.1.3 WOW 5000.0.1.3 is an update, which does not require re-installation of the WebApps software tree. This update is compatible with OpenWorks 5000.8.0.0 and above. 1. QC/QA: clearly annotate certain queries that are only applicable on project databases, e.g. orphan vector detection queries (defect 875442). 2. Subscriptions: trap login failure if the executing user does not have access to a particular instance (defect 875555). 3. Horizon Summary: fix bug displaying thumbnails if survey names have spaces. 4. Project Comparison: modify behavior in cross-instance comparison to always show all projects, ignoring OW_DISTRICT_FILTER (defect 877371). 5. KRS: ensure web links always start with http://. 6. Faults: fix issues with filtering and savings results (defect 978831). 7. Error report and start page: report if Oracle user from wallet is not the same as the WOW Apache user. 8. Seismic/Horizon: improved error messages if external files not readable. 9. CRSConvert: handle (skip) and blank lines in the input file (defect 880038). 10. SeisStats: fix trace counts for newly-created 3dv volumes. 11. SeisLTO: fix for exact algorithm hzdcls error. Version 5000.0.1.2 WOW 5000.0.1.2 is an update, which does not require re-installation of the WebApps software tree. This update is compatible with OpenWorks 5000.8.0.0 and above. 1. Port to OpenWorks 5000.8.0.0 (version 9) libraries. 2. Added generic coordinate conversion capability to convert between any two cartographic reference systems (projected or geographic) with the following functionality: - single-point conversion via WOW browser - crsConvert command line utility for single-point conversion - listcrsids command line utility to list projected and basis CRSs - fileCrsConvert command line utility for file-based conversions - CrsConvert GUI for multiple point file-based conversions. 3. Standardized coordinate precision as 3 dp for XY and 8 dp for Lat/Lon. 4. Added coordinate conversion to IP well header XY coordinates (defect 841472). 5. Added link to display query descriptions in the QC/QA cross-project mode (defect 872544). 6. Fixed error with hrzStats3D/HrzStats3D utility introduced in OpenWorks 5000.0.3.0 (defect 871760). 7. Modified WebAppsUpgrade script to report htdocs links for recreation (defect 867986). 8. Fixed date-related error in well matching module (defect 871974). WOW 5000.0.1.11 Release Notes Page 10 of 104 March 2014 Version 5000.0.1.1 WOW 5000.0.1.1 is an update, which does not require re-installation of the WebApps software tree. This update is compatible with OpenWorks 5000.0.3.0 and above. 1. Added support for Oracle 11 with OpenWorks 5000.0.3.5. 2. Added optional district support for Z-MAP Plus, Other Data, GeoProbe and VIP modules, i.e. restrict displayed data based on current district selection (defect 856038). 3. Added support for GeoProbe V2 ascii/binary horizon file formats (defect 850103). 4. Added sorting of results by name throughout the GeoProbe module. 5. Added LAS viewer improvements: handle up to 250 curves, handle curve names greater than 8 chars, plot curves in a grid rather than a long row (defect 861486). 6. Changed OpenWorks LAS export page to handle curve names greater than 8 chars (defect 862058). 7. Changed date format of spud/completion date in OpenWorks well header page to allow sorting by date (defect 858822). 8. Added ability to display image of .dts mapping files contain fault polygons and no grid; added support for display of .dts files produced in R5000 (defect 863947). 9. Changed SeisWorks seismic long remark add page to only allow addition of existing remark types for the project, which are not already in use for the current data set (defect 859799). 10. Improved performance on SeisWorks survey detail page; added option to filter by project type and survey type (defect 860934). 11. Added command-line arguments to plist utility for survey type and project type. 12. Fixed error with seisStats/SeisStats utility introduced in OpenWorks 5000.0.3.0 (defect 858077). 13. Fixed WOW cosmetics issue in top and side bars when using Internet Explorer 6 or 7 (defect 857223). Version 5000.0.1.0 Important note: WOW 5000.0.1.0 is a point product release, requiring re-installation of the WebApps software tree. WebApps 5000.0.1.0 is compatible with OpenWorks 5000.0.3.0 and above. 1. Port to OpenWorks 5000.0.3.0 (version 8) libraries. 2. Cosmetic redesign with new style sheets. 3. Added a WebAppsUpgrade script as an alternative to WebAppsInstall, allowing existing WebApps 5000.0.0.x sites a simple upgrade without reinstall to 5000.0.1. 4. Added a Real-Time Monitoring module for viewing OpenWire data, launched from the OpenWorks Project Summary page (defect 849790). 5. Added a Well Planning Projects module launched from the OpenWorks Project Summary page (defect 742326). WOW 5000.0.1.11 Release Notes Page 11 of 104 March 2014 6. Added a Well Status page displaying well symbols, launched from the OpenWorks Project Summary page. 7. Added a Well Location page, launched from the Well Summary page (defect 853278). 8. Added option to the “Lat/Lon ⇔ XY Calculator” to support conversion to and from WGS84 (defect 850172). 9. Automatically display ZGF picture thumbnails, if generated by CDA ZgfThumbs, when browsing OpenWorks project external data ZGF directory (defect 849517). 10. Added datum and replacement velocity, and optional display of interpretation project selection criteria, on the OpenWorks Project Summary page. 11. Added option to “Show all well details” in a single table with export to Excel on projects with greater than 1,000 wells (defect 844465). 12. Added option to “Show all document details” in a single table. 13. Added list creation options in the QC/QA module for horizons and 2D/3D navigation; added support for well location, with new QC/QA queries to illustrate. 14. Added automatic hyperlinking for wells/fields/leases in OpenWorks stored queries. 15. Added better support for hardcopy KRS document location attribute (defect 849960). 16. Added “Create project KML file” link to the OpenWorks module. 17. Fixed error in “Map all navigation” for 2D lines for IPs only (defect 854317) 18. Display converted X/Y coordinates for wells in interpretation projects with CRS different from the project database (defect 841472). 19. Fixed error in certain position log displays (defect 853942). 20. Changed the OpenWorks "Search across Projects" well results to honor environmental variable WELL_NAME_SQL (defect 853989). 21. Fixed issue displaying seismic images for certain SeisWorks lines with non-zero datum; datum shifts are now noted and handled correctly (defect 853997). 22. Changed VIP module to list VDBs alphabetically; fixed intermittent plot image error. 23. Changed OpenWorks seismic filter and SeisWorks “Search across projects” to use data set name rather than file name (defect 855332). 24. Fixed various hyperlink issues when using the OpenWorks/SeisWorks Faults module. 25. Added Fault Segment value display and download in the OpenWorks/SeisWorks Faults module (defect 778953). WOW 5000.0.1.11 Release Notes Page 12 of 104 March 2014 Known Problems The addition of attributes to the Live Trace Outline shapefile dbf output (version 5000.0.1.8, defect 904045/6) means that preexisting shapefiles cannot be appended, they must be recreated. When running the SeisLTO GUI over multiple volumes, check that ‘Overwrite’ is set to ‘Yes’. For command-line versions of this module, specify the ‘clobber’ flag. When running through the WOW browser, the error ow_seismic_lto.cgi: seisLTO: sdl_seis3dmap: output_shape: error in function may be encountered in this scenario, with additional diagnostic information in the ‘Errors’ report: shape_output: dbf file <full path> already exists but has 13 fields, 17 required. When deleting old version shapefiles, note that there are three operating system files per shapefile, e.g. lto.shp, lto.shx, lto.dbf, all of which should be removed. WOW 5000.0.1.11 Release Notes Page 13 of 104 March 2014 Pre-Installation Planning Minimum Requirements The minimum requirement for the WOW server is: Server Hardware: Intel Pentium IA32 or X86_64 processor, 2 GB RAM, 4 GB swap, 200 MB disk space for software installation. Server Operating System: Red Hat Enterprise Linux 4 or 5. Server Application Software: Apache version 2, OpenWorks R5000.0.3.x. Important note: WOW does not work with SELinux. SELinux must be disabled. Note that WOW is a server-side application. There is no client-side (Web browser) installation or configuration: Client Hardware: not restricted Client Operating System: not restricted. Windows is preferred, but not mandated. Client Web Browser: Internet Explorer version 7 or above, Mozilla Firefox version 1.0 or above. See Appendix 3 for a description of the product architecture. Other Pre-installation Considerations Reinstallation of the WebApps tree is required for R5000, there is no upgrade path. For sites with R2003 WebApps, having the old conf directory available for comparison may help with the installation process. Before installing, you need to choose or confirm the following: 1. A system on which to run the Apache server. 2. Apache is usually, but not always, installed with the operating system. If installed, directory /etc/httpd will exist. To confirm that Apache is installed, type: prompt> rpm -qa | grep httpd There should be a number of Apache packages installed. If not found, please request your System Administrator obtain and install it – see Appendix 4 for more details. 3. Apache may not be running on the selected system. If Apache is running, i.e. from a previous installation of WOW, you must stop it before continuing (as root): prompt> /usr/sbin/apachectl stop mv /etc/httpd/conf/httpd.conf /etc/httpd/conf/httpd.conf.orig 4. An install location, typically $OWHOME/WebApps, but may be any NFS-exported filesystem, e.g. /apps/WebApps. 5. A user who will run the Apache server. This should be a user with read-write (interpret) access to the OpenWorks projects – typically a data loader or administrator. Do NOT use root or oracle for security reasons. Run the install script as this user, from within an OpenWorks environment. WOW 5000.0.1.11 Release Notes Page 14 of 104 March 2014 6. The domain name for the site. This will default correctly during installation if the site uses DNS to allow the resolving of domain names. To test this, type: nslookup <hostname> in a Linux xterm or at the DOS command prompt. The value returned by the Linux domainname command is not the correct domain name. If nslookup returns an error, you will need to determine whether the host name is visible across the site network. To do this, type ping <hostname> from a DOS prompt on a PC. If the host is recognized, use the host name with no domain specified; if not, use the full IP address obtained from the local /etc/hosts file or from NIS using the Linux command: ypcat hosts | grep <hostname>. 7. Root access is required to execute the root.sh script for Apache configuration. 8. See Appendix 4 if you require anything other than a single standard Apache root installation. Appendix 4 discusses options for customizing the Apache installation, such as using an existing Apache server, changing server name or port, running multiple instances, using alternative authentication methods etc. Licensing WOW uses standard FlexLM licensing with a feature name of WOW. The Web interface to the product simulates a typical user session using the FlexLM ‘linger’ function. Whenever a user clicks on a link in WOW, the license is refreshed for a further 15 minutes. The license is checked back in after 15 minutes of inactivity, without the user needing to logout or close the browser. Note that linger applies only to Web modules, not command-line utilities. See the R5000 installation instructions and Release Notes for how to install licenses, and/or email [email protected] to obtain a valid license key. WOW 5000.0.1.11 Release Notes Page 15 of 104 March 2014 Installation The latest WOW point product release can be obtained by electronic delivery using the Landmark Software Manager (requires PeopleSoft login and password). The downloadable setup.tar.gz file is listed under the product name WebApps, and includes WOW, Corporate Data Archiver, and Project Administrator. Alternatively, the media can be obtained on DVD. The release requires re-installation (new sites) or upgrade (existing sites) of the WebApps software, as described below. Upgrading WebApps using InstallAnywhere (existing sites only) • Download the setup.tar.gz file using the Landmark Software Manager (requires PeopleSoft login and password), or obtain it from DVD. • Login to the WebApps server as the current WebApps software tree owner. • Source the OpenWorks environment if not done by default: prompt> source $OWHOME/templates/.lgclogin prompt> . $OWHOME/templates/.lgcprofile (if C shell) (if Bourne shell) • Extract and run the installer: prompt> gzip -dc setup.tar.gz | tar xf prompt> sh setup.bin • Continue through the installation wizard, accepting license terms and confirming the existing OWHOME and WOW_HOME locations. The installer will rename the current WebApps directory, create a new WebApps directory and extract the new media into it, then launch the WebAppsUpgrade upgrade script to copy the main configuration files from the old to the new WebApps directory. No additional Apache configuration is required; the existing Apache server will be utilized. Installing WebApps using InstallAnywhere (new sites only) The overall installation process consists of installing the latest point product release, then applying any subsequent patches or updates, as described in this section. • Download the setup.tar.gz file using the Landmark Software Manager (requires PeopleSoft login and password), or obtain it from DVD. • Login to the chosen server as the chosen user. • Source the OpenWorks environment if not done by default: prompt> source $OWHOME/templates/.lgclogin prompt> . $OWHOME/templates/.lgcprofile • (if C shell) (if Bourne shell) Extract and run the installer: prompt> gzip -dc setup.tar.gz | tar xf prompt> sh setup.bin WOW 5000.0.1.11 Release Notes Page 16 of 104 March 2014 • Continue through the installation wizard, accepting license terms and confirming OWHOME and WOW_HOME locations. After the files are extracted, continue with the WebAppsInstall installation script as documented below. Important note: the WebApps post installation script can be re-run if required, i.e. without rerunning the InstallAnywhere installer: cd $OWHOME/WebApps/install ./WebAppsInstall –o $OWHOME Stage 1 – Installation Parameters The WebAppsInstall script is wrapper to allow selection of which WebApps application to install. Select option 1 to install WOW. WebApps Configuration R5000.0 ==================================================== Install WOW (required 1st step) Install Corporate Data Archiver Install Project Administrator EXIT ...................................... 1 2 3 0 Please enter option=> 1 After an environmental check, the installation script prompts for the following parameters: • WOW Apache server host: the name of the system on which Apache will run: see pre-installation considerations. This is referred to as <hostname> hereafter. • WOW Apache server URL: if DNS is configured this will default correctly, if not, enter http://<hostname>. • WOW Apache user: defaults to the user name you are using to run the install script: this should be a user with read-write access to the OpenWorks projects – typically a data loader or administrator. • WOW Apache user default group: the default group of the user running Apache. Enter the primary group for the WOW user. • WOW administration group: enter the Linux group for a privileged group of users who can do WOW configuration through the browser. To disable browser-based configuration file editing, set this to a non-existent group. • ORACLE_HOME: the ORACLE_HOME location, default taken from the environment. Confirm the default value. • ORACLE_SID: the ORACLE_SID location, default taken from the environment. Confirm the default value. • LM_LICENSE_FILE: the location of the OpenWorks license file, defaults to $OWHOME/lam/license.dat if not set in the environment. WOW 5000.0.1.11 Release Notes Page 17 of 104 March 2014 • Apache administrator’s email: this email address is used in error messages when Apache has internal errors. Specify the system administrator’s email. • Company email suffix: the part of your company email addresses following the @ symbol, e.g. shell.com • Data administrator’s email: a comma-separated list of email addresses for the data administrators, to whom error form output will be sent. The forms will only work if email is configured to work internally – see the Notes on WOW email section. • SMTP mail server: address of the mail server used for outgoing SMTP email. This can usually be found by typing nslookup mailhost, e.g. mailhost.shell.com. If not present it will default to host name. • Security level (B or C): Level B provides universal read without authentication, but authenticates any write actions. Level C authenticates all access. See the Security section for more detail. • Parent directory for WebApps exports: enter a parent directory for WOW to use for subscription output, exported shapefiles, geo-referenced images, ZGFs, LAS files etc. • Review: check the options specified; and re-run if there are any errors. Important note: the OpenWorks configuration directory setting $OW_CONF_DIR will be included automatically in the wow.env file, if set within the environment of the installer. During this stage the $OWHOME/WebApps/conf/wow.env file is created containing all the variables required by WOW. This is the single most important configuration file for WOW; see Appendix 1 for an example and Appendix 2 for a list of all configuration files. During this stage the installation script also modifies environmental variables and URLs in the WOW tree, and creates links for various devkit shell utilities. See Appendix 5 for further background on the devkit shells. Stage 2 – Apache Configuration Important note: see Appendix 4 for non-default installation options, including bypassing this Apache configuration step, i.e. if wanting to use an existing Apache server. The installation of Apache must be run as root. This step configures the main Apache configuration file httpd.conf, then creates a ‘root.sh’ file for execution as root in a separate xterm. The selected system may not already running Apache and the default port of 80 must be available. The root.sh script does the following: • Copies httpd.conf into the Apache configuration directory /etc/httpd/conf. • Starts Apache WOW 5000.0.1.11 Release Notes Page 18 of 104 March 2014 • Creates an example password file in the Apache configuration directory, containing the installation user only (with same username as password) and further configures WOW for level B or C security. See the Security section for more detail. • Copies the WOW default index.html to the Apache web root directory. • Copies the WOW favicon.ico to the Apache web root directory. Run $OWHOME/WebApps/install/root.sh as root before continuing. There should be a message indicating that Apache has started on the server. Stage 3 – Finalizing the Install Configuring WOW_DATA_DIR directories: directories for subscription output and other WOW exports are automatically created beneath $WOW_DATA_DIR. The subscription directory will also be linked to $OWHOME/WebApps/htdocs/wow_reports. See the Subscription section later in this document. A message will indicate complete installation. To check the installation, run mozilla or other Linux browser, typing in the indicated URL, e.g. http://<hostname>.<domain>. To test PC connectivity, try the same URL in a PC browser. If level C security was selected, you will be prompted for username and password: use the WOW username for both. Once the license is installed and any required Oracle 11 changes are made (see below) WOW should be fully functional. See the Troubleshooting section if errors are encountered. Oracle 11 Notes This section is applicable only to sites running OpenWorks 5000.0.3.5 or above, using Oracle version 11.2.0.2. Oracle 11 client does not include required 32-bit libraries, i.e. there is no $ORACLE_HOME/lib32 directory. Instead, OpenWorks provides the Oracle 11 32-bit libraries in its 'Instant Client' location, $OWHOME/oracle32/instantclient. This requires three changes in wow.env, to ORACLE_HOME, ORACLE_LIBRARY and LD_LIBRARY_PATH, e.g.: old: ORACLE_HOME=/apps/oracle/OraHome1 new: ORACLE_HOME=/apps/oracle/product/11.2.0/dbhome_1 old: ORACLE_LIBRARY=${ORACLE_HOME}/lib32/libclntsh.so new: ORACLE_LIBRARY=${OWHOME}/oracle32/instantclient/libclntsh.so.11.1 old: LD_LIBRARY_PATH= ${OWHOME}/lib:${ORACLE_HOME}/lib32:${WOW_HOME}/tcltk/lib new: LD_LIBRARY_PATH= ${OWHOME}/lib:${OWHOME}/oracle32/instantclient:${WOW_HOME}/tcltk/lib Note that ${OWHOME}/SeisWorks/lib is no longer required and may be removed from LD_LIBRARY_PATH. WOW 5000.0.1.11 Release Notes Page 19 of 104 March 2014 Configuring Districts Support for districts – collections of project data typically based on geographic or business unit criteria – is provided by OpenWorks in R5000. No additional configuration is required within WOW. Districts are listed in the OpenWorks configuration directory $OW_CONF_DIR (typically $OWHOME/conf) district.dat file. The district is set on a per-client basis by clicking on ‘Change District/SID’ on the WOW top bar. This sets a cookie that stores the district name locally and ‘remembers’ it until changed by any user on the same client. This option will also change the OWSYSSID (OpenWorks Oracle instance) to match that specified for the chosen district. Patching the Installation WebApps patches (bug fixes only) and updates (bug fixes and minor enhancements) are designed as simple compatible additions or replacements of existing files in the software directories. They are provided as compressed tar files, available for download from the Landmark Software Manager. Before installing any WebApps patch or update, please see the associated README for detailed installation instructions. This README is available alongside the patch on the Landmark Software Manager by clicking the Install Guide icon. Current version can be obtained by clicking on ‘About’ on the WOW browser interface. Release/Update/Patch history: 5000.0.0.0 – foundation release compatible with OpenWorks 5000.0.0.1 (March 2008) 5000.0.0.1 – update compatible with OpenWorks 5000.0.0.2 (June 2008) 5000.0.0.2 – update compatible with OpenWorks 5000.0.0.3 (October 2008) 5000.0.0.3 – update compatible with OpenWorks 5000.0.0.3 (December 2008) 5000.0.0.4 – update compatible with OpenWorks 5000.0.1.0 (March 2009) 5000.0.0.5 – update compatible with OpenWorks 5000.0.1.0 (June 2009) 5000.0.0.6 – update compatible with OpenWorks 5000.0.1.0 (September 2009) 5000.0.0.7 – update compatible with OpenWorks 5000.0.2.0 (December 2009) 5000.0.0.8 – update compatible with OpenWorks 5000.0.2.0 (March 2010) 5000.0.0.9 – update compatible with OpenWorks 5000.0.2.0 (June 2010) 5000.0.0.10 – update compatible with OpenWorks 5000.0.2.5 (September 2010) 5000.0.0.11 – update compatible with OpenWorks 5000.0.2.5 (December 2010) 5000.0.1.0 – point product release compatible with OpenWorks 5000.0.3 (February 2011) 5000.0.1.1 – update compatible with OpenWorks 5000.0.3.0 (May 2011) 5000.0.1.2 – update compatible with OpenWorks 5000.8.0.0 (September 2011) 5000.0.1.3 – update compatible with OpenWorks 5000.8.0.0 (December 2011) 5000.0.1.4 – update compatible with OpenWorks 5000.8.0.0 (March 2012) WOW 5000.0.1.11 Release Notes Page 20 of 104 March 2014 5000.0.1.5 – update compatible with OpenWorks 5000.8.0.0 (June 2012) 5000.0.1.6 – update compatible with OpenWorks 5000.8.0.0 (September 2012) 5000.0.1.7 – update compatible with OpenWorks 5000.8.0.0 (December 2012) 5000.0.1.8 – update compatible with OpenWorks 5000.8.0.0 (March 2013) 5000.0.1.9 – update compatible with OpenWorks 5000.8.3.01 (June 2013) 5000.0.1.10 – update compatible with OpenWorks 5000.8.3.01 (September 2013) 5000.0.1.11 – update compatible with OpenWorks 5000.8.3.01 (March 2014) Compatibility matrix: Important note: dynamic libraries in OpenWorks R5000 introduce a strong dependency between OpenWorks and WebApps versions, as summarized in the table below. WebApps version Release date OW library version Minimum OpenWorks version* 5000.0.0.0 Mar-08 1 5000.0.0.1 5000.0.0.1 Jun-08 2 5000.0.0.2 5000.0.0.2 Oct-08 3 5000.0.0.3 5000.0.0.3 Dec-08 3 5000.0.0.3 5000.0.0.4 Mar-09 4 5000.0.1.0 5000.0.0.5 Jun-09 4 5000.0.1.0 5000.0.0.6 Sep-09 4 5000.0.1.0 5000.0.0.7 Dec-09 6 5000.0.2.0 5000.0.0.8 Mar-10 6 5000.0.2.0 5000.0.0.9 Jun-10 6 5000.0.2.0 5000.0.0.10 Sep-10 6 5000.0.2.5 5000.0.0.11 Dec-10 6 5000.0.2.5 5000.0.1.0 Feb-11 8 5000.0.3.0 5000.0.1.1 May-11 8 5000.0.3.0 5000.0.1.2 Sep-11 9 5000.8.0.0 5000.0.1.3 Dec-11 9 5000.8.0.0 5000.0.1.4 Mar-12 9 5000.8.0.0 5000.0.1.5 Jun-12 9 5000.8.0.0 5000.0.1.6 Sep-12 9 5000.8.0.0 5000.0.1.7 Dec-12 9 5000.8.0.0 5000.0.1.8 Mar-13 9 5000.8.0.0 5000.0.1.9 Jun-13 9.1 5000.8.3.01 5000.0.1.10 Sep-13 9.1 5000.8.3.01 5000.0.1.11 Mar-13 9.1 5000.8.3.01 * Note: OpenWorks is backward compatible with WebApps, but not vice versa, i.e. OpenWorks version determines the WebApps version. For example: a site running OpenWorks 5000.8.1.x may run any WebApps version up to and including 5000.0.1.8, but may not install 5000.0.1.9. WOW 5000.0.1.11 Release Notes Page 21 of 104 March 2014 This is the end of the compulsory installation process. To modify the default security sections or to add additional users, read the Security section. If the site uses Z-MAP Plus, GeoProbe, VIP, ProMAX or AssetJournal, read the Configuring Other Landmark Applications section. WOW 5000.0.1.11 Release Notes Page 22 of 104 March 2014 Configuring Security Options This section applies to the WOW browser client only. All WOW command-line and GUI utilities obeys identical Oracle and Linux file permissions as any other OpenWorks or SeisWorks utility. All WOW operations are actually executed by the WOW Apache user. Security levels as described below only emulate end user access. To perform a particular operation in WOW, both the WOW Apache user and the end user must have legitimate access. There are two different options for implementing security in WOW: full emulation of user access requiring authentication/authorization for all operations (level C), and open read access, requiring authentication only for write operations, e.g. creating well lists (level B). Security Levels Level B – Universal read-only access with emulation on write functionality: This provides full emulation but only on the write-back modules (e.g. creating well lists, adding/deleting KRS documents). Any user that can login to any system over the company network can access all OpenWorks, SeisWorks and other data, read-only, except for named exclusions. Universal browsing is thus encouraged without having to provide a password, but as soon as an attempt is made to write back to the database (e.g. loading a KRS document), the user is prompted for a login and password. This is the default security level. Level C – Full emulation: Users are required to login at all times. The authenticated username is then used to authorize access at an individual project level, exactly as if the user is logging on to a Linux workstation in the site. This is as secure as the underlying applications, but at the expense of extra administration to maintain the password file. Extra administration is also required to grant casual (non-OpenWorks) users access. To access WOW, a casual browser must: • have a Linux account • be added to Oracle as an internal user • be granted at least BROWSE access to the required OpenWorks projects • be granted read access to external data directories Named Exclusions Specified ‘tight’ projects can be restricted entirely from being viewed in WOW, irrespective of security level. Access is restricted to projects and directories by modifying files in the $OWHOME/WebApps/conf directory as described below. OpenWorks: modify the OW_PROJ_WHERE_CLAUSE in wow.env to restrict projects to those that have a particular name or comment. Modifying this requires a degree of SQL knowledge; contact support if in doubt. SeisWorks: the restricted_plist.dat file lists the names of any ‘tight’ SeisWorks surveys. They will appear in listings but will not be further accessible. Z-MAP Plus/Other: the restricted_dir_list.dat file lists the names of any ‘tight’ Linux directories. These will appear in listings but will not be further accessible. WOW 5000.0.1.11 Release Notes Page 23 of 104 March 2014 Adding Users to the Apache Password File A default password file is created during installation with only the install user added. Adding additional users requires root access for permission to edit the password file /etc/httpd/conf/.wp. Updating the password file using ypcat. The format for the password file is identical to that of a Linux passwd file, except that only the first two fields (user and encrypted password) are used. Apache uses the same crypt function as Linux, so one method of adding users is: prompt> ypcat passwd > /etc/httpd/conf/.wp If using this method, edit the file and delete users based on criteria such as group membership etc. It is not considered secure to use the actual /etc/passwd file itself. It is the site's responsibility to keep the password file up-to-date, e.g. by scheduling a cron job to refresh it at regular intervals. For additional security, the password file name and location can be changed, and made readable by the Apache server user only. Updating the password file manually. To add new users manually using the htpasswd facility, e.g. to add user demo, passwd demo: prompt> /usr/bin/htpasswd –b /etc/httpd/conf/.wp demo demo Use the additional –c flag when creating a new passwd file, or –help for complete usage. Integrating with NIS. If a site uses NIS, it is possible to authenticate directly using an optional Apache module - see Appendix 4 for details. Changing Security Level between B and C Two steps are required to switch from B to C security and vice-versa: 1. Modify the .htaccess file: Edit the $OWHOME/WebApps/cgi-bin/.htaccess file. For level C security, comment the <FilesMatch></FilesMatch> lines. For level B security, uncomment the <FilesMatch></FilesMatch> lines. prompt> cd $OWHOME/WebApps/cgi-bin prompt> vi .htaccess # For level C security comment <FilesMatch></FilesMatch> #<FilesMatch “(input|delete)\.cgi$”> AuthType basic AuthName "WOW Linux" (a descriptive name for the authorization form) AuthUserFile "/etc/apache2/.wp" Require valid-user #</FilesMatch> # For level B security uncomment <FilesMatch></FilesMatch> <FilesMatch “(input|delete)\.cgi$”> AuthType basic AuthName "WOW Linux" (a descriptive name for the authorization form) AuthUserFile "/etc/apache2/.wp" Require valid-user WOW 5000.0.1.11 Release Notes Page 24 of 104 March 2014 </FilesMatch> 2. Update wow.env: prompt> vi $OWHOME/WebApps/conf/wow.env and change SECURITY_LEVEL to B or C. Protecting ‘Static’ Documents The WOW security model is largely aimed at preventing access to dynamic pages created on the fly in WOW. This section explains how to protect certain static documents, e.g. an AssetJournal project, which requires selective security. The restricted dir list mechanism described earlier in this section provides blanket protection for certain directories, but even legitimate users cannot get to these directories. One possibility is to set up a custom .htaccess and password file for the specified directory. Apache will then authenticate all access to static files in that directory. Notes that this will have no effect on WOW dynamic pages, e.g. Z MAP Plus browsing. To implement: 1. Create a password file. Use the htpasswd utility to create a passwd file. The example below creates a file called ajpasswd with user ‘tight’, passwd ‘aj2001’: prompt> htpasswd –bc /etc/apache2/.ajpasswd tight aj2001 2. Create an .htaccess file. Create a file with contents as listed below: AuthType basic AuthName "Tight AJ Projects" AuthUserFile "/etc/apache2/.ajpasswd" Require valid-user 3. Copy .htaccess to the required directory. Place the file into all directories that require the same security policy. 4. Configure Apache to recognize the .htaccess file: prompt> vi /etc/httpd/conf/httpd.conf Change AllowOverride from None to AuthConfig within the <Directory /> stanza. 5. Restart Apache: prompt> /usr/sbin/apachectl restart WOW 5000.0.1.11 Release Notes Page 25 of 104 March 2014 Configuring Other Landmark Applications Z-MAP Plus / Other Data Unlike OpenWorks and SeisWorks which have strong project management, Z-MAP Plus and some other data can be widely scattered in different locations. WOW needs to know where to look for these data. The methodology employed is to maintain a list of parent directories in configuration files in $OWHOME/WebApps/conf. For Z-MAP Plus, the directories specified are simply start points for directory browsing, i.e. no project structure is assumed. To configure, add directories to zmap_projdirs.dat: prompt> cd $OWHOME/WebApps/conf prompt> cp zmap_projdirs.dat.default zmap_projdirs.dat prompt> vi zmap_projdirs.dat … and add top-level directories for browsing in WOW, e.g.: ######################################################################### # # This file contains a list of project directories for Z-MAP Plus. # File format: # - directory (required) # - district (optional; use 'all' if shared between districts) # ######################################################################### /data1/gom/zmap GOM /data2/int/zmap INT /data3/misc/zmap all An identical concept is provided for ‘Other Data’, e.g. directories containing SEG-Y, LAS, CGM, DGN, Shape, DBF and general ASCII and Web files; other_projdirs.dat: prompt> cd $OWHOME/WebApps/conf prompt> cp other_projdirs.dat.default other_projdirs.dat prompt> vi other_projdirs.dat … and add top-level directories for browsing in WOW. Alternatively, members of the WOW_ADMIN_GROUP can configure both these files through the browser by clicking on ‘Admin’ on the WOW top bar. ASCII/Web files: Both these modules also cater for two special categories of files: • files that are composed only of ASCII characters • files that are universally recognized by Web browsers, e.g. with extensions of .html, .gif, .jpg etc. These are referred to as mime types. If there are ASCII file types (e.g. .vel for velocity surveys) which should be viewed through WOW, do the following: WOW 5000.0.1.11 Release Notes Page 26 of 104 March 2014 prompt> cd $OWHOME/WebApps/conf prompt> cp ascii_file_extensions.dat.default ascii_file_extensions.dat prompt> vi ascii_file_extensions.dat And add in file extensions as required. A similar approach can be adopted for common mime types using the file $OWHOME/WebApps/conf/web_file_extensions.dat. Members of the WOW_ADMIN_GROUP can configure both these files through the browser by clicking on ‘Admin’ on the WOW top bar. GeoProbe As with Z-MAP Plus, GeoProbe projects can be widely scattered across filesystems; GeoProbe does not have a strong 'project' structure like OpenWorks. WOW needs to know where to look for these data. The WOW for GeoProbe module uses two methods to identify GeoProbe projects. Type GP projects exist beneath any of the parent directories listed in the gp_projdirs.dat configuration file in $OWHOME/WebApps/conf. The directories must be direct parent directories of GeoProbe projects: prompt> cd $OWHOME/WebApps/conf prompt> cp gp_projdirs.dat.default gp_projdirs.dat prompt> vi gp_projdirs.dat … add parent directories of GeoProbe projects, e.g.: ######################################################################### # # This file contains a list of project directories for GeoProbe. # File format: # - directory (required) # - district (optional; use 'all' if shared between districts) # ######################################################################### /data1/gom/geoprobe GOM /data2/int/geoprobe INT /data3/misc/geoprobe Type OW projects are OpenWorks-linked; they exist beneath any of the OpenWorks external storage directories listed in owdir.dat, e.g. <owdir.dat entry>/OW_PROJ_DATA/<OpenWorks Project>/GeoProbe. WOW for GeoProbe does not use the home directory-based projects.dat file. VIP As with Z-MAP Plus VIP data can be widely scattered across filesystems. WOW needs to know where to look for these data. The methodology employed is to maintain a list of parent directories in configuration files in $OWHOME/WebApps/conf. For VIP, the directories specified must be parent directories of VDB files/directories: WOW 5000.0.1.11 Release Notes Page 27 of 104 March 2014 prompt> cd $OWHOME/WebApps/conf prompt> cp vip_projdirs.dat.default vip_projdirs.dat prompt> vi vip_projdirs.dat …add parent directories of VIP VBDs, e.g.: ######################################################################### # # This file contains a list of project directories for VIP. # File format: # - directory (required) # - district (optional; use 'all' if shared between districts) # ######################################################################### /data1/gom/VIP_data GOM /data2/int/VIP_data INT /data3/misc/VIP_data all Alternatively, members of the WOW_ADMIN_GROUP can configure these files through the browser by clicking on ‘Admin’ on the WOW top bar. Important note: VIP VDB files/directories may also be viewed in WOW through the ZMAP Plus/Other Data directory browsing modules. ProMAX To enable ProMAX data viewing in WOW, configure promax.env: prompt> cd $OWHOME/WebApps/conf prompt> cp promax.env.default promax.env prompt> vi promax.env …check that the ProMAX environment is correctly specified, particularly PROMAX_HOME, PROMAX_DATA_HOME and PROMAX_64BIT (1=64-bit, 0=32-bit). Also, create a link from promaxsh32 or promaxsh64 to promaxsh in $OWHOME/WebApps/bin, e.g. for 64-bit: cd $OWHOME/WebApps/bin ln -s promaxsh64 promaxsh Multiple PROMAX_DATA_HOME locations can also be configured. To implement: prompt> cd $OWHOME/WebApps/conf prompt> cp promax_data_homes.dat.default promax_data_homes.dat prompt> vi promax_data_homes.dat … add all PROMAX_DATA_HOME locations If promax_data_homes.dat exists, a link will appear on the ProMAX area page to select or change location. If this file is not present, PROMAX_DATA_HOME is taken from promax.env. Utility pmxGetAreas can be used as a test of whether ProMAX is correctly configured. WOW 5000.0.1.11 Release Notes Page 28 of 104 March 2014 AssetJournal AssetJournal projects contain web documents (using standard mime types such as html text and images) which are supported directly by the browser. This requires that files be addressable via a URL, i.e. they must reside below the Web root. Location(s) for AssetJournal browsing: In some sites these data can be quite widely scattered, so WOW provides a convenient grouping mechanism. The parent location for AssetJournal is $OWHOME/WebApps/htdocs/ assetjournal_data. The directory should be created, and links created within this directory, to match the entries in a typical $HOME/pjprojects.xml, e.g. prompt> prompt> prompt> prompt> prompt> prompt> mkdir $OWHOME/WebApps/htdocs/assetjournal_data cd $OWHOME/WebApps/htdocs/assetjournal_data ln -s <directorylocation> <directoryname> ln -s /data1/AJ_Data/GOM GOM ln -s /data2/AJ_Deepwater Deepwater ln -s /data2/AJ_noshore Onshore By creating and deleting links to data, directories may be simply exposed or hidden. Publishing: AssetJournal ‘publishing’ is designed to allow the automatic sharing of AssetJournal projects in a two-tier system of ‘working’ vs. ‘published’ projects. The publication takes place in situ by creating a .auto_publish file in the project directory. The .auto_publish file is a simple ASCII file, which may be edited outside of WOW with any text editor. The format is illustrated below: Title: AssetJournal Tutorial Project Author: Andrew Greig Date: 2001/08/14 Category: Support Keywords: Landmark,AssetJournal,Badleys,support,tutorial Description: This doc describes product usage, including the Image drag&drop and text annotation functionality. If this file is to be created outside of WOW, note the following points: • a space is required after the ‘:’ before the metadata itself • keywords are comma-separated without spaces after the comma • only the description may span multiple lines (must be last in the file). OpenWorks/SeisWorks integration: Any AssetJournal project linked into $OWHOME/WebApps/htdocs/assetjournal_data (see exposing additional directories) or a single subdirectory level below, will appear as a hypertext link on the OpenWorks or SeisWorks project summary page in WOW, provided its name begins with (or matches) the name of the OpenWorks or SeisWorks project. For example, if the SeisWorks survey is named mc3d, an AssetJournal project named mc3d_dataloading_history will automatically appear on the SeisWorks survey summary page. The name will be the internal AssetJournal title, rather than the project (directory) name. WOW 5000.0.1.11 Release Notes Page 29 of 104 March 2014 Configuring Subscription Tools and Email The subscription tools allows users to request automatic notification by email in the event that data are changed or added within a registered area of interest – by specified project, geographic area or data type. These tools allow users to establish, view and modify their subscriptions directly through html forms. A series of cron jobs execute queries, which compose emails providing users with a list of new/changed data from WOW. To configure the subscription tools, you need to set up a cron job to run as the Apache user. A default crontab is configured during installation, with contents in $OWHOME/WebApps/install/wow_crontab. This can be added manually to other users using the crontab command: prompt> prompt> 0 4 * 0 4 * 0 4 1 setenv EDITOR vi crontab -e * 2-6 /your/OWHOME/WebApps/bin/DoAllSubscriptions Daily * 1 /your/OWHOME/WebApps/bin/DoAllSubscriptions Weekly * * /your/OWHOME/WebApps/bin/DoAllSubscriptions Monthly OpenWorks subscriptions are stored in the OWSYS schema in table wow_ow_push. From version 5000.0.0.11, it is possible to execute ad hoc subscriptions which search for changes over a specified number of days, rather than just daily, weekly or monthly. This can be executed on the command-line or via cron using DoAdhocSubscription; or interactively from the Subscriptions window in the WOW browser. prompt> DoAdhocSubscription Usage: DoAdhocSubscription owproj ?days? ?email? ?min_lat? ?max_lat? ?min_lon? ?max_lon? ?wells? ?logs? ?picks? ?checkshots? ?leases? ?fields? ?nav? ?seismic? ?horizons? ?faults? ?docs? prompt> DoAdhocSubscription TEAPOT_DOME 3 [email protected] Processing ad hoc subscription request (3 days) for fred on TEAPOT_DOME Notes on WOW Email The subscription module described above, as well as data error forms, requires access to an SMTP (outgoing) mail server in order to correctly send email to relevant users. Prior to version 5000.0.0.11 sendmail was also used in places for mail transport; this is no longer supported. The mail server is typically identified by a host alias of mailhost, i.e.: prompt> nslookup mailhost The mail server must be correctly identified to WebApps in the wow.env file in $OWHOME/WebApps/conf, e.g.: # Address of SMTP mail server (usually 'nslookup mailhost') WOW_MAILSERVER=smtp.oilco.com; export WOW_MAILSERVER WOW 5000.0.1.11 Release Notes Page 30 of 104 March 2014 To test WOW email on the command-line, use the testEmail utility: prompt> testEmail Usage: testEmail <plain|html|sendmail> <email address> Set WOW_DEBUG=1 for additional diagnostic information. prompt> testEmail plain [email protected] 'sendEmail plain' completed in 8 seconds. Check [email protected] inbox; most likely email has been delivered. prompt> testEmail html [email protected] 'sendEmail html' completed in 8 seconds. Check [email protected] inbox; most likely email has been delivered. If configured correctly, the email should appear in your email client within a few seconds. Email from the WOW server may also be tested in the WOW browser from the Errors link. WOW 5000.0.1.11 Release Notes Page 31 of 104 March 2014 Customizing the WOW Interface Although WOW will install and run ‘out of the box’, it is designed to form part of a larger subsurface E&P portal. For example, the portal would cover project databases via WOW, other internal databases, links to electronic document management systems, external links etc. WOW behaves identically to any other Web site that contains a combination of static and dynamic content. This means that WOW URLs can be called from or embedded in any other Web page. Knowledge of html and Web authoring is required to create Web pages that invoke WOW components. The static pages and style sheets that provide the default WOW interface reside in $OWHOME/WebApps/htdocs. Halliburton recommends that you do NOT modify these files. Rather, create a new Web page that links to the relevant WOW page directly. The ‘home page’ for the Apache installation is /var/www/html/index.html. This file is replaced with the WOW home page on installation, but any client-provided page may be used. In this case, the full WOW URL is http://<host>.<domain>/wow/, with the trailing slash required. Changing the Color Scheme WebApps 5000.0.1.8 introduces a choice of color schemes, which applies to all client browsers accessing the Apache server. The 'dark' and 'light' schemes broadly match the choice offered in OpenWorks and DecisionSpace. The default is 'dark'. To change to light: prompt> cd $OWHOME/WebApps/htdocs; cp wow_css.js.light wow_css.js To change to dark: prompt> cd $OWHOME/WebApps/htdocs; cp wow_css.js.dark wow_css.js Note that browsers may cache both JavaScript and style sheet files, so that refreshing the browser may be required to get WOW to display correctly. Changing Default Project Listings In WOW R2003, the choice of district would determine the list of SeisWorks projects, and the choice of SID the list of OpenWorks projects. In R5000, each OpenWorks project belongs to a specific district. In some sites it may be preferable for the choice of district to govern the OpenWorks project list, e.g. if there are multiple unrelated districts all sharing a single instance. To change the default behavior of listing all OpenWorks projects for the instance, set the environmental variable OW_DISTRICT_FILTER in the wow.env file, e.g.: prompt> cd $OWHOME/WebApps/conf prompt> vi wow.env … uncomment and edit the lines below as required: # Filter OpenWorks projects by current district, # or display all for current SID (1=on 0=off) OW_DISTRICT_FILTER=1; export OW_DISTRICT_FILTER WOW 5000.0.1.11 Release Notes Page 32 of 104 March 2014 Up to version 5000.0.1.10 the default OpenWorks project listing is of project databases (PDBs). Since version 5000.0.1.11 this changes to a hierarchy mode which displays interpretation projects (IPs) beneath their associated PDB. For SeisWorks-mode survey listings, the default has changed from listing surveys in IPs by survey type, to by project. These defaults may be changed by setting environmental variables WOW_OW_LISTING, WOW_SW_LISTING and WOW_SW_GROUPING in the wow.env file: prompt> cd $OWHOME/WebApps/conf prompt> vi wow.env … uncomment and modify these environmental variables: # OpenWorks/SeisWorks listing default: pdb, ip or all #WOW_OW_LISTING=pdb; export WOW_OW_LISTING #WOW_SW_LISTING=ip; export WOW_SW_LISTING # SeisWorks group by default: project or survey #WOW_SW_GROUPING=survey; export WOW_SW_GROUPING Adding a Site Label A site-specific label can be added to the WOW front page title, e.g. to change the default label from ‘WOW R5000’ to ‘WOW R5000 – Houston Site’: prompt> cd $OWHOME/WebApps/conf prompt> vi wow.env … uncomment and modify the WOW_SITE_LABEL environmental variable: # Optional site label for WOW front page WOW_SITE_LABEL="- Houston Site"; export WOW_SITE_LABEL Adding to the WOW Menu The WOW left frame menu is partly customizable. This allows site administrators to add links directly into the WOW menu, by modifying a simple configuration file. See $OWHOME/WebApps/conf/wow_menu.dat.default for details. prompt> cd $OWHOME/WebApps/conf prompt> cp wow_menu.dat.default wow_menu.dat prompt> vi wow_menu.dat ############################################################################## # # This file contains metadata for adding links to the WOW left frame # It consists of the following tab-delimited fields: # Name: short name for the link, e.g. "Landmark Graphics" # URL: fully-specified URL, e.g. http://www.lgc.com # Note: use double quotes for entries with a space in the name # ############################################################################## "Landmark Graphics" http://www.lgc.com "Exprodat" http://www.exprodat.com "Company Home Page" http://www.oilco.com Alternatively, members of the WOW_ADMIN_GROUP can configure this file through the browser by clicking on ‘Admin’ on the WOW top bar. WOW 5000.0.1.11 Release Notes Page 33 of 104 March 2014 Adding a ‘Custom’ Intro Page If a file wow_custom.html exists in $OWHOME/WebApps/htdocs, a link to this page will appear on the WOW front page. This can be used to add site-specific content. prompt> cd $OWHOME/WebApps/htdocs prompt> cp wow_custom.html.default wow_custom.html Edit wow_custom.html in any HTML authoring tool and add your desired content. Changing Default Well Name Display By default WOW displays wells using the common well name attribute WELL_NAME_FREE. The default can be overridden for the site by setting an environmental variable WELL_NAME_SQL in the wow.env file, e.g.: prompt> cd $OWHOME/WebApps/conf prompt> vi wow.env … add line: WELL_NAME_SQL=”well_uwi”; export WELL_NAME_SQL The default is to use common well name unless null in which case UWI is used, i.e.: WELL_NAME_SQL=”nvl(well_name_free,well_uwi)”;export WELL_NAME_SQL The site administrator can provide any SQL fragment that is queryable as an attribute e.g. ”well_uwi” ”current_well_lease_name || ’ | ’ || current_well_lease_no” ”current_company || ’ | ’ || current_well_lease_no” Note that the attribute is also used to control well display order. It is not possible to have per-user control over well name display format. Adding Extra Well Header Attributes Additional well header attributes from the well_master table may be displayed in the OpenWorks module, by setting an environmental variable WELL_HEADER_EXTRAS in the wow.env file, e.g.: prompt> cd $OWHOME/WebApps/conf prompt> vi wow.env … uncomment and edit the lines below as required, e.g.: # SQL to add extra attributes to WOW well header query WELL_HEADER_EXTRAS='permit_no "Permit", data_acquisition_type "Acquisition Type",'; export WELL_HEADER_EXTRAS Note that the comma before the closing single quote is required. Viewing R2003 and R5000 Project Summary Pages Side-by-Side For the OpenWorks and SeisWorks modules, project summary pages may be viewed side-by-side between R2003 and R5000 versions. This is envisaged as a transitional activity, in order to assist with QC the migration to R5000; it will only work in project names are unchanged between R2003 and R5000. WOW 5000.0.1.11 Release Notes Page 34 of 104 March 2014 Important note: this functionality is deprecated and will be removed in a future release. To implement, add the environmental variable WOW2003_URL to wow.env, e.g.: prompt> cd $OWHOME/WebApps/conf prompt> vi wow.env … add or modify the WOW2003_URL environmental variable): # Fully qualified URL to WOW 2003 server WOW2003_URL=http://wow2003; export WOW2003_URL Adding Links to Project Summary Pages External links may be added to any OpenWorks or SeisWorks project summary page, by modifying a simple configuration file. These links may be to external websites, documents published under WOW, or even other dynamic WOW pages (see KRS section below). See $OWHOME/WebApps/conf/ wow_project_links.dat.default for details. prompt> cd $OWHOME/WebApps/conf prompt> cp wow_project_links.dat.default wow_project_links.dat prompt> vi wow_project_links.dat ############################################################################## # # The file is used in the WOW OpenWorks and SeisWorks project summary pages to # provide a list of direct links to external data or documents, using a URL. # # Each line consists of 5 fields: Use double-quotes if there are spaces # # - OpenWorks project name, e.g. SWDEVKIT # - SeisWorks survey name, e.g. devnor # ('n/a' for OpenWorks, '2D' if a 2D project) # - Data type, e.g. Z-MAPPlus # - Label, e.g. "Culture data for project" # - URL, e.g. http://wow/bin/zm_zgflist.cgi?zgf=/data/zmap/culture.zgf # ############################################################################## SWDEVKIT n/a Miscellaneous "Farm-in Offer" http://wow.lgc.com/wow/wow_relnotes.pdf SWDEVKIT n/a Miscellaneous "Landmark Support" http://www.halliburton.com/ps/default.aspx?navid=1062&pageid=2453 SWDEVKIT n/a VIP "My favourite VDB file" http://wow/bin/vip_case_list.cgi?vdb=/data1/VIP_data/111offshore.vdb DEVNOR_IP devnor Z-MAPPlus "Culture data for project" http://wow/bin/zm_zgflist.cgi?zgf=/data3/zmap/29a2_amp.zgf MINKIT_IP 2D GeoProbe "Viz data in GeoProbe" http://wow/bin/gp_proj_summary.cgi?project=/data1/GeoProbe_data/Demo2/gerge WOW 5000.0.1.11 Release Notes Page 35 of 104 March 2014 Accessing WOW pages from other applications District Redirects Most WOW pages can be accessed directly using an HTTP GET, i.e. a full URL with arguments. To see what this URL look like, place the cursor over any link in WOW, use the right mouse button and select option ‘Open Link in New Window’. The URL will be displayed in the address bar of the new window. In the examples below, http://wow.oilco.com is an illustrative main WOW URL, (environmental variable WOW_URL in wow.env), TESTDATA is an example OpenWorks project, and GOM an example district. For example, to view a particular Well Summary page directly: http://wow.oilco.com/bin/ow_well.cgi?owproj=TESTDATA&wellid=1&headeronly=true If a site uses multiple districts, then this direct approach may fail, for example if the current district is set to one that does not contain the specified project. In these situations it is necessary to use the wow_redirect.cgi script to set the district before proceeding to the target page. For example, to launch the SeisWorks module from outside WOW with a specified district: http://wow.oilco.com/bin/wow_redirect.cgi?dist=GOM&url=http://wow.oilco.com/bin/sw.cgi If the URL itself contains arguments, then it is necessary to replace ‘&’ with ‘@’ so that these arguments are then correctly passed on by the redirect script. For the well example above, the resulting redirect syntax is: http://wow.oilco.com/bin/wow_redirect.cgi?dist=GOM&url=http://wow.oilco.com/bin/ow_we ll.cgi?owproj=TESTDATA@wellid=1@headeronly=true WOW 5000.0.1.11 Release Notes Page 36 of 104 March 2014 Configuring KRS OpenWorks knowledge reference system (KRS) documents can be loaded and viewed through WOW. The document types supported are ‘Hardcopy’, which is a reference to a physical location, and ‘Web link’, which is any URL beginning with http://. Note that WOW itself can be used a source of both dynamic URLs to any related WOW page, or as a server to ‘publish’ a directory of static documents beneath WOW’s Web root. To display online files via WOW in this manner, create a link from the document parent directory to beneath the WOW Web root. For example if documents are in the/data1/wowdocs directory: prompt> cd $OWHOME/WebApps/htdocs prompt> ln –s /data1/wowdocs wowdocs This provides location independence, i.e. the file /data1/wowdocs/report123.html is published as http://wow.oilco.com/wow/data1/wowdocs/report.html. To obtain the hyperlink for any WOW page, e.g. the SEG-Y analyzer, hover over the link in WOW to see the syntax. These are usually self-explanatory, e.g. http://wow.oilco.com/bin/file_segy.cgi?file=/data1/other_data/segyfiles/fp32ibm.sgy. Bulk Loading KRS Documents A simple KRS document bulk loader is provided by the loadKRSDocuments utility, with Usage: loadKRSDocuments owproj dsource dfile e.g.: prompt> source $OWHOME/WebApps/templates/wow.login prompt> . $OWHOME/WebApps/templates/wow.profile prompt> loadKRSDocuments TESTDATA BCR krs.dat (if C-shell) (if Bourne shell) The format of the file to be loaded is fixed as follows: it must comprise whitespacedelimited ASCII text containing 7 attributes per line, constituting a single document to be loaded: • Data type - must be one of well, nav2d or nav3d • Data identifier - UWI for well, line name for nav2d, survey name for nav3d • Document name - use quotes if name has spaces, e.g. "Well 12 Scanned Logs" • Document category - must match an existing category, e.g. WELL, SEISMIC, MAP • Document sub-category - may be new; use "" to indicate blank, e.g. LOGS • URL or hardcopy location - URLs must begin with http:// • Comments (optional) An example krs_bulk_load_example.dat is provided in $WOW_HOME/conf. WOW 5000.0.1.11 Release Notes Page 37 of 104 March 2014 OpenWorks QC/QA Queries The QC/QA module allows the storage and execution of SQL queries against OpenWorks projects. It differs from the stored queries in OpenWorks in that queries are ‘global’, i.e. they are stored once without needing to be copied between projects. Multiple queries can be run sequentially against a single project, or a single query can be run across multiple projects. The objective is to run a series of queries that provide a project health check, e.g. wells without KB, wells without TD etc. Important note: The QC/QA logic as expressed in these queries may not apply to all sites, or made need modification based on local conditions. These queries are not meant to be universally applicable and infallible. Although a standard suite is provided, these may be copied to a site-specific version and edited. Editing the queries as provided is not recommended, as edits will be overwritten by subsequent WebApps updates. Queries can be edited or added to this list by copying a .sql file to the $OWHOME/WebApps/conf/sqlscripts directory. Files should follow a certain format to execute properly within the browser: Important points to note: • The first line must contain ‘REM title:’ – this is displayed as the title in the browser. • The second line must contain ‘REM dtype:’ – this tells the browser what to create the hyperlink to. Currently well, wellloc (well location), field, lease, nav (line), nav3d (survey) seismic and horizon data types are supported. Set dtype to some other value (e.g. none) if not a simple well, well location, field, lease, navigation, seismic or horizon query. • Multiple optional ‘REM: description:' lines will be displayed if present, allowing documentation of queries and any variables expected. These are also used in a dynamically generated query description page. • The first attribute selected must be the primary key for that data type, i.e. well_id, well_location_id, field_id, lease_id, seis_geom_set_id, seismic_data_set_id, horizon_attr_hdr_id. This first attribute then appears as a hypertext link in the browser. To turn off this behavior, set dtype to some other value, e.g. none. • The final line must contain a ‘/’ and nothing else. • Support for standard SQL*Plus variable substitution is provided (&varname syntax). Variables will be displayed in the order in which they appear in the SQL. • Support for list creation is provided for those data types that support lists: well, field, lease, nav, nav3d and horizon. The advantage of this format is that files can be created and tested in standard SQL*Plus – the ‘REM’ lines are treated as remarks and ignored, and the final ‘/’ is the standard SQL terminator. If a query parses and executes in SQL*Plus, it will usually execute in the browser, with one exception: variable names including hyphen, period and open/close parentheses are illegal in SQL but will work here. WOW 5000.0.1.11 Release Notes Page 38 of 104 March 2014 To turn on the display of the SQL in WOW, set the WOW_SHOW_SQL environmental variable to 1 (on) in $OWHOME/WebApps/conf/wow.env. The default is 0 (off): # Show SQL in QC/QA module: 1=on 0=off WOW_SHOW_SQL=1; export WOW_SHOW_SQL An example QC/QA query is provided below: REM title: Wells with 0 or null total depth REM dtype: well REM description: This query checks for wells with TD. select well_id ID, well_uwi "UWI", well_name_free "Common Well Name", final_td "TD" from well_master where final_td is null or final_td = 0 order by well_name_free / Important note: Optionally, individual lists of QC/QA queries will be picked up from a user's $HOME/sqlscripts directory, if present. This option will only work if level C security is configured. Users should prefix query names with their initials to ensure they are grouped together in the browser. WOW 5000.0.1.11 Release Notes Page 39 of 104 March 2014 Command-Line Utilities OpenWorks and SeisWorks project data management changes significantly in R5000. WOW provides a number of command-line utilities to assist users in understanding the new approach. These allow listing of districts, projects, surveys, lines, seismic, and horizons. First source the WebApps environment before running any command-line utilities: (if C-shell) prompt> source $OWHOME/WebApps/templates/wow.login prompt> . $OWHOME/WebApps/templates/wow.profile (if Bourne shell) Running the Utilities Utility dlist: list districts, e.g.: prompt> dlist Deepwater District1 OWDefault Regional prompt> dlist long District OWSYSSID --------------District1 LINKSID Regional OWLINUX5 Deepwater OWLINUX5 OWDefault OWLINUX5 DPath ----/home/bruce/conf_d1 /home/bruce/conf_dr /home/bruce/conf_dx /apps/ow/conf Utility checkDistrict: check and report current district and instance, e.g.: prompt> checkDistrict District set to: Regional Instance set to: OWLINUX5 Utility owlist: list OpenWorks project, e.g.: prompt> owlist Project -------------------ARCHIVES FLOUNDER GOM OCEVET SALT SWDEVKIT TESTDATA devnor2_ip devnor_ip empty2d_ip hew3d01_ip long2d_ip minkit_ip ocevet_ip pwt_ip salt3d_ip WOW 5000.0.1.11 Release Notes District -------------------OWDefault OWDefault Regional Regional Regional OWDefault OWDefault OWDefault OWDefault OWDefault OWDefault OWDefault OWDefault Regional OWDefault Regional Page 40 of 104 Type PDB ---- --PDB PDB PDB PDB PDB PDB PDB IP SWDEVKIT IP SWDEVKIT IP SWDEVKIT IP SWDEVKIT IP SWDEVKIT IP SWDEVKIT IP OCEVET IP SWDEVKIT IP SALT March 2014 Utility prjlist: list ‘projects’ names only, i.e. 3D surveys and OpenWorks projects containing 2D lines, with external storage defined. The convention is to list 3D surveys as <owproj>/<survey>, with project databases capitalized and interpretation projects in lowercase, e.g.: prompt> prjlist SWDEVKIT SWDEVKIT/devnor SWDEVKIT/devnor2 SWDEVKIT/hew3d01 SWDEVKIT/pwt devnor2_ip/devnor2 devnor_ip/devnor goliath2d minkit2d minkit_ip pwt_ip/pwt Utility plist: list ‘projects’, i.e. 3D surveys and OpenWorks projects containing 2D lines, plus counts of the main data types and other useful attributes, e.g.: prompt> plist ID -6 6 10 10 0 181 0 0 182 182 0 Survey -----devnor devnor devnor2 devnor2 goliath2d hew3d01 minkit2d minkit_ip pwt pwt SWDEVKIT OW Project ---------SWDEVKIT devnor_ip SWDEVKIT devnor2_ip goliath2d SWDEVKIT minkit2d minkit_ip SWDEVKIT pwt_ip SWDEVKIT Type Lines ---- ----3D 0 3D 0 3D 0 3D 0 2D 169 3D 0 2D 4 2D 4 3D 0 3D 0 2D 181 Seis ----24 24 5 5 224 1 8 8 5 5 280 Hrz --367 367 9 9 2 1 18 18 5 5 53 Last Interp Flts ----------- ---2007-07-31 3 2007-07-31 3 2007-07-14 3 2007-07-14 3 2007-07-09 0 2007-07-09 0 2007-07-09 1 2007-07-09 1 2007-07-09 0 2007-07-09 0 2007-08-05 1 Segs Datum Storage ---- ----- ------33 0 devnor 33 0 devnor 3 0 devnor2 3 0 devnor2 0 0 lgcmast 0 3 hew3d01 8 0 lgcmast devms 8 1200 lgcmast devms 0 0 pwt 0 0 pwt 8 0 lgcmast devms The plist utility contains optional command-line arguments of survey type and project type, i.e. plist <2D|3D|both> <pdb|ip|all> Utility surveylist: lists 3D surveys for the specified OpenWorks project, with the option to only display those with external storage (i.e. used by SeisWorks): prompt> surveylist SWDEVKIT ID Survey Storage Directory ----- -------------------- -------------------6 devnor devnor 10 devnor2 devnor2 183 flndr3d 181 hew3d01 hew3d01 185 hew3d02 hew3d01 186 hew3d03 hew3d01 182 pwt pwt WOW 5000.0.1.11 Release Notes Page 41 of 104 March 2014 Utility linelist: lists 2D lines for the specified OpenWorks project or external storage directory, e.g.: prompt> linelist minkit2d 2D ID Linename Start End Traces ----- ------------------------------ ----- ----- ----2 BSA-105 1 900 900 3 BSA-115 1 900 900 4 BSA-154 1 720 720 5 BSA-164 1 955 955 prompt> linelist lgc_master Master Linename -------BSA-105_______________________ FLNDR-1_______________________ FLNDR-2_______________________ FLNDR-3_______________________ FLNDR-4_______________________ FLNDR-5_______________________ FLNDR-6_______________________ Utility seislist: lists seismic files: seislist owproj ?gtype? ?survey? ?fmt? e.g.: prompt> seislist SWDEVKIT 3D devnor bri ID Survey or Line/Seismic File ----- --------------------------11 devnor/AAA.bri 12 devnor/brick_32_float.bri 13 devnor/brick_float16_x8x8x16.bri 14 devnor/dev08_float8_10_10_20.bri 15 devnor/dev08_float8_inline.bri 16 devnor/dev08_float8_xline.bri 17 devnor/dev08_inline_float8.bri prompt> seislist SWDEVKIT 3D devnor (lists all 3D seismic for specified survey) prompt> seislist SWDEVKIT 3D (lists all 3D seismic for all surveys in the OW project) prompt> seislist SWDEVKIT (lists 2D/3D seismic for all surveys/lines in the OW project) Utility hrzlist: lists horizon headers: hrzlist owproj ?gtype? ?survey? e.g.: prompt> hrzlist SWDEVKIT 3D devnor2 ID Name|Source|Attr|Version ----- -----------------------406 Coverage_Pieces01.3dv|LGC|DEPTH STRUCTURE| 348 Coverage_Pieces01.3dv|LGC|TIME_STRUCTURE| 327 Coverage_dev0801.3dv|LGC|TIME_STRUCTURE| 346 top_13_add_renamed_x2|LGC|DEPTH_STRUCTURE| 342 top_reservoir_plus_100|LGC|DEPTH_STRUCTURE| 343 top_reservoir_plus_400|LGC|DEPTH_STRUCTURE| 344 top_reservoir_plus_700|LGC|AMPLITUDE| 345 top_reservoir_plus_900|LGC|AMPLITUDE| WOW 5000.0.1.11 Release Notes Page 42 of 104 March 2014 Important note: handing spaces in arguments: If arguments have spaces, for example survey name, it is necessary to both quote and use braces, e.g. prompt> seislist SWDEVKIT 3D "{devnor survey 2}" Utility ow_prj_sql: runs SQL*Plus for the specified OpenWorks project. This is similar to the OpenWorks ow_prj_access script, except that the project password is not printed to the screen, but is used to connect directly to Oracle. As with ow_prj_access, the user running the utility must have the OW_ADMINISTRATOR role. prompt> ow_prj_sql testdata SQL*Plus: Release 10.2.0.3.0 - Production on Thu Aug 9 18:47:27 2007 Copyright (c) 1982, 2006, Oracle. All Rights Reserved. Connected to: … SQL> select count(*) from well_master; COUNT(*) ---------37 SQL> exit Utility ow_user_sql: runs SQL*Plus for the specified OpenWorks project. This is similar to the above ow_prj_sql script, except that the Oracle connection is made as the user, with the appropriate project access role granted and schema set. Unlike ow_prj_sql, the user running the utility does not need to have the OW_ADMINISTRATOR role. prompt> ow_user_sql TESTDATA SQL*Plus: Release 10.2.0.3.0 - Production on Mon Jun 21 14:56:10 2010 Copyright (c) 1982, 2006, Oracle. All Rights Reserved. Connected to: … Connected -------------------------------------------------------------------------------Connected to TESTDATA as BRUCE with role MANAGE_TESTDATA on 21-JUN-10 Utility pickReport: lists picks to screen or file, including the following attributes: UWI, Well Name, Pick Name, Interpreter, X, Y, MD, TVD, TVDSS, TWT, and TD_NAME. Utility checkshotReport: lists picks to screen or file, including the following attributes: UWI, Well Name, Time Depth Name, Interpreter, X, Y, TVD below TD Datum, MD below Well Elev, TVDSS below Well Elev, TWT, Int Velocity, Avg Velocity. An alternative way to execute these reports is to use the PickReport and CheckshotReport graphical user interfaces. Utilities zgfpiclist, zgfpicinfo, zgf2shp, zgfImage: see Converting ZGF Pictures to Shapefiles in Batch. WOW 5000.0.1.11 Release Notes Page 43 of 104 March 2014 Utility lasexport: utility to export LAS files for a single well. Usage: lasexport owproj uwi ?dir? ?curveList? ?top? ?base? e.g.: prompt> lasexport GOM365 04019011430000 - exports all curves for the specified well to the default $WOW_DATA_DIR/wow_images prompt> lasexport GOM365 04019011430000 /tmp - exports all curves for the specified well to /tmp prompt> lasexport GOM365 04019011430000 /tmp 345,346,388,401 - exports only the specified log curve IDs for the specified well to /tmp Utility findWells: utility to find a number of wells by UWI or common well name across multiple OpenWorks projects. The utility outputs a tab-separated list of project, well_id, UWI, common well name and WOW url. Usage: findWells wellfile e.g.: prompt> findWells welllist.inp > welllist.out Utility wow_err: command-line version of the WOW browser ‘Errors’ link; reports diagnostic information for the command-line and GUI utilities. prompt> wow_err Setting up WebApps environment... Date: 2010-06-21 15:23 Version: WebApps 5000.0.0.9 (2010-06-24) OpenWorks: 5000.0.2.2 District: Regional SID: OWLINUX5 OS: Linux linux5 2.6.9-34.ELsmp #1 SMP Fri Feb 24 16:56:28 EST 2006 x86_64 x86_64 x86_64 GNU/Linux Release: Red Hat Enterprise Linux AS release 4 (Nahant Update 3) User: uid=500(bruce) gid=100(users) groups=100(users) Oracle access : OK WOW license : OK OPENWORKS license : OK CDARCHIVER license : OK PROJADMIN license : OK WOW Environment: /data/development/WebApps/conf/wow.env … WOW 5000.0.1.11 Release Notes Page 44 of 104 March 2014 The WOW GUI The WOW GUI provides a single interface to launching most of the WOW graphical user interfaces and other command-line utilities. In an OpenWorks xterm, set the WebApps environment first, then run wowgui: prompt> source $OWHOME/WebApps/templates/wow.login (if C shell) prompt> . $OWHOME/WebApps/templates/wow.profile (if Bourne shell) prompt> wowgui The GUI is illustrated below: Note also the Launch and Extras menus, allowing access to these additional WOW utilities: • OpenWorks to KML conversion GUI (Ow2kml) • OpenWorks to shapefile conversion GUI (Ow2shp) • Navigation shapefiles creation GUI (NavShape) • Live trace outlines creation GUI (SeisLTO) • Seismic statistics calculation GUI (SeisStats) • Seismic polygon clipping (SeisPoly) • Horizon 3D statistics calculation GUI (HrzStats3D) • Horizon GIS images conversion GUI (HrzImage) • Horizon thumbnail creation GUI (HrzThumbs: requires CDA license) • Pick report (Pickreport) WOW 5000.0.1.11 Release Notes Page 45 of 104 March 2014 • Checkshot report (CheckshotReport) • Generic coordinate converter (CrsConvert) • Generic MD-TVD converter (TvdConvert) • ZGF to shapefile conversion GUI (Zgf2Shape) • ZGF picture thumbnail creation GUI (ZgfThumbs: requires CDA license) • WOW browser, WebApps and Tcl xterms • Commands owlist plist seislist hrzlist linelist surveylist. WOW 5000.0.1.11 Release Notes Page 46 of 104 March 2014 Coordinate Conversion WOW has historically had a single-point ‘Lat/Lon ⇔ XY Calculator’ which converts coordinates within the context of the OpenWorks project, i.e. between projected and geographic coordinates using the project’s CRS. Version 5000.0.1.0 added the option to use WGS84 as the geographic coordinate system, allowing for datum shifting. New in version 5000.0.1.2 are generic coordinate conversion utilities that will convert between any two cartographic reference systems (projected or geographic), provided the conversion is allowed by the underlying Blue Marble conversion software. Datum shifting is carried out automatically. The following have been added, illustrated further below: • single-point conversion via WOW browser (on the OpenWorks project list page) • crsids command line utility to list projected and basis CRSs • crsConvert command line utility for single-point conversion • fileCrsConvert command line utility for file-based conversions • CrsConvert GUI for multiple point file-based conversions. Utility crsids: lists project and basis CRS ID and name for all or a specified project. The CRS IDs are required for use in crsConvert and fileCrsConvert. prompt> crsids Project ----------CURVEMODE FLOUNDER GOM IRAQ_REG KMOC OCEVET RDTEST SALT SWDEVKIT TEAPOT_DOME UTM16 WGS84 667: 670: 709: 727: 679: 707: 720: 705: 671: 713: 676: 370: Project CRS -----------------------utm-55 2 utm-55 1 UTM15_1 UTM 38N Nahrwan 1967 - Iraq kmoc_utm42_kras UTM30N BG EuropeanDatum1950SP UTM 31N 3E TXSC4204 Project Default CRS 1 Wyoming State Pl NAD 1927 UTM16/Clarke1866/NAD27/feet World Geodetic System 1984 41: 669: 252: 726: 678: 103: 103: 252: 666: 252: 675: 0: Basis CRS -----------------------Australian Geodetic 1966 Unknown - Australian 1965 North American Datum 1927 Nahrwan 1967 - IRAQ - epsg1587 Pulkovo 1942 - Hungary 1 European Datum 1950 European Datum 1950 North American Datum 1927 UNKNOWN North American Datum 1927 North American Datum 1927 prompt> crsids IRAQ_REG Project: IRAQ_REG CRS ID: 727 (UTM 38N Nahrwan 1967 - Iraq) Basis ID: 726 (Nahrwan 1967 - Iraq - epsg1587) Utility crsConvert: command-line single-point conversion between any two cartographic reference systems (projected or geographic). Note the order of arguments: either X Y or Lon Lat (as opposed to Lat Lon). Usage: crsConvert xlon ylat src_crs_id target_crs_id prompt> crsConvert 43.4 36.9 726 727 357441.541 4084682.830 WOW 5000.0.1.11 Release Notes Page 47 of 104 March 2014 Utility fileCrsConvert: command-line file-based multiple-point conversion between any two cartographic reference systems (projected or geographic). The utility takes as input a columnar ASCII file, column IDs for the coordinates to convert, and source/target CRS IDs. Converted coordinates are inserted at the beginning of each line in the output file. Any header lines in the files will be ignored if prefixed with a # symbol. Usage: fileCrsConvert filein fileout xloncol ylatcol src_crs_id target_crs_id prompt> fileCrsConvert iraq1.dat iraq2.dat 3 2 726 727 Utility CrsConvert: GUI for file-based multiple-point conversion between any two cartographic reference systems (projected or geographic). The user choses a conversion direction (one of four options) and specifies the input and output data files; the input is displayed in table form in the GUI. Then choose the CRS selection mode, either list all CRSs or just those in use in the OW projects (a shorter list). After choosing an input and output CRS and X Y or Lat Lon columns, click ‘Run’ and then ‘View Output’: Utilities fileXY2LL and fileLL2XY: file-based bulk conversion of X/Y to Lat/Long coordinates (and vice versa) within the context of a specified OW project. These are deprecated in favor of fileCrsConvert. These utilities takes as input a columnar ASCII file, compute latitude and longitude for the specified column IDs containing the X and Y coordinates (or vice-versa), and inserts these at the beginning of each line in the file. If the crsflag is specified as project, the CRS information is taken from the specified OpenWorks project; if wgs84 conversion to WGS84 geographic datum is carried out. Usage: fileXY2LL owproj filein fileout Xcol Ycol ?crsflag? Usage: fileLL2XY owproj filein fileout Latcol Loncol ?crsflag? WOW 5000.0.1.11 Release Notes Page 48 of 104 March 2014 MD/TVD Conversion New in version 5000.0.1.6 is a generic conversion utility that will convert an ASCII file of well-related measured depth (MD) data to true vertical depth (TVD), also including subsea true vertical depth (TVDSS) and X/Y absolute and relative coordinates for each point. The reverse operation is also possible, i.e. from TVD to MD. The following have been added: • fileMDtoTVD command line utility for file-based conversions • fileTVDtoMD command line utility for file-based conversions • TvdConvert GUI for file-based conversions. Utilities fileMDtoTVD and fileTVDtoMD: file-based bulk conversion of MD to TVD (and vice versa) within the context of a specified OW project. These utilities takes as input an OpenWorks project name, a columnar ASCII file, and column number within the file for UWI and MD or TVD columns. The corresponding depth is computed and additional attributes are inserted at the beginning of each line of the specified output file. Any header lines in the files will be ignored if prefixed with a # symbol. Command-line usage: prompt> fileMDtoTVD Usage: fileMDtoTVD owproj filein fileout md_col uwi_col ?delim? ?units? prompt> fileMDtoTVD Usage: fileTVDtoMD owproj filein fileout tvd_col uwi_col ?delim? ?units? <owproj> OpenWorks project name <filein> input ASCII file name <fileout> output ASCII file name <tvd_col/md_col> column no. containing the depth measure to be converted <uwi_col> column no. containing the well UWI <delim> delimiter: Space, Tab or Comma <units> depth units: 1 = meters, 2 = feet Example: prompt> fileMDtoTVD picks.dat picks2.dat 5 1 Tab 1 Utility TvdConvert: GUI for file-based multiple-point MD/TVD conversion. The user choses an OpenWorks project, a conversion direction, and specifies the input and output data files. The input is displayed in table form in the GUI and the separator (space, tab or comma) is determined. Note that must be provided, there is no way to default this. After specifying depth units, click ‘Run’ and then ‘View Output’: To run the TvdConvert graphical user interface, first source the WebApps environment then type the appropriate command: prompt> source $OWHOME/WebApps/templates/wow.login prompt> . $OWHOME/WebApps/templates/wow.profile prompt> TvdConvert WOW 5000.0.1.11 Release Notes Page 49 of 104 (if C-shell) (if Bourne shell) March 2014 The TvdConvert GUI is illustrated below. TvdConvert may also be launched from the wowgui interface. WOW 5000.0.1.11 Release Notes Page 50 of 104 March 2014 Integrating with Google Earth This module provides the ability to create Google Earth format .kmz files from OpenWorks projects. These .kmz files are in fact zip files containing the .kml file with spatial information, and associated .png files for well, line and survey icons. Coverage includes well locations, position logs, 2D lines, 3D surveys and OpenWorks project extents based on well data. Important note: this module converts project X/Y coordinates into lat/long using the WGS84 geodetic datum, which may differ from the project geodetic datum. To execute from a graphical user interface, first source the WebApps environment then type Ow2kml. Ow2kml may also be launched from the wowgui interface. prompt> source $OWHOME/WebApps/templates/wow.login prompt> . $OWHOME/WebApps/templates/wow.profile prompt> Ow2kml (if C-shell) (if Bourne shell) The GUI is illustrated below. Select any project, or OWSYS to generate OpenWorks project extents. An output .kmz file must also be selected. By default, all wells, surveys and lines will be included; specify lists to subset if required. There are also options to include position logs (no by default) and to use spud date to display wells over time. To execute on the command-line using ow2kml, first source the WebApps environment, then type ow2kml to see the usage: WOW 5000.0.1.11 Release Notes Page 51 of 104 March 2014 prompt> ow2kml Usage: ow2kml owproj ?fileout? ?wellListID? ?posLogFlag? ?timeSpanFlag? ?surveyListID? ?lineListID? <owproj> OpenWorks project name <fileout> Full path to output .kmz file <wellListID> well list ID: -1 = all wells (default), 0 = no wells <posLogFlag> 1 = include position logs (default), 0 = exclude position logs <timeSpanFlag> 1 = use spud date to display wells over time, 0 = don’t use (default) <surveyListID> 3D survey list ID: -1 = all surveys (default), 0 = no surveys <lineListID> 2D line list ID: -1 = all lines (default), 0 = no lines For example, to generate a default .kmz containing all data for project FLOUNDER: prompt> ow2kml FLOUNDER /tmp/flounder.kmz Processing FLOUNDER wells+poslogs, 3D surveys, 2D lines to /tmp/flounder.kmz - opening kml file - writing styles - processing 6 wells - processing 2 surveys - processing 25 lines - closing kml file - zipping up kmz /tmp/flounder.kmz Specify project OWSYS to generate OpenWorks project database and interpretation project extents, e.g. prompt> ow2kml OWSYS /tmp/projects.kmz Network links: OWSYS and project-level kmz files may also be served dynamically using a region-based network link. These are in fact produced on the Web server and streamed to the client, such as Google Earth. In the examples below, http://wow.oilco.com is an illustrative main WOW URL (environmental variable WOW_URL in wow.env), OWLINUX5 is an example OpenWorks instance, and TEAPOT_DOME an example district: To see all project outlines, and zoom in to activate a project region: http://wow.oilco.com/bin/ow2kml.cgi If in a multi-Oracle-instance environment, instance must be specified: http://wow.oilco.com/bin/ow2kml.cgi?sid=OWLINUX5 To create a network link for an individual project: http://wow.oilco.com/bin/ow2kml.cgi?owproj=TEAPOT_DOME Browser execution: from version 5000.0.0.11, kml files may also be generated and downloaded directly from WOW, on the OpenWorks Project List and Summary pages. WOW 5000.0.1.11 Release Notes Page 52 of 104 March 2014 Creating OpenWorks WGS84 Shapefiles in Batch WOW interactively produces WGS84 geographic shapefiles of wells, position logs, 2D lines and 3D surveys from the OpenWorks Project Summary page. This process can optionally be run on the command-line of from a graphical user interface. Important note: this module converts project X/Y coordinates into lat/long using the WGS84 geodetic datum, which may differ from the project geodetic datum. To execute from a graphical user interface, first source the WebApps environment then type Ow2shp. Ow2shp may also be launched from the wowgui interface. prompt> source $OWHOME/WebApps/templates/wow.login prompt> . $OWHOME/WebApps/templates/wow.profile prompt> Ow2shp (if C-shell) (if Bourne shell) The GUI is illustrated below. Select any project, an output directory and an optional suffix to help distinguish the output files. By default, all wells, surveys and lines will be included; specify lists to subset if required. There is also an option to include position logs (no by default). To execute on the command-line using ow2shp, first source the WebApps environment, then type ow2shp to see the usage: WOW 5000.0.1.11 Release Notes Page 53 of 104 March 2014 prompt> ow2shp Usage: ow2shp owproj ?shpdir? ?suffix? ?wellListID? ?posLogFlag? ?lineListID? ?survListID? ?botHoleFlag? <owproj> OpenWorks project name <shpdir> Full path to output shapefile directory <suffix> Optional suffix to include in shapefile name <wellListID> well list ID: -1 = all wells (default), 0 = no wells <posLogFlag> 1 = include position logs (default), 0 = exclude position logs <lineListID> 2D line list ID: -1 = all lines (default), 0 = no lines <surveyListID> 3D survey list ID: -1 = all surveys (default), 0 = no surveys <botHoleFlag> 1 = use bottom hole location, 0 = use top hole location (default) For example, to generate shapefiles containing all data for project FLOUNDER in /tmp with suffix Sep10: prompt> ow2shp FLOUNDER /tmp Sep10 Processing TEAPOT_DOME wells+poslogs, 3D surveys, 2D lines to /tmp - created /tmp/TEAPOT_DOME_Sep10_wgs84_wells.shp - created /tmp/TEAPOT_DOME_Sep10_wgs84_poslogs.shp - created /tmp/TEAPOT_DOME_Sep10_wgs84_lines.shp - created /tmp/TEAPOT_DOME_Sep10_wgs84_surveys.shp Interpretation Project outlines: from version 5000.0.1.4, shape files containing WGS84 interpretation project outlines may also be generated and downloaded directly from WOW, on the OpenWorks Project Summary page. For command-line generation, use ow2shp with project specified as OWSYS, e.g. prompt> ow2shp OWSYS $HOME all_interp_projects Processing interpretation project outlines to /home/bruce - created /home/bruce/all_interp_projects.shp Creating Projected Navigation Shapefiles in Batch WOW interactively produces XY projected shapefiles of 2D and 3D navigation, one project/survey at a time. This process can optionally be run in batch to produce shapefiles for all projects. The script navShapeAll will process navigation shapefiles in batch for multiple projects. navShapeAll has the following arguments: -p <projtype:2d|3d|all> process all, all 2D or all 3D projects -o <override directory> optional directory to write to -s <shapetype:poly|grid> 'poly' for polygon, 'grid' for points (3D only) -l <lineinc> line increment for points (3D only) -t <traceinc> trace increment for points. WOW 5000.0.1.11 Release Notes Page 54 of 104 March 2014 The directory override allows all shapefiles to be written to a single location, rather than the default $WOW_DATA_DIR/wow_shapes/<owproj> directory. To create navigation shapefiles for a single project/survey, use navShape with usage: navShape owproj survey gtype ?lineinc? ?traceinc? ?shapetype? ?shp? e.g. navShape SWDEVKIT devnor 3D Use survey All3D to process all surveys in the project. An alternative way to create navigation shapefiles is to use the NavShape graphical user interface, illustrated below. First source the WebApps environment then type NavShape: prompt> source $OWHOME/WebApps/templates/wow.login prompt> . $OWHOME/WebApps/templates/wow.profile prompt> NavShape (if C-shell) (if Bourne shell) NavShape may also be launched from the wowgui interface. Important note: navShapeAll will skip surveys listed in a file named plist.bad in the directory of execution. This allows the user to rapidly skip any suspect data causing the process to fail, without needing to attempt to fix the issue. WOW 5000.0.1.11 Release Notes Page 55 of 104 March 2014 Creating Horizon Images in Batch WOW interactively produces images of horizons, one at a time, for use as backdrops in GIS applications. This process can optionally be run in batch to produce images for all horizons in a specified project. The script hrzImageBatch has the following usage: hrzImageBatch owproj survey gtype ?xsize? ?clm? ?dir? <owproj> OpenWorks project name <survey> SeisWorks survey name – use All3D for all 3D surveys in the OpenWorks project, dummy or repeat OpenWorks project name for all 2D lines <gtype> SeisWorks survey type (2D/3D) <xsize> approximate image width in pixels, default 600 <clm> optional SeisWorks color map (clm) file name, default is spectrum <dir> optional directory to write to, default $WOW_DATA_DIR/wow_images/<owproj> The example below will create the .jpg and .jpgw images for horizons in 3D survey colt in the /tmp directory. The images will be created using the rspectrum colormap and will have a width of 1000 pixels: prompt> hrzImageBatch SWDEVKIT colt 3D 1000 rspectrum.clm /tmp Important note: handing spaces in arguments: If the survey name has spaces it is necessary to quote and use braces, e.g. prompt> hrzImageBatch SWDEVKIT "{colt survey}" 3D The example below will create the .jpg and .jpgw images for horizons for all 2D lines in the OpenWorks project minkit_ip in the default directory. The images will be created using the default spectrum colormap and will have the default width of 600 pixels: prompt> hrzImageBatch minkit_ip minkit_ip 2D An alternative way to execute the horizon image creation is to use the HrzImage graphical user interface. First source the WebApps environment then run HrzImage. prompt> source $OWHOME/WebApps/templates/wow.login prompt> . $OWHOME/WebApps/templates/wow.profile prompt> HrzImage (if C-shell) (if Bourne shell) HrzImage may also be launched from the wowgui interface. WOW 5000.0.1.11 Release Notes Page 56 of 104 March 2014 Creating ‘Live Trace’ Outlines The Default ‘Live Trace’ Algorithm The default algorithm is designed to display the actual extent of 2D or 3D seismic traces, rather than the navigation extents. In the 2D case, the output shows exactly which lines or parts thereof have the specified processed level. In the 3D case, the output attempts to show the exact shape or outline where traces exist within the rectangular project limits. The 3D algorithm operates by walking clockwise around the outside of the survey, until it returns to the starting point. The algorithm does not read every trace, which makes it considerably faster, but it consequently cannot handle the following scenarios: • Surveys where e.g. every 2nd line or trace is loaded • Internal holes within the survey • Non-contiguous pieces of seismic data • Zero-valued traces, i.e. real traces with zeros, as distinct from absent or null traces The default algorithm therefore produces reasonable outlines in the majority of 3D cases, but will not always succeed. An alternative algorithm is provided to address this and is described further overleaf. Using the Default Algorithm in Batch WOW aims to dynamically create Web pages or images on the fly, i.e. without resorting to static, pre-created files. Seismic trace outlines present a real challenge in this regard. 3D volumes containing many millions or traces may not complete within the patience threshold of a typical user. A batch mechanism is therefore provided to auto-generate the live trace outlines as png images, or if 3D, as shapefiles, ASCII coordinate files or ZGF pictures. Options are provided to generate outlines in these formats for a single volume, all volumes within a project or for all projects. To generate a single outline for 2D or 3D, use utility seisLTO, with usage: seisLTO owproj survey gtype seismic ?stride? ?delta? ?lineinc? ?traceinc? ?xsize? ?padding? ?outfile? ?zgfout? ?picout? ?shapetype? <owproj> OpenWorks project name <survey> SeisWorks survey name <gtype> 2D/3D <seismic> seismic file name or proclev, e.g. mig0801.3dv or mig080001 <stride> look-ahead factor (default 25 traces – 3D only) <delta> thinning distance (default 10 traces – 3D only) <lineinc> line increment for symbol posting (default 100 – 3D only) WOW 5000.0.1.11 Release Notes Page 57 of 104 March 2014 <traceinc> trace increment for symbol posting (default 100) <xsize> approximate image size, in pixels (default 500) <padding> padding around image, in pixels (default 40) <outfile> output image file name (default stdout) <zgfout> optional output zgf file (default none) <picout> optional output ZGF picture name (default none) Note that the output file extension determines the output type. Note also the different syntax for ZGF file output. See the next section for a simpler mechanism for generating outlines over all volumes in a project. Alternative Algorithm An alternative 3D-only algorithm that does read every trace is also provided. Although it is considerably slower, the standard invocation can handle internal holes within the survey, non-contiguous pieces of seismic data, and decimated surveys. To test this algorithm, use utility seisLTOexact, with similar arguments as seisLTO. seisLTOexact owproj survey gtype seismic ?stride? ?delta? ?lineinc? ?traceinc? ?xsize? ?padding? ?outfile? ?zgfout? ?picout? ?zeroFlag? The additional zeroFlag option will test for zero-valued traces. Generating Outlines for all Volumes in a Project To generate outlines for all volumes for a project with the default algorithm, use seisLTO2D or seisLTO3D. This includes a clobber argument (3D only), allowing you to regenerate all images (clobber) or only regenerate if the seismic has been modified since the last live trace outline was created (noclobber). Important note: noclobber does not work reliably with shapefile output where multiple outlines are stored within a single file; using clobber with shapefile and zgf output is therefore advised. seisLTO2D owproj ?traceinc? ?size? ?dir? <owproj> OpenWorks project name <traceinc> trace increment for symbol posting (default 100) <dir> override directory location <xsize> approximate image size, in pixels (default 500). seisLTO3D owproj survey fmt ?clob? ?stride? ?delta? ?linc? ?tinc? ?size? ?speed? ?dir?: <owproj> OpenWorks project name <survey> SeisWorks survey name – use All3D for all surveys in the project <fmt> WOW 5000.0.1.11 Release Notes png, asc, zgf or shp Page 58 of 104 March 2014 <clob> default is noclobber, i.e. only regenerate if the seismic has changed <stride> look-ahead factor for 3D (default 25 traces) <delta> thinning distance for 3D (default 10 traces) <linc> line increment for symbol posting (default 100 – ignored for 2D) <tinc> trace increment for symbol posting (default 100) <size> approximate image size, in pixels (default 500) <speed> fast (uses seisLTO) or slow (uses seisLTOexact) <dir> optional single directory to write to; overrides default system directory. Note that an output file name need not be specified as the png, ASCII or ZGF files are located with the following naming convention: PNG image: $WOW_DATA_DIR/wow_images/<owproj>/<swproj>/<survey>_<seismic>.png ASCII file: $WOW_DATA_DIR/wow_images/<owproj>/<swproj>/<survey>_<seismic>.asc Shapefile: $WOW_DATA_DIR/wow_shapes/<owproj>/<swproj>/<survey>_lto.shp (Each seismic volume produces a single shape within the shapefile.) ZGF file: $WOW_DATA_DIR/wow_shapes/<owproj>/<swproj>/<survey>_lto.zgf (Each seismic volume produces a single picture within the ZGF file.) Examples: prompt> seisLTO3D SWDEVKIT devnor png (generates default png pictures) prompt> seisLTO3D SWDEVKIT "{devnor survey}" png (survey has spaces) prompt> seisLTO3D SWDEVKIT devnor png clobber 25 10 50 50 800 (overwrite the defaults with new parameters). Generating Outlines for all Projects Finally, to generate outlines for all 2D or 3D projects with the default algorithm, the scripts $OWHOME/WebApps/bin/seisLTO2DAll and seisLTO3DAll will run on the command line with options as shown below. For 3D, specify the –c flag for clobber behavior; do not specify it for noclobber behavior. prompt> seisLTO2DAll -t <traceinc> -x <xsize> -o <override dir> prompt> seisLTO3DAll –c –f <format: png|asc|zgf|shp> –s <stride> -d <delta> -l <lineinc> - t <traceinc> -x <xsize> -a <algorithm:slow|fast> -o <override directory> The directory override allows all shapefiles to be written to a single location, rather than the default project system directory. WOW 5000.0.1.11 Release Notes Page 59 of 104 March 2014 Important note: specifying –a slow to invoke the seisLTOexact algorithm will take considerably longer and is not recommended. Rather, use the default fast algorithm, then selectively use the slow algorithm where the default does not give a satisfactory output. Using the SeisLTO GUI An alternative way to execute the live trace outline utilities is to use the SeisLTO graphical user interface, illustrated below. First source the WebApps environment then type SeisLTO: prompt> source $OWHOME/WebApps/templates/wow.login prompt> . $OWHOME/WebApps/templates/wow.profile prompt> SeisLTO (if C-shell) (if Bourne shell) Parameters are as described in the previous pages. SeisLTO may also be launched from the wowgui interface. Note: To convert the ASCII live trace outlines from XY to Lat/Long coordinates, the fileXY2LL utility may be used as documented in the Command-Line Utilities section of this document. WOW 5000.0.1.11 Release Notes Page 60 of 104 March 2014 Updating Seismic and Horizon Statistics The seismic data set table in OpenWorks includes attributes for trace count, coverage %, number of extents and total volume size. These are currently not maintained by SeisWorks, but provide useful metadata to the user and data manager if loaded correctly. For 3dv and 3dh volumes, trace count is stored and can be read directly. For bri and cmp volumes, reading traces is required to obtain a valid trace count. The algorithm allows for decimation to improve performance at the expense of accuracy. For example, if a decimation of 3 is specified, every third line and trace is read, i.e. one trace in 9. The resulting count is then multiplied by 9. The computed trace count is not exact, but the process runs 9 times faster. Command-line usage: prompt> seisStats Usage: seisStats owproj survey ?decimation? ?forceFlag? 3D example: OW project SWDEVKIT survey devnor, default decimation of 1 (i.e. no decimation on read), force re-computation (forceFlag=1): prompt> seisStats SWDEVKIT devnor 1 1 If survey name has spaces, the following syntax is required: prompt> seisStats SWDEVKIT "{devnor}" Use All3D for all surveys in the project. 2D example: prompt> seisStats SWDEVKIT 2D The computed attributes can be seen in the SeisWorks seismic view, Seismic Info dialog. Results for multiple volumes can also be viewed in Seismic Data Manager: use the column chooser to select these attributes, which are not displayed by default. The horizon data table in OpenWorks includes attributes for total samples, coverage % and mean, which are not maintained by SeisWorks, but provide useful metadata to the user and data manager if loaded correctly. Command-line usage (3D horizons only): use forceFlag=1 to force re-computation: prompt> hrzStats3D Usage: hrzStats3D owproj survey ?forceFlag? prompt> hrzStats3D SWDEVKIT devnor2 An alternative way to execute seisStats and hrzStats3D is to use the SeisStats or HrzStats3D graphical user interfaces. First source the WebApps environment then type the appropriate command. SeisStats/HrzStats3D may also be launched from the wowgui interface. prompt> prompt> prompt> prompt> source $OWHOME/WebApps/templates/wow.login . $OWHOME/WebApps/templates/wow.profile SeisStats HrzStats3D WOW 5000.0.1.11 Release Notes Page 61 of 104 (if C-shell) (if Bourne shell) March 2014 Seismic Polygon Clipping The seismic polygon clipping a utility takes as input a 3D seismic volume, trims it to one or more polygon shapes within the specified mapping polygon set in OpenWorks, and writes a new seismic volume as output. This may be used for example to cut out some complex lease shape from a larger survey. Additional notes: • Polygons may be INCLUSIVE or EXCLUSIVE, i.e. the output will include all traces within one or more INCLUSIVE polygons, and exclude traces that are in any EXCLUSIVE polygons. • If there are only EXCLUSIVE polygons and no INCLUSIVE polygons, then assume an INCLUSIVE polygon bounding the 3D survey outline. • No seismic reformatting is done, so same output format as the input, just clipped to the polygon boundaries. • The output seismic dataset and version must not exist. • The polygon set id must exist and must contain polygons. Command-line usage: prompt> seisPoly Usage: seisPoly owproj survey seismic dataset version id <owproj> OpenWorks project name <survey> SeisWorks survey name <seismic> input seismic file name, e.g. mig0801.3dv <dataset> output seismic dataset name <version> output seismic version <id> mapping polygon set id. Example: prompt> seisPoly SWDEVKIT devnor mig0801.3dv clipped V1 123 If survey name, output dataset or version has spaces, the following syntax is required: prompt> seisPoly SWDEVKIT devnor ESP24.bri "{ESP clipped}" V1 123 An alternative way to execute seisPoly is to use the SeisPoly graphical user interface. First source the WebApps environment then type the appropriate command: prompt> source $OWHOME/WebApps/templates/wow.login prompt> . $OWHOME/WebApps/templates/wow.profile prompt> SeisPoly (if C-shell) (if Bourne shell) SeisPoly may also be launched from the wowgui interface. The SeisPoly GUI is illustrated overleaf. WOW 5000.0.1.11 Release Notes Page 62 of 104 March 2014 WOW 5000.0.1.11 Release Notes Page 63 of 104 March 2014 Using ZGF Backdrops The SeisWorks navigation, live trace outline and horizon map displays can be enhanced through the use of ZGF backdrops. This allows the maps to include wells, fields, leases, bathymetry, coastlines, shipping lanes etc. – whatever is in the specified ZGF picture. ZGFs are ideal for cultural backdrops, in that they are the OpenWorks standard neutral backdrop culture format. They are widely used across applications and can be created in SeisWorks, StratWorks, Z-MAP Plus and WOW. There is no accepted default location for these files, but they are often stored in the ZGF subdirectory of one of the OW_PROJ_DATA/<owproj> directories. WOW will therefore use the first wow_backdrop.zgf file it encounters when searching these directories in order. If found, the first picture from the file is used. Note that this file may be a simple link, e.g. prompt> cd <OW_PROJ_DATA>/<OpenWorks Project>/ZGF prompt> ln –s <actual ZGF name> wow_backdrop.zgf Note also that the batch generation of seismic live trace outlines, using script seisLTO3DAll as described in the previous section, uses the same logic. Converting ZGF Pictures to Shapefiles/Images in Batch Utility zgf2shp provides the same functionality as in the WOW browser for converting a ZGF picture file to a shapefile. Utility zgfImage provides the same functionality as in the WOW browser for converting a ZGF picture file to a geo-referenced image, i.e. a .jpg file plus .jpgw world file. Additional utilities zgfpiclist and zgfpicinfo are provided to obtain the arguments required for zgf2shp. The workflow is illustrated below: prompt> zgfpiclist Usage: zgfpiclist zgf prompt> zgfpiclist contract_28.ZGF 3d outlines overlay_for_finder prompt> zgfpicinfo Usage: zgfpicinfo zgf picture prompt> zgfpicinfo contract_28.ZGF "{3d outlines}" {1 Borders} {6 Text} {16 Fault trace} {30 Colorfilled polygons} {36 Lease borders and labels} prompt> zgf2shp Usage: zgf2shp zgf picture stem lgbs ?dir? prompt> zgf2shp contract_28.ZGF "{3d outlines}" outline3d 16,36 /tmp /tmp/outline3d_faults_arc.shp /tmp/outline3d_lgb36_arc.shp WOW 5000.0.1.11 Release Notes Page 64 of 104 March 2014 prompt> ls -ltr /tmp/out* -rw-rw-r-- 1 bruce users 1140 Aug 10 11:56 /tmp/outline3d_lgb36_arc.shx -rw-rw-r-- 1 bruce users 12308 Aug 10 11:56 /tmp/outline3d_lgb36_arc.shp -rw-rw-r-- 1 bruce users 2501 Aug 10 11:56 /tmp/outline3d_lgb36_arc.dbf To produce geo-referenced images rather than shapefiles, use utility zgfImage. Use picture argument all to process all pictures in the specified ZGF, or specify the individual picture name: prompt> zgfImage Usage: zgfImage zgf ?picture? ?xsize? ?dir? prompt> zgfImage /data1/zmap/contract_28.ZGF "{3d outlines}" Processing /data1/zmap/contract_28.ZGF:3d outlines: - image saved to: /data/WebAppsData/wow_images/ZGF/contract_28_3d_outlines.jpg - world saved to: /data/WebAppsData/wow_images/ZGF/contract_28_3d_outlines.jpgw An alternative way to convert a ZGF picture to a shapefile is to use the Zgf2Shape graphical user interface, illustrated below (there is no GUI for zgfImage). First source the WebApps environment then type Zgf2Shape: prompt> source $OWHOME/WebApps/templates/wow.login prompt> . $OWHOME/WebApps/templates/wow.profile prompt> Zgf2Shape (if C-shell) (if Bourne shell) Zgf2Shape may also be launched from the wowgui interface. WOW 5000.0.1.11 Release Notes Page 65 of 104 March 2014 Integrating with ESRI GIS Saving GIS Image Backdrops ArcView and GIS is aimed predominantly at vector data. It is however possible to load raster images as backdrops to cultural information in GIS. WOW images can be exported in an ArcView-compatible format for a number of data types: • OpenWorks grids • Z-MAPPlus grids and pictures • SeisWorks horizon, navigation and live trace outlines Of the above, the most important are the raster types: OpenWorks and Z-MAPPlus grids and SeisWorks horizons. There are alternative and better methods for viewing Z-MAPPlus pictures and SeisWorks live trace outlines in ArcView. In the relevant parts of WOW, select the Create GIS Image checkbox. This will save a .jpg file and an associated ‘world file’ with .jpgw extension, which provides ArcView with the parameters required to geo-reference the image. The image can then be viewed in ArcView as a theme, after loading the JPEG extension. WOW will write images to $WOW_DATA_DIR/wow_images/… Shapefile Creators WOW provides the capability to convert numerous data types to shapefiles, as listed below: • SeisWorks 2D seismic lines (projected)* • SeisWorks 3D seismic surveys (projected)* • SeisWorks 3D seismic live trace outlines (projected)* • Z-MAPPlus ZGF pictures (projected) • Z-MAPPlus MFD grid files (projected) • OpenWorks mapping polygon and fault centerline sets (projected)* • SeisWorks ZCM files (projected)* • SeisWorks DTS files (projected)* • CDA project outlines (projected) • OpenWorks Wells, 2D lines and 3D surveys (WGS84) • OpenWorks interpretation project outlines (WGS84) WOW will write shapefiles to $WOW_DATA_DIR/wow_shapes/… * Important note: Where OpenWorks projects are involved, the projected shapefile creators will look for and copy in a .prj file containing CRS information from the OpenWorks external data directory, if present. For example, in a project named GOM315, WOW will look for file GOM315.prj in directory OW_PROJ_DATA/GOM315. WOW 5000.0.1.11 Release Notes Page 66 of 104 March 2014 Customizing Choice of Color Maps WOW utilizes SeisWorks color maps (.clm files) in a number of functions: • SeisWorks horizon display • SeisWorks seismic displays • SEG-Y image displays • OpenWorks grid displays • Z-MAP Plus grid displays • ProMAX seismic displays The choice of which color maps to use can be modified for the installation be setting environmental variables COLOR_SOURCE1 and COLOR_SOURCE2: COLOR_SOURCE1 applies to SeisWorks only and has 3 options: • DEFAULT: a short hardcoded list. For horizons, the list is: rspectrum spectrum dipazim blkwht whtblk. For seismic, the list is: blkwht whtblk blkwhtrd blkwhyel bluwhtbn bluwhtrd grnwhtbn segfreq segphase segpolar segstg. • DIRECTORY: the contents of the directory $OWHOME/WebApps/conf/clm. You can add color map files to this directory. You can delete SOME of the files, but not the defaults listed above. • PROJECT: all color maps in the first OW_PROJ_DATA/<owproj>/SWDATA directory. COLOR_SOURCE2 applies to SEG-Y, OpenWorks, Z-MAP Plus and ProMAX and has options of DEFAULT or DIRECTORY as described above. To implement: cd $OWHOME/WebApps/conf vi wow.env uncomment and edit line: COLOR_SOURCE1=PROJECT; export COLOR_SOURCE1 uncomment and edit line: COLOR_SOURCE2=DEFAULT; export COLOR_SOURCE2 The recommended setting is DEFAULT as this produces the shortest selection lists and therefore simpler user interfaces. WOW 5000.0.1.11 Release Notes Page 67 of 104 March 2014 Viewing CGMs in WOW There are two different methods of implementation: client-side plugin or server-side conversion, with advantages and disadvantages for both methods. A number of vendors provide functionality in this area, e.g. SDI (http://www.sdicgm.com) and Zeh (http://www.zeh.com). Others are mentioned below. Important note: By default, WOW implements a converter from SDI (http://www.sdicgm.com). No further configuration should be required for simple viewing. Client-side Plugin A plugin is an extension to the browser that allows it to recognize a file type, in this case CGM, and provide corresponding functionality. The advantage of this is rich functionality, i.e. zoom, pan, scaled hardcopy etc. However, the entire CGM needs to download to the client; these files can be large which increases network traffic. The plugin also needs to be installed on every client system, with increased effort to install and maintain over time. Options include Larson WebView CGM Pro (http://www.cgmlarson.com) and CGM Reader from SDI (http://www.sdicgm.com/sdiweb/cgm_reader.html). To implement, download and install the plugin as per the vendor instructions and do the following: prompt> cd $OWHOME/WebApps/cgi-bin prompt> cp file_cgm.cgi.clientside file_cgm.cgi The client-side version of file_cgm.cgi simply copies the CGM from server to client, assuming there is a client-side plugin. Server-side CGM to PNG converter Rather than process the entire CGM locally, the server-side approach converts the CGM into a highly compressed, lower-resolution Web format such as a jpeg or png which is understood automatically by the browser. The advantage of this approach is fast displays with much reduced network traffic. There is also only a single (server) installation required, rather than on a per-client basis. However the speed and simplicity are achieved by trading off against functionality. The server-side approach is adequate for a quick look but not for submitting scaled hardcopy. WOW implements a converter from SDI (http://www.sdicgm.com) in the default file_cgm.cgi. This may display a watermarked image. Please contact SDI ([email protected]) for further information. Other command-line CGM to png converters are available from JustCroft (http://www.justcroft.com) and EasyCopy (http://myeasycopy.com). To implement these unsupported options, download and install the application as per the vendor's instructions. You will need to do the following manual configuration: prompt> cd $OWHOME/WebApps/cgi-bin prompt> cp file_cgm.cgi.serverside file_cgm.cgi prompt> vi file_cgm.cgi provide the correct info for the converter being used. Due to the complexities of this issue and the range of possible configurations and software tools, additional services may be required to fully implement CGM viewing in WOW. WOW 5000.0.1.11 Release Notes Page 68 of 104 March 2014 Integrating with CDA Corporate Data Archiver (CDA) can be used to generate ‘throwaway’ stubs which include image thumbnails for re-use within WOW. These options are provided for OpenWorks, SeisWorks, GeoProbe, ProMAX and VIP projects. This functionality is designed to facilitate a project cleanup operation, e.g. deleting empty horizons. Note that a CDARCHIVER license is required in order to run CDA. To generate these in CDA, use an archive project name of ‘Stubs’ to create thumbnails in a pre-determined location, for re-use in the WOW horizon list builder. Once generated, the stub can be viewed directly from a link on the SeisWorks survey summary page. The SeisWorks horizon list builder is accessible from the ‘Horizons’ link on the SeisWorks project summary page. This allows viewing horizons, drilling down to view details or selecting horizons to save to a list. The web interface is illustrated below: An alternative way to generate just horizon thumbnails is to use the CDA HrzThumbs utility. See the CDA Release Notes for further details. For ZGF pictures, an alternative way to generate just picture thumbnails is to use the CDA ZgfThumbs utility. See the CDA Release Notes for further details. WOW 5000.0.1.11 Release Notes Page 69 of 104 March 2014 Additional Customization Options Customizing the Well, Field and Lease Modules The lease module allows the editing of lease commitments, interests and remarks. Editing can be turned off for sites that prefer read-only execution. Also, descriptive names can be changed to take into account global differences, e.g. ‘Lessee’ has meaning in the Gulf of Mexico, whereas ‘Block interests’ might be more applicable in the North Sea. The file $OWHOME/WebApps/conf/lease_tables.dat controls lease module labels and editing behavior. To customize the lease module: prompt> cd $OWHOME/WebApps/conf prompt> cp lease_tables.dat.default lease_tables.dat prompt> vi lease_tables.dat (example below) and change labels/edit/multi flag. # If present, the lease_tables file allows site-wide overwriting # of the default lease table labels and editing behaviour. # format: InternalKey TableName DetailFlag Label EditableFlag # MultiLeaseSummaryFlag # The 4th and 5th items (Label and EditableFlag) may be changed # If EditableFlag is 'n/a', there is no edit functionality for the table. # The 6th item controls appearance and can be edited if not n/a document null YES Documents YES n/a keyfact null YES "Key Facts" YES n/a tract lease_tract NO Tract n/a n/a boundary tract_boundary NO Boundary n/a n/a lessee lessee NO Interests YES YES lessor lessor NO "Lessor Interests" YES YES commitment lease_commitment NO Commitments YES YES narrative lease_narrative NO Remarks YES YES Similar configuration files are used to control the labels and multi-object display properties for wells, fields and basins. These cannot be edited at present through the browser. $OWHOME/WebApps/conf/well_tables.dat: document null YES Documents YES n/a keyfact null YES "Key Facts" YES n/a Picks pick NO Picks n/a YES Curves log_crv_hdr YES Curves n/a YES Time-Depths time_depth_curve YES "Time Depths" n/a YES Dir-Surveys dir_survey_hdr YES "Dir Surveys" n/a YES Posn-Logs positional_log_hdr YES "Posn Logs" n/a YES Synthetics synthetic_seismic YES Synthetics n/a NO Lithology computed_lithology_hdr YES Lithology n/a NO Casing casing NO Casing n/a NO Cores well_core NO Cores n/a NO Shows intrp_drilg_show NO Shows n/a NO Tests well_test NO Tests n/a NO Dipmeter dipmeter NO Dipmeter n/a NO Paleo paleo NO Paleo n/a NO Zone-Attributes strat_unit_intrp NO "Zone Attributes" n/a NO Plugging plugging NO Plugging n/a NO DST-RFTs dst_rft_gen NO "DST RFTs" n/a NO Interests well_interest NO Interests n/a NO Dates well_date NO Dates n/a NO Alt-UWIs well_uwi_alt NO "Alt UWIs" n/a NO Well-Study well_study NO "Well Study" n/a NO Note-Pad well_note_pad NO "Note Pad" n/a NO Remarks well_remark NO "Remarks" n/a NO WOW 5000.0.1.11 Release Notes Page 70 of 104 March 2014 Customizing the ‘Key Facts’ Module The ‘key facts’ module allows users to ‘add a note’ against projects, wells, fields, leases, basins, seismic and 3D surveys. These notes are a collection of up to 10 long remarks, each up to 2000 characters in length, associated with an individual well, field or lease. The ‘key facts’ are implemented in the OpenWorks KRS (knowledge reference system) model. The attributes that may be edited are controlled on a site-wide basis by the following configuration files. The required flag and display order flags are not yet implemented. Important note: you should review and customize these before entering any documentation, as changing the structure after instantiating is non trivial. # Format: ColumnName(COL01-COL20) ColumnLabel Required(Y/N) DisplayOrder # NOTE: column labels must be 25 chars or less $OWHOME/WebApps/conf/project_keyfacts.dat: COL01 COL02 COL03 COL04 COL05 COL06 COL07 COL08 "Project Provenance" "Geographic Area" "Business Ownership" "Business History" "Data Mgmt Ownership" "Data Mgmt History" "Data Restrictions" "Other Comments" N N N N N N N N 1 2 3 4 5 6 7 8 $OWHOME/WebApps/conf/well_keyfacts.dat: COL01 COL02 COL03 COL04 COL05 COL06 COL07 COL08 COL09 "Well Prognosis" N 1 "Pre-Drill Risk Review" N 2 "Drilling Summary" N 3 "Tests / Shows" N 4 "Reservoir Review" N 5 "Postmortem" N 6 "Data Availability" N 7 "Scout Info" N 8 "Other Comments" N 9 $OWHOME/WebApps/conf/field_keyfacts: COL01 COL02 COL03 COL04 COL05 COL06 COL07 COL08 COL09 COL10 "Exp/Appraisal History" N 1 "Geology" N 2 "Geophysics" N 3 "Reservoir Engineering" N 4 "Facilities" N 5 "Economics" N 6 "Development Plans" N 7 "Data Availability" N 8 "Scout Info" N 9 "Other Comments" N 10 $OWHOME/WebApps/conf/lease_keyfacts: COL01 COL02 COL03 COL04 COL05 COL06 COL07 COL08 COL09 COL10 "Exploration History" N 1 "License History" N 2 "Geology" N 3 "Geophysics" N 4 "Structure" N 5 "Plays" N 6 "Seismic" N 7 "Data Availability" N 8 "Scout Info" N 9 "Other Comments" N 10 $OWHOME/WebApps/conf/basin_keyfacts: COL01 "Exploration History" N 1 WOW 5000.0.1.11 Release Notes Page 71 of 104 March 2014 COL02 COL03 COL04 COL05 COL06 COL07 COL08 COL09 COL10 "Play Summary" N 2 "Stratigraphy" N 3 "Reservoir" N 4 "Source" N 5 "Seal" N 6 "Structure" N 7 "Timing" N 8 "Scout Info" N 9 "Other Comments" N 10 $OWHOME/WebApps/conf/seismic_keyfacts: COL01 COL02 COL03 COL04 COL05 COL06 "Data Source" N 1 "Acquisition Info" N 2 "Processing Info" N 3 "Data Loading Info" N 4 "Related Seismic" N 5 "Other Comments" N 6 $OWHOME/WebApps/conf/survey_keyfacts: COL01 COL02 COL03 COL04 COL05 COL06 COL07 COL08 "Interp Status" N 1 "Quad/Block" N 2 "Field" N 3 "Operator" N 4 "Asset" N 5 "Data Loading Info" N 6 "Data Availability" N 7 "Other Comments" N 8 Customizing the Comparison Module The Comparison module allows users to compare well, field, lease and navigation headers as well as details on well position logs, curves, picks and time-depth tables. In addition to the above, users may compare counts for any well-related reference data types. For example, do the wells have the same number of casing points in two different projects? The default option caters for cores, tests, casing, tubing, completions, perforation, liners, packers, dipmeters, shows, paleo and mud reports. The list is customizable using the default file well_comparison.dat.default in $OWHOME/WebApps/conf. To modify the defaults, copy this file to well_comparison.dat and add tables as indicated by the syntax description. Note that any tables added must contain a well_id field. # # If present, the well_comparison.dat file allows the specification of # additional well data types for the comparison of data between 2 OpenWorks # projects. Comparison will simply be on counts per well. # # format: TableName Label # well_core Cores well_test Tests casing Casing tubing Tubing well_completion Completions well_perforation Perforations liner Liners packer Packers dipmeter Dipmeters intrp_drilg_show Shows paleo Paleontology mud_report "Mud Report" WOW 5000.0.1.11 Release Notes Page 72 of 104 March 2014 Customizing the Well Match Module The well match modules computes, then stores, a reference between a well in one project and a well in another project. Well matching is typically relevant where wells have different UWIs in different projects. Well matches are stored in the WELL_UWI_ALT table in both projects. There may be multiple matches for the same UWI against many UWI types. For example, API:1001423276841000 may match NPD:12/13-14a and also CORP:012/13014s1. You must therefore choose a UWI type in each project. Only wells of the selected UWI type will be matched The matching algorithm compares a number of attributes as listed below to determine likely matches in the target project. Each attribute is weighted according to a score. The scores and tolerances (but not the attributes) can be adjusted by editing well_match.dat in $OWHOME/WebApps/conf. Alternatively, click on 'Admin'->'Well Matching Scores' in the WOW top bar. # If present, the well_match file allows the overriding of scores and tolerances # used when matching wells between projects. # format: InternalKey Score Tolerance # # The 2nd and 3rd items (Score and Tolerance) may be changed # uwi 100 n/a latlon 50 0.001 wellname 15 n/a operator 10 n/a spud 10 7 completion 8 7 field 6 n/a basin 5 n/a country 1 n/a WOW 5000.0.1.11 Release Notes Page 73 of 104 March 2014 Maintenance and Troubleshooting Apache Apache is a freeware web server developed by the Apache Software Foundation (http://www.apache.org). Apache is the most widely used web server on the Web. It has excellent performance, is lightweight, stable, and very reliable. It should require almost no maintenance from a system administration perspective. Apache must be started by root. If you use the standard version of Apache distributed with the operating system, then the requisite commands to start/stop Apache on system boot/shutdown will already be configured: see /etc/init.d/httpd. Apache will start automatically at boot time, provided httpd.conf exists and is correctly configured in /etc/httpd/conf. To check Apache is running: prompt> ps –ef | grep httpd If no processes are found restart Apache manually (as root): prompt> /usr/sbin/apachectl stop prompt> /usr/sbin/apachectl start If Apache is not running, and cannot be restarted, check the error log file: prompt> tail /etc/httpd/logs/error_log WOW Browser Due to Apache’s reliability, most errors are WOW errors and appear as an ‘Internal Server Error’ in the browser. The Apache log file provides an excellent diagnostic medium. If a repeatable error occurs in some part of WOW, do the following: 1. On the WOW top bar, click on Errors. This will display the Apache error log contents, as well as the complete environment and WOW version number. 2. Click Write START tag, repeat the operation, click Write END tag. 3. Save this page and provide the output to your support representative for diagnosis. WOW Command-line and GUI Utilities The equivalent to the Errors link for non-browser utilities is the command-line wow_err script: prompt> source $OWHOME/WebApps/templates/wow.login prompt> . $OWHOME/WebApps/templates/wow.profile prompt> wow_err WOW 5000.0.1.11 Release Notes Page 74 of 104 (if C-shell) (if Bourne shell) March 2014 Appendix 1: Example wow.env File #============================================================================ # Name: # wow.env - required environment for WOW applications # # Usage: # sourced by WebApps scripts # # Description: # sets up OpenWorks, Tcl/Tk, Apache Web server environment # #---------------------------------------------------------------------------#WOW_DEBUG=1; export WOW_DEBUG #ERR_LEVEL=0; export ERR_LEVEL #============================================================================ # Check for OWHOME, WOW_HOME, OW_CONF_DIR, ORACLE_HOME and ORACLE_SID # Change value of variables here if required # Set LM_LICENSE_FILE if NOT OWHOME/lam/license.dat #---------------------------------------------------------------------------# OW_CONF_DIR (location of district.dat) #OW_CONF_DIR=${OWHOME}/conf; export OW_CONF_DIR # OWHOME and WOW_HOME OWHOME=/apps/ow; export OWHOME WOW_HOME=${OWHOME}/WebApps; export WOW_HOME # Oracle ORACLE_HOME=/apps/oracle/product/11.2.0/dbhome_1; export ORACLE_HOME ORACLE_SID=owlinux5; export ORACLE_SID ORACLE_LIBRARY=${OWHOME}/oracle32/instantclient/libclntsh.so.11.1; export ORACLE_LIBRARY # Required for Oracle wallet implementation if [ "${OW_HOME_DIR:-""}" = "" ]; then HOME=/home/bruce; export HOME OW_HOME_DIR=${HOME}; export OW_HOME_DIR fi # License file if [ "${LM_LICENSE_FILE:-""}" = "" ]; then LM_LICENSE_FILE=${OWHOME}/lam/license.dat; export LM_LICENSE_FILE fi #============================================================================ # Set up Web server environment # Change value of all variables here #---------------------------------------------------------------------------# Name of apache user APACHE_USER=bruce; export APACHE_USER # Fully qualified URL to web server WOW_URL=http://linux5.exprodat.com; export WOW_URL # WOW admin group (can edit LOVs etc.) WOW_ADMIN_GROUP=users; export WOW_ADMIN_GROUP # Email address to send WOW error report emails to WOW 5000.0.1.11 Release Notes Page 75 of 104 March 2014 WOW_ADMIN_EMAIL="bruce"; export WOW_ADMIN_EMAIL # Default email suffix (e.g. exprodat.com) WOW_EMAIL_SUFFIX=exprodat.com; export WOW_EMAIL_SUFFIX # Address of SMTP mail server (usually 'nslookup mailhost') WOW_MAILSERVER=linux5; export WOW_MAILSERVER # Security level WOW_SECURITY=C; export WOW_SECURITY # Default location to write WOW exported data WOW_DATA_DIR=/data/WebAppsData; export WOW_DATA_DIR # Number of points to display in data tables WOW_MAXPOINTS=500; export WOW_MAXPOINTS # Optional site label for WOW front page #WOW_SITE_LABEL="- Company X"; export WOW_SITE_LABEL # Where clause controlling subselect of OpenWorks projects #OW_PROJ_WHERE="where nvl(p.remark,'blank') not like '%TIGHT%'" #OW_PROJ_WHERE="where p.project_name not in ('PROJECT1','PROJECT2')"; export OW_PROJ_WHERE # SQL to add extra attributes to WOW well header query #WELL_HEADER_EXTRAS='permit_no "Permit", data_acquisition_type "Acq Type",'; export WELL_HEADER_EXTRAS # Source of .clm files for SeisWorks images (DEFAULT/DIRECTORY/PROJECT) #COLOR_SOURCE1=PROJECT; export COLOR_SOURCE1 # Source of .clm files for other images (DEFAULT/DIRECTORY) #COLOR_SOURCE2=DIRECTORY; export COLOR_SOURCE2 # SeisWorks logfile #SEISWORKS_LOGFILE=${OWHOME}/conf/swacess.log; export SEISWORKS_LOGFILE # Show SQL in QC/QA module: 1=on 0=off #WOW_SHOW_SQL=1; export WOW_SHOW_SQL # Fully qualified URL to WOW 2003 server #WOW2003_URL=http://wow2003; export WOW2003_URL # Filter OW projects by current district or display all for SID (1=on 0=off) #OW_DISTRICT_FILTER=1; export OW_DISTRICT_FILTER # OpenWorks/SeisWorks listing default: pdb, ip or all #WOW_OW_LISTING=pdb; export WOW_OW_LISTING #WOW_SW_LISTING=ip; export WOW_SW_LISTING # SeisWorks group by default: project or survey #WOW_SW_GROUPING=survey; export WOW_SW_GROUPING # Specify userids for OpenWire real-time monitoring #OW_RTM_USERS="bruce,lmsys"; export OW_RTM_USERS #============================================================================ # THIS SECTION IS AUTO_GENERATED # should not neeed to make any changes #---------------------------------------------------------------------------# Apache location (should not need to change) WOW 5000.0.1.11 Release Notes Page 76 of 104 March 2014 APACHE_HOME=/etc/httpd; export APACHE_HOME # Web root (should not need to change) WEB_ROOT=${WOW_HOME}/htdocs; export WEB_ROOT # URL to web server cgi-bin directories (should not need to change) WOW_CGI=${WOW_URL}/bin; export WOW_CGI # SeisWorks if [ -d ${OWHOME}/SeisWorks ]; then SEISHOME="${OWHOME}/SeisWorks"; export SEISHOME fi # set Tcl/Tk library locations TCL_LIBRARY=${WOW_HOME}/tcltk/lib/tcl8.4; export TCL_LIBRARY TK_LIBRARY=${WOW_HOME}/tcltk/lib/tk8.4; export TK_LIBRARY # set LD_LIBRARY_PATH LD_LIBRARY_PATH=${OWHOME}/lib:${ORACLE_HOME}/lib32:${OWHOME}/SeisWorks/lib:${WOW _HOME}/tcltk/lib export LD_LIBRARY_PATH # ProMAX: see promax.env WOW 5000.0.1.11 Release Notes Page 77 of 104 March 2014 Appendix 2: Summary of Important Files The following table summarizes the main files used by WOW and Apache. File/Directory Description /etc/httpd/conf: httpd.conf Main apache configuration file .wp Password file used for Apache authentication /usr/sbin: apachectl Starts and stops Apache httpd The Apache web server /usr/bin/htpasswd Creates/adds Apache passwords /etc/httpd/logs: access_log Stores all Apache server accesses error_log Stores all Apache server errors for diagnostics /etc/httpd/logs: httpd.pid Process ID of the Apache parent process $OWHOME/WebApps/bin Directory containing WOW executables and wrappers $OWHOME/WebApps/cgi-bin Directory containing WOW dynamic executables $OWHOME/WebApps/conf/ sqlscripts: Directory containing SQL scripts used in the QC/QA section $OWHOME/WebApps/conf/clm, cmap, gpc: Directories containing color maps for use in OW, SW, ZM, VIP and GeoProbe modules $OWHOME/WebApps/install: Directory containing installation scripts $OWHOME/WebApps/htdocs: assetjournal_data: Directory containing links to AssetJournal parent directories wow_reports: Directory for subscription reports index.html WOW start page wow_css.js WOW style sheet selector wow_relnotes.pdf WOW Release Notes (this document) wow_custom.html Customizable html page WOW 5000.0.1.11 Release Notes Page 78 of 104 March 2014 $OWHOME/WebApps/conf: wow.env Main WOW configuration file – see appendix 1 webapps_version.dat WebApps version information wow_menu.dat Customize WOW left frame menu zmap_projdirs.dat Lists of parent directories for ZMAP data other_projdirs.dat Lists of parent directories for ‘Other’ data gp_projdirs.dat Lists of parent directories of GeoProbe projects vip_projdirs.dat Lists of parent directories of VIP projects promax_data_homes.dat Lists of PROMAX_DATA_HOME locations restricted_dir_list.dat List of directories that may not be browsed in WOW restricted_plist.dat List of SeisWorks projects that may not be browsed in WOW ascii_file_extensions.dat List of ASCII extensions recognized by directory browsers web_file_extensions.dat List of inbuilt extensions recognized by directory browsers well_comparison.dat Lists of tables whose counts may be compared between wells well_match.dat List of attributes used for the well matching module lease_tables.dat Customize lease labels and whether editable well_tables.dat Customize well labels and multi-object display field_tables.dat Customize field labels and multi-object display lease_keyfacts.dat ‘Add a note’ attributes for leases well_keyfacts.dat ‘Add a note’ attributes for wells field_keyfacts.dat ‘Add a note’ attributes for fields basin_keyfacts.dat ‘Add a note’ attributes for basins $OWHOME/WebApps/templates: wow.lmkrc ‘Dot file’ for lmksh for command-line execution wow.login C-shell WOW full environment wow.profile Bourne-shell WOW full environment launcher.dat.extra Launcher entries for WOW Documenter B.htaccessB/C.htaccess Default Apache .htaccess files WOW 5000.0.1.11 Release Notes Page 79 of 104 March 2014 Appendix 3: WOW Architecture The fundamental concept behind WOW is dynamic access to data. This means that the majority of content is generated on the fly programmatically by reading the underlying databases, formatting and then sending results to a Web browser. WOW is a server-side application. There are no client-side dependencies, i.e. plug-ins to be downloaded or installed, considerably simplifying maintenance. The majority of data access is therefore done on the server, via an application API or devkit. This architecture is designed to separate data I/O from business logic, from presentation logic as illustrated in the figure below: Data layer: WOW currently covers OpenWorks, SeisWorks, Z-MAP Plus and other data types, including SEG-Y, LAS, Shape files etc. Data I/O layer: This layer is comprised of the application devkits, which provide a safe mechanism for reading/writing the data stores. Data Integration Layer: This provides an integration layer on top of the diverse devkits to allow consistent read/write of vendor data. WOW uses a number of devkit shells, which are Tcl/Tk shells extended with the underlying devkit functions. Business Logic Layer: This layer ‘wrappers’ the lower-level extensions with business logic, including error checking, lists of values, numerical computations etc. This provides a consistent, modular, interface to the underlying data stores. Presentation Layer: This layer executes the shell the web server in response to being passed a URL by a web browser. It calls procedures from the business logic layer, and formats output on the fly as html to send back to the browser. WOW 5000.0.1.11 Release Notes Page 80 of 104 March 2014 Appendix 4: Apache Installation Options Introduction This section discusses options for customizing the Apache installation, such as using an existing Apache server, changing server name or port, running multiple instances, using alternative authentication methods etc. When planning any non-default installation or customization of WOW, administrators should be aware of the critical configuration files for Apache and for WOW. Most changes, e.g. to server and port, will require editing in these three locations: • All Apache configuration is controlled by a single file, httpd.conf in /etc/httpd/conf. This file contains the important variables such as ServerName, Listen, User, and Group. • All WOW configuration (with the exception below) is stored in a single file, $OWHOME/WebApps/conf/wow.env which is sourced by all dynamic scripts. • There are two static files in WOW which may contain hardcoded URLs. These are index.html and wow_css.js in directory $OWHOME/WebApps/htdocs. These may need to be edited if server name or port is changed. Important note: Apache is a component of the operating system; it is not part of WOW. Landmark Customer Support cannot provide support for all possible configuration options of the Apache server. The notes in this section are provided as guidelines only, and any customization is at the customer’s risk. For further guidance on Apache server configuration, refer to http://httpd.apache.org/docs. Obtaining and Installing the Red Hat Linux Apache RPMs Apache comes as an optional software package with the Red Hat Linux operating system. If installed, directory /etc/httpd will exist. To confirm that Apache is installed, type: prompt> rpm –qa | grep httpd There should be at least httpd version 2.0 (RHEL 4) or 2.2 (RHEL 5). If the packages are not found, please install them from the Red Hat Installation CDs. WOW 5000.0.1.11 Release Notes Page 81 of 104 March 2014 Using an existing Apache server during install By default, WOW installation requires a system with Apache installed but not configured or running. Sites may wish to install WOW and rather use an existing Apache, e.g. the server shipped with PowerExplorer. To do so, run WebAppsInstall (or WOWInstall directly) with an additional –n flag to skip Apache configuration during installation, as illustrated below. In this example the server is http://wow.oilco.com and the WebApps tree is in the default $OWHOME/WebApps location, where $OWHOME is /apps/ow. prompt> cd $OWHOME/WebApps/install prompt> ./WebAppsInstall Usage: WebAppsInstall -o <OpenWorks Path> [-a <WOW Path>] [-n (no Apache config)] prompt> ./WebAppsInstall –o $OWHOME -n Using the –n flag bypasses the default checks for Apache being already configured or running on the install system, allowing the installation to continue with an existing server. It also skips the creation of the root.sh script which does the default httpd.conf configuration and starting of Apache. Instead, it writes an Apache.README file instructing the installer what to change and what to add to the existing Apache's httpd.conf. An example is illustrated below: prompt> cat /apps/ow/WebApps/install/Apache.README WOW requires the following directives to be set in the relevant httpd.conf on wow.oilco.com: User owadm (critical) Group admins (critical) ServerAdmin [email protected] (optional) ServerName wow.oilco.com (confirm this matches the current setting) WOW requires the following stanzas to be added to the relevant httpd.conf on wow.oilco.com: Alias /wow/ "/apps/ow/WebApps/htdocs/" <Directory "/apps/ow/WebApps/htdocs"> Options Indexes FollowSymLinks AllowOverride None Order allow,deny Allow from all </Directory> ScriptAlias /bin/ "/apps/ow/WebApps/cgi-bin/" <Directory "/apps/ow/WebApps/cgi-bin"> AllowOverride AuthConfig Options None Order allow,deny Allow from all </Directory> The setting of the User and Group directives is critical: this should be a user with readwrite (interpret) access to the OpenWorks projects – typically a data loader or administrator. It should not be set to root, apache, nobody etc. WOW 5000.0.1.11 Release Notes Page 82 of 104 March 2014 Changing the Apache server during install Sites may need to install WOW on a different system from which the Apache server will eventually run. For example, WOW may need to be installed on an application server containing the OpenWorks tree, which may be exported read-only to the intended Apache server. To achieve this, provide the hostname for the preferred Apache server rather than the default during installation. Do NOT run root.sh on the installation system. Then, copy this file to the intended Apache server and run the script locally. Changing the Apache port during install Sites may need to install WOW on a port other than the default port 80. To achieve this, specify a port-qualified value for the WOW server full URL during installation, i.e. http://<host>.<domain>:<port>. You will need to edit httpd.conf and change the value of Listen, as described above. It may also be necessary to open up permissions on the files and directories used by the PidFile, ErrorLog and CustomLog variables in httpd.conf. Changing the Apache server post-install To move the WOW Apache server from one system to another, root access is required to perform the following steps: 1. Copy the httpd.conf file from the old to the new server. prompt> /etc/httpd/conf/httpd.conf 2. Edit the Apache configuration file to change the value of ServerName: prompt> vi /etc/httpd/conf/httpd.conf change ServerName to the new server (may also be commented out) 3. Edit the WOW configuration file to change the value of WOW_URL: vi $OWHOME/WebApps/conf/wow.env change WOW_URL to new server URL 4. If present, change all references from old to new server in $OWHOME/WebApps/ htdocs, files index.html and wow_css.js (3 locations in each) vi $OWHOME/WebApps/htdocs/index.html vi $OWHOME/WebApps/htdocs/wow_css.js 5. Stop Apache on the old server and start Apache on the new server: prompt> /usr/sbin/apachectl stop (on old server) prompt> /usr/sbin/apachectl start (on new server) Changing the Apache user post-install To change the WOW Apache user after installation, root access is required to perform the following steps. WOW 5000.0.1.11 Release Notes Page 83 of 104 March 2014 1. Edit the Apache configuration file to change the value of User/Group: prompt> vi /etc/httpd/conf/httpd.conf change User and Group to the new user’s credentials. 2. Edit the WOW configuration file to change the value of APACHE_USER: vi $OWHOME/WebApps/conf/wow.env change APACHE_USER to new username change HOME to match the home directory of the APACHE_USER. 3. Stop and start Apache: prompt> /usr/sbin/apachectl stop prompt> /usr/sbin/apachectl start Important note on file permissions: WOW contains self-configuration modules which require the Apache user have write access to the WebApps tree. Furthermore, any patches applied to the tree need to be made as a user with appropriate permissions, otherwise errors will occur. The Apache user should therefore belong to a group which has write access to the WebApps tree. Installing Multiple Apache Servers for WOW R5000 Instructions are provided below for RHEL 4 only. In this example, a new Apache binary distribution is installed into /usr/local/apache2 running on server http://wow.oilco.com port 8082, using a duplicated WebApps tree in $OWHOME/WebApps2 where $OWHOME is /apps/ow. See the next section for instructions for building Apache from source for both RHEL 4 (Apache 2.0) and RHEL 5 (Apache 2.2). Building from source is an alternative where a binary distribution is not available or is unsuitable for any reason. In such cases, replace steps 1 and 2 below with the steps in the next section. 1. Obtain the Apache binary distribution. Download from http://archive.apache.org/dist/httpd/binaries/linux/; look for the latest 2.0.x version, e.g. httpd-2.0.48-x86_64-unknown-linux-gnu.tar.gz 2. Install Apache to a writeable local directory e.g. /usr/local/apache2. Use any new directory, taking care not to overwrite any existing Apache installations: cd /tmp gzip -dc httpd-2.0.48-x86_64-unknown-linux-gnu.tar.gz | tar xvf cd httpd-2.0.48 ./install-bindist.sh /usr/local/apache2 3. Configure Apache httpd.conf with the following changes (line numbers are approximate): vi /usr/local/apache2/conf/httpd.conf line 218: Listen 8082 line 295: User <WOW user> line 296: Group <group of WOW user> line 305: ServerAdmin <system administrator’s email> line 319: ServerName <WOW server hostname>:8082 line 381: change AllowOverride None to AllowOverride AuthConfig (this is an optional change to allow .htaccess authentication of static web pages) line 613: Add lines: WOW 5000.0.1.11 Release Notes Page 84 of 104 March 2014 # WOW Alias /wow/ "/apps/ow/WebApps2/htdocs/" line 645: Add lines: #WOW ScriptAlias /bin/ "/apps/ow/WebApps2/cgi-bin/" <Directory "/apps/ow/WebApps2/cgi-bin"> AllowOverride AuthConfig Options None Order allow,deny Allow from all </Directory> line 945: Insert line ErrorDocument 500 "/wow/error.html" 4. Start Apache (as root if port is less than 80): /usr/local/apache2/bin/apachectl start 5. Duplicate the WOW software tree: cd $OWHOME mkdir WebApps2 cd WebApps find . -depth -print | cpio -pdlmv ../WebApps2 6. Configure WOW: If the WOW URL is fully qualified in files index.html and wow_css.js, change all references from the default to the new port e.g. change wow.oilco.com to wow.oilco.com:8082 (3 locations in each file). 7. Update the wow.env file (line numbers are approximate): cd $OWHOME/WebApps2/conf vi wow.env line 24: change WOW_HOME to /apps/ow/WebApps2 line 51: change WOW_URL to http://wow.oilco.com:8082 line 110: change APACHE_HOME to /usr/local/apache2 Change ORACLE_SID, OWSYSSID and any other variables as appropriate. 8. Copy the index.html and favicon.ico to the web root: cd /usr/local/apache2/htdocs cp index.html index.html.orig (if it exists) cp $OWHOME/WebApps2/htdocs/index.html . cp $OWHOME/WebApps2/htdocs/favicon.ico . 9. Repeat steps above as often as is required, e.g.: Port: 80, Apache: default OS package, WOW: $OWHOME/WebApps Port: 8082, Apache: /usr/local/apache2, WOW: $OWHOME/WebApps2 Port: 8083, Apache: /usr/local/apache3, WOW: $OWHOME/WebApps3 Port: 8084, Apache: /usr/local/apache4, WOW: $OWHOME/WebApps4 etc. See PeopleSoft Solution Doc 170943 for instructions of configuring both R2003 and R5000 WOW Apache servers on the same system. WOW 5000.0.1.11 Release Notes Page 85 of 104 March 2014 Building the Apache Server from Source Building Apache from source is an alternative where a binary distribution is not available or is unsuitable for any reason. In this example, a new Apache binary distribution is compiled and installed into /usr/local/apache2. See the previous section for instructions on required WOW changes to Apache httpd.conf. 1. Download the Apache source from http://httpd.apache.org/download.cgi. Look for the latest stable 2.0.x version (RHEL 4) or 2.2.x (RHEL 5), e.g. httpd-2.0.64.tar.gz or httpd-2.2.17.tar.gz. 2. Build Apache and install to a writeable local directory e.g. /usr/local/apache2. Use any directory, taking care not to overwrite any existing installations: cd /tmp gzip -dc httpd-2.0.64.tar.gz | tar xvf cd httpd-2.0.64 ./configure –-prefix=/usr/local/apache2 make make install Using PAM for NIS Password Authentication (RHEL 4 only) By default WOW uses a duplicated password file /etc/httpd/conf/.wp to store encrypted passwords for authentication purposes. This is required for any activity if security level is C, and for write activity at level B. If a client uses NIS, i.e. if a list of users and their encrypted passwords can be obtained using ypcat passwd, then it is possible to authenticate directly using the Apache mod_auth_pam module (for Apache 2.0 on RHEL 4 only). The procedure is described below (root is required): 1. Install mod_auth_pam.so : cp $OWHOME/WebApps/dso/mod_auth_pam.so /usr/lib64/httpd/modules chmod 755 /usr/lib64/httpd/modules/mod_auth_pam.so 2. Edit httpd.conf, add entries to LoadModule section: vi /etc/httpd/conf/httpd.conf. LoadModule auth_pam_module modules/mod_auth_pam.so 3. Configure Pam: vi /etc/pam.d/httpd, add the following lines: #%PAM-1.0 auth required pam_unix.so account required pam_unix.so Alternative for AD: auth required pam_stack.so service=system-auth account required pam_stack.so service=system-auth password required pam_stack.so service=system-auth session required pam_limits.so 4. Edit $OWHOME/WebApps/cgi-bin/.htaccess, remove AuthUserFile line. 5. Restart Apache: /usr/sbin/apachectl restart WOW 5000.0.1.11 Release Notes Page 86 of 104 March 2014 Using External NIS Password Authentication (RHEL 5 only) The mod_auth_pam.so method described above is for Apache 2.0 on RHEL 4 and will not work with Apache 2.2 on RHEL 5. Note that mod_auth_pam is no longer supported or developed: see http://pam.sourceforge.net/mod_auth_pam. On RHEL 5 with Apache 2.2, using mod_authnz_external.so with pwauth may provide an alternative method for NIS authentication. For installation details see $OWHOME/WebApps/dso/external.README and external.tar.gz. Using LDAP for Password Authentication Apache 2.0 and newer includes by default the required modules for LDAP authentication. 1. Check that the httpd.conf loads the required modules: grep ldap_module /etc/httpd/conf/httpd.conf LoadModule ldap_module modules/mod_ldap.so LoadModule auth_ldap_module modules/mod_auth_ldap.so Note: on RHEL 5, mod_auth_ldap is renamed to mod_authnz_ldap: LoadModule authnz_ldap_module modules/mod_authnz_ldap.so. 2. Modify the .htaccess file located in $OWHOME/WebApps/cgi-bin to turn on LDAP authentication, as illustrated below (for security level B): <FilesMatch "(input|delete)\.cgi$"> AuthType basic AuthBasicProvider ldap # Apache 2.2 only AuthName "WOW LDAP Linux" AuthAuthoritative off # Apache 2.0 only AuthzLDAPAuthoritative off # Apache 2.2 only AuthLDAPURL "ldap://xtera/ou=people,dc=cooper,dc=com?uid" Require valid-user </FilesMatch> The AuthLDAPURL value will be site-specific. It is the URL of the LDAP server and indicates where in the LDAP database the user information is taken from. The LDAP administrator will know what is appropriate for the site. Additional notes: 1. Comment out the AuthBasicProvider line for Apache 2.0. 2. Use either AuthAuthoritative or AuthzLDAPAuthoritative depending on whether running Apache 2.0 or 2.2. 3. Comment out the FilesMatch lines for security level C. See PeopleSoft Solution Doc 166075 for further information. Using Kerberos for Password Authentication See PeopleSoft Solution Doc 169246 for further information. WOW 5000.0.1.11 Release Notes Page 87 of 104 March 2014 Moving the Apache Web Root (read-only $OWHOME) WOW by default creates a Web alias from /wow/ to $OWHOME/WebApps/htdocs, which is referred to as the Web Root. This location on disk contains static files, directories and links that are customizable on a site-by-site basis. If your site requires that the $OWHOME directory be entirely read-only, then the Web Root can be moved as described below: 1. Change the Apache alias: vi /etc/httpd/conf/httpd.conf. Find/edit this line: Alias /wow/ "/new-read-write-location/htdocs/" 2. Modify the WEB_ROOT variable in the wow.env file to the new location: cd $OWHOME/WebApps/conf vi wow.env WEB_ROOT=/new-read-write-location/htdocs; export WEB_ROOT 3. Copy the htdocs directory to the new read-write location: cp –r $OWHOME/WebApps/htdocs /new-read-write-location 4. Add the new location to the config file that prevent browsing above the web root: vi $OWHOME/WebApps/conf/restricted_dirlist.dat Add this line: /new-read-write-location/htdocs 5. Restart Apache: /usr/sbin/apachectl restart In the scenario where a read-only $OWHOME is required, the WOW conf directory can also be moved, and linked back to $OWHOME/WebApps, i.e.: cd $OWHOME/WebApps cp –r $OWHOME/WebApps/conf /new-read-write-location mv conf conf.orig ln –s /new-read-write-location/conf WOW 5000.0.1.11 Release Notes Page 88 of 104 March 2014 Appendix 5: Background on the Devkit Shells Introduction The ‘WebApps’ products WOW, Corporate Data Archiver and Project Administrator all run Tcl/Tk shells, extended with OpenWorks devkit functions. This provides a powerful yet simple mechanism for extracting information from these project data sources for display in a table, graphical user interface or Web page. The main devkit shell lmksh integrates the OpenWorks, SeisWorks, Z-MAPPlus and ZGF devkits with other api’s providing coverage of e.g. GeoProbe, SEG-Y and LAS files. Other than as documented in the main body of these Release Notes, command-line usage of lmksh is not formally supported. This appendix is provided as an unofficial start point to those interested in scripting their own command line utilities. Please note that no support will be provided on either Tcl/Tk or on lmksh. For more information on Tcl/Tk, try one of these books: • Tcl and the Tk Toolkit, by John Ousterhout, published by Addison-Wesley 1994, ISBN 020163337X • Practical Programming in Tcl and Tk (4th Edition), by Brent Welch, Jeffrey Hobbs & Ken Jones, published by Prentice-Hall 2003, ISBN 0130385603 • Tcl/Tk in a Nutshell, by Paul Raines & Jeff Tranter, O’Reilly 1999, ISBN 1565924339. • Tcl/Tk: A Developer’s Guide (2nd Edition), by Clif Flynt, published by Morgan Kaufmann 2003, ISBN 1558608028. Some useful web sites: • Main Tcl/Tk site: http://www.tcl.tk • ActiveState (Tcl distribution): http://www.activestate.com/Products/ActiveTcl • Tcl Wiki (getting started guide): http://wiki.tcl.tk • Newsgroup: news:comp.lang.tcl or http://groups.google.com/groups?group=comp.lang.tcl Running lmksh To run lmksh you require a .lmkrc file in your home directory and to have sourced the required environment: prompt> cp $OWHOME/WebApps/templates/wow.lmkrc ~/.lmkrc (1-off) (C-shell) prompt> source $OWHOME/WebApps/templates/wow.login* prompt> . $OWHOME/WebApps/templates/wow.profile (Bourne shell) prompt> lmksh lmksh{1}% OWSetup (configures OpenWorks environment) lmksh{2}% info commands (lists all available commands) lmksh{3}% info commands sdl* (lists commands beginning with sdl) lmksh{4}% info procs (lists all available procedures) lmksh{5}% info args hrzinfo (lists arguments for specified proc) Alternatively, a wrapper script is provided and linked to $OWHOME/bin during installation: prompt> rlmksh WOW 5000.0.1.11 Release Notes Page 89 of 104 March 2014 Notes on .lmkrc: you will need to copy the .lmkrc into the home directory of every user that wishes to run lmksh interactively: prompt> cp $OWHOME/WebApps/templates/wow.lmkrc $HOME/.lmkrc Add or uncomment the commands OWSetup in .lmkrc so you do not need to type these during every interactive session. Add or uncomment SourceAllProcs to load all available commands. The lmksh Commands There are three classes of commands: Tcl built-in commands: This is the core Tcl language. See the Tcl man pages or html help at $OWHOME/WebApps/tcltk/htmldocs/tcltk.html for information on built-in commands. To access the man pages: prompt> source $OWHOME/WebApps/templates/wow.login prompt> man <cmd> Extended commands: These are added to lmksh to provide scripted access to devkit functions. The extended commands are usually low-level with little error trapping. Most begin with sdl_ (SeisWorks), ow_ (OpenWorks), sil_ (MFD), zgf_ (ZGF), sgy_ (SEGY) and gen_ (LAS and others). To see the arguments for an extended command, type the command name, e.g.: lmksh{7}% ow_poslog Procedures: These are additional ‘wrappers’ to the extended commands, including more robust error trapping and other business logic to make the low-level commands more useful. To see the arguments for any procedure, e.g.: lmksh{8}% info args GetPoslog OpenWorks database access procedures usually start with a lowercase letter to denote that they require an Oracle database connection to be established first, e.g.: prompt> rlmksh lmksh{9}% set lda [OWoralogon] lmksh{10}% getWellLists TESTDATA lmksh{11}% oralogoff $lda Exposing lmksh Commands It is sometimes more convenient to run lmksh procedures through a regular Bourne- or Cshell. A wrapper script is provided in $OWHOME/WebApps/bin for this purpose. To ‘expose’ any lmksh procedure on the command line, create a link as illustrated below: prompt> cd $OWHOME/WebApps/bin prompt> ln –s wlmksh <proc> The procedure can then be run on the command line, with any required parameters passed through to the underlying lmksh. Warning WOW and CDA are largely read-only applications. But the underlying lmksh has additional destructive options, e.g. the ability to create, rename and delete SeisWorks horizons. Use of these options is entirely at your own risk, and you should always ensure you have a current backup before proceeding. WOW 5000.0.1.11 Release Notes Page 90 of 104 March 2014 Appendix 6: WOW Functionality Checklist OpenWorks Multi-Project • • • • • • • summarize projects, reporting main data type counts across multiple projects search for objects (wells/fields/leases/lines/surveys) across multiple projects apply a standard or user defined QC/QA query across multiple projects compare 2 projects, reporting differences in attributes for the main data types match wells between projects that have a different UWI scheme show project create info with CRS info for all projects subscribe to notification of changed/new data in registered areas of interest Project Header • • • • • • • • display project header with CRS details convert X/Y<->Lat/Long display associated Interpretation projects summarise project by object counts over all main data types, drilldown or filter view side-by-side with R2003 project (if configured) show external data directories with drill down to detail show any linked AssetJournal projects request or view existing archive stub Wells • • • • • • • • • • • • • • • • • • • • • • • advanced well filter by multiple criteria display well headers in a multi-well table show multi-well summary with counts of and drilldown to the main data types tabulate well vs. curve mnemonic in a curve matrix tabulate well vs. pick name in a pick matrix create well list from filtered/selected wells display single well header with counts and drilldown to well data subtypes convert arbitrary MD<->TVD,X,Y in a well edit well remark and edit well object remarks display/add well documents display/add extended well documentation in the key facts module display well picks (plus interpolate TVD, TVDSS, TWT, X, Y for picks) display log curves (plus drill down for digits/detail) export all/selected curves in LAS format display checkshots (plus drill down for digits/image) display synthetics (plus drill down for digits/image) display dir surveys (plus drill down for digits/detail) display position logs (plus drill down for digits/ image) display lithology (plus drill down for digits/detail) display dipmeter (plus drill down for digits/detail) display headers for casing, cores, shows, tests, paleo, zone attributes display headers for plugging, DST/RFTs, interests, dates, alt UWI, well study display well notepad and remarks WOW 5000.0.1.11 Release Notes Page 91 of 104 March 2014 Fields, Lease & Basins • • • • • • • • • display field headers, interests and boundary display/launch/add field documents display/add extended field documentation in the key facts module display lease headers, interests and remarks display/add lease documents display/add extended lease documentation in the key facts module display basin headers display/add basin documents display/add extended basin documentation in the key facts module Documents • • • • • • display all KRS documents display document headers modify document header attributes link a document to a well, field, lease, basin, line or survey delete document and its links display/add survey and/or line documents SeisWorks Data • • • • • • • • advanced filter by multiple criteria display 2D/3D survey headers display 2D lines display 3D surveys display/add survey and/or line documents drill into corresponding SeisWorks project filter/display seismic data filter/display horizon data Interpretation Data • • • • • • • • • • • • • • • display grid headers and grid images display pointset headers and pointset details display mapping polygon headers and details display wavelet headers and images display velocity model headers display velocity model digits (TDQ models only; not DepthTeam Express) display interpretation notes display interpretation sets and link to data objects display geoshape set headers and details display geotiff images (requires plug-in) display vertical images display XYZ function sets and samples execute stored queries with variable substitution save well lists from well-based stored queries edit remarks for most interpretation data types WOW 5000.0.1.11 Release Notes Page 92 of 104 March 2014 Admin • • • • • • • • • display tables in Oracle project schema with table/column descriptions display VC tables list with data counts display individual VC table list of values display R_ tables list with data counts display individual R_ table list of values display stratigraphic column headers display surfaces and units for an individual stratigraphic column display users with project access rights and interpreter count display interpreters for an individual project user QC/QA • • • • • show customisable list of cross-project QC/QA queries execute multiple selected queries against an individual project edit queries in the browser create lists if query is of type well, field or lease drilldown to well, field or lease summary page SeisWorks Project Header • • • • • • • • display survey list divided between 3D and 2D projects display all survey details in a table with data counts search across 3D projects for named horizons and seismic volumes search across 2D projects for named lines display header with counts of data objects and drilldown to detail view storage directory contents display any linked AssetJournal projects generate or view existing archive stub (requires CDA license) Navigation • • • • • • display project navigation header with basemap image overlay basemap image with optional ZGF picture convert basemap to GIS image convert navigation line/trace<->X/Y display/export 2D line or 3D survey navigation details with shapefile output option display 2D line length/trace spacing Seismic • • • • • • • display seismic line/volume headers display seismic sections/timeslice images display outline of live seismic traces display/export seismic trace data display 2D line vs. proclev matrix display associated long remarks view process history WOW 5000.0.1.11 Release Notes Page 93 of 104 March 2014 Horizons • • • • • • • • display horizon headers display horizons with optional CDA-generated thumbnails display horizon statistics (% coverage) display horizon basemap images export horizon GIS image display/export horizon values display 2D line vs. horizon matrix list 2D lines containing interpretation for a selected horizon Other • • • • • • • • • • • display fault plane headers display fault segment headers display list of storage area files selectable by name, date, size and owner drill down to file details for most SeisWorks file types display color map (.clm) file as image display mapping file (.dts) header display mapping file polygon data with shapefile output option display mapping file grid as an image display zone control map (.zcm) file polygons with shapefile output option display SEGY/LAS file contents display MFD/ZGF file contents Directory Browsing Modules All Modules • • • browse directory tree and view directory files view file attributes: owner, size, modify date, access date filter by file name, size and modify date Z-MAPPlus • • • • • • • • • • • search for MFD/ZGF internal file/picture names display MFD file internal file headers display grid header, statistics and image convert grid to GIS image display non-grid file header plus data convert non-grid data to ArcView shapefile format display ZGF file internal picture headers display ZGF picture image convert ZGF pictures to ArcView shapefile format display common ASCII file formats (e.g. .fmt, txt, .dat, .zcl) document MFDs, ZGFs and their internal contents AssetJournal • • • search through projects for matching text display AssetJournal project index or table of contents page display project internal html/gif/jpg contents WOW 5000.0.1.11 Release Notes Page 94 of 104 March 2014 • • display and request publishing of shared AssetJournal projects link AssetJournal project to an OpenWorks object as a KRS document Other Data • • • • • • • • • • • • • • • • display common ASCII file formats (e.g. .dat, .txt) display common web file formats (e.g. .gif, .jpg, .pdf) display CGM files as images display SEGY EBCDIC/binary headers display SEGY trace headers, data and statistics display SEGY images display LAS headers display LAS curve images display SHP (shapefiles) as images download LAS files display DBF (.dbf) file contents display APR (.apr) project contents display DGN (.dgn) files as images display .tar, .Z and .gz compressed file contents display EarthVision 2D and 3D grid formats display VIP VDB file/directory contents GeoProbe Project Header • • • • • • • display project list with drilldown to detail option display project summary with counts of and drilldown to the different data types search across projects for files and/or documentation display project header page with data counts generate or view existing archive stub (requires CDA license) create or update project-level documentation set up copy/rename/delete/link/move operations on project files Volumes • • display volume headers with CDA thumbnails if generated display volume details with trace values and images Surfaces • • display surface headers with CDA thumbnails if generated display surface details with statistics and images Horizons • • display horizon headers with CDA thumbnails if generated display horizon details with statistics and images Other Data Types • display point file headers with drilldown to data values WOW 5000.0.1.11 Release Notes Page 95 of 104 March 2014 • • • • • • display fault file headers with drilldown to data values display well file headers with drilldown to marker/curve headers display colormaps with drilldown to RGB values and images display state file headers with drilldown to objects referenced in state files document volume, surface, horizon, point, fault, well, colormaps or lease objects display all project documentation • • • • • • • • • • • • display all VBD file attributes display VDB summary info with case headers plus CDA thumbnails if generated generate or view existing archive stub (requires CDA license) browse VDB directory files display VBD case summary with data counts and plot/variable/grid headers display plot classes with graphs of variables vs. time + observed data if present drill down to view actual plot data for given item and variable display initialization variables with images of variables per layer display recurrent variables with images of variables per layer per timestep display ternary diagrams of initial and recurrent variables display lists of grids, timesteps and perforations with start/end flow type display any well data VIP ProMAX Areas • • • • • • supports multiple PROMAX_DATA_HOME locations show area headers with no. lines search for lines across areas view ProMAX config_file drill down to line list generate or view existing archive stub (requires CDA license) Lines • • • show line headers with no. flows/datasets/tables/OPFs search for flows across lines drill down to line details Flows • • show flow headers drill down to show packet contents and job output Datasets • • • • • • show dataset headers with sizes drill down to dataset details showing header and ensembles drill down to ensemble details view trace data as image view single trace headers and sample values view a trace header attribute for all traces WOW 5000.0.1.11 Release Notes Page 96 of 104 March 2014 Parameter Tables • • show table headers with types drill down to show table header plus data OPFs • • • • • list OPFs drill down to show OPF attributes drill down to OPF attribute details view 2D cross plot of OPF attributes view OPF tabular data Miscellaneous • • • • • • • • • • • • save results to Excel on PC or Linux file (all modules) report data errors context-sensitive (all modules) change SeisWorks/OpenWorks district/instance in multi-district sites display WOW Apache error log plus environment for customer support launch release notes link to Corporate Data Archiver (requires additional license) link to Project Administrator (requires additional license) hide ‘tight’ OpenWorks projects hide ‘tight’ SeisWorks projects hide ‘tight’ Linux directories validate user access against Linux credentials modify WOW configuration files (administrators only) WOW 5000.0.1.11 Release Notes Page 97 of 104 March 2014 Appendix 7: WOW Documenter Attributes Migration to R5000 Seismic Attributes PIM_SEIS_INFO 3D Upgrade Path 2D Upgrade Path PROJECT None None SEISMIC None None TIME_DEPTH None POLARITY Copy into SEISMIC_DATA_SET field PHASE Copy into SEISMIC_DATA_SET field SEIS_CLASS Copy into SEISMIC_DATA_SET attribute SEISMIC_CLASS None Copy into each SEISMIC_DATA_SET entries associated with the proclev. Copy into each SEISMIC_DATA_SET entries associated with the proclev. Copy into each SEISMIC_DATA_SET entries associated with the proclev. SEIS_STATUS DATA_SOURCE Copy into SEISMIC_DATA_SET attribute INTERPRETATION_STATUS Added to SEISMIC_DATA_SET_REMARK Type = SW_GENERAL Copy into each SEISMIC_DATA_SET entries associated with the proclev. Added to SEISMIC_DATA_SET_REMARK Type = SW_GENERAL Notes Not relevant Value will be migrated from the seismic data file to the SEISMIC_DATA_SET table, attribute DATA_FILE_NAME Value will be migrated from the seismic data file to the SEISMIC_DATA_SET table, attribute Z_DOMAIN If all instances of PIM_SEIS_INFO associated with the same 2D proclev don't have the same CLASS and STATUS values, then the class and status value of the last WOW record encountered will be used to populate these fields in the new model. SAMP_FMT None None SAMP_RATE None None TIME_MIN None None TIME_MAX None None LINE_MIN None None LINE_MAX None None TRACE_MIN None None TRACE_MAX None Copy into SEISMIC_DATA_SET attribute NUM_TRACES Copy into SEISMIC_DATA_SET attribute PERCENT_COV Copy into SEISMIC_DATA_SET attribute NO_EXTENTS None Value will be migrated from the seismic data file to the SEISMIC_DATA_SET table, attribute BINARY_DATA_FORMAT Value will be migrated from the seismic data file to the SEISMIC_DATA_SET table, attribute Z_SAMPLE_RATE Value will be migrated from the seismic data file to the SEISMIC_DATA_SET table, attribute Z_START Value is computable from the SEISMIC_DATA_SET table, i.e. Z_START+(Z_NPTS1)*Z_SAMPLE_RATE Value will be migrated from the seismic data file to the SEISMIC_DATA_SET table, attribute LINE_MIN Value will be migrated from the seismic data file to the SEISMIC_DATA_SET table, attribute LINE_MAX Value will be migrated from the seismic data file to the SEISMIC_DATA_SET table, attribute TRACE_MIN Value will be migrated from the seismic data file to the SEISMIC_DATA_SET table, attribute TRACE_MAX None Values didn't apply to 2D in pim None Values didn't apply to 2D in pim None Values didn't apply to 2D in pim NO_TRACES PERCENT_COV NO_EXTENTS WOW 5000.0.1.11 Release Notes Page 98 of 104 March 2014 Copy into SEISMIC_DATA_SET attribute TOTAL_SIZE TOTAL_SIZE None Values didn't apply to 2D in pim REMARKS Copy into SEISMIC_DATA_SET attribute PROCESSED_DATE Added to SEISMIC_DATA_SET_REMARK Type = SW_GENERAL Added to SEISMIC_DATA_SET_REMARK Type = SW_GENERAL Added to SEISMIC_DATA_SET_REMARK Type = SW_GENERAL Added to SEISMIC_DATA_SET_REMARK Type = EBCDIC_HDR Added to SEISMIC_DATA_SET_REMARK Type = BINARY_HDR Added to SEISMIC_DATA_SET_REMARK Type = SW_GENERAL Added to SEISMIC_DATA_SET_REMARK Type = SW_GENERAL Copy into each SEISMIC_DATA_SET attribute SCALE_DISPLAY entry associated with the proclev. Copy into each SEISMIC_DATA_SET entries associated with the proclev. Copy into each SEISMIC_DATA_SET entries associated with the proclev. Copy into each SEISMIC_DATA_SET entries associated with the proclev. Copy into each SEISMIC_DATA_SET entries associated with the proclev. Added to SEISMIC_DATA_SET_REMARK Type = SW_GENERAL Added to SEISMIC_DATA_SET_REMARK Type = SW_GENERAL Added to SEISMIC_DATA_SET_REMARK Type = SW_GENERAL Added to SEISMIC_DATA_SET_REMARK Type = EBCDIC_HDR Added to SEISMIC_DATA_SET_REMARK Type = BINARY_HDR Added to SEISMIC_DATA_SET_REMARK Type = SW_GENERAL Added to SEISMIC_DATA_SET_REMARK Type = SW_GENERAL CREATE_DATE None None CREATE_USER_ID None None UPDATE_DATE None None UPDATE_USER_ID None None OPT_DISPLAY_SCALE Copy into SEISMIC_DATA_SET attribute SCALE_DISPLAY ACQUIRED_BY Copy into SEISMIC_DATA_SET attribute ACQUIRED_BY ACQUISITION_DATE Copy into SEISMIC_DATA_SET attribute ACQUISITION_DATE PROCESSED_BY Copy into SEISMIC_DATA_SET attribute PROCESSED_BY PROCESSING_DATE LOADED_BY LOADING_DATE PARENT_SEISMIC SEGY_EBCDIC_HEADER SEGY_BINARY_HEADER ASSOC_TAG Horizon Attributes PIM_HRZ_INFO 3D Upgrade Path 2D Upgrade Path Notes PROJECT None None Not relevant HRZ_NUMBER None None Not relevant HRZ_NAME None None Value will be migrated from the horizon index file to the OW model. HRZ_TYPE None None Value will be migrated from the horizon index file to the OW model. HRZ_ONSET None None Value will be migrated from the horizon index file to the OW model. COLOUR None None STORED_MIN None None STORED_MAX None None Value will be migrated from the horizon index file to the OW model. Min value in new model will be computed as part of upgrade from the data. Max value in new model will be computed as part of upgrade from the data. RECOMP_MIN None None Not relevant WOW 5000.0.1.11 Release Notes Page 99 of 104 March 2014 RECOMP_MAX MEAN None None None Not relevant None Mean in new model will be computed as part of upgrade from the data. Percent coverage value in new model will be computed as part of upgrade from the data. PERCENT_COV None None HRZ_INTERP_SOURCE Added to HORIZON_DATA_REMARK Type = SW_GENERAL Added to HORIZON_ATTRIBUTE_REMARK Type = SW_GENERAL HRZ_APPL_SOURCE Added to HORIZON_DATA_REMARK Type = SW_GENERAL Added to HORIZON_ATTRIBUTE_REMARK Type = SW_GENERAL PARENT_HRZ_NAME Added to HORIZON_DATA_REMARK Type = SW_GENERAL Added to HORIZON_ATTRIBUTE_REMARK Type = SW_GENERAL HRZ_CREATE_DATE Ignore value in WOW model. Copy the creation date from the horizon data file header into ORIG_CREATE_DATE in HORIZON_DATA None date field in WOW is free format. Too difficult to interpret STRAT_UNIT_NAME Fill out the picksurf field in R_HORIZON_NAME with this value if the value actually exists in the strat column. Fill out the picksurf field in R_HORIZON_NAME with this value if the value actually exists in the strat column. SEISMIC_FILE Use the seismic data set id for this volume on this survey Use the seismic data set id for this volume on this line. HRZ_STATUS Copy into HORIZON_DATA field Copy into HORIZON_DATA field HRZ_CLASS Copy into HORIZON_ATTRIBUTE_HDR Copy into HORIZON_ATTRIBUTE_HDR DTS_FILE Added to HORIZON_DATA_REMARK Type = SW_GENERAL Added to HORIZON_ATTRIBUTE_REMARK Type = SW_GENERAL PARENT_HRZ_NAME2 Added to HORIZON_DATA_REMARK Type = SW_GENERAL Added to HORIZON_ATTRIBUTE_REMARK Type = SW_GENERAL ASSOC_TAG Added to HORIZON_DATA_REMARK Type = SW_GENERAL Added to HORIZON_ATTRIBUTE_REMARK Type = SW_GENERAL REMARKS Added to HORIZON_DATA_REMARK Type = SW_GENERAL Added to HORIZON_ATTRIBUTE_REMARK Type = SW_GENERAL CREATE_DATE None None CREATE_USER_ID None None UPDATE_DATE None None UPDATE_USER_ID None None WOW 5000.0.1.11 Release Notes Page 100 of 104 From all the HORIZON_DATA records associated with a HORIZON_ATTRIBUTE_HDR record, copy the oldest ORIG_CREATE_DATE into the ORIC_CREATE_DATE field in HORIZON_ATTRIBUTE_HDR. Not doing yet. If all instances of PIM_HRZ_INFO associated with the same Horizon name don't have the same CLASS and STATUS values, then the class and status value of the last WOW record encountered will be used to populate these fields in the new model. March 2014 Structure of Remark Data For each PIM_SEIS_INFO record associated with a 3D project, three remark records will be created that are associated with the SEISMIC_DATA_SET instance in OW. A SEISMIC_DATA_SET_REMARK ‘long remark’ of type SW_GENERAL will contain the fields in the WOW model that don't map to the OW R5000 model directly including the contents of the remark field. A SEISMIC_DATA_SET_REMARK ‘long remark’ of type EBCDIC_HDR will contain the EBCDIC header and a SEISMIC_DATA_SET_REMARK of type BINARY_HDR will contain the Binary header. For each PIM_SEIS_INFO record associated with a 2D project (one per proclev), three remark records will be created that are associated with each SEISMIC_DATA_SET instance in OW with the same proclev. A SEISMIC_DATA_SET_REMARK ‘long remark’ of type SW_GENERAL will contain the fields in the WOW model that don't map to the OW R5000 model directly including the contents of the remark field. A SEISMIC_DATA_SET_REMARK ‘long remark’ of type EBCDIC_HDR will contain the EBCDIC header and a SEISMIC_DATA_SET_REMARK of type BINARY_HDR will contain the Binary header. For each PIM_HRZ_INFO record associated with a 3D project, one HORIZON_DATA_REMARK of type SW_GENERAL ‘long remark’ will be created that is associated with the HORIZON_DATA instance in OW. It will contain the fields in the WOW model that don't map to the OW R5000 model directly including the contents of the remark field. For each PIM_HRZ_INFO record associated with a 2D project, one HORIZON_ATTRIBUTE_REMARK of type SW_GENERAL ‘long remark’ will be created that is associated with the HORIZON_ATTRIBUTE_HDR instance in OW. It will contain the fields in the WOW model that don't map to the OW R5000 model directly including the contents of the remark field. Viewing Metadata Post-Migration Attributes are most readily viewed in the Seismic Data Manager. Many attributes are visible in the tables for seismic and horizons; note however that not all are shown by default, and it may be necessary to click on the Select columns icon and check additional required attributes for display. To view metadata migrated into the ‘long remarks’, select any seismic or horizon row, right-click to bring up the context menu, then select option View long remarks. This brings up a new window in which remarks may be viewed edited or deleted. In addition, long remarks and selected metadata attributes may be viewed in the SeisWorks Seismic View, menu items Seismic -> Info and Horizon -> Attributes. WOW 5000.0.1.11 Release Notes Page 101 of 104 March 2014 Contacting Landmark Customer Support Landmark software operates Technical Assistance Centers (TACs) in Australia, the United Kingdom, and the United States. Additional support is also provided through local support offices around the world. Support via Web Portal Support information is always available on the Landmark Customer Support internet page. You can also submit a support request directly to Landmark Customer Support though the Landmark Customer Support Portal: http://css.lgc.com/InfoCenter/index?page=home To request support in the Landmark Customer Support Portal: 1. In the PIN and Password text boxes in the Please Sign In area, enter your registered personal identification number and password. 2. Click the Sign In button. 3. In the Case & Defect Information area, click the Create a New Case link. 4. In the Create Case area, fill in the necessary information. Provide details about your technical concern, including any error messages, the workflow steps where the problem occurred, and attachments of screen shots that display the problem. To help understand the concern, you can also attach other files too, such as example data files. 5. Click the Submit button. A support analyst in the nearest Technical Assistance Center will respond to your request. Technical Assistance Centers Asia, Pacific 8:00 am - 5:00 pm Local Time Monday-Friday, excluding holidays 61-8-9481-4488 (Perth, Australia) Toll Free 1-800-448-488 Fax: 61-8-9481-1580 Email: [email protected] Europe, Africa, Middle East 9:00 am - 5:30 pm Local Time Monday - Friday, excluding holidays 44-1372-868686 (Leatherhead, UK) Fax: 44-1224-723260 (Aberdeen, UK) Fax: 44-1372-868601 (Leatherhead, UK) Email: [email protected] Latin America (Spanish, Portuguese, English) 7:00 am - 5:00 pm Local Time 713-839-3405 (Houston, TX, USA) Fax: 713-839-3646 Email: [email protected] North America 7:30 am - 5:30 pm Central Standard Time Monday - Friday, excluding holidays 713-839-2200 (Houston, TX, USA) Toll Free 1-877-435-7542 (1-877-HELP-LGC) Fax: 713-839-2168 Email: [email protected] WOW 5000.0.1.11 Release Notes Page 102 of 104 March 2014 Regional Offices For contact information for regional offices, see the Contact Support page located at: http://css.lgc.com/InfoCenter/index?page=contact§ion=contact If problems cannot be resolved at the regional level, an escalation team is called to resolve your incidents quickly. WOW 5000.0.1.11 Release Notes Page 103 of 104 March 2014 © 2014 Halliburton All Rights Reserved Information in this document is subject to change without notice. No part of this document may be reproduced or transmitted in any form or by any means, electronic or mechanical, for any purpose, without the express written permission of Halliburton. Unauthorized reproduction or distribution of this documentation, or any portion of it, may result in severe civil and criminal penalties, and will be prosecuted to the maximum extent possible under law. Halliburton may have patents, patent applications, trademarks, copyrights, or other intellectual property rights covering subject matter in this document. The furnishing of this document does not give you any license to these patents, trademarks, copyrights, or other intellectual property. Trademarks 3D Drill View, 3D Drill View KM, 3D Surveillance, 3DFS, 3DView, Active Field Surveillance, Active Reservoir Surveillance, 3D Drill View, 3D Drill View KM, 3D Surveillance, 3DFS, 3DView, Active Field Surveillance, Active Reservoir Surveillance, Adaptive Mesh Refining, ADC, Advanced Data Transfer, Analysis Model Layering, ARIES, ARIES DecisionSuite, Asset Data Mining, Asset Decision Solutions, Asset Development Center, Asset Development Centre, Asset Journal, Asset Performance, AssetConnect, AssetConnect Enterprise, AssetConnect Enterprise Express, AssetConnect Expert, AssetDirector, AssetJournal, AssetLink, AssetLink Advisor, AssetLink Director, AssetLink Observer, AssetObserver, AssetObserver Advisor, AssetOptimizer, AssetPlanner, AssetPredictor, AssetSolver, AssetSolver Online, AssetView, AssetView 2D, AssetView 3D, BLITZPAK, CasingLife, CasingSeat, CDS Connect, Channel Trim, COMPASS, Contract Generation, Corporate Data Archiver, Corporate Data Store, Data Analyzer, DataManager, DataStar, DBPlot, Decision Management System, DecisionSpace, DecisionSpace 3D Drill View, DecisionSpace 3D Drill View KM, DecisionSpace AssetLink, DecisionSpace AssetPlanner, DecisionSpace AssetSolver, DecisionSpace Atomic Meshing, DecisionSpace Desktop, DecisionSpace Nexus, DecisionSpace Reservoir, DecisionSuite, Deeper Knowledge. Broader Understanding., Depth Team, Depth Team Explorer, Depth Team Express, Depth Team Extreme, Depth Team Interpreter, DepthTeam, DepthTeam Explorer, DepthTeam Express, DepthTeam Extreme, DepthTeam Interpreter, Desktop Navigator, DESKTOP-PVT, DESKTOP-VIP, DEX, DIMS, Discovery, Discovery 3D, Discovery Asset, Discovery Framebuilder, Discovery PowerStation, DMS, Drillability Suite, Drilling Desktop, DrillModel, Drill-to-the-Earth-Model, Drillworks, Drillworks ConnectML, DSS, Dynamic GeoModeling, Dynamic Reservoir Management, Dynamic Surveillance System, EarthCube, EDM, EDM AutoSync, EDT, eLandmark, Engineer’s Data Model, Engineer’s Desktop, Engineer’s Link, ESP, Event Similarity Prediction, ezFault, ezModel, ezSurface, ezTracker, ezTracker2D, FastTrack, Field Scenario Planner, FieldPlan, For Production, FrameBuilder, FZAP!, GeoAtlas, GeoDataLoad, GeoGraphix, GeoGraphix Exploration System, GeoLink, Geometric Kernel, GeoProbe, GeoProbe GF DataServer, GeoSmith, GES, GES97, GESXplorer, GMAplus, GMI Imager, Grid3D, GRIDGENR, H. Clean, Handheld Field Operator, HHFO, High Science Simplified, Horizon Generation, I2 Enterprise, iDIMS, Infrastructure, Iso Core, IsoMap, iWellFile, KnowledgeSource, Landmark (as a service), Landmark (as software), Landmark Decision Center, Landmark Logo and Design, Landscape, Large Model, Lattix, LeaseMap, LithoTect, LogEdit, LogM, LogPrep, Magic Earth, Make Great Decisions, MathPack, MDS Connect, MicroTopology, MIMIC, MIMIC+, Model Builder, NETool, Nexus (as a service), Nexus (as software), Nexus View, Object MP, OpenBooks, OpenJournal, OpenSGM, OpenVision, OpenWells, OpenWire, OpenWire Client, OpenWire Server, OpenWorks, OpenWorks Development Kit, OpenWorks Production, OpenWorks Well File, PAL, Parallel-VIP, Parametric Modeling, Permedia, PetroBank, PetroBank Explorer, PetroBank Master Data Store, PetroStor, PetroWorks, PetroWorks Asset, PetroWorks Pro, PetroWorks ULTRA, PlotView, Point Gridding Plus, Pointing Dispatcher, PostStack, PostStack ESP, PostStack Family, Power Interpretation, PowerCalculator, PowerExplorer, PowerExplorer Connect, PowerGrid, PowerHub, PowerModel, PowerView, PrecisionTarget, Presgraf, PressWorks, PRIZM, Production, Production Asset Manager, PROFILE, Project Administrator, ProMAGIC, ProMAGIC Connect, ProMAGIC Server, ProMAX, ProMAX 2D, ProMax 3D, ProMAX 3DPSDM, ProMAX 4D, ProMAX Family, ProMAX MVA, ProMAX VSP, pSTAx, Query Builder, Quick, Quick+, QUICKDIF, Quickwell, Quickwell+, Quiklog, QUIKRAY, QUIKSHOT, QUIKVSP, RAVE, RAYMAP, RAYMAP+, Real Freedom, Real Time Asset Management Center, Real Time Decision Center, Real Time Operations Center, Real Time Production Surveillance, Real Time Surveillance, Realtime View, Reference Data Manager, Reservoir, Reservoir Framework Builder, RESev, ResMap, RTOC, SCAN, SeisCube, SeisMap, SeisModel, SeisSpace, SeisVision, SeisWell, SeisWorks, SeisWorks 2D, SeisWorks 3D, SeisWorks PowerCalculator, SeisWorks PowerJournal, SeisWorks PowerSection, SeisWorks PowerView, SeisXchange, Semblance Computation and Analysis, Sierra Family, SigmaView, SimConnect, SimConvert, SimDataStudio, SimResults, SimResults+, SimResults+3D, SIVA+, SLAM, SmartFlow, smartSECTION, smartSTRAT, Spatializer, SpecDecomp, StrataAmp, StrataMap, StrataModel, StrataSim, StratWorks, StratWorks 3D, StreamCalc, StressCheck, STRUCT, Structure Cube, Surf & Connect, SurfNet, SynTool, System Start for Servers, SystemStart, SystemStart for Clients, SystemStart for Servers, SystemStart for Storage, Tanks & Tubes, TDQ, Team Workspace, TERAS, T-Grid, The Engineer’s DeskTop, Total Drilling Performance, TOW/cs, TOW/cs Revenue Interface, TracPlanner, TracPlanner Xpress, Trend Form Gridding, Trimmed Grid, Turbo Synthetics, Unconventional Essentials, VESPA, VESPA+, VIP, VIP-COMP, VIP-CORE, VIPDataStudio, VIP-DUAL, VIP-ENCORE, VIP-EXECUTIVE, VIP-Local Grid Refinement, VIP-THERM, WavX, Web Editor, Well Cost, Well H. Clean, Well Seismic Fusion, Wellbase, Wellbore Planner, Wellbore Planner Connect, WELLCAT, WellDirect, WELLPLAN, WellSolver, WellXchange, WOW, Xsection, You’re in Control. Experience the difference, ZAP!, and Z-MAP Plus are trademarks, registered trademarks, or service marks of Halliburton. All other trademarks, service marks and product or service names are the trademarks or names of their respective owners. Note The information contained in this document is subject to change without notice and should not be construed as a commitment by Halliburton. Halliburton assumes no responsibility for any error that may appear in this manual. Some states or jurisdictions do not allow disclaimer of expressed or implied warranties in certain transactions; therefore, this statement may not apply to you. WOW 5000.0.1.11 Release Notes Page 104 of 104 March 2014