1
21
Note: 1) Before attaching magazines, always recheck the loops and the additional frame
in the lower loop as described in
section 4.6-b.
2) Fit dust caps to magazines not in use.
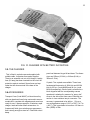
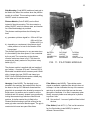
4.8. FITTING THE HANDGRIP
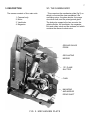
FIG. 18. UNEXPOSED FILM INDICATOR.
Unscrew the knurled ring.
Screw the handgrip into the hole provided for that
purpose at the base of the camera.
Adjust the handgrip to a comfortable gripping position and lock in that position by turning the knurled
ring.
The angle of the handgrip is easily adjusted by
unscrewing the handgrip lock.
4.6.1 DAYLIGHT SPOOLS
4.9. STARTING THE CAMERA
When daylight spools are used instead of 50mm
(2in) cores the loading and loop forming procedure is
the same except that the core flanges on both feed
and take-up sides must be removed to reveal the
squared shoulder for locating the spool.
When the lens and magazine are mounted and the
viewfinder adjusted, proceed as outlined below :
Connept the battery to the camera with the MIBLE
cable. Adjust the mirror to the viewing position using
the knurled knob on the motor.
Set the clapper switch to -the desired position.
Centre
= No Clapper.
Right or left = Automatic Clapper.
For manual clapper during filming, move the switch
to either side position. The clapper (fogging period) is
0.3 second.
START the camera by pressing the release button.
Slide the button towards the motor to lock it in the
running position.
If the amber lamp on the motor housing comes ON, it
will signify low voltage and that the battery needs
recharging.
To STOP the camera, slide the pushbutton away
from the motor and allow it to return outward to the
OFF position.
Note : After loading, run the camera for approxi
mately five seconds before starting to film.
This advances that part of the film which will
have been fogged during the loading
procedure.
4.7
MOUNTING MAGAZINE TO
CAMERA BODY (fig 14)
Before engaging the magazine ensure that; the
aperture plate is clean, the claw side lateral pressure
guide is free and that the magazine safety catch is
open.
With the magazine tilted backwards as shown in fig.
14, place the lower part of the magazine nose at the
bottom of the aperture plate. Pivot the magazine on
its lower locating points and push it home. The lock
operates automatically and a sharp click indicates
that the magazine is firmly in position.
Push the safety catch inwards. This ensures that
the magazine will not be accidentally detached by a
knock on the release lever.