1
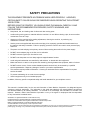
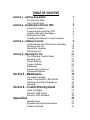
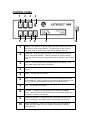
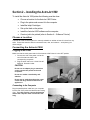
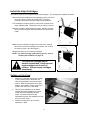
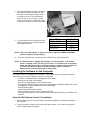
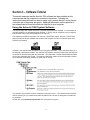
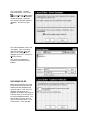
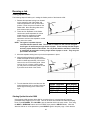
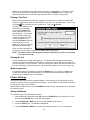
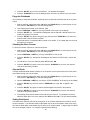
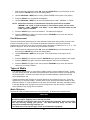
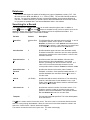
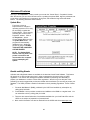
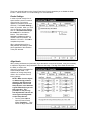
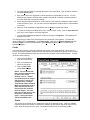
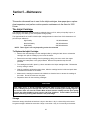
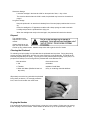
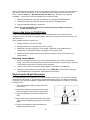
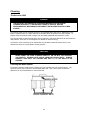
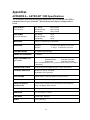
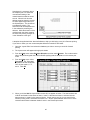
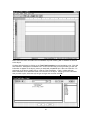
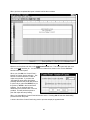
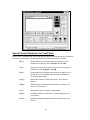
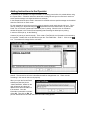
ASTRO
AstroJet 1000
Inkjet Printer
Installation, and Operating Manual
SAFETY PRECAUTIONS
THIS EQUIPMENT PRESENTS NO PROBLEM WHEN USED PROPERLY. HOWEVER,
CERTAIN SAFETY RULES SHOULD BE OBSERVED WHEN OPERATING THE ASTROJET
1000 SYSTEM.
BEFORE USING THE PRINTER, YOU SHOULD READ THIS MANUAL CAREFULLY AND
FOLLOW THE RECOMMENDED PROCEDURES, SAFETY WARNINGS, AND
INSTRUCTIONS:
ü
Keep hands, hair, and clothing clear of rollers and other moving parts.
ü
Avoid touching moving parts or materials while the machine is in use. Before clearing a jam, be sure machine
mechanisms come to a stop.
ü
Always turn off the machine before making adjustments, cleaning the machine, or performing any
maintenance covered in this manual.
ü
Use the power cord supplied with the machine and plug it into a properly grounded wall outlet located near
the machine and easily accessible. Failure to properly ground the machine can result in sever personal injury
and/or fire.
ü
The power cord and wall plug is the primary means of disconnecting the machine for the power supply.
ü
DO NOT use an adapter plug on the line cord or wall outlet.
ü
DO NOT remove the ground pin from the line cord.
ü
DO NOT route the power cord over sharp edges or trapped between furniture.
ü
Avoid using wall outlets that are controlled by wall switches, or shared with other equipment.
ü
Make sure there is no strain on the power cord caused by jamming between the equipment, walls or furniture.
ü
DO NOT remove covers. Covers enclose hazardous parts that should only be accessed by a qualified
service representative. Report any damage of covers to your service representative.
ü
This machine requires periodic maintenance. Contact your authorized service representative for required
service schedules.
ü
To prevent overheating, do not cover the vent openings.
ü
Use this equipment only for its intended purpose.
In addition, follow any specific occupational safety and health standards for your workplace or area.
This manual is intended solely for the use and information of Astro Machine Corporation, its designated agents,
customers, and their employees. The information in this guide was obtained from several different sources that
are deemed reliable by all industry standards. To the best of our knowledge, that information is accurate in all
respects. However, neither Astro Machine Corporation nor any of its agents or employees shall be responsible
for any inaccuracies contained herein.
ASTROJET is a registered trademark of Astro Machine Corp.
Hewlett-Packard is a registered trademark of Hewlett-Packard Corporation.
Windows 95 and Windows 98 are registered trademarks of Microsoft Corporation.
IBM is a registered trademark of International Business Machines.
All other trademarks are the property of their respective holders.
All rights reserved. No part of this book may be reproduced or transmitted in any form or by any means, electronic or mechanical, including
photocopying, recording, or any information storage and retrieval system, without permission in writing from the Publisher.
TABLE OF CONTENT
Section 1 – Getting Acquainted
1
The AstroJet 1000
The Control Panel
1
3
Choose a Location
Connecting the AstroJet 1000
Installing the Inkjet Cartridges
Setting up the Feed
Installing the Software on the Computer
5
5
6
6
7
Section 2 – Installing the AstroJet 1000
Section 3 – Software Tutorial
5
9
Using the AstroJet 1000 System Software
Setting up the Job
Saving the Template
Saving the Job
9
13
18
18
The Computer Control Panel
Running a Job
Printer Settings
Types of Media
Databases
Searching for a Record
Advanced Features
21
23
24
26
27
27
28
The Inkjet Cartridge
Jams in the AstroJet 1000 Printer
Replacing the Sheet Separators
Cleaning
33
35
35
36
Inkjet Cartridges
AstroJet 1000 Printer
AstroJet 1000 Software
37
42
39
Specifications
Supplies and Optional Hardware
Software Options
41
43
44
Section 4 – Running the Job
Section 5 – Maintenance
Section 6 – Trouble Shooting Guide
Appendices
i
21
33
37
41
Notes
ii
Section 1 – Getting Acquainted
ASTROJET 1000
The AstroJet 1000 is a high-speed printing and addressing systems that can print
addresses, bar code, return addresses, bitmapped graphics, and special messages
using TrueType scaleable fonts simultaneously on up to 20,000 postcard (3.5 X 5.5
inch) mail pieces per hour.
4
1
2
3
5
6
7
1
2
CONTROL PANEL – See page 3
3
SHEET SEPARATORS – There are four sheet separators that help separate the media as it is
being fed. (See Setting Up the Job page 6)
4
5
SIDE GUIDES – The side guides are used to maintain side to side registration.
6
7
MOTOR CIRCUIT BREAKER – This circuit breaker protects the motor from overloads.
SHEET SEPARATOR LOCKING LEVER – This lever locks and releases the sheet separators
Item 3.
REAR-GUIDE - The rear-guide is used to hold the media against the sheet-separators for
proper feeding.
POWER RECEPTACLE – The power receptacle contains the main power switch and the fuses.
1
1
5
2
3
4
1
PRINT HEAD COVER – Shown open for illustration purposes, but should be in the closed
position for running.
2
PARALLEL PORT – The printer cable from your computer should be connected here.
3
MEDIA TRANSPORT BELTS – The media is transported under the printheads on these belts.
4
PRINTHEAD CARRIAGE – The AstroJet 1000 has four printheads. Head 1, 2, and 3 are
banked together on the rail. Head 4 shares the same rail, but is opposite and independent of
the other heads.
You can move the two printing banks from side to side to position the information properly on
the media with the following restrictions. Heads 1, 2, and 3, print a band 1-1/2 inch wide and
may be positioned anywhere within a range of 2-1/2 inches from the Control Panel side of the
printer to 4 inches from the opposite side of the printer. Head 4 can be positioned to within 13/4 inches of head 3 and to within 2-1/2 inch of the non-operator side of the printer.
5
MEDIA SENSOR – The media sensor is located just before the printheads and senses the
media to start the printing action.
2
CONTROL PANEL
1
2
3
4
5
6
7
8
9
1
ONLINE – The indicator on this key lights when data is sent to the AstroJet
1000 and it is ready to begin printing. Turns the printer on and off line so
that menu mode can be accessed. (See Printer Settings, page 26)
2
PREVIOUS – When the AstroJet 1000 is in the menu mode this key will
scroll to the previous selection. When the selection is unlocked with the
select key, this key will scroll through the selections available in the selected
menu.
3
SELECT – In the print mode this key starts and stops the printing. In the
menu mode it locks and unlocks the selection.
4
ERROR INDICATOR – When RED indicates a problem with the printing
process.
5
RESET – This key does not function.
6
NEXT – When the AstroJet 1000 is in the menu mode this key will scroll to
the next selection. When the selection is unlocked with the select key, this
key will scroll through the selections available in the selected menu.
7
TEST – This key does not function.
8
STANDBY – Toggles the printer between the ON LINE and STANDBY
modes. When the AstroJet 1000 is first turned on the indicator light shows
the machine is ready to receive data.
9
OPERATOR DISPLAY – Indicates AstroJet 1000 status including menus
and error messages. Any display readout indicates that the unit is ON.
10
MEDIA THICKNESS – The knob on the right side of the control panel is
used to adjust the height of the print heads to compensate for different
media thickness.
3
10
Notes
4
Section 2 – Installing the AstroJet 1000
To install the AstroJet 1000 printer the following must be done:
•
Choose a location for the AstroJet 1000 Printer
•
Plug in the printer and connect it to the computer
•
Install the Inkjet Cartridges
•
Set up the feed on the printer
•
Install the AstroJet 1000 software on the computer
•
Create a job to be printed (refer to Section 4 – Software Tutorial)
Choose a Location
The AstroJet 1000 should be placed on a sturdy worktable or cabinet at least 12 inches from any
walls. Protect the AstroJet 1000 from excessive heat, dust, and moisture – avoid placing it in
direct sunlight.
Connecting the AstroJet 1000
Plugging in the Printer
Make sure that the main power switch of the AstroJet 1000 Printer is in the OFF position.
1.
Connect one end of the power cord to the
rear of the AstroJet 1000 in the
corresponding receptacle.
2.
Plug the other end into a 115-220 Volt AC,
50/60 Hz. Grounded outlet.
CAUTION
Do not use an adapter plug or extension
cord to connect the printer to the wall
receptacle.
Do not use outlets controlled by wall
switches.
Do not use an outlet that shares the same
circuit with large electrical machines or
appliances.
Connecting to the Computer
Plug the parallel printer cable from your computer
into the rear of the printer and latch the two locking
clips. The cable used to connect the AstroJet
1000 to the computer must not exceed 6 feet
long.
5
Install the Inkjet Cartridges
The AstroJet 1000 can be configured with 4 inkjet cartridges. The cartridges are installed as follows:
• Remove the inkjet cartridge from its packaging, taking care not to
touch the copper contacts, the metal plate, or the gold
printhead. Remove the protective tape from the printhead.
• The cartridges are held in place by a latch lever mounted on the
inkjet cartridge holder. Release the lever by raising it vertical.
• With the cartridge’s printhead pointing down, slide the cartridge
into the holder and push down and toward the contacts in the
holder.
• Make sure the cartridge is seated in the holder then close the
latch lever to secure the cartridge in the holder. Do not force
the lever into place. (See the diagram.)
• Repeat the above for the remaining cartridges.
NOTE: For optimum image quality during the run, refer to
"Cleaning the Printhead" on page 34.
The ink in the cartridge may be
harmful if swallowed. Keep new and
used cartridges out of reach of
children. Discard empty cartridges
immediately.
Setting up the Feed
1.
Release the separator-locking lever located
on the operator’s side of the feeder and
raise the separators to the up and locked
position. Move the side guides out to their
extreme open position. Place one piece of
media in the center of the feed table.
2.
There are four separators on the feeder.
Use the two center separators for narrow
media and all four separators for wide
media. Place the media under the
separators and lower the separators so that
they rest on the media.
3.
Rotate the locking lever up to lock the
separators in place.
6
4.
Adjust the side guides to within 1/32-inch of
the media and set the back guide so that
the media is raised approximately 1/2-inch
and rests on the curve of the back guide.
When running 10 inch or longer or heavy
media you may have to set the back guide
so that it just touches the back of the media.
5.
Turn the AstroJet 1000 on and then turn the
media thickness knob to set the initial print
head height as follows:
Media Thickness
.004” to 1/32”
1/32” to 1/16”
1/16” to 1/8”
1/8” to 1/4”
Dial Setting
0 to 2
2 to 3
3 to 7
7 to 10
NOTE: These are initial settings. It may be necessary to adjust the MEDIA THICKNESS
control to optimize the print quality
6.
Press the STAND BY key, and then press the SELECT key, to test feed media.
NOTE: The AstroJet 1000 is supplied with two types of sheet separators. The hard tip,
which is installed on the unit when you receive it, is for media such as envelopes,
books, and stuffed envelopes. A soft tip separator is packed with the machine for
use with single sheets of paper and plain envelopes. Refer to Section 5 –
Maintenance for instructions on how to change them.
Installing the Software on the Computer
The AstroJet 1000 is not supplied with a computer. The computer that you use with your AstroJet
1000 System should meet the following minimum requirements:
An IBM or Compatible Pentium 100 Megahertz PC or better.
Windows 95, 98, 2000 or NT installed.
A minimum of 20 Megabytes of free hard disk space.
The computer should be equipped with at least 16 Megabytes of RAM for Windows 95 and 98
(32 Megabytes of RAM required for Windows 2000 and NT).
A 2X CD ROM or better.
An 800 X 600 SVGA Monitor or better.
Parallel (Centronics) printer cable, no longer than 6 feet.
The Parallel Port must be set to the EPP (Enhanced Parallel Port) setting in the CMOS of the
computer.
AstroJet 1000 Software Version 3.3 Installation
1.
Before installing the CD check that there is at least 20 megabytes of disk space available on
the computer.
2.
Close all programs currently running and reboot the computer. Do not open any programs
prior to installing AstroJet software.
7
3.
Install the CD in the computer. The CD should start automatically. If it does not click on the
Start button, then select Run. Type “D:\Setup.exe” (where D is the CD drive) and then click
OK.
4.
The AstroJet Setup Menu will appear on your screen. It contains five options:
Install Printer Software
Read the Manuals
Browse this CD
Install Adobe Acrobat – This is version 4.0 of Adobe Acrobat for reading and printing the
Operator Manuals.
www.astromachine.com – this is a link to our web site if you are connected to the Internet.
5.
Click on “Install Printer Software” and then choose the operating system that is installed on
your computer. If you are using Windows 95 refer to the instructions under “Windows 95” and
if you are using Windows 98, Windows NT4, or Windows 2000 refer to the instructions under
“W98 / NT4 / W2000”.
6.
If this is a new printer installation (not a software update) go to the installation instructions for
your operating system to complete the installation. If this is a software and firmware update,
you must also download a new “BIOS” to the printer.
Windows 95
1.
Insert the program CD into your CD-ROM drive. Click on “Install Printer Software”.
2.
Select “Windows 95”.
3.
Select “ODBC95” and follow the instructions in the windows to install “DCOM95 for Windows
95”. When this is installed Restart your computer.
4.
Open the program CD again and select “Install Printer Software”, then “Windows 95”.
5.
Select “AstroJet” and follow the directions in the windows. At the end of the installation you
will be asked to identify the model of your printer. Select the AstroJet 1000 and then restart
your computer.
Windows 98, NT4, or 2000
1.
Insert the program CD into your CD-ROM drive. Click on “Install Printer Software”.
2.
Select “W98 / NT4 / W2000” “AstroJet Setup will appear with the “Welcome: window. Follow
the instructions.
3.
At the end of the installation you will be asked to identify the model of your printer. Select the
AstroJet 1000 and then restart your computer.
BIOS Installation
1.
Load the AstroJet software for your printer into your computer.
2.
Connect the computer to the printer and turn the printer ON.
3.
Select the “AstroJet Control Panel” icon on your desktop and double click on it.
4.
Select “Properties”, then select “Update BIOS”.
5.
Click on the Update BIOS button. When the software completes the update check the printer’s
control panel for the new BIOS level.
NOTE: DO NOT TURN THE POWER OFF DURING THIS PROCESS.
8
Section 3 – Software Tutorial
This section assumes that the AstroJet 1000 software has been installed on the
computer and that the computer is connected to the printer. Following the
instructions below will teach you how to create a job, process that job, and in Section
4 send the job to the printer and print it. Additional information on the operation of
the software can be found in the AstroJet Help file on your computer.
Using the AstroJet 1000 System Software
This tutorial begins with a brief discussion of how the program files are arranged. It is assumed that
you have experience in navigating through Windows. If you are new to computers or are not familiar
with Windows many books are available that can help you.
The software is divided into two parts, The AstroJet Layout Editor and the AstroJet Control Panel.
When the AstroJet Printer Software was loaded on the computer, the two icons shown below were
placed on the desktop.
In addition, the AstroJet folder was placed in your Program Files folder. This is the place where all of
the AstroJet 1000 software resides. The AstroJet Layout Editor, AstroJet Control Panel and Help files
are located in this folder along with the Data folder. The Data folder contains several additional folders
one for each AstroJet Printer model. The AstroJet 1000 folder contains all of the information required
by the AstroJet 1000 Printer Software to create and run the job.
The AstroJet Layout Editor is used to create the job that is to be run. The AstroJet Control Panel is
used to send the job you created to the AstroJet 1000 Printer. All jobs are designed in the AstroJet
Layout Editor.
Double click on the AstroJet Layout Editor icon and open the program.
9
The “Layout Editor – Untitled”
screen will appear. Click on the
icon or File, then New and the
“Layout Editor – Select Database”
window will appear. Leave the
box “Does this template require a
database?” checked and click
OK.
The “Select Database” screen will
now appear. Click on the drop
down menu “Files of Type” and
select “1 UP LABELS (*TXT)”.
Highlight “4Lines.TXT” and click on
Open to continue.
The “4Lines.txt” database is
included in the software and is
indexed.
DATABASE FILES
Before we proceed there are a few
things about the way the AstroJet
software handles databases that
should be noted. If you use a TXT
database other than the one
supplied, the software will create an
index file when you click Open from
the “Select Database window. You
will be asked if the first record is
used to record field names. If it is,
check the box. Then click OK.
10
CSV databases are also indexed,
but additional information about the
character that delimits the fields is
required for the software to create
the index file. Click on the
appropriate delimiter and then click
OK.
Microsoft Access *.MDB, dBase III,
IV, V, and FoxPro *.DBF files are
automatically converted to *.CSV
files with a comma delimiter. If you
make any changes to these types
of databases by upgrading or
adding information the AstroJet
software will automatically re-index
the file the next time you open the
template.
The “4Lines.txt”, database in the
software is indexed. The next
screen to appear is the “Database
View – 4lines” window displaying
the first record in the database.
There is a series of arrows
just below the record.
These can be used to step
through the records as
shown.
NOTE: The 1 Databases folder in the AstroJet 1000 software is the default. You must store
your databases in this folder.
Click Next>> and the “Layout Wizard – Stock Properties” window will appear. For the purpose of this
tutorial we will select the standard #10 envelope. This window which is also accessible from the
11
Layout Editor screen allows you to
choose from a list of standard
envelope sizes or permits you to
create your own custom envelope
size. If you choose to create a
custom envelope size, select
custom, enter the size of the piece
in width and length, give the piece
a name in the “Save As” window
and click Save As then OK. The
new size will be saved to the list as
a Standard size for future use.
When you click on OK, the “Layout
Editor – Untitled” window will open.
You will notice that there are 8
print bands shown. The AstroJet
1000 has 4 printheads. To setup
the layout screen to match the
printer, click on Setup on the pull
down menu bar and select
Printhead. The “Print Head
Properties” window will appear.
Click on the check marks on Print
Heads 5, 6, 7, and 8 to turn the
guidelines for the heads off.
The “Layout Editor – Untitled
screen will reappear as below.
You are now ready to enter the
information and set up the job.
If you choose you may start by
selecting Open from the file menu, then Select “TemplateAJ1000FWD.AJPJT”, and click OK. Next
select Change Database and when the “***Warning***” window appears click OK. The “Select
Database” window will open. Select the database you wish to use and click OK. Immediately select
Save As… from the File menu and give the template another name. This will preserve the original
template for future use. This technique is particularly useful when Reverse Printing.
Before continuing, spend a little time exploring the “Layout Editor – Untitled” screen.
The white lines in the display represent the print cartridges and how they are positioned in the printer.
The AstroJet 1000 has four print cartridges. The print cartridges are arranged on one set of rails in the
following manner:
Printheads 1, 2, and 3 are connected together and printhead 4 is separate and facing printhead 3.
The total printing width is 2 inches, however there is always a 1 3/4-inch space between the bank of
three heads and printhead 4. This must be taken into account when setting up a job. If you wish to
place a message below the destination address line on a piece you must set up the layout for Reverse
printing. A template is provided to help you with this under “TemplateAJ1000REV.AJPJT”. Also at the
end of this sect are instructions for creating a reverse printing layout.
12
By clicking on the RED numbers to the left of the layout you can move the print band positions on the
layout.
The drop down menu bar consists of the following items:
File
View
Fields
Setup
Tools
Help
Each of these menus provides choices that perform the tasks required for setting up the job. The
second line contains icons that represent the basic tasks required to set up the job. For the purpose of
this tutorial, we will use both the icon buttons and the menu bar to set up a sample job.
To the left of the media image are numbers. These correspond to the printheads and are marked with
the same numbers on the AstroJet 1000 Printer. When the numbers are in RED the print direction is
Forward and when the numbers are in BLUE the print direction is Reverse. To the right of the media
image is a line. This guideline can be moved to any point on the layout to assist you in lining up the
fields or information that you will be adding. To get all of the information to line up on a particular bank
move the line close to the position desired for the text fields and right click on the mouse while the
guideline is selected.
At the bottom of the window is the information line. It displays the database in use, the printer being
used, the ratio of the length of the piece to its height, the size of the piece in inches, and the
orientation of the print direction either forward or reverse.
Setting up the Job
It is a good idea to get into the habit of naming and saving your Layout at this point. Select File, then
Save Template As… and then type the name “SAMPLE”. Then click Save.
If you wish to change the type or size of the envelope before beginning, use the Setup menu and click
on Envelope Size or click on the Envelope Size icon on the menu bar
13
When you click on this icon
the Envelope Properties window
will open. You may choose any of
the standard envelope sizes listed
under Standard or you may select
Custom and create your own
envelope size. To do this highlight
the Width and type in the actual
width of the media, and then
highlight the Length and type in
the length of the media. You may
use any number or fraction from 3
inches up to 12 inches in width and
from 5 inches up to 14 inches in
length. To save the custom size
so that it is available for future
layouts type a unique name in the
save as box and click Save As…
Next click OK and the Layout
screen will adjust the view of the media to the size selected automatically. The illustration at right
shows a change to a 6 X 9 inch envelope.
The next step is to begin
building the job on the layout.
When you click on the “Text Field
Properties” icon the “Layout Editor
– Text Field Properties” window
will open. This window permits
you to enable up to 24 text fields of
information and/or data. One
button for each of the text fields
that will be different from the others
in the layout should be selected. If
you want to make additions or
deletions to the layout you can
click on this icon anytime during
the setup or before you run the job
to add new text fields. For the
purposes of this tutorial, we are
going to enable the first 3 text
fields. Text Field 1 will be for the database address. Text Field 2 will be for the company name in the
return address. Text Field 3 will be for an additional message.
After enabling the text fields, click OK to continue.
The software returns to the Layout Editor screen and the data
selected will be displayed at the bottom right hand corner of the
layout called the blotter area. Use the mouse to move each text
field into the general area of the layout where they will be finally
positioned as in the example below.
14
Once you have done this, place the cursor on the field that will contain the variable address from your
database and double click on the left mouse button.
The following window will appear on the screen. This window allows you to layout the variable
address fields in their proper order.
The box at the right of the window contains the names of the fields. Click on each field name to add it
to the layout. You may combine fields on a single text field, or click Enter after each entry to create an
address block. You may also add punctuation marks spaces and fixed text at any time.
Next click on the
icon to prevent blank lines in the database from appearing in the print. The
icon will disable all the information in this window on the layout. The
15
icon is used when creating a
layout that does not use a database (see the end of this section for more information. The
icon
and the
icon are used to select and display multiple field barcodes or barcodes in other formats
than the standard USPS barcode. More information on using these two icons appears under the
barcode section.
In addition to the above this window is used to change the font type, font size, and type style such as
Bold, Italic, Underlined, or Strikethrough. You may also change the format from Left alignment to
Centered or Right alignment. When finished click OK.
NOTE: Any entry may be edited at any time by double clicking or right clicking and selecting
edit.
To add a fixed return address to the layout double click on the text filed your placed in the return
address area on your layout. The following window will appear. Type the information as shown in that
window. Each data or text field that uses a different type or style of type is entered by means of an
Address Text Field Editor window. When you have completed the entry below click OK.
The AstroJet 1000 Software has the flexibility to allow you to add additional information to your layout
in any position. For the purpose of this tutorial, we will add the following text at the bottom of the
layout. Double click on the “~ Field 3~” on your layout and type the information below. Change the
type style and size to match the illustration below. You can change fonts, sizes and styles in the Text
Field Editor view at any time by double clicking on the message. When you have added or edited your
message click OK.
16
You may add as many as 24 messages to the layout in any position on the media by simply enabling a
text field in the “Layout Editor – Text Field Properties” window. Then drag the text field from the blotter
area to the position you would like to have it appear on the media. Double click on the new field and
modify it in the Text Field Editor window.
The Logo icon is used to add
logos and graphics in .BMP format
to your design. When you click on
the icon or access it from the
Fields drop box, under Logos, the
window on the right appears. You
may add up to eight logos to the
layout. Each logo is selected by
first activating one of the Logo
Enable buttons and then browse
for the desired file in the Logo
folder using the Browse button.
The AstroJet 1000 is a 600-dpi
printer. When creating graphics 1inch is equal to 600 pixels. A logo
or graphics that is 300 pixels tall
will print the width of a single
printhead or 1/2” high. If you wish
to print a logo or graphic that would
span two or more connected printheads it has to be taller than 300 pixels.
NOTE: Store all your logos in the LOGO folder in BMP format.
Once you have found the logo you wish to use, click OK. The screen will return to the Layout Editor
and the logo will appear in the lower right hand corner of the layout in the blotter area. Use your
mouse to place the logo or graphic on the layout.
Press this button to add the USPS bar code to the address. Presses the number 1 Enable
button and then select the Field where the bar code is located in the database. Then press OK. The
bar code will appear in the lower right hand corner of your screen just below the layout in the blotter
area. Click and drag the bar code to its position under the address as shown.
CAUTION: You must have all the
USPS barcode digits (with or
without check digit) in a dingle
database field to use this icon.
Otherwise use the text field
method below.
IMPORTANT NOTE: In this case
the bar code displayed in the
Layout Editor view is a
representation of the bar code on
your layout. If you use the data
base view function in the Layout
Editor, the bar code will appear the
same for each record. When the
record is printed on the AstroJet
1000 Printer the bar code will be
the correct one for each zip code in
the database.
17
If the database contains more than one field for the barcode, or you wish to use a barcode other than
the USPS barcode use the text editor to combine fields to get the proper barcode do the following:
Click on the “Text Field Properties” button and the “Layout Editor – Text Field Properties” window will
open. Enable a field and click OK. Drag the “Data Line” from the blotter area to the location you wish
the Barcode to appear on the layout. Double click on the “Data Line” and then click on the Barcode
icon in the “Text Field Editor” and select the proper font and font size (the USPS barcode is a fixed
size font and can not be changed). If the barcode requires a check digit and it is not included in the
barcode field, click on the
when the job is run.
icon and it will be automatically calculated and inserted in the layout
When you have completed the layout it should look like the one below:
18
The actual database records can be viewed by clicking on the Template/Database View icon. A
set of arrow buttons will appear below the icons that will permit you to step through the records.
Saving the Template
Now that you have designed the template using the layout editor, it is time to save it.
Click on File and select either Save or Save As… and the “Save As” window will appear. Give the
template file a unique name then click Save. The Template will be saved in the AstroJet 1000 Data
1Projects folder with the proper extension “. AJPJT”.
Saving the Job
Before exiting the “Layout Editor” you must create
a job so that the database and the layout can be
printed. To do this select, File and then select
New Job. The “Layout Wizard – Select
Template” window will appear. Click OK to select
“Database View – (database name)”. At this
point, it is possible to select a specific range of
records to be output. To set the range select the
starting record that you wish to use by using the
database advance buttons. Click on the left (4
4 É)
to choose the starting record. Use the same
buttons to step to the last record you wish to print
and click on the right button (É3
3 ) to set the end of
the job.
NOTE: Changes to the print range can be done at any time by opening the job in the layout
editor, selecting New Job, selecting the new print range and then saving the job.
To print all of the database records for this example, skip this step and click on Next>> and save the
job.
Click on Next>> and the “Save As” window will appear. As the default the same file name as your
layout file is displayed. Click save to save it or enter a unique name for the job and click save. The
AJJOB extension will be added automatically to the job file.
The template and the job that have been created are now ready to be printed. Close the Layout Editor
window by clicking File and then Exit.
19
Notes
20
Section 4 – Running the Job
THE COMPUTER CONTROL PANEL
There are two ways that the Control Panel can be selected for running a job. One is from the
AstroJet 1000 Control Panel button in the “Layout Editor”.
The other is from the “AstroJet
1000 Control Panel” icon on the desktop of the computer.
CAUTION: Always make sure
that the AstroJet 1000 is
connected to the computer and
that it is turned on. If it is not
the software can not establish
communication with the printer.
When the AstroJet 1000 is started
properly “AstroHP45” and “Ready”
appear in the upper right hand box
just below the data information
window of the Control Panel
Window.
By clicking on the Load Job
icon, the Load Job window will
open. Choose the job you just
created and then click Load Job.
The database information will now display in the Control Panel.
21
1
2
3
4
5
6
Name of the Job file.
7
This area tells you about the job and the record being printed. AstroHP45 must display
Ready in order to print.
Current Database Record. For more information on Databases see page 29.
Use this button to select the Job you wish to run.
Pressing this button while a job is running will stop the printer.
Pressing this button after a job is loaded will start the printing process.
These buttons permit you to search through the database for a record. See page 11 for
more information.
8
9
10
11
The bar shows the progress rendering and downloading the job.
12
The Properties button provides additional control of the printing process. See the end of
this section for more information.
You can access the Layout Template at any time to make changes with this button
These buttons select the resolution of the print and the speed of the printer.
The Print Record button permits you to print one or more copies of the address displayed on
the screen for recovering lost addresses or checking setup of the machine before running a
job.
22
Running a Job
Setting up the Feeder
The following steps will assist you in setting the feeder portion of the AstroJet 1000:
1.
Release the separator-locking lever located
on the operator’s side of the feeder and
raise the separators to the up and locked
position. Place one piece of media on the
feeder table. Move the side guides out to
their extreme open position.
2.
There are four separators on the feeder.
Use the two center separators for narrow
media and all four separators for wide
media. Place the media under the
separators and lower the separators so that
they rest on the media.
NOTE: Two types of separator tips are
included with the AstroJet 1000. The set that is installed on the unit was designed
for all types of media except single sheets of paper. These hard tips last the longest
and carry a part number of 90-103-09. The set packed with the machine is softer and
is intended to be used when running single sheets of paper or cards. They carry the
part number 90-103-09S.
3.
Move the separator-locking lever up to lock the separators in place.
4.
Adjust the side guides to the width of the
media and adjust the back guide so that the
media is raised approximately 1/2-inch and
rests on the curve of the back guide. When
running 10 inch or longer or heavy media
you may have to set the back guide so that
it just touches the back of the media.
5.
Turn the AstroJet 1000 on and then turn the
medial thickness knob to set the initial print
head height according to the chart on the
right:
Media Thickness
.004” to 1/32”
1/32” to 1/16”
1/16” to 1/8”
1/8” to 1/4”
Dial Setting
0 to 2
2 to 3
3 to 7
7 to 10
Starting Up the AstroJet 1000
If the AstroJet 1000 has been sitting idle for a period of time, It is a good idea to Purge the
printheads before beginning to run a job. This can be done from the AstroJet 1000 LCD Display
Panel. Press STANDBY, then ON LINE to put the AstroJet 1000 in the menu mode. Then using
the NEXT or PREVIOUS buttons scroll to PURGE: then press the SELECT button. Allow the
AstroJet 1000 to run a few pieces then press SELECT again to stop the purge. Check that the
23
pattern run on the media is even, without any blank areas or white streaks. If the pattern is OK,
then return the AstroJet to the standby mode by pressing the STANDBY button. Anytime the
AstroJet 1000 sits idle for a while the purge routine should be run before running the job.
Printing a Test Print
Make sure that the AstroJet 1000 printer is properly connected to the computer and turned ON.
Open the “Control Panel” either from the desktop or from the icon in the layout editor. Click on the
Load Job
icon and select the job you wish to run. Then click Load Job.
Once the job is loaded the first
record to be run will appear.
Click on the Print Record
button and the window on the
right will appear. You have the
choice of either selecting the
number of prints that you wish
to print (the default is 1) or
selecting Unlimited, which will
allow the printer to run the
same record until you press the
Select key to stop the feed.
When you have completed the
running the copies for setup, simply click on GO to start printing the job.
NOTE: This feature may be used at anytime during the printing of your job to check setup
or to rerun lost records.
Printing the Job
Click on the GO button to begin printing the job. The AstroJet 1000 will begin by rendering the
fonts and logos then download them to the printer. Depending on the complexity of the page this
process may take up to a few minutes. Once a font or logo is rendered, the AstroJet 1000 can call
it up from this folder for reuse the next time a job that uses that particular font style or logo is run.
Monitoring the Job
The AstroJet 1000 can be stopped by pressing the SELECT key or by clicking on STOP in the
Control Panel software without affecting the job. The printer will resume printing at exactly the
same point in the database when it is restarted.
Printer Settings
The AstroJet 1000 has the following operator settings. These settings can be changed at any time
during the running of a job from the printer’s control panel. Once the AstroJet 1000 power is turned off
the settings will revert to their defaults.
With the AstroJet 1000 turned on and the STAND BY indicator lamp lit, the settings can be changed in
the following manner:
Setting Left Margin
To increase the gap at the lead edge of the piece:
1.
With the AstroJet 1000 power switch ON, press the STAND BY key to put the printer On-line,
then press the ON LINE key to enter the Settings Menu.
2.
Use the PREVIOUS or NEXT key to bring “LEFT MARGIN” to the top line.
3.
Press the SELECT key. The asterisk will disappear.
4.
Use the PREVIOUS or NEXT key to select the desired left margin in 0.1-inch increments.
24
5.
Press the SELECT key to lock in the selection. The asterisk will reappear.
6.
Press the STAND BY key to exit the Settings Menu and return the Printer to the print mode.
Purge the Printheads
It is necessary to Purge the printheads, especially when the AstroJet 1000 has been idle for a period
of time:
1.
With the AstroJet 1000 power switch ON, press the STAND BY key to put the printer On-line,
then press the ON LINE key to enter the Settings Menu.
2.
Load media into the feeder on the AstroJet 1000.
3.
4.
Use the PREVIOUS or NEXT key to bring “PURGE” to the top line of the display.
Press the SELECT key. The asterisk will disappear and the AstroJet 1000 will start to feed
media and purge the print heads.
5.
Press the SELECT key again to stop the purge, then press the STAND BY key to return the
AstroJet 1000 to the print ready condition.
Check that there is a consistent pattern printed on the media. If not, repeat Step 4 and 5 until
the pattern is consistent.
6.
Checking the Piece Counter
To check the number of pieces run proceed as follows:
1.
With the AstroJet 1000 power switch ON, press the STAND BY key to put the printer On-line,
then press the ON LINE key to enter the Settings Menu.
2.
Use the PREVIOUS or NEXT key to bring “COUNTERS” to the top line.
3.
Press the SELECT key, the asterisk will disappear and “MACH CYCLES” with a number will
appear.
4.
To reset this to “0” turn the AstroJet power OFF and then ON.
5.
Press the SELECT key again to exit, then press the STAND BY key to return the AstroJet
1000 to the print ready condition.
Stop on Break
The Bag and Bundle break feature is always on in the printer, but it may be turned off from the printer
control panel during a job run as follows:
1.
With the AstroJet 1000 power switch ON, press the STAND BY key to put the printer On-line,
then press the ON LINE key to enter the Settings Menu.
2.
Use the PREVIOUS or NEXT key to bring the “STOP ON BREAK” to the top line of the display.
3.
Press the SELECT key and then press the PREVIOUS key to get “NO” to appear in the
display.
4.
Press the SELECT key again so that the asterisk appears and locks in the selection.
5.
Press the SELECT key again to exit, then press the STAND BY key to return the AstroJet
1000 to the print ready condition.
6.
The package and/or bundle break function will then be turned off. To reactivate the function,
follow the steps above or turn the AstroJet 1000 OFF and then ON. This will reset the default.
Setting Print Speed
The speed of the AstroJet 1000 may be changed to run at a slower speed than the maximum one for
the print resolution. The Standard quality mode speed may be set to low speed to allow more drying
time and the Draft quality mode speed may be set to low or medium speed. In High quality, the speed
can not be changed, however. To change the speeds do the following:
25
1.
With the AstroJet 1000 power switch ON, press the STAND BY key to put the printer On-line,
then press the ON LINE key to enter the Settings Menu.
2.
Use the PREVIOUS or NEXT button to bring “PRINT SPEED” to the top line in the display.
3.
Press the SELECT key, the asterisk will disappear.
4.
Use the PREVIOUS or NEXT key to select the desired speed “LOW”, “MEDIUM”, or “HIGH”.
NOTE: If Standard resolution is selected there will be two speed choices available
“MEDIUM” and “LOW”. If Draft resolution is selected three speed choices will be
available: “LOW”, “MEDIUM”, and “HIGH”. In the “HIGH”-resolution mode only the
“LOW” speed is available.
5.
Press the SELECT key to lock in the selection. The asterisk will reappear.
6.
Press the SELECT key again to exit, then press the STAND BY key to return the AstroJet
1000 to the print ready condition.
Print Enhancement
The print enhancement feature keeps all of the printhead nozzles open during printing, even the ones
that are not actually printing. This prevents the printhead nozzles from drying out and causing
possible loss of characters such as accent marks and the descender on letters such as “y” or “q”. This
feature is always on, but can be turned off by the operator as follows:
1.
With the AstroJet 1000 power switch ON, press the STAND BY key to put the printer On-line,
then press the ON LINE key to enter the Settings Menu.
2.
Use the PREVIOUS or NEXT key to bring the “Print enhancement” to the top line of the
display.
3.
Press the SELECT key and then press the PREVIOUS key to get NO to appear in the display.
4.
Press the SELECT key again so that the asterisk appears and locks in the selection.
5.
Press the SELECT key again to exit, then press the STAND BY key to return the AstroJet
1000 to the print ready condition.
Types of Media
The AstroJet 1000 will print on many types of mailing media, but some restrictions apply. As with
any other printing process, the texture of the media has a direct effect on both the print quality and
the ink drying time. It is best to test each new type of media to determine performance levels
before beginning the Job.
Coated and plastic types of paper do not easily absorb ink and smearing may occur. Print may
appear fuzzy on very porous paper. Another cause of fuzzy printouts is excessive buildup of dust
within the machine, or if the printhead is too far away from the media. Be aware, that when printing
in the High Quality mode, drying time for the ink is longer than in the other modes. In addition,
when humidity is high, drying time is increased.
Media Thickness
The AstroJet 1000 will handle pieces up to 1/4” thick (0.250”). All folds must be crisp and even.
CAUTION
DO NOT use stapled pieces in the AstroJet 1000.
DO NOT use paper- clipped pieces in the AstroJet 1000.
These methods of binding the mail piece will damage the printheads, affect print quality,
and may seriously damage your printer. The Astro Warranty Policy will not cover
components damaged through improper use.
The USPS does not accept this type of mail for its automated equipment.
26
Databases
The AstroJet 1000 System is capable of handling many types of databases including .TXT, .CSV,
Microsoft Access. MDB, and dBase III, IV, V, FoxPro (*.DBF). TXT and CSV files are handled as
they are. The rest of the database files are converted automatically by the AstroJet Software to
CSV files. In addition whenever you update a file the AstroJet Software will reconvert and re-index
it if you place the updated files in the AstroJet Database folder in the software.
Searching for a Record
The arrows below the database information can be used to step through the data. In addition, a
Search , Search next , and Jump
buttons are available to help you find a specific record in the
database. Simply click on the search or jump button and fill in the requested information. The
following is a list and description of each search variable:
Variable
Default
Description
Search For
Must be filled
in.
This field specifies the criteria the search must find. It can be
a complete or partial, word or phrase. If it is Case
Sensitive, check the box in the Options and make sure that
the Search For is precise. If the criteria are in a specific field
in the database it can be specified in the Look In box.
Case Sensitive
0
Specifies whether upper and lower case characters should
be treated as identical in searches. Non-zero value specifies
searches are sensitive to the case of letters. 0 calls for case
insensitive searches.
Search direction
All
0
Specifies a search the entire database. Non-zero value
forces searches of the entire database in the forward
direction, proceeding from the first record to the last. A “0”
value in the Limit causes a directional search from the
current position base on Search Forward, and Search Limit.
Search Direction
Forward
0
Specifies the direction of the search, either forward or
backward. A number in Limit specifies forward searches, “0”
specifies backward. Not used when Search All is set to a
non-zero value.
Look In
(All Fields)
Specifies the field the search will look in to. The value string
must be a valid field name for the database in use, or (All
Fields). If the Look In value doesn’t match a valid field name
(All Fields) is used instead.
Limit search to:
0
Specifies the maximum number of records to search. “0” is
implied to mean the number of records from the current
position to the end of the database in the specified direction.
Not used Search All is set to a non-zero value.
Template
“”
The last search template specified. This is the default pattern
to be searched for.
The
icon is used to search for the next record. The arrow in the icon shows the direction that the
search is moving through the database. When the next record is found that meets the criteria in the
search the “Control Panel – Search” window will reappear.
The Search can also be used in the Layout View. The same criteria apply.
27
Advanced Features
Clicking on the Properties… button permits you to enter the “Control Panel – Properties” window.
With this window you can control functions such a updating the printer BIOS, align the printheads, set
a time delay in the feeding to increase stock drying time, and enable the bag and bundle break
feature. The following discusses these features.
Update Bios
From time to time as
improvements or changes in
operating systems occur it may
be necessary to update the
Printer’s BIOS. This is done by
activating the “Control Panel –
Properties” window. Click on
the Properties… button.
Choose Update BIOS and click
on Update BIOS button. The
program will automatically
update the bios. While this
process is going on DO NOT
TURN OFF THE COMPUTER
OR THE PRINTER.
NOTE: The Update BIOS
function will only work if the
printer is turned on and
connected to the computer
prior to attempting the
update.
Bundle and Bag Breaks
A Bundle and a Bag Break feature are available in the AstroJet Control Panel Software. This feature
will permit you to stop the AstroJet printer in order to separate the pieces according to USPS
regulations. The various mail management software available for presorting have the ability to
prepare your database to conform to Post Office regulations. We will not go into this part of the
presorting, but we do suggest that you become familiar with the software you are using to presort your
database. The USPS provides a wealth of information on their presorting regulations. Some of these
are:
1. “Domestic Mail Manual” (DMM), published by the USPS and available by subscription by
calling (202) 783-3238.
2. “Postal Bulletin” which provides corrections and additions to the DMM on a regular basis. You
can subscribe to this by calling (202) 512-1800.
3. There are also several informative, free booklets available from your local Post Office and the
USPS on the subject of preparation of presorted mail.
4. Much useful information can also be obtained from the USPS web site at www.usps.com.
28
The Bundle and Bag Break control
windows can be found under the
Properties… button on the Control
Panel. When you click on this
button the “Control Panel –
Properties” window will appear. At
the top of the window there are two
tabs, Bag Breaks and Bundle
Breaks. Their functions are
similar. They permit you to
separate bags of mail and bundles
in the same job. You can use
either or both of these to separate
the pieces.
To use this feature you must first
put a non-alpha or numeric
character in an existing field of
your database or create a separate
field for the bag and bundle break
character. If you do create a
separate field you may use any
character except the tilde (~).
All presorting software is capable
of preparing your database in this
way. For example we used (*) for
bag break and (##) for bundle
break.
Once you have loaded your job in
the control panel, select
Properties… then select Bag
Break, the above window will
appear. Click on the Enable Bag
Breaks to select it.
Select the field where the break
character was placed in the
database. If you used a character
other than the (*) place that in the
Break Sequence block, then
select pieces for the break in the
Break Delay block. Then click
OK. The printer will stop at the
break when the job is run.
If you require a Bundle Break
repeat the above sequence, but
use a different character or field to
designate this function.
NOTE: You can use any alpha or numeric characters but not the tilde (~) for this if you place
the character into a separate field in the database .
Start the printing process by clicking the GO button. When the AstroJet Control Panel software
reaches a break character the printer will stop feeding. To restart the printing process, press SELECT
on the control panel.
29
There is an optional feature on the Control Panel of the Printer that permits you to disable the break
function. See the section on “Printer Settings” for more information.
Feeder Settings
In order to permit enough time or
space between pieces to assist in
drying the ink or to help the
operator to handle the piece more
efficiently. The Feeder Settings…
button is provided. When you click
on it the following screen appears.
Click on “Should Feeder Delays
be enabled?” to activate the
feature. Then select either
seconds or inches and place a
number in the box provided. The
default is 5.5 inches. Click OK to
complete the process.
When activated there will be a
delay between the feeding of each
piece regardless of the resolution
of the print selected.
Align Heads
When printing addresses and particularly logos that stretch across several heads, it may be necessary
to adjust the alignment of the printheads to fine-tune the image. The Align Print Heads function has
the ability to achieve this
alignment, producing a straight line
across multiple heads. The
software can change the printing
offset in fine increments from its
factory settings.
NOTE: Make sure the object
or address being printed is
aligned in the layout using
the Alignment Tool on the
Setup Screen in the AstroJet
Layout Editor before you use
this procedure. This
procedure is only for very
fine adjustments and will not
correct gross misalignment
on the Setup Screen.
1. Turn the printer ON and
open the Control Panel.
Select Properties… Then
select the Align Heads tab.
30
2. The printheads are initially locked with the others in the same Band. They should be unlocked
using the Unlock button.
3. Each index mark on the Alignment Controls represents 4 thousandths of and inch. You can
adjust the print heads to half that value, to within 2 thousandth for a total of 20 thousandths of
an inch to either side of the factory setting.
4. Simply drag the alignment pointer on a print head to a new setting to change the exact location
at which it starts to print. You can also us the fine adjustment arrows to work in 2 thousandths
increments.
5. When you have completed the adjustment click on Apply to register the change.
6. To check the change click OK to return to the “Control Panel” screen. Click on Print Record to
print one or more copies to check the alignment.
7. You can make additional adjustments anytime by clicking on Properties… and repeating the
adjustment process.
The changes that you make to the head alignment are permanent in the software. To restore the
factory settings click on Properties… then Align Heads. Next click on Restore Defaults and then
deselect Unlock to lock the printhead bands. Click Apply then OK to close the “Control Panel –
Properties” window.
Cache
The Cache tab is used to control the rendering and caching of the logos and fonts. When you run a
job the control panel software renders the fonts and logos into a format that the printer can use to print
the job. The rendered fonts and logos are stored in the Font Folder in the AstroJet software. To clean
up this file do the following:
1. Turn the Printer ON and
open the Control Panel.
2. Click on Properties and
select the Cache tab.
3. Click on Flush Fonts
and/or Flush Images.
NOTE: You will notice that
there are two checked boxes
in each of the Cache
Settings. One is “ Enable
pre-rendered fonts or images
and the other is Cache prerendered fonts or images.
They should remain checked.
When unchecked the control
panel will process the job,
but not save the rendered
fonts or images. The next
time you run the job they will
have to be rendered over
again. Leaving the boxes
checked eliminates this.
Printer
The purpose of the Printer tab is to disable the output to the AstroJet Printer. When the “Disable
output to printer for this session is checked the software will load the file and render the fonts and
logos, but it will not permit you to print. The default for this function is unchecked or OFF.
31
If you open the control panel while the printer is turned off the Control Panel software will ask you if
you want to disable the printer for this session. This is the same as checking the box.
32
Section 5 – Maintenance
This section discussed how to care for the inkjet cartridges, clear paper jams, replace
sheet separators, and perform routine operator maintenance to the AstroJet 1000
Printer.
The Inkjet Cartridge
The AstroJet 1000 inkjet cartridges must be replaced when out of ink, when print quality is poor, or
when purging and cleaning have not helped the image quality.
The Approximate life of the HP 51645A Inkjet cartridges based on three lines of 20 characters at 10point size per address is:
High Quality
50,000 addresses
Standard Quality
Draft Quality
100,000 addresses
200,000 addresses
NOTE: These figures can vary depending on the font selected.
To Replace the Inkjet Cartridge:
•
Remove the used cartridge from the cartridge holder by raising the latch lever to release the
cartridge, then pull the cartridge up and out of the holder.
•
Remove the new inkjet cartridge from its packaging, taking care not to touch the copper
contacts, the metal plate, or the gold printhead. Remove the protective tape from the
printhead.
•
The cartridges are held in place by a lever mounted on the inkjet cartridge holder. Release the
lever by raising it vertical.
•
With the cartridge’s printhead pointing down, slide the cartridge into the holder and push down
and toward the contacts in the holder.
•
Make sure the cartridge is seated in the holder then close the lever to secure the cartridge in
the holder. Do not force the lever into place.
•
Repeat the above for the remaining cartridges.
CAUTION
Never shake, drop, or hit the cartridge against the palm of your hand or any other hard
surface. Shaking the print cartridge does not “mix” the ink and hitting the cartridge against a
hard surface does not clear the nozzles Both of these actions actually hurt the print quality
because they allow bubbles to form near the ink firing chambers. These bubbles prevent the
nozzles from firing causing white streaks in the print image.
Storage
Short-term storage is defined as less than 2 days or less than 1 day in a hot and dry environment.
Long-term storage is defined as more than 2 days or more than 1 day in a hot and dry environment.
33
Short-term Storage
Leave the cartridge in the AstroJet 1000 for short periods of time, 1 day or less.
The next time that the AstroJet 1000 is used, the printhead may have to be cleaned and
purged
Long-term Storage
Keep the printhead in an area that is relatively free of dust and paper particles that is not too
dry
Place the cartridges in a Tupperware container with a damp sponge or towel to maintain
humidity and prevent the printhead from drying out.
When the cartridges are ready to be used again, the printhead will need to be cleaned.
Disposal
The cartridge may be
disposed of in a normal
manner.
If there should be an ink
spill, use soap and water
to clean up any problem areas. Abrasive soap works well to get the ink off of hands.
Cleaning the Printhead
To maintain good print quality it is important that the printheads are kept clean. During the printing
process ink spray, paper fibers, and dust can cause a build-up on the printheads. This build-up will
eventually degrade the print quality. If you begin to notice problems with the quality of the print, or to
just prevent a build-up from occurring with the printhead with a wet fiberless cloth.
Cloth should be:
Cloth should not be:
a Soft
r Abrasive
a Fiberless
r Made of small fibers
a Moist with Water (Distilled is best but
tap works)
r Dry or containing chemical additives
Wipe slowly across the long-axis with the printhead
facing down (as shown). Do not apply excessive
force, as this could scratch the nozzle area.
Purging the Nozzles
If the printhead sits inactive for a period of time, ink may dry in the nozzles. Printing may not remove
these “ink plugs” from the nozzles. White streaks will then show up in the printed text or graphic. In
34
order to obtain better print quality, these ink plugs need to be forced out or purged. A Purge routine is
built into the AstroJet 1000 Printer. It can be accessed from the LCD panel on the AstroJet 1000
Printer. Refer to Section 4 – Operating the AstroJet 1000, under "Running a Job; Purge the
Printheads". If this does not solve the problem then proceed as follows:
1.
Wipe the printhead with a wet cloth as described in "Cleaning the Printhead" above.
2.
Perform the Purge routine from the AstroJet 1000 Printer LCD Display panel.
3.
Wipe the printhead again with a moist cloth.
NOTE: For more information refer to the Troubleshooting Print Heads in Section 6 –
Trouble Shooting Guide.
Jams in the AstroJet 1000 Printer
If a jam occurs, STOP the AstroJet Printer. The missed addresses can be recovered at the
computer from the control panel by stepping back to the place in the job where the jam occurred. No
data will be lost.
Some possible reasons for jamming are:
1.
Feeding more than one piece of media.
2.
Damaged media, such a dog-eared (turn down corners).
3.
Media that is not stiff enough may not be usable. Media that meets Postal stiffness
requirements for automated feeding is acceptable in the AstroJet 1000.
4.
Envelopes that are caught under the flap of another envelope or stuck to one another may
cause jamming.
Removing Jammed Media
1.
It may be necessary to move one or more of the printheads to gain access to the jammed
media. Take care in removing jammed media to prevent damage to the print heads. All pieces
of the jammed media must be removed from the feed path.
2.
Use the control panel in the AstroJet 1000 Software to recover any lost addresses.
3.
Restart the job by putting the AstroJet 1000 back to STAND BY and then resume printing by
using the GO button on the AstroJet 1000 Software Control Panel.
Replacing the Sheet Separators
The sheet separators insure separation of the pieces as they are being fed. The do wear and must be
replaced from time to time. If you experience double sheet feeding and can not adjust the separators
to prevent it, they should be replaced. Replacement of the sheet separators is not difficult. Just follow
the steps below:
1. Turn off the AstroJet 1000 and unplug it from the
power source.
2. Release the separator-locking lever and move the
paper side guides to their maximum open position.
3. Lower the separators so that they touch the feed
roller.
4. Remove the screw [A] and the separator support [B.]
Then remove the separator [C] by prying it out of the
holder.
5. Install a new separator in place and replace the
separator support and screw.
35
Cleaning
The AstroJet 1000
WARNING
THE ASTROJET 1000 PRINTER IS A PRECISION MACHINE THAT SHOULD BE
CLEANED REGULARLY TO INSURE MANY YEARS OF SERVICE. BEFORE
PERFORMING ANY MAINTENANCE DISCONNECT THE MACHINE FROM ITS POWER
SOURCE!
The AstroJet 1000 must be cleaned regularly of accumulated paper dust and ink. Depending on the
types of media that are run, paper dust may accumulate within the printer and on the transport. To
properly clean the AstroJet 1000, unplug it from the power receptacle and remove the covers.
The internal areas are best cleaned with a vacuum that has a soft brush attachment to help loosen the
dust particles. Take care not to damage the PC Boards or electrical wiring.
The exterior of the machine may be cleaned with any standard household cleaner which is nonabrasive and does not contain plastic harming solvents.
CAUTION
NEVER SPRAY OR POUR CLEANERS DIRECTLY ON OR INTO THE ASTROJET
1000 PRINTER. EXCESS LIQUID COULD HARM ELECTRONIC PARTS. ALWAYS
DAMPEN A RAG WITH THE CLEANER AND APPLY IT TO THE PARTS TO BE
CLEANED.
Cleaning the Media Sensor
Periodically check the media sensor located in the print carriage area of the printer section. The
sensor should be clean and free of accumulated paper dust. Use a vacuum with a soft brush
attachment or dry compressed air to remove the dust.
36
Section 6 – Trouble Shooting Guide
The following trouble shooting guides are provided to assist you in solving any
problems that might occur with the AstroJet 1000 Printer or its software. We have
tried to make them as complete as possible. The best advice we can offer is to make
sure that the system is setup properly, plugged in, that it has an adequate supply of
ink before attempting to trouble shoot any problem.
Inkjet Cartridges
HP 51645A Print Cartridges
CONDITION
Cartridge will not print
PROBLEM
Sheet is blank even after it has
gone underneath cartridge(s).
White streaks in text or graphics
Black streaks around text
37
SOLUTION
•
Check to make sure the
tape is off the printhead
•
Remove and reinsert the
cartridge into the carriage
holder
•
Install a new print
cartridge
•
Clean cartridge
•
Check media thickness
adjustment.
•
Re-insert the cartridge
into the carriage
•
Wet wipe and purge the
cartridge (There are
clogged nozzles.)
•
Clean interconnects
•
Insert a new Print
Cartridge
•
Wet Wipe the cartridge
(There is ink buildup or
dirt on the cartridge.)
•
Check Media thickness
adjustment. It may be too
close
AstroJet 1000 Printer
PROBLEM
Printer does not turn on
REASON
No power to printer
REMEDY
Check that power cord is plugged
in
Check that power outlet is live
Check fuse on power switch
No communication
Improper output (address
information out of order,
misfeeding, etc.)
Improper cabling
Use Proper cable (see Sect. 2)
Unit not receiving power
Check plug connections, on/off
switch and fuse on back panel
(see Sect. 1)
Wrong interface settings
Check software or data base on
PC
Static electricity
Dirty media sensor
Turn AstroJet 1000 of and on
Clean media sensor
Extra lines; losing data
Data base problem
Check data in data base program
Not printing on media
Media not positioned
properly
1.
Adjust print band vertically
2.
Adjust media margin setting on
AstroJet 1000
Print too light or missing
character dots
Clogged or dirty printheads
Either purge or clean cartridges
Running out of ink
Replace inkjet cartridges
Media jams
Double feeding
Adjust feeder
Media is curled or bent
Uncurl media
Media is too thin
Media must be at least 0.008”
Media is too thick
Media must be less than 1/4” thick
Media less than 1/4”
Jog contents of piece to feed end
Fails to feed
Side guides too tight
WARNING
DO NOT REMOVE THE SIDE COVERS OF THE ASTROJET 1000 PRINTER
THERE ARE HIGH VOLTAGES PRESENT BEHIND THE COVERS!
38
AstroJet 1000 Software
ERROR MESSAGE
Template File is Corrupt
PROBLEM
The AstroJet 1000 Control
Panel can not open the related
ajpjt file.
SOLUTION
Re-open AstroJet 1000 Layout
Editor and attempt to open the
file.
Re-save the file and attempt to
open the AstroJet 1000 Control
Panel again.
If the file still will not open in the
AstroJet 1000 Layout editor,
restart the computer and try
again.
Try a backup or older copy of
the .ajpjt file
Job Loading Failure
A problem arises loading the
job file.
Click on Remove Job, if you
know the file is out of date and
no longer in use.
Click on Recreate Job to reopen the Layout Editor, then
click on the File Menu and
select New Job, select the print
range and Click on Next>> to
continue. Click Next>> again
and then save the job with a
new name.
Click on Cancel to return to the
Control Panel and select
another job file.
Template View Warning
Due to the design of the
database management
software, it is not possible to
display records simultaneously
in the Layout Editor and Control
Panel.
When you click OK the Layout
Editor will switch automatically
to the Template View.
Fields not visible in blotter area
on Layout Screen.
The line may be piled up on top
of each other. Click and drag
the first line into the appropriate
Printhead Area.
New Fields missing from layout
screen
Caution: If an attempt is
made to switch to Database
View in the Layout Editor, a
fatal error will occur and any
unsaved information will be
lost.
Open the Address Field
property sheet by right clicking
on one of the existing address
lines or by selecting Address
from the Fields Menu. Select
OK. The fields should reappear in the blotter area.
39
Software continued…
ERROR MESSAGE
PROBLEM
SOLUTION
New Fields missing from layout
screen. Continued…
Fields not visible in blotter area
on Layout Screen.
Right click on one of the fields
that has already been
positioned and click OK on the
field property sheet an they
should re-appear Right click on
one of the fields that has
already been positioned and
click OK on the field property
sheet an they should reappear
Printing in Wrong Location on
the mailing piece
Printing too far to the Left or
Right.
Make sure that the size of the
mailing piece entered in the
Setup Menu is correct.
Make sure that the piece on the
Layout Screen looks EXACTLY
the way you want your piece to
look. Use the rulers to verify
that the fields are located the
proper number of inches form
the edges.
Adjust the left margin setting.
Check the product detection
sensor to verify that it is
properly aligned.
Printing Too High or Low
Check image on layout screen.
Adjust the paper guide, or
individual printheads on their
mounting brackets to adjust
how far from the bottom edge
of a piece the fields are printed.
40
Appendices
APPENDIX A – ASTROJET 1000 Specifications
The information (electrical and physical dimensions, etc.) on the AstroJet 1000 is
presented here for your reference. Specifications are subject to change without
notice.
PRINT QUALITY
(Dots Per Inch)
High Quality
Standard Quality
Draft Quality
600 x 600 dpi
600 x 300 dpi
600 x 150 dpi
PRINT SPEED
(Inches Per Second)
High Quality
Standard Quality
Draft Quality
15 ips
25 ips
50 ips
IMAGE AREA
Total of 2 inches using four printheads
MEDIA SIZES
Maximum
Minimum
PRINT MECHANISM
HP 51645A Inkjet Cartridge
NUMBER OF CARTRIDGES
4 cartridges
INKJET CARTRIDGE LIFE
(approximate)
14” long x 13.5” wide up to 1/4“ thick
5” long x 3” wide up to 1/4” thick
Addressing:
High Quality
1,050,000 characters
Standard Quality
2,100,000 characters
Draft Quality
4,200,000 characters
(three line address labels only, logos and other printing not included
in the above)
GRAPHICS AND LOGOS
Allows printing of Bitmapped graphics, logos, and pictures
SOFTWARE AND FONTS
Windows 95, 98, NT, and 2000
All Windows True-Type fonts
PRINT COLORS
Standard Black, Fast Drying Black, and Spot Colors
INK
Water based may require drying assistance for coated stock
OPERATOR DISPLAY
OPTIONS (LCD)
Counter, Stop on Break, Print enhancement, Print Resolution,
Purge, Left Margin, BIOS Version
PC INTERFACE
Centronics Parallel Cable
DIMENSIONS
11.5” H x 19.56” L x 20” W
ELECTRICAL
115-240 VAC, 50/60 Hz
WEIGHT
67 lbs. (30.5 kg.)
41
Computer Requirements
1.
An IBM or Compatible Pentium 100 Megahertz PC or better.
2.
Windows 95, 98, 2000 or NT installed.
3.
A minimum of 10 Megabytes of free hard disk space.
4.
At least 16 Megabytes of RAM. (32 Megabytes for Windows 2000 and NT)
5.
A 2X CD ROM or better.
6.
An 800 X 600 SVGA Monitor or better.
7.
Parallel (Centronics) printer cable, no longer than 6 feet.
8.
The Parallel Port must be set to the EPP (Enhanced Parallel Port) setting in the CMOS of
the computer.
42
APPENDIX B - Supplies and Optional Hardware
The following supply items and optional hardware are available from your Astro
Machine Distributor:
Supplies
Black Inkjet Cartridge
HP 51645A
Fast Drying Black Inkjet Cartridge
HP 6195A
Yellow Inkjet Cartridge
HPC6173A
Red Inkjet Cartridge
HPC6168A
Green Inkjet Cartridge
HPC6169A
Blue Inkjet Cartridge
HPC6170A
Versatile Black
HPC8842A
Optional Hardware
Various Conveyors Available
43
APPENDIX C – Software Options
Full 256 ASCII Character Set for AstroJet Printer
The AstroJet 1000 software uses the basic 128-character set to print the addresses. This speeds up
downloading of the fonts and is more efficient. In some cases it may be necessary to use the entire
256 ASCII character set to print the addresses. European addresses that use accent marks over
certain letters for example. In order to activate the entire 256 ASCII character set it is necessary to
modify the registry file in windows. If you are not familiar with modifying registries in Windows, get
help.
1.
Click on START, then RUN. Enter “REGEDIT” in Open: then click OK.
2.
Enter the following tree:
HKEY_CURRENT_USER
Software
Astro Machine Corp
AstroJet 1000
Options
Windows Char Set
3.
Double Click on Windows Char Set icon.
4.
Change “0” to “1”. Then Click OK
5.
Click on Registry, then Exit to exit the program and save the changes.
6.
Open AstroJet Printer Control Panel and click on Properties…
7.
Click on Cache, then click on Flush Fonts then click OK.
NOTE: You must flush the fonts and re-render them to get the special characters to print.
8.
Reload the print job and print.
NOTE: Once this change is made it is permanent in the registry. To change it reenter the
Registry and change the “1” to “0” then flush the fonts.
Reverse Printing
The default method of printing on
the AstroJet Printer is referred to
as the Forward printing. That is to
say when you stand by the control
panel of the printer the address
being printed is readable as in the
illustration to the right.
44
Sometimes it is necessary due to
the media layout or to obtain the
most efficient feeding of the
material that the media be turned
around. When this is done the
address must be printed in reverse
so that it appears right side up on
the finished piece. This is referred
to as Reverse printing. The
AstroJet Printer accomplishes this
in the software by reversing the
address. While the direction of the
media through the printer remains
the same, the printing changes as
in the illustration to the right.
A template is supplied with the AstroJet Software to help you with laying out a job in Reverse printing.
If you wish to create your own reverse template follow the instructions are below:
1.
Open the “Layout Editor” and select the database you wish to use as you would for forward
printing.
2.
The layout screen will appear with eight print heads.
3.
From the Setup menu select Envelope Direction and then select Reverse . The numbers at the
side of the printhead guide lines will turn BLUE signifying that the template is in the reverse print
mode.
4.
From the Setup menu select
Print head. The “Print Head
Properties” window will appear.
Turn off print heads 1, 2, 3,
and 4. Click OK.
5.
When you clicked OK the Layout Editor screen will now appear as below. The head numbers are
in BLUE and Head 8 is the same as head 1, head 7 is the same as head 2, and head 6 is the
same as head 3. Head 5 is the same as head 4. Simply set up your job as you would for the
Forward printing mode. Remember that there is a 1 3/4-inch space between head 6 and 5 in the
reverse mode as there is between heads 3 and 4 in the Forward print mode.
45
Printing without a Database
It is possible to print return addresses on envelopes, logos, and other information on media without a
database. One application would be to put the return address on the flap of an envelope. To do this
select a the New Template icon
or New… from File menu and
when the Layout Editor – Select
Database window appears
deselect the “Does this template
require a database?” Then click
OK.
The “Layout Editor – Stock
Properties” window will open.
Select the size of the envelope
and click OK as you normally
would.
Click on Setup and then Print
head and deselect Heads 5
through 8 as you would for a
normal template. Then deselect
head 4 as well for this example
as we will be printing on a 6 3/4
envelope which is only 3.5 inches wide and will not accommodate printhead 4 due to the required 1
3/4-inch space between heads 3 and 4. When you have completed these steps the layout should look
like the one below.
46
Notice that in the lower information line the Database says N/A meaning that no database is attached
to this layout.
Continue with the layout by clicking on the Text Field Properties icon and activating a font. Click OK
and “Data line1” will appear in the blotter area. Click on this and drag it to the place that you wish the
information to appear on the layout, just as you would with a database field. When the “Data line 1” is
positioned on the layout, double click on it and the “Text Field Editor – Field 1” window will open.
Notice that there are no data base fields to choose from for the layout. Simply type in the information
that you wish to print, select the style of type and type size and then click OK.
47
When you have completed the layout it should look like the one below:
Save the template and then create a job by clicking on File and then New Job… to save the job.
Next turn on the printer and click on the
Control Panel icon. The control panel will open, then
click on the
to load the job. You will note that no data will be shown in the “Current Database”
window in the control panel.
When you click GO, the “Control Panel –
Number of Copies” window will open. This
window is used to select the number of
copies to be printed. If you leave the
“Unlimited [job stops when Stop button
pressed]” selected, the printer will continue
to print until you press the SELECT key on
the printer or STOP in the Control Panel
software. For our example we have
deselected it and entered “500” in the box
provided. This will permit the printer to
print 500 copies then stop feeding.
When you press OK, the Control Panel will become active. Pressing GO will start the downloading
process and then the printer.
A screen shot of the Control Panel being used to print the sample job appears below.
48
Special Insert Characters for Text Fields
Built in to the “Text Field Editor” are several special characters that can be used to increase the
information on your layout. The special characters and their functions are as follows:
Date()
When inserted into your layout returns the Date set on your
computer as “month day, year” Example: Jun 11, 2001
Time()
Places the time from the computer’s clock on to your layout as
“Hr:Min AM or PM” Example: 3:30 PM
Seq#()
This special insert will display the count of the records from 1 to
the last record run regardless of the direction the database is
run and print that number.
Copy#()
Returns the number of copies of the layout. The number is
always 1.
Head#()
When placed on a particular head will print the number of that
head on your document.
Field()
Will print the number of fields in your database.
Rand#()
Generates a random number from 1 to 99999 and places it on
your printout.
Rand$()
Randomly generates an ASCII character and places it on your
printout.
49
Adding Instructions to the Operator
It is possible for an operator to change information on a mailing piece before it is printed without using
the Layout Editor. A situation where the same basic mailing list and layout is used each month but
some special message is changed would be one example.
In the sample below the piece used in the tutorial is modified so that a special message can be added
when the mail list is run each month.
For this example we are going to have the printer change the month each time the job is run. This is
done by setting up a layout and using the
“Specifies that this field will be filed in by the Control
Panel” icon to have the operator add information prior to printing. When this icon is activated a
window will appear in the Control Panel requesting that something be added prior to printing.
In order to set the job up, do the following:
Create a job just as you would normally. Then create a Text Field for the information to be entered by
the operator. Double click on the field and to open the “Text Field Editor – Field 3”. Click on the
icon. The window will change like the one below.
The top line is for the instructions to the operator as to what information is to be entered into the
printout. The second line is for the information that will be changed when run. There must be
something in this area for this to work properly.
When you open the Control Panel
software and load the job the
“Label Field Editor” window on the
right will appear to instruct the
operator as to what information is
to be entered. Once the
information is entered the operator
clicks OK. Then click on GO, the
job then downloads and runs with the added information being printed.
50
51
Copyright © 2001 Astro Machine Corporation
Elk Grove Village, Illinois 60007
06/30/2001