1
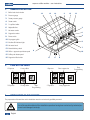
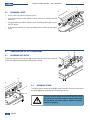
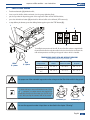
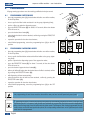
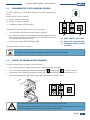
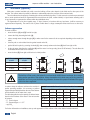
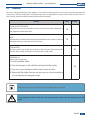
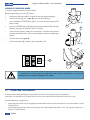
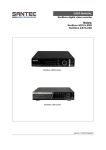
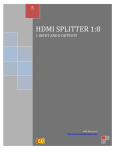
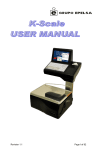
LB 4700 Wega Instruction Manual
ENGLISH
Summary
READ CAREFULLY .............................................................................................. page63
HOW TO USE THIS MANUAL ............................................................................... page63
GENERAL WARNINGS.......................................................................................... page63
SYMBOLS ....................................................................................................... page65
PRESENTATION.................................................................................................. page65
1.
GENERAL DESCRIPTION ........................................................................... page66
2.
PUSH BUTTON PANEL.............................................................................. page66
3.
PREPARATION OF THE MACHINE ............................................................. page66
4.
ACTIVATION OF THE MACHINE ................................................................. page67
5.
USE OF THE MACHINE.............................................................................. page67
5.1 POD PREPARATION ........................................................................ page67
5.2 DISPENSING COFFEE ..................................................................... page68
6.
PREPARATION OF HOT BEVERAGES ........................................................ page68
6.1 DISPENSING HOT WATER................................................................ page68
6.2 DISPENSING STEAM........................................................................ page68
7.
CAPPUCCINO MAKER................................................................................ page69
8.
PROGRAMMING ........................................................................................ page70
8.1 PROGRAMMING COFFEE DOSES ..................................................... page70
8.2 PROGRAMMING CAPPUCCINO DOSES ............................................. page70
8.3 PROGRAMMING THE COFFEE-CAPPUCCINO SEQUENCE ................. page71
8.4 TO RESET THE ORIGINAL FACTORY PROGRAMME .......................... page71
9.
SOFTENER (optional) ............................................................................... page72
10. CLEANING................................................................................................. page73
CLEANING OF CAPPUCCINO MAKER ......................................................... page74
11. CHECKS and MAINTENANCE ..................................................................... page74
12. SUGGESTIONS FOR OBTAINING GOOD COFFEE........................................ page75
13. LIST OF HAZARDS ................................................................................... page75
14. MALFUNCTIONS and RELATIVE SOLUTIONS............................................. page76
espresso coffee machine - user instructions
READ CAREFULLY
all parts of this manual before using the product.
The espresso coffee machine that you have purchased has been designed and manufactured with innovative methods and
technology which ensure long lasting quality and reliability.
This manual will guide you in discovering the advantages of selecting this product. You will find information on how to get the
best out of your machine, how to always keep it efficient and what to do if you should have any problems.
Keep this manual in a safe place. If you lose it you can ask the manufacturer for another copy.
ENJOY YOUR READING … AND YOUR COFFEE
HOW TO USE THIS MANUAL
The manufacturer has the right to make any improvements on the product. We also guarantee that this manual reflects the technical
state of the product at the time it is marketed.
We would like to take this opportunity to invite the customers to make any suggestions for improvement of the product or the
manual.
GENERAL WARNINGS
•
After removing the packaging, check the condition of the appliance. If in doubt, do not use it but contact the retailer directly.
•
The packaging material must not be left within the reach of children since it is a potential source of danger. It is advisable to
keep the packaging until after the guarantee has expired.
•
Before you turn the machine on, please make sure that the electrical mains are in accordance with the indications given on
the machine data plate which is set just below the discharge tray.
•
The installation must be done in accordance with the safety standards in force and by qualified and trained personnel. Incorrect
installation may be harmful to people, property or animals.
•
This appliance is completely safe only if it is connected to an effective grounding system, executed as required by current safety
standards. It is important to have compliance with this requirement checked. If in doubt, have the system carefully checked by
qualified personnel. The manufacturer cannot be considered responsible for any damage caused by an incorrect grounding
device.
•
Upon installation of the machine, qualified personnel will be required to install a main switch as required by current safety
regulations, with a contact aperture of at least 3 mm.
•
It is not advisable to use extensions or electrical adaptors with multiple outlets. If their use is indispensable, use only simple or
multiple plug adaptors and extensions which are in accordance with the safety standards in force. Never exceed the capacity
value in kW indicated on the simple adaptor or on the extensions and the maximum power value indicated on the adaptor.
•
The espresso coffee machine is intended for the preparation of hot beverages such as coffee, tea or warm milk. This appliance
is to be used only for its intended purpose. Any other use is considered improper and therefore dangerous. The manufacturer
cannot be responsible for any damage caused by incorrect and unreasonable use.
English
63
espresso coffee machine - user instructions
•
When using the electrical appliance, several safety standards must be observed :
- do not touch the appliance when hands or feet are wet or damp;
- do not use the appliance in bare feet;
- do not use extensions in rooms where there are showers or baths;
- do not pull on the power cord to disconnect the appliance from the power outlet;
- do not leave the appliance exposed to atmospheric agents (rain, sun, etc.)
- do not allow the appliance to be used by children or the disabled.
•
Before any maintenance, disconnect the appliance from the electrical network through the main switch.
•
For daily cleaning, follow the instructions in this manual.
•
In case of breakdowns or poor functioning, turn off the appliance and unplug it. Do not attempt any repairs; call for specialised
technical service.
•
Any repairs must be done only by the manufacturer or an authorised service centre using original spare parts only. If this requirement is not observed, the safety of the appliance is compromised and the guarantee becomes void.
•
The power cord of the appliance must not be replaced by the user. If the cable is damaged, turn the machine off and contact
professionally qualified personnel only.
•
If you should decide not to use the appliance any longer, unplug it and have it drained of water by qualified personnel.
•
To guarantee that the machine is efficient and to keep it operating correctly, it is indispensable to follow the manufacturer’s
instructions, having periodical maintenance and a check of all the safety devices done by qualified personnel.
•
Never touch the dispensing unit as it is very hot.
•
Do not expose your hands or other body parts in the direction of the coffee dispensing spouts or in the direction of the steam
and hot water dispensing terminals. The steam and the water that exit the nozzles can cause burns.
•
When in operation, the steam and water nozzles and the filter holder cups are overheated and should be handled with care
only in the indicated parts.
•
Cups must be placed on the special surface only after having been thoroughly dried.
•
The dishes belonging to the machine itself are to be placed on the cup surface. It is incorrect to place any other object on this
surface.
•
Any unauthorised tampering with any part of the machine renders all guarantees null and void.
GUARANTEE
The guarantee is valid for 12 months on all components except electrical and electronic components and
expendable pieces.
64
English
espresso coffee machine - user instructions
SYMBOLS
This symbol warns you that there are important instructions that must be strictly followed in order to avoid
severe injury and/or damage to the machine!
This symbol indicates the operations that should be carried out more thoroughly for better use of the machine.
PRESENTATION
The espresso coffee machine is strictly for professional use only. It is designed for the preparation of hot drinks such as tea, cappuccinos and long, short and espresso coffee, etc. A range of accessories is available to guarantee practical and functional use of
the machine.
If the model has two groups, it can be used by two people simultaneously. This characteristic, together with the fact that the
machine is able to deliver beverages continuously without any problems, guarantees its intensive use.
The following are the instructions for correct use of the machine. The various accessories supplied with the appliance will also
be examined.
The user must be sufficiently informed to correctly operate the machine. It is recommended not to carry
out any operations on the machine which may modify or alter its operation.
WHEN THE MACHINE IS OPERATIVE THE BOILER CONTAINS STEAM AND HOT WATER THAT
ARE UNDER PRESSURE.
English
65
espresso coffee machine - user instructions
1.
GENERAL DESCRIPTION
1
Boiler level-check window
2
Pressure gauge
3
Steam pressure gauge
4
Steam nozzle
5
2-cup filter holder
6
Adjustable foot
7
Hot water nozzle
8
Cappuccino maker
9
Power switch
12
13
14
2
13
15
10
3
1
4
10 Cup support grille
5
11 Machine-ON indicator light
12 Hot water knob
7
13 Manual delivery switch
14 Coffee + cappuccino push button panel
9
16
15 Coffee push button panel
11
16 Cappuccino filter holder
2.
6
8
PUSH BUTTON PANEL
1 Espresso
1 Long coffee
2 Espresso
2 Long coffee
3.
1 Espresso
Stop
Programming
2 Espresso
Short cappuccino
Stop
Programming
Long cappuccino
PREPARATION OF THE MACHINE
The preparation of the machine and its installation must be carried out by qualified personnel.
Use of the machine without all the installation operations having been carried out by technical personnel could damage it seriously.
66
English
espresso coffee machine - user instructions
4.
ACTIVATION OF THE MACHINE
Before starting the machine, make sure that the level of water in the boiler is higher than the minimum level
on the level-check window (1). If there is no water (first installation or after boiler maintenance), it is necessary to fill the boiler in advance, so as to prevent overheating of the heating element.
1
Proceed as follows:
•
Open the water tap of the water mains and of the softener.
•
Turn the switch to position “1” (electrical power supplied to the pump for automatic boiler filling and
machine services) and wait for the boiler to be automatically filled with water.
•
Turn the switch to position “2” (full electrical power supplied, including the heating element in the boiler)
and wait for the machine to warm up completely.
0
1
2
•
during the machine’s warm-up phase (roughly 20 minutes), the negative pressure valve will
release steam for a few seconds until the valve itself closes.
•
before using the machine, run dry deliveries with the filter holder attached for a few seconds to
release any air which may be in the circuit, so that the delivery groups are completely heated.
•
before using the machine, dispense a few servings of coffee to check the operating pressure
of the machine.
B E S
T
•
Insert the pod into the filter holder, as shown in the figure;
•
hook the filter holder to the group without closing it too tightly in order to avoid
excessive wear of the seal;
U L T I M
A T
E
L AV
POD PREPARATION
A
Z Z
S S O
R E
5.1
A
P
USE OF THE MACHINE
E S
5.
2-Cup
filter holder
A
Z Z
U L T I M
A T
E
E S
L AV
A
P
S S O
R E
B E S
T
1-Cup
filter holder
(optional)
The seat for the pod is the same for a double coffee as it is for
a single coffee. Thus you must be careful to insert the pod in
the correct filter holder (with 1 or 2 spouts).
A
Z Z
U L T I M
A T
E
E S
L AV
A
S S O
R E
B E S
T
To obtain a correct hooking of the filter-holder, it must be
completely closed resulting in the particulat handle position
as per drawins.
P
Use “LAVAZZA BLUE” pods only.
1-Cup filter
holder for
cappuccino
Correct
handle angle
English
67
espresso coffee machine - user instructions
1
5.2
DISPENSING COFFEE
•
put the coffee cup under the dispensing spout;
•
press the desired dose button (1) and wait for coffee to be delivered (the LED
comes on);
•
to stop the delivery of coffee in advance, press the delivery button again or press
the STOP button;
•
in the event of anomalies or if the push button panel is locked, use the manual
switch.
6.
PREPARATION OF HOT BEVERAGES
6.1
DISPENSING HOT WATER
1
2
To dispense hot water, turn the tap knob (1) counter-clockwise: the hot water coming out
of the nozzle (2) will be proportional to the opening of the tap.
3
5
6.2
DISPENSING STEAM
To dispense steam, turn the tap knob (3) counter-clockwise: the steam coming out of
the nozzle (4) will be proportional to the opening of the tap.
4
Carefully move the steam nozzle with the anti-burn rubber
(5) and do not touch the hot water nozzle: contact with
the hot water and steam may be harmful to people,
animals or property.
68
English
espresso coffee machine - user instructions
7.
CAPPUCCINO MAKER
•
Put the suction tube (1) inside the milk ;
•
insert a pod in the filter holder and attach it to the group, tightening firmly;
•
put the cup under the dispensing spout of the cappuccino maker and the left filter holder;
•
press the desired dose button (2) and wait for milk and coffee to be delivered (LED comes on);
•
to stop delivery in advance, press the delivery button again or press the STOP button (3).
1
2
3
2
To modify the temperature of the milk, fix one of the flow-reducers supplied with
the machine kit onto the aspiration tube. In the chart here below are shown the
milk exit temperatures according to the type of reducer which is installed.
TEMPERATURE CHART WITH AND WITHOUT REDUCERS
(temperatures found in a pre-heated cup)
White
Ø 1,9mm
Red
Ø 1,8mm
Milk
temperatures
Ambient
temperature 16°C
Refrigerated milk
6°C
Without
reducer
With WHITE
With RED reducer
reducer Ø 1,9mm
Ø 1,8mm
55 - 60 °C
60 - 68 °C
68 - 75 °C
48 - 56 °C
58 - 63 °C
63 - 70 °C
For proper use of the automatic cappuccino maker, always use the filter holder with the long spout.
To obtain delivery of warm milk without foam, lift the
tab (4) upwards. For better results, we suggest not
dispensing directly into the coffee cup, but into a jug
or pot, then pouring the foamed milk on the coffee.
4
CAPPUCCINO pos.
WARM MILK pos.
Be sure the cappuccino maker is kept clean as described in the chapter “Cleaning”.
English
69
espresso coffee machine - user instructions
8.
PROGRAMMING
All programming operations must be made by qualified technical personnel.
8.1
•
place the programming lever (1), located under the boiler cover of the machine,
in the ON position;
•
insert a pod in the filter holder and attach it to the group, tightening firmly;
•
put the coffee cup under the dispensing spout;
•
press the PROG/STOP button (2) for about 8-10 seconds; all the dose button
LEDs will come on;
•
press the desired dose button(3);
•
when the desired dose has been attained, confirm by pressing the PROG/STOP
button (2);
•
repeat this operation for the other dose buttons;
•
when finished programming, return the programming lever (1) to the OFF
position.
8.2
•
1
PROGRAMMING COFFEE DOSES
ON
3
PROGRAMMING CAPPUCCINO DOSES
place the programming lever (1), located under the boiler cover of the machine,
in the ON position;
•
insert a pod in the filter holder and attach the filter holder to the group, tightening firmly;
•
put the cup under the dispensing spout of the cappuccino maker;
•
press the PROG/STOP button (2) for about 5 seconds; all the dose button
LEDs will come on;
•
press the desired cappuccino dose button(4);
•
delivery of coffee will begin; when the desired dose of coffee is attained, confirm
by pressing the PROG/STOP button (2);
•
milk dispensing will start automatically;
•
when the desired dose of milk has been attained, confirm by pressing the
PROG/STOP button (2);
•
repeat the operation for the other dose button;
•
when finished programming, return the programming lever (1) to the OFF
position.
3
2
4
4
2
The programming of each dose must be done with a new pod and not with previously used pods.
Programming the doses of the left-hand push button panel first automatically programs the doses of the right-hand
push button panel. It is, however, both possible and advisable to program the push button panels independently,
taking care to always start from the left-hand push button panel. Furthermore, after having programmed the cappuccino doses on the left-hand push button panel, the corresponding coffee doses on the right-hand push button
panel must be reprogrammed.
70
English
espresso coffee machine - user instructions
8.3
PROGRAMMING THE COFFEE-CAPPUCCINO SEQUENCE
0
1
The machine allows you to decide which sequence to use when dispensing cappuccino.
In particular, there are three options:
a
a) Delivery of milk first, then coffee.
2
c
b) Delivery of coffee first, then milk.
c) Simultaneous delivery of milk and coffee.
To decide which of the three options to use, proceed as follows:
•
Turn the machine off by moving the power switch to position 0;
•
press and hold the button of the push button panel regarding the desired option (see figure alongside) and simultaneously turn the machine back on: the
LED of the button pressed will come on;
a) Deliver milk first, then coffee.
confirm by pressing the PROG/STOP button (2).
b) Deliver coffee first, then milk.
•
b
2
c) Simultaneous delivery of milk
and coffee.
The machine will now use the set sequence.
The machine is programmed for simultaneous delivery of milk and coffee (mode c).
8.4
TO RESET THE ORIGINAL FACTORY PROGRAMME
To reset the original factory programme, proceed as follows :
•
Set the programming lever (1) under the top grill of the machine to the ON position;
•
Turn on the machine by pressing simultaneously button (2)
•
Confirmation that the default data program has been reset is indicated when the LEDs of both buttons turn on;
•
Turn the programming lever (1) under the upper grill of the machine to the OFF position.
1
and button (3)
for at least 5 seconds;
2
ON
3
All programming operations must be made by qualified technical personnel.
Take care when accessing the inside of the machine to set the programming lever: some of the components are scalding hot and there are parts under electrical tension.
English
71
espresso coffee machine - user instructions
9.
SOFTENER (optional)
Mains water contains insoluble salts, which cause the build-up of lime scale deposits in the boiler and in other parts of the
machine. The softener makes it possible to eliminate or substantially reduce the presence of these mineral salts.
The resin softener has the property of retaining the calcium contained in the water. For this reason, the resins become saturated
after a certain period and must be regenerated with coarse kitchen salt (NaCl, sodium chloride) or special water softening salt. It
is very important to regenerate the softener within the established times.
The regeneration is to be done regularly every 15 days. However, in locations with very hard water, it will be necessary to
regenerate more frequently. The same is true of places in which there is a large consumption of hot water for tea or other uses.
Softener regeneration
Proceed as follows:
•
move the levers (2) and (5) from left to right;
•
remove the lid by loosening the knob (1);
•
release enough water through the pipe (3) to make room for the amount of salt as required depending on the model (see
table);
•
clean any salt or resin residue from the gasket located on the lid;
•
put the lid back in place by screwing the knob (1) down securely and move the lever (2) back from right to left.
•
let the salt water drain from the small tube (4) until the water is no longer salty (about 30-60 minutes). The salt allows the
accumulated mineral salts to be released;
•
move the lever (5) from right to left back to its initial position.
Softener
model
8 litres
Amount
of salt
1.0 kg
2
12 litres
1.5 kg
5
16 litres
2.0 kg
1
3
4
The build-up of lime scale in the hydraulic circuit and boiler inhibit thermal exchange, thus compromising proper operation of the machine. Heavy incrustation in the boiler may cause long machine
shutdowns and in any case invalidate any guarantee, because this symptom indicates that regeneration has been neglected.
In order to keep the softener and hence the machine in
perfect operating condition, it is necessary to perform
regeneration periodically based on the use of the softener
and the hardness of the water that is used.
The table alongside shows the quantity of softened water
based on the hardness of the water in the various units
of measure:
- F°: French degree
- D°: German degree = 1.8 °F
- mg CaCO3
Amount of softened water based on hardness
F°
30°
40°
60°
80°
D°
16.5°
22°
33°
44°
mg CaCO3
30
40
60
80
8 litres
1000 lt
900 lt
700 lt
500 lt
1.0 kg
12 litres
1500 lt
1350 lt
1050 lt
750 lt
1.5 kg
16 litres
2100 lt
1800 lt
1400 lt
1000 lt
2.0 kg
For further information on installation, start-up and regeneration of the softener, refer to the relative instruction manual.
72
English
salt
espresso coffee machine - user instructions
10. CLEANING
For perfect cleaning and efficiency of the appliance, several simple cleaning operations are necessary on the functional parts and
accessories as well as the body panels. The indications given here are applicable for normal use of the coffee machine. If the machine is heavily used then cleaning should be performed more frequently.
CLEAN
Daily
FILTERS and FILTER HOLDERS
Daily, wash the seat for the pods with hot water, and remove any coffee residues with a
cloth dampened with lukewarm water.
X
BODY
Clean the panels of the body with a cloth dampened in lukewarm water. Do not use abrasive
detergents which may scratch the surface of the body.
X
STEAM NOZZLES
The steam nozzles must be kept clean at all times. Check the ends of the steam nozzles
and clean them monthly, clearing out the exit holes with a small needle.
Weekly
X
DISPENSING unit
Wash the units as indicated:
1) Use the solid filter holder
2) Pour the detergent on the solid filter and attach the filter holder
X
3) Carry out a series of deliveries until the water comes out clean
4) Remove the filter holder from the unit and carry out at least one delivery
so as to eliminate the detergent residue
When cleaning, always use cloths that are completely clean and hygienic.
During cleaning, be careful of the tips of the pod perforator located inside the clamping ring of the
group.
English
73
espresso coffee machine - user instructions
CLEANING OF CAPPUCCINO MAKER
To wash the cappuccino maker, proceed as follows:
With the programming lever in the OFF position:
•
immerge the milk suction tube in a solution of water and suitable detergent;
•
turn the lower body (1) 90° to pos. B (closure of milk outlet duct);
•
press and hold the STOP/PROG key (3) for 8 seconds, until the respective LED
begins to flash;
•
press the STOP/PROG button (3) again and the cappuccino maker will be activated,
allowing a cleaning cycle which lasts about 30 seconds;
•
at the end of the delivery, immerge the suction tube in cold water and repeat the
procedure described above in order to rinse the cappuccino maker of any detergent
residue.
•
return the lower body to pos. A;
•
if the air intake hole (2) is blocked, clear it gently with a pin.
pos. A
1
2
pos. B
3
H2O
It is advisable to clean the cappuccino maker after each period of continued use so as to avoid
malfunctions and to ensure the hygiene of the system
11. CHECKS and MAINTENANCE
To ensure perfect safety and efficiency of the machine over time, it is necessary to carry out maintenance.
In particular, it is advisable to ask Technical Service to carry out an overall check of the machine at least once a year.
Check the following on a regular basis:
•
check pump pressure with a pressure gauge which should indicate a pressure of around 8-9 bar. In case of anomalies, contact
Technical Service;
•
check the boiler pressure also with a pressure gauge, which should indicate about 0.8-1.2 bar. This may also require the assistance of Technical Service;
74
English
espresso coffee machine - user instructions
12. SUGGESTIONS FOR OBTAINING GOOD COFFEE
To obtain high-quality coffee, it is important that the hardness of the water used does not exceed 4-5 °F (French degrees). If the
water hardness exceeds these values, it is advisable to use a water softener.
Avoid using a water softener if the water hardness is less than 4 °F.
If the taste of chlorine in the water is particularly strong, a special filter should be installed.
After the machine has not been used for a period of time (2-3 hours) make a few dry runs.
Be sure to carry out regular cleaning and maintenance.
13. LIST OF HAZARDS
This chapter describes possible hazards for the user if the specific safety standards (described in this manual) are not adhered to.
The appliance must be connected to an efficient grounding system
If this is not done, the appliance can be a source of dangerous electrical discharges in that it is no longer able to discharge electricity to earth.
Do not use running water for washing.
The use of pressurized water directly on the machine can seriously damage electrical appliances. Never use water jets to wash any
part of the appliance.
Do not touch the dispensing unit
The high temperature of the dispensing unit may cause burns Avoid contact of the dispensing unit with the hands or other parts
of the body.
Be careful of the tips of the pod perforator
During cleaning, be careful of the tips of the pod perforator located inside the clamping ring of the group.
Be careful with the steam and hot water nozzles.
During use, the steam and hot water nozzles may overheat, thus becoming a source of danger. Handle these parts carefully. Never
direct steam or hot water jets directly on parts of the body.
Do not work on the machine when it is supplied with electrical power.
Before carrying out any maintenance or repair work on the machine you must turn it off by means of the main network switch or,
better yet, disconnecting the connection terminals in the network. Never remove any body panel when the machine is supplied with
electrical power.
Never work on the hydraulic system before having emptied it.
All work regarding the hydraulic system and the relative boiler are to be avoided when there is still water and pressure in the system.
You must therefore empty it beforehand, closing the mains tap and dry-running the delivery group for a short time. Switch off the
machine and open all the steam and water taps. When the pressure is zero, completely empty the boiler, unscrewing the special
pipe fitting located on the lower part of it.
If the above procedure is not correctly carried out, opening any part of the hydraulic system can cause a sudden outlet of overheated
water under pressure.
Use of the appliance
This espresso coffee machine is an appliance for professional use only. Any other type of use is considered incorrect and therefore
dangerous. Never allow children or incapacitated persons to use the machine.
Non-observance of the above standards can cause serious harm to people, property or animals.
Never work on the electronic apparatus when the machine is still supplied with electrical energy.
Shut down the machine completely by unplugging it from the mains before carrying out any operation.
English
75
espresso coffee machine - user instructions
14. MALFUNCTIONS and RELATIVE SOLUTIONS
Indication
Cause
1)
MACHINE
LACKING POWER
Solution
The machine power switch is in position “0”
1) Turn the machine switch to the “2” position.
or “1”.
2) The mains power supply switch is in the OFF 2) Place the mains switch in the ON position.
position.
WATER LACKING
IN BOILER
The water mains tap is closed.
Open the water mains tap.
TOO MUCH WATER
IN THE BOILER
Malfunction of the electrical system or
hydraulic system.
Contact Technical Service.
STEAM DOES NOT
COME OUT OF
NOZZLES
1) The nozzle sprayer is clogged.
2) The machine power switch is in position “1”.
1) Clean the steam nozzle sprayer.
1)
Turn the machine power switch to position
“2”.
STEAM MIXED WITH
WATER COMES OUT
OF THE NOZZLES
Malfunction of the electrical system or
hydraulic system.
Contact Technical Service.
NO DISPENSING
The water mains tap is closed.
Open the water mains tap.
WATER LEAKS
FROM THE MACHINE
1) The tub does not drain.
1) Check the sewer drain.
2) The drain tube is broken or detached or has an
2) Check and restore the connection.
obstruction in the water flow.
COFFEE
IS TOO HOT or
TOO COLD
Malfunction of the electrical system or
hydraulic system.
Contact Technical Service.
THE PRESSURE GAUGE
INDICATES AN
UNACCEPTABLE
PRESSURE
Malfunction of the electrical system or
hydraulic system.
Contact Technical Service.
76
English
espresso coffee machine - user instructions
Indication
Cause
Solution
After a few minutes, automatic filling with water is
ALL THE LED’s OF
ALL THE PUSH
BUTTON PANELS
ARE FLASHING
stopped:
1) Time control device has cut in.
1) Turn the machine off and then back on.
2) No water in mains.
2) Open the water mains tap.
COFFEE DELIVERY
OCCURS ONLY USING
THE MANUAL BUTTON
Malfunction of the electrical system or
hydraulic system.
Contact Technical Service.
THE PUMP WORKS
ONLY WITH THE
MANUAL DELIVERY
BUTTON
Malfunction of the electrical system or
hydraulic system.
Contact Technical Service.
SHUTDOWN OF
THE ELECTRONIC
SYSTEM
Malfunction of the electrical system or
hydraulic system.
Contact Technical Service.
Pump malfunction.
Contact Technical Service.
THE PUMP LEAKS
WATER
THE MOTOR STOPS
SUDDENLY OR THE
THERMAL PROTECTOR
INTERVENES DUE TO
OVERLOAD
THE PUMP FUNCTIONS
BELOW THE NOMINAL
CAPACITY
THE PUMP IS NOISY
If the problem cannot be resolved, turn the machine off and contact Technical Service. Do not attempt any sort of repairs.
English
77