1
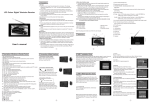
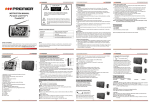
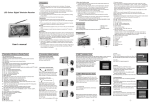
LCD1105A
Operation Instruction
LCD Color digital TV receiver
NOTE: THIS UNIT IS NOT MEANT TO BE USED IN A MOVING VEHICLE.
ATSC DIGITAL TUNERS DOES NOT RECEIVE SIGNAL WHEN IN MOTION.
This device complies with Part 15 of the FCC Rules.
Operation is subject to the following two conditions: (1) this device may not cause harmful
interference, and (2) this device must accept any interference received, including interference
that may cause undesired operation.
Contents
I
Precautions
1
II
Accessories
2
III
Appearance
3
IV
Description of Panel Buttons
4
V
Remote Controller Directions
5
VI
Basic Operation
7
VII TV Menu Operation
8
6.1. TV/AV Image Quality Adjustment
8
6.2. Sound Adjustment
9
6.3. Time Adjustment
9
6.4. Settings
10
6.5. Program Searching
12
VIII To Receive Clear Images
15
IX
Before Repair
16
X
Technical Parameter
17
XI
Stand Assemble Instruction Manual
18
I Precautions
Storage
1. Keep this product away from extremely hot or cold places. The
storage temperature ranges from -40 to 60 and the working
temperature from -5 to 40 .
2. Do not use this product at damp environment like bathtubs, wash
basins, kitchens, washtubs, as well as basements, swimming pools
or similar places.
3. Do not expose your TV set to high humidity, dust or oil smoke.
4. Do not throw or drop this product.
5. Do not subject this device to the inside of a case or strong vibrations,
avoiding strong collision.
6. Do not push on or scrub this product with sharp objects.
Maintenance
1. Disconnect all cables of this device at first before cleaning.
2. Wipe the enclosure, screen and keys using soft cloth with a little
soft detergent on.
3. Do not use polishing cloth, abstergent, and all types of propellants or
chemical detergents like alcohol and benzene to clean your device.
Warning!
1. Do not watch television programs or turn your TV set on for your
own and others' safety.
2. It is very dangerous to watch television programs or operate the
TV set while driving.
Special Notice
Bright spots or dark spots may appear on the screen. This is a
normal phenomenon associated with the active matrix display
technology and is not a sign of malfunction. Do not attempt to
maintain. For any failures, please turn off your TV set immediately
and contact us or your dealer. This device integrates a great deal
of fine electronic components. Disassembly or alternation may
result in damages or breaks.
-1-
II Accessories
1. Car adapter
2. AC adapter
3. AV conversion cable
4. Remote control
5. AAA type batteries
6. Telescopic antenna
7. 75 ohm antenna conversion cable(screw connector)
8. User manual
* Open the package and make sure all the items are included.
-2-
III Appearance
1. Loudspeaker
2. TFT-LCD Screen
3. Control Panel
4. Remote-control receive
window
5. Power indicator
Red: Standby
Green: Power-on
6. Power: power on/off
7. Antenna Input Jack
8. AV2 IN Input
9. AV1 IN Input
10. Earphone Jack
11. 12V DC Power Jack
-3-
IV Description of Panel Buttons
1. MENU: Menu button, press to show
the main menu. When system enters
a multilevel submenu, press to return
the previous menu step by step.
2. CH+
: Upward selection/Channel
increasing.
3. CH-
: Downward selection/Channel
decreasing.
4. VOL+ : Rightward selection/For volume increasing.
5. VOL-
: Leftward selection/For volume decreasing.
6. SOURCE: TV,AV1,AV2 switch.
7. MTS: Language switch button, press to adjust among different
languages.
8. AUDIO: Audio mode button, press to choose among the four audio
modes, Standard, Music, Movie, Personal.
9. EPG: press to show the program guide menu. ( ATSC mode )
10. PRLIST: TV program menu key, press to see the entire program
list in a program list box.
11. CC: Close/Open caption.
12. INFO: Press to show the information of present program.
-4-
V Remote Controller Operation Instruction
1
9
2
10
11
5
AAA
12
13
14
6
7
8
AAA
3
4
15
16
17
18
1. CH+/CH- (Program choosing key, up and down direction key):
Press CH+ key to increase the channel by degree. Press this key
and choose menu upward if it is in the system menu.
Press CH- key to decrease the channel by degree. Press this key
and choose menu downward if it is in the system menu.
2. VOL+/VOL- (Volume control key, left and right direction key)
Press VOL+ to turn up the volume. Press this key to choose menu
rightward if it is in the system menu.
Press VOL- to turn down the volume. Press this key to choose
menu leftward if it is in the system menu.
3. TV/AV Switch Key: When pressing this key, you switch state among
TV, AV1 and AV2.
4. MUTE (Mute Key): When you press this key, the sound will
disappear, and press again or press VOL+ the sound will return
to normal.
5. 0, 1, 2, 3, ... 9: Program Direct Choosing Key. Press this key to
choose program number.
6. : Press this key to execute channel direct choosing transform
function.
7. CC: Close/Open Caption
8. MTS: When pressing this key, you can adjust among different
languages.
-5-
9. MENU: Menu key. When you press this key, the main menu will
display. When the system enters a multilevel submenu, press this
key and return to previous menu step by step.
10. PRLIST: TV program menu key. When pressing this key, you will
see the entire program list in a program list box.
11. POWER (Power Switching Key): When you press this key, the
TV set will be turned off, and press again it will be turned on.
12. EXIT: Exit Key. Press this key, exit operation and return to the
program.
13. PICT: Image Mode Key. Press this key to choose among the four
image modes of Standard, Dynamic, Soft and Personal.
14. AUDIO: Audio Mode Key. Press this key to choose among the four
audio modes of Standard, Music, Movie, Personal.
15. INFO: When you press this key, the system will show the message
of present program.
16. EPG: When you press this key, the system will show the program
guide menu(ATSC mode).
17.
: Return Key. Press this key to return to last program you were
watching and press again to return to current program.
18. FORMAT: When pressing this key, you can choose among Normal
and Wide image display formats.
-6-
VI Basic Operation
1. Connection of Power Supply:
Align the power supply plug on
AC adapter with the jack on the
machine rear cover marked with
DC.
2. Connection Of External Antenna:
75
external antenna cord
Align one end of the attached
external antenna cord plug with
the external antenna jack, and
the other end to connect the
external antenna head.
3. Connection of AV convert Cable:
AV transforming wire
Insert the external video cord into
the yellow port of the AV convert
cable, the left sound track into the
white port and the right sound track
into the red port. Then plug the AV
convert cord in AV1 IN or AV2 IN
jack.
-7-
VII TV Menu Operation
7.1. TV/AV Image Quality Adjustment
Personal
Picture Mode
Contrast
50
Brightness
50
Color
50
Sharpness
50
Tint
0
UP/DOWN
ADJUST
"MENU": EXIT
Press MENU key to enter the menu list and then press left or right key
to enter the above list. Press up and down key to choose to enter the
sub-list, press left and right key to adjust the numerical value or setup
the contents, then press Menu to confirm and return to previous list.
Press Menu again or press EXIT key on the remote controller to quit
the sub menu list directly after the adjustment of image quality.
Precautions
1. There are four options of picture mode, which are Personal,
Standard, Dynamic and Soft.
2. Contrast: Adjust the black and white contrast of the image
3. Brightness: Adjust the brightness of the image
4. Color: Adjust the color of the image
5. Sharpness: Adjust the sharpness of the image
6. Tint: Adjust the red and green balance of the image
-8-
7.2. Sound Adjustment
Standard
Sound Mode
Bass
50
Treble
50
50
Balance
English
Audio Language
UP/DOWN
ADJUST
"MENU": EXIT
Press MENU key to enter the menu list and then press left or right key
to enter the above list. Press up and down key to choose to enter the
sub-list, press left and right key to adjust the numerical value or setup
the contents, then press Menu to confirm and return to previous list.
Press Menu again or press EXIT key on the remote controller to quit
the sub menu list directly after the adjustment of sound effect.
Precautions
1. There are four options of sound mode, which are Personal,
Standard, Movie and Music.
2. Bass: Adjust bourdon.
3. Treble: Adjust alt.
4. Balance adjust the balance between left and right sound track.
5. Audio Language can be setup as English, French and Spanish.
7.3. Time Adjustment
Time Zone
Eastern
Day Saving Time
Off
2004/12/31 16:00
Clock
UP/DOWN
ADJUST
-9-
"MENU": EXIT
Press MENU key to enter the menu list and then press left or right key
to enter the above list. Press up and down key to choose to enter the
sub-list, press left and right key to adjust the numerical value or setup
the contents, then press Menu to confirm and return to previous list.
Press Menu again or press EXIT key on the remote controller to quit
the sub menu list directly after the adjustment of time.
Precautions
1. Time Zone has seven areas to be chosen.
2. Day Saving Time can be setup as Off or On (Summer time off or on).
3. Clock 2004/12/31 16:00 shows the current program time.
7.4. Settings
Language
English
Transparency
Off
Color Mode
Normal
zoom mode
Auto
Closed Caption
Restore Default
UP/DOWN
ADJUST
"MENU": EXIT
Press MENU key to enter the menu list and then press left or right key
to enter the above list. Press up and down key to choose to enter the
sub-list, press left and right key to setup the contents.
7.4.1. OSD Language Settings
Press Up and Down Key to choose Language, and press Left and
Right Key to choose among English, French and Spanish.
7.4.2. Menu State Settings
Press UP and Down Key to choose Transparency, and press Left and
Right Key to choose Off (menu transparency off) or On (menu
transparency on).
7.4.3. Color Auto-adjustment
Press Up and Down Key to choose Color Mode. Press Left and Right
Key to choose among Normal, Warm and Cool.
7.4.4. Zoom Mode Settings
Press UP and Down Key to choose Zoom Mode, and press Left and
Right Key to choose among WIDE, NORMAL.
-10-
7.4.5. Closed Caption Settings
Many TV programs contain closed caption information, and the
audience can see the caption in words on the screen. Not all the
channels at any time have closed caption code information.
Press Up and Down Key to choose Closed Caption and press Left and
Right Key to enter the following picture.
CC Mode
Off
Basic Selection
CC1
Service1
Advance Selection
On
Option
ADJUST
UP/DOWN
"MENU": EXIT
There are three CC Modes, which are Off (closed caption off), On
(closed caption always on when information is available) and CC on
Mute (closed caption on when TV is in mute and closed caption off
when TV is not in mute).
Basic Selection can choose among CC1, CC2, CC3, CC4, Text1,
Text2, Text3 and Text4
Advance Selection can choose among Service1, Service2, Service3,
Service4, Service5 and Service6.
Option: Press Up and Down key to choose option item to set the
display mode of CC.
7.4.6. Restore Settings
Press UP and DOWN key to choose Restore Default, press VOL+ Key,
the hint of Are you sure will show. As in the following picture, press
YES or NO to choose whether restore or not and press CH+ or CH- to
confirm.
Are you sure?
NO
SELECT
YES
UP/DOWN
-11-
7.5. Program Searching
Press MENU Key to enter the menu list, press Left and Right Key to
enter the following list, press Up and Down Key to enter the sub-list
and then press Left and Right Key to setup the contents.
7.5.1.1. Antenna can be setup as CATV and Air.
Antenna
Auto Scan
Favorite
Show/Hide
Channel No.
Channel Lable
DTV Signal
UP/DOWN
Antenna
Auto Scan
Favorite
Show/Hide
Channel No.
Channel Lable
DTV Signal
UP/DOWN
CATV
ADJUST
"MENU": EXIT
Air
4-1
ADJUST
"MENU": EXIT
7.5.1.2. In the CATV state, choose Auto scan and press OK to enter
Cable system settings. Four options, AUTO, STD, IRC, HRC can be
chosen.
Cable System
AUTO
Start to Scan
DTV Signal
UP/DOWN
ADJUST
-12-
"MENU": EXIT
7.5.2. In the Start to scan item, press VOL+ to start searching.
Auto searching will clear the primary program.
AUTO
Cable System
Start to Scan
DTV Signal
UP/DOWN
ADJUST
"MENU": EXIT
After received the programs,the DTV Signal item will show the DTV
signal strength.
7.5.3. Choose Favorite item, press Up and Down key to choose
program, press Left and Right key to setup favorite program.
Antenna
Auto Scan
CATV
Favorite
Show/Hide
Channel No.
Channel Lable
DTV Signal
UP/DOWN
ADJUST
"MENU": EXIT
7.5.4. Show/Hide settings
Choose Show/Hide and press Up and Down key to choose program
then press Left and Right dey to setup Show or Hide the program
Antenna
Auto Scan
Favorite
CATV
Show/Hide
Channel No.
Channel Lable
DTV Signal
UP/DOWN
ADJUST
-13-
"MENU": EXIT
No.
4-1
9-2
Program Name
FD 3803
KQED-SD
SELECT
Show
"MENU": EXIT
7.5.5. Change Channel Number
Choose Channel No. as in the following picture:
Antenna
Auto Scan
Favorite
Show/Hide
Air
Channel No.
4-1
FD 3803
Channel Lable
DTV Signal
UP/DOWN
ADJUST
"MENU": EXIT
Press VOL+ or VOL- to change current channel number.
7.5.6. Change or Edit Program Name
Choose Channel Label and press VOL+ to enter the following picture.
Press UP and Down key to alter the characters and numbers in the
box to change the program name according to your preference as in
the following picture.
F
D
UP/DOWN
3
8
ADJUST
-14-
0
3
"MENU": EXIT
VIII To Receive Clear Image
Adjust the length, angle and direction of the telescopic antenna to
receive the optimal image. Draw back the antenna beginning from the
wide part after using.
Warning
If the signals are too weak, no matter how to adjust the antenna, the
image will not be clear and there are phenomenons like high noise,
shaking, and sound not well and so on. It's not the fault of the TV
set. If the image quality is not good when using the telescopic
antenna, try to use open antenna or cable TV.
-15-
IX Before Repair
The following phenomenons do not mean that the TV set has fault.
Please check it according to the following methods before repair.
Phenomenon
No image and sound
No signal
Reason
AC adapter or automobile adapter
connecting improperly; using
unauthorized power; the power switch is
on the state of off.
Whether chosen the right channel; auto
setup receiving channel again; channels
need to be reset in a new place.
No sound
Whether the volume has been turned
down at the bottom; whether the
earphone is inserted; signals too weak;
the mute function is working.
Mosaic in the image
Whether the antenna has been adjusted
properly, and maybe the signals are too
weak.
Could not receive signals
Maybe the local signals are too weak;
open antenna or cable TV preferred.
Image too dark
Whether the brightness and contrast are
proper, and please adjust again.
When the car is moving, It is possibly because that the local
if there are mosaics in
signals are too weak. Please move to
the image or the image
place with strong signals to receive.
and sound are not fluent.
-16-
X Technical Parameter
Input
ATSC frequency: 54MHz 803MHz
NTSC receiving frequency: 55.25MHz
801.25MHz
LCD Screen Technical Parameter
LCD screen: 11 inch
LCD screen scale: 16:9
Resolution: 800(H)
RGB
480(V)
Response Rate: R: 30/F: 50
Visible Angle: U: 55/D: 65
L/R: 65
Illuminant: CCFL
Lamp Life: >10,000 Hours
Capability Parameter
Power Supply: AC INPUT 100-240V 50/60HZ
DC OUTPUT 12V/2A
Dimensions: 367
205
63.5mm
Net Weight: About 1500g
Power Consumption: About 19W
-17-
XI Stand Assemble Instruction Manual
Pict.-1
Pict.-2
Pict.-5
Pict.-9
Pict.-3
Pict.-7
Pict.-6
Pict.-11
Pict.-10
Pict.-13
Pict.-14
Pict.-4
Pict.-8
Pict.-12
Pict.-15
Step one: Pick up the stand accessory from the package as Pict.-1.
Step two: Take out the rectangle patch from the stand haead as Pict.-2,
Pict.-3 & Pict.-4.
Step three: Loose the screw of rectangle patch, and then locked it on the
back of the Unit. as Pict.-5 & Pict.-6.
Step four: Loose the screw and open the stand head as Pict.-7 & Pict.-8.
Step five: Lock the 2 piece stand hand while they combine together with
stand in middle as Pict. -9 & Pict.-10.
Step six: Firm the screw while adapting the angle as Pict. -11 & Pict.-12.
Step seven: Lock the stand into the unit as Pict. -13 & Pict.-14.
Step eight: Completed As Pict.-15.
-18-
Warning
This operation instruction is only intended for reference. No further
notice is available to any modification of all information contained
therein. Due to continuing improvements, the features and design
are subject to change without notice.
Warning
There is no component that can be repaired in the TV set. Do not try
to disassemble and improve the TV set. There is high voltage inside
and it is very dangerous. The maintenance and adjustment work
should be carried through by professional people.
Warning
To prevent injury, this apparatus must be securely attached to the
floor/wall in accordance with the installation instructions.
The mains plug is used as the disconnect device, the disconnect
device shall remain readily operable, and it shall be disconnected
from the mains completely.
The plug is used as disconnect device form the mains supply, the
plug shall remain readily operable.
The apparatus should not be exposed to dripping or splashing and
that no objects filled with liquids, such as vases, shall be placed on
the apparatus.
No naked flame sources, such as lighted candles, should be
placed on the apparatus.
-19-