1
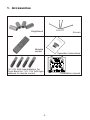
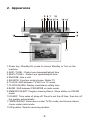
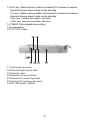
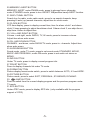
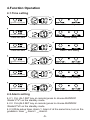
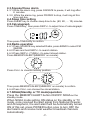
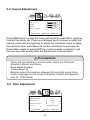
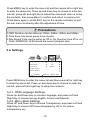
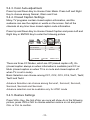
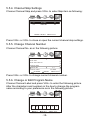
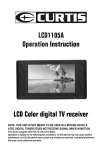
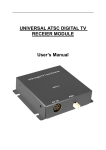
OPERATION INSTRUCTIONS
MODEL NO.: KCR2614A
UNDER COUNTER CLOCK RADIO
WITH 7INCHES ROTATING LCD TV
Table of Contents
1.Accessories
1
2.Appearance
2
3.Remote Control Application
4
4.Function Operation
6
5.TV Menu Operation
8
6. Before Repair
15
7. Technical Parameter
16
1. Accessories
Knighthead
Screws
Op
er
Kit
ch
en
Remote
control
2 X 1.5V AAA type batteries for
Clock Back Up . 2 X 1.5V AAA type
batteries for remote control .
-1-
Sp
ec
ia
lT
V
Re
ce
iv
at
io
n
In
st
ru
ct
io
ns
er
Operation Instructions
Installation manual
2. Appearance
17
1.Power key: Standby/On, press to choose Standby or Turn on the
machine.
2.SKIP-/TUNE- : Radio tune downward/adjust time
3.SKIP+/TUNE+ : Radio tune upward/adjust time.
4.SNOOZE: Has a rest
5.SOURCE: Function mode choose: Radio-TV.
6.TV/AUX: Shift between TV/AUX on TV mode.
7.CLOCK/ALARM: Display clock/alarm setting time
8.BAND: Shift between FM/AM/WB on radio mode.
9.MEMORY/ALERT: Program memory/Alarm. Store station on FM/AM
mode.
10.SLEEP: Time setup of sleep off. Press to set the off-time, then turn off
the system automatically.
11.MENU/MONO: Enter menu under TV/AV mode, and choose stereo
/mono under radio mode.
12.IR position: Remote receiving window.
-2-
13.CH+ key: Radio memory station increases/TV channel increases,
direction/choose alarm mode on the standby.
CH- key: Radio memory station decreases/TV channel decreases,
direction/choose alarm mode on the standby.
VOL- key: Volume decreases. direction.
VOL+ key: Volume increases. direction.
14.TIMER: Calculagraph time setting.
15.Loudspeaker
16.TFT LCD screen.
17.clock back up house
18.External Right sound track
19.External Video
20.External Left sound track
21.External DC power input jack
22.External TV antenna input jack
23.FM, ANTENNA, CABLE.
-3-
3. Remote Control Operation
1.POWER BUTTON
Standby/off, press to switch between ON and
16
1
STANDBY.
17
2
2.SOURCE BUTTON
3
System working mode, press to switch RADIO
18
4
19
/TV.
5
20
6
3.BAND BUTTON
21
7
Band switch, under radio mode, press to switch
22
8
FM/AM/WB.
9
23
4.TIMER BUTTON
Press to enter timer setting mode, use SKIP+/10
24
to adjust time, then press TIMER to confirm time 11
25
setting.
26
12
27
5.AL1. SET BUTTON
28
Alarm clock 1 setting, press to setup alarm mode:
29
BUZZER1/RADIO1/TV1.
13
30
6.AL2. SET BUTTON
14
31
Alarm clock 2 setting, press to setup alarm mode:15
BUZZER2/RADIO2/TV2.
7.SKIP -/TUNE- BUTTON
Search key for radio, under radio mode, press to down search channels, keep
pressing to auto (down) search channels; adjust time on clock mode.
8.CH+ AND UP BUTTON
CHANNEL + and UP, under RADIO/TV mode, press to + channels. Adjust item
when enter menu.
9.VOL- AND LEFT BUTTON
Volume and left, under RADIO, TV, AV mode, press to reduce volume. Adjust item
when enter menu.
10.MENU BUTTON: Press to enter/exit menu.
11.EXIT BUTTON: Press to exit menu.
12.Number (0-9) BUTTON
Under TV mode, press to select channels.
13. - BUTTON
Press digit keys to select main channel number, then press '-' and insert second
digit number key to select program directly.
14.CC BUTTON
CLOSED CAPTION ON/OFF KEY, under TV(ATSC & NTSC) mode, press to set CC
mode ON, OFF or CC ON MUTE (CC ON for mute)
15.MTS BUTTON
Audio language switch, under ATSC mode, press to switch current display program
audio language (only available when program supports multi- languages)
16.MUTE BUTTON
Press to switch between mute and cancel mute from speaker.
17.TV/AUX:
Shift between TV and AUX on TV mode.
18.SLEEP BUTTON
Press to set up auto off anytime
19.SNOOZE BUTTON
When alarm clock is operating, press SNOOZE, the alarm will operate again After
8 minutes.
-4-
20.MEMORY/ ALERT BUTTON
MEMORY/ ALERT, under FM/AM mode, press to storage favour channels;
under STANDBY mode, press to turn ON/OFF WB(weather band) ALERT function.
21.SKIP+/TUNE+ BUTTON
Search key for radio, under radio mode, press to up search channels, keep
pressing to auto (up) search channels; adjust time on clock mode.
22.CLOCK BUTTON
LCD time display, press to display current time, time for alarm clock 1 and alarm
clock 2; keep pressing to adjust time/alarm clock 1/alarm clock 2; use skip+/tune+,
skip-/tune- button to adjust time
23. VOL+ AND RIGHT BUTTON
Volume + and right, under RADIO, TV, AV mode, press to increase volume.
Adjust item when enter menu.
24.CH- AND DOWN BUTTON
CHANNEL - and down, under RADIO/TV mode, press to - channels. Adjust item
when enter menu.
25.AUDIO/MONO BUTTON
Sound mode, under TV mode, press to set sound mode STANDARD, MOVIE,
MUSIC AND PERSONAL; under FM mode, press to set audio out stereo or
MONO.
26.INFO BUTTON
Under TV mode, press to display current program info.
27.PRLIST BUTTON
Press to display channels list under TV mode
28.FORMAT BUTTON
Picture display format mode switch, press to switch between AUTO, 4:3 and WIDE.
29.PICTURE BUTTON
Picture mode, press to select SOFT, PERSONAL, STANDARD, DYNAMIC.
30.
JUMP BUTTON
Press to switch from the current display program and the previous program under
TV mode.
31.EPG BUTTON
Under ATSC mode, press to display EPG info. (only available with the program
support of EPG)
-5-
4.Function Operation
4.1.Time setting
(CLOCK on remote)
Press and hold
Hour setting
.
(CLOCK on remote)
Press one time
Minute setting
(CLOCK on remote)
Press one time
Alarm 1 hour setting
(CLOCK on remote)
Press one time
Alarm 1 minute setting
(CLOCK on remote)
Press one time
Alarm 2 hour setting
(CLOCK on remote)
Press one time
Alarm 2 minute setting
4.2.Alarm setting
4.2.1. CH- (AL1.SET key on remote) press to choose BUZZER1
/Radio1/TV1 on the standby mode.
4.2.2. CH+(AL2.SET key on remote) press to choose BUZZER2
/Radio2/TV2 on the standby mode.
4.2.3.While setup timer, Alarm 1, Alarm 2 at the same time, turn on the
gradation: timer
Alarm1
Alarm2.
-6-
4.3.Snooze/Close alarm
4.3.1.While the alarm ring, press SNOOZE to pause, it will ring after
8 minutes.
4.3.2. While the alarm ring, press POWER to stop, it will ring at this
time nest day.
4.4.Sleep time setting
Press SLEEP key to choose sleep time to be (90, 80, .... 10) minutes.
4.5.Calculagraph
Press TIMER key, then press SKIP+/- to adjust time of calculargraph:
Then press TIMER key to confirm.
4.6.Radio operation
4.6.1.Press SOURCE key selected Radio, press BAND to select FM
/AM/WB.
4.6.2.Press and hold SKIP+/- to search station.
4.6.3.Press SKIP+/- (TUNE+/-) to select stored station.
Press MEMORY/ALERT(MEMORY on remote):
Press CH+/- to choose memory position:
Then press MEMORY/ALERT(MEMORY on remote) to confirm.
4.6.4.Press CH+/- can choose the stored station.
4.7.NOAA(Standby or TV mode)operation
Press the MEMORY/ALERT button ON/OFF NOAA on the
standby mode.
When NOAA mode setting ON status on the standby or TV
mode, once received the alert signal from National Oceanic
and Atmospheric, the alert alarm will be Automatically turned
ON of this set, press POWER button once to turn OFF the
alert alarm and receive local weather broadcast channels
Automatically.
-7-
5. TV Menu Operation(on the TV and AUX mode)
Precautions
It's unavailable if the menu is grey.
5.1. TV/AV Image Quality Adjustment
Personal
Picture Mode
Contrast
50
Brightness
50
Color
50
Sharpness
50
Tint
0
UP/DOWN
ADJUST
"MENU": EXIT
Press MENU key to enter the menu list and then press left or right key
to enter the above list. Press up and down key to choose to enter the
sub-list, press left and right key to adjust the numerical value or setup
the contents, then press Menu to confirm and return to previous list.
Press Menu again or press EXIT key on the remote controller to quit
the sub menu list directly after the adjustment of image quality.
Precautions
There are four options of picture mode, which are Personal,
Standard, Dynamic and Soft.
Contrast adjust the black and white contrast of the image
Brightness adjust the brightness of the image
Sharpness adjust the sharpness of the image
Tint adjust the red and green balance of the image
Color adjust the color of the image
-8-
5.2. Sound Adjustment
Standard
Sound Mode
Bass
50
Treble
50
50
Balance
English
Audio Language
UP/DOWN
ADJUST
"MENU": EXIT
Press MENU key to enter the menu list and then press left or right key
to enter the above list. Press up and down key to choose to enter the
sub-list, press left and right key to adjust the numerical value or setup
the contents, then press Menu to confirm and return to previous list.
Press Menu again or press EXIT key on the remote controller to quit
the sub menu list directly after the adjustment of sound effect.
Precautions
There are four options of sound mode, which are Personal,
Standard, Movie, and Music .
Bass adjust bourdon.
Treble adjust alt.
Balance adjust the balance between left and right sound track.
Audio Language can be setup as English, French and Spanish
only for ATSC Mode.
5.3. Time Adjustment
OSD Duration
15 Sec
Time Zone
Eastern
Off
Day Saving Time
2006/05/02 14:40-
Clock
UP/DOWN
ADJUST
-9-
"MENU": EXIT
Press MENU key to enter the menu list and then press left or right key
to enter the above list. Press up and down key to choose to enter the
sub-list, press left and right key to adjust the numerical value or setup
the contents, then press Menu to confirm and return to previous list.
Press Menu again or press EXIT key on the remote controller to quit
the sub menu list directly after the adjustment of time.
Precautions
1.OSD Duration can be setup as 15Sec, 30Sec, 45Sec and 60Sec.
2.Time Zone has seven areas to be chosen.
3.Day Saving Time can be setup as Off or On (Summer time off or on).
Clock 2006/05/02 14:00 shows the current program time.
5.4. Settings
Language
English
Transparency
Off
Color Mode
Normal
Closed Caption
Restore Setting
UP/DOWN
ADJUST
"MENU": EXIT
Press MENU key to enter the menu list and then press left or right key
to enter the above list. Press up and down key to choose to enter the
sub-list, press left and right key to setup the contents.
5.4.1. OSD Language Settings
Press Up and Down Key to choose Language, and press Left and
Right Key to choose among English, French and Spanish.
5.4.2. Menu State Settings
Press UP and Down Key to choose Transparency, and press Left and
Right Key to choose Off (menu transparency off) or On (menu
transparency on).
-10-
5.4.3. Color Auto-adjustment
Press Up and Down Key to choose Color Mode. Press Left and Right
Key to choose among Normal, Warm and Cool.
5.4.4. Closed Caption Settings
Many TV programs contain closed caption information, and the
audience can see the caption in words on the screen. Not all the
channels at any time have closed caption code information.
Press Up and Down Key to choose Closed Caption and press Left and
Right Key or ENTER Key to enter the following picture.
CC Mode
Off
Basic Selection
CC1
Service1
Advance Selection
UP/DOWN
ADJUST
"MENU": EXIT
There are three CC Modes, which are Off (closed caption off), On
(closed caption always on when information is available) and CC on
Mute (closed caption on when TV is in mute and closed caption off
when TV is not in mute).
Basic Selection can choose among CC1, CC2, CC3, CC4, Text1, Text2,
Text3 and Text4
Advance Selection can choose among Service1, Service2, Service3,
Service4, Service5 and Service6.
Advance selection can be available only for ATSC mode
5.4.5. Restore Settings
Press VOL+ Key, the hint of Are you sure will show. As in the following
picture, press YES or NO to choose whether restore or not and press
CH+ or CH- to confirm.
-11-
Are you sure?
NO
YES
SELECT
CONFIRM
5.5. Program Searching
Press MENU Key to enter the menu list, press Left and Right Key to
enter the following list, press Up and Down Key to enter the sub-list
and then press Left and Right Key to setup the contents.
Precautions
There is no search menu under the AUX mode.
5.5.1.1. Antenna can be setup as CATV and Air.
CATV
Antenna
Auto Scan
Auto Scan Add CH
Channel Skip
Channel No.
Channel Lable
UP/DOWN
ADJUST
"MENU": EXIT
Air
Antenna
Auto Scan
Auto Scan Add CH
Channel Skip
Channel No.
4-1
FD 3803
Channel Lable
UP/DOWN
ADJUST
-12-
"MENU": EXIT
5.5.1.2. In the CATV state, choose Auto scan and press OK
to enter Cable system settings. Four options, AUTO, STD,
IRC, HRC can be chosen.
AUTO
Cable System
Start to Scan
UP/DOWN
ADJUST
"MENU": EXIT
5.5.2. In the Start to scan item, press VOL+ to start searching.
Auto searching will clear the primary program.
AUTO
Cable System
Start to Scan
UP/DOWN
ADJUST
"MENU": EXIT
5.5.3. Press Auto Scan Add Ch will start auto search based
on primary program.
CATV
Antenna
Auto Scan
Auto Scan Add CH
Channel Skip
Channel No.
Channel Lable
UP/DOWN
ADJUST
-13-
"MENU": EXIT
5.5.4. Channel Skip Settings
Choose Channel Skip and press VOL+ to enter Skip item as following:
No.
4-1
9-2
Program Name
FD 3803
KQED-SD
Skip
Off
Off
"ENTER": SELECT "MENU": EXIT
Press VOL+ or VOL- to close or open the current channel skip settings.
5.5.5. Change Channel Number
Choose Channel No. as in the following picture:
Air
Antenna
Auto Scan
Auto Scan Add CH
Channel Skip
Channel No.
4-1
FD 3803
Channel Lable
UP/DOWN
ADJUST
"MENU": EXIT
Press VOL+ or VOL- to change current channel number.
5.5.6. Change or Edit Program Name
Choose Channel Label and press VOL+ to enter the following picture.
Alter the characters and numbers in the box to change the program
name according to your preference as in the following picture.
F
D
EDIT
3
SELECT
-14-
8
0
3
"MENU": EXIT
6. Before Repair
The following phenomenons do not mean that the TV set has fault.
Please check it according to the following methods before repair.
Phenomenon
Reason
No image and sound
The power switch is on the state of off.
No signal
Whether chosen the right channel; auto
setup receiving channel again.
No sound
Whether the volume has been turned
down at the bottom; signals too weak;
the mute function is working.
Mosaic in the image
Whether the antenna has been adjusted
properly, and maybe the signals are too
weak. Whether the Antenna connect well.
Image too dark
Whether the brightness and contrast are
proper, and please adjust again.
Radio(FM/WB) noise
or no sound
Whether the FM ANTENNA CABLE has
been adjusted properly, and maybe the
Radio(FM/WB) signal weak.
Radio(AM) noise or
no sound
Maybe the Radio(AM) signal weak.
NOAA no function
Whether the FM ANTENNA CABLE has
been adjusted properly, and maybe the
WB signal weak.
-15-
7. Technical Parameter
Radio technical parameters
Receiving frequence rang:
AM 520KHz~1710KHz
FM 87.5MHz~108MHz
WB
162.400MHz 162.425MHz 162.450MHz
162.475MHz 162.500MHz 162.525MHz
162.550MHz
Step: AM 10KHz
FM 100KHz
Sensitivity:
AM 65dB FM 23dB WB 2 V
Signal-noise ratio: AM 30dB FM 40dB WB 30dB
TV technical parameters
ATSC frequency: 54MHz~803MHz
NTSC receiving frequency: 55.25MHz~801.25MHz
TFT LCD screen technical parameters
Screen picture mode: 16:9 (7 )
Resolution: 1440(H) 234(V)
Technical parameters
Power supply: AC INPUT 120V 60Hz
DC INPUT 12V/2A
Audio output: 1.5W<10% distortion
Power Consumption: 18W
Outer Dimension: 371mm 350mm 80mm
Weight: about 2800g
NOTE:
Battery is for time backup only.The clock and alarm memory will be
retained during a power interruption.During battery backup operation
the display will not light up,but the correct time will be maintained
internally.
-16-
Warning
This manual is for reference only. No further notice is made if there
is any change of the information. The authority of interpretation
belongs to manufactory if there is any information is missing or not
detailed.
Warning
There is no component that can be repaired in the TV set. Do not try
to disassemble and improve the TV set. There is high voltage inside
and it is very dangerous. The maintenance and adjustment work
should be carried through by professional people.
-17-