1
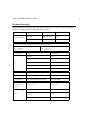
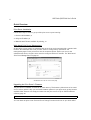
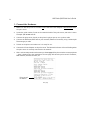
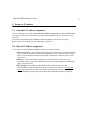
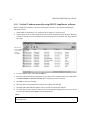
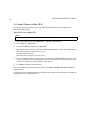
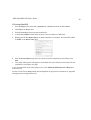
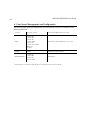
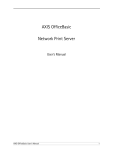
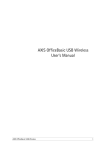
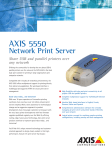
AXIS 540+/AXIS 560 User’s Guide
1
AXIS 540+/AXIS 560
User’s Guide
USER’S GUIDE AXIS 540+/AXIS 560| R1.0| Part nr: 21376 |Copyright © Axis Communications 2004
AXIS 540+/AXIS 560 User’s Guide
TABLE OF CONTENTS
Regulatory Information 3
Hardware Inventory 5
Quick Overview 6
Physical Description 7
Connect the Hardware 8
Assign an IP address 9
Automatic IP address assignment 9
Manual IP address assignment 9
Verify access to the print server’s web pages 12
Make Network Printers available for printing 13
Install Printers in Windows 2000/XP/Server 2003 and NT 13
Install Printers in Windows 98 and Windows Me 18
Install Printers in UNIX/Linux 20
Install Printers in Mac OS X 22
Print Server Management and Configuration 24
Web-based Print Server Management 25
Managing multiple print servers with AXIS ThinWizard software 26
Using the Test Button 27
Technical Specifications 28
2
AXIS 540+/AXIS 560 User’s Guide
Regulatory Information
Safety Notices: take some time to read through the safety notices before installing the print server. Please observe all safety markings and instructions
when using this product.
Observe “Important:” in the text to avoid operational impairment. Do not proceed until you have fully understood the implications.
Electromagnetic Compatibility (EMC)
USA
This equipment has been tested and found to comply with the limits for a Class B digital device, pursuant to Part 15 of the FCC Rules. These limits are
designed to provide reasonable protection against harmful interference in a residential installation. This equipment generates, uses and can radiate radio
frequency energy and, if not installed and used in accordance with the instructions, may cause harmful interference to radio communications. However,
there is no guarantee that interference will not occur in a particular installation. If this equipment does cause harmful interference to radio or television
reception, which can be determined by turning the equipment off and on, the user is encouraged to try to correct the interference by one or more of the
following measures:
- reorient or relocate the receiving antenna
- increase the separation between the equipment and receiver
- connect the equipment into an outlet on a circuit different from that to which the receiver is connected
- consult the dealer or an experienced radio/TV technician for help. Shielded (STP) network cables must be used with this unit to ensure compliance with
the class B limits.
Europe
This digital equipment fulfils the requirements for radiated emission according to limit B of EN55022, and the requirements for immunity according to
EN55024 residential, commercial, and light industry. Compliance is not valid for unshielded network cables.
Japan
This is a class B product based on the standard of the Voluntary Control Council for Interference from Information Technology Equipment (VCCI). If this is
used near a radio or television receiver in a domestic environment, it may cause radio interference. Install and use the equipment according to the
instruction manual. Compliance is not valid for unshielded network cables.
Australia
This electronic device meets the requirements of the Radio communications (Electromagnetic Compatibility) Standard 1998 AS/NZS 3548. Compliance is
not valid for unshielded network cables.
Liability: Every care has been taken in the preparation of this manual; if you detect any inaccuracies or omissions, please inform your local Axis office,
which can be found on the cover of this document. Axis Communications AB cannot be held responsible for any technical or typographical errors and
reserves the right to make changes to the product and manuals without prior notice. Axis Communications AB makes no warranty of any kind with regard
to the material contained within this document, including, but not limited to, the implied warranties of merchantability and fitness for a particular
purpose. Axis Communications AB shall not be liable nor responsible for incidental or consequential damages in connection with the furnishing,
performance or use of this material.
Axis’ Trademarks: AXIS IP JumpStarter, AXIS ThinWizard, axinstall, AXIS Print Monitor.
Other Trademark Acknowledgments: Adobe Acrobat Reader, Aix, Apple, ARP, BOOTP, Debian, Ethernet, EtherTalk, IBM, LAN Manager, LAN Server,
Macintosh, Microsoft, Novell NetWare, OS/2, OS/400, AS/400, Red Hat, Solaris, SuSe, UNIX/Linux, Windows, are registered trademarks of the respective
holders.
Support Services: should you require technical assistance, please contact your Axis dealer. If your questions cannot be answered immediately, your Axis
dealer will forward your queries through the appropriate channels to ensure you a rapid response. On the Internet you can find on-line manuals, technical
support, software updates, application software, corporate information, etc.
Patent information: Axis AB has intellectual property rights relating to technology embodied in the product that is described in this document. In
particular, and without limitation, these intellectual property rights may include one or more of the patents listed at http://www.axis.com/patent.htm and
one or more additional patents or pending patent applications in the US and other countries.
USER’S GUIDE AXIS 540+/AXIS 560| R1.0| Part nr: 21376 |Copyright © Axis Communications 2004
3
AXIS 540+/AXIS 560 User’s Guide
4
Before You Start
This guide applies to the AXIS 540+/AXIS 560 with firmware version 6.48 and higher. The
following operating systems are covered in this guide:
• Windows 98, Windows Me, Windows NT, Windows 2000, Windows XP, Windows Server
2003
• Mac OS X
• UNIX/Linux
Note:
Installation instructions in this book cover the above operating systems over TCP/IP. See the AXIS
540+/AXIS 560 User’s Manual, located on www.axis.com for installation instructions regarding
•
Windows over NetBIOS/NetBEUI
•
NetWare over IPX/SPX and TCP/IP
•
MacOS over Appletalk
The instructions in this guide describe settings found in a new and unconfigured AXIS
540+/AXIS 560 with firmware version 6.48 and higher. To reload the default parameters, you
can perform a Factory Default, which will restore all settings to their default values. See Using the
Test Button on page 27 for instructions.
AXIS 540+/AXIS 560 User’s Guide
5
Hardware Inventory
Unpack and check all the items using the following check list. Contact your dealer if anything is
missing or damaged. All packing materials are recyclable.
Hardware
Axis Print Server
Model
Part number
Power Adapter
AXIS 560
0053-xxx-02
PS-H
AXIS 540+
0058-xxx-02
PS-H
There are different versions of this product depending on the hardware platform. To determine which version you
have, please check the product number located on the label on the print server:
AXIS 540+
version 2 - 0058-xxx-02
version 1 - 0058-xxx-01
Power Adapter
AXIS 560
version 2 - 0053-xxx-02
version 1 - 0053-xxx-01
Model
PS-H Part No.
Australia
19111
Europe
19108
Korea
19112
UK
19109
USA / Japan
19110
Media
Title
Part Number
CD
AXIS Network Product CD
rev 1.3 and up
Printed Material
AXIS 540+/AXIS 560 User’s Guide
rev 1.0 and higher
PS-H
Optional accessories
(not included in
Description
package)
Parallel Printer Cable for AXIS 560
Cables
Part Number
13360
Centronics to Mini Centronics Cable for
16453
AXIS 540+
Parallel Printer Cable for AXIS 540+
13522
AXIS 540+/AXIS 560 User’s Guide
6
Quick Overview
Print Server Installation
Follow these steps in order to get your Axis print server up and running:
1. Connect the Hardware, 8
2. Assign an IP address, 9
3. Make Network Printers available for printing, 13
Web-based Print Server Management
All Axis print servers contain an embedded web server that can be accessed with a standard web
browser. The embedded web server provides access to configuration, information and
management pages for the print server and the connected printer. Before you can use the
embedded web server, the print server must be configured with an IP address. See “Web-based
Print Server Management” on page 25.
Axis Network Print Server Internal web page
Upgrading the Print Server’s Firmware
The print server’s firmware* is stored in its Flash memory. Flash memory allows data to be erased
and re-written, which is why you can install firmware updates in your print server as they become
available. New firmware can simply be loaded into the print server via ftp or AXIS ThinWizard
software, page 26.
* Firmware is internal print server software that determines its functionality.
You can obtain all print server firmware free of charge from www.axis.com or your local dealer.
AXIS 540+/AXIS 560 User’s Guide
7
Physical Description
AXIS 540+
Ethernet
connector
Parallel printer port (LPT1)
Power Adapter
connector
Network
indicator
Power
indicator
Test button
AXIS 560
Serial printer port (COM1)
Power
indicator
Network
Indicator
Parallel printer port (LPT1)
Parallel printer port (LPT2)
Test button
Ethernet
connector
Backside label of print server
Serial number same as
MAC/Ethernet address; e.g.
00408c181cf0 =
00-40-8c-18-1c-f0 (Windows)
00:40:8c:18:1c:f0 (Unix/Mac)
Power Adapter
connector
AXIS 540+/AXIS 560 User’s Guide
8
1. Connect the Hardware
1. Make sure that the printer is switched off and that the Power Adapter is disconnected from
the print server.
2. Locate the serial number, found on the underside label of the print server, and write it down.
Example: S/N: 00408c181cf0
3. Connect the print server directly to the printer’s printer port or use a printer cable.
4. Connect the AXIS 540+/AXIS 560 to your network (Ethernet Connector), using a twisted pair
RJ45 category 5 cable.
5. Switch on the printer and make sure it is ready for use.
6. Connect the Power Adapter to the print server. The Network Indicator will start flashing when
the print server is correctly connected to the network.
7. Wait 1 minute and press the test button once. A test page will be printed on the connected printer
— keep it handy during the installation. The test page will show the print server’s IP address,
MAC address, firmware number, etc.
Print server’s
IP address
Test page
AXIS 540+/AXIS 560 User’s Guide
2. Assign an IP address
2.1 Automatic IP address assignment
If you are working in a network with automatic IP address assignment (e.g. DHCP, RARP, BOOTP,
Auto-IP), your print server will obtain an IP address automatically when you connect it to the
network.
You will find the print server’s IP address on the test page you printed out on page 8,
go to Verify access to the print server’s web pages, on page 12
2.2 Manual IP address assignment
If you wish to set the IP address manually, choose one of these methods:
• AXIS IP JumpStarter - Axis software that locates print servers on your network and allows
you to assign an IP address to them. Recommended for small offices and local networks.
Refer to Set the IP address manually using AXIS IP JumpStarter software on page 10 for
instructions.
• ARP/Ping - use this alternative method to set the IP address for each print server
individually. Refer to Alternative method for setting the IP address manually: ARP/Ping on
page 11 for instructions.
• AXIS ThinWizard for Windows 2000, Windows XP and Windows Server 2003.
AXIS ThinWizard is Axis software that assists in setting the IP address of several print
servers. Recommended for large organizations and enterprise networks.
Refer to Managing multiple print servers with AXIS ThinWizard software, on page 26
9
AXIS 540+/AXIS 560 User’s Guide
10
2.2.1 Set the IP address manually using AXIS IP JumpStarter software
AXIS IP JumpStarter software is used for locating print servers on your LAN and assigning IP
addresses to them.
1. Install AXIS IP JumpStarter. It is available free of charge on www.axis.com
2. Select a print server from the serial number list in the IP JumpStarter dialog window. The serial
number of the print server is displayed on the printed label on its backside and on the printed
test page.
Click here to
access the
print server’s
internal
web pages.
3. From the Server menu, select Set IP Address.
4. Click the radio button that corresponds to your choice of IP setting method. You must define
the Subnet Mask and Default Gateway when assigning a static IP address.
5. Click OK to save your settings.
6. Enter the server root password (by default set to pass), and click OK.
7. The AXIS 540+/AXIS 560 will appear in the list with the assigned IP address.
8. To verify that you have access to the print server’s web pages, highlight the print server in the
list and select Server Home Page from the Server menu.
Note:
If your print server does not appear in the serial number list, refer to the AXIS IP JumpStarter
online help files!
AXIS 540+/AXIS 560 User’s Guide
11
2.2.2 Alternative method for setting the IP address manually: ARP/Ping
Refer to the appropriate section below to assign an IP address to your AXIS 540+/AXIS 560 using
ARP/Ping:
Windows
1. Open a Command Prompt and enter the following commands:
Syntax
1. arp -s <IP address> <Ethernet address>
2. ping <IP address>
Example
arp -s 192.168.3.191 00-40-8c-18-1c-f0
ping 192.168.3.191
2. The host will return reply from 192.168.3.191, or a similar message. This indicates that
the IP address has been set and that communication is established.
3. Next, log in to the print server’s web pages (page 12) and define the Default Router and Subnet
Mask of your network: choose Admin | Network Settings | Detailed View | TCP/IP.
DHCP, Auto-IP, BOOTP and RARP (...Enabled) must first be set to No!
UNIX/Linux, Mac OS X
1. Open a Terminal window and enter the following commands:
1.
2.
Syntax
arp -s <IP address> <Ethernet address> temp
ping <IP address>
Example
arp -s 192.168.3.191 00:40:8c:18:1c:f0 temp
ping 192.168.3.191
2. The host will return 192.168.3.191 is alive, or a similar message. This indicates that
the address has been set and that communication is established.
3. Next, log in to the print server’s web pages (page 12) and define the Default Router and Subnet
Mask of your network: choose Admin | Network Settings | Detailed View | TCP/IP.
DHCP, Auto-IP, BOOTP and RARP (...Enabled) must first be set to No!
Notes:
•
The Ethernet Address/MAC address is the same as the serial number, found on the print server’s underside label.
Enter the Ethernet Address in the same format as in the examples above.
•
Setting the IP address with arp and ping is only possible during the first ten minutes after re-booting the
print server. Re-boot the print server by disconnecting and then re-connecting its power supply.
•
When you execute the ping command for the first time, you may experience a significantly longer response
time than usual.
•
You need root privileges on your UNIX/Linux and Mac system in order to execute the arp command (refer to
the User’s Manual for more information).
•
Use the command man arp to get a list of arp commands in UNIX/Linux.
AXIS 540+/AXIS 560 User’s Guide
12
2.3 Verify access to the print server’s web pages
Follow these instructions to verify that the IP address has been set and that you can access the
print server’s web pages:
1. Open a web browser (e.g. Internet Explorer, Netscape).
2. In the web browser’s Location/Address field, enter the print server’s IP address
(displayed on the test page or manually configured) and press Enter.
3. If the Network Print Server page appears in your web browser, the IP address has been set
correctly. Proceed to Make Network Printers available for printing, on page 13.
Note:
Use a web browser with JavaScript support.
See Web-based Print Server Management, on page 25 for more information on the print server’s internal web pages.
AXIS 540+/AXIS 560 User’s Guide
3. Make Network Printers available for printing
When you have assigned an IP address to your AXIS 540+/AXIS 560, proceed with making your
network printer available for printing:
Install Printers in Windows 2000/XP/Server 2003 and NT, on page 13
Install Printers in Windows 98 and Windows Me, on page 18
Install Printers in Mac OS X, on page 22
Install Printers in UNIX/Linux, on page 20
Note:
For printing from other platforms and protocols, see the AXIS 540+/AXIS 560 User’s Manual
on www.axis.com
3.1 Install Printers in Windows 2000/XP/Server 2003 and NT
Windows 2000/Windows XP/Windows Server 2003
1. Windows XP/Windows Server 2003:
Go to Start | Printers and Faxes and click the Add a Printer icon to start the Add Printer
Wizard. Click Next.
Windows 2000:
Go to Start | Settings | Printers and click the Add Printer icon to start the Add Printer
Wizard. Click Next.
2. In the wizard, select Local Printer attached to this computer. Make sure the Automatically
detect and install my Plug and Play printer check box is not checked. Click Next.
13
14
AXIS 540+/AXIS 560 User’s Guide
3. Click the Create a new port radio button and select Standard TCP/IP Port from the list.
Click Next and the Add Standard TCP/IP Printer Port Wizard starts. Click Next.
4. Enter the IP address of the print server in the Printer Name or IP Address field
(Example: 192.168.3.191)
The Port Name field will be filled in automatically when you enter the IP address.
Optionally, add the port you want to use as a suffix: _LPT1, _LPT2 or _COM1
(Example: 192.168.3.191_LPT1) Click Next.
Optional:
Add _Port
as a suffix
AXIS 540+/AXIS 560 User’s Guide
5. In the Additional Port Information Required window, select the Device Port you want to use;
LPT1, LPT2 or COM1. Click Next then Finish.
6. Select Manufacturer and Printer from the driver list. Click Next. If you already have the
printer’s driver installed, you will be asked whether to keep it or replace it.
7. Click Next. Supply a name for the printer and choose whether you want to make it your
default printer. Click Next.
15
16
AXIS 540+/AXIS 560 User’s Guide
8. Choose whether you want to share the printer with other network users, print a test page,
etc. Select the appropriate radio button and click Next and Finish.
9. Print a test page to verify your installation. You have now completed the installation.
AXIS 540+/AXIS 560 User’s Guide
Install Printers in Windows NT 4:
1. Go to Start | Settings | Printers | Add Printer. Select My Computer and click Next.
2. From the Available Ports list, choose the appropriate printer port, which will appear as the IP
address or host name of the print server. If it doesn’t appear in the list, click Add Port.
3. Choose LPR Port from Available Printer Ports and click New Port.
Tip:
If the LPR Port doesn’t
appear, install the
Windows TCP/IP
Printing Service,
delivered with the
Windows NT4 OS.
4. Type the print server’s IP address (or host name) in the field Name or address of server providing
lpd (IP address example: 192.168.3.191). Enter which port to use in the field Name of printer
or print queue on that server (Example: LPT1). Click OK and then Close.
5. The added print server will now appear in the Available Ports list. Click Next, choose a driver
and finish the installation as usual.
17
AXIS 540+/AXIS 560 User’s Guide
18
3.2 Install Printers in Windows 98 and Windows Me
AXIS Print Monitor is the recommended tool to use for network printing in Windows 98 and
Windows Me. Follow the instructions below to use the standard Windows method (TCP/IP over
LPR) with AXIS Print Monitor.
Note:
AXIS Print Monitor must be installed on all printing clients.
1. Install AXIS PrintMonitor on all workstations that will print via the Axis print server.
AXIS PrintMonitor is available free of charge on www.axis.com
2. Next, start the Windows Add Printer Wizard: select Settings | Printers from the Start menu
and double-click the Add Printer icon.
3. After clicking Next in the first dialog, the Wizard asks you to select between Local Printer
and Network Printer. You must select Local Printer as the print server emulates a local
printer port. Click Next.
4. Choose the appropriate print driver for your printer. If the desired print driver already appears
within the displayed Manufacturers and printers lists, highlight your selection, click Next
and proceed directly to step 7. It is only necessary to perform steps 5- 6 if your printer does
not feature in the model list.
5. Click the Have Disk... button. Insert the printer driver diskette/CD into the appropriate disk
drive of your computer.
6. Select the type of printer you want to install from the diskette/CD and click Next.
7. If you already have the printer’s driver installed, you will be asked whether to keep it or to
replace it.
8. Select the Printers@TCP/IP Port and click Next.
9. Enter an appropriate name for your printer and choose whether you want it to be the default
printer. Click Next.
10. In the next window, do not order a Test Page to be written, just click Finish.
11. The printer you have defined will now be displayed in the Printers Folder. Right-click the
printer object and select Properties.
12. Click the Details tab within the Properties page and then click Add Port to display the
available monitors.
13. Click the radio button “other”. Select AXIS Port and then click OK.
14. Select LPR (TCP/IP) as your choice of protocol and click OK.
AXIS 540+/AXIS 560 User’s Guide
15. Enter the IP address or host name of your print server (Example: 192.168.3.191)
In the Logical Printer Name field, enter the port you wish to use; LPT1, LPT2 or COM1. Click
OK.
16. The TCP/IP port will then be added automatically to the list of available ports. Click Apply and
OK.
17. You may now configure the port, as described below. The Axis Printer Port is now installed.
Configure the Port (optional):
1. Select Settings | Printers from the Start menu and highlight the printer you wish to
configure. Select File | Properties | Details and click Port Settings.
2. Choose whether error condition pop-up messages are to be displayed by checking the box in
the Configure AXIS Ports dialog. Define the frequency at which the error messages should be
displayed after retry. Click OK.
Note:
Even if the desired printer is available in the Manufacturers and Printers lists, you are
advised to use the print driver provided with the printer. This assures you of the latest driver
software.
If you need additional information, refer to the AXIS 540+/AXIS 560 User’s Manual on
www.axis.com
Proceed to Print Server Management and Configuration on page 24 for information on supported
management and configuration tools.
19
AXIS 540+/AXIS 560 User’s Guide
20
3.3 Install Printers in UNIX/Linux
The following printing tools are recommended for lpd printer configuration:
Operating
system
Recommended
printing tool
Instructions
AIX
SMIT
Type the command smit in a Terminal window, then click Print
Spooling.
Debian
printtool
Type the command printtool in a Terminal window to start
the graphical version.
HP UX
Sam
Type the command sam in a Terminal window, click Printers and
Plotters and then click Actions and Add_Remote Printer/Plotter.
Red Hat
printconf
- Type the command printconf-gui in a Terminal window to
start the graphical version.
- For a text-based application where the X Window System isn’t
installed, log in as root and type the command
/usr/sbin/printconf-tui from a shell prompt.
Solaris 9
Printer Administrator
Type the command /usr/sadm/admin/bin/printmgr in
a Terminal window.
SuSE
YaST2
From the Desktop, select YaST2 | In Yast Control Center |
Hardware | Edit Printers
AXIS axinstall script
The axinstall script is an installation and management utility for Axis print servers that supports
lpd, ftp, PROS A and PROS B print methods. For more advanced printing functionality, use the
PROS filter or named pipe methods.
With this installation script, the printer connected to the print server will appear as though it is
directly connected to the host print spooler. If you want to integrate your AXIS 540+/AXIS 560
into your host spooler, you can use the Axis installation script axinstall, or perform a manual
integration.
Follow these instructions to download axinstall to your host:
1. Open a Terminal window and log in to the AXIS 540+/AXIS 560 by typing:
ftp <IP address> or ftp <host name>
2. Enter root as the default user id and pass as the default Administrator password.
AXIS 540+/AXIS 560 User’s Guide
3. Enter the following command to download the axinstall script (make sure you use the ASCII
transfer mode):
get axinstall
4. Exit from the ftp program and enter the following command to install the AXIS 540+/AXIS 560
using the axinstall script. Follow the instructions that appear when the script has started.
sh axinstall (or sh ./axinstall depending on your system)
Note:
•
LPRng is not supported by axinstall
•
You need root privileges on your UNIX/Linux in order to run axinstall
•
PROS is a protocol developed by Axis Communications. It comes in two versions;
named pipe (PROS A) and filter (PROS B).
If you need additional instructions, please refer to the AXIS 540+/AXIS 560 User’s Manual which
is available on www.axis.com
Proceed to Print Server Management and Configuration on page 24 for information on supported
management and configuration tools.
21
AXIS 540+/AXIS 560 User’s Guide
22
3.4 Install Printers in Mac OS X
This section describes setting up your AXIS 540+/AXIS 560 for printing in the Macintosh
environment (Mac OS X).
AppleTalk Printing (MacOSX)
Note:
For installation on an older Mac OS, refer to the User’s Manual on www.axis.com
1. Start Print Center (from Go | Applications | Utilities | Print Center)
2. Select Printers | Add Printer...
3. From the Printer List dialog, select AppleTalk.
4. Now, the port (or ports) of your AXIS 540+/AXIS 560 will appear in the list of available printers.
Each port is shown as <host name>_<port>.
Example: AXIS181cf0_LPT1
Select the print server port you want to use.
5. Select an appropriate printer driver for your printer from the Printer Model drop-down list. If
it is not available in the list, select Generic. You can also browse for a printer driver on your
computer or network by selecting Other... from the list.
6. Click Add to complete the installation.
If you need additional instructions, please refer to the AXIS 540+/AXIS 560 User’s Manual on
www.axis.com
Proceed to Print Server Management and Configuration on page 24 for information on supported
management and configuration tools.
AXIS 540+/AXIS 560 User’s Guide
IP Printing (MacOSX)
1. From the Apple menu, select Go | Applications | Utilities and start the Print Center.
2. Click Add in the Printer List.
3. Select IP Printing from the top drop-down menu.
4. In the Printer’s Address field, enter the print server’s IP address or DNS name.
5. Making sure the Use default queue on server checkbox is unchecked, and enter LPT1, LPT2
or COM1 in the Queue name field:
6. From the Printer Model drop-down list, select the printer manufacturer and model. Click
Add.
7. Your newly added printer will appear in the Printer List as the default printer (bold). Test the
installation by printing a test page.
If you need additional instructions, please refer to the AXIS 540+/AXIS 560 User’s Manual on
www.axis.com
Proceed to Print Server Management and Configuration on page 24 for information on supported
management and configuration tools.
23
AXIS 540+/AXIS 560 User’s Guide
24
4. Print Server Management and Configuration
The following table shows the management and configuration tools that are available for the
AXIS 540+/AXIS 560.
Protocol
Operating System
Configuration/Management method
TCP/IP
Windows 98
Windows Me
Windows NT
Windows 2000
Windows XP
Windows Server 2003
UNIX/Linux
Mac OS X
Web browser*, AXIS ThinWizard**, FTP, Telnet
IPX/SPX
NetWare
AXIS NetPilot, Novell Utilities
NetBIOS/NetBEUI
Windows 98
Windows Me
Windows NT
Windows 2000
AXIS NetPilot
* Described in this guide. See the AXIS 540+/AXIS 560 User’s Manual for all other protocols, operating systems and tools.
** AXIS ThinWizard 3.0 is Windows 2000, Windows XP and Windows Server 2003 compatible.
AXIS 540+/AXIS 560 User’s Guide
25
4.1 Web-based Print Server Management
Follow the instructions below to access the built-in Web pages of your AXIS 540+/AXIS 560.
1. Enter the print server’s IP address (or host name) in the Location or Address field of your web
browser (Example: http://192.168.3.191) and press Enter.
Admin | General Settings | Change=> General
root
pass
****
The AXIS 540+ Web interface
2. The Printer Overview page will appear. Click the Admin button to access the Administration
Web pages.
3. You may be prompted for a password, enter the default user name root and the default password
pass. Click OK.
Notes:
•
It is highly recommended that you change the default password to prevent unauthorized
access to the print server’s configuration pages. This is done from Admin | General Settings
=> Change. Go to the Root Password field.
•
Use a Web browser with JavaScript support and make sure Java is enabled.
AXIS 540+/AXIS 560 User’s Guide
26
4.2 Managing multiple print servers with AXIS ThinWizard software
AXIS ThinWizard software allows you to manage and upgrade multiple Axis products. You can
find, install, monitor, configure and upgrade your Axis print servers remotely in any TCP/IP
network using a standard web browser. AXIS ThinWizard 3.0 and higher is Windows 2000,
Windows XP and Windows Server 2003 compatible.
Install AXIS ThinWizard:
AXIS ThinWizard software is available free of charge on www.axis.com. Install AXIS ThinWizard
on a designated computer on your network. When you want to use AXIS ThinWizard for
management purposes, you can access it via any standard web browser. To install, follow the
instructions in the Installation Wizard. During the installation, you will be asked to enter a user id
and a password, these will be used when logging in to AXIS ThinWizard, please take a note of
them.
How to use AXIS ThinWizard:
1. Start a web browser on a computer in your network.
2. Enter the IP address (or host name) of the computer where you installed AXIS ThinWizard.
3. Enter the user id and password, specified during the installation of AXIS ThinWizard (see above)
and click the Log in button.
4. The first time you use ThinWizard, set the Preferences to reflect your network environment.
Select a network group from the list on the Manage Network page. If the list is empty, you must
first create a group. Click the Network Groups tab and follow the instructions.
Caution!
The following parameters must be enabled in the print server’s web interface for AXIS ThinWizard to function properly:
- FTP: click Admin| Network Settings| Detailed view | TCP/IP | FTP Enabled => Yes.
- SNMP: click Admin | Network Settings | Detailed View | SNMPv1 Enabled => Yes.
These parameters are enabled by default in the print server.
AXIS 540+/AXIS 560 User’s Guide
4.3 Using the Test Button
The following operations can be performed by pressing the test button on the print server in
different sequences.
Print a Test Page:
- Press the test button once to print a test page.
Print a Parameter List:
- Press the test button twice to print a list of all parameters.
Perform a Factory Default:
1. Remove the external power supply to switch off the print server.
2. Press and hold down the test button, while you reconnect the external power supply.
3. Continue to hold down the test button until the network indicator remains constantly lit. This
should take about 20 seconds.
4. Restart the print server by disconnecting and reconnecting the external power supply.
Important!
For print servers with firmware version 6.43 and higher, a Factory Default will reset all AXIS
540+/AXIS 560 parameters and settings to their default values and erase all configuration.
27
AXIS 540+/AXIS 560 User’s Guide
28
Technical Specifications
Supported Printers:
All printers except host-based printers (also known as GDI, PPA or Windows-based printers).
Supported Systems:
Microsoft Windows:
Windows NT4, Windows 98, Windows Me, Windows 2000, Windows XP, Windows Server 2003.
Print Methods: NetBEUI, LPR, Raw TCP.
Novell NetWare:
NetWare 3.11, 3.12, 4.10, 4.11, 5 and above. Supports bindery emulation and NDS. Up to 16
bindery file servers and 96 print queues are served. Supports user messages. NDPS supported by
versions 4.11 and above.
Print Methods: NDPS, RPRINTER/NPRINTER, PSERVER.
Additional Systems:
All computers supporting the TCP/IP suite of protocols, including BSD systems: BSD 4.2, 4.3, 4.4,
SunOS4 (SOLARIS 1.x), DEC Ultrix etc.
System V systems:
R3, R4, AT&T.Interactive, SCO, SUNOS5 (Solaris 2.x), HP-UX, Silicon Graphics IRIX, DEC Alpha
OSF/1, IBM AIX, BULL (BOS, AIX), Linux.
Apple EtherTalk:
Print Method: AppleTalk Phase 2.
WWW:
Netscape Communicator 4.7 and above, Internet Explorer 4.0 and above, Mozilla 1.0 and above.
Supported Protocols:
Windows :
NetBIOS/NetBEUI, WINS, DNS/DHCP, LPR, Raw TCP.
NetWare:
IPX/SPX, SAP, RIP, RIP2, OSPF, NLSP, and NCP (extended with NDS), TCP/IP, UDP, NLSP, DIAG, LIP.
AXIS 540+/AXIS 560 User’s Guide
TCP/IP:
DNS/DHCP, BOOTP, ARP, RARP, DHCP, ICMP, IGMP, TCP/IP, UDP, HTTP, LDP, FTP, Telnet, Reverse
Telnet, PROS.
Apple EtherTalk:
AAPR, ATP, DDP, NBP, PAP, RTMP, ZIP.
NetWare:
Encrypted passwords, NetWare Packet Signature Level 1, 2, 3.
UNIX/Linux:
Root password (default user = root, default password = pass), User access list and printer access.
Network Management:
Print server/job/printer status presentation and management via NWAdmin/PCONSOLE.
AXIS ThinWizard for monitoring, configuration and firmware upgrade.
Available languages in print server’s web interface:
English, French, German, Italian, Japanese, Spanish.
Network Connection:
All standard Ethernet networks: RJ-45 connector (Category 5 or 6, sheilded twisted pair cable) for
10 baseT Ethernet with full duplex. Supports IEEE802.2, IEEE802.3, SNAP and Ethernet II frame
types simultaneously.
Logical Printers:
Logical printer ports can be programmed to perform auto ASCII-to-PostScript conversion, string
before and after job, string substitution, alternative output and character set conversion.
Printer Ports:
• AXIS 540+: Parallel port: One 36-pin Centronics connector. Highspeed IEEE 1284 compliant
with ECP support and throughput of 1 MB/sec.
• AXIS 560: Parallel port: Two 25-pin DSUB connector. Highspeed IEEE 1284 compliant with ECP
support and throughput of 1 MB/sec.
Serial port: 9-pin DSUB connector, RS-232, XON/ XOFF or RTS/CTS, data rates up to 115.200 baud
29
AXIS 540+/AXIS 560 User’s Guide
30
Power Consumption:
AXIS 540+: Maximum 3W
AXIS 560: Maximum 5W
Power provided by Power Adapter type PS-H: 5.1V DC 2000 mA
Dimensions:
Height x Width x Depth
AXIS 540+: 1.1in (27 mm), 2.2in (56 mm), 4.7in (118 mm)
AXIS 560: 1.1in (29 mm), 6.3in (160 mm), 5.1in (129 mm)
Weight
AXIS 540+: 0.22 lb (100g)
AXIS 560: 0.64 lb (280g)
Environmental:
Temperature:
40 - 105 °F (5 - 40 °C)
Safety:
EN 60950, approved power supplies for all countries.
Hardware
32-bit 100 MHz AXIS ETRAX 100 LX RISC Controller, 2 MB Flash memory, 8 MB RAM.
Front Panel
2 LED indicators for Power and Network.
Test button for information printouts.
All specifications are subject to change without prior notice.