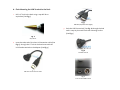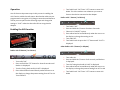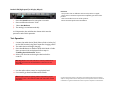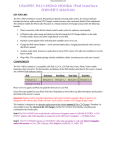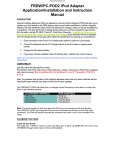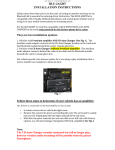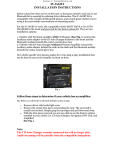
1
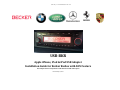
Courtesy of:DiscountCarStereo.com
USB-BKR
Apple iPhone, iPod & iPad USB Adapter
Installation Guide for Becker Radios with AUX Feature
This adapter works on any Becker radio that has an AUX menu option
Revised: May 8, 2015
Introduction:
Just because you drive an older car does not mean you have to
settle for old technology. IPods, Smartphones, iPods etc. let you
enjoy music at the beach, at a picnic, in the back yard and in your
car. The USB-BKR works on all Becker Radios that has an AUX
setting in the user menu and connecting the adapter requires
sacrificing the CD Changer. From a single USB terminal on or near
the dash, the user can connect, play and charge all Apple devices
and the Galaxy S4 without sacrificing the look and feel of the
dashboard components. With the storage capacity of most
portable devices sacrificing the CD Changer should be an easy
decision.
Warning! The blue and green iso plugs are present only if there is a CD
Changer or another accessory connected to the radio. Disconnecting
these plugs will permanently disable that accessory.
Fig. 1
Installation:
Comand Radio Connectors
Warning! Although not critical, we recommend disconnecting the car
battery. But before anything locate and record the radio safe code. The
radio code, otherwise the radio will not operate upon reconnection.
1.
Remove radio from the dashboard to gain access to the
connectors.
2. A pair of special removal tools (See Fig. 2) is required to
remove these radios.
3. To remove the radio, slide both tools into the slots to the
second detent position. Withdraw the radio by pulling
outwards.
4. With radio removed disconnect the blue (C-3) and green
(C-2) plugs from Radio connector (See Fig. 1 )
Fig. 2
Radio removal Tools
5. Connect the blue and green iso plug on the adapter to the
C-3 and C-2 slots vacated in step 4
6. Decide where and how to mount the USB terminal.
A. Flush mount requires drilling a ¾” hole in the dash
B. USB mounting bracket without drilling (use this
option to mount the USB terminal wherever your
installation demands)
A. Flush Mounting the USB Terminal to the Dash
1.
Drill a ¾” hole in the dash using a step drill bit or
equivalent (See Fig. 3)
Fig. 5
USB Male (left) USB Female (Right)
3. Push the USB flat terminal ( See Fig. 6) through the hole
until it snaps in place and flush with mounting surface
(See Fig. 7)
Fig. 3
Step drill bit
2. Insert the male end of the short USB extension cable (See
Fig. 4) through the ¾” hole in dash and mate with the
USB Female terminal on the Adapter (See Fig. 5)
Fig. 6
Flat USB Terminal
Fig. 4
USB dash mount extension cable
Fig. 7
Flush mounted USB terminal
4. Tuck and secure extra wire from moving parts and test
operation (See Enabling the AUX section below)
B. Installing Optional Mounting Bracket without
drilling
Fig. 10
1.
Locate a flat surface in the location of choice that is within
6 ft. of radio to mount the optional bracket to surface
using adhesive/tape or screws. (See Fig. 8)
3. Push the flat USB terminal through the hole in the
mounting bracket until it snaps in place and flush (See Fig
11)
Fig. 8
Optional mounting bracket
2. Insert the male end of the USB cable through the hole in
bracket (See Fig. 9) and mate with Female USB terminal
from Adapter (See Fig. 10)
Fig. 11
4. Tuck and secure the extra wire away from moving parts
and test operation (See Enabling the AUX section)
Fig. 9
USB Male (left) USB Female (right)
Operation:
One of the most important steps in this process is enabling the
AUX function within the radio menu. Most Becker radios are preprogrammed to recognize a CD Changer connection and because
of that you must perform the following steps and change the
setting to “AUX” otherwise the radio will not recognize the
adapter.
Enabling the AUX function
5. Turn Radio back “ON” Press “CD” button to enter AUX
Mode. This is the mode to use whenever you want to
listen to the device connected to the adapter.
Radios with ☼ button: (i.e. BE6104)
1.
2.
3.
4.
Turn Radio “ON”
Press and hold the ☼ button for about 8 seconds.
Select AUX “ON/OFF” option.
Press either button located directly under the Arrows on
the display to change the setting to ON.
5. Turn radio OFF.
6. Turn Radio back ON press the “☼” button until “AUX” is
displayed.
Other Radios with ☼button (i.e. BE4602)
Radios with TP button: (i.e. CDR-220)
1. Turn radio "ON"
2. Press and hold the "TP" button for about 8 seconds until
Becker 1 is displayed.
3. Turn the Tuning Knob until AUX OFF is displayed.
4. Press either button located directly under the Arrows on
the display to change the present setting from OFF to ON.
Turn radio OFF.
1. Turn radio ON.
2. Press and hold the ☼ button for 8 seconds, until Becker 1
is displayed.
3. Turn the Tuning Knob until AUX OFF is displayed.
4. Press either button located directly under the Arrows on
the display to change the present setting from OFF to ON
5. Turn Radio back “ON” Press “CD” button to enter AUX
Mode
Radios with 3 Function buttons (i.e. Mexico Pro cc BE4527)
1. Turn radio ON.
2. Press and hold Function button #2 (center) for more than
4 seconds.
3. The accompanying menu appears on the display.
4. Press the multifunction button located directly under
“AUX” on the display to change the present setting from
OFF to ON.
5. The Setting is stored automatically. Press “CD” button to
enter AUX Mode
Nav Traffic Radios
1. Press the "Radio" button to enter Radio mode.
2. Press the "Navi" and "F10" simultaneously
3. Press "Next" until the AUX input, Changer Res screen
4. Press AUX to enable/disable.
Becker 4775 (Land Rover Traffic Pro)
1.
With the Radio "ON" press and hold the Tone button until
the sub-menu comes up.
2. Press the soft-key labeled “Aux” until the screen displays
“AUX Mode on”.
3. Press the Tone button to exit the menu.
4. To enter "AUX" mode, press the "CD" button and select
the "AUX" soft-key.
Sound 5 (BE7077 Sprinter Van)
1.
2.
3.
4.
Turn radio ON.
Press the dp repeatedly until EXT menu appear.
Turn Rotary control knob clockwise and select EXT AUX.
Press the CD button repeatedly until “AUX” is displayed
Cascade Pro (i.e. BE7941)
To activate the External Device mode
1. Turn radio ON.
2. Press the Ci) button on Radio
3. Turn the rotary control/push (OK) button
counterclockwise until System Settings appears at the top
right of the display
4. Press the rotary control/push (OK) button
5. Turn the rotary control /push (OK) button to select
External Device
6. Confirm selection by pressing the rotary control/push (OK)
button
7. Select “AUX” from list and turn it “ON”.
8. Exit menu
9. To listen to the “AUX” device, press the MEDIA button
10. Turn the rotary control /push (OK) button to “AUX” and
press the rotary control/push (OK) button
Becker DTM /High speed (i.e. BE-7892, BE7910)
1. Press the Sound button for more than 2 seconds
2. Press multifunction button “AUX”
3. Select Aux Mode on
4. The setting is stored automatically
Disclaimer
• This product has no affiliation with Porsche, Becker or Apple
• There are no warranties expressed or implied by purchase of this
product
• We’re not liable for misuse of this product.
•We recommend professional installation.
In CD Operation, the multifunction button AUX must be
pressed to select AUX operation
Test Operation
7. Connect the audio device (iPod, iPhone, iPad or Galaxy S4)
to the USB Terminal using their respective charging cables
8. The audio device will begin charging
9. Press the CD Button on Radio to enter AUX Mode. If radio
does not enter AUX mode please follow steps in
“Enabling the AUX function” above.
10. Select your favorite track using the devices built-in
controls.
Warning! Playlist and Track selection is *NOT* possible from
the radio. You must use the iPod built-in controls to access
music files.
11. Use the radio volume control to set playback level
12. If successful go ahead and Reinstall the Radio
Alert! Apple authentic Lighting cable is required for proper
operation. Knock –off Lightning cables will charge but will not
play music.
© 1995-15 Discount Car Stereo. All rights reserved. Information in this document is
subject to change without notice. Other products and companies referred to herein are
trademarks or registered trademarks of their respective companies or mark holders.