1
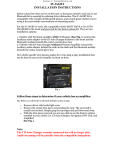
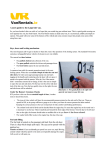
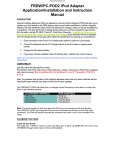
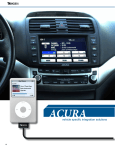
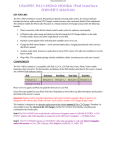
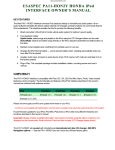
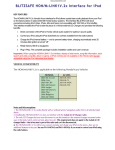
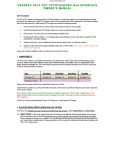
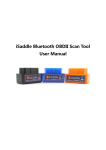
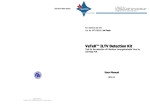
Courtesy of: DiscountCarStereo.com
BLU-JAGBT
INSTALLATION INSTRUCTIONS
Safety comes first when you’re on the road, so having an intuitive and easy to use
Bluetooth kit is essential to reducing driver distraction. The BLUE-JAGBT kit is
compatible with virtually all Bluetooth phones, and sounds great whether you’re
using it for your mobile conversations or streaming music.
For the BLU-JAGBT to work the compatible vehicle MUST HAVE A CD AUTO
CHANGER in the trunk and prewired for the factory phone kit is a plus.
They are two installation options:
1. Vehicles with Premium amplifier AND CD Auto Changer (See Fig. 1). The
Auxiliary audio adapter connects at the CD Auto Changer location in the trunk and
the Bluetooth module beneath the center console glove box
2. Vehicles with CD Auto Changer/without Premium Amplifier. The Auxiliary
audio adapter connects behind the radio in the dash and the Bluetooth module
beneath the center console glove box.
Our vehicle specific wire harness makes for a true plug-n-play installation that a
novice installer can complete in about an hour.
Fig. 1
Follow these steps to determine if your vehicle has an amplifier:
Tip: If there is a subwoofer on the back shelf the car has an amp
1.
2.
3.
In trunk, remove driver side brake light cover
Remove the carpet trim piece surrounding the rack. The surround is usually
not secured. Simply gasp the top edges and pull down and away.
With the trim piece removed you are now able to see full rack with factory
options: (i.e. CD Auto Changer, Navigation DVD Unit, Amplifier) See Fig. 1
Note:
The CD Auto Changer remains connected but will no longer play,
however wireless audio streaming will be possible from the paired
Smartphone.
Courtesy of: DiscountCarStereo.com
INSTALLING THE AUXILIARY ADAPTER
in vehicles equipped with Amplifier & CD Auto Changer
1.
2.
Remove carpet trim piece surrounding amp rack (see Fig. 1) and remove (4)
8mm nuts securing rack to the vehicle. Once removed, lean rack forward to
reveal all wiring and connections on the back
Locate Ai-NET connection (a thick black cable) between the CD Auto
Changer and Amp. See Fig. 2
Fig. 2
3.
4.
Remove cable from holding tab and separate (disconnect) by gasping the
ends and gently pull outward (do not twist)
Once separated the CD Auto Changer has the female end (right) and the Amp
has the Male end (left) See Fig. 3.
Fig. 3
5.
6.
Connect the Male end from step 4 to the Female Ai-Net port on the Auxiliary
Audio Adapter (AUX-JAGCD) See (See Fig. 4)
Connect the Female end from step 4 to the Male Ai-Net plug on the Auxiliary
Audio Adapter (AUX-JAGCD) (See Fig. 4)
Fig. 4
Courtesy of: DiscountCarStereo.com
7.
Route the included audio cable (4.5m) from trunk to the center console glove
box.
Routing the audio cable
The included 3.5mm Male to Female audio cable for trunk installs is 4.5m. long
(14.5 ft.)
1.
Start at the rear window on the driver’s side. Use a pry tool or similar to open
gap (1/2 inch) to allow the 3.5mm Male end through and into the trunk as
seen in Fig. 5
Fig. 6a
Fig. 6
Fig. 5
2.
With the cable through (See Fig. 6), go back to trunk and pull audio cable as
needed to connect to the 3.5mm jack on auxiliary Audio input adapter. (See
Fig. 6a)
3.
Return to vehicle and route to Female end to center glove box by concealing
under the seat backrest, seat cushion working your way towards the back
end of the center console as seen in Fig. 7, Fig. 8 and Fig. 9
Fig. 7
Fig. 8
Fig. 9
Courtesy of: DiscountCarStereo.com
4.
5.
6.
7.
Continue to use pry tool or fingers to push cable under center console until
you reach the area just below the center armrest storage bin.
To remove storage bin: Open the center armrest and remove 2 Philips head
screws from the latch cover, two more from the hinge at the rear and the
single screw on retainer bracket.
Lift storage bin and set aside.
User pry tool to open gap at the bottom of the center console to fish the audio
cable through
They are other ways to route the audio cable. The process outlined above should
be used as a guide.
Installing Bluetooth Module
The Bluetooth module is small enough to fit under the center armrest and is
powered by the factory prewired phone plug.
Note: If your vehicle is not prewired for the factory phone, an ignition and ground
wire must be wired to this location to power the Bluetooth module.
1.
The factory 10 (white) or 14-pin (yellow) phone plug is located at the rear of
the center console (See Fig. 10)
Fig. 10
2.
Mate the factory 10 or 14-pin plug to corresponding connector on the
harness included in kit (See Fig. 11)
Fig. 11
3.
4.
5.
Connect the 16-pin power harness to the Bluetooth module (See Fig. 12)
Secure the Bluetooth control button to dash within reach of driver and route
the cables to area below the center console
Crimp the pink and black wires on Control button to corresponding wires on
power harness(See Fig. 12)
Courtesy of: DiscountCarStereo.com
Fig. 12
6.
7.
8.
Connector the 3.5mm Female cable end (from step 3 above) to the 3.5mm
jack on 16-pin harness
Connect the microphone (See below for additional details)
Secure module to either side of the center glove box
Connecting and installing Microphone
Warning: If your vehicle is not wired for a microphone, you must connect
and route the included microphone to the visor etc.
Follow these steps if vehicle IS equipped with factory microphone (See Fig 14
below)
1.
Open overhead storage compartment and turn retainer screw (See Fig. 13)
Fig. 13
2.
Above overhead storage compartment is where you will find the 2-pin
factory microphone terminal (blue) that originates in the center armrest
wiring. (See Fig. 14)
Courtesy of: DiscountCarStereo.com
Fig. 14
3.
Connect the black 2-pin matching connector on short harness (See Fig 15
below) to the blue plug. Connect the 3.5mm female to matching 3.5mm plug
on microphone (See Fig. 16)
Fig. 15
Fig. 16
4.
Find suitable location to mount microphone using included clip. Angle
microphone for best possible sound. (this may require test calls and feedback)
5.
Coil excess wire from microphone and hide above storage compartment.
Secure store compartment
Courtesy of: DiscountCarStereo.com
Pairing and testing Phone
1.
2.
3.
4.
5.
6.
7.
Turn ignition to “ON” or start vehicle
Press and hold the control button for 2 seconds to enter discoverable mode.
To pair a new phone. Red and Green LEDS should be flashing on back of
Bluetooth module.
Access your smartphone’s Bluetooth menu and search for devices.
Select TranzIt BLU HF from list
Wait for the kit to confirm pairing
For additional information see user manual included with kit
The BLU-JAGBT will automatically reconnect with your paired phone when
entering the vehicle. This ensures that your hands-free calls and music
playback is routed through the Aux input (CD mode) on your radio.
To begin using your new Bluetooth Module, Enter CD mode on radio and
proceed with use Voice Prompts or the phone dial pad to make a test call.
See Bluetooth module manual for additional operation details
8.
Re-install Amp rack using the (4) 8mm screws removed in step 1 as well as the
carpet rack cover and brake light cover.
Fig. 16
IMPORTANT NOTES:
1. The BLU-JAGBT kit is compatible with select Jaguar XK and XJ Radios with
Alpine Ai-NET CD Auto Changer only. (will not work in any other application)
2. Requires a CD Auto Changer (i.e. LNF4160AA) for the Auxiliary input adapter
to work. CD Auto Changer remain connected but will no longer play
BEHIND THE RADIO INSTALLS
vehicles with CD Auto Changer/NO Amp
you must remove the radio to install the BLU-JAGBT Kit in vehicles with CD Auto Changer
without Premium amp.
Please follow the steps below:
With the radio removed from dash:
1. Disconnect the CD Auto Changer Ai-Net plug (male) from the radio and plug
into Female Ai-Net connector on the Auxiliary Audio Adapter
2. Connect the Male Ai-NET plug on the Auxiliary Audio Adapter into radio.
3. Connect the 3.5mm audio cable to the Auxiliary Audio Adapter and route the
cable to the Bluetooth Module in center glovebox.
4. Proceed to Microphone and Module instruction steps above
5. Reverse above steps to re-install radio.
© 1995-14 Discount Car Stereo. All rights reserved. Information in this document is subject to change without notice.
Other products and companies referred to herein are trademarks or registered trademarks of their respective companies
or mark holders.