1
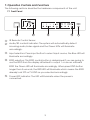
CPRO-3D42S HDMI 4 by 2 v1.4 Switcher with HEAC Operation Manual Draft Manual CPRO-3D42S Disclaimers The information in this manual has been carefully checked and is believed to be accurate. Cypress Technology assumes no responsibility for any infringements of patents or other rights of third parties which may result from its use. Cypress Technology assumes no responsibility for any inaccuracies that may be contained in this document. Cypress also makes no commitment to update or to keep current the information contained in this document. Cypress Technology reserves the right to make improvements to this document and/or product at any time and without notice. Copyright Notice No part of this document may be reproduced, transmitted, transcribed, stored in a retrieval system, or any of its part translated into any language or computer file, in any form or by any means - electronic, mechanical, magnetic, optical, chemical, manual, or otherwise - without express written permission and consent from Cypress Technology. © Copyright 2011 by Cypress Technology. All Rights Reserved. Version 1.0 January 2011 Trademark Acknowledgments All products or service names mentioned in this document may be trademarks of the companies with which they are associated. Safety Precautions Please read all instructions before attempting to unpack or install or operate this equipment, and before connecting the power supply. Please keep the following in mind as you unpack and install this equipment: Always follow basic safety precautions to reduce the risk of fire, electrical shock and injury to persons. To prevent fire or shock hazard, do not expose the unit to rain, moisture or install this product near water. Never spill liquid of any kind on or into this product. Never push an object of any kind into this product through module openings or empty slots, as you may damage parts. Do not attach the power supply cabling to building surfaces. Do not allow anything to rest on the power cabling or allow it to be abused by persons walking on it. To protect the equipment from overheating, do not block the slots and openings in the module housing that provide ventilation. Revision History Version No Date RDV1 20110103 Summary of Change Preliminary Release Table of Contents 1. 2. 3. 4. 5. 6. 7. Introduction................................................................................... 1 Applications.................................................................................. 1 Package Contents....................................................................... 1 System Requirements................................................................... 1 Features......................................................................................... 2 Specifications............................................................................... 2 Operation Controls and Functions.............................................. 3 7.1 Front Panel..................................................................... 3 7.2 Rear Panel..................................................................... 4 8. Remote Control............................................................................ 5 9. RS-232 Protocol............................................................................. 5 9.1 Pin Definition.................................................................. 5 9.2 Command..................................................................... 5 10.Connection and Installation . ..................................................... 6 1. Introduction This is a high performance four input & two outputs HDMITM Switcher supports, the output ports support Audio Return Channel (ARC) and HDMI Ethernet Channel (HEC) follow by HDMI v1.4 specification. The ARC provides an S/ PDIF link from and HDMITM sink and output through ARC port to AVR to get true audio from the sink. The HEC feature adds a connection to the HDMI link that is capable of carrying the same data as a full duplex, 100Mbps Ethernet connection. Using an HDMI with HEAC cable allowing for convenient integration of Digital Televisions (DTVs) into the end user’s home network system. 2. Applications • • • • • Simultaneous display one HDMI source on 2 TVs Professional audio display Showroom display Education demo Commercial usage 3. Package Contents • 4 x 2 HDMI Switcher with HEAC • 5V/2.6A DC power supply adaptor • Operation Manual 4. System Requirements • • • Source equipments with HDMI output connector(s) Displays TV/monitor with HDMI input connector(s) Two output ports can be connect to the Ethernet Channel (HEC) of Digital Televisions (DTVs) from end user’s home network system and Audio Return Channel (ARC) can output to the AVR to get true audio from the sink. 1 5. Features • • • • • • • Support multiplexed HDMI 4-input and 2-output Two output ports support Ethernet Channel (HEC) and Audio Return Channel (ARC) follow by HDMI v1.4 specification HDMI 1.4 support: √ Audio Return Channel (ARC) √ 3D √ CEC 1.4 √ HDMI Ethernet Channel (HEC), enabling high-speed, bi-directional networking at up to 100Mb/sec HDCP repeater support Deep Color support 36/30/24-bit, 1080p@60Hz EDID can selected Standard, TV or Lock EDID feature Audio support: √ HDMI 1.4 compatible audio interface √ Dedicated, flexible audio input/output port √ Dolby TrueHD √ DTS-HD Master Audio √ Full audio input and output support 6. Specifications Frequency Bandwidth 2.25Gbps (single link) Input Ports 4x HDMI (Female type) Output Ports 2 x HDMI (Female type) 2 x Ethernet 2 x ARC Output Resolution 480i ~1080p 50/60, 1080p24, VGA~UXGA ESD Protection Human Body model: ±8kV (air-gap discharge) ± 4kV (contact discharge) Dimensions (mm) (W) x (D) x (H) Weight(g) Chassis Material Metal Silkscreen Color Black Operating Temperature 0°C ~ 40°C/ 32°F ~104°F Storage Temperature -20°C ~ 60°C/ -4°F ~140°F Relative Humidity 20~90% RH (non-condensing) Power Consumption 4.1W 2 7. Operation Controls and Functions The following sections describe the hardware components of the unit. 7.1 Front Panel 1 2 3 4 5 1. IR Remote Control Sensor. 2. Audio/3D content indicator: The system will automatically detect incoming audio/video signal and the Green LEDs will illuminate accordingly. 3. Input selection: Press input button to select input source, the Blue LED will illuminate accordingly. 4. EDID selection: This EDID control button is determined if you are going to use the EDID from the display attached to output 1 or use an onboard EDID the Green LED will illuminate accordingly. When press EDID button longer then 3 seconds, the RED LED will illuminate which means the EDID already lock STD or TV EDID as you selected accordingly. 5. Power LED Indicator: The LED will illuminate when the power is connected. 3 7.2 Rear Panel 1 2 2 2 3 4 1. RS-232: This slot is for RS-232 control signal sending and is for service only. 2. HDMI 1~2out/ARC 1~2/Ethernet 1~2: Connect Ethernet and Audio Return Channel to capabilities of sink, The sink will pass the Ethernet and Audio signal via HDMI input to HDMI output port individually, each HDMI will separate the Ethernet and audio and send it out from ARC and Ethernet ports. For the ARC, the user had a sink with a built-in tuner or DVD player and wanted to send content “upstream” from the TV back to the audio system to play and multi-channel audio. The HDMI Ethernet Channel, it can consolidates video, audio and data streams into a single HDMI cable to the Ethernet Hub/AP to access the internet and it incorporates a dedicated data channel into the HDMI link, enabling high-speed, bi-directional networking at up to 100Mb/sec to control and search from the sink. Note: 1.Be sure to connect devices with one of the new cables designed to support HDMI Ethernet Channel functionality, either the standard HDMI cable with Ethernet or High Speed HDMI cable with Ethernet. 2.When the HDMI output with the Audio and ARC are exist at the same time the ARC will be the first priority to access. 3. HDMI input 1~4: Connect to HDMI or DVI sources equipment such as DVD player or set-top-box for input video and audio sending. 4. Power: Plug the DC 5V power supply into the splitter and connect the adaptor to AC wall outlet. 4 8. Remote Control ① Power button: Press to switch On the device, press it again to set the device in standby mode. ② 1~4: Press the desire input button to select the input source. 9. RS-232 Protocol 9.1 Pin Definition CPRO-3D42S PIN Definition 1 NC 2 Tx 3 Rx 4 NC 5 GND 6 NC 7 NC 8 NC 9 NC Baud Rate: 9600bps Data bit: 8bits Parity: None Stop bit: 1 bit Flow Control: None 9.2 Command Command POWER 00 POWER 01 PORT 11 PORT 12 PORT 13 PORT 14 PORT 21 PORT 22 PORT 23 PORT 24 ► ◄ Remote Control Console PIN Definition 1 NC 2 Rx 3 Tx 4 NC 5 GND 6 NC 7 NC 8 NC 9 NC Action Power Off (standby) Power On Output Select Input 1 Output Select Input 2 Output Select Input 3 Output Select Input 4 Output Select Input 1 Output Select Input 2 Output Select Input 3 Output Select Input 4 5 1 2 10. Connection and Installation DVD DVD HUB Blu-Ray Blu-Ray HUB HDTV PC or AVR1 NB HDTV AVR1 INTERNET 6 A Acronyms Acronym Complete Term ARC Audio Return Channel CEC Consumer Electronics Control EDID Extended Display Identification Data HCE HDMI Ethernet Channel HDCP High-bandwidth Digital content protection HEAC HDMI Ethernet Audio Channel HDMI High-Definition Multimedia Interface 7 CYPRESSTECHNOLOGYCO.,LTD. Home page: http://www.cypress.com.tw MPM-CPRO3D42S