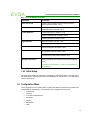
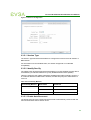
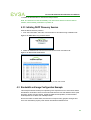
1
PC-over-IP® Administrative Interface
User Manual
PC-over-IP Administrative Interface User Manual
EVGA Corporation
2900 SATURN ST. SUITE B, BREA, CA 92821, USA
p +1 714 528 4500 f +1 714 528 4501
www.evga.com
The information contained in this document represents the current view of EVGA Corporation as of the date of publication.
Because EVGA must respond to changing market conditions, it should not be interpreted to be a commitment on the part of
EVGA, and EVGA cannot guarantee the accuracy of any information presented after the date of publication.
This document is for informational purposes only. EVGA MAKES NO WARRANTIES, EXPRESS, IMPLIED OR STATUTORY,
AS TO THE INFORMATION IN THIS DOCUMENT.
Complying with all applicable copyright laws is the responsibility of the user. Without limiting the rights under copyright, no
part of this document may be reproduced, stored in or introduced into a retrieval system, or transmitted in any form or by any
means (electronic, mechanical, photocopying, recording, or otherwise), or for any purpose, without the express written
permission of EVGA Corporation.
© 2009 EVGA Corporation. All rights reserved.
PC-over-IP, and PCoIP are registered trademarks of Teradici Corporation.
1
PC-over-IP Administrative Interface User Manual
Contents
CONTENTS .................................................................................................................... 2 TABLE OF FIGURES ..................................................................................................... 5 TABLES .......................................................................................................................... 8 DEFINITIONS ................................................................................................................. 9 INTRODUCTION ........................................................................................................... 10 1 ADMINISTRATIVE WEB INTERFACE ................................................................... 11 1.1 Supported Web Browsers ................................................................................................................ 12 1.2 Administrative Web Interface IP Address......................................................................................... 12 1.3 Web Interface Security ..................................................................................................................... 13 1.3.1 Installing the CA Root Certificate .............................................................................................. 13 1.4 Log In ............................................................................................................................................... 14 1.4.1 Warning ..................................................................................................................................... 14 1.4.2 Password .................................................................................................................................. 14 1.4.3 Idle Timeout .............................................................................................................................. 14 1.5 Home/Initial Setup Webpages .......................................................................................................... 15 1.5.1 Home ......................................................................................................................................... 15 1.5.2 Initial Setup ............................................................................................................................... 16 1.6 Configuration Menu .......................................................................................................................... 16 1.6.1 Initial Setup ............................................................................................................................... 17 1.6.2 Network ..................................................................................................................................... 21 1.6.3 Connection Management .......................................................................................................... 23 1.6.4 Discovery .................................................................................................................................. 25 1.6.5 Session ..................................................................................................................................... 26 1.6.6 Bandwidth ................................................................................................................................. 28 1.6.7 RDP ........................................................................................................................................... 29 1.6.8 Language .................................................................................................................................. 31 1.6.9 OSD .......................................................................................................................................... 32 1.6.10 Image ........................................................................................................................................ 32 1.6.11 Monitor Emulation ..................................................................................................................... 33 1.6.12 Time .......................................................................................................................................... 34 1.6.13 Password .................................................................................................................................. 35 1.6.14 Reset Parameters ..................................................................................................................... 36 1.7 Permissions Menu ............................................................................................................................ 37 1.7.1 USB ........................................................................................................................................... 37 1.7.2 Audio ......................................................................................................................................... 39 1.7.3 Power ........................................................................................................................................ 40 2
PC-over-IP Administrative Interface User Manual
1.8 Diagnostics Menu ............................................................................................................................. 40 1.8.1 Event Log .................................................................................................................................. 41 1.8.2 Session Control ......................................................................................................................... 42 1.8.3 Session Statistics ...................................................................................................................... 43 1.8.4 Host CPU .................................................................................................................................. 44 1.8.5 Audio ......................................................................................................................................... 45 1.8.6 Display ...................................................................................................................................... 46 1.8.7 PCoIP Processor....................................................................................................................... 47 1.9 Info Menu ......................................................................................................................................... 47 1.9.1 Version ...................................................................................................................................... 48 1.9.2 Attached Devices ...................................................................................................................... 49 1.10 Upload Menu ................................................................................................................................ 50 1.10.1 Firmware ................................................................................................................................... 51 1.10.2 OSD Logo ................................................................................................................................. 52 2 ON SCREEN DISPLAY (OSD) ............................................................................... 54 2.1 Connect Screen................................................................................................................................ 54 2.1.1 Connect Button ......................................................................................................................... 55 2.2 OSD Options Menu .......................................................................................................................... 55 2.3 Configuration Window ...................................................................................................................... 56 2.3.1 Unlocking the Configuration Settings ........................................................................................ 57 2.3.2 Network Tab .............................................................................................................................. 57 2.3.3 Connection Management Tab................................................................................................... 59 2.3.4 Discovery Tab ........................................................................................................................... 60 2.3.5 Session Tab .............................................................................................................................. 61 2.3.6 Bandwidth Tab .......................................................................................................................... 63 2.3.7 RDP Tab ................................................................................................................................... 64 2.3.8 Language Tab ........................................................................................................................... 65 2.3.9 OSD Tab ................................................................................................................................... 66 2.3.10 Reset Tab.................................................................................................................................. 67 2.4 Diagnostics Window ......................................................................................................................... 68 2.4.1 Event Log Tab ........................................................................................................................... 68 2.4.2 Session Statistics Tab ............................................................................................................... 69 2.4.3 PCoIP Processor Tab ............................................................................................................... 71 2.4.4 Ping Tab .................................................................................................................................... 71 2.5 Information Window.......................................................................................................................... 72 2.6 User Settings Window ...................................................................................................................... 74 2.6.1 Mouse Tab ................................................................................................................................ 74 2.6.2 Keyboard Tab............................................................................................................................ 75 2.6.3 Image Tab ................................................................................................................................. 75 2.7 Password Window ............................................................................................................................ 76 3 OVERLAY WINDOWS ............................................................................................ 78 3.1 Network Connection Lost Overlay.................................................................................................... 78 3
PC-over-IP Administrative Interface User Manual
3.2 USB Device Not Authorized Overlay................................................................................................ 78 3.3 Half-Duplex Overlay ......................................................................................................................... 78 3.4 Video Source Overlays .................................................................................................................... 79 4 APPENDIX A: USAGE EXAMPLES ....................................................................... 80 4.1 Peer-to-Peer Direct Connection Example ........................................................................................ 80 4.1.1 Configuring the Portal Peer-to-Peer Operation......................................................................... 80 4.1.2 Configuring the Host Peer-to-Peer Operation........................................................................... 83 4.1.3 Initiating the Peer-to-Peer Session ........................................................................................... 85 4.2 DHCP and Enable Host Discovery Example ................................................................................... 86 4.2.1 Configuring Portal DHCP and Discovery .................................................................................. 86 4.2.2 Configuring Host DHCP and Discovery .................................................................................... 89 4.2.3 Initiating DHCP Discovery Session ........................................................................................... 92 4.3 Bandwidth and Image Configuration Example ................................................................................. 92 4.3.1 Configuring the Host Bandwidth Limit to 25 Mbps .................................................................... 93 4.3.2 Configuring Image Properties ................................................................................................... 95 4.3.3 Configuring the Host Bandwidth Limit to 0 Mbps (No Limit) ..................................................... 97 4.4 USB Permissions Example .............................................................................................................. 98 4.4.1 Authorizing USB Device By Class ............................................................................................ 98 4.4.2 Authorizing USB Device By Vendor/Product ID ...................................................................... 101 5 APPENDIX B: PORTAL LANGUAGE AND KEYBOARD SUPPORT.................. 104 6 APPENDIX C: PORTAL RDP COMPATIBILITY .................................................. 106 4
PC-over-IP Administrative Interface User Manual
Table of Figures
Figure 1-1: Administrative Web Interface ......................................................................... 11
Figure 1-2: Administrative Web Interface Overview ......................................................... 12
Figure 1-3: Log In Webpage ............................................................................................. 14
Figure 1-4: Home Page ..................................................................................................... 15
Figure 1-5: Configuration Menu Navigation ...................................................................... 17
Figure 1-6: Initial Setup Host Webpage ............................................................................ 18
Figure 1-7: Initial Setup Portal Webpage .......................................................................... 19
Figure 1-8: Network Configuration Webpage ................................................................... 22
Figure 1-9: Connection Management Configuration Webpage (IP Address) ................... 24
Figure 1-10: Connection Management Configuration Webpage (FQDN)......................... 24
Figure 1-11: Discovery Configuration Webpage ............................................................... 25
Figure 1-12: Session Configuration Webpage .................................................................. 27
Figure 1-13: Session Configuration Webpage (RDP) ....................................................... 27
Figure 1-14: Bandwidth Configuration Webpage .............................................................. 29
Figure 1-15: RDP Configuration Webpage ....................................................................... 30
Figure 1-16: Language Configuration Webpage............................................................... 31
Figure 1-17: OSD Configuration Webpage ....................................................................... 32
Figure 1-18: Image Configuration Webpage ..................................................................... 33
Figure 1-19: Monitor Emulation Configuration Webpage.................................................. 34
Figure 1-20: Time Configuration Webpage ....................................................................... 34
Figure 1-21: Password Configuration Webpage ............................................................... 36
Figure 1-22: Reset Parameters Webpage ........................................................................ 36
Figure 1-23: Permissions Menu Navigation ...................................................................... 37
Figure 1-24: USB Permissions Webpage ......................................................................... 37
Figure 1-25: Audio Permissions Webpage ....................................................................... 39
Figure 1-26: Power Permissions Webpage ...................................................................... 40
Figure 1-27: Diagnostics Menu Navigation ....................................................................... 41
Figure 1-28: Event Log Webpage ..................................................................................... 41
Figure 1-29: Session Control Webpage ............................................................................ 42
Figure 1-30: Session Statistics Webpage ......................................................................... 43
Figure 1-31: Host CPU Webpage ..................................................................................... 45
Figure 1-32: Audio Diagnostics Webpage ........................................................................ 46
Figure 1-33: Display Webpage ......................................................................................... 46
Figure 1-34: PCoIP Processor Webpage ......................................................................... 47
Figure 1-35: Info Menu Navigation.................................................................................... 48
5
PC-over-IP Administrative Interface User Manual
Figure 1-36: Version Webpage ......................................................................................... 48
Figure 1-37: Attached Devices Webpage ......................................................................... 50
Figure 1-38: Upload Menu Navigation .............................................................................. 51
Figure 1-39: Firmware Upload Webpage .......................................................................... 51
Figure 1-40: OSD Logo Upload Webpage ........................................................................ 52
Figure 2-1: OSD Connect Screen ..................................................................................... 54
Figure 2-2: OSD Connect Screen (Connecting) ............................................................... 55
Figure 2-3: OSD Options Menu ........................................................................................ 56
Figure 2-4: Setting Unlock OSD........................................................................................ 57
Figure 2-5: Network Configuration .................................................................................... 58
Figure 2-6: Connection Management Configuration ......................................................... 59
Figure 2-7: Discovery Configuration ................................................................................. 61
Figure 2-8: Session Configuration .................................................................................... 62
Figure 2-9: Bandwidth ....................................................................................................... 63
Figure 2-10: RDP Configuration........................................................................................ 64
Figure 2-11: Language Configuration ............................................................................... 66
Figure 2-12: OSD Configuration ....................................................................................... 67
Figure 2-13: Reset ............................................................................................................ 68
Figure 2-14: Event Log ..................................................................................................... 69
Figure 2-15: Session Statistics ......................................................................................... 70
Figure 2-16: PCoIP Processor .......................................................................................... 71
Figure 2-17: Ping............................................................................................................... 72
Figure 2-18: Version.......................................................................................................... 73
Figure 2-19: Mouse ........................................................................................................... 74
Figure 2-20: Keyboard ...................................................................................................... 75
Figure 2-21: Image ............................................................................................................ 76
Figure 2-22: Change Password ........................................................................................ 77
Figure 3-1: Network Connection Lost Overlay .................................................................. 78
Figure 3-2: USB Device Not Authorized Overlay .............................................................. 78
Figure 3-3: Half-Duplex Overlay ....................................................................................... 79
Figure 3-4: No Source Signal Overlay .............................................................................. 79
Figure 3-5: Source Signal on Other Port Overlay ............................................................. 79
Figure 4-1: Portal Connection Management Peer-to-Peer Configuration......................... 81
Figure 4-2: Portal Session Webpage Peer-to-Peer Configuration.................................... 82
Figure 4-3: Portal PCoIP Processor Webpage Peer-to-Peer Configuration ..................... 83
Figure 4-4: Host Connection Management Peer-to-Peer Configuration........................... 84
Figure 4-5: Host Session Webpage Peer-to-Peer Configuration...................................... 85
6
PC-over-IP Administrative Interface User Manual
Figure 4-6: Peer-to-Peer Connect Screen ........................................................................ 86
Figure 4-7: Portal Connection Management DHCP & Discovery Configuration ............... 87
Figure 4-8: Portal Discovery Webpage Enable Discovery Configuration ......................... 87
Figure 4-9: Portal Network Webpage DHCP Configuration .............................................. 88
Figure 4-10: Portal PCoIP Processor Webpage DHCP & Discovery Configuration ......... 89
Figure 4-11: Host Connection Management DHCP & Discovery Configuration ............... 90
Figure 4-12: Host Discovery Webpage Enable Discovery Configuration ......................... 90
Figure 4-13: Host Network Webpage DHCP Configuration .............................................. 91
Figure 4-14: Host PCoIP Processor Webpage DHCP & Discovery Configuration ........... 91
Figure 4-15: DHCP Discovery Connect Screen................................................................ 92
Figure 4-16: Discovered Hosts Screen ............................................................................. 92
Figure 4-17: Simplified User Bandwidth Requirements (Assuming 100 Mbps) ................ 93
Figure 4-18: Host Bandwidth Limit Configuration (25 Mbps) ............................................ 94
Figure 4-19: Simplified User Bandwidth Requirements (25 Mbps) ................................... 95
Figure 4-20: Portal Minimum Image Quality Configuration ............................................... 96
Figure 4-21: Host Bandwidth Limit Configuration (0 Mbps, no limit) ................................ 97
Figure 4-22: Simplified User Bandwidth Requirements (no limit) ..................................... 98
Figure 4-23: USB Permissions Example: Add new Button ............................................... 99
Figure 4-24: USB Permissions Example: Selecting the Class Entry Type ....................... 99
Figure 4-25: USB Permissions Example: Selecting the Device Class ........................... 100
Figure 4-26: USB Permissions Example: Selecting the Sub Class ................................ 100
Figure 4-27: USB Permissions Example: Selecting the Protocol ................................... 101
Figure 4-28: USB Authorization Example: Class Authorization ...................................... 101
Figure 4-29: USB Permissions Example: Add new Button ............................................. 102
Figure 4-30: USB Permissions Example: Selecting the Class Entry Type ..................... 102
Figure 4-31: USB Permissions Example: Entering Vendor ID and Product ID............... 103
Figure 4-32: USB Permissions Example: Vendor ID and Product ID Authorization ....... 103
7
PC-over-IP Administrative Interface User Manual
Tables
Table 1-1: Home Webpage Parameters ........................................................................... 16
Table 1-2: Step 1: Audio Parameters................................................................................ 20
Table 1-3: Step 2: Network Parameters............................................................................ 20
Table 1-4: Step 3: Host Session Parameters ................................................................... 21
Table 1-5: Step 3: Portal Session Parameters ................................................................. 21
Table 1-6: Connection Manager Method .......................................................................... 25
Table 1-7: Peer Identity Methods ...................................................................................... 28
Table 1-8: NTP Host Method ............................................................................................ 35
Table 1-9: USB Device Authorization Entry Types ........................................................... 38
Table 1-10: USB Device Unauthorization Entry Types ..................................................... 39
Table 1-11: VPD Information ............................................................................................ 49
Table 1-12: Firmware Information ..................................................................................... 49
Table 1-13: VPD Information ............................................................................................ 49
Table 1-14: USB Device Status ........................................................................................ 50
Table 2-1: Connection Manager Method .......................................................................... 60
Table 2-2: Peer Identity Methods ...................................................................................... 62
Table 2-3: VPD Information .............................................................................................. 73
Table 2-4: Firmware Information ....................................................................................... 73
Table 2-5: Firmware Information ....................................................................................... 74
Table 5-1: Languages Supported by the Portal .............................................................. 104
Table 5-2: Keyboard Layouts Supported by the Portal ................................................... 104
Table 6-1: Portal RDP Capabilities ................................................................................. 106
8
PC-over-IP Administrative Interface User Manual
Definitions
CA
Certificate Authorities
CMI
Connection Management Interface – interface provided by the Portal or Host,
used to communicate with an external connection management server
CMS
Connection Management Server – an external management entity (3rd party)
that manages and controls the Portal/Host through the CMI interface
DDC
Display Data Channel
DHCP
Dynamic Host Configuration Protocol
DNS
Domain Name System
DNS SRV
Domain Name System Service Record
EDID
Extended Display Identification Data
FQDN
Fully Qualified Domain Name
GPU
Graphics Processing Unit
GUI
Graphical User Interface presented by the Portal On-Screen Display when not
operating in a PC-over-IP session
HPDET
Hot Plug Detect
MTU
Maximum Transmission Unit
NTP
Network Time Protocol
OS
Operating System
OSD
On Screen Display
®
PC-over-IP
Personal Computer over Internet Protocol
PC-over-IP Host
Host side of PC-over-IP system
PC-over-IP Portal
Portal, or desktop, side of PC-over-IP system
®
PCoIP
Personal Computer over Internet Protocol (PC-over-IP)
RDP
Remote Desktop Protocol
SLP
Service Location Protocol
SSL
Secure Socket Layer (security protocol)
Teradici
Teradici Corporation, the provider of PCoIP processors
TERA1100
Teradici device supporting PC-over-IP Portal functionality
TERA1200
Teradici device supporting PC-over-IP Host, functionality
VPD
Vital Product Data – Factory provisioned information to uniquely identify a Portal
or Host
VPN
Virtual Private Network
9
PC-over-IP Administrative Interface User Manual
Introduction
Users and administrators can interact with the PC-over-IP®, or PCoIP®, Portal and Host
via an embedded HTTPS web interface. The Portal can also be accessed via the local
Graphical User Interface (GUI) On Screen Display (OSD). As well, messages are
displayed over the user screen when required.
Users can connect or disconnect a session, view diagnostics, and configure user
parameters. Administrators can view and change configuration settings and user
permissions, upload data to the PCoIP device, view session diagnostics information, and
view product information.
The interfaces are structured in a task-oriented fashion intended to maximize accessibility
and minimize the learning curve. Additionally, the web interface and OSD are organized
as similarly as possible, to reduce the total user learning curve.
This document describes the PCoIP Host and Portal user interfaces. When a feature is
only available for the Host (i.e. host only) or Portal (i.e. desktop side only), this is explicitly
stated.
This document has three main sections:
•
Section 1 details the PCoIP Administrative Web Interface
•
Section 2 reviews the On Screen Display (OSD) of the Portal
•
Section 3 discusses the user message Overlay Windows
The Appendix contains:
•
Appendix A: Usage Examples
•
Appendix B: Portal Language and Keyboard Support
•
Appendix C: Portal RDP Compatibility
This document is intended to give administrators and users a working understanding of a
PCoIP system.
Note: The PCoIP Administrative Web Interface and On Screen Display configuration
features are also available via a software Application Program Interface (API) for use with
a Connection Management Server. However, details of the API are outside the scope of
this document.
10
PC-over-IP Administrative Interface User Manual
1
Administrative Web Interface
The PCoIP Administrative Web Interface allows an administrator to interact with the
device remotely using an internet browser.
Figure 1-1 shows an example of the Administrative Web Interface with seven regions
highlighted:
•
Log Out: Allows an administrator to log out of the Administration Web Interface
•
PCoIP Processor: Displays PCoIP processor information
TERA1100 Portal PCoIP® Processor
TERA1200 Host PCoIP® Processor
•
Home: Allows an administrator to navigate to the Home webpage
•
Drop-down menus: The five menus are Configuration, Permissions, Diagnostics,
Info, and Upload
•
Webpage information: Displays the title and summary of the current webpage
•
Data field: Shows editable and/or displayed parameters that an administrator can
configure from the current webpage (inline help is displayed when appropriate)
•
Apply/Cancel: Every webpage with editable parameters has an Apply button and
a Cancel button
Selecting Apply will store the edited parameters in flash
Selecting Cancel will reset the edited parameters to the values currently
stored in flash.
Figure 1-1: Administrative Web Interface
11
PC-over-IP Administrative Interface User Manual
Figure 1-2 shows an overview of the configuration webpages available in the
Administrative Web Interface.
Figure 1-2: Administrative Web Interface Overview
1.1 Supported Web Browsers
The webpage servers on the Host and Portal have been tested and are compatible with
the following web browsers:
•
Firefox 1.5, 2.0 and 3.0
•
Internet Explorer 6.0 and 7.0
Other browsers may also be compatible.
We strongly recommend you install the CA root certificate in the browser you use (see
Section 1.3.1).
Note: Firefox 3.0 requires that the CA root certificate be installed.
1.2 Administrative Web Interface IP Address
To access the Administrative Web Interface, the administrator must browse to the IP
address of the Host or Portal. The IP address used depends on how the IP addresses
are determined within your IP network:
•
Static IP Address: the IP address is hard-coded and must be known
•
Dynamic IP Address: the IP address is dynamically assigned by the Dynamic
Host Configuration Protocol (DHCP) server and can be obtained from the DHCP
server
12
PC-over-IP Administrative Interface User Manual
Once the administrator has determined the IP address, enter it into the browser to access
the Administrative Web Interface, e.g. https://192.168.1.123.
1.3 Web Interface Security
The web interface uses HTTP over an SSL socket (HTTPS), and cannot be accessed
without an administrative password. The HTTPS connection is secured using a selfsigned certificate of Teradici, the provider of PCoIP processors.
1.3.1 Installing the CA Root Certificate
The administrator can install a Certificate Authorities (CA) root certificate in the internet
browser to avoid the browser security warnings. Steps for installing the certificate on
Internet Explorer 7 and Firefox are detailed below:
Internet Explorer 7
1. Open the Tools menu and select Internet Options
2. On the Content tab, and select Certificates
3. On the Trusted Root Certification Authorities tab, select Import
4. Follow the directions to import the certificate; ensure you use the Trusted Root
Certification Authorities certificate store
Note: When browsing for the certificate, it may be necessary to change the file type to all
files.
Firefox
1. Open the Tools menu and select Options
2. Select the icon labeled Advanced at the top of the window
3. On the Encryption tab, select View Certificates
4. On the Authorities tab, select Import
5. Follow the directions to import the certificate; ensure you check the option labeled
Trust this CA to identify web sites
13
PC-over-IP Administrative Interface User Manual
1.4 Log In
The Log In page allows the administrator to securely log into the administrative
webpages.
Figure 1-3: Log In Webpage
1.4.1 Warning
The Warning displays pertinent information regarding the device the administrator is
logging in to when there is an administrative session already in progress. Only one
administrator is allowed per device. Logging into a session will terminate any other
administrative session in progress.
1.4.2 Password
The Password field allows the administrator to enter the password to gain access to the
administration webpage. The default value is blank, i.e. “”.
See Section 1.6.13 for information on changing the password.
1.4.3 Idle Timeout
The Idle Timeout field sets the administration idle timeout. The options are:
•
1 minute
•
5 minutes
•
15 minutes
•
30 minutes
•
Never
14
PC-over-IP Administrative Interface User Manual
1.5 Home/Initial Setup Webpages
When an administrator logs in, the Home webpage is shown. The Home webpage
provides an overview of the status.
If configured in the firmware defaults, the Initial Setup webpage is optionally used the first
time an administrator logs in. Afterwards the Home page is shown unless the firmware
parameters reset (see Section 1.6.14 Reset Parameters)
1.5.1 Home
The Home webpage provides a summary of the Host or Portal. It can be accessed at any
time using the Home link at the top left section of the menu bar.
Figure 1-4: Home Page
The information fields shown on the Home webpage are summarized in Table 1-1.
15
PC-over-IP Administrative Interface User Manual
Table 1-1: Home Webpage Parameters
Parameter
Comments
Time since boot
Length of time that the PCoIP processor has been
running (refer to Section 1.8.7)
Connection State
Possible states: Disconnected, Connection Pending,
Connected (refer to Section 1.8.3)
Packet Statistics
Packets sent (refer to Section 1.8.3)
Packets received (refer to Section 1.8.3)
Packets lost (refer to Section 1.8.3)
Byte Statistics
Round Trip Latency
Bandwidth Stats:
Bytes sent (refer to Section 1.8.3)
Bytes received
Approximate network round trip, e.g. Portal to Host and
back to Portal (refer to Section 1.8.3)
Active bandwidth Limit is bandwidth PCoIP processors
may generate (refer to Section 1.8.3)
Bandwidth Utilization is approximately the bandwidth
currently being used (refer to Section 1.8.3)
Display Frame Rates
Display Rate for video content through PCoIP; e.g. if
nothing changing, Frame Rate is 0 fps (refer to Section
1.8.3)
This field is only available on a Host; on the Portal it is
not displayed.
1.5.2 Initial Setup
The Initial Setup webpage contains the configuration parameters that must be first set by
the administrator when using the Host and Portal devices. See Section 1.6.1 Initial Setup
for more information.
1.6 Configuration Menu
The Configuration menu contains links to pages that define how the device operates and
interacts with its environment. The webpages in the Configuration menu are:
•
Initial Setup
•
Network
•
Connection Management
•
Discovery
•
Session
•
Bandwidth
•
RDP
16
PC-over-IP Administrative Interface User Manual
•
Language
•
OSD
•
Image
•
Monitor Emulation
•
Time
•
Password
•
Reset Parameters
Figure 1-5: Configuration Menu Navigation
1.6.1 Initial Setup
The Initial Setup webpage contains the configuration parameters that the administrator
must first set when using the Host and Portal devices. The webpage simplifies the out-ofbox experience and reduces the time for initial users to establish a 1-to-1 PCoIP session.
More complex environments that use host discovery or connection management systems
will require further configuration.
The Host and Portal Initial Setup webpages are not identical and provide parameters
applicable to the Host or Portal, respectively.
17
PC-over-IP Administrative Interface User Manual
Figure 1-6: Initial Setup Host Webpage
18
PC-over-IP Administrative Interface User Manual
Figure 1-7: Initial Setup Portal Webpage
1.6.1.1 Step 1: Audio
Step 1: Audio allows the administrator to configure the audio parameters. Table 1-2
summarizes the applicable parameters.
19
PC-over-IP Administrative Interface User Manual
Table 1-2: Step 1: Audio Parameters
Parameter
Comments
Enable HD Audio
Enables audio support on Host or Portal (refer to
Section 1.7.2).
Enable Microsoft® Windows
Vista® 64-bit Mode
Enables 64-bit mode on Host (refer to Section
1.7.2). This mode should only be used for Vista-64.
This option is only available on a Host; on the Portal
it is not shown.
Note: Enabling 64-bit mode is not required for Linux
or Windows XP (32-bit or 64-bit); refer to section
1.7.2.
1.6.1.2 Step 2: Network
Step 2: Network allows the administrator to configure the network parameters. Table 1-3
summarizes the applicable parameters.
Table 1-3: Step 2: Network Parameters
Parameter
Comments
Enable DHCP
Enables DHCP vs. manual configuration (refer to Section
1.6.2).
IP Address
Device’s IP address (refer to Section 1.6.2).
Subnet Mask
Device’s subnet mask (refer to Section 1.6.2).
Gateway
Device’s gateway IP address (refer to Section 1.6.2).
Primary DNS Server
Device’s primary DNS IP address (refer to Section 1.6.2).
Secondary DNS Server
Device’s secondary DNS IP address (refer to Section
1.6.2).
1.6.1.3 Step 3: Session
Step 3: Session allows the administrator to configure the session parameters. Table 1-4
summarizes the Host parameters and Table 1-5 shows the Portal parameters.
20
PC-over-IP Administrative Interface User Manual
Table 1-4: Step 3: Host Session Parameters
Parameter
Comments
Accept Any Portal
Allows the Host to accept any Portal for a PCoIP Session
(refer to Section 1.6.5).
Portal MAC Address
Allows the administrator to specify the Portal MAC address
for a PCoIP Session (refer to Section 1.6.5).
Table 1-5: Step 3: Portal Session Parameters
Parameter
Comments
Session Type
Specifies the PCoIP or RDP session (refer to Section 1.6.5).
Identify Host by
Specifies the Host identity method (refer to Section 1.6.5).
Host IP Address
Specifies the Host IP address (refer to Section 1.6.5).
Host MAC Address
Specifies the Host MAC address (refer to Section 1.6.5).
Note: When Host Discovery or connection management is configured by default on the
Portal, it is not possible to modify the Portal session parameters. A message will be
displayed on the Initial Setup Portal webpage instead of the Step 3: Session
parameters.
1.6.1.4 Step 4: Apply Changes
Step 4: Apply Changes allows the administrator to apply the parameter updates made in
the steps above. Parameters will not be updated until Apply is selected.
1.6.2 Network
The Network webpage allows an administrator to set the Portal and Host network
parameters.
Note: The Portal Network parameters can also be configured using the Portal OSD. See
Section 2.3.2 Network.
21
PC-over-IP Administrative Interface User Manual
Figure 1-8: Network Configuration Webpage
1.6.2.1 Enable DHCP
When the Enable DHCP option is enabled, the device will contact a DHCP server to be
assigned an IP address, subnet mask, gateway IP address, and DNS servers. When
disabled, these parameters must to be set manually.
1.6.2.2 IP Address
The IP Address is the device’s IP address. If DHCP is disabled, this field is required. If
DHCP is enabled, this field is not editable. This field must be a valid IP address; if an
invalid IP address is entered, the web interface will prompt the administrator to correct it.
1.6.2.3 Subnet Mask
The Subnet Mask is the device’s subnet mask. If DHCP is disabled, this field is required.
If DHCP is enabled, this field is not editable. This field must be a valid IP address; if an
invalid IP address is entered, the web interface will prompt the administrator to correct it.
Warning: It is possible to configure an illegal IP Address/Subnet Mask combination (e.g.
invalid mask) that will leave the Host unreachable. Care must be taken when setting the
Subnet Mask.
1.6.2.4 Gateway
The Gateway is the device’s gateway IP address. If DHCP is disabled, this field is
required. If DHCP is enabled, this field is not editable. This field must be a valid IP
address; if an invalid IP address is entered, the web interface will prompt the
administrator to correct it.
1.6.2.5 Primary DNS Server
The Primary DNS Server is the device’s primary DNS IP address. This field is optional. If
the DNS server IP Address is configured when using a Connection Manager, the
Connection Manager address may be set as a FQDN instead of an IP address (see
Section 1.6.3.2). This field must be a valid IP address; if an invalid IP address is entered,
the web interface will prompt the administrator to correct it.
22
PC-over-IP Administrative Interface User Manual
1.6.2.6 Secondary DNS Server
The Secondary DNS Server is the device’s secondary DNS IP address. This field is
optional. If the DNS server IP Address is configured when using a Connection Manager,
the Connection Manager address may be set as a FQDN instead of an IP address (see
Section 1.6.3.2). This field must be a valid IP address; if an invalid IP address is entered,
the web interface will prompt the administrator to correct it.
1.6.2.7 Ethernet Mode
The Ethernet Mode field configures the Ethernet mode of the Host or Portal. The options
are:
•
Auto
•
10 Mbps Full-Duplex
•
100 Mbps Full-Duplex
When the administrator chooses 10 Mbps Full Duplex or 100 Mbps Full-Duplex and
selects the Apply button, the following warning is displayed:
Warning: When Auto-Negotiation is disabled on the PCoIP device, it must also
be disabled on the switch. Additionally, the PCoIP device and switch must be
configured to use the same speed and duplex settings. Different settings may
result in a loss of network connectivity. Are you sure you want to continue?
The administrator must select OK to change the parameter setting.
Note: Administrators should always set the Ethernet Mode to Auto and only use 10
Mbps Full-Duplex or 100 Mbps Full-Duplex when the other network equipment, e.g.
switch, is also configured to operate at 10M Mbps Full-Duplex or 100M Mbps Full-Duplex.
An improperly-set Ethernet Mode may result in the network operating at Half-Duplex.
Half-Duplex is not supported by PCoIP; the session will be severely degraded and
eventually dropped.
1.6.2.8 Maximum MTU Size
The Maximum MTU Size option allows the administrator to configure the Maximum
Transmission Unit (MTU) packet size. A smaller MTU may be required in situations such
as VPN tunneling because PCoIP packets cannot be fragmented. The Maximum MTU
Size should be set to a value smaller than the network path MTU for the end-to-end
connection between the Host and Portal. The Maximum MTU Size range is 500 to 1500
bytes.
1.6.3 Connection Management
The Connection Management webpage allows an administrator to enable or disable
connection management and to specify the IP address of the connection manager.
In a managed connection, an external Connection Manager Server communicates with
and can remotely control and configure the device. Additionally, the connection manager
can locate an appropriate peer for the device to connect to and initiate the connection.
Connection management can greatly simplify the administration effort for a large,
complex system.
Note: The Portal Connection Management parameters can also be configured using the
Portal OSD. See Section 2.3.3 Connection Management.
23
PC-over-IP Administrative Interface User Manual
Figure 1-9: Connection Management Configuration Webpage (IP Address)
Figure 1-10: Connection Management Configuration Webpage (FQDN)
1.6.3.1 Enable Connection Management
If the Enable Connection Management option is enabled, the device can be configured
and controlled by an external connection manager.
1.6.3.2 Identify Connection Manager By
The Identify Connection Manager By selector allows the administrator to choose whether
the connection manager is identified by IP address or by Fully Qualified Domain Name
(FQDN). If connection management is disabled, this field is not required and is not
editable.
24
PC-over-IP Administrative Interface User Manual
Table 1-6 shows the configuration parameters available when either method is chosen. If
an invalid IP address or DNS name is entered, the web interface will prompt the
administrator to correct it.
Table 1-6: Connection Manager Method
Method
Data Fields
Figure
IP address
Connection Manager IP Address
See Figure 1-9
FQDN
Connection Manager DNS name
See Figure 1-10
1.6.3.3 Enable Event Log Notification
The Event Log Notification field controls whether the PCoIP Host and Portal devices send
the contents of their event logs to the connection management server
1.6.3.4 Enable Diagnostic Log
The Enable Diagnostic Log field controls whether connection management specific
debug messages are written to the event log of the PCoIP Host and Portal devices.
1.6.4 Discovery
The Discovery configuration webpage allows the use of features that ease the discovery
of Portals and Hosts in a PCoIP system.
Note: The Portal Discovery parameters can also be configured using the Portal OSD.
See Section 2.3.4 Discovery.
Figure 1-11: Discovery Configuration Webpage
1.6.4.1 SLP Discovery
Enable SLP Discovery
When the Enable SLP Discovery option is enabled, the Host and Portals can be
dynamically discovered by SLP management entities, without requiring prior knowledge
of their locations in the network.
Using a discovery mechanism can dramatically reduce the configuration and
maintenance effort for complex systems. This discovery mechanism is independent of
DNS SRV discovery.
25
PC-over-IP Administrative Interface User Manual
Enable Host Discovery
The Enable Host Discovery feature allows the Portal to discover Hosts that are not in a
PCoIP session.
When enabled, the Portal is able to display up to 10 available hosts in the order that they
were discovered. It is expected that the Enable Host Discovery feature will be used with
small numbers of Hosts.
This option is only available on a Portal; on the Host it is disabled and non-editable.
1.6.4.2 DNS SRV Discovery
Enable DNS SRV
When the Enable DNS SRV option is enabled, the Host and Portals can be dynamically
discovered by a discovery method that uses DNS SRV Resource Records, without
requiring prior knowledge of their locations in the network.
Using a discovery mechanism can dramatically reduce configuration and maintenance
effort for complex systems. This discovery mechanism is independent of SLP Discovery.
DNS SRV Discovery Delay
The DNS SRV Discovery Delay configures amount of delay time in seconds between
DNS SRV Discovery attempts. DNS SRV Discovery continues periodically until the
device is successful in contacting a Connection Management Server.
1.6.5 Session
The Session webpage allows an administrator to configure how the device connects to or
accepts connections from peer devices.
Note: The Portal Session parameters can also be configured using the Portal OSD. See
Section 2.3.5 Session.
26
PC-over-IP Administrative Interface User Manual
Figure 1-12: Session Configuration Webpage
Figure 1-13: Session Configuration Webpage (RDP)
1.6.5.1 Accept Any Peer
If the Accept Any Peer option is enabled, the host will accept connections from any
Portal. If this option is disabled, the administrator must specify the peer MAC address.
This option is only available on a Host; on the Portal it is disabled and non-editable.
27
PC-over-IP Administrative Interface User Manual
1.6.5.2 Session Type
The administrator can choose a PCoIP session or an RDP session.
For information on the Portal RDP client, see Section 6 Appendix C: Portal RDP
Compatibility
This option is only available on a Portal; on the Host it is disabled and non-editable.
1.6.5.3 Identify Peer By
The Identify Peer By selector allows the administrator to choose whether the peer device
is identified by IP and MAC address or by Fully Qualified Domain Name (FQDN). If
Accept Any Peer is enabled, these fields are not required and are not editable.
Table 1-7 shows the peer identity parameters available when either method is chosen. If
an invalid IP address or DNS name is entered, the web interface will prompt the
administrator to correct it.
Table 1-7: Peer Identity Methods
Peer Identity
Method
Data Fields
Comment
Figure
Peer IP/MAC
Peer IP Address (Portal
only)
PCoIP or Portal
RDP client
See Figure 1-12
Peer MAC Address
PCoIP
Peer DNS Name
Used with Portal
RDP client only
Peer FQDN
See Figure 1-13
1.6.5.4 Enable Auto-Reconnect
The Enable Auto-Reconnect option allows the Portal to automatically reconnect with the
last connected Host when a session is lost.
This option is only available on a Portal; on the Host it is disabled and non-editable.
1.6.5.5 Session Timeout
The Session Timeout configures the timeout for a connection. If the PCoIP processor
does not detect a network within the timeout period, the PCoIP processor will disconnect
the session.
1.6.6 Bandwidth
The Bandwidth webpage allows the device bandwidth to be limited for PCoIP Sessions.
Note: The Portal Bandwidth can also be configured using the Portal OSD. See Section
2.3.6 Bandwidth.
28
PC-over-IP Administrative Interface User Manual
Figure 1-14: Bandwidth Configuration Webpage
1.6.6.1 Device Bandwidth Limit
The Device Bandwidth Limit parameter defines the maximum bandwidth peak for the
PCoIP system. The bandwidth setting on the Host side defines the bandwidth from the
Host to the Portal (e.g. graphics data), while the Bandwidth setting on the Portal side
defines the bandwidth from the Portal to Host (e.g. USB data). The usable range of the
device bandwidth is 3 to 220 Mbps.
The PCoIP processor will continue to use only the bandwidth required up to the Device
Bandwidth Limit maximum. The PCoIP processor will dynamically adjust the bandwidth in
response to network congestion.
Setting the Device Bandwidth Limit to 0 configures the PCoIP processor to adjust the
bandwidth depending on network congestion. If there is no congestion, there will be no
limit on bandwidth—i.e. the processor will use the maximum rate available.
We recommended setting the Device Bandwidth Limit to the limit of the network
connected to the Portal and Host.
See Section 4.3 Bandwidth and Image Configuration Example for an example on setting
the Device Bandwidth Limit.
Note: The Device Bandwidth Limit is applied immediately after the administrator selects
Apply.
1.6.6.2 Device Bandwidth Target
The Device Bandwidth Target parameter defines the soft limit on the network bandwidth
during periods of congestion (packet loss). When the network experiences congestion,
the device bandwidth is reduced rapidly to the target value and more slowly below this
value. This allows for a more even distribution of bandwidth between users sharing a
congested network link. Administrators should have a good understanding of the network
topology before setting this to a non-zero value.
Note: The Device Bandwidth Target is applied when a new PCoIP session is started
after selecting Apply.
1.6.7 RDP
The RDP webpage allows the administrator to configure device settings specific to the
Remote Desktop Protocol (RDP).
29
PC-over-IP Administrative Interface User Manual
For information on the Portal RDP client, see Section 6 Appendix C: Portal RDP
Compatibility.
This option is only available on a Portal; on the Host it is disabled and non-editable.
Note: The Portal RDP parameters can also be configured using the Portal OSD. See
Section 2.3.7 RDP.
Figure 1-15: RDP Configuration Webpage
1.6.7.1 Resolution
The Resolution is the RDP screen resolution setting. Possible values are:
•
800x600
•
1024x768
•
1280x768
•
1280x1024
•
1440x900
•
1600x1200
•
1680x1050
•
1920x1200
1.6.7.2 Bit Depth
The Bit Depth is the RDP session colour bit depth. Possible values are:
•
8 bpp (bits per pixel)
•
16 bpp
•
24 bpp
1.6.7.3 Terminal Server Port
The Terminal Server Port sets the port number that the RDP client connects to.
30
PC-over-IP Administrative Interface User Manual
1.6.7.4 Audio Mode
The Audio Mode field configures where the audio playback occurs for the RDP session.
Possible options are:
•
Do not play
•
Play on client
•
Play on host
1.6.7.5 Enable Wallpaper
The Enable Wallpaper field enables the use of wallpaper with the RDP session.
1.6.7.6 Enable Themes
The Enable Themes field enables the use of desktop themes with the RDP session.
1.6.8 Language
The Language webpage allows the administrator to change the user interface language.
Note that this will affect the local OSD GUI.
This option is only available on a Portal; on the Host it is disabled and non-editable.
Note: The Portal Language parameters can also be configured using the Portal OSD.
See Section 2.3.8 Language.
Figure 1-16: Language Configuration Webpage
1.6.8.1 Language
The Language field allows the administrator to configure the language of the OSD.
Refer to Section 5 Appendix B: Portal Language and Keyboard Support for supported
languages.
1.6.8.2 Keyboard Layout
The Keyboard Layout field allows the administrator to change the keyboard layout.
Refer to Table 5-2 in Section 5 Appendix B: Portal Language and Keyboard Support for
supported keyboard layouts.
31
PC-over-IP Administrative Interface User Manual
1.6.9 OSD
The OSD webpage allows the administrator to modify the On Screen Display (OSD)
parameters.
This option is only available on a Portal; on the Host it is disabled and non-editable.
Note: The Portal OSD parameters can also be configured using the Portal OSD. See
Section 2.3.9 OSD.
Figure 1-17: OSD Configuration Webpage
1.6.9.1 Screen-Saver Message
The Screen-Saver Message field allows the administrator to change the OSD screensaver text. The text can be up to 240 characters.
The screen-saver is a simple black screen with the screen-saver text jumping randomly.
1.6.9.2 Screen-Saver Timeout
The Screen-Saver Timeout field allows the administrator to configure the screen-saver
timeout. The timeout can be configured in seconds, up to 9999 seconds. A setting of 0
seconds disables the screen-saver.
1.6.10
Image
The Image webpage allows the administrator to adjust the image (graphics) quality of the
PCoIP session.
This option is only available on a Portal; on the Host it is disabled and non-editable.
32
PC-over-IP Administrative Interface User Manual
Figure 1-18: Image Configuration Webpage
1.6.10.1
Minimum Image Quality
The Minimum Image Quality slider allows the administrator to make compromises
between image quality and frame rate when network bandwidth is limited. Some usage
cases may require lower-quality images at a higher frame rate, while in other cases
higher-quality images at a lower frame rate may be preferred.
In environments where the network bandwidth is constrained, moving the slider towards
Reduced allows higher frame rates; moving the slider towards Perception-Free allows
higher image quality. When network bandwidth is not constrained, the PCoIP system will
maintain perception-free quality regardless of the Minimum Image Quality setting.
Note: The Minimum Image Quality must be less than or equal to the Maximum Initial
Image Quality.
Note: The Minimum Image Quality can also be configured using the Portal OSD. See
Section 2.6.3 Image.
See Section 4.3 Bandwidth and Image Configuration Example for an example on setting
the Minimum Image Quality.
1.6.10.2
Maximum Initial Image Quality
The Maximum Initial Image Quality slider can be used to reduce network bandwidth
peaks caused by screen content changes. This setting limits the initial quality on the first
video frame of a screen change. Unchanged regions of the image will build to a lossless
state regardless of this setting.
Note: The Maximum Initial Image Quality must be greater than or equal to the Minimum
Image Quality.
Note: The Maximum Initial Image Quality does not have a corresponding parameter on
the Portal OSD, as it is intended as an administrator-only parameter.
1.6.11
Monitor Emulation
The Monitor Emulation webpage allows the monitor emulation feature to be enabled and
disabled.
33
PC-over-IP Administrative Interface User Manual
This option is only available on a Host; on the Portal it is disabled and non-editable.
Figure 1-19: Monitor Emulation Configuration Webpage
1.6.11.1
Enable Monitor Emulation
When Enable Monitor Emulation is disabled, the Host will only respond to Display Data
Channel (DDC) when in a PCoIP session. When Enable Monitor Emulation is enabled,
the Host will use emulated data for DDC queries regardless if in a PCoIP session of not.
Independent Enable Monitor Emulation fields are available for both monitor ports, DVI 1
and DVI 2.
1.6.12
Time
The Time webpage configures the Network Time Protocol (NTP) settings to allow the
event logs (see Section 1.8.1 Event Log) of the Portal and Host to be time-stamped
based on NTP time.
Figure 1-20: Time Configuration Webpage
1.6.12.1
Current Time
The Current time field displays the time based on the NTP.
34
PC-over-IP Administrative Interface User Manual
1.6.12.2
Enable NTP
The Enable NTP field allows the administrator to enable and disable the NTP feature.
1.6.12.3
Identify NTP Host By
The Identify NTP Host by selector allows the administrator to choose whether the NTP
Host is identified by IP address or by Fully Qualified Domain Name (FQDN). If NTP is
disabled, this field is not required and is not editable.
Table 1-8 shows the configuration parameters available when either method is chosen. If
an invalid IP address or DNS name is entered, the web interface will prompt the
administrator to correct it.
Table 1-8: NTP Host Method
Method
Data Fields
IP address
NTP Host IP Address
FQDN
NTP Host DNS name
1.6.12.4
NTP Host Port
The NTP Host Port field configures the NTP port number.
1.6.12.5
NTP Query Interval
The NTP Query Interval fields allow the administrator to configure the query interval. The
first field denotes the interval period and the second field denotes the time unit in
Minute(s), Hour(s), Day(s) and Week(s).
1.6.12.6
Time Zone
The Time Zone field allows configuration for the local time zone.
1.6.12.7
Enable Daylight Savings Time
The Enable Daylight Savings Time field allows the administrator to enable and disable
automatic adjustment for daylight savings time.
1.6.13
Password
The Password webpage allows the administrator to update the local administrative
password for the device. Note that this will affect the web interface and the local GUI.
The password can be a maximum of 20 characters.
Note: Care must be taken when updating the Portal Password as the Portal may become
unusable if the password is lost.
Note: The Portal Password can also be updated using the Portal OSD. See Section 2.7
Password.
35
PC-over-IP Administrative Interface User Manual
Figure 1-21: Password Configuration Webpage
1.6.13.1
Old Password
The Old Password field must match the current administrative password for the update to
take place.
1.6.13.2
New Password
The New Password field will be the new administrative password for both the web
interface and the local OSD GUI.
Note: The Host and Portal passwords are changed individually.
1.6.13.3
Confirm New Password
The Confirm New Password field must match the New Password field for the change to
take place.
1.6.14
Reset Parameters
The Reset webpage allows the administrator to reset all the configurable parameters
stored in flash.
Note: The Portal Reset Parameters can also be initiated using the Portal OSD. See
Section 2.3.10 Reset.
Figure 1-22: Reset Parameters Webpage
1.6.14.1
Reset Parameters
The Reset Parameters button resets all configuration and permissions to factory default
values. When this button is selected, the web interface will prompt the administrator for
confirmation to prevent accidental resets.
36
PC-over-IP Administrative Interface User Manual
1.7 Permissions Menu
The Permissions menu contains links to pages that define the range of functionality
exposed to the user. The webpages in the Permissions menu are:
•
USB
•
Audio
•
Power
Figure 1-23: Permissions Menu Navigation
1.7.1 USB
The USB webpage allows the administrator to specify authorized and unauthorized USB
devices. The USB webpage is divided into two sections: Authorized Devices (“white list”)
and Unauthorized Devices (“black list”). Entries can define an authorized or unauthorized
device (or group of devices) based on ID or Class. Using wildcards (or specifying “any”)
can reduce the number of entries needed to define all authorized or unauthorized
devices. See Section 4.4 USB Permissions Example in Appendix A: Usage Examples for
more details on USB configuration.
This option is only available on a Portal; on the Host it is disabled and non-editable.
Figure 1-24: USB Permissions Webpage
1.7.1.1 Authorized Devices
The Authorized Devices section allows the administrator to specify the authorized USB
devices for the Portal. Two buttons allow customization of this “white list.” The Add new
37
PC-over-IP Administrative Interface User Manual
button allows a new device or device group to be added to the list and the Remove
button allows a device or device group to be removed from the list.
Selecting the Add new button allows USB authorization by ID or Class. If ID is selected,
then this entry authorizes a USB device by Vendor ID and Product ID. If Class is
selected, then this entry authorizes a USB device by Device Class, Sub Class and
Protocol.
Note: USB authorizations are applied in the following priority order:
1. Unauthorized Vendor ID/Product ID (highest priority)
2. Authorized Vendor ID/Product ID
3. Unauthorized Device Class/Sub Class/Protocol
4. Authorized Device Class/Sub Class/Protocol (lowest priority)
Table 1-9 summarizes the USB authorization entry type and the associated data fields.
Table 1-9: USB Device Authorization Entry Types
Entry
Type
Required
Fields
Hexadecimal Value
ID
VID
0-FFFF
PID
0-FFFF
Device
Class
0-FF; asterisk (*) indicates
any device class
Drop-down menu provides
human-readable translations of
the known device classes
Sub Class
0-FF; asterisk (*) indicates
any device sub class
Drop-down menu provides
human-readable translations of
the known device sub classes
Protocol
0-FF; asterisk (*) indicates
any protocol authorized
Drop-down menu provides
human-readable translations of
the known protocols
Class
Comments
1.7.1.2 Unauthorized Devices
The Unauthorized Devices section allows the administrator to specify the unauthorized
USB devices for the Portal. Two buttons allow customization of this “black list.” The Add
new button allows a new device or device group to be added to the list and the Remove
button allows a device or device group to be removed from the list.
Selecting the Add new button allows USB unauthorization by Class or ID. If ID is
selected, then this entry unauthorizes a USB device by Vendor ID and Product ID. If
Class is selected, then this entry unauthorizes a USB device by Device Class, Sub Class
and Protocol.
Note: USB authorizations are applied in the following priority order:
1. Unauthorized Vendor ID/Product ID (highest priority)
2. Authorized Vendor ID/Product ID
3. Unauthorized Device Class/Sub Class/Protocol
38
PC-over-IP Administrative Interface User Manual
4. Authorized Device Class/Sub Class/Protocol (lowest priority)
Table 1-9 summarizes the USB unauthorization entry types and the associated data
fields.
Table 1-10: USB Device Unauthorization Entry Types
Entry
Type
Required
Fields
Hexadecimal Value
ID
VID
0-FFFF
PID
0-FFFF
Device
Class
0-FF; asterisk (*)
indicates any device
class
Drop-down menu provides
human-readable translations of
the known device classes
Sub Class
0-FF; asterisk (*)
indicates any device sub
class
Drop-down menu provides
human-readable translations of
the known device sub classes
Protocol
0-FF; asterisk (*)
indicates any protocol
authorized
Drop-down menu provides
human-readable translations of
the known protocols
Class
Comments
1.7.2 Audio
The Audio webpage allows the administrator to configure the audio permissions of the
device.
Figure 1-25: Audio Permissions Webpage
1.7.2.1 Enable HD Audio
The Enable HD Audio option enables and disables audio for the Host and Portal. For
audio to function, it must be enabled on both the Host and Portal.
If the Enable HD Audio option is disabled on the Host, the audio hardware will not be
available for the OS to enumerate.
39
PC-over-IP Administrative Interface User Manual
1.7.2.2 Enable Audio Compression
The Enable Audio Compression option enables and disables audio compression to
reduce the data bandwidth used for audio.
1.7.2.3 Enable Microsoft® Windows Vista® 64-bit Mode
The Enable Microsoft® Windows Vista® 64-bit Mode option enables the 64-bit workaround for Vista64 to avoid memory corruption when audio is enabled on host systems
that are running 64-bit operating systems and that have more than 4 GB of RAM.
This option is only available on a Host; on the Portal it is disabled and non-editable.
Note: This mode is not to be used with Windows XP64 or 32-bit operating systems.
Note: Enabling the 64-bit mode is not required for Linux 64-bit operating systems, as
Linux kernels should be compiled with latest Teradici audio codec support.
1.7.3 Power
The Power webpage allows the administrator to configure the power-off permissions of
the Portal.
Figure 1-26: Power Permissions Webpage
1.7.3.1 Portal Power Button
The Portal Power Button pull-down menu allows the Portal power button functionality to
be configured. The options for the Portal Power Button are:
•
Power-off not permitted
•
Soft Power-off only
•
Hard Power-off only
•
Soft and Hard Power-off
This option is only available on a Portal; on the Host it is disabled and non-editable.
1.8 Diagnostics Menu
The Diagnostics menu contains links to pages with run-time information and functions
that may be useful for troubleshooting. The webpages in the Diagnostics menu are:
•
Event Log
40
PC-over-IP Administrative Interface User Manual
•
Session Control
•
Session Statistics
•
Host CPU
•
Audio
•
Display
•
PCoIP Processor
Figure 1-27: Diagnostics Menu Navigation
1.8.1 Event Log
The Event Log webpage allows the administrator to view and clear event log messages
from the Portal or Host.
Note: The Portal Event Log can also be viewed using the Portal OSD. See Section 2.4.1
Event Log.
Figure 1-28: Event Log Webpage
1.8.1.1 Event log message
The Event log messages field allows the administrator to view and clear the message.
View
Selecting the View button opens a new browser window with all of the event log
messages (with timestamp information) stored on the device.
Clear
Selecting the Clear button deletes all of the stored event log messages.
41
PC-over-IP Administrative Interface User Manual
1.8.1.2 Event log filter mode
The Event log filter mode pull-down menu allows the event log to be filtered. The options
are:
•
Verbose
•
Terse
1.8.2 Session Control
The Session Control webpage allows control of the device session.
Figure 1-29: Session Control Webpage
1.8.2.1 Connection State
The Connection State field reports the current state of the session. Values are:
•
Disconnected
•
Connection Pending
•
Connected
Below the Connection State field there are two buttons, Connect and Disconnect.
Connect
If the Connection State is Disconnected, selecting this button causes the Portal to initiate
a PCoIP session with its peer device. If the Connection State is Connection Pending or
Connected, this button is disabled.
This option is only available on a Portal; on the Host it is disabled and non-editable.
Disconnect
If the Connection State is Connected or Connection Pending, selecting this button causes
the device to end the PCoIP session. If the Connection State is Disconnected, this button
is disabled.
1.8.2.2 Peer IP/MAC Address
Peer IP Address
The Peer IP Address reports the IP address of the peer device. When not in session, the
field is blank.
42
PC-over-IP Administrative Interface User Manual
Peer MAC Address
The Peer MAC Address displays the MAC address of the peer currently in session. When
not in session, the field is blank.
1.8.3 Session Statistics
The Session Statistics webpage allows the administrator to view PCoIP-specific statistics.
Note: A subset of Session Statistics can also be viewed using the Portal OSD. See
Section 2.4.2 Session Statistics.
Figure 1-30: Session Statistics Webpage
1.8.3.1 Connection State
The Connection State field reports the current state of the PCoIP session. Connection
State values are:
•
Asleep
•
Cancelling
•
Connected
•
Connection Pending
•
Disconnected
•
Waking
1.8.3.2 PCoIP Packets Statistics
PCoIP Packets Sent
PCoIP Packets Sent reports the total number of PCoIP packets sent in the current
session.
PCoIP Packets Received
PCoIP Packets Received reports the total number of PCoIP packets received in the
current session.
43
PC-over-IP Administrative Interface User Manual
PCoIP Packets Lost
PC0IP Packets Lost reports the total number of PCoIP packets lost in the current
session.
1.8.3.3 Bytes Statistics
Bytes Sent
Bytes Sent reports the total number of bytes sent in the current session.
Bytes Received
Bytes Received reports the total number of bytes received in the current session.
1.8.3.4 Round Trip Latency
The Round Trip Latency field reports the total round-trip PCoIP system (e.g. Host to
Portal, and back to Host) and network latency in milliseconds (+/- 1 ms).
1.8.3.5 Bandwidth Statistics
Active Bandwidth Limit
Active Bandwidth Limit displays the maximum amount of network traffic the Tera1x00
processor may currently generate. The value is derived from the configured bandwidth
settings (see Section 1.6.6 Bandwidth) and the current network congestion levels.
Bandwidth Utilization
Bandwidth Utilization reports the average amount of traffic generated by the Tera1x00
processor at a particular moment in time.
1.8.3.6 Display Frame Rate
Display 1 Frame Rate
Display 1 Frame Rate reports the frame rate of Display 1. It is reported in frames per
second (fps).
Display 2 Frame Rate
Display 2 Frame Rate reports the frame rate of Display 2. It is reported in frames per
second (fps).
This option is only available on a Host; on the Portal the reported frames per second is 0
fps.
1.8.4 Host CPU
The Host CPU webpage allows the administrator to view and modify the Host information
and state.
This option is only available on a Host; on the Portal it is disabled and non-editable.
44
PC-over-IP Administrative Interface User Manual
Figure 1-31: Host CPU Webpage
1.8.4.1 Host Identity
The Host Identity field displays the host computer identity string (if data is available).
1.8.4.2 Current Power State
The Current Power State field displays the current host power state.
1.8.4.3 Change Power State
The Change Power State pull-down menu allows the administrator to change the host
power state. The options are:
•
S5 (Soft Off)
•
S5 (Hard Off)
Note: This requires compatible Host hardware architecture.
This option is only available on a Host; on the Portal it is disabled and non-editable.
1.8.4.4 Reset host CPU
The Reset Host CPU button allows reset of the Host CPU.
Note: This requires the Host hardware to support remote resetting.
This option is only available on a Host; on the Portal it is disabled and non-editable.
1.8.5 Audio
The Audio webpage allows the administrator to generate an audio test tone from the
Portal.
This option is only available on a Portal when not in a PCoIP session; on the Host it is
disabled and non-editable.
45
PC-over-IP Administrative Interface User Manual
Figure 1-32: Audio Diagnostics Webpage
1.8.5.1 Generate an audio test tone (portal only)
There are two buttons available: The Start button starts the test tone and the Stop button
stops the test tone.
This option is only available on a Portal; on the Host it is disabled and non-editable.
1.8.6 Display
The Display webpage allows the administrator to display a test pattern on the Portal
displays.
This option is only available on a Portal when not in a PCoIP session; on the Host it is
disabled and non-editable.
Figure 1-33: Display Webpage
1.8.6.1 Test mode
The Test Mode pull-down menu allows the administrator to enable a test pattern on the
attached monitor(s). The test pattern options are
•
Video Test Pattern Generator
•
Pseudo Random Bitstream
This option is only available on a Portal; on the Host it is disabled and non-editable.
1.8.6.2 Test resolution
The Test resolution pull-down menu sets the test pattern resolution. The options are:
•
1024x768
•
1280x1024
46
PC-over-IP Administrative Interface User Manual
•
1600x1200
•
1920x1200
This option is only available on a Portal; on the Host it is disabled and non-editable.
1.8.6.3 Start/Stop
The Start button starts the test pattern and the Stop button stops the test pattern.
This option is only available on a Portal; on the Host it is disabled and non-editable.
1.8.7 PCoIP Processor
The Reset PCoIP Processor Reset button allows the administrator to reset the device
processor.
Figure 1-34: PCoIP Processor Webpage
1.8.7.1 Current Time
The Current Time field displays the current time. This feature requires that the NTP be
enabled and configured as described in Section 1.6.12 Time.
1.8.7.2 Time Since Boot
The Time Since Boot field allows a user to view the uptime of the Portal PCoIP processor
since last boot.
Note: The Portal Uptime can also be viewed using the Portal OSD. See Section 2.4.3
PCoIP Processor.
1.8.7.3 Reset PCoIP Processor
The Reset PCoIP Processor button allows the administrator to reset the PCoIP Portal or
Host.
1.9 Info Menu
The Info menu contains links to pages that show information about the device. The
webpages in the Info menu are:
•
Version
47
PC-over-IP Administrative Interface User Manual
•
Attached Devices
Figure 1-35: Info Menu Navigation
1.9.1 Version
The Version webpage allows the administrator to view hardware and firmware version
information.
Note: The Portal Version information can also be viewed using the Portal OSD. See
Section 2.5 Information.
Figure 1-36: Version Webpage
1.9.1.1 VPD Information
Vital Product Data (VPD) is information provisioned by the factory to uniquely identify
each Portal or Host.
Note: The VPD information can also be viewed using the Portal OSD. See Section
2.5.1.1 VPD Information.
48
PC-over-IP Administrative Interface User Manual
Table 1-11: VPD Information
MAC Address
Portal/Host unique MAC address
Unique Identifier
Portal/Host unique identifier
Serial Number
Portal/Host unique serial number
Firmware Part Number
Part number of the current PCoIP firmware
Hardware Version
Portal/Host hardware version number
1.9.1.2 Firmware Information
The firmware information reflects the current PCoIP firmware details.
Note: The Firmware information can also be viewed using the Portal OSD. See Section
2.5.1.2 Firmware Information.
Table 1-12: Firmware Information
Firmware Version
Version of the current PCoIP firmware
Firmware Build ID
Revision code of the current PCoIP firmware
Firmware Build Date
Build date of the current PCoIP firmware
1.9.1.3 PCoIP Processor Revision
The PCoIP Processor Revision code reports the silicon revision of the PCoIP processor.
Revision B of the silicon is denoted by 1.0.
Note: The PCoIP Processor Revision information can also be viewed using the Portal
OSD. See Section 2.5.1.3 PCoIP Processor Revision.
1.9.1.4 Bootloader Information
The Bootloader information reflects the current PCoIP bootloader details.
Table 1-13: VPD Information
Bootloader Version
Version of the current PCoIP bootloader
Bootloader Build ID
Revision code of the current PCoIP bootloader
Bootloader Build Date
Build date of the current PCoIP bootloader
1.9.2 Attached Devices
The Attached Devices webpage reports the type and status of the Monitor and USB
hardware currently attached to the Portal.
49
PC-over-IP Administrative Interface User Manual
Figure 1-37: Attached Devices Webpage
1.9.2.1 Monitors
The Monitors section reports the Name, Serial Number, Vendor Identification (VID),
Product Identification (PID), Date, and Status of the monitor attached to each port. The
first line provides information for monitor 1 and the second line provides information for
monitor 2.
This option is available on a Portal and is available on the Host when in a PCoIP session.
1.9.2.2 USB Devices
The USB Devices section reports the Name, Serial Number, Vendor Identification (VID),
Product Identification (PID), Device Class, Sub Class, Protocol, and Status of the USB
device attached to each port. The first line provides information for the first USB port, the
second line provides information for the second port, etc.
Table 1-14 summarizes the possible Status descriptors for USB Devices.
Table 1-14: USB Device Status
Status
Description
Not Connected
No device connected
Standalone
Device detected outside of a PCoIP session
Not Initialized
Device detected in a PCoIP session, but host controller has not
initialized the device
Failed Authorized
Device detected in a PCoIP session, but not authorized (see
Section 1.7.1)
Locally Connected
Device detected and authorized, but locally terminated in a
PCoIP session (e.g. local cursor)
Connected
Device detected and authorized in a PCoIP session
This option is only available on a Portal; on the Host it is disabled and non-editable.
1.10 Upload Menu
The Upload menu contains links to pages that can be used to upload files to the device.
The webpages in the Upload menu are:
50
PC-over-IP Administrative Interface User Manual
•
Firmware
•
OSD Logo
Figure 1-38: Upload Menu Navigation
1.10.1
Firmware
The Firmware webpage allows the administrator to upload a new firmware build to the
Portal or Host.
Figure 1-39: Firmware Upload Webpage
1.10.1.1
Firmware build filename
The Firmware build filename field specifies the filename of the firmware image to be
uploaded. The administrator can browse to the file via the Browse button. The file must
be accessible to the web browser (i.e. on a local or accessible network drive). The
firmware image must be an “.all” file.
1.10.1.2
Upload
Selecting the Upload button will cause the specified file to be transferred to the device.
The web interface will prompt the administrator for confirmation to avoid accidental
uploads.
Note: Ensure that both the Portal and Host have the same firmware release.
Example Firmware Upload Process:
1. Ensure host PC or Workstation is in a idle state (all applications must be closed).
2. Log into the Host Administration Web Interface
3. Select the Firmware Upload webpage Browse button to browse to the firmware “.all”
file, e.g. tera1x00_rel1-9_v175.all
4. Select the File Upload window Open button
5. Select the webpage Upload button
51
PC-over-IP Administrative Interface User Manual
6. Select the webpage OK button on the warning window that reads, “Are you sure? This
will upload a new firmware image. This operation may take a few minutes.”
7. Wait for the firmware upload to complete. The following message appears when
complete: “Success Flash successfully programmed! You must reset the device for
the changes to take effect.”
8. Select the Reset button.
9. Select the OK button on the warning window that reads, "The PCoIP processor will
reset on the next host system restart; your changes will take effect then. Are you sure
you want to proceed?"
10.Repeat steps 2 through 7 on the Portal, but do not restart the Portal.
11.Restart the Host PC or Workstation
12. Reset the Portal
13.Start PCoIP Session
1.10.2
OSD Logo
The OSD Logo webpage allows an image to be uploaded to the device. This image is
displayed on the connect window of the local GUI On Screen Display (OSD) logo.
This option is only available on a Portal; on the Host it is disabled and non-editable.
Figure 1-40: OSD Logo Upload Webpage
1.10.2.1
OSD logo filename
The OSD logo filename field specifies the filename of the logo image to be uploaded. The
administrator can browse to the file via the Browse button. The file must be accessible to
the web browser (i.e. on a local or accessible network drive).
The 24 bits-per-pixel image must be either JPG or BMP format and its dimensions cannot
exceed 256 pixels in width, 64 pixels in height. If the file extension is incorrect, the web
interface will display an error message.
1.10.2.2
Upload
Selecting the Upload button will cause the specified file to be transferred to the device.
The web interface will prompt the administrator for confirmation to avoid accidental image
uploads.
Example OSD Logo Upload Process:
1. Select the webpage Browse button to browse to the logo file
2. Select the File Upload window Open button
52
PC-over-IP Administrative Interface User Manual
3. Select the webpage Upload button
4. Select the OK button on the warning window that reads, “Are you sure? This will
upload a new logo for local GUI. This operation may take a few minutes.”
5. Wait for the OSD Logo upload to complete. The following message appears when
complete: “Success Flash successfully programmed! You must reset the device for
the changes to take effect.”
6. Reset the Portal
53
PC-over-IP Administrative Interface User Manual
2
On Screen Display (OSD)
The On Screen Display (OSD) local GUI (Portal only) is displayed to the user when the
device is powered on and a PCoIP session is not in progress. The OSD provides a
mechanism to connect to a host device via the Connect Screen. The Connect Screen is
presented to the user on startup.
The Connect Screen also allows access to the Options Window. The Options Window
provides a subset of the functionality provided by the Administrative Web Interface
described in Section 1. The Options Window is accessible through the Options button on
the Connect Screen. An administrative password is required to change Portal options.
2.1 Connect Screen
The Connect Screen is shown on startup except when the Portal has been configured for
a managed start-up or auto-reconnect.
The logo displayed above the Connect button can be changed by uploading a
replacement image via the Administrative Web Interface. Refer to 1.10.2 for information
on updating the Connect Screen logo.
Figure 2-1: OSD Connect Screen
54
PC-over-IP Administrative Interface User Manual
2.1.1 Connect Button
Selecting the Connect button initiates a PCoIP or RDP session, depending on the
session settings. While the PCoIP connection is pending, the OSD local GUI will display
a “Connection Pending” message. When the connection is established, the OSD local
GUI will disappear and be replaced with the session image.
Figure 2-2: OSD Connect Screen (Connecting)
2.2 OSD Options Menu
Selecting the Options menu will produce a list of selections. The OSD Options menu
contains:
•
Configuration
•
Diagnostics
•
Information
•
User Settings
•
Password
Selecting one of the selections will produce a settings window.
55
PC-over-IP Administrative Interface User Manual
Figure 2-3: OSD Options Menu
2.3 Configuration Window
The Configuration window allows the administrator to access window tabs with settings
that define how the Portal operates and interacts with its environment.
The tabs in the Configuration window are:
•
Network
•
Connection Management
•
Discovery
•
Session
•
Bandwidth
•
RDP
•
Language
•
OSD
•
Reset
Each tab has OK, Cancel, and Apply buttons that allow the administrator to accept or
cancel the setting changes made on the tab.
56
PC-over-IP Administrative Interface User Manual
2.3.1 Unlocking the Configuration Settings
All settings in the configuration tabs are password-protected. To unlock the settings:
1. Select the Unlock button in the bottom left corner of the Configuration window
2. Enter the password
3. Select the OK button
Figure 2-4: Setting Unlock OSD
2.3.2 Network Tab
The Network tab allows an administrator to set the Portal network parameters.
Note: The Network parameters can also be configured using the Webpage Administration
Interface. See Section 1.6.2 Network.
57
PC-over-IP Administrative Interface User Manual
Figure 2-5: Network Configuration
2.3.2.1 Enable DHCP
When Enable DHCP is enabled, the device will contact a DHCP server to be assigned an
IP address, subnet mask, gateway IP address and DNS servers. When disabled, the
device requires these parameters to be set manually.
2.3.2.2 IP Address
The IP Address field is the device’s IP address. If DHCP is disabled, this field is required.
If DHCP is enabled, this field is not editable. This field must be a valid IP address; if an
invalid IP address is entered, the OSD will prompt the administrator to correct it.
2.3.2.3 Subnet Mask
The Subnet Mask field is the device’s subnet mask. If DHCP is disabled, this field is
required. If DHCP is enabled, this field is not editable. This field must be a valid subnet
mask; if an invalid subnet mask is entered, the OSD will prompt the administrator to
correct it.
2.3.2.4 Gateway
The Gateway field is the device’s gateway IP address. If DHCP is disabled, this field is
required. If DHCP is enabled, this field is not editable. This field must be a valid IP
address; if an invalid IP address is entered, the OSD will prompt the administrator to
correct it.
2.3.2.5 Primary DNS Server
The Primary DNS Server field is the device’s primary DNS IP address. This field is
optional. If DHCP is enabled, this field is not editable. This field must be a valid IP
address; if an invalid IP address is entered, the OSD will prompt the administrator to
correct it.
58
PC-over-IP Administrative Interface User Manual
2.3.2.6 Secondary DNS Server
The Secondary DNS Server field is the device’s secondary DNS IP address. This field is
optional. If DHCP is enabled, this field is not editable. This field must be a valid IP
address; if an invalid IP address is entered, the OSD will prompt the administrator to
correct it.
2.3.2.7 Ethernet Mode
The Ethernet Mode field configures the Ethernet mode of the Portal. The options are:
•
Auto
•
10 Mbps Full-Duplex
•
100 Mbps Full-Duplex
Note: Administrators should always set the Ethernet Mode to Auto and only use 10
Mbps Full-Duplex or 100 Mbps Full-Duplex when the other network equipment, e.g.
switch, is also configured to operate at 10M Mbps Full-Duplex or 100M Mbps Full-Duplex.
2.3.3 Connection Management Tab
The Connection Management tab allows the administrator to enable or disable
connection management and to specify the IP address of the connection manager.
In a managed connection, an external Connection Manager Server communicates with
and can remotely control and configure the device. Additionally, the connection manager
can locate an appropriate peer for the device to connect to and initiate the connection.
Connection management can greatly simplify the administration effort for a large,
complex system.
Note: The Connection Management parameters can also be configured using the
Webpage Administration Interface. See Section 1.6.3 Connection Management.
Figure 2-6: Connection Management Configuration
59
PC-over-IP Administrative Interface User Manual
2.3.3.1 Enable Connection Management
If the Enable Connection Management option is enabled, the device can be configured
and controlled by an external connection manager.
2.3.3.2 Identify Connection Manager By
The Identify Connection Manager selector allows the administrator to choose whether the
connection manager is identified by IP address or by Fully Qualified Domain Name
(FQDN). If connection management is disabled, this field is not required and is not
editable.
Table 2-1 shows the configuration parameters available when either method is chosen. If
an invalid IP address or DNS name is entered, the OSD will prompt the administrator to
correct it.
Table 2-1: Connection Manager Method
Method
Data Fields
IP address
Connection Manager IP Address
FQDN
Connection Manager DNS name
2.3.3.3 Enable Event Log Notification
The Event Log Notification field controls whether the PCoIP Host and Portal devices send
the contents of their event logs to the connection management server
2.3.3.4 Enable Diagnostic Log
The Enable Diagnostic Log field controls whether connection management specific
debug messages are written to the event log of the PCoIP Host and Portal devices.
2.3.4 Discovery Tab
The Discovery configuration tab allows the use of features that ease the discovery of
Portals in a PCoIP system.
Note: The Discovery parameters can also be configured using the Webpage
Administration Interface. See Section 1.6.4 Discovery.
60
PC-over-IP Administrative Interface User Manual
Figure 2-7: Discovery Configuration
2.3.4.1 Enable Discovery
If the Enable Discovery option is enabled, the device will dynamically discover peer
devices and management entities, without requiring prior knowledge of their locations in
the network. This can dramatically reduce configuration and maintenance effort for
complex systems.
2.3.4.2 Enable Host Discovery
The Enable Host Discovery feature allows the Portal to discover Hosts that are not in a
PCoIP session.
When enabled, the Portal is able to display up to 10 available hosts in the order they are
discovered. It is expected that the Enable Host Discovery feature will be used with small
numbers of Hosts.
2.3.5 Session Tab
The Session tab allows an administrator to configure how the device connects to peer
devices.
Note: The Session parameters can also be configured using the Webpage Administration
Interface. See Section 1.6.5 Session.
61
PC-over-IP Administrative Interface User Manual
Figure 2-8: Session Configuration
2.3.5.1 Session Type
The Session Type allows the administrator to configure the Portal for a PCoIP session or
RDP session.
For information on the Portal RDP client, see Section 6 Appendix C: Portal RDP
Compatibility.
2.3.5.2 Identify Peer By
The Identify Peer By selector allows the administrator to choose whether the peer device
is identified by IP and MAC address or by Fully Qualified Domain Name (FQDN).
Table 2-2 shows the peer identity parameters available when either method is chosen. If
an invalid IP address or DNS name is entered, the OSD will prompt the administrator to
correct it.
Table 2-2: Peer Identity Methods
Peer Identity Method
Data Fields
Comment
Peer IP/MAC
Peer IP Address
PCoIP or Portal RDP client
Peer MAC Address
PCoIP
Peer FQDN
Used with Portal RDP client only
Peer FQDN
2.3.5.3 Enable Auto-Reconnect
The Enable Auto-Reconnect option allows the Portal to automatically reconnect with the
last connected Host when a session is lost.
62
PC-over-IP Administrative Interface User Manual
2.3.5.4 Session Timeout
The Session Timeout configures the timeout for a connection. If the PCoIP processor
does not detect a network within the timeout period, the PCoIP processor will disconnect
the session.
2.3.6 Bandwidth Tab
The Bandwidth tab allows the administrator to limit the Portal bandwidth.
Note: The Bandwidth can also be configured using the Webpage Administration
Interface. See Section 1.6.6 Bandwidth.
Figure 2-9: Bandwidth
2.3.6.1 Device Bandwidth Limit
The Device Bandwidth Limit parameter defines the maximum bandwidth peak for the
PCoIP system. The bandwidth setting on the Host side defines the bandwidth from the
Host to the Portal (e.g. graphics data) and the Bandwidth setting on the Portal side
defines the bandwidth from the Portal to Host (e.g. USB data). The usable range of the
maximum device bandwidth is 3 to 220 Mbps.
The PCoIP processor will continue to use only the bandwidth required up to the Device
Bandwidth Limit maximum. The PCoIP processor will dynamically adjust the bandwidth in
response to network congestion.
Setting the Device Bandwidth Limit to 0 configures the PCoIP processor to adjust the
bandwidth depending on network congestion. If there is no congestion, there will be no
limit; i.e. the PCoIP processor will use the maximum rate available.
We recommend setting the Device Bandwidth Limit to the limit of the network connected
to the Portal and Host.
63
PC-over-IP Administrative Interface User Manual
See Section 4.3 Bandwidth and Image Configuration Example for an example on setting
the Device Bandwidth Limit.
2.3.7 RDP Tab
The RDP tab allows the administrator to configure settings specific to the Remote
Desktop Protocol (RDP).
For information on the Portal RDP client, see Section 6 Appendix C: Portal RDP
Compatibility.
Note: The RDP parameters can also be configured using the Webpage Administration
Interface. See Section 1.6.7 RDP.
Figure 2-10: RDP Configuration
2.3.7.1 Resolution
The Resolution field is the RDP screen resolution setting. Possible values are:
•
800x600
•
1024x768
•
1280x768
•
1280x1024
•
1440x900
•
1600x1200
•
1680x1050
•
1920x1200
64
PC-over-IP Administrative Interface User Manual
2.3.7.2 Bit Depth
The Bit Depth is the RDP session colour bit depth. Possible values are:
•
8 bpp (bits per pixel)
•
16 bpp
•
24 bpp
2.3.7.3 Terminal Server Port
The Terminal Server Port field sets the port number that the RDP client connects to.
2.3.7.4 Audio Mode
The Audio Mode field configures where the audio playback occurs for the RDP session.
Possible options are:
•
None
•
Play on client
•
Play on host
2.3.7.5 Enable Wallpaper
The Enable Wallpaper field enables the use of wallpaper with the RDP session.
2.3.7.6 Enable Themes
The Enable Themes field enables the use of desktop themes with the RDP session.
2.3.8 Language Tab
The Language field allows the administrator to configure the language of the OSD.
Note: The Language parameters can also be configured using the Webpage
Administration Interface. See Section 1.6.8 Language.
65
PC-over-IP Administrative Interface User Manual
Figure 2-11: Language Configuration
2.3.8.1 Language
The Language field allows the administrator to configure the language of the OSD.
Refer to Section 5 Appendix B: Portal Language and Keyboard Support for supported
languages.
2.3.8.2 Keyboard Layout
The Keyboard Layout field allows the administrator to change the keyboard layout.
Refer to Table 5-2 in Section 5 Appendix B: Portal Language and Keyboard Support for
supported keyboard layouts.
2.3.9 OSD Tab
The OSD tab allows the administrator to modify the On Screen Display (OSD)
parameters.
Note: The OSD parameters can also be configured using the Webpage Administration
Interface. See Section 1.6.9 OSD.
66
PC-over-IP Administrative Interface User Manual
Figure 2-12: OSD Configuration
2.3.9.1 Screen-Saver Message
The Screen-Saver Message field allows the administrator to change the OSD screensaver text. The text can be up to 240 characters.
The screen-screen saver is a simple black screen with the screen-saver text jumping
randomly.
2.3.9.2 Screen-Saver Timeout
The Screen-Saver Timeout field allows the administrator to configure the screen-saver
timeout. The timeout can be configured in seconds, up to 9999 seconds. A setting of 0
seconds disables the screen-saver.
2.3.10
Reset Tab
The Reset tab allows the administrator to reset all the configurable parameters stored in
flash.
Note: The Reset can also be initiated using the Webpage Administration Interface. See
Section 1.6.14 Reset Parameters.
67
PC-over-IP Administrative Interface User Manual
Figure 2-13: Reset
2.3.10.1
Reset Parameters
The Reset Parameters Reset button resets all configuration and permissions to factory
default values. When this button is selected, the OSD will prompt the administrator for
confirmation to prevent accidental resets.
2.4 Diagnostics Window
The Diagnostics window allows the administrator to access window tabs with diagnostics
concerning the Portal. The tabs in the Diagnostics window are:
•
Event Log
•
Session Statistics
•
PCoIP Processor
•
Ping
Each tab has a Close button to close the window.
2.4.1 Event Log Tab
The Event Log tab allows the administrator to view and clear event log messages from
the Portal.
Note: The Event Log (terse or verbose) can also be initiated using the Webpage
Administration Interface. See Section 1.8.1 Event Log.
68
PC-over-IP Administrative Interface User Manual
Figure 2-14: Event Log
2.4.1.1 View event log message
The View event log messages field displays log messages with timestamp information.
There are two associated buttons available.
Refresh
Selecting the Refresh button refreshes the event log messages displayed.
Clear
Selecting the Clear button clears all of the displayed event log messages.
2.4.2 Session Statistics Tab
The Session Statistics tab allows the administrator to view PCoIP-specific statistics.
Note: Session Statistics can also be viewed using the Webpage Administration Interface.
See Section 1.8.3 Session Statistics.
69
PC-over-IP Administrative Interface User Manual
Figure 2-15: Session Statistics
2.4.2.1 PCoIP Packets Statistics
PCoIP Packets Sent
The PCoIP Packets Sent field reports the total number of PCoIP packets sent from the
Portal to the Host in the last active session.
PCoIP Packets Received
The PCoIP Packets Received field reports the total number of PCoIP packets received
from the Host to the Portal in the last active session.
PCoIP Packets Lost
The PCoIP Packets Lost field reports the total number of PCoIP packets lost in the last
active session.
2.4.2.2 Bytes Statistics
Bytes Sent
The Bytes Sent field reports the total number of bytes sent in the last active session.
Bytes Received
The Bytes Received field reports the total number of bytes received in the last active
session.
2.4.2.3 Round Trip Latency
The Round Trip Latency field reports the total round-trip PCoIP system (e.g. Portal to
Host and back to Portal) and network latency in milliseconds (+/- 1 ms).
70
PC-over-IP Administrative Interface User Manual
2.4.3 PCoIP Processor Tab
The PCoIP Processor tab allows the administrator to view the uptime of the Portal PCoIP
processor since last boot.
Note: The PCoIP Processor Uptime can also be viewed in the Webpage Administration
Interface. See Section 1.8.7 PCoIP Processor.
Figure 2-16: PCoIP Processor
2.4.4 Ping Tab
The Ping tab allows the administrator to ping a device to see if it is reachable across an
IP network. This may be useful for determining if a Host is reachable.
Note: The Ping tab has no matching menu in the Webpage Administration Interface of
Section 1.
71
PC-over-IP Administrative Interface User Manual
Figure 2-17: Ping
2.4.4.1 Ping Settings
IP Address
IP Address to ping
Interval
Interval between ping packets
Packet Size
Size of ping packet
2.4.4.2 Packets
Sent
Number of ping packets sent
Received
Number of ping packets received
2.5 Information Window
The Information window allows an administrator to access the Version tab containing
information about the device.
Note: The Version information can also be viewed using the Webpage Administration
Interface. See Section 1.9.1 Version.
72
PC-over-IP Administrative Interface User Manual
Figure 2-18: Version
2.5.1.1 VPD Information
Vital Product Data (VPD) is information provisioned by the factory to uniquely identify
each Portal or Host.
Table 2-3: VPD Information
MAC Address
Portal unique MAC address
Unique Identifier
Portal unique identifier
Serial Number
Portal unique serial number
Firmware Part Number
Part number of PCoIP firmware
Hardware Version
Portal hardware version number
2.5.1.2 Firmware Information
The firmware information reflects the current PCoIP firmware details.
Table 2-4: Firmware Information
Firmware Version
Version of the current PCoIP firmware
Firmware Build ID
Revision code of the current PCoIP firmware
Firmware Build Date
Build date of the current PCoIP firmware
2.5.1.3 PCoIP Processor Revision
The PCoIP Processor Revision field reports the PCoIP Processor Revision code.
TERA1x00 Revision A silicon is denoted by 0.0 and TERA1x00 Revision B silicon is
denoted by 1.0.
73
PC-over-IP Administrative Interface User Manual
2.5.1.4 Bootloader Information
The Bootloader information reflects the current PCoIP bootloader details.
Table 2-5: Firmware Information
Bootloader Version
Version of the current PCoIP bootloader
Bootloader Build ID
Revision code of the current PCoIP bootloader
Bootloader Build Date
Build date of the current PCoIP bootloader
2.6 User Settings Window
The User Settings window allows the user to access window tabs that define the mouse
and keyboard settings and the PCoIP image quality.
The tabs in the User Settings menu are:
•
Mouse
•
Keyboard
•
Image
2.6.1 Mouse Tab
The Mouse tab allows a user to change the mouse cursor speed settings for the OSD
and RDP sessions.
Note: The OSD mouse cursor speed setting does not affect the mouse cursor settings
when a PCoIP session is active.
Note: The Mouse tab has no corresponding menu in the Webpage Administration
Interface of Section 1.
Figure 2-19: Mouse
74
PC-over-IP Administrative Interface User Manual
Mouse Speed
The Mouse Speed field allows the Portal mouse cursor speed to be configured.
2.6.2 Keyboard Tab
The Keyboard tab allows a user to change the keyboard repeat settings for the OSD and
RDP sessions.
Note: The keyboard settings do not affect the keyboard settings when a PCoIP session is
active.
Note: The Keyboard tab has no corresponding menu in the Webpage Administration
Interface of Section 1.
Figure 2-20: Keyboard
Keyboard Repeat Delay
The Keyboard Repeat Delay field allows a user to configure the Portal keyboard repeat
delay.
Keyboard Repeat Rate
The Keyboard Repeat Rate field allows a user to configure the Portal keyboard repeat
rate.
Repeat Settings Test Box
The Repeat Settings Test Box field allows a user to test the chosen keyboard settings.
2.6.3 Image Tab
The Image tab allows a user to change the image settings on the PCoIP system.
Note: The Image parameters can also be configured using the Webpage Administration
Interface. See Section 1.6.10.1 Minimum Image Quality.
75
PC-over-IP Administrative Interface User Manual
Figure 2-21: Image
Minimum Image Quality
The Minimal Image Quality slider allows a user to make compromises between image
quality and frame rate when network bandwidth is limited. Some usage cases may
require lower-quality images at a higher frame rate, while in other cases higher-quality
images at a lower frame rate may be preferred.
In environments where network bandwidth is constrained, moving the slider towards
Reduced allows higher frame rates; moving the slider towards Perception-Free allows
higher image quality.
When network bandwidth is not constrained, the PCoIP system will maintain perceptionfree quality regardless of the Minimum Image Quality setting.
2.7 Password Window
The Password window allows an administrator to update the administrative password for
the device. Note that this will affect the web interface and the local OSD GUI.
Note: Care must be taken when updating the Portal Password as the Portal may become
unusable if the password is lost.
Note: The Password can also be updated using the Webpage Administration Interface.
See Section 1.6.13 Password .
76
PC-over-IP Administrative Interface User Manual
Figure 2-22: Change Password
Old Password
The Old Password field must match the current administrative password for the change
to take place.
New Password
The New Password field will be the new administrative password for both the web
interface and the local OSD GUI.
Confirm New Password
The Confirm New Password field must match the New Password field for the change to
take place.
77
PC-over-IP Administrative Interface User Manual
3
Overlay Windows
Overlay windows provide a mechanism for displaying information to the user while a
PCoIP session is in progress. These windows are occasionally displayed on top of the
user’s remote session.
Status overlay windows are used to show network, USB device status and monitor status
in the form of icons and text. The overlays have simple animation and are displayed
when the status changes (i.e., the network connection is lost or an unauthorized USB
device is plugged in).
3.1 Network Connection Lost Overlay
Loss of network connectivity is indicated using an overlay with the message “Network
connection lost” over the most recent screen data. An example is shown in Figure 3-1.
Figure 3-1: Network Connection Lost Overlay
Network connection lost
The lost network connection message will persist until the network is restored or the
timeout expires (and the PCoIP session ends).
3.2 USB Device Not Authorized Overlay
If an unauthorized USB device is connected, an overlay with the message “USB device
not authorized” is displayed. An example is shown in Figure 3-2.
Figure 3-2: USB Device Not Authorized Overlay
The overlay will be displayed for approximately 5 seconds.
3.3 Half-Duplex Overlay
PCoIP Technology is not compatible with Half-Duplex network connections. When a halfduplex connection is detected, an overlay with the message “Half-duplex network
connection” is displayed. An example is shown in Figure 3-3.
78
PC-over-IP Administrative Interface User Manual
Figure 3-3: Half-Duplex Overlay
Half-duplex network
connection
The overlay will be displayed until the session ends. Refer to Section 1.6.2.7 Ethernet
Mode for more information on network configuration.
3.4 Video Source Overlays
Improper connection of the Host video source is denoted by two possible overlays.
When no video source is connected to the PCoIP Host, an overlay with the message “No
source signal” is displayed. This helps the user debug a situation where the Host does
not have video source connected or the Host PC has stopped driving a video signal. This
can be rectified by connecting the host PC video to the PCoIP Host. An example of the
overlay is shown in Figure 3-4.
Figure 3-4: No Source Signal Overlay
No source signal
When a video source to the Host does not correspond to the video port used on the
Portal, an overlay with the message “Source signal on other port” is displayed. This helps
the user debug a situation where the video source is connected to the wrong port. This
can be rectified by swapping the video port used either on the Host or on the Portal. An
example of the overlay is shown in Figure 3-5.
Figure 3-5: Source Signal on Other Port Overlay
Source signal on other port
The overlays will be displayed for approximately 60 seconds. The monitor will be put into
sleep mode approximately 15 seconds later.
79
PC-over-IP Administrative Interface User Manual
4
Appendix A: Usage Examples
4.1 Peer-to-Peer Direct Connection Example
This example provides an overview of configuring a Portal and Host for a direct
connection, i.e. without the use of a Connection Management Server or the Enable Host
Discover option.
The following IP and MAC addresses are used for this example:
•
Portal: IP Address: 192.168.42.149, MAC: 00-1C-59-00-05-0E
•
Host:
IP Address: 192.168.50.107, MAC: 00-1C-8A-03-00-CA
Note: For a Peer-to-Peer direct connection, the administrator must know the IP and MAC
addresses of the Portal and Host.
4.1.1 Configuring the Portal Peer-to-Peer Operation
Note: This example uses the Administration Web Interface for configuring the Portal for
peer-to-peer operation. The Portal OSD could also be used to configure the Portal. See
Section 2 On Screen Display (OSD) for the corresponding OSD functionality.
Configure the Portal for peer-to-peer direct connection:
1. Open the Portal Administration Web Interface by using an internet browser to open
the Portal IP address, e.g. https://192.168.42.149
2. Log in to the Portal Administration Web Interface
3. Select the Connection Management webpage from the Configuration menu
80
PC-over-IP Administrative Interface User Manual
Figure 4-1: Portal Connection Management Peer-to-Peer Configuration
4. Ensure Enable Connection Management is not selected
5. Select the Session webpage from the Configuration menu
81
PC-over-IP Administrative Interface User Manual
Figure 4-2: Portal Session Webpage Peer-to-Peer Configuration
6. In the Identify Peer by field, select IP address
7. Enter the Host IP address in Peer IP Address field, e.g. 192.168.50.107
8. Enter the Host MAC address in Peer MAC Address field, e.g. 00-1C-8A-03-00-CA
9. Select the Apply button to accept the changes
10.Select the PCoIP Processor webpage from the Diagnostics menu
82
PC-over-IP Administrative Interface User Manual
Figure 4-3: Portal PCoIP Processor Webpage Peer-to-Peer Configuration
11.Select the Reset button to reset the PCoIP processor
4.1.2 Configuring the Host Peer-to-Peer Operation
Configure the Host for peer-to-peer direct connection:
1. Open the Host Administration Web Interface by using an internet browser to open the
Host IP address, e.g. https://192.168.50.107
2. Log in to the Portal Administration Web Interface
3. Select the Connection Management webpage from the Configuration menu
83
PC-over-IP Administrative Interface User Manual
Figure 4-4: Host Connection Management Peer-to-Peer Configuration
4. Ensure Enable Connection Management is not selected
5. Select the Session webpage from the Configuration menu
84
PC-over-IP Administrative Interface User Manual
Figure 4-5: Host Session Webpage Peer-to-Peer Configuration
6. Ensure Accept Any Peer is not selected so that other Portals cannot start a PCoIP
session with the Host
7. Enter the Portal MAC address in Peer MAC Address field, e.g. 00-1C-59-00-05-0E
8. Select the Apply button to accept the changes
4.1.3 Initiating the Peer-to-Peer Session
Start the peer-to-peer session:
1. From the Portal OSD, select the Connect button to start the PCoIP session
85
PC-over-IP Administrative Interface User Manual
Figure 4-6: Peer-to-Peer Connect Screen
2. When connected, the Host computer is ready to use over PCoIP
4.2 DHCP and Enable Host Discovery Example
This example covers configuring the Portal and Host for use with a DHCP server and the
Host Discovery feature without the use of a Connection Management Server.
The following starting IP addresses are used for this example:
•
Portal: IP Address: 192.168.0.111
•
Host:
IP Address: 192.168.1.222
Note: To configure for DHCP and Host Discovery, the administrator must know the IP
address of the Portal and Host, regardless of whether it is set statically or dynamically.
4.2.1 Configuring Portal DHCP and Discovery
Note: Although this example uses the Administration Web Interface for configuring the
Portal for DHCP and Host Discovery operation, the Portal OSD may also be used to
configure the Portal. See Section 2 On Screen Display (OSD) for the corresponding OSD
functionality.
Configure the Portal for DHCP and Discovery:
1. Open the Portal Administration Web Interface by using an internet browser to open
the Portal IP address, e.g. https://192.168.0.111
86
PC-over-IP Administrative Interface User Manual
2. Log in to the Portal Administration Web Interface
3. Select the Connection Management webpage from the Configuration menu
Figure 4-7: Portal Connection Management DHCP & Discovery Configuration
4. Ensure Enable Connection Management is not selected
5. Select the Discovery webpage from the Configuration menu
Figure 4-8: Portal Discovery Webpage Enable Discovery Configuration
6. Select Enable Discovery and Enable Host Discovery
87
PC-over-IP Administrative Interface User Manual
7. Select the Apply button to accept the changes
8. Select Continue to complete configuration
9. Select the Network webpage from the Configuration menu
Figure 4-9: Portal Network Webpage DHCP Configuration
10. Select Enable DHCP
11.Select the Apply button to accept the changes
Note: Once configured for DHCP, the IP address will be leased from the DHCP server.
For future configuration, obtain the IP address from the DHCP server.
12.Select the PCoIP Processor webpage from the Diagnostics menu
88
PC-over-IP Administrative Interface User Manual
Figure 4-10: Portal PCoIP Processor Webpage DHCP & Discovery Configuration
13.Select the Reset button to reset the PCoIP processor
4.2.2 Configuring Host DHCP and Discovery
Configure the Host for DHCP and Discovery:
1. Open the Host Administration Web Interface by using an internet browser to open the
Host IP address, e.g. https://192.168.1.222
2. Log in to the Host Administration Web Interface
3. Select the Connection Management webpage from the Configuration menu
89
PC-over-IP Administrative Interface User Manual
Figure 4-11: Host Connection Management DHCP & Discovery Configuration
4. Ensure Enable Connection Management is not selected
5. Select the Discovery webpage from the Configuration menu
Figure 4-12: Host Discovery Webpage Enable Discovery Configuration
6. Select Enable Discovery
7. Select the Apply button to accept the changes
8. Select the Network webpage from the Configuration menu
90
PC-over-IP Administrative Interface User Manual
Figure 4-13: Host Network Webpage DHCP Configuration
9. Select Enable DHCP
10.Select the Apply button to accept the changes
Note: Once configured for DHCP, the IP address will be leased from the DHCP server.
For future configuration, obtain the IP address from the DHCP server.
11.Select the PCoIP Processor webpage from the Diagnostics menu
Figure 4-14: Host PCoIP Processor Webpage DHCP & Discovery Configuration
91
PC-over-IP Administrative Interface User Manual
12.Select the Reset button to reset the PCoIP processor
Note: The Host will not reset immediately. The reset will be deferred until the Host PC
restarts, enters standby, hibernates or powers off.
4.2.3 Initiating DHCP Discovery Session
Start the DHCP discovery session:
1. From the Portal OSD, select the Connect button to start discovering available hosts
Figure 4-15: DHCP Discovery Connect Screen
2. Select the desired host from the Discovered Hosts screen and select OK
Figure 4-16: Discovered Hosts Screen
3. When connected, the Host computer is ready to use over PCoIP
4.3 Bandwidth and Image Configuration Example
This example outlines the steps for optimizing user experiences in an environment where
bandwidth is constrained. Here it is assumed that there are four task-based workers (web
browsing, simple word processing, simple spreadsheet manipulation, and small video
windows) that are to share one 100-Mbps switch.
Due to the nature of these tasks, the users do not require heavy graphics changes and
each user would likely require peak network bandwidth at different times.
92
PC-over-IP Administrative Interface User Manual
Figure 4-17 shows simplified bandwidth requirements for each user assuming they each
had the full 100 Mbps available. The figure shows that network demand for each user
peaks only for short periods (e.g. when opening/closing windows, scrolling a page, etc.).
The PCoIP system adapts quickly to available network bandwidth, so we recommend
keeping the system defaults. However, the following examples show how to adapt the
default settings if your configuration requires it.
Figure 4-17: Simplified User Bandwidth Requirements (Assuming 100 Mbps)
4.3.1 Configuring the Host Bandwidth Limit to 25 Mbps
In this example, the network will be configured to minimize packet loss. Networks
respond to congestion by dropping packets. The PCoIP processor responds to dropped
(lost) packets by reducing the amount of bandwidth it generates. In most cases, the
PCoIP processor will conceal the packet loss to be imperceptible to the user. However, in
some situations where bandwidth is low or network latency is high, it might be preferable
to eliminate congestion-based packet loss by limiting the available bandwidth to each
user. In this example, we limit each user’s peak bandwidth to a hard limit of 25 Mbps (i.e.
the firmware will not use more than 25 Mbps).
In addition, we will set a target (soft limit) of 20 Mbps, so that during periods of network
congestion, the bandwidth will be decreased rapidly to 20 Mbps and more slowly below
20 Mbps. This will ensure that the available bandwidth is shared fairly if other network
traffic further constrains the link.
93
PC-over-IP Administrative Interface User Manual
Note: For this example, it is assumed that very little data is required from the Portal back
to the Host (i.e. USB keyboard and mouse data), and therefore the only the Host
bandwidth is limited. To be complete, the Portal bandwidth limit could also be configured.
1. Open the Host Administration Web Interface for the first user’s Host by using an
internet browser to open the Host IP address
2. Log in to the Host Administration Web Interface
3. Select the Bandwidth webpage from the Configuration menu
Figure 4-18: Host Bandwidth Limit Configuration (25 Mbps)
4. Enter 25 in the Device Bandwidth Limited field
5. Enter 20 in the Device Bandwidth Target field
6. Select the Apply button to accept the changes
7. Repeat for the other three users’ Hosts
The bandwidth is now limited to 25 Mbps and targeted to 20 Mbps for each user.
Figure 4-19 shows simplified bandwidth usage with the limit for each user now configured
for 25 Mbps. This figure shows that all users are limited to 25 Mbps and do not have
access to more bandwidth when required. It also shows that even when the usage is
totaled, the total switch bandwidth (100 Mbps) is never fully used.
Also note that since there is no congestion, there is no requirement to reduce the
bandwidth to the targeted 20 Mbps or lower.
94
PC-over-IP Administrative Interface User Manual
Figure 4-19: Simplified User Bandwidth Requirements (25 Mbps)
4.3.2 Configuring Image Properties
In the above section, the bandwidth was limited to 25 Mbps with a bandwidth target of 20
Mbps. Depending on the usage, it is possible that users may occasionally require more
than that bandwidth limit to fully render their display information at maximum quality and
full frame rate. The PCoIP system gives two controls over imaging quality that can
optimize the user experience in environments where bandwidth is constrained.
For users who prefer higher image quality than what the PCoIP balanced-quality/framerate algorithm provides, increasing the Portal Minimum Image Quality setting may be
beneficial.
The Maximum Initial Image Quality setting can change the peak bandwidth required by
any user. Decreasing the Maximum Initial Image Quality from the default setting of 90
95
PC-over-IP Administrative Interface User Manual
can reduce the amount of bandwidth required per user while maintaining a minimum limit
on the user experience.
Note: This example uses the Administration Web Interface for configuring the Portal for
Minimum Image Quality and Maximum Initial Image Quality. The Portal OSD may
also be used to configure the Portal. See Section 2 On Screen Display (OSD) for the
corresponding OSD functionality. The Maximum Initial Image Quality does not have a
corresponding parameter on the Portal OSD; it is intended as an administrator-only
parameter due to the impact on network traffic.
1. Open the Portal Administration Web Interface for the first user’s Portal by using an
internet browser to open the Portal IP address
2. Log in to the Portal Administration Web Interface
3. Select the Image webpage from the Configuration menu
Figure 4-20: Portal Minimum Image Quality Configuration
4. Slide the Minimum Image Quality slider to the right
5. Slide the Maximum Initial Image Quality slider to the left
6. Select the Apply button to accept the changes
7. Repeat for the other three user Portals
The Minimum Image Quality is now configured towards Perception-Free to increase the
minimum image quality the system will reduce to under any condition. This effect will only
be noticed in limited-bandwidth cases; if bandwidth is not constrained the system will
always maintain perception-free quality. The Minimum Image Quality feature does not
alter the overall bandwidth requirements of the user.
The Maximum Initial Image Quality is now configured towards Reduced to limit the quality
on the changed image (i.e. initial video frame). A lower Maximum Initial Image Quality
setting requires less bandwidth as the lower-quality initial image will require less
bandwidth to create. In this case, the administrator and the users determined that setting
96
PC-over-IP Administrative Interface User Manual
the Maximum Initial Image Quality to 60 was a preferable way of reducing bandwidth
requirements than setting a hard limit on the Device Bandwidth Limit.
Regardless of the Maximum Initial Image Quality setting, the PCoIP system will always
build unchanged regions of the display to a lossless image.
Note: the Minimum Image Quality setting must always be less than or equal to the
Maximum Initial Image Quality setting.
4.3.3 Configuring the Host Bandwidth Limit to 0 Mbps (No
Limit)
In Section 4.3.1, the bandwidth was limited to 25 Mbps with a bandwidth target of 20
Mbps. In this section, the PCoIP default bandwidth and imaging settings are used to take
advantage of the usage characteristics of the group. (The characteristics in this example
are similar to many actual usage groups.) Here the Device Bandwidth Limit and Device
Bandwidth Target are configured to 0 (no limit) to allow more effective bandwidth sharing.
The PCoIP firmware alleviates bandwidth congestion by implementing a bandwidth
adaptation algorithm that strives for fairness on shared networks. The firmware will use
the bandwidth as determined by the Ethernet physical-layer device.
Note: Here it is assumed that very little data is required from the Portal back to the Host
(i.e. USB keyboard and mouse data), and therefore the only the Host bandwidth is
limited. To be complete, the Portal bandwidth limit could also be configured.
Open the Host Administration Web Interface for the first user’s Host by using an internet
browser to open the Host IP address
1. Log in to the Host Administration Web Interface
2. Select the Bandwidth webpage from the Configuration menu
Figure 4-21: Host Bandwidth Limit Configuration (0 Mbps, no limit)
3. Enter 0 in the Device Bandwidth Limited field to enable no limit
97
PC-over-IP Administrative Interface User Manual
4. Enter 0 in the Device Bandwidth Target field to enable no limit
5. Select the Apply button to accept the changes
6. Repeat for the other three users’ Hosts
The bandwidth limit and target are now set to 0 Mbps (no limit) for each user. Due to the
nature of the users’ tasks—light graphics changes and peak network demand at different
times—it is expected that there will be little conflict for the full 100-Mbps bandwidth. The
users share the bandwidth more effectively and have fewer situations where their images
would have to be compromised to meet a bandwidth limit.
When there is congestion, the PCoIP firmware will automatically reduce the bandwidth
limit using a bandwidth adaptation algorithm that strives for fairness on shared networks.
When the congestion clears, the firmware will again open the bandwidth limit.
Figure 4-22 shows the total simplified bandwidth usage with no limit for the four users in
this example. This figure shows that the bandwidth is more efficiently shared, compared
to the case of setting a low maximum bandwidth limit as in Figure 4-19. In the unlimited
case, each PCoIP session has the opportunity to use up to 100 Mbps. This provides the
user with a more perception-free experience.
Figure 4-22: Simplified User Bandwidth Requirements (no limit)
All Users
BW
Time
4.4 USB Permissions Example
This example illustrates the use of the USB Permissions webpage. It shows how an
administrator can use the human-readable drop down menus to authorize a specific class
of IEEE-compatible bidirectional USB printers and a specific vendor/product ID.
The following sections outline the steps to authorize a USB device by Class or by Device
ID.
4.4.1 Authorizing USB Device By Class
1. In the Authorization section, select Add new button
98
PC-over-IP Administrative Interface User Manual
Figure 4-23: USB Permissions Example: Add new Button
2. When the entry fields expand, select Class from the Add New drop-down menu to
authorize a class of devices
Figure 4-24: USB Permissions Example: Selecting the Class Entry Type
3. Select Printer from the Device Class drop-down menu to authorize a class of printers
99
PC-over-IP Administrative Interface User Manual
Figure 4-25: USB Permissions Example: Selecting the Device Class
4. Select Printer from the Sub Class drop-down menu to authorize a specific class of
printers (otherwise, the sub class and protocol could be left as Any)
Figure 4-26: USB Permissions Example: Selecting the Sub Class
5. Select the desired IEEE 1284.4-compatible bidirectional protocol from the Protocol
drop-down menu
100
PC-over-IP Administrative Interface User Manual
Figure 4-27: USB Permissions Example: Selecting the Protocol
6. Select Apply to save the changes to flash and complete the configuration
Figure 4-28: USB Authorization Example: Class Authorization
4.4.2 Authorizing USB Device By Vendor/Product ID
1. In the Authorization section, select the Add new button
101
PC-over-IP Administrative Interface User Manual
Figure 4-29: USB Permissions Example: Add new Button
2. When the entry fields expand, select ID from the Add New drop-down menu to
authorize a device by its vendor/product ID
Figure 4-30: USB Permissions Example: Selecting the Class Entry Type
3. Enter the USB device Vendor ID and Product ID into the corresponding fields
102
PC-over-IP Administrative Interface User Manual
Figure 4-31: USB Permissions Example: Entering Vendor ID and Product ID
4. Select Apply to save the changes to flash and complete the configuration
Figure 4-32: USB Permissions Example: Vendor ID and Product ID Authorization
103
PC-over-IP Administrative Interface User Manual
5
Appendix B: Portal Language and Keyboard
Support
The Portal Firmware can support various languages and keyboard layouts.
Information concerning configuring the language and keyboard layout can be found in
Section 1.6.8 Language for the web interface and Section 2.3.8 Language for the OSD.
Table 5-1 lists supported languages and Table 5-2 lists supported keyboards layouts
(defaults are noted).
Table 5-1: Languages Supported by the Portal
Supported Languages
English [default]
French
German
Greek
Spanish
Italian
Portuguese
Korean
Japanese
Traditional Chinese
Simplified Chinese
Table 5-2: Keyboard Layouts Supported by the Portal
Supported Keyboards
United States of America ISO-8859-1 [default]
French Canadian ISO-8859-1 (accent keys)
French ISO-8859-1
French ISO-8859-1 (accent keys)
French Dvorak-like
French Dvorak-like (accent keys)
German ISO-8859-1
German ISO-8859-1 (accent keys)
German Codepage 850
Greek ISO-8859-7
Japanese 106
104
PC-over-IP Administrative Interface User Manual
Japanese 106x
Latin American
Latin American (accent keys)
Portuguese ISO-8859-1
Portuguese ISO-8859-1 (accent keys)
Italian ISO-8859-1
Spanish ISO-8859-1
Spanish ISO-8859-1 (accent keys)
Spanish ISO-8859-15 (accent keys)
Swiss-French ISO-8859-1
Swiss-French ISO-8859-1 (accent keys)
Swiss-French Codepage 850
Swiss-German ISO-8859-1
Swiss-German ISO-8859-1 (accent keys)
Swiss-German Codepage 850
United Kingdom ISO-8859-1
United Kingdom ISO-8859-1 (ctrl and caps
swapped)
United Kingdom Codepage 850
United Kingdom Codepage 850 (ctrl and caps
swapped)
United States of America ISO-8859-1 (accent keys)
United States of America ISO-8859-1 (ctrl and caps
swapped)
United States of America dvorak
United States of America right-hand dvorak
United States of America left-hand dvorak
United States of America dvorakx
United States of America Emacs optimized layout
United States of America Traditional Unix
Workstation
105
PC-over-IP Administrative Interface User Manual
6
Appendix C: Portal RDP Compatibility
The Portal Firmware also supports a Remote Desktop Protocol client. This can be
enabled for a lower-than-PCoIP experience. Table 6-1 below outlines the Portal RDP
client capability. For information concerning enabling the RDP client, see Sections 1.6.5.2
Session Type, 1.6.7 RDP, 2.3.5.1 Session Type and 2.3.7 RDP.
Table 6-1: Portal RDP Capabilities
RDP Protocol
Version 5.2
Supported Terminal Servers
Windows XP, Vista, Server 2003, Server 2008, Linux
XRDP
Display Resolution (single
monitor)
800x600, 1024x768, 1280x768, 1280x1024,
1440x900, 1600x1200, 1680x1050, 1920x1200,
Color Depth
8, 16, 24 bits per pixel
RDP Port
Configurable (default 3389)
Audio
Two output channels (16 bit at 22.05 KHz)
Experience Options
Desktop Wallpaper enable/disable (via web/OSD &
Connection broker)
Display Window content while dragging (only via
connection broker)
Menu and window animation enable/disable (only via
connection broker)
Themes enable/disable (via web/OSD & Connection
Broker)
Bitmap caching is supported
Port Redirection
Port redirection not supported
Clipboard redirection not supported
Logon
Connection broker can pass user ID and password to
bypass the Windows logon screen when opening a
session
Encryption
Security Layer:
(Windows Server 2003, Server
2008)
- RDP Security Layer => supported
- Negotiate => supported
Encryption Levels:
- Low => supported
- Client Compatible => supported
- High => supported
- FIPS Compliant => not supported
Network Level Authentication
Not supported
106
PC-over-IP Administrative Interface User Manual
(Vista)
107