1
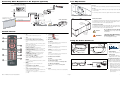
Connecting Other Equipment to the Projector (optional)
Lens Adjustments
AutoScope Lens Motor
Focus
To focus the projected image, grasp the lens by the front ring and rotate it.
Remote Control
IR Sensor
Power
Switch
Focus
AC Input
Zoom
To make the picture smaller (zoom out) or larger (zoom in), slide the zoom control in the direction
shown at left.
Zoom In
IR Repeater
To lock the position of the lens, tighten the knob with a flat-blade screwdriver.
Zoom Out
(3.5-mm, mini
phono plugs)
RS-232
USB
COMPONENT 1
Vertical
Lens Shift
Control
RS-232
USB
WIRED REMOTE
I
II
12V TRIGGER
12V TRIGGER
RGB
Y
RGB
Y
Horizontal Lens Shift
To shift the projected image horizontally, first ensure that the lens lock is not engaged. Insert the
provided hex wrench into the horizontal lens shift adjuster at the top of the projector. Then, turn the
wrench to shift the lens in the desired direction.
Pb
COMPONENT 2
3D SYNC IN
IN
COMPONENT 2
HDMI 2
Pb
HDMI 1
(3-pin mini-DIN plug)
R
POWER
LED STA
STATUS
TATUS
WIRED REMOTE
Y
ISSUE
Active 3D Emitter
LED STA
STATUS
TATUS
HDMI 2
HDMI 1
3D SYNC
Vertical Lens Shift
To shift the projected image vertically, first ensure that the lens lock is not engaged. Insert the
provided hex wrench into the vertical lens shift adjuster on the side of the projector. Then, turn the
wrench to shift the lens in the desired direction.
ISSUE
PR
EL
IM
IN
A
R
Y
POWER
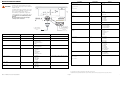
Tip = +12V
A
Sleeve = Ground
COMPONENT 1
Retractable Screen or other
12-volt trigger-activated
device
Caution
3D SYNC
8.
Contrast
Press to adjust white level.
2.
OFF
Use this button to turn the projector off.
9.
Brightness
Press to adjust black level.
3.
Discrete Aspect Ratio Selection Buttons
Press one of these buttons to select an aspect
ratio:
10. Memory Preset Buttons:
16 : 9: For viewing 16:9 DVDs or HDTV programs
in their native aspect ratio.
4 : 3: Scales the input signal to fit 4:3 sources in
the center of the screen.
LETBOX (Letterbox): For viewing nonanamorphic (“full-screen”) DVDs on a 16:9 screen.
V-WIDE (VirtualWide): Enlarges a 4:3 image
horizontally in a non-linear fashion to fit a 16:9 full
screen display.
CINEMA: For viewing 2.35:1 source material.
V-CINE (Virtual Cinema): For viewing 16:9
source material on a 2.35:1 screen.
4
5
7
6
8
9
11
4.
Cursor Keys ( , , , )
Use these buttons to select items or settings,
adjust settings or switch display patterns.
12
ENTER
Press to select a highlighted menu item or confirm
a changed setting.
10
5.
Runco X-200i Series Quick Setup Guide
MENU
Press this button to show or hide the OSD
controls.
6.
Aspect Ratio Selection Button
Press this button repeatedly to select an aspect
ratio.
7.
Source Selection Buttons (1-5):
Press to select a video source. These buttons are
assigned as follows: 1 = HDMI 1;
2 = HDMI 2; 3 = Component 1; 4 = Component 2;
5 = RGB.
WARNING
EL
3
2
ON
Use this button to turn the projector on.
Horizontal
Lens Shift
Control
THE LENS SHIFT MECHANISM CAN BE DAMAGED BY
EXCESSIVE FORCE. Do not attempt to move the primary lens beyond
its normal adjustment range.
Using the Active 3D Glasses
ISF NIGHT
Press to recall settings for the current input from
the “ISF Night” memory preset.
PR
1
1.
IM
Remote Control
Do not attempt any lens adjustments when the lens lock is
engaged. Doing so may cause damage to the zoom or lens shift
mechanisms.
ISF DAY
Press to recall settings for the current input from
the “ISF Day” memory preset.
CUST 1
Press to recall settings for the current input from
the “Custom 1” memory preset.
Battery Status
LED (Red/Blue)
Power Button
CUST 2
Press to recall settings for the current input from
the “Custom 2” memory preset.
Power
Input
• Battery Status LED
Indicates battery charge state when glasses are turned on, as
follows:
= Fully Charged (12 - 15 hrs. left)
= 50% Charged (approx. 4 hrs. left)
= 30% Charged (approx. 2 hrs. left)
= ≤10% Charged (must charge glasses
before further use)
• Power Button
Press to turn the glasses on or off.
• Power Input
To chazrge the glasses, connect this input to your PC or other
USB power source, using the included charging cable.
11. 3D Mode Selection Buttons:
3D AUTO
Press to set the 3D Mode to Auto.
Charging the 3D Glasses
The glasses must be fully charged before first use and whenever
the Battery Status LED flashes red once every couple of
seconds. Charging takes approximately five hours.
3D SBS (Side-by-Side)
Press to set the 3D Mode to 3D Side-by-Side.
3D TAB (Top-and-Bottom)
Press to set the 3D Mode to 3D Top-andBottom.
12. LIGHT
Press momentarily to activate remote backlighting.
Page 2
1.
Attach one end of the supplied charging cable to the Power
Input above the left lens on the glasses.
2.
Attach the other end of the cable to any USB “A” port on a
USB hub, personal computer or display device. The Battery
Status LED lights solid red while the battery is charging.
3.
When the Battery Status LED lights solid blue, the battery is
fully charged. You can disconnect the glasses from the
power source.
020-1201-00 Rev. A (September 2012)