1
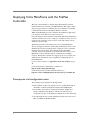
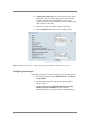
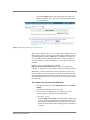
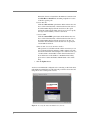
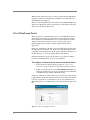
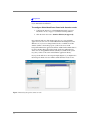
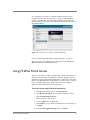
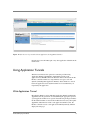
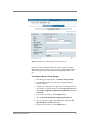
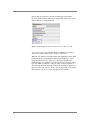
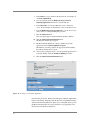
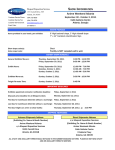
Deployment Guide
Deploying Citrix Presentation Server (MetaFrame)
with the FirePass Controller
Deploying Citrix MetaFrame with the FirePass
Controller
Welcome to the F5 FirePass controller Deployment Guide for Citrix®
Presentation Server™ (formerly called MetaFrame®). This guide contains
step-by-step procedures on configuring the various methods of connecting
to Citrix Presentation Server through the FirePass controller.
While Citrix MetaFrame provides a run-time environment for applications
to be hosted on an internal server and accessed over a
keyboard-windows-mouse emulation environment (thin-client), the FirePass
controller extends secure access to employees or partners so they can access
resources from any device in any location as easily and securely as from
within the corporate LAN.
The FirePass provides secure Web-based access to Citrix MetaFrame
devices and supports automatic downloading and installation of the correct
Terminal Services remote-platform client component, if it is not currently
installed on the remote device. Once authenticated by the FirePass
controller, users pass through the corporate firewall and are able to access
MetaFrame resources without having to re-authenticate for multiple
resources. The FirePass controller also supports group access options, user
authentication and automatic logon capabilities for authorized users of
Citrix MetaFrame.
For an overview of Citrix, see Appendix A: Overview of Citrix, on page
26.
For more information on the FirePass controller, see
http://www.f5.com/products/firepass/
For more information on Citrix Presentation Server, see
http://www.citrix.com/English/ps2/products/product.asp?contentID=186
Prerequisites and configuration notes
The following are prerequisites for this deployment:
1
◆
This document assumes you will have at least a working knowledge of
the FirePass controller and Citrix Presentation Server/MetaFrame.
◆
We assume you already have the appropriate Master and Resource
Groups configured on the FirePass controller. For instructions on
creating these groups, see the FirePass documentation or the online help.
◆
All configurations were created on FirePass 6.0 and client views from a
Microsoft Windows XP SP2 machine.
Configuring the FirePass controller for Citrix
Presentation Server
There are a number of ways to connect to Citrix published applications via
FirePass. Each provides a slightly different user experience depending on
your needs. The following list gives a brief description of each type of
access, with links to each location in this Deployment Guide.
◆
Network Access
Assuming any needed Citrix clients are or can be installed; there are no
additional FirePass settings when connecting through Network Access
unless Packet Filtering is enabled. If packet filter is enabled, then you
would need to ensure ports 80 (http), 443 (https), 1494 (ICA), port 1604
(ICA browser) and port 2598 (session reliability - in environments where
Session Reliability is enabled, port 2598 replaces port 1494 as the port
that the ICA protocol uses.)
Note: This Deployment Guide does not contain procedures for
configuring Network Access.
◆
Using FirePass Terminal Server, on page 3
The FirePass controller Terminal Server functionality loads the
appropriate ICA ActiveX control, and users logon like any other terminal
server or remote connection. There are three options for configuring
FirePass Terminal Server:
• Citrix MetaFrame, on page 3
This option is just like terminal servers, in that you get a Windows
logon prompt, and after entering credentials, you are on the
MetaFrame server.
• Citrix MetaFrame browser, on page 8
This functionality allows ICA browsing over TCP in order to access
published applications and applications sets, residing on a Citrix
MetaFrame Server Farm through the Firepass controller. MetaFrame
Browser is essentially MetaFrame but with the added protocol
support, and is useful in accessing Citrix server farms, and for
resolving application names to IP:port. MetaFrame Browser also
supports load balancing a Citrix farm if multiple IP addresses are in a
farm. MetaFrame Browser can also find a published application if it is
distributed.
• Citrix MetaFrame Portal, on page 9
This option is the webified version of Citrix, similar to an nFuse web
portal. The user gets a list of published applications available and all
they need to do is click the desired application. In this case, the
FirePass controller contacts the Citrix master browser using the
supplied user's credentials, and obtains a list of published applications
configured for that specified user.
• Seamless Mode, on page 10
Each of the options above can be run in Seamless mode, which
essentially eliminates the browser window after a user clicks the
Citrix favorite.
FirePass® Deployment Guide
2
◆
Using FirePass Portal Access, on page 12
With Portal Access, you are accessing nFuse web portal. The FirePass
controller loads the ICA ActiveX control, opens a terminal services
AppTunnel and automatically patches the ICA file returned via HTTP for
use in the tunnel.
◆
Using Application Tunnels, on page 16
AppTunnels provide secure, application-level TCP/IP connections from
the client to the network. There are two types of AppTunnels, static and
dynamic.
Connecting to the FirePass controller
To perform the procedures in this Deployment Guide you must have
administrative access to the FirePass controller.
To access the Administrative console, in a browser, type the URL of the
FirePass controller followed by /admin/, and log in with the administrator’s
user name and password.
Once you are logged on as an administrator, the Device Management screen
of the Configuration utility opens. From here, you can configure and
monitor the FirePass controller.
Using FirePass Terminal Server
Since, in part, Terminal Server on the FirePass controller was based on
Citrix, we start with the different options offered in the FirePass to get you
connected within Terminal Servers. There are three different ways to
configure Citrix Presentation Server (MetaFrame) on the FirePass controller
using Application Access-Terminal Server:
• Citrix MetaFrame, on page 3
• Citrix MetaFrame browser, on page 8
• Citrix MetaFrame Portal, on page 9
The end of this section contains procedures on using Seamless mode with
these options.
Citrix MetaFrame
The first option is to configure a Citrix MetaFrame Favorite, using the Citrix
MetaFrame option, which uses the default Citrix MetaFrame port, 1494.
The following procedure serves as the base for all three procedures in this
section (all of the options, except one, are the same in all three configuration
options).
3
To connect to the Citrix device using Terminal Server
1. From the main navigation pane, click Application Access, and then
from the upper navigation pane, click Terminal Servers.
2. From the Resource Group list, select the relevant Resource Group.
Figure 1 Terminal Servers Resources screen
3. Click the Add New Favorite link.
The new Favorite options appear.
4. Leave the Type list set to Favorite.
5. In the Name box, type a name for this Favorite. In our example, we
use citrix.
6. In the Host box, type the address (IP or host) of the Citrix server.
You can also enter a list here for multiple Presentation Server hosts.
The FirePass controller shuffles the entries, and then tries to use the
first one in the list. If connection fails, the FirePass controller tries
the next one in the list, and so on, until a working server is found.
You can use this simple technique for high availability solutions.
7. From the Port list, select Citrix MetaFrame. Port 1494 appears in
the Port box.
8. In the Select a Program box, type the full path to the application on
the target server, if this is necessary. For Citrix, always prefix the
application name with a pound sign ( # ) for published applications.
For example, #notepad.
9. In Working Dir box, type the directory you want the user to access
to on the target server.
10. The Open in a New Window, Seamless Window, Redirect Local
Resources and Redirect Local Audio configuration settings are
optional, configure as applicable for your deployment. The Citrix
Seamless option is discussed later in this guide.
FirePass® Deployment Guide
4
11. In Encryption (Citrix-only), select the encryption level for Citrix
MetaFrame connections. This setting specifies an internal Citrix
parameter, which must match the MetaFrame server setting.
Connection from the client to the FirePass controller is made using
SSL, regardless of this setting.
12. The last two settings are optional, configure as applicable.
13. Click the Add New button. The Favorite is added to the list.
Figure 2 Adding a new Favorite for Citrix using the Citrix MetaFrame Terminal Server option
Configuring Auto-Logon
Follow this procedure if you want to configure auto logon for this Favorite.
1. From the navigation pane, under Terminal Servers, click Master
Group Settings.
2. From the Master Group list, make sure the appropriate Master
Group is selected.
3. Check the Auto-logon to applicable Terminal Servers using
FirePass user logon credentials check box, and in the
Domain/Workgroup box, type the Domain for the Master Group,
5
and click the Update button. This setting works only if the users
FirePass credentials (name, password or domain) match the Citrix
logon (see Figure 3).
Figure 3 Configuring Auto-logon to the Favorite
The last task for this Favorite is to select where the ICA client should come
from if the user does not already have it installed. There might be instances
(any unit shipped after January 2006) where your FirePass controller does
not have the ICA client pre-installed. This is due to Citrix cancelling the
contract(s) with many vendors, including F5, to allow the ICA client to be
available.
In these cases, you can download the client from
http://www.citrix.com/downloads and then upload it to the FirePass
controller, or specify the location of the file using the following procedure.
The FirePass controller dynamically loads the Citrix client onto the user's
system, at runtime. If your site requires a version of the Citrix Web Client
that is different from what the FirePass controller provides, you can use the
options described in this section to specify the location of the Citrix client to
be downloaded.
To configure the location of the ICA client
1. From the navigation pane, under Terminal Servers, click Global
Settings.
The Citrix ICA Client Location screen opens.
2. You now have a few different options, configure one of the
following options as applicable for your deployment:
a) FirePass controller
Click the FirePass Controller option button. If the end-user does
not have a Citrix client installed, or if the installed version does
not match the number displayed in the Version box, this option
downloads and installs the Citrix client supplied on the FirePass
controller.
FirePass® Deployment Guide
6
If the ICA client is not installed on the FirePass Controller click
the Click Here to Install link, and when prompted for location
of the file, type the path.
b) Citrix Web Site
Click the Citrix web-site option button. If the end-user does not
have a Citrix client installed, or if the installed version does not
match the number displayed in the Version box, this option
obtains the client from the Citrix web site. You can also specify
the target version number you want to download.
c) Custom URL
Click the Custom URL option button. If the end-user does not
have a Citrix client installed, or if the installed version does not
match the number displayed in the Version box, the user can
obtain the client from the location entered. You can specify the
custom URL for retrieval.
d) Put the ICA client in the FirePass sandbox
This option is not available from the current screen, but you can
also put the ICA client in a FirePass sandbox. When a user who
does not have the ICA client attempts to use a Citrix favorite, you
can direct them to the Sandbox for ICA client installation. For
more information on the Sandbox or WebDAV functionality,
please refer to either the FirePass Admin Guide or the on-line
help.
3. Click the Update button.
You have now finished the configuration for connecting to the Citrix device
using FirePass Terminal Servers. The following screen shot shows the end
user point of view for this specific favorite.
Figure 4 Accessing the Citrix Terminal Server favorite
7
In this example, we’ve launched a new window and the familiar Terminal
Server prompt appears. If Auto Logon was checked in Master Group
Settings, the User name and Password fields would already be populated.
Once the end user has entered their credentials, the full desktop from Citrix
opens, as seen in the following screenshot.
Figure 5 The Citrix desktop accessed through the FirePass Terminal Server favorite.
Citrix MetaFrame browser
Another option for deploying Terminal Servers on the FirePass controller is
to configure the Favorite using Citrix MetaFrame Browser. The Citrix
MetaFrame Browser option is useful in accessing Citrix server farms, and
for resolving application names to IP:port, and allows ICA browsing over
TCP in order to access published applications, and applications sets,
residing on a Citrix MetaFrame Server Farm through the Firepass controller.
The MetaFrame Browser relies on the Citrix XML Service, which must be
enabled on the target server.
This procedure is very similar to the preceding one; only one step is
different.
To configure a Terminal Server favorite with Citrix
Browser
1. Follow the steps in the preceding procedure (To connect to the
Citrix device using Terminal Server) with the following exception:
2. In Step 7, from the Port list, select Citrix MetaFrame Browser.
Port 80 appears in the Port box. You can also make the same
adjustments to the Master Group Settings and Global settings.
FirePass® Deployment Guide
8
When the user clicks this favorite, it looks exactly like the first MetaFrame
example (see Figure 4). And when they authenticate, the end result is just
like MetaFrame (see Figure 5).
There is really nothing different to the end user, but the MetaFrame Browser
setting does add support for ICA load balancing a Citrix farm; meaning the
ability to use the Citrix load balancer.
Citrix MetaFrame Portal
The next option is to configure the Favorite as a Citrix MetaFrame Portal.
Using this option, Citrix looks a little more like a web application rather
than a terminal server. MetaFrame Portal is a web-based version of Citrix,
similar to nFuse web portal. The user gets a web page with a list of
published applications available, and they simply click the desired
application.
In this case, the FirePass controller contacts the Citrix master browser using
the supplied user's credentials, and obtains a list of published applications
configured for that specified user. In this instance, FirePass can either act as
the Web interface, or can work together with the Web interface.
Like the Citrix Browser option, this procedure is very similar to adding a
favorite for Citrix MetaFrame; only one step is different.
To configure a Terminal Server favorite with Citrix Portal
1. Follow the steps in the preceding procedure (To connect to the
Citrix device using Terminal Server) with the following exception:
2. In Step 7, from the Port list, select Citrix MetaFrame Portal. Port
80 appears in the Port box. You can also make the same adjustments
to the Master Group Settings and Global settings.
In this case, while the procedure is the same, the experience for the end user
is quite different. Once they click the Favorite, they are either taken directly
to the list of applications, or if the Auto Logon was not configured at the
Master Group level, to an authentication screen, followed by the application
list.
Figure 6 Citrix Portal Application list
9
Now the user can just click the desired application. Notepad, for instance,
would appear in a browser window, as would the other applications.
Figure 7 Notepad in Citrix, using Citrix Portal.
Seamless Mode
Now we will look at the same configuration in Seamless Mode. Seamless
Mode essentially eliminates the browser window after clicking on the Citrix
favorite. Once the user clicks an icon, rather than a browser or terminal
server window opening, it just runs the application without the browser
window.
If you need to determine if your Citrix implementation supports Seamless
mode, logon to your Citrix Server. If you click the Citrix tray icon, the
Program Neighborhood Agent Properties display.
A closer look on the Session Options tab reveals the display options,
specifically Window Size, which, in our example, is set to Seamless.
Figure 8 Citrix Program Neighborhood Agent Properties box showing
Window size set to Seamless
FirePass® Deployment Guide
10
Important
Seamless mode is currently only available on FirePass version 6.0 with
hotfix: HF-28699-6257065493-1.
To configure Citrix MetaFrame Portal with Seamless mode
1. Configure the Favorite as a Citrix MetaFrame Portal (see Citrix
MetaFrame Portal, on page 1-9), with the following addition:
2. Click the check box next to Seamless Window (if supported).
Now, when the end user clicks the Favorite, they get a page with their
application icons, the same as in Citrix MetaFrame Portal (Figure 6). The
difference is, if you are not using Seamless mode, a terminal server-like
window (similar to the desktop) opens, you'll see the server in the
background and then the application launches. With Seamless Mode there is
no remote desktop-like background, just the application. When the user
clicks an icon, an AppTunnel launches (which you can hide in the system
tray), they connect to the server and launch the application directly.
If you go back and look at our notepad example (Figure 7), you might notice
that Notepad is inside a browser window. With Seamless mode, it is not.
Figure 9 Launching Notepad in Seamless mode
11
As a comparison, if you were to configure Seamless mode in our first
example (Using FirePass Terminal Server, on page 3), the AppTunnel
launches, and rather than a browser window with the server prompt, the
server prompt arrives by itself. After entering credentials the user arrives on
the published desktop.
Figure 10 Seamless mode example for Citrix MetaFrame
You can compare Figure 10 with the example in Figure 4, on page 7.
The seamless option is available in each of the three modes: MetaFrame,
MetaFrame Browser and MetaFrame Portal.
Using FirePass Portal Access
There are some instances where you might want to use the Web interface of
Citrix through Portal mode on the FirePass controller. With Portal Access,
the FirePass works together with the Web interface rather than acting as the
interface, like MetaFrame Portal. The FirePass controller works as a reverse
proxy for webified applications. FirePass Portal Access establishes
application tunnels dynamically for the application.
To access Citrix using FirePass Portal Access
1. From the main navigation pane, click Portal Access.
2. From Resource Group list, select the relevant Resource Group
3. Click the Add New Favorite link.
The new Favorite options appear.
4. Leave the Type list set to Favorite.
5. In the Name box, type a name for this Favorite. In our example, we
use citrix.
6. Leave the Web Application Type list set to Generic.
FirePass® Deployment Guide
12
7. In the URL box, type the URL of the Citrix MetaFrame
Presentation Server web interface.
Figure 11 Creating a Portal Access Favorite
8. In the URL variables box, type any variables you wish to add. URL
variables contain variables to be either appended to the GET request
or sent as data in a POST request to the specified URL. If you are
interested in configuring URL variables, see Adding URL variables,
on page 15.
9. In the Enforce user-agent box, you can type the string you want the
FirePass controller to send to the internal web server instead of the
browser's actual user-agent identifier.
10. For the Open in new window option, click the check box if you
want the Favorite to open in a new window.
11. In the Allow List, you can type URLs that a user is allowed to
access. You can also be done from the URL section, by clicking
Add to allow list.
12. From the Endpoint protection required list, you can choose if you
want to enforce a configured Endpoint protection.
13. Click the Add New button, and the Favorite is added to the list.
There is one more option that needs to configured for Citrix in this case.
MetaFrame Presentation Server 3.0 uses cookies to check if the ICA client is
already installed, so we want to make sure to let this cookie through.
To allow the Citrix cookie to be passed
1. From the navigation pane, expand Web Applications, and then
click Content Processing.
2. Click the Global Settings tab.
13
3. Find the Web Applications Global Settings section, near the
bottom of the page. Click the check box for Do not block cookies
at FirePass 4100, pass them to the browser for specified URL
patterns.
4. In the box, type the URL(s) of the Citrix server.
5. Click the Update button.
Figure 12 Configuring the FirePass controller to pass the Citrix cookie
FirePass® Deployment Guide
14
Adding URL variables
If you'd like Single Sign-on, add the URL variables in that area. You can use
tools such as Paros or httpWatch to find the URL variables. In the
following example, the administrator went to the logon page of
MetaFrame/Presentation Server, enabled httpWatch, typed in credentials,
and recorded the connections.
Figure 13 Opening MetaFrame while using httpWatch
Highlight the row that is the logon POST and select the POST Data tab of
httpWatch. This tells you the proper parameters for the application. So the
URL variable for this particular application is:
state=LOGIN&LoginType=Explicit&user=%username%&password=%pas
sword%&ReconnectAtLogin=On&ReconnectAtLoginOption=Disconnecte
dAndActive&do_login=1
Tip
There is also a solution that details this procedure available on AskF5:
SOL5451: Creating a Portal Access favorite that automatically logs in to a
Citrix MetaFrame Presentation Server web interface.
So after configuring this Portal Access favorite, a user gets the Citrix logon
page, now with the proper credentials pre-filled. After logging in, the Web
interface for Citrix opens. Once the user clicks an application, the
AppTunnel launches, and upon connection, the application appears.
15
Figure 14 After the user logs in and clicks an application, the AppTunnel launches
Now the user can work in Notepad or any other application offered from the
Citrix Server.
Using Application Tunnels
This final section shows the options for connecting to Citrix using
Application Tunnels (AppTunnels). AppTunnels provide secure,
application-level TCP/IP connections from the client to the network. In the
FirePass controller, tunnels are categorized into two types: static and
dynamic (including Web Application Tunnels). Static tunnels are created
before the application starts. Dynamic tunnels are created when they are
requested by the application.
Web Application Tunnel
Introduced in FirePass version 6.0, Web Application Tunnels and Dynamic
Apptunnels take the guesswork out of determining the appropriate ports for
a given application. There are no special client side user privileges needed to
run the tunnel and there are no host file modifications necessary, like regular
Apptunnels. When the user clicks a web application tunnel favorite, the
FirePass controller creates a web application tunnel dynamically and then
displays the web page.
FirePass® Deployment Guide
16
To configure a Web Application Tunnel
1. From the main navigation pane, click Application Access, and then
from the upper navigation pane, click AppTunnels.
2. From the Resource Group list, select the relevant Resource Group.
3. Click the Web Application Tunnels tab.
The Web Application Tunnels screen opens.
4. Click the Add New Favorite link.
The new Favorite options appear.
5. Leave the Type list set to Favorite.
6. In the Name box, type a name for this Favorite. In our example, we
use citrix tunnel.
7. In the URL box, type the URL of the Citrix MetaFrame
Presentation Server web interface.
8. In the URL variables box, type any variables you wish to add. URL
variables contain variables to be either appended to the GET request
or sent as data in a POST request to the specified URL. If you want
to configure URL variables, see Adding URL variables, on page 15.
9. You can optionally choose to enable the Locked Browser setting.
This presents a browser to the user that prohibits them from typing
URLs, and saving or printing web pages.
10. In the Allow List, you can type URLs that a user is allowed to
access. You can also be done from the URL section, by clicking
Add to allow list.
11. From the Endpoint protection required list, you can choose if you
want to enforce a configured Endpoint protection.
12. Click the Add New button, and the Favorite is added to the list.
17
Figure 15 Adding a new Web Application Tunnel Favorite
Now that you have configured the Favorite, the next task is to check its
Master Group Settings, where you can optionally configure Single Sign-on
with the Auto logon check, and minimize the AppTunnel window to the
tray.
To configure Master Group Settings
1. From the upper navigation pane, click Master Group Settings.
2. From the Master Group list, make sure the appropriate Master
Group is selected.
3. Configure any of the options as applicable for your deployment. In
our example, we click the check box for Use gzip compression and
Auto-logon to applicable AppTunnels using FirePass user logon
credentials.
4. If you made any changes, click the Update button.
5. Click the Dynamic Tunnels/Web Application Tunnels tab.
6. You can optionally configure split tunneling by clicking the Use
split tunneling for traffic option button.
7. If you made any changes, click the Update button.
FirePass® Deployment Guide
18
From an end user perspective, the links for Web Application Tunnel
Favorites and the application Favorites configured through Portal access are
slightly different, as seen in Figure 16.
Figure 16 Web Application Tunnel and Portal access Favorite links
As you can see, the icon for the Web Application Tunnels Favorite has a
green circle, and the other Favorite icons have a blue circle.
When the user clicks the green Citrix tunnel, the AppTunnel launches in the
background the user is presented the Citrix Logon. In Figure 17, you’ll
notice the mini-browser now being used - this is the Locked Browser
mentioned previously. With the locked browser, the user will not be able to
type other URL's or print/save a web page. After entering credentials (or
auto-fill based on the Master Group settings), the applications appear just as
they have in the other situations. When a user clicks an application, the ICA
client launches and once it's loaded, the application is available.
19
Figure 17 Accessing Citrix through the Web Application Tunnel Favorite
Dynamic AppTunnels - Citrix Neighborhood Agent
FirePass offers yet another way to connect to Citrix applications through
Dynamic AppTunnels and using the Citrix Program Neighborhood Agent.
The Program Neighborhood Agent allows users to access their published
applications without opening Citrix's Program Neighborhood or a Citrix
NFuse web site. The Program Neighborhood Agent relies on an NFuse site
to provide its list of published applications. The transparent integration of
published applications is listed in one of three places, based on
configuration selections: Start Menu, Desktop Folder or System Tray.
To create a Dynamic AppTunnel
1. From the main navigation pane, click Application Access, and then
from the upper navigation pane, click AppTunnels.
2. From the Resource Group list, select the relevant Resource Group.
3. Click the Add New Favorite link.
The new Favorite options appear.
4. Leave the Type list set to Favorite.
FirePass® Deployment Guide
20
5. In the Name box, type a name for this Favorite. In our example, we
use citrix neighborhood.
6. You can optionally check the Display message box before
launching applications check box to alert the end user.
7. In the Allow List, you can type URLs that a user is allowed to
access. In our example, we entered the location of our Citrix server.
8. From the Endpoint protection required list, you can choose if you
want to enforce a configured Endpoint protection.
9. Click the Add New button.
Two new options appear, Dynamic Tunnels and Static Tunnels.
10. Click the Add New Dynamic Tunnel button.
The Dynamic Tunnel options appear.
11. The New Dynamic Tunnel list contains a number of pre-built
applications. Select Citrix Neighborhood Agent.
The FirePass controller populates the appropriate fields including
the path for running the local agent.
12. If you want to prompt the user to close the specified application if it
is already running, check the Terminate Existing check box.
13. Click the Add New Dynamic Tunnel button.
Figure 18 Creating a new Dynamic AppTunnel
From end user perspective, this Favorite link appears under the AppTunnels
banner on the webtop. When they click the Favorite an AppTunnel launches
and starts the Citrix Neighborhood Agent. If you configured Auto-Logon in
the Master Group Settings, the logon parameters are pre-populated, if not,
the user must enter them (see Figure 19).
21
Figure 19 Connecting to the Neighborhood Agent through a Dynamic AppTunnel.
After entering the logon information, the client connects and make its way
to the tray. With the client in the system tray, the user simply needs to click
the icon and the applications will show the resources they have from Citrix
(see Figure 20). You can also see the F5 ball in the system tray, which is the
icon for the AppTunnel.
Figure 20 Choosing the Citrix Program Neighborhood Agent from the system tray
FirePass® Deployment Guide
22
When the application is selected, it opens and runs like the user expects.
Static AppTunnels
Static AppTunnels are another way to connect to Citrix Presentation Server,
and just as simple. The procedure is very similar to creating a Dynamic
AppTunnel Favorite, with the exception of choosing Static Tunnel as
opposed to Dynamic Tunnel.
For Static AppTunnels, we show three different types of configuration
options: HTTP, MS Remote Desktop, and Citrix.
To create an HTTP Static AppTunnel
1. From the main navigation pane, click Application Access, and then
from the upper navigation pane, click AppTunnels.
2. From the Resource Group list, select the relevant Resource Group.
3. Click the Add New Favorite link.
The new Favorite options appear.
4. Leave the Type list set to Favorite.
5. In the Name box, type a name for this Favorite. In our example, we
use citrix static.
6. You can optionally check the Display message box before
launching applications check box to alert the end user.
7. In the Allow List, you can type URLs that a user is allowed to
access. In our example, we entered the location of our Citrix server.
8. From the Endpoint protection required list, you can choose if you
want to enforce a configured Endpoint protection.
9. Click the Add New button.
Two new options appear, Dynamic Tunnels and Static Tunnels.
10. Click the Add New Dynamic Tunnel button.
The Dynamic Tunnel options appear.
11. The New Dynamic Tunnel list contains a number of pre-built
applications. Select Citrix Neighborhood Agent.
The FirePass controller populates the appropriate fields including
the path for running the local agent.
12. If you want to prompt the user to close the specified application if it
is already running, check the Terminate Existing check box.
13. Click the expand [x] button next to Static Tunnel, and then click
Add New Static Tunnel.
14. From the list, select http. Port 80 appears in the Port box, and
Local Host is also automatically populated (this is the loopback
address).
23
15. In the Remote Host box, type the IP address of the target Citrix
server.
16. You can optionally add application information in the Application
box, so a user’s browser launches the application transparently. It is
important to add the application path so the browser knows where to
go. The exact general string is:
iexplore http://citrix.yourcompany.com.
Launch Internet Explorer and browse to this location.
17. Check the Keep-Alive check box if you want to turn on
"keep-alive" TCP option on both client to FirePass and FirePass to
target host TCP connections. Note, however, Keep-Alive does not
prevent user's session from timing out.
18. Click Add New Static Tunnel. The Favorite is added to the list.
From the end user's perspective, they click the AppTunnel favorite, and in
this instance, because we set iexplore.exe and the path, their browser opens
and Citrix logon opens. Once they log on, they are working in Citrix again.
To create a Static AppTunnel that launches the Remote
Desktop Client
1. Follow Steps 1-13 from the preceding procedure. This takes you to
the point where you select an option from the New Static Tunnel
list.
2. From the New Static Tunnel list, select MS Terminal Services.
The FirePass controller populates the appropriate port, 3389 and
inserts the Local Host address.
3. In the Remote Host box, type the IP address of the target Citrix
server.
4. In the Application box, you can optionally add application
information in the Application box, so a user’s browser launches the
application transparently.
In our example, we typed: %SystemRoot%\system32\mstsc.exe
/v: rsaserv.lab.fp.f5net.com
When you specify the name of the application in the Application
box and the path, you can use environment variables in the format
%envvarname%, which resolves to the value of corresponding
environment variable on the user's PC. Here we configured an
AppTunnel for the Microsoft Service Terminal client and specified
the following: "%SystemRoot%\system32\mstsc.exe" /v: mysite.
5. Click the Add New Static Tunnel button.
If you are curious about the other types of variables available for use, please
consult the online help. For this example, when the AppTunnel connects, the
client's Remote Desktop Connection automatically starts and connects.
FirePass® Deployment Guide
24
First the user sees the Remote connection starting. After it launches, the
Terminal Server logon screen opens. Once the user logs on, the Citrix server
displays.
To create a Citrix Static AppTunnel
Note
This procedure requires the local Program Neighborhood Citrix client
installed on the end device which is available for download from Citrix web
site. Look for Ica32pkg.
1. Follow Steps 1-13 from the preceding procedure. This takes you to
the point where you select an option from the New Static Tunnel
list.
2. From the New Static Tunnel list, select Citrix. The FirePass
controller populates the appropriate port, 1494 and inserts the Local
Host address.
3. In the Remote Host box, type the IP address of the target Citrix
server.
4. In the Application box, you can optionally add application
information in the Application box, so a user’s browser launches the
application transparently.
In our example, we typed: %ProgramFiles%/Citrix/ICA
Client/pn.exe" /v: rsaserv.lab.fp.f5net.com
Instead of %SystemRoot%, like the last example, we used
%ProgramFiles%, for the variable along with the absolute path of
the Program Neighborhood program. We also entered /v: host so the
application knows where it is heading.
5. Click the Add New Static Tunnel button.
In this example, there might be an extra click or two for the user, but it is
still effective. The user clicks the Favorite, the AppTunnel launches and
Program Neighborhood starts. In our example, we already set up the
particular ICA connection. The user clicks their connection and MetaFrame
then looks for the application and connects to it.
Once the connection is successful, the user sees the typical Terminal Server
logon prompt. After entering proper credentials, the MetaFrame Server is
now available.
25
Appendix A: Overview of Citrix
Citrix Presentation Server (formerly Citrix MetaFrame) is a remote
access/application publishing product built on the Independent Computing
Architecture (ICA), Citrix Systems' thin client protocol which allows a user
to browse applications in ICA program neighborhood client.
The Microsoft Remote Desktop Protocol, part of Microsoft's Terminal
Services, is based on Citrix technology and was licensed from Citrix in
1997. Unlike traditional frame-buffered protocols like VNC, ICA transmits
high-level window display information, much like the X11 protocol, as
opposed to purely graphical information.
Networks that use this software are reminiscent of the mainframe-terminal
system, where a central powerful computer does most of the processing
work and smaller, much less powerful machines provide the user interface.
The Presentation Server product resides on a Microsoft Windows machine,
which can be either standalone or part of a larger cluster of Citrix servers.
Presentation Server also supports three UNIX variants: HP-UX, Solaris, and
AIX. It is important to note that in addition to per-user Citrix licensing, there
must exist a Terminal Server CAL and a Windows Server CAL from
Microsoft for each client connection. Both products must be adequately
licensed for the environment to function correctly. There is a web-based
Citrix server component, freely available under the name Web Interface.
The Web Interface may be used as a secure ICA proxy over HTTPS when
combined with Citrix Secure Gateway (courtesy wikipedia).
Web Interface/WI (nFuse): Web portal based interface to Presentation
Server in which you can browse applications in browser - ICA web client.
Program Neighborhood Agent requires the WI to retrieve published
applications. NFuse Classic has been integrated as a feature in MetaFrame
XP. It is now called the Web Interface for MetaFrame XP.
ICA Clients are the components of MetaFrame XP that users run on their
computers to access applications running on MetaFrame XP servers.
FirePass® Deployment Guide
26