1
Chapter 3 – Programming Mitel PBXs
:
:
:
:
:
:
:
:
:
:
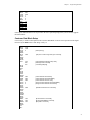
├─────┴─────────┬──┴────────┴──┬────┴─────┴───┬─┴───────┴────┬──┴────────────┤
│1-PERSONAL O/G │2-PRIVATE TRK │3-BLF/DSS
│4│5- ** MORE ** │
├───────────────┼──────────────┼──────────────┼──────────────┼───────────────┤
│6-QUIT
│7-KEY
│8│9│0│
└───────────────┴──────────────┴──────────────┴──────────────┴───────────────┘
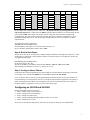
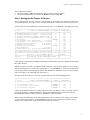
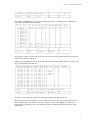
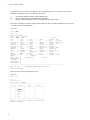
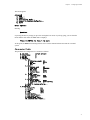
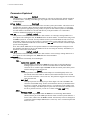
Press softkey 1, PERSONAL O/G, to choose outgoing-only for Key 12, and then softkey 0, ENTER. The
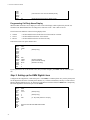
port programming should then look like this:
┌─────┬────────────┬────────┬───────┬─────┬─────┬───────┬───────┬────────────┐
│ KEY │
TYPE
│
DIR │ RING │ SEC │ DSS │EXT NUM│TRK NUM│
LABEL
│
├─────┼────────────┼────────┼───────┼─────┼─────┼───────┼───────┼────────────┤
│ 01 │Prime
│In/Out │ Immed │ No │
│ 101
│
│
│
│ 02 │Speed Dial │
│
│
│
│
│
│
│
│ 03 │Speed Dial │
│
│
│
│
│
│
│
│ 04 │Speed Dial │
│
│
│
│
│
│
│
│ 05 │Speed Dial │
│
│
│
│
│
│
│
│ 06 │Speed Dial │
│
│
│
│
│
│
│
│ 07 │Speed Dial │
│
│
│
│
│
│
│
│ 08 │Speed Dial │
│
│
│
│
│
│
│
│ 09 │Speed Dial │
│
│
│
│
│
│
│
│ 10 │Speed Dial │
│
│
│
│
│
│
│
│ 11 │Speed Dial │
│
│
│
│
│
│
│
│ 12 │Personal
│ O/G
│ None │ No │
│
│
│
│
├─────┼────────────┼────────┼───────┼─────┼─────┼───────┼───────┼────────────┤
>│ 12 │Personal
│ O/G
│ None │ No │
│
│
│
│<
├─────┴─────────┬──┴────────┴──┬────┴─────┴───┬─┴───────┴────┬──┴────────────┤
│1│2│3│4│5│
├───────────────┼──────────────┼──────────────┼──────────────┼───────────────┤
│6-QUIT
│7-KEY
│8-DELETE
│9-REVIEW
│0│
└───────────────┴──────────────┴──────────────┴──────────────┴───────────────┘
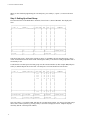
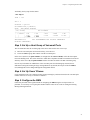
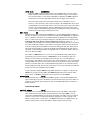
Press softkey 6, QUIT, to return to the list of ports, move the cursor to the NAME column, and give the port
a name (in this example “VMAIL 1”).
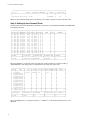
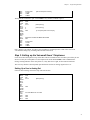
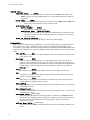
Repeat the port programming as above for the other voicemail ports (using a different name, of course). The
list of ports should now look like this:
┌───┬───┬───┬───┬─────┬───┬───┬────┬────────┬──────────┬─────┬───────────────┐
│BAY│SLT│CCT│TEN│EXTN │COS│COR│TYP │ANNOUNCE│
NAME
│ASSOC│
COMMENTS
│
├───┼───┼───┼───┼─────┼───┼───┼────┼──┬──┬──┼──────────┼─────┼───────────────┤
│ 1 │01 │01 │ 1 │100 │ 1 │ 1 │ 430│ │ │ │
│
│
│
│ 1 │01 │02 │ 1 │101 │ 2 │ 1 │ 430│ │ │ │ VMAIL 1 │
│
│
│ 1 │01 │03 │ 1 │102 │ 2 │ 1 │ 430│ │ │ │ VMAIL 2 │
│
│
│ 1 │01 │04 │ 1 │103 │ 2 │ 1 │ 430│ │ │ │ VMAIL 3 │
│
│
>│ 1 │01 │05 │ 1 │104 │ 2 │ 1 │ 430│ │ │ │ VMAIL 4 │
│
│<
│ 1 │01 │06 │ 1 │105 │ 1 │ 1 │ 430│ │ │ │
│
│
│
│ 1 │01 │07 │ 1 │106 │ 1 │ 1 │ 430│ │ │ │
│
│
│
│ 1 │01 │08 │ 1 │107 │ 1 │ 1 │ 430│ │ │ │
│
│
│
│ 1 │01 │09 │ 1 │108 │ 1 │ 1 │ 430│ │ │ │
│
│
│
│ 1 │01 │10 │ 1 │109 │ 1 │ 1 │ 430│ │ │ │
│
│
│
│ 1 │01 │11 │ 1 │110 │ 1 │ 1 │ 430│ │ │ │
│
│
│
│ 1 │02 │01 │ 1 │112 │ 1 │ 1 │ 430│ │ │ │
│
│
│
├───┼───┼───┼───┼─────┼───┼───┼────┼──┼──┼──┼──────────┼─────┼───────────────┤
│ 1 │01 │01 │ 1 │100 │ 1 │ 1 │ 430│ │ │ │
│
│
│
├───┴───┴───┴───┼─────┴───┴───┴┬───┴──┴──┴──┴─┬────────┴─────┼───────────────┤
│1-MOVE
│2-FIND EXT
│3-EXPAND SET │4-EXPAND PKM │5-RANGE
│
├───────────────┼──────────────┼──────────────┼──────────────┼───────────────┤
│6-QUIT
│7-BAY/SLT/CCT │8-DELETE
│9-REVIEW
│0│
└───────────────┴──────────────┴──────────────┴──────────────┴───────────────┘
Of course you are likely to have other ports programmed, and they will appear in the list.
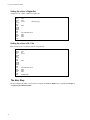
Ensure that the COS number displayed in the column labeled COS for each of the voicemail ports refers to
the COS number that you decided to use in Step 1. If it does not, move the highlight up or down to the
appropriate line, and then move the cursor toward the right, to column labeled COS, and enter the correct
COS number.
15