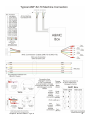
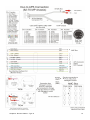
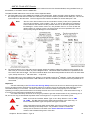
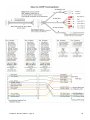
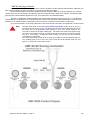
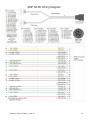
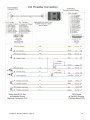
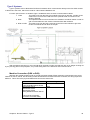
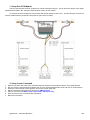
1
Duo Installation Instructions & Reference Guide Table of Contents OVERVIEW ............................................................................................................................................. 1 POWER REQUIREMENTS ........................................................................................................................ 2 FCC DECLARATION OF CONFORMITY ..................................................................................................... 3 CHAPTER 1: HANG THE DISPLAYS .................................................................................................... 4 OPTION1: PURCHASE DISPLAYS FROM YOUR COMPUTER SCORE REPRESENTATIVE .................................. 4 OPTION2: PURCHASE YOUR OWN DISPLAYS. ........................................................................................... 5 Comments on choosing a display ................................................................................................... 5 Commercial Grade vs Domestic Grade: .................................................................................................... 5 Inputs: ........................................................................................................................................................ 5 Quality: ...................................................................................................................................................... 5 Presence: .................................................................................................................................................. 5 Service:...................................................................................................................................................... 5 Spares: ...................................................................................................................................................... 5 RS-232: ..................................................................................................................................................... 5 Try It: ......................................................................................................................................................... 5 Connectors...................................................................................................................................... 6 VGA Input .................................................................................................................................................. 6 DVI Input.................................................................................................................................................... 6 RS-232 Input ............................................................................................................................................. 6 AV Input ..................................................................................................................................................... 6 AV Output .................................................................................................................................................. 6 CHAPTER 2: RUN THE CABLES .......................................................................................................... 7 COMMON CABLES.................................................................................................................................. 8 LLAN Communications Backbone .................................................................................................. 8 DCC IP Score Camera Cable ......................................................................................................... 9 DUP IP Camera Power ................................................................................................................... 9 Optional Network Cable (DNC)..................................................................................................... 10 TYPE A SYSTEMS ................................................................................................................................ 12 Machine Connection Cable (DMO & DME) .................................................................................. 13 Brunswick A and A2................................................................................................................................. 13 AMF 82-30 ............................................................................................................................................... 15 AMF 82-70 ............................................................................................................................................... 18 AMF 82-70 with MP Chassis ................................................................................................................... 20 AMF 82-70 with MK Expander ................................................................................................................. 22 AMF 82-70 with XOP Chassis ................................................................................................................. 24 AMF 82-90 (Large Chassis) ..................................................................................................................... 26 Xima Pinsetter ......................................................................................................................................... 28 VIA Pinsetter ............................................................................................................................................ 30 TYPE B SYSTEMS ................................................................................................................................ 32 Machine Communications Cable (DXL) ....................................................................................... 33 AMF 8800 Gold, 82-90XL and 90XLi ....................................................................................................... 33 TYPE C SYSTEMS ................................................................................................................................ 35 Machine Connection (DGX or DG9) ............................................................................................. 35 Brunswick GS-X (DGX) or Late Model GS-98 ......................................................................................... 36 Brunswick GS-10 / 96 / 98 with Pinsetter Interface Controller fitted (DG9). ............................................. 37 CHAPTER 028177+(%2:/(5¶ S KEYPAD CONSOLE ........................................................... 38 CONCRETE FLOORS ............................................................................................................................ 38 TIMBER FLOORS .................................................................................................................................. 38 CHAPTER 4: SECURE THE CAPPING ............................................................................................... 39 W OODEN AND PLASTIC CAPPING .......................................................................................................... 39 METAL CAPPING .................................................................................................................................. 40 CHAPTER 5: ACCOUNTING FOR BUMPER RAILS .......................................................................... 41 NO BUMPERS ...................................................................................................................................... 41 VERTICAL BUMPERS AND BALL W ALL ................................................................................................... 42 AMF HORIZONTAL SWING OUT TYPE ..................................................................................................... 42 CHAPTER 6: INSTALL THE DUO CAMERA MODULE ...................................................................... 43 Creating your own NAS disk ......................................................................................................... 67 3. NETWORKING COMPUTERS .............................................................................................................. 68 Naming Conventions .................................................................................................................... 68 Setting IP Addresses .................................................................................................................... 69 4. INSTALLING AND SHARING PRINTERS ................................................................................................ 70 6. INSTALL THE SOFTWARE .................................................................................................................. 71 CHAPTER 10: INSTALL AND CONFIGURE THE SOFTWARE ......................................................... 72 1. INSTALL THE SOFTWARE ON THE MASTER COMPUTER ....................................................................... 72 2. REGISTER THE SOFTWARE ............................................................................................................... 72 3. INSTALL AND UPDATE THE LANE SOFTWARE ..................................................................................... 73 4. UPDATE THE DUO HARDWARE MODULES .......................................................................................... 73 5. ASSIGN PRINTER FUNCTIONS ........................................................................................................... 74 Open & League Scoresheet. ........................................................................................................ 75 Receipt Printer. ............................................................................................................................. 75 Cash Drawer. ................................................................................................................................ 76 Customer Display. ........................................................................................................................ 76 6. ENABLING OR DISABLING SOFTWARE MODULES ................................................................................ 76 7. INSTALL THE SOFTWARE ON ALL OTHER COMPUTERS ......................................................................... 76 CHAPTER 11: SETUP CENTER COMMAND TO SUIT YOUR NEEDS ............................................. 77 CONTROL SETUP ................................................................................................................................. 77 Center Setup Tab ......................................................................................................................... 77 Open Play Tab .............................................................................................................................. 80 Open Exciters .......................................................................................................................................... 80 Game Colors ........................................................................................................................................... 80 Game Backgrounds ................................................................................................................................. 80 League Play Tab ........................................................................................................................... 80 Printers Tab .................................................................................................................................. 81 Print Scoresheets for all Open Play Games ............................................................................................ 81 Lane Options Tab ......................................................................................................................... 82 Default Grid Style..................................................................................................................................... 82 Limited Clear for Open Play ..................................................................................................................... 82 Limited Clear for League Play ................................................................................................................. 82 Food & Drinks Button............................................................................................................................... 82 Enable No-Tap from Lanes ...................................................................................................................... 83 Machine Timeouts ................................................................................................................................... 83 Lane Messages Tab ..................................................................................................................... 83 Creating your own messages .................................................................................................................. 83 Menu Security Tab ........................................................................................................................ 84 ENABLE PASSWORD SECURITY ............................................................................................................ 85 ENABLE TABS AND ACCOUNTS ............................................................................................................. 87 Creating Accounts ................................................................................................................................... 87 CREATE SOME POS ITEMS .................................................................................................................. 87 CREATING PICTURES TO CUSTOMISE THE SYSTEM. ................................................................................ 88 Scoresheets .................................................................................................................................. 88 Internet League List ...................................................................................................................... 88 Invoices ......................................................................................................................................... 88 APPENDIX A - USING THE TROUBLESHOOTING SCREENS ........................................................ 89 CHECKING THE MACHINE CONNECTIONS .............................................................................................. 89 Outputs ......................................................................................................................................... 90 Inputs ............................................................................................................................................ 90 REVIEWING THE LAST SCORE BOWLED ................................................................................................. 91 Save the Last Score ..................................................................................................................... 91 Stage 1. Scoring Cycle Started .................................................................................................... 91 Things to Check ....................................................................................................................................... 91 Stage 2. Score Determined .......................................................................................................... 92 Things to Check ....................................................................................................................................... 92 Stage 3. Setting Pins .................................................................................................................... 93 Stage 4. Scoring Cycle Ended ...................................................................................................... 93 Things to Check ....................................................................................................................................... 93 NETWORK CONNECTION OPTIONS ........................................................................................................ 94 Auto IP Address ............................................................................................................................ 94 Fixed IP Address .......................................................................................................................... 94 VIEWING THE SCORING LOG................................................................................................................. 94 Saving the System Log ................................................................................................................. 94 Reboot and run Check Disk .......................................................................................................... 94 FINE TUNING THE SCORING SETUP....................................................................................................... 95 Take Data Delay ........................................................................................................................... 95 Advanced Pinsetter Timings ......................................................................................................... 95 st Synchronise the frame to 1 Ball ............................................................................................................. 96 ADJUST CAMERA ................................................................................................................................. 96 Score Camera ............................................................................................................................... 96 Find the Pins ............................................................................................................................................ 96 Manually Moving a Pin............................................................................................................................. 97 Changing Brightness Levels .................................................................................................................... 97 Specify the type of Camera ..................................................................................................................... 97 Player Camera .............................................................................................................................. 98 Zoom In and Adjust position .................................................................................................................... 98 Save Last Delivery ................................................................................................................................... 98 APPENDIX B – AUTOMATIC BUMPERS ............................................................................................ 99 AMF (AND OTHERS) AUTOMATIC BUMPERS........................................................................................... 99 1. Setup Duo CPU Module ......................................................................................................... 100 2. Setup Center Command ......................................................................................................... 100 BRUNSWICK AUTOMATIC BUMPERS .................................................................................................... 101 Type A Systems .......................................................................................................................... 101 Type B Systems .......................................................................................................................... 101 Type C Systems ......................................................................................................................... 102 1. Configure the Brunswick Bumper Controller .......................................................................... 103 2. Setup Duo CPU Module ......................................................................................................... 104 3. Setup Center Command ......................................................................................................... 104 USING AUTOMATIC BUMPERS ............................................................................................................. 105 Method 1: Via the Name Entry Screen. ..................................................................................... 105 Method 2: Via League Setup ..................................................................................................... 105 Method 3: Via the Override buttons. .......................................................................................... 105 APPENDIX C – AMF MANAGERS CONTROL UNIT CONNECTION ............................................... 106 INSTALLING THE MCU INTERFACE CONTROLLER ................................................................................. 108 A. Install driver for USB to RS232 converter ............................................................................. 108 B. Create Startup Shortcut......................................................................................................... 109 C. Setup the Center Command Software .................................................................................. 109 USING THE MCU INTERFACE.............................................................................................................. 109 APPENDIX D – SWITCHING TO A VIDEO SOURCE ....................................................................... 110 DVT SERIAL CABLE ........................................................................................................................... 111 APPENDIX E – SETTING BIOS ENTRIES ON THE DUO CPU MODULE ....................................... 113 W HAT IS THE BIOS?.......................................................................................................................... 113 W HEN WOULD I NEED TO SET THE BIOS DEFAULTS? ........................................................................... 113 SETTING BIOS DEFAULTS IN THE DUO HARDWARE MODULES ............................................................. 113 Main Menu .................................................................................................................................. 114 Menu Item 1: Standard CMOS Features .................................................................................... 114 Menu Item 2: Advanced BIOS Features ..................................................................................... 115 Menu Item 3: Advanced Chipset Features ................................................................................. 115 Menu Item 4: Integrated Periphals ............................................................................................. 116 Menu Item 4 – 1: On Chip IDE Device ................................................................................................... 116 Menu Item 4 – 2: Onboard Device ......................................................................................................... 117 Menu Item 4 – 3: Super IO Device......................................................................................................... 117 Menu Item 4 – 4: USB Device Setting ................................................................................................... 118 Menu Item 5: Power Management Setup ................................................................................... 118 Menu Item 6: PnP / PCI Configuration ....................................................................................... 119 Menu Item 7: PC Health Status .................................................................................................. 119 APPENDIX F – PREVENTATIVE MAINTENANCE ........................................................................... 120 DUO CPU MODULE ........................................................................................................................... 120 DUO CAMERA MODULE (IF FITTED) ..................................................................................................... 120 2YHUYLHZ Thank you for purchasing the Duo Automatic Scoring system. The Duo hardware should be able to be easily installed by a team of two or three people with a reasonable degree of technical competence. The Duo system consists of three parts: 1. The Duo CPU Module, which is responsible for all communications to the front counter as well as displaying the scoregrids and exciter animations. 2. Duo Camera Module, which is responsible for viewing the Pins in order to determine the score, as well as communications with the machine in order to cycle them and turn them on & off. 3. Duo Keyboard Module, which your bowlers use on the lanes. Note: For Brunswick GS series machines, the Duo Camera Module is not required at all as the Duo CPU module communicates directly with the GS machine in order to determine the score. The Duo scoring system is designed to be self-installed with a minimum of electronic hardware modules, using standard LCD’s, Plasma Panels or any other display technology that accepts a both VGA and DVI video signals. These displays can be purchased and supported by a local supplier, which allows you the security of having the support of the biggest potential source of service issues close at hand. Introduction 1 Power Requirements There are at least two power circuits that need to be present for the system to function (Shown in Pink, below): 1. Display Units. There must be a power available to the display units in the ceiling. There must be a GPO (General Purpose Outlet) for each monitor and also one for the Duo unit. There is a maximum of 8 lanes per circuit or lower, depending on your local power regulations. 2. Computer Equipment. There must also be a separate circuit available for the front end Computer Equipment. It is recommended that this circuit not only is separate from the Duo Units and Monitors, but it should also be on a separate circuit from the remainder of the center’s power. Note: A licensed electrician MUST do Any high voltage electrical work. It may be necessary to contact a licensed electrician to pre-install these power circuits BEFORE starting installation. Introduction 2 FCC Declaration of Conformity PRODUCT NAME: Duo MODEL NUMBER: FCC RULES: TESTED TO COMPLY WITH FCC PART 15, CLASS B OPERATING ENVIRONMENT STATEMENT: COMMERCIAL USE FCC COMPLIANCE STATEMENT: This device complies with part 15 of the FCC Rules. Operation is subject to the following two conditions: (1) This device may not cause harmful interference, and (2) this device must accept any interference received, including interference that may cause undesired operation. INFORMATION TO USER: This equipment has been tested and found to comply with the limits of a Class B digital device, pursuant to Part 15 of the FCC Rules. These limits are designed to provide reasonable protection against harmful interference in a residential installation. This equipment generates, uses and can radiate radio frequency energy and, if not installed and used in accordance with the instructions, may cause harmful interference to radio communications. However, there is no guarantee that interference will not occur in a particular installation. If this equipment does cause harmful interference to radio or television reception, which can be determined by turning the equipment off and on, the user is encouraged to try to correct the interference by one or more of the following measures: - Reorient / Relocate the receiving antenna. - Increase the separation between the equipment and receiver. - Connect the equipment into an outlet on a circuit different from that to which the receiver is connected. - Consult the dealer or an experienced radio/TV technician for help. CAUTION: Changes or modifications not expressly approved by the manufacturer responsible for compliance could void the users authority to operate the equipment. Introduction 3 &KDSWHU+DQJWKH’LVSOD\V The Duo system can be used with any type of display that can accept both a VGA and a DVI signal. This will often involve a TV that is either a Glass CRT (Cathode Ray Tube) or more commonly a TV that uses a LCD (Liquid Crystal Display) panel. Either way, you must also purchase and arrange for these displays to be hung from the ceiling. Note: Any mounting hardware should be secured to the ceiling under advice from a local structural engineer who can verify that your ceiling purlins or other suspension framework is strong enough to support the weight of the monitors. Option1: Purchase displays from your Computer Score representative Your Computer Score representative is able to supply (and install, if needed) displays and hanging brackets that have been manufactured specifically to suit the displays that will be supplied. An example of this arrangement is shown below. Note: Mounting arrangement is subject to change without notice. Chapter 1: Hang the Displays 4 Option2: Purchase your own displays. There are a number of manufacturers of mounting brackets for TVs and other displays that can be readily seen in Bars, Clubs and other facilities. This is a large industry, which should have a number of local suppliers who can advise you on the various methods on mounting displays onto the ceiling. Following are the web site addresses of some, but not all, of the major manufacturers of this type of equipment: www.atdec.com www.pivotelli.com www.peerlessindustries.com Comments on choosing a display Obviously, price can have a large bearing on the decision for which display to purchase to use with the system, but the following factors should also be taken into account when purchasing displays: Commercial Grade vs Domestic Grade: Although Domestic TV screens are cheaper than Commercial Grade displays, using a Domestic TV MAY produce some issues. It may be possible that you will void the warranty if you use a Domestic TV in a commercial setting. Also, as a general statement, a commercial grade panel will be of higher quality than a domestic grade panel. This may result in a longer life span with fewer problems. Commercial Grade monitors are also designed to remain the same in appearance across multiple hardware versions. The appearance of Domestic Grade monitors are constantly changing and it may be difficult to source the same monitor after a short period of time. Inputs: Your display MUST be able to accept BOTH VGA and DVI inputs. This is because with the Duo system, the Odd Lane is using the VGA output of the Duo CPU Module and the Even Lane uses DVI. If DVI is not available, then you can use a HDMI input instead. Warning: Some older LCD TVs may OVERSCAN a PC signal when using HDMI. This means that Left and Right edge of the image may be off the screen. Newer TVs have the option of turning off overscan from within their menu system. You should check that this is the case before purchasing your displays. Quality: The cheapest display is not necessarily the best. Consider that the usual life of a scoring system is at least 10 years and that any monitor that will be reliable for that length of time must be well built. (and well maintained) As a general statement, LCD TV screens will be more reliable long term than glass CRT TV screens or Plasma panels. Presence: Go with a supplier who is reputable and present in the market. Commonly, a manufacturer with an unknown brand may not last long term, making spares and repair work hard to achieve. Service: Choose a supplier with a local repair agent. Sometimes a manufacturer will actually include the schematic diagram for the monitor’s electronics with their other documentation. This will make a repairer’s job much easier. Spares: Strongly consider purchasing additional units for spare parts as insurance against failure that cannot be repaired. (Or replaced with an equivalent unit) Spare units are often put into service as TV screens in the Bar or Café until they are required. RS-232: Your displays should also be able to accept an RS232 serial data signal to include the ability to select the video source on the monitor via serial connection. This will facilitate the feature, which allows the bowlers to watch TV on one screen while both score grids are displayed on the other screen. This also allows video to be displayed on the screen when it is not being used for a score grid. This input is usually labelled as “RS-232.” See Appendix D for more information on switching video sources. Try It: The Duo unit is small enough that it should be possible to take one to your local TV retailer to test the quality of the TV’s display of the video signal. Although this is not essential, it could make your purchase decision an easier one, and allow you to be confident that your choice will work with the equipment. Chapter 1: Hang the Displays 5 Connectors The image below is from a Samsung 400PX commercial display. It represents a very good display with all the connectors that you would need to correctly run the Duo, utilising all its features, with the minimum of complications. Below is a summary of the connectors used: (Like most TVs, there are some connectors that are not used.) VGA Input Plug in the Odd Lane Video output from the Duo CPU module into here, if the monitor is on the Odd Lane. DVI Input Plug in the Even Lane Video output from the Duo CPU module into here, if the monitor is on the Even Lane. If your monitor does not have DVI input, then you can use a HDMI input instead. However, you may experience OVERSCAN, as discussed above. If this is the case, and you are not able to stop your monitor from over scanning from within its menu settings, then you are still able to purchase, at additional cost, a converter which will allows you to plug into the VGA input for the Even lane. Contact your Computer Score representative for more information. RS-232 Input Plug in the Monitor control cable from the Duo CPU module, for the appropriate lane. This serial communications port allows the Duo CPU module to tell the display to switch channels from Scoregrid to AV and back. See Chapter 8 and also Appendix D for more information on this feature. AV Input Plug in your Audio Visual (AV) source into this plug to allow the monitor to display video. AV Output The AV Output plug repeats whatever signal is coming into the AV Input. This Output also amplifies the AV signal slightly to allow the video cable to daisy chain from one monitor to another, without having to go to the extra expense and cabling of a video distribution amp. It is the responsibility to the center to supply the monitors with an AV video signal. See your AV equipment supplier for more information. Chapter 1: Hang the Displays 6 &KDSWHU5XQWKH&DEOHV There are three different methods to communicate to the Pinsetters. The manufacturer and model of the Pinsetter installed at your Bowling Center dictate which method is used and how the system is cabled: Type A This type uses the Duo Camera Module’s Machine Connection port for each machine in the pair. Machine connection relies on relays to open and close a switch contact, which is then wired into the Pinsetter’s control box to perform the required function. For example: to perform a function such as cycle the lane, the Duo system closes a relay, which completes a circuit that is wired in parallel to the cycle pinsetter button at the ball return. Type B This type uses the Duo Camera Module’s Machine Communication port. This connection takes advantage of the more advanced functions of the AMF 82-90XL and 90XLi Pinsetters. The cable is plugged into Pinsetter’s electronics so the Duo system communicates directly to both lanes via their common control chassis. For Example: to perform a function such as cycle the lane, the Duo sends a command to the Pinsetter, which then starts a cycle. In a Type B connection, it is the Duo that tells the machine what score was bowled and what to do. Type C This type is designed for connection to Brunswick’s GS-X and GS-98 (Unified Chassis) machines as well as GS-10, 96 & 98 machines. (That include the Pinspotter Interface box) This connection type takes advantage of the LLAN backbone to communicate without the need to have a Duo Camera Module at all. In a Type C connection, it is the Pinspotter that determines the score and tells the Duo what to display on the screen. Note: Although the terms Pinspotter and Pinsetter refer to Brunswick or AMF machines, they are used interchangeably for the purposes of this installation guide. Type A Systems Common Cables LLAN DCC DNC Pinsetter Brunswick A and A2 AMF 82-30 AMF 82-70 AMF 82-70 MP Chassis AMF 82-70 MK Expander AMF 82-90 Xima Pinsetter Machine Connection Cable DMO-A2 & DME-A2 DMO-30 & DME-30 DMO-70 & DME-70 DMO-70MP & DME-70MP DMO-70MK & DME-70MK DM-90 DMO-XM & DME-XM Pinsetter Machine Connection Cable Type B Systems Common Cables LLAN DCC DNC AMF 8800 Gold AMF 82-90XL AMF 90XLi DXL Type C Systems Common Cables LLAN DNC Pinsetter Brunswick GS-10 (With Pinsetter Interface Controller) Brunswick GS-92 (With Pinsetter Interface Controller) Brunswick GS-96 (With Pinsetter Interface Controller) Brunswick GS-98 (With Pinsetter Interface Controller) Brunswick GS-98 (Consolidated Chassis) Brunswick GS-X (Next Gen Chassis) Chapter 2: Run the Cables Machine Connection Cable DG9 DGX 7 Common Cables Although the cable that connects to each type of pinspotter is different, there are several cables that are used for some or all of the different classes of system. LLAN Communications Backbone The LLAN cable is used in Type A, Type B and Type C systems. The LLAN is the main communications backbone between all components of the Duo system. The LLAN cable can be of varying lengths in different situations. However, the wiring of this cable is always the same. It is used to make the main communications connection the Duo CPU module, the Duo Camera Module and also the Duo Bowler’s keypad. Note: All cables should be routed as far as practical away from sources of power or RF interface such as fluorescent lights and transformers. It is important to consider occupational health and safety issues when routing these cables. Each installation will vary depending upon the nature of the ceiling, however minimum precautions should include gloves, eye protection, and a dusk mask. An approved platform should be used to give safe access to the ceiling. Some ceilings may have insulation and therefore require protective clothing to be worn. If in doubt about the nature of this task it is advisable to contract a licensed electrical contractor to route the cables. Chapter 2: Run the Cables 8 DCC IP Score Camera Cable The DCC cable is used in Type A and Type B systems. It is not used in Type C Systems. The DCC cable is used to carry signal from the Duo CPU module to the IP Camera at the Duo Camera module. This signal is in the form of a network connection, which is shielded to help protect from interference. The Duo Camera Module is not present in Type C systems, so the DCC and DUP cables are not used in this situation. The Duo system uses a IP Camera as its choice of camera because they are produce a, color, high resolution and extremely reliable image. This is an example of using the price advantages of main stream computing to achieve maximum benefit for the price competitiveness of your system. Note: When installing this cable, make sure that the end with the Drain Wire connected is at the DUO CPU Module end, not the IP Camera End. This is ensure proper dispersal of static electricity that could be induced onto the cable. Note: Even though the DCC cable is shielded, all cables should be routed as far as practical away from sources of power or RF interface such as fluorescent lights and transformers. It is important to consider occupational health and safety issues when routing these cables. Each installation will vary depending upon the nature of the ceiling, however minimum precautions should include gloves, eye protection, and a dusk mask. An approved platform should be used to give safe access to the ceiling. Some ceilings may have insulation and therefore require protective clothing to be worn. If in doubt about the nature of this task it is advisable to contract a licensed electrical contractor to route the cables. DUP IP Camera Power This cable provides power for the IP Camera located inside the DUO Camera module. It is supplied preinstalled inside the Dup Camera module, ready for use. You should not need to install it. Chapter 2: Run the Cables 9 Optional Network Cable (DNC) The DNC cable is used in Type A, Type B and Type C systems. The Duo system is designed to have a stand alone basic scoring functionality, without the need to connect any computers at all. However, if you wish to control the lanes from a computer on the front counter, you will need to connect the Network Cable. (DNC) This cable is shown here in Blue. This optional CAT5e or Cat 6 cable will allow the Duo system to interface with the Center Command software suite and allow you to fully control your systems functions including several optional software modules such as Point of Sale, League Secretarial and System Management. See Chapter 10 for more information on setting up your computers and printers for use with the Duo Scoring System. The DNC Cable is run from the Duo CPU module forward to a convenient place where a Gigabit (1000Mbit) network switch for all lanes is located. A second switch or a router can then be placed near the optional system management computers so that just a single cable need be run from the office to the lanes area. Chapter 2: Run the Cables 10 Alternatively, a single switch can be used, however in this case all network cables must be run to that position. The advantage of this is that the networking is simpler and more efficient. It is for this reason that this method is the one recommended by Computer Score. The disadvantage is that there is more work involved in running the cables. Chapter 2: Run the Cables 11 Type A Systems For each pair of lanes in a standard Type A installation there are five communications cables: 1. LLAN This cable runs from the Duo CPU module to the Duo Camera module. Another LLAN cable is then run from the Duo Camera module to the optional wired connection for the Bowler’s Keypad. This cable supplies both power and communications. 2. DCC This cable runs from the Duo CPU module to the Duo Camera module. This cable supplies video signal from the camera. 3. DNC This optional cable runs from the Duo CPU module to a network switch in order to gain communications to the Center Command front desk software. 4. DMO This cable runs from the Duo Camera module to the location on the odd lane pinspotter where the Duo system can tell the machine to turn on and cycle. The location and configuration of this cable with change according to the model of pinspotter installed. Please refer to the Machine Connection section of this manual for further information on your type of pinspotter. 5. DME This cable runs from the Duo Camera module to the location on the even lane pinspotter where the Duo system can tell the machine to turn on and cycle. The location and configuration of this cable with change according to the model of pinspotter installed. Please refer to the Machine Connection section of this manual for further information on your type of pinspotter. After all cables have been run, they should all be checked to make sure that they are not in danger of being cut by any moving parts in the pinspotter, or by a ball hitting them in the ball track area under the lanes. In addition, all the cables should be tied together at the Duo Camera Module and securely tied up out of the way of any balls travelling past on the ball track. Chapter 2: Run the Cables – Type A 12 Machine Connection Cable (DMO & DME) Brunswick A & A2 as well as AMF 82-30 & 82-70 Pinsetters are only capable accepting the basic on / off and cycle commands whereas all other later Pinsetter types are capable of accepting advanced commands such as 7 - 10 pick off, strike cycles and short cycles. The following Pinsetters use the Machine Connection port on the Duo Camera Module where as others use the Machine Communications port as discussed in the next section. Cable designations for Pinsetters using the Machine Connection port are as follows: Pinsetter Cable Designation Brunswick A and A2 DMO-A2 DME-A2 AMF 82-30 DMO-30 DME-30 AMF 82-70 DMO-70 DME-70 AMF 82-70 MP Chassis DMO-70MP DME-70MP AMF 82-70 MK Expander DMO-70MK DME-70MK AMF 82-90 DM-90 Xima Pinsetter DMO-XM DME-XM VIA Pinsetter DMO-VIA DME-VIA Brunswick A and A2 Run both the DMO-A2 (Odd Lane) and DME-A2 (Even Lane) cables from the Duo Camera Module, along the Ball Track, up the kickback, and then up the A-frame to the Control box on the Odd and Even lanes respectively. Make sure you route all cables away from moving parts, so there is no chance of the cables being crushed or cut. The start contacts are connected in series to the managers control switch and the cycle contact is wired in parallel to the cycle button from the ball return. Note: The Duo unit’s start contacts must be connected in series (in line) not in parallel with (across) the manager’s control switch. This is to ensure that when the manager’s control switches are switched off the pinsetter will turn off. Normal operation will see the Manager’s control switch turned on, the pinsetter will turn on and off with the games bowled. If, however, there is an urgent need to turn the pinsetter off it can be done quickly using the Manager's control switches. Chapter 2: Run the Cables – Type A 13 Chapter 2: Run the Cables – Type A 14 AMF 82-30 Run both the DMO-30 (Odd Lane) and DME-30 (Even Lane) cables from the Duo Camera Module, along the Ball Track, and up the kickback to the Odd and Even lane Pinsetter respectively. The Start cable is wired to the “P” Box at the front of the machine and the cycle cable is wired to the “J” Box. Again, the start contact is wired in series to the managers control switch and the cycle contact is wired in parallel to the cycle button from the ball return. Warning: Beware of high voltage present in the J Box. You MUST turn off AND isolate the pinsetter BEFORE working on it. Warning: You MUST NOT connect the foul to the Duo Scoring Module or YOU WILL DAMAGE IT. Many 82-30 machines use a high voltage foul signal. Duo accepts the low voltage foul signal only. Chapter 2: Run the Cables – Type A 15 Chapter 2: Run the Cables – Type A 16 Chapter 2: Run the Cables – Type A 17 AMF 82-70 Run both the DMO-70 (Odd Lane) and DME-70 (Even Lane) cables from the Duo Camera Module, along the Ball Track, up the kickback, to the A&MC box located on the curtain wall, which is the common connection box for both lanes. Again, the start contact is wired in series to the managers control switch on AMC Pin 5 and the cycle contact is wired in parallel across AMC pins 1 & 2 to the cycle button from the ball return. The Foul signal is also wired to the AMC box across AMC pins 7 & 8. Warning: Be careful when pulling out the existing AMC connections that you do not pull out more than the intended connector by exerting too much force. Also, make sure that no connectors are shorting out with any others, otherwise machine faults like continual cycling could occur. Note: The Duo unit’s start contacts must be connected in series (in line) not in parallel with (across) the manager’s control switch. This is to ensure that when the manager’s control switches are switched off the pinsetter will turn off. Normal operation will see the Manager’s control switch turned on, the pinsetter will turn on and off with the games bowled. If, however, there is an urgent need to turn the pinsetter off it can be done quickly using the Manager's control switches. Chapter 2: Run the Cables – Type A 18 Chapter 2: Run the Cables – Type A 19 AMF 82-70 with MP Chassis Run both the DMO-70MP (Odd Lane) and DME-70MP (Even Lane) cables from the Duo Camera Module, along the Ball Track, up the kickback. The DMO and DME cables each consist of two cables: A. One cable is then run to the A&MC box located on the curtain wall. Again, the start contact is wired in series to the managers control switch on AMC Pin 5. B. The other is run to the MP chassis. The tenth frame cycle contact, foul and second ball input are included in the round APS plug that is present on the MP chassis. The APS commands also allow more advanced st pinsetter functions such as short strike cycle, sweep reverse on 1 ball miss and 7 – 10 pick off. Warning: Be careful when pulling out the existing AMC connections that you do not pull out more than the intended connector by exerting too much force. Also, make sure that no connectors are shorting out with any others, otherwise machine faults like continual cycling could occur. Note: The Duo unit’s start contacts must be connected in series (in line) not in parallel with (across) the manager’s control switch. This is to ensure that when the manager’s control switches are switched off the pinsetter will turn off. Normal operation will see the Manager’s control switch turned on, the pinsetter will turn on and off with the games bowled. If, however, there is an urgent need to turn the pinsetter off it can be done quickly using the Manager's control switches. Important! The take data delay in the Fine Tune the Scoring Setup screen must be set to allow enough time for the score to be taken and the APS input to the pinspotter MP chassis to be driven prior to the pinspotter table starting to move. The default setting is 3.0 seconds for the MP chassis. The MP Chassis must receive the APS scoring input prior to the table operating, so that any advanced functions such sweep reverse can occur if necessary. If the table starts moving, it is too late for any advanced commands to be received. This Take Data Delay should be set as long as possible to give the maximum time for any unsteady pins to fall, but not too long so that the MP chassis times out and ignores 7-10 pick off or short strike cycles. Chapter 2: Run the Cables – Type A 20 Chapter 2: Run the Cables – Type A 21 AMF 82-70 with MK Expander Run both the DMO-70MK and DME-70MK cables from the Duo Camera Module, along the Ball Track, up the kickback. The DMO & DME cables each consist of three separate cables: A. The First cable is run to the A&MC box located on the curtain wall. Again, the start contact is wired in series to the managers control switch on AMC Pin 5 and the cycle contact is wired in parallel across AMC pins 1 & 2 to the cycle button from the ball return. The Foul signal is also wired to the AMC box across AMC pins 7 & 8. Warning: Be careful when pulling out the existing AMC connections that you do not pull out more than the intended connector by exerting too much force. Also, make sure that no connectors are shorting out with any others, otherwise machine faults like continual cycling could occur. Note: The Duo unit’s start contacts must be connected in series (in line) not in parallel with (across) the manager’s control switch. This is to ensure that when the manager’s control switches are switched off the pinsetter will turn off. Normal operation will see the Manager’s control switch turned on, the pinsetter will turn on and off with the games bowled. If, however, there is an urgent need to turn the pinsetter off it can be done quickly using the Manager's control switches. B. The second cable is run to the MK Expander PC Board in the control chassis, where the four-pin connector is plugged into the top right corner of the Printed Circuit Board. The APS commands allow more advanced st pinsetter functions such as short strike cycle, sweep reverse on 1 ball miss and 7 – 10 pick off. C. The third cable is run to the masking unit, where it is connected across the 2 Ball light. Check the polarity of nd the connection by making sure that the 2 Ball Indicator on the Duo Camera unit comes on when the pinsetter is on second ball. nd Important! The take data delay in the Fine Tune the Scoring Setup screen must be set to a allow enough time for the score to be taken and the APS input to the MK expander chassis to be driven prior to the pinspotter table starting to move. The default setting is 3.0 seconds for the Omega-Tek chassis fitted with MK expanders. The MK expander must receive the APS scoring input prior to the table operating, so that any advanced functions such sweep reverse can occur if necessary. If the table starts moving, it is too late for any advanced commands to be received. This Take Data Delay should be set as long as possible to give the maximum time for any unsteady pins to fall, but not too long so that the MK expander times out and ignores 7-10 pick off or short strike cycles. Note: Make sure that the Pinsetter Model Type in the Setup Wizard is set to AMF 82_70MP. The MP Chassis and the MK Expander behave in the same way, so the one Pinsetter Model Type will operate both types of chassis. Tip: Some pinspotters have the MK expander fitted, but have not been re-wired to enable reversing of the sweep motor. It is possible to enable or disable the sweep reverse function for the APS in the Check Pinsetter Connections screen in the troubleshooting menu of the Duo. Chapter 2: Run the Cables – Type A 22 Chapter 2: Run the Cables – Type A 23 AMF 82-70 with XOP Chassis Run both the DMO-70XOP and DME-70XOP cables from the Duo Camera Module, along the Ball Track, up the kickback, to a location near the A&MC Box. The DMO & DME cables then each consist of three separate cables: A. The First cable is run to the A&MC box located on the curtain wall. Again, the start contact is wired in series to the managers control switch on AMC Pin 5 and the cycle contact is wired in parallel across AMC pins 1 & 2 to the cycle button from the ball return. The Foul signal is also wired to the AMC box across AMC pins 7 & 8. Note: The Duo unit’s start contacts must be connected in series (in line) not in parallel with (across) the manager’s control switch. This is to ensure that when the manager’s control switches are switched off the pinsetter will turn off. Normal operation will see the Manager’s control switch turned on, the pinsetter will turn on and off with the games bowled. If, however, there is an urgent need to turn the pinsetter off it can be done quickly using the Manager's control switches. B. The second cable is run to the XOP control chassis, where the existing cable to the old Accuscore system is cut and a four pin connector is fitted, as per the diagram below. This allows APS commands to be passed from the Duo units to the XOP chassis. The APS commands allow more advanced pinsetter functions such as short strike st cycle, sweep reverse on 1 ball miss and 7 – 10 pick off. nd C. The third cable is run to the masking unit, where it is connected across the 2 Ball light. Check the polarity of the nd connection by making sure that the 2 Ball Indicator on the Duo Camera unit comes on when the pinsetter is on second ball. Important! The take data delay in the Fine Tune the Scoring Setup screen must be set to a allow enough time for the score to be taken and the APS input to the XOP chassis to be driven prior to the pinspotter table starting to move. The default setting is 3.0 seconds. The XOP Chassis must receive the APS scoring input prior to the table operating, so that any advanced functions such sweep reverse can occur if necessary. If the table starts moving, it is too late for any advanced commands to be received. This Take Data Delay should be set as long as possible to give the maximum time for any unsteady pins to fall, but not too long so that the MK expander times out and ignores 7-10 pick off or short strike cycles. Note: Make sure that the Pinsetter Model Type in the Setup Wizard is set to AMF 82_70MP. The MP Chassis and the XOP Chassis behave in the same way, so the one Pinsetter Model Type will operate both types of chassis. Tip: Some pinspotters have the XOP chassis fitted, but have not been re-wired to enable reversing of the sweep motor. It is possible to enable or disable the sweep reverse function for the APS in the Check Pinsetter Connections screen in the troubleshooting menu of the Duo. Chapter 2: Run the Cables – Type A 24 Chapter 2: Run the Cables – Type A 25 AMF 82-90 (Large Chassis) As the AMF 82-90 machine uses the same common chassis to control both the Odd and Even machines, the Duo Camera module only uses one cable to connect to this model of Pinsetter. Run the DM-90 cable from the Duo Hardware Module, along the Ball Track, up the kickback, to the 82-90 chassis at the rear of the Pinsetter, and plug into the APS connection at the back of the chassis. The DM-90 cable gives the Duo Camera Module signals for Cycle, Foul, Rake Down and Pinsetter Status. However, it DOES NOT contain signals to turn the Pinsetter On and Off from the Duo unit. To enable this optional feature, the optional Lane Control Computers must be connected to the MCU (Managers Control Unit) and software run to enable the MCU commands to be sent from the computer to the Pinsetter, via the MCU. For more information on connecting the MCU to the Lane Control Computers, see Appendix C in this manual. Note: The take data delay in the Fine Tune the Scoring Setup screen must be set to a allow enough time for the score to be taken and the APS input to the 82-90 chassis to be driven prior to the pinspotter table starting to move. The default setting is 3.0 seconds for the 82-90 pinsetter model type. The 82-90 must receive the APS scoring input prior to the table operating, so that any advanced functions such sweep reverse can occur if necessary. If the table starts moving, it is too late for any advanced commands to be received. This Take Data Delay should be set as long as possible to give the maximum time for any unsteady pins to fall, but not too long so that the 82-90 chassis times out and ignores 7-10 pick off or short strike cycles Chapter 2: Run the Cables – Type A 26 Chapter 2: Run the Cables – Type A 27 Xima Pinsetter Run both the DMO-XM (Odd Lane) and DME-XM (Even Lane) cables from the Duo Camera Module, along the Ball Track, up the kickback, and then up to the Control box on the Odd and Even lanes respectively. Make sure you route all cables away from moving parts, so there is no chance of the cables being crushed or cut. The start contacts are connected in series to the managers control switch and the cycle contact is wired in parallel to the cycle button from the ball return. See your Xima reference material to determine for more information on where to connect into the Xima Control chassis. Note: The Duo unit’s start contacts must be connected in series (in line) not in parallel with (across) the manager’s control switch. This is to ensure that when the manager’s control switches are switched off the pinsetter will turn off. Normal operation will see the Manager’s control switch turned on, the pinsetter will turn on and off with the games bowled. If, however, there is an urgent need to turn the pinsetter off it can be done quickly using the Manager's control switches. Chapter 2: Run the Cables – Type A 28 Chapter 2: Run the Cables – Type A 29 VIA Pinsetter Run both the DMO-VIA (Odd Lane) and DME-VIA (Even Lane) cables from the Duo Camera Module, along the Ball Track, up the kickback, and then up to the cable tray at the front of the Odd and Even lanes respectively. Make sure you route all cables away from moving parts, so there is no chance of the cables being crushed or cut. All connections go to a single 15 pin plug on the MC2 Scoring Interface board, located in the cable tray. See your VIA reference material to determine for more information on the location and connection to the MC2 Scoring Interface Board. 1= Scoring Interface Connector DB15 Male Note: In order for the Duo system to operate with the VIA pinsetter, you MUST set the machine type to XIMA in Step 2 of the lane setup wizard. This is because the XIMA and the VIA pinsetters operate in a very similar manner, with only the electronics being the major difference. Chapter 2: Run the Cables – Type A 30 Chapter 2: Run the Cables – Type A 31 Type B Systems For each pair of lanes in a standard Type B installation there are four communications cables: 1. LLAN This cable runs from the Duo CPU module to the Duo Camera module. Another LLAN cable is then run from the Duo Camera module to the optional wired connection for the Bowler’s Keypad. This cable supplies both power and communications. 2. DCC This cable runs from the Duo CPU module to the Duo Camera module. This cable supplies power and video signal to the camera. 3. DNC This optional cable runs from the Duo CPU module to a network switch in order to gain communications to the Center Command front desk software. 4. DXL This cable runs from the Duo Camera module to the Pinsetter Control Chassis for the pair of lanes. The location and name of the plug varies from model to model. Please refer to the Machine Connection section below for more information. After all cables have been run, they should all be checked to make sure that they are not in danger of being cut by any moving parts in the pinspotter, or by a ball hitting them in the ball track area under the lanes. In addition, all the cables should be tied together at the Duo Camera Module and securely tied up out of the way of any balls travelling past on the ball track. Chapter 2: Run the Cables – Type B 32 Machine Communications Cable (DXL) This cable will allow the Duo Camera unit to communicate with advanced Pinsetters such as the AMF 8800Gold, AMF 82-90XL and 90XLi. These machines allow the Duo to communicate with them at a software level. The Duo determines the score via the Camera and then tells the Pinsetter the score so that it can behave appropriately (Strike Cycle, 7 – 10 pickoff etc.) The cable designation is as follows: Pinsetter AMF 8800 Gold AMF 82-90XL AMF 90XLi Cable Designation DXL AMF 8800 Gold, 82-90XL and 90XLi Route the SXL cable from the Duo Hardware Module, along the Ball Track, up the kickback, inside the cable channel, to the 8290XL, 8800 Gold or 90XLi chassis at the rear of the Pinspotter. The cable is connected to the CAM/SCORE connector for the 90XLi chassis and the SCORING connector for the 8290XL and 8800 Gold pinspotters. The SXL cable is a serial communications link that transmits data been the Duo Camera Module and the pinspotter. Note: 82-90XL & 8800 Gold DO NOT recognise codes to turn the pinspotter On and Off from the Duo unit. To enable this optional feature, the Lane Control Computers must be connected to the MCU (Managers Control Unit) and software run to enable the MCU commands to be sent from the computer to the pinspotter. For more information on connecting the MCU to the Lane Control Computers, see the Appendix C: AMF Managers Control Unit Connection section in this manual. The 90Xli DOES contain codes to turn the Pinsetters On and Off without the need for an MCU interface. Chapter 2: Run the Cables – Type B 33 Chapter 2: Run the Cables – Type B 34 Type C Systems Type C systems refer to Brunswick GS Series Pinsetters which communicate directly to the Duo CPU module to tell the Duo the score, without the need for a Duo Camera Module at all. For each pair of lanes in a standard Type C installation there are three communications cables: 1. LLAN This cable runs from the Duo CPU module to the Duo LLAN Hub. Another LLAN cable is then run from the LLAN Hub to the optional wired connection for the Bowler’s Keypad. 2. DNC This optional cable runs from the Duo CPU module to a network switch in order to gain communications to the Center Command front desk software. 3. DGX or DG9 This cable runs from the Duo LLAN Hub to the GS control chassis to give and receive commands to both lanes of the pair. After all cables have been run, they should all be checked to make sure that they are not in danger of being cut by any moving parts in the pinspotter, or by a ball hitting them in the ball track area under the lanes. Machine Connection (DGX or DG9) Although the Unified Chassis found on the GS-X and late model GS-98 machines communicate in the same fashion as GS-10, GS-92, GS-96 & early model GS-98 with the Pinsetter Interface Controller, the wiring required is different. This is due to the physical differences found in the electronics. Pinsetter Brunswick GS-X Late Model Brunswick GS-98 Brunswick GS-10 Brunswick GS-92 Brunswick GS-96 Early Model Brunswick GS-98 Cable Designation DGX DG9 (All must have Pinsetter Interface Controller fitted). Chapter 2: Run the Cables – Type C 35 Brunswick GS-X (DGX) or Late Model GS-98 Route the DGX cable from the Duo Hub, under the capping, up the kickbacks to the GS-X Next Gen Box or GS-98 Consolidated Box control chassis. Chapter 2: Run the Cables – Type C 36 Brunswick GS-10 / 96 / 98 with Pinsetter Interface Controller fitted (DG9). Route the DG9 cable from the Duo Hub, under the capping, up the kickbacks to the Pinsetter Interface Controller. The plug required is located inside the Pinsetter Interface Controller. Make sure you power off and disconnect BEFORE opening this box. Thread the cable through the existing stain relief clamp before connecting the 5-way connector into the J4 plug. Chapter 2: Run the Cables – Type C 37 &KDSWHU 0RXQWWKH%RZOHU¶V.H\SDGFRQVROH The Bowler’s Keypad console must be secured to the floor very tightly, as this unit often must adsorb a large amount of abuse from the public. Even when properly secured, it is necessary to periodically check to make sure that all fittings are still tight. Vandals will exploit any looseness or slack and may result in damage to the pedestal base or the floor itself. If you are intending to use the optional hard wired cable for communication between the keypad and the Duo CPU Module, then make sure you have run this cable from the Duo Camera Module’s LLAN Out port, along the ball track, past the ball return to the keypad’s location. Thread this cable through the steel pedestal base before securing the base to the floor. If you are going to use the wireless connection option instead, then there is no need to run the cable and the keypad can be secured at any location. Concrete Floors For concrete floors, make sure that the floor is level and there is no extra concrete around the conduit. The Bowler’s console should be able to sit flat on the floor without rocking. Drill the correct size hole in the concrete and use a concrete anchor bolt, or Tiger Bolt, to secure the console to the floor. Timber Floors For timber floors use a hex drive self-drilling screw to secure the Bowler’s Console to the floor. Make sure you use fresh holes to ensure that the screws bite into the timber flooring well. Warning: Eye Protection, Ear Protection and a Dust Mask must be worn. Note: Take care to ensure the SKC cable is not pinched or damaged when securing the keypad console. Chapter 3: Mount the Bowler’s Keypad Console 38 &KDSWHU6HFXUHWKHFDSSLQJ Perform this step ONLY if you use Type A or B connections to your Pinsetters. Skip this step if you use a Type C connection (Brunswick GS series) In order for the Duo system to consistently take accurate scores, the Camera Module MUST be securely attached to the lanes with no movement. For installation simplicity, the Duo Camera Module is designed to be screwed directly to the capping. Therefore, a section of the capping itself (Not the entire capping) must also be securely fastened to the sub timbers to avoid mis-scoring due to movement of the capping and Camera unit. You do not need to secure the capping along the entire lane, only a short length that will hold the Duo Unit. Capping has, in the past, been made from three different materials: Timber, Metal and Plastic. All these types must be securely fastened. In all cases, there must be a cable access hole in the capping 4010mm (13’2”) from the rear of the pindeck. Wooden and Plastic Capping The procedure for all Wooden and Plastic Capping is the same. 1. Drill a hole in the center of the capping of 35mm diameter (Approx 1 ½”) measured 4010mm (13’2”) from the edge of the Tailplank. 2. Pull all the cables previously run in Chapter 2 through the hole. 3. Screw the capping securely to the sub timbers. Chapter 4: Secure the Capping 39 Note: Horizontal Bumpers. The only exception to the above steps is in the situation where swing out type bumpers has been previously installed. In this case, there is usually a gap between the existing bumper rails, at the position of the camera. A section of capping must be removed and packing timber must be secured to the sub timbers to allow the Duo Camera unit to be mounted at the correct height. See Chapter 5: Accounting for Bumper Rails below for more information on mounting to Duo Camera unit to account for bumpers. Metal Capping Metal capping is most often used in Brunswick centers. This method does not use any sub timbers and the capping is screwed directly to the trusses underneath the lane. In this case: 1. Drill a pilot hole in the center of the capping and then use a metal saw of 35mm diameter (Approx 1 ½”) measured 4010mm (13’2”) from the edge of the Tailplank. Make sure you use a hole saw designed for cutting through steel. 2. Remove any sharp edges from the hole with a half round steel file. If you wish, you could use a rubber grommet to cover the edge for safety reasons. 3. Pull all the cables previously run in Chapter 2 through the hole. 4. Make sure that all screws that secure the capping to the trusses are tight and there is no movement in the capping. Chapter 4: Secure the Capping 40 &KDSWHU$FFRXQWLQJIRU%XPSHU5DLOV Perform this step ONLY if you use Type A or B connections to your Pinsetters and you have bumper rails fitted. Skip this step if you use a Type C connection (Brunswick GS series) The Duo system relies on the ability to detect that a ball has gone past in order to start the scoring software routine. However, bumper rails can interfere with this because, if the Duo Camera unit is positioned incorrectly, the rail can cut the beam when it is raised or extended. No matter how the Duo Camera unit is mounted, the Ball Detector must be below the top of the ball when it is in the gutter. Otherwise a gutter ball will not result in a miss score. No Bumpers Where no bumpers have been installed on the lanes, securely attach the Duo Camera Module directly to the capping, which has been secured in Chapter 4 above. Make sure that a ball will cut the ball detector beam when it is in the gutter. Chapter 5: Accounting for Bumper Rails 41 Vertical Bumpers and Ball Wall Bumper systems such as Brunswick’s Ball Wall & Pinball Wizard and AMF’s Duralane raise the bumper rail up from the gutter (or tilt the whole gutter in the case of Ball Wall). Therefore it is important that the Duo Camera Module be high enough so that the raised bumper rail does not cut the beam from the Ball Detector. Where Vertical bumpers have been installed on the lanes, securely attach the Duo Camera Module directly to the capping, which has been secured in Chapter 4 above. Make sure that a ball will cut the ball detector beam when it is in the gutter. AMF Horizontal swing out type Horizontal Bumpers. The only exception to the above steps is in the situation where swing out type bumpers in installed. In this case, there is usually a gap between the existing bumper rails, which are used as an area for older scoring scanners. A section of capping must be removed and packing timber must be secured to the sub timbers in order for the Duo unit to be mounted at the correct height. Make sure that a ball will cut the ball detector beam when it is in the gutter. See Chapter 4 for more information on the packing timber needed and removing a section of capping. Chapter 5: Accounting for Bumper Rails 42 &KDSWHU,QVWDOOWKH’XR&DPHUD0RGXOH Perform this step ONLY if you use Type A or B connections to your Pinsetters. Skip this step if you use a Type C connection (Brunswick GS series) Secure to the Capping AMF and Brunswick Wooden and Plastic Capping Make sure that the Duo Unit is straight on the capping and in the middle. Then mount the Duo Units directly to the capping, using long screws to go right through the capping and bite into the sub timbers as well. Brunswick Metal Capping Make sure that the Duo Unit is straight on the capping and in the middle. Then mount the Duo Units directly to the capping, using Self-Drilling Roofing Screws. Chapter 6: Install the Duo Units 43 Mount the Reflectors Screw down the reflectors of the ball detectors on the intermediate (Thin) capping. Make sure that the reflectors are all in line and level with the ball detectors on the Duo Camera Modules. Mount Optional Camera Protector Incorrectly bowled balls, delivered by deliberately bowling down the capping between raised bumpers, can impact the Duo Camera unit and result in damage. Secure the Option Camera Protection Steelwork to the sub timbers, in front of the nearest join in the capping. Chapter 6: Install the Duo Units 44 &KDSWHU3OXJ,QDQG3RZHU2Q The final step in installing the lane hardware is to plug in all the cables, power on the system and align the ball detectors. At the Duo CPU Module Plug in all your cables into their corresponding connectors on the Duo CPU Module as shown below: At the Duo Camera Module For Type A and Type B systems, install the various cables at both ends of the line as shown below. Type C systems do not require this step, as the Duo Camera Module is not present. Chapter 7: Plug In and Setup 45 At the Bowler’s Keypad The Duo system has the option to communicate with the bowler’s keypads either via a wireless interface, or alternatively via an extension of the LLAN wired communications cable. Also, you have the option of either one or two keypads per lane pair. Depending on whether these options, you must set the following settings on the PC Board inside the keypad. This will tell the Keypad PCB Board how to behave when a key is pressed. JP2 JP3 ¶V ¶V Wired Single Keypad Left Left 0 (Zero) 0 (Zero) Dual Keypads - Odd Lane Left Left 0 (Zero) 1 (One) Dual Keypads - Even Lane Left Left 0 (Zero) 2 (Two) Wireless Single Keypad Right Right 0 (Zero) 4 (Four) Dual Keypads - Odd Lane Right Right 1 (One) 0 (Zero) Dual Keypads - Even Lane Right Right 2 (Two) 0 (Zero) Please note: No other combination of channels is valid. Wired Keypads The advantage of wired keypads is they afford greater reliability, however there is more work to do (and therefore expense) at the time of installation. For all wired keypads, either single or dual, you must first verify that the jumper for JP2 and JP3 are set to the Left. This will activate the communications drivers on the PC Board to send the signal via the LLAN cable. Single Wired Keypads Remove the battery pack connector and plug in the LLAN cable from the Duo CPU Module into the LLAN IN connector on the Keyboard PCB (Printed Circuit Board). Then, set the Channel Number on both the Rotary DIP switches to 00. (Zero on the 10’s switch and Zero on the 1’s switch) When this is done, the keypad will send out a signal to the Duo CPU module whenever a key is pressed, without specifying Odd or Even Lane. Chapter 7: Plug In and Setup 46 Dual Wired Keypads Remove the battery pack connector and plug in the LLAN cable from the Duo CPU Module into the LLAN IN connector on the Keyboard PCB (Printed Circuit Board) of the Odd Lane. Then, run a short LLAN cable from the LLAN OUT of the Odd Lane, through the steel keypad stand to the LLAN IN of the Even Lane’s keypad. Then you must set the Channel Number on the Rotary DIP Switches to: 01 for the Odd Lane. (Zero on the 10’s switch and One on the 1’s switch) and 02 for the Even Lane. (Zero on the 10’s switch and Two on the 1’s switch) This is so the keypad can send a signal for left or right lane via the LLAN plug, every time a key is pressed. Chapter 7: Plug In and Setup 47 Wireless Keypads The advantage of wireless keypads is they allow you to have greater flexibility as to where they are located, they are also advantageous in situations where there is no cable conduit to the bowler’s score table. However you will occasionally need to change the batteries in order for them to continue to operate. For all wireless keypads, either single or dual, you must first verify that the jumper for JP2 and JP3 are set to the RIGHT. This will disconnect the LLAN communications drivers on the PC Board and hence improve battery life. When the power is first supplied to the keypad PC Board, the keypad will beep three times to indicate that it has performed its self test ok. If it does not beep at all, check that the cable is correctly plugged in and there are no breaks in the cable. Also check that your batteries are properly inserted and fully charged. If it beeps a fourth time, this indicates that a key is being held down, either by the keypad surround being too tight, or by damage to the keypad switch. Single Wireless Keypads If you have a single keypad that will be used to wirelessly control BOTH lanes in the pair, then you must first set the Channel Number on both the Rotary DIP switches to 04. (Zero on the 10’s switch and Zero on the 1’s switch) Once this is done, the keypad will send out a signal to the Duo CPU module whenever a key is pressed, without specifying Odd or Even Lane. Note: If you change the channel number on the Keypad PCB, then you must re-boot it by unplugging the cable from the LLAN IN port and then plug it back in. Chapter 7: Plug In and Setup 48 Dual Wireless Keypads If you have dual keypads that will be used to wirelessly control one lane per keypad, then you must first set the following channel numbers: Odd Lane: Set the Channel Number on both the Rotary DIP switches to 10 (One on the 10’s switch and Zero on the 1’s switch) Even Lane: Set the Channel Number on both the Rotary DIP switches to 20 (Two on the 10’s switch and Zero on the 1’s switch) Once this is done, each keypad will send out a signal to the Duo CPU module, stating that the keystroke was for the odd or the even lane. Note: If you change the channel number on the Keypad PCB, then you must re-boot it by unplugging the cable from the LLAN IN port and then plug it back in. Chapter 7: Plug In and Setup 49 Power On ! Once you have verified that all the cables are correctly plugged in and the keypad channel numbers are set correctly, you are ready to turn the system on. Turn on power via your circuit breakers and make sure that your monitors are on. Then turn on the Duo CPU module via its power switch. Duo CPU Module You should be able to hear the cooling fan in the Duo CPU Module turning and see the Duo CPU unit booting on the screens. Duo Camera Module If installed, you should see the MCU activity and LLAN activity LEDs flashing on the Duo Camera Module (If fitted) See below for the position and function of the LED Indicators on the Duo Camera Module. If the Ball Detectors have not yet been correctly adjusted, then you would also see a red LED on the end of the ball detector for each lane. See below for how to adjust the Ball Detectors correctly. Duo Keypad If your keypads are wired, then the keypad will beep three times to indicate that it has performed its self test ok. If it does not beep at all, check that the cables are correctly plugged in and there are no breaks in the cable. If it beeps a fourth time, this indicates that a key is being held down, either by the keypad surround being too tight, or by damage to the keypad switch. If your keypads are wireless, then they will make no beeps when the Duo CPU is switched on. Resetting the Wireless Keypad Channels If you have wired keypads installed, skip this section. If you have wireless keypads installed, then your Duo CPU Module probably does not know which keypad to listen to and which of the neighboring lane’s keypads to ignore. Before correct keypad operation can start you must first reset the wireless channel on the Duo CPU Module. Each Duo CPU Module can accept up to two keypads. To assign the keypads to the Duo CPU Module: 1. Make sure your keypads have the right Channel Number set, as explained above. 2. Press the Keyboard Address Reset Button. The Duo CPU Module will then be placed into keyboard address mode and listen for any keystrokes for the next 10 seconds before timeout. During this time, both the LLAN Transmit and Receive Data lights will flash together. 3. i. If dual keypads are fitted, press any key on one Keypad and then press any key on other keypad. ii. If a single keypad is fitted, press any key on the keypad twice. 4. Test the keypads to make sure that they are correctly working. If a key on a neighboring lane’s keypad was pressed before the procedure was completed, then that keypad may have been assigned to the Duo CPU Module instead of the correct keypad. If this is the case, then just repeat the above procedure. Note: You must repeat this procedure every time you change the battery in the keypad. Chapter 7: Plug In and Setup 50 Adjusting the Ball Detectors The ball detectors within the Duo Camera Module are designed to validate the score so that a score is reported to the monitors only when a ball is actually bowled. Therefore, if a pinsetter is cycled from the cycle button at the ball return without bowling, no false scores will be displayed. In order to function, the ball detectors must first be adjusted so that the beam of light from the detector hits the reflector mounted on the thin capping and bounces back to the detector. When the unit is properly adjusted, then LED indicator on the end of the detector will be off. Whenever a ball goes past, the LED indicator will flash on and then off again. If the detector is not adjusted properly, then the LED indicator will remain on. This will result in no scoring being displayed at all. If the detector is adjusted poorly, you may notice that the response of the LED is sluggish, so that the LED goes off only sometime after the ball has gone past. To adjust the ball detectors, loosen off the four screws at the top of the eyeball bracket and rotate the ball detector up and down, side to side until you can see the angles from which the LED will go off. Then centre the detector into the middle of this detection envelope and re-tighten the four screws. Chapter 7: Plug In and Setup 51 Duo Camera Module LED Indicators The LED indicators on the Duo Camera Module show the various input and outputs that are currently active and affecting the Duo Hardware. Output LEDS Outputs are defined as situations where the Duo system is telling other hardware to act. (Eg. Turn on the Machine) These LEDs are all green and are all on the bottom row. Pinsetter On This output LED signifies when the Duo Hardware has activated the machine. Whenever this LED is on, the Pinsetter should also be on, unless the switches at the rear of the Pinsetter or at the Managers Control Desk have manually turned it off. Cycle Lane This Output LED will light every time the Duo Hardware sends a cycle command to the machine. Bumpers Up This Output LED will be lit whenever the Automatic Bumper system should be raised. Input LEDS Inputs are defined as situations where the Duo system is being told by other hardware that something has happened. (Eg. A Foul has occurred.) These LEDs are all red and are all on the top row. Foul Input This Input LED indicates that the Duo Unit is receiving a Foul signal either from the Foul Unit (If connected) or from the machine itself with high level pinsetters such as the 82-90Xli and GS series. If throw a foul ball, then this LED will be lit for a few seconds. 2 Ball Light nd This Input LED indicates that the Duo Unit is being told that the machine is on second nd ball via an optional connection to the 2 Ball Light on the Masking Unit. This is only done with AMF 82-70s with MP chassis, 82-70s with MK expander and 82-90 Pinsetters and overcomes problems with the short cycle in these particular Pinsetters. If the Pinsetter is on second ball (and the second ball light input is fitted) then this LED will be on. Diag LEDS Diag LEDs are used to give additional information on the system activity of the Duo Camera Module. Both these LEDs are red and are on the top right corner of each bank. MCU Heartbeat This indicator shows that the Micro Controller Unit of the Duo Hardware Module is functioning at a hardware level. This LED is used for system diagnosis purposes only. LLAN Activity Note: This indicator flashes whenever data is being communicated via the LLAN cable. This LED is used for system diagnosis purposes only. The MCU and LLAN LEDs will not flash at the same time or at the same rate. This is not a concern. You should only be concerned if these indicators don’t flash at all. Chapter 7: Plug In and Setup 52 &KDSWHU8VLQJWKH6HWXS:L]DUG Starting the Wizard In order for the Duo Hardware Module to start scoring, it must first be configured so that it knows what lane number it is, what type of Pinsetting machine is in the center, and the Ball Speed Detectors must be calibrated. To enter the configuration screen, do the following steps: 1. Start a game by typing the number of players present (Say 1 or 2) and pressing the Play button. 2. Accept the default player numbers by pressing Play again. 3. Now press the Help button and the letter C (Standing for Configure) and the following screen should be shown. This screen is shown so that if a member of the public were to accidentally find their way to this screen, they are instructed to just press Play to continue bowling. 4. Now while this screen is displayed, type the default password of 1507 to enter the setup wizard. Note: Once the system installation has been completed, you can specify your own PIN number. This is done from the Center Setup tab of the Control Setup Screen, which can be found in the System Management menu of the Center Command software. It is HIGHLY RECOMMENDED that you then use this new PIN and leave 1507 for use ONLY when the system is not connected to the computers. 5. The next screen is a Welcome screen, which allows you to select either the Setup Wizard or the Troubleshooting screens. Ignore the Troubleshoot option for now, as this will be covered in the next section. This screen also displays the current version date of the Duo Software for diagnostic purposes. Select your desired language by pressing the L key repeatedly. To start the wizard, press the Move Cursor Left button. Note: On any step of the Setup Wizard, pressing the Move Cursor Left button will skip it, without modifying any of the information already entered on the screen. Chapter 8: Using the Setup Wizard 53 Step1: Set Lane Numbers The first step of the Setup Wizard allows you to set what lane the Duo unit is on. The Duo Hardware Module must know which lane it is on in order to function in conjunction with the other lanes. There can only be one Duo unit set to any lane pair. If there are two units with the same lane numbers, then both of these units will not network to the host computers (If installed) until the lane numbers are correctly specified. To do this, type the lane number of the Odd lane of the pair. Make sure you use two numbers. For Example: If you are configuring lanes 3 & 4, type 03 as the Odd Lane Number and press the Move Cursor Right button to go to the next step. Step 2: Pinsetter Model Type Step 2 of the Setup Wizard will allow you to specify what type of pinsetter is being used for that lane pair. The Duo unit needs to be told which type of Pinsetter Machine is installed at your center because the different types of machine behave differently from each other and so the Duo unit must alter its scoring behaviour appropriately. Each machine type also includes extra information to provide clues as to the unique behaviour of each type of machine. This is displayed just below the machine list. Press the M key until the correct machine type is highlighted, and then press the Move Cursor Right button to go to the next step. Note: If your pinsetter is an AMF 82-70 with the MK Expander, make sure that the Pinsetter Model Type in the Setup Wizard is set to AMF 82_70MP. The MP Chassis and the MK Expander behave in the same way, so the one Pinsetter Model Type will operate both types of chassis. Chapter 8: Using the Setup Wizard 54 Step 3: Set Options The third step of the Setup Wizard is the Set Options screen. The Set Options screen controls all aspects of how the Duo Unit behaves and what additional equipment is connected to the Duo unit. Each option can be toggled on and off by pressing the appropriate button for the desired option. These options include: Automatic display of the score Disabling the Automatic Scoring will cause the Duo Hardware to ignore all scores and only allow score entry from the keyboard. Automatic scoring is usually left enabled, but occasionally the need might arise to disable it for coaching purposes or in a faulty scoring situation. Automatic Cycle on Tenth Frame If a spare is bowled in the Tenth frame, the bowler can bowl the bonus third ball for this frame. The Tenth Frame Cycle setting sets the Duo’s behaviour in this situation. If you have your cycles connected to the Duo Hardware via the Machine Interface Port or the Machine Communications Port, then the Tenth Frame Cycle should be enabled. In this situation, the Duo will cycle the Pinspotter a second time for Brunswick A, A2, AMF 82-30 and 82-70 machines. For all other advanced machines, the Duo will perform a Short Cycle directly to first ball. Note: If you do not have any cycle cables connected, then the Tenth Frame Cycle option should be disabled. In this case the Duo will display a sign on the monitors asking the bowler to either bowl another ball (The Score from which is ignored) or press the cycle button at the ball return. Display a Foul in Competition Play This option defines the Duo’s behaviour when a Foul is detected during Competition Play. The majority of Pinsetters will automatically perform a foul cycle when the Pinsetter detects that a foul has been bowled. In this case the Display Foul option should be enabled so that an F will be shown on the scoregrid for that bowler. The Foul Units can then be turned on and off at the managers control desk as desired. It is only Brunswick A and A2 machines that do not have a foul cycle. In this case, you have the option to show the F on the scoregrid or ignore it by disabling this setting. It is most common to Enable the setting for Competition Play. Display a Foul in Open Play This option defines the Duo’s behaviour when a Foul is detected during Open Play. As mentioned above, the majority of Pinsetters will automatically perform a foul cycle when the Pinsetter detects that a foul has been bowled. In this case the Display Foul option should be enabled so that an F will be shown on the scoregrid for that bowler. The Foul Units can then be turned on and off at the managers control desk as desired. It is only Brunswick A and A2 machines that do not have a foul cycle. In this case, you have the option to show the F on the scoregrid or ignore it by disabling this setting. It is most common to Disable this setting for Open Play so that the Foul Units can be left on to try to stop members of the public over stepping the foul line and slipping on the lanes. Chapter 8: Using the Setup Wizard 55 Automatically Control the Bumpers This option tells the Duo software whether there are any automatic bumper systems being controlled by the system. Automatic bumpers are either controlled via a relay switch closure across pins 4 and 12 in the Machine Interface Port (Usually AMF Bumpers systems) or by a central controller connected to the host computer (Usually Brunswick Bumper systems). For more information on centrally controlling bumper systems such as Brunswick Ball Wall, see Appendix B. If this option is enabled, then the system will display a Bumper Icon for any bowler who has bumpers specified from the Control Computer. Connected to a Control Computer Aside from their Stand Alone functionality, the Duo hardware is able to connect to optional computers on the front desk to allow you to control all aspects of the lanes from the front counter, as well as the other optional software modules such as Point Of Sale and League Secretary. In order to use these features the Duo hardware must be told to look for the presence of the front end computers. If control computers are present, enable this setting. If the Duo units have no computers attached and are operating in Stand Alone mode, disable this setting. Scorer Cycles Light Balls The desire for Light Ball Triggering comes from the situation where a light children’s ball is sometimes not thrown with enough force to activate the Pinsetter’s cycle. Most newer Pinsetters such as the GS series already include an electronic sensor to detect the ball and perform a cycle automatically. In this case, disable Light Ball Triggering in the Set Options screen. However, older Pinsetter models may not include this feature. Although the Duo system does not need to have light ball triggering in order to report the score, it does have the ability to cycle the machine on a time delay after the ball passes the ball detectors built into the Duo Hardware Module. Light Ball Triggering Safety Once you enable this feature you are presented with a Warning screen regarding the safety of any light ball triggering system. You must read this message in full by pressing on the M for Read More button. Once this is done, the I Accept option becomes enabled. Chapter 8: Using the Setup Wizard 56 The full text of this warning is as follows: Light Ball Triggering in NOT required by this Scoring System. Enabling this feature will result in the Pinsetter/Pinspotter being cycled a time delay period after the Ball Detection beam at the Score Camera has been cut. The manufacturer of this equipment does NOT require Light Ball triggering in order to determine and report the score. If Light Ball Triggering is enabled it is the sole responsibility of the proprietor of this center to initiate and maintain all necessary safety systems to protect the safety of all persons within this center. Such safety systems include, but are not limited too, 1. Appropriate Warning Signs. 2. Written and enforced procedures in regards the safe operation of the Pinsetters/Pinspotters. 3. Training of all staff in safe operating procedures. 4. Device(s) capable of monitoring unauthorised personnel approaching the pinsetters/pinspotters. The manufacturer does not accept any liability whatsoever for the operation of Light Ball Triggering and merely provides this feature upon the discretion of the proprietor of this center. He/she must make themselves aware of all possible consequences of this method of triggering the pinsetter/pinspotter, BEFORE enabling this feature. This feature is to be enabled by an authorized representative of the proprietor of this center only. The proprietor of this center is advised to seek advice from his/her attorney prior to enabling this feature. By choosing to accept these conditions the proprietor of this center is agreeing to them. As with any light ball triggering system, moving machinery will be automatically activated whenever the ball detector beam is cut. It HIGHLY RECOMMENDED that you DO NOT use Light Ball Triggering UNLESS you have properly thought out, acted and accepted all its implications. Note: If Light Ball Triggering is enabled, a cycle signal will NOT be sent to the Pinsetter in the following situations: 1. If the Ball Detector beam is cut twice. 2. If the Ball Detector beam is cut for a long time. (Approx 2 seconds) Chapter 8: Using the Setup Wizard 57 Monitor Control Codes The Duo CPU Module includes the ability to send control codes to the monitor, via a RS-232 serial connection. This allows the Duo CPU to communicate to the monitor and direct it to switch inputs to and from AV1, this allows the bowlers to watch TV on the lanes, simply by pressing the T (TV) button on the bowler’s keypad. This screen shows a list of predefined control codes for various manufacturers. It allows you to scroll through the list using the C button and then perform a 5 second TV test by selecting either 1 for the Odd Lane and 2 for the Even Lane. Unfortunately there is no standard set of control codes used by all monitor manufacturers, so trial and error is required. If none of the options work, then contact your Computer Score representative with the make and model number of your monitor. Press the Enter button to Exit when finished. This will return you back to Step 3. Chapter 8: Using the Setup Wizard 58 Step 4: Calibrate Odd Lane Ball Speed The forth step of the Setup Wizard allows you to calibrate the Ball Detectors on the odd lane so that an accurate ball speed can be determined whenever a ball goes past the Duo Hardware Module. It is necessary to accurately calibrate the Ball Detectors, because the scoring software adjusts it’s score capture timings based upon the speed of the ball. Press the M key to display the ball speed in Miles per Hour or press the K key to display the ball speed in Kilometres per Hour. In order to perform this step you will need the help of another person to bowl a medium paced ball down the center of the Odd lane, while you time its travel by pressing the F key when the ball passes the Foul Line. To set the Odd Lane Ball Speed: 1. Get ready to press the F key 2. Tell the bowler to bowl 3. Press F at the moment the ball passes the foul line 4. The screen with then count the seconds as the ball is travelling down the lane 5. When the ball passes the Ball Detectors, the speed is determined Note: If this procedure has already been done previously, and you are satisfied with the Ball Speed’s accuracy, you can skip this step pressing the Move Cursor Left button, without pressing F. Chapter 8: Using the Setup Wizard 59 Step 5: Calibrate Even Lane Ball Speed The fifth step of the Setup Wizard allows you to calibrate the Ball Detectors on the even lane so that an accurate ball speed can be determined whenever a ball goes past the Duo Hardware Module. It is necessary to accurately calibrate the Ball Detectors, because the scoring software adjusts it’s score capture timings based upon the speed of the ball. Press the M key to display the ball speed in Miles per Hour or press the K key to display the ball speed in Kilometres per Hour. In order to perform this step you will need the help of another person to bowl a medium paced ball down the centre of the Even lane, while you time its travel by pressing the F key when the ball passes the Foul Line. To set the Even Lane Ball Speed: 1. Get ready to press the F key 2. Tell the bowler to bowl 3. Press F at the moment the ball passes the foul line 4. The screen with then count the seconds as the ball is travelling down the lane 5. When the ball passes the Ball Detectors, the speed is determined Note: If this procedure has already been done previously, and you are satisfied with the Ball Speed’s accuracy, you can skip this step pressing the Move Cursor Left button, without pressing F. Chapter 8: Using the Setup Wizard 60 Step 6: Adjusting the Scoring Camera The sixth step in the Setup Wizard shows the current real time image from the camera and allows you to verify that the camera is positioned straight and level to the pins. The image has a cross hair superimposed over the pins. Press the C button to automatically adjust the image position to the center of the screen. If you are not satisfied with the result of the auto positioning, adjust the position of the image by pressing W to move the image up, Z to move the image down, A to move the image left or S to move the image right. The desired images should look similar to the image below. When you are satisfied with the image, press the Move Cursor Left button to continue. Finished ! The final screen in the Setup Wizard shows the results of the camera configuration process. Verify that there is a Pin Position Marker dot on the head of every pin. The Duo software looks at this dot to see if the pin is present or has been knocked over. If the Pin Position Markers are not correctly positioned, press the Move Cursor Left button to go back to the previous screen and try again. If you continue to have poor results from the automatic pin detection process, you set these pin positions manually using the Adjust Camera section of the Troubleshooting screen. Chapter 8: Using the Setup Wizard 61 &KDSWHU6HWXSWKH2SWLRQDO&RPSXWHUVDQG3ULQWHUV The remaining Chapters in this manual are only required if you have purchased the Center Command system management software suite. If you have not purchased Center Command, then your job should now be finished and you are ready to bowl! You may have purchased system computers as part of your quote. If this is the case, then you will be supplied all the computers you will need. If you have elected to purchase your own computer equipment, then the following section will give you a good guide to make your purchases. What Computer Equipment do I need to purchase? Equipment needed for each Point of Sale Workstation New computer running Windows XP Professional or later. Touch Screen LCD Monitor (Optional) or Regular LCD Monitor Keyboard & Mouse Point Of Sale Receipt Printer (If Point of Sale Module is installed) Cash Drawer to match the Receipt Printer (If Point of Sale Module is installed) Equipment needed for overall system management Laser Printer for Scoresheets Network Switches Network Cables Office Computer and LCD Monitor (Optional) Printer for system management reports. (Optional, you could use the Scoresheet Laser for all reports) An example of a large bowling centre with Point of Sale, two Control Counter Terminals, Café, Bar and an office computer: Chapter 9: Setup the Optional Computers and Printers 62 Comments on purchasing Computers Again, like the purchasing of overhead monitors, price can have a large bearing on the decision for which computer to purchase to use with the system, but the following factors should also be taken into account when purchasing computers and other hardware: Quality: The cheapest computer is not necessarily the best. Consider that the usual life of a scoring system is at least 10 years and that any computer that will be reliable for that length of time must be well built (and well maintained.) Beware of Cheap Systems. A computer that is for sale at a low price often contains low-end components and a flimsy case. Presence: Go with a supplier who is reputable and present in the local community. Although name brand computers have the advantage of being generally very well built, a reputable local supplier should be in a position to offer continuing technical support if you experience any hardware troubles. Speed: Obviously the quicker the better, but basically any NEW computer that will run the current version of Windows comfortably will easily run the software. There is a tendency for computer manufacturers to only supply the minimum amount of RAM to run Windows, which can lead to the computer running slower than it need be. It is recommended that each computer include at least the amount of RAM recommended for the current version of Windows. Operating System: The Duo system software is designed to be run on a home or small business PC running the current version of Microsoft Windows. It is recommended to use XP Professional or later, however the system will still operate using XP Home. Windows 98 or earlier is NOT recommended. Windows Vista is fully supported. Comments on purchasing Touch Screens Touch Screens are special LCD monitors that have driver software that you load onto your computer. They include sensors on the screen that detects your finger touching it and then act like a mouse click on your computer via a USB or Serial cable. Touch Screens are not essential equipment for the system to function, it will work quite fine using a mouse instead. However, a Touch Screen is very professional looking and will impress your customers. There are three basic types of Touch Screen, Capacitive, Resistive and Surface Wave: Capacitive Touch Screens use your finger as an earth point to detect the location of a touch on the screen. The advantage is that the screen is very clear and easy to read. The disadvantage is that only a skin touch will work, you cannot use a fingernail, pencil or gloves. Resistive Touch Screens use two thin layers of plastic separated by tiny plastic beads. When you touch the screen, contact is made between the two layers to determine the touch position. The advantage is that any pressure of the screen will detected as a touch. The disadvantage is that the layers of plastic and the beads make the screen slightly less clear than a capacitive screen. Surface Wave Touch Screens use the dampening effect of your finger on any other soft object to stop a wave being oscillated through the glass screen. The big advantage of this type is that there is no coating or overlay used that can be damaged or worn out compared to other technologies. Any type of screen will work with the system. The decision between the three types is a personal preference. However, general consensus is that the Surface Wave technology is superior. Chapter 9: Setup the Optional Computers and Printers 63 Comments on purchasing Receipt Printers and Cash Drawers Receipt Printers are required only when the Point of Sale software module has been activated. They are used to print out sales receipts to your customers, either on every transaction or on demand. They also send a signal to open the Cash Drawer, which is usually plugged in to the back of the Receipt Printer. There are two types of receipt printer, Dot Matrix Impact and Thermal. Although the Thermal Printers are slightly more expensive, they are much quicker and more reliable than the Dot Matrix printers and therefore are definitely recommended. The system software is ESC POS (Pronounced Escape POS) compliant, so when purchasing your Receipt Printer, make sure that it is compatible to the ESC POS protocol. This protocol is a multi model, multi manufacturer standard of communicating the additional commands that Point of Sale printers need, such as “Cut the Paper” and “Open the Cash Drawer”. Most new Receipt Printers are now ESC POS compatible. Comments on purchasing a Scoresheet Printer A Laser printer is required in order to print customer’s scoresheets. A Black and White Laser is most commonly used, although if you use a color laser printer, any header or footer image you create for the scoresheets will be printed in color. Although this looks very good, the running costs of a color laser are higher than that of a mono laser. When purchasing a laser printer, you should also inquire as to whether the printer driver software has a reputation for being solid, simple and reliable. Unfortunately, some manufacturers have been guilty of producing software that is overly complex and can be a draw on your computer’s system resources. You should consult your computer specialist for his opinion of a simple and reliable printer. You should also take into account the expected duty cycle of the printer. You might print more pages per month than what some cheaper printers might be designed to print. Therefore there is a higher risk that your rate of usage may wear the printer out prematurely. The laser printer will often be connected to the main computer at the front counter via the Parallel Port or via a USB port. However, as shown in the diagram at the beginning of this chapter, you are also able to use a networked printer. The advantage of this is that it makes sure that all the Workstations contain exactly the same peripherals, which help with the simplicity of setting up and sharing printers. The other advantage is that the Scoresheet Printer no longer needs to be close to the computer. Because it is connected via Cat5 cable to the switch or router, it can be placed wherever you would like it. Whichever connection method you use is up to your personal preference. Consult your computer specialist for more information on networked printers. Chapter 9: Setup the Optional Computers and Printers 64 Overview of the Setup sequence Installing the software should be the LAST thing that is done when setting your system management computers. The majority of problems encountered when setting up new system management computers involve issues with Windows networking and printers. You should ONLY install the software once you have tested and verified that ALL printers will operate from ALL computers.. The basic sequence of events is as follows: 1. Run all the Network Cable and Install the Switch or Router. 2. Install the NAS Disk 3. Network the Computers 4. Install and Share the Printers 5. Install and Configure the Software 1. Run all Cables and Install the Switch or Router Wired computer networking currently supports two speeds: Fast Ethernet (100mbit) and the faster Gigabit Ethernet (1000mbit.) CAT5e cable is used for Fast Ethernet and also for shorter runs of Gigabit. Alternatively, CAT6 cable, although more expensive, is designed specifically for Gigabit networking. Both CAT5e and CAT6 support a maximum cable run of 100m (328 feet) Gigabit networking is recommended, purely because it is faster than Fast Ethernet. However, Fast Ethernet will also work quite satisfactorily. If using Gigabit, then make sure all Switches, Routers and Network Interface Cards (NICs) in the computers support Gigabit. Use a qualified Data Cable contractor, who would be able to run the cables into difficult locations as well as properly install wall plate connectors and crimp connectors. Running Cables Run a length of cable from the switch at the curtain wall to a convenient place to locate the second switch or router. Then, run an additional cable for each computer from this position to where each computer will be placed. At this time you should consider whether you might like to add additional computers in the future and run the cables while you are at it. Finally, run another cable to where the NAS Disk will be located. Dual Switch cabling (Type A System shown) Chapter 9: Setup the Optional Computers and Printers 65 Single Switch Cabling (Type A System shown) What is a Switch? A network Switch was multiple connectors which allow you to plug in all the CAT5e cable from each computer, the NAS Disk and the other switch at the curtain wall (If used). This device then acts like a telephone exchange that allows data to flow from the sending to the receiving computer directly, without all other computers having to “listen in” as well. What is a Router? A Router performs all the same functions as a switch but in addition, a Router will also tell every computer what IP address it should be. This function is known as DHCP (Dynamic Host Configuration Protocol) Serving. A computer’s IP address is its unique identifying code for networking data. A Router can also perform other functions such as sharing broadband Internet (if connected.) By default, most computers are set to obtain their IP address automatically. Basically, this means that all the computers on the network must work out their IP address amongst themselves. This process can take up to one minute before a computer is then able to connect to the network and communicate to others. The function of a Router (Amongst other things) is to streamline this process by telling each computer (Including the Duo Hardware Units) what it’s IP address will be. This means that all computers will then be able to communicate immediately on reboot. Note: There can only be one Router on any network. Chapter 9: Setup the Optional Computers and Printers 66 2. Installing the NAS Disk What is a NAS Disk? NAS stands for Network Attached Storage and a NAS Disk is essentially a Hard Disk Drive that is connected to the network so that all computers can communicate with it to access the software and data files. The NAS Disk should be located in a secure position where there is no vibration and it is not in danger of being jostled or bumped. Often the NAS Disk is placed in an office or near an administration Workstation, however make sure that it is not put in an office that is locked during the night shift. Otherwise the night staff won’t be able to gain access to it if a reboot is needed for whatever reason. To install the supplied NAS Disk, simply plug in the Network cable and power. Why do I need a NAS? Windows has a restriction called the “Inbound Connection Limit” which means that only a limited number of computers can connect or talk to a computer at one time. For Windows XP Professional, this limit is 10 and for Windows XP Home, this limit is 5. For example, a 16 lane center will have 8 Duo units, so if you also have two computers, you have reached the 10 user limit in Windows XP Professional. A NAS does not have this limit, so if you use a NAS drive you can connect to Computer Score from as many lanes and other computers as you would like. Sourcing your own NAS disk A NAS disk should be supplied with the Duo hardware, however you may wish to purchase your own NAS drive. Any NAS (Network Attached Storage) device should be able to be used. It should set up with the following settings: 1. The network name of the device must be COMSCORE 2. The Workgroup for the device must be called WORKGROUP (All Capital Letters) 3. There must be a share created called COMSCORE with Read / Write access to all users. 4. There must be a user account called Solo with a password of Solo. (Note: The username and password must have a Capital S and the rest in lower case.) Once this is done, you can continue to follow these instructions and then finally install the software as described in Chapter 10. Note: The Duo system is an extension of Computer Score’s Solo system and as such it shares the same software platform. Therefore, throughout the Duo backend user interface makes reference to Solo in various places. Creating your own NAS disk There are also several NAS solutions aimed at transforming a standard computer into a NAS device by installing a Linux based NAS operating system. An install disk ISO image for one of these Linux solutions is in a folder on your Computer Score installation CD. This folder also contains step by step instructions on how to create the NAS device. Contact your Computer Score representative for more information on creating your own NAS drive. Chapter 9: Setup the Optional Computers and Printers 67 3. Networking Computers Assuming that all your computers are set up and have windows installed and running, the next thing to do is setup networking so that the computers can share data. In order to network computers together, obviously, every computer must have a network adaptor installed. The vast majority of new computers will include this as standard. Naming Conventions Each computer must have a unique name so that you can easily identify it on the network. The name and description for each computer can be entered from the System icon in the Control Panel of Windows. Enter a Computer Description in the space provided. Then click on the Change button and enter a computer name. Also make sure that the Workgroup name is WORKGROUP. Chapter 9: Setup the Optional Computers and Printers 68 The Center Command software uses several pre-defined names to specify particular roles that each computer will take. These include: Name Description Comscore The NAS Disk is always called COMSCORE. This is where all data is kept. Master If a computer is called MASTER, then it will automatically compress a copy of all the data on the Comscore NAS Disk whenever the Center Command is run. This is kept in a separate folder for each day’s backup. It is highly recommended that a computer on the network be called MASTER. Aside from the NAS Disk, this computer could be considered to be the main computer of the system. Most often it is located on the front counter. Backup If a computer is called BACKUP, then when the Center Command software is run, it will perform a normal daily backup as per the MASTER computer and then it will restore it onto the COMSCORE folder on its own hard disk drive. This way, your data is constantly being backed up. It is highly recommended that one computer on the network is called BACKUP. However you MUST still perform regular backups to CD, USB Drive or other removable media to make sure that you do not lose any league data in the event of computer breakdown, or theft. Cafe If a computer is called CAFÉ or any variation, (Such as CAFE1, CAFE2 etc) then the League Secretary and Control Lanes functions are hidden from the Center Command menu. This is so that staff using the Cafe module (If Installed) are not able to accidentally ring up anything in the Bowling Point of Sale and contaminate their Cash Drawer with bowling monies. Bar If a computer is called BAR or any variation, (Such as BAR1, BAR2 etc) then the League Secretary and Control Lanes functions are hidden from the Center Command menu. This is so that staff using the Bar module (If Installed) are not able to accidentally ring up anything in the Bowling Point of Sale and contaminate their Cash Drawer with bowling monies. Misc If a computer is called MISC or any variation, (Such as MISC1, MISC2 etc) then the League Secretary and Control Lanes functions are hidden from the Center Command menu. This is so that staff using the Misc module (If Installed) are not able to accidentally ring up anything in the Bowling Point of Sale and contaminate their Cash Drawer with bowling monies. Setting IP Addresses In order to change the default setting for your computer’s IP address, you need to go the Network Connections area in Window’s Control Panel and then select Properties for the Local Area Network and then select Properties for the Internet Protocol (TCP/IP) As already discussed, if you use a Router in your network, you should leave it set to Obtain an IP Address Automatically. You are also able to leave this setting alone if you are using a Switch instead of a Router, just bear in mind that your computers will only network after about one minute after re-booting. If this is not acceptable, then you also have the option to specify set IP addresses for every computer on the network. (Including the Duo Hardware units.) For more information on setting IP Addresses or if you are unsure in any way, contact your local computer technician. Chapter 9: Setup the Optional Computers and Printers 69 4. Installing and Sharing Printers Installing and Networking Printers can be a challenging aspect to setting up computers. The following example assumes a printer is plugged in to a computer called MASTER and is to be installed on other computers on the network. Other printer situations may alter the installation process from this example. For more information on installing networked printers, consult your computer technician. 1. Install the Printer on the Local computer. You should be able to install your printers on the computer it is connected to by following the manufacturer’s instructions. Most of the issues occur when you want to print to this printer from other computers. 2. Share the Printer. Go to the properties of the printer you wish to share and click on the Sharing Tab. Enable printer sharing and give the printer a Share Name that you will be able to remember. In this example, this printer is a Laser printer, which will be used to print out bowler’s scoresheets. Therefore I have shared the printer with the share name of SCORES. In the situation where it is connected to a computer called MASTER, the full network path of this printer is \\MASTER\SCORES 3. Install the printer driver on other computers. Use the Add Printer wizard in the Printers and Faxes section of Windows. Select the Network printer option. Chapter 9: Setup the Optional Computers and Printers 70 4. Then, select the desired printer from the list on detected network printers. 5. Windows should then automatically install the printer driver. 6. Set the printer as the default, only if this printer will be used to print system reports. 7. Perform a Test Print from Windows for each printer on every computer. 8. Repeat this until all computers have all shared printers installed. 6. Install the Software Only once all the above steps have been performed and tested as working, you are then able to continue on to install the Center Command software. This last step is discussed in the next chapter. Chapter 9: Setup the Optional Computers and Printers 71 &KDSWHU,QVWDOODQGFRQILJXUHWKH6RIWZDUH Once all printers have been installed and tested and the networking connections have been tested on all computers, you can proceed to installing the Center Command software suite. 1. Install the Software on the Master Computer Insert the installation CD into the MASTER computer and you will be presented with the following screen. Click on the Full Program Installation button and follow the prompts to install the initial program files. Once this is done there will be a Computer Score icon on the desktop of your computer. Double click on this icon to start the software. 2. Register the Software Once the software is running, you must then tell the computer what the name and address of the center is. To do this, click on the System Management menu button and then select F4 Register Software. Click on the Register button and enter your center’s details including the exact name of the center as given to your supplier for registration purposes. Then enter the registration number as given by your sales representative and click on the OK button. Chapter 10: Install and Configure the Software 72 3. Install and Update the Lane Software Exit the software back to the Windows Desktop, then Re-insert the installation CD into the MASTER computer and select the Lane Server Software option. Follow the on screen prompts and complete the installation. 4. Update the Duo Hardware Modules The Duo Hardware units should be pre-installed with the latest Duo operating software, however it is a good policy to update the Duo units to ensure that this is the case. The Duo units are updated by using the following procedure. Click on the Go Control Lanes button from any main menu screen. Then click on the Management menu from the top of the screen and select Network. The following screen is then displayed showing each Duo unit that is currently corrected to the network. If you cannot see all the Duo units, then click on the Refresh View button. Select one Duo unit only from the list and click on the Update Options button. Select the Include dll’s option. Then click on the Update Now button and select the option to re-boot the unit when completed. The Duo unit will now be updated and the log below will show the files being transferred. Note: The Duo system is an extension of Computer Score’s Solo system and as such it shares the same software platform. Therefore, throughout the Duo backend user interface makes reference to Solo in various places. Note: You must wait until this process is completed before continuing. Once completed, quit back to the Control Lanes screen and repeat the process for the next Duo unit. Chapter 10: Install and Configure the Software 73 5. Assign Printer Functions By default, most printing for the standard reports are merely printed to the Default Printer for that computer. However, it is possible to set specific printing roles to other printers that might also be installed. For example, you may have a laser printer that should be used to always print scoresheets, or you may have a custom receipt printer that also includes a Cash Drawer. It will be necessary to perform the following steps on every computer connected on the network. From the main menu, click on File then Printer Setup. The following screen is displayed. Click on the Tab for the desired function, such as the cash drawer and select the correct device from the drop down list. (In the case of a Cash Drawer, it is often connected to a receipt printer). Then select the correct model to specify the command set that the device responds to. Note: The settings in this printer setup screen are concerned with this computer only. Other computer workstations on the network will also need their own printer setup settings done. If you do not have the optional Point of Sale module installed, you will probably not have a Receipt Printer, Cash Drawer or Customer Display installed. If this is the case, select Not Installed from the printer name drop down list. If a particular POS Module is not installed, for example Bar, then the Tab relating to that module will be hidden to make the screen easier to read. Chapter 10: Install and Configure the Software 74 A summary table of the meaning of the various printer models is as follows: Open & League Scoresheet. Model 0 Draft / Generic 1 Standard Windows 13 LX300+ 14 LX300 15 LX100 16 LX850 Description This setting will print the scoresheets by printing directly to the printer port, without any formatting. This is used mainly for older Dot Matrix printers. The Standard Windows setting is the one that is most commonly used by all Laser printers and is the recommended setting. It uses the Windows printer driver and print spooler to handle all aspects of the print job. The remaining settings use the Draft / Generic method of printing directly to the printer port, the difference being the number of lines left before the first scores are printed. These are designed to be used with pre-printed, continuous paper scoresheets. The different number of lines suits the various models of Epson Dot Matrix printers described. Receipt Printer. Model Draft / Generic Standard Windows Epson B&W Printer Epson Color Printer Star POS Printer Citizen IDP 3210 Citizen IDP 3530 Citizen IDP 3541 Citizen IDP 3551 ESC POS Description This setting will print the receipts by printing directly to the printer port, without any formatting. This is used mainly for older Dot Matrix receipt printers. This setting uses the Windows printer driver and print spooler to handle all aspects of the print job. If this option is used, you are able to create your own header and footer graphic which will appear when the receipt is printed. These files need to be stored as: P:\PROGRAMS\REPORTS\RECEIPT\RECEIPT HEADER.JPG and P:\PROGRAMS\REPORTS\RECEIPT\RECEIPT FOOTER.JPG See the online help manual for more information. This setting is used of older Epson Dot Matrix receipt printers. It includes paper cut, but not commands for red text from a dual color ribbon. This setting is used of older Epson Dot Matrix receipt printers. It includes paper cut, as well as commands for red text from a dual color ribbon. By selecting this option, the software will use the command set used for the Star Receipt printer emulation. Some older Dot Matrix receipt printers support this command set. This citizen Thermal Printer does not quite support the ESC POS command set. It uses a custom command to cut the paper and pop the cash drawer. Select this option only if you have this printer. These settings use the various Citizen command sets used by the different Citizen brand Dot Matrix receipt printers. As you can probably tell, in the past, receipt printers suffered from a lack of coordination of command sets amongst the various manufacturers. ESC POS (Pronounced Escape POS) is a unified command set that most manufacturers support in their current range of printers, especially thermal receipt printers. It is highly recommended to use a thermal printer that supports ESC POS emulation and the ESC POS setting is the most commonly used setting. Chapter 10: Install and Configure the Software 75 Cash Drawer. Model Serial Cash Drawer st 1 Cash Drawer nd 2 Cash Drawer st 1 Cash Drawer (ESC POS) nd 2 Cash Drawer (ESC POS) Description It is possible to buy stand alone Cash Drawers that do not require a connection to a receipt printer in order to function. Most are serial, but parallel interface versions also exist. Use this setting if you have this type of cash drawer. You will have to create a printer in the windows printer list to represent the Cash Drawer, but if this is done, the software will “Print” a string of characters to the selected printer port which will then make a stand alone Cash Drawer open. Use these settings to use the open command for Drawer #1 or Drawer #2 when connected to Citizen Dot Matrix receipt printers. (Most receipt printers support the connection of up to 2 different cash drawers at one time.) Use these settings to use the open command for Drawer #1 or Drawer #2 when connected to ESC POS compliant receipt printers. (Most receipt printers support the connection of up to 2 different cash drawers at one time.) Customer Display. Model Standard Customer Display POSIFLEX USB Display Description This setting will support the display commands for a Citizen brand serial pass through Vacuum Fluorescent display. In the windows printer list, create a Generic/Text Only printer with the correct COM port. Then select this printer from the drop down list in the Computer Score printer setup screen. The POSIFLEX range (and possibly other brands) of USB customer display are supported. There is no driver to install and the unit should just Plug N Play if this option is selected. 6. Enabling or Disabling Software Modules It is possible to add or remove menu options if a section of the software is not going to be used. Click on the System Management menu and click on the Register Software button. Click on the Enable Features button to show a screen with a number of check boxes for individual software features that can be enabled or disabled. By default all extra software features are disabled so that you can learn to use the essential aspects of the software, without being confused by additional buttons by software features that you may not use. Each check box is password protected to stop staff members from enabling modules unnecessarily. Contact your sales representative for the number to enable any of these options. 7. Install the Software on all other computers All other computers, aside from the MASTER computer should be installed with the Workstation Installation button. This will install the minimum amount of software on each computer so that it can network to the COMSCORE NAS Disk to retrieve data. Chapter 10: Install and Configure the Software 76 &KDSWHU6HWXS&HQWHU&RPPDQGWRVXLW\RXUQHHGV Once you have successfully installed, updated and tested Center Command on all your computers, then you should think about what can be done to make Center Command operate the way you would like it. For more information on the day to day operation of the system, refer to the Operations Manual. The following section is intended to act as a setup guide for the center in general. Note: Center Command was designed around a touch screen interface. Therefore, on most screens where you can change settings, there is an Edit button. Before pressing this button, all the fields on the screen are locked so that touching the screen cannot accidentally change them. To make a change to a setting, click on the Edit button, the screen will then turn blue, indicating that changes can now be made. Control Setup When registering the software, you have already entered the Name and contact details of your center. However, now you may wish to further customise the general software setup to suit your operations. The main area for General System setup is from the Control Setup screen. Click on the System Management menu and select F2 Control Setup. Note: For more information on the Center Setup options, see the Computer Score Online Help System. Center Setup Tab Once in the System Setup program, click on the Center Setup Tab. This is the general setup area and is probably the most important section to setup correctly. Chapter 11: Setup Center Command to suit your needs 77 Aside from your Contact and Address details, make sure that the following fields are set correctly: Field Default Setting Split 0 Country Model Bumpers USA Duo Not Available Pinsetter Lane Configuration Password AMF 82/70 1234 Show option for Multiple languages on lanes Unchecked Name Entry required after Start Open Play Zip Code required after Open Play Pin Awards – Only Highest Applicable Checked Display League Roster on Info Terminal CDE Folder Unchecked HTML Folder P:\HTML Info Terminal Home Filename Blank Average Mins per Game 10 Buffer Time 5 Late After Minutes 20 Display Booking Icons on Control Lanes Allocate bookings from Lane to Lane Checked Overbook Tolerance 20 Unchecked Unchecked Blank 0 to 0 Comment This is the maximum number of lanes on each row in the Control Lanes screen. There can be up to three rows of lanes. Leave Blank or 0 for Auto Split. Alternatively, enter 1, 2 or 3 digits separated by a comma for the number of lanes per row. For Example: (Assuming 16 Lanes total, as above): 6,10 will result in two rows of icons, the first with 6 lanes and the second with 10. 4,10,6 will result in three rows of icons, the first with 4 lanes, the second with 10 lanes and the third with 6 lanes. This sets things such as the date format and Sales Tax vs GST Choose the type of lane hardware in your center Choose Brunswick bumpers for Centrally controlled Pinball Wizard Auto Bumpers, Choose AMF Bumpers for all others. Select the Pinsetter type for your center from the list. You should choose a 4 digit password for your center. This password is used to gain entry to the Configuration Wizard on the Lanes, when they are on-line. Place a tick here to show an extra option in the Messages Tab of the Control Lanes screen. This option allows you to set the language of the lanes for the current group bowling. The default language is set from the Setup Wizard in Chapter 8 above. When a Social lane is started, automatically shows the Name Entry screen for the operator to pre-enter bowler’s names. Allows the polling of your Social Bowlers to find out what Zip Codes are visiting the center. Can be turned on or off at any time. If checked, the system will only give out the highest Pin Award that a bowler achieves. Lower award levels are ignored until another, lower score is bowled. If checked, the Bowler’s Info Terminal software will default to the Lane Draw Roster for the next league. Type the location where data should be saved when exporting to CDE League Secretary (Optional) This is where any league Standing Sheets are saved before uploading to your Website. Enter the location of a HTML file to use as a local website to welcome patrons, highlight the facilities and advertise your center. This will be the default page shown on the Bowlers Info Terminal. (If the Display League Roster on Info Terminal option is Checked) This is the assumed rate of play as used by the Booking Sheet to estimate the finishing time for bookings. (The finishing time for lanes in use is calculated from their actual rate of play.) The average time that a booking group will take to get to the lanes, put on shoes, etc and start playing. If a booking is more than 20 minutes late, then they will be removed off the Booking Sheet and Waiting list and placed on a separate Late Bookings list. They can be reinserted (at the next available time slot) by either confirming the booking or performing a Check In on the group. Shows an icon on each lane when there is a League or Booking due to start soon. Some centers have corporate lanes with bar facilities and so do not want regular bookings to use those lanes (Saving them for corporate groups or parties.) In the above screen, bookings will be allocated from lanes 1 to 10. You can still manually assign any lane you want. To disable this feature and allow the entire lane to be used for bookings enter either 0 to 0, the entire house (1 to 16 in the example above) or leave the fields blank. This will allow the booking sheet make a booking in a position where there would not normally be room, IF the booking will only Chapter 11: Setup Center Command to suit your needs 78 Email blank SMTP blank Tax # blank Cert # Enable Point of Sale blank Checked Rounding Cents 0 Sunday to Saturday Financial Reporting Unchecked Accounting Software Quickbooks Q’Books 20 char export Checked delay others by less then 20 minutes. This allows you to overbook the center by an amount, in the knowledge that a percentage of bookings will not arrive at all. Enter the email address for the business. This will be the one used when emailing report from the system. (Simple Mail Transfer Protocol) This setting is provided by your Internet Service Provider and is your outgoing mail server address. Fill this in to enable the emailing of reports and score sheets directly from the system. This is your country’s tax ID number for your business and is printed on all your customer receipts. For Australian centres, this is your ABN. This is your lane certification number. Use this option to temporarily disable Point Of Sale, even when the POS module is registered. This is useful if you wish to start using the system straight away, before setting up Point of Sale Items and accounts. This field is used if your country has a smallest coin that is not 1 cent. For example, New Zealand’s smallest coin is 10 cents. Therefore all prices must be rounded to the nearest 10 cent value. In this situation, enter 10 in this field. Leave blank or 0 for no rounding. Tick this field to have the weekly reporting period to be from the Sunday to the Saturday of any week. Leave the field unchecked for the reporting period to be from Monday to Sunday. This option displays or hides the Menu button to produce a Quickbooks export .iif file. If you do not use Quickbooks, select Not Installed and the button will not appear in the Point of Sale Menu. Select Quickbooks + Invoicing to separate account transactions as Invoices and Payments in Quickbooks. If you do not use Quickbooks, then select Not Installed. Older versions of Quickbooks were limited to 13 characters for POS Item descriptions in their import facility. Select 20 characters if you have a current version of Quickbooks. Chapter 11: Setup Center Command to suit your needs 79 Open Play Tab The Open Play tab is used to define the graphics modules and the score grid color schemes to use when the lanes are in Open Play Mode. Open Exciters Select which categories of exciter graphic you would like to be played to your Open Play bowlers. By default Beer Frame (All bowlers except one close their frame) and Team Close (All bowlers bowl a closed frame) are not selected because they are not very relevant to Open Play. Game Colors Select the desired score grid colors for the first four games in the series. Each time you select a different grid color, an image for the score grid is shown to allow you to get an idea of the score grid color. This pattern of colors is repeated from game five onwards. Game Backgrounds In a similar manner to the Game Colors, select the desired background image for the first four games in the series. The combination of the Game Color and the Game Background will determine what the score grid will actually look like. You are also able to make your own score grid background images by creating a 640 x 480 PCX image as defined below, and saving it into the P:\backgrounds directory. Once this is done, the image will be included in the drop down list. Graphic Name: Description: Graphic Type: File Location: Dimensions: Color Depth: any name up to 20 characters Score grid background image PC Paintbrush (PCX) p:\backgrounds 640 pixels (W) x 480 pixels (H) 24 bit (RGB True Color) League Play Tab The League Play tab has the same items as the Open Play Tab, the only difference is that these controls will determine how a League Play score grid will look. Select the desired exciter graphics categories, as well as the score grid colors and background images for the fist four games in the series. After the first four games, these color combinations will be repeated. Chapter 11: Setup Center Command to suit your needs 80 Printers Tab The printers tab allows you to define up to nine customised messages for different situations. To make a customised message, click on one of the 9 different buttons in the Available Messages section and enter your message on the three message lines provided. Also type a short description in the description field above. To use a message for any of the three situations, simply select the desired message from the relevant drop down list. Note: When creating a message for the Receipt Printer, please bear in mind the most receipt printers are only capable of printing text of 40 characters wide across the page, rather than the usual 80 characters. If this is the case with your receipt printer, then only use a maximum of 40 characters in each message line. Print Scoresheets for all Open Play Games This check box determines whether a scoresheet will be printed every time a social group finishes their bowling. If you remove this check box, no scoresheets will be printed unless the operator specifically requests one from the Start Tab of the Control Lanes screen. It is a common desire to save money by turning off Open Play scoresheets, but this is not recommended from a pure customer relations point of view. The scoresheet is often the only thing that your bowlers will take away from the lanes, and it is a good opportunity to try to encourage them to visit your center again, by printing a discount offer at the bottom of the scoresheet. For more information, see Creating pictures to customise the system, below. Scoresheets for League play are turned on or off on a league by league basis from the Auto Scoring Tab of the League Setup screen. By default scoresheets are turned off for a new league. Chapter 11: Setup Center Command to suit your needs 81 Lane Options Tab The Lane Options tab determines the timing of the pinsetter’s operation as well as some miscellaneous settings for the operation of the scoregrids. Default Grid Style The scoregrids are able to display either the entire 10 frames in the game of a larger 5 frame version which scrolls across as the game progresses. Alternatively and is also the default Automatic Mode which shows the 5 frame mode for the initial part of the game, and then expands out to the 10 frame mode once the fifth frame is reached. Choose the desired display type from the drop down list. The desired default Scoregrid size can also be set on a League by League basis from the Auto Scoring tab of the League Setup screen. Limited Clear for Open Play This field will set a limited number of times that a score can be cleared from the Bowler’s Keypad on the lanes. For example, setting a value of 5 will mean that the clear button can only be pressed 5 times before a message appears saying that for further score corrections, please see the counter staff. This stops Open Play bowlers from over bowling by clearing out large portions of the game. Limited Clear for League Play This field behaves exactly the same as the Limited Clear for Open Play, only for Leagues. It is common to set a slightly larger number of clears for league players, but this is totally optional. Food & Drinks Button This determines the behaviour of the lanes when the Food & Drinks button is pressed on the bowler’s keypad. If the Display Message option is selected, then when the Food & Drinks button is pressed, a full screen message advertising the Café will be displayed for about 15 seconds. If the Waitress Call option is selected, then when the button is pressed, the background of the scoregrid is changed to the image of a hamburger and an animated message is shown saying that a Waitress has been called. In addition to this a message is displayed on the Café Point of Sale screen (If software module is installed) telling the operator that the lane requires assistance. Press the Food & Drinks button again to cancel the Waitress Call for this lane. Chapter 11: Setup Center Command to suit your needs 82 Enable No-Tap from Lanes This option will enable or disable the ability to select a No-Tap game directly from the Bowler’s Keypad on the lanes. This is done by pressing Help then 7 Scoring Options, then C Competition Play, then selecting the desired No Tap option. No-Tap from the Lanes is usually disabled by default. Even if this option is disabled here, it is still possible to set a lane into No Tap by clicking on the Play Mode tab in the Control Lanes screen and selecting the desired No-Tap game. Machine Timeouts This series of fields determines the behaviour of the scorer at the end of each game or at the end of the entire series, the default values are set as follows: Field League Checkout Default Setting 240 seconds Open Play Checkout 120 seconds Open Play Next Game 60 seconds Machine Off Delay 15 seconds Comment In League Play mode, this is the amount of time in seconds before the scoregrids are removed automatically, once the series has been completed. This gives the league bowlers time to fill in their recap sheets. In Open Play mode, this is the amount of time seconds before the scoregrids are removed automatically, once all games have been bowled. In Open Play mode, this is the amount of time, before the Scoregrid advances to the next game in the series automatically, once a game has been completed. Note: If a ball is bowled during this period, the Scoregrid will advance to the next game straight away. Once the last ball is bowled, the scorer will automatically turn off the pinsetter after this period of time, so those bowlers cannot over-bowl. Lane Messages Tab The Duo model allows you to create a series of images for display on any vacant lanes as a slide show. Select one of a number of pre-created images from the drop down lists. Then define how long each message will display, by entering a number of seconds in the field provided. Also place a tick in the enabled field for each message to be used in the slide show. Creating your own messages Each message is an image that you can create using any third party graphics program. The specifications for these images are shown below. If you are unable to create these images, consult a local printer who will be able to produce them for you. Once you have created the message image, save it into the P:\MESSAGES directory and the image will appear in the drop down list, along with the other messages already in the system. Graphic Name: Description: Graphic Type: File Location: Dimensions: Color Depth: any name up to 20 characters Lane Monitor Message used when lanes are not in use PC Paintbrush (PCX) p:\messages 640 pixels (W) x 480 pixels (H) 24 bit (RGB True Color) Chapter 11: Setup Center Command to suit your needs 83 Menu Security Tab The Menu Security Tab only becomes visible if the Employee security system has been turned on. See: The next topic for more information on how to do this. In addition to this, if the Point of Sale module is not installed, all items relating to POS functions will be hidden from this screen, so the screen you see may differ from the one shown here. Select the desired employee level for each of the actions listed. It is advisable to start off with the default values and then modify them only when you are familiar with the system. Specific Actions that need an explanation include: Field Default Comment Setting Unattended Mode after XX 15 Minutes After a period of inactivity, the system will log out whoever is Minutes currently logged in and then present the password entry screen. A valid password must be entered before any further work can be done. This is so that if the control desk is left unattended, unauthorised persons can not use the system. This is the same process as pressing the Unattended button. Number of Transactions 10 When viewing a list of transactions rung up for a day, it is unwise viewable to view every single transaction. Otherwise a staff member would be able to count the transaction totals to work out the current balance in the cash drawer. This field allows you to limit the list of transactions to only the last (say 10) rung up. POS Password Required for False This option will force a password to be re-entered every time a Every Transaction Point Of Sale transaction is done. This is so you can accurately track which staff member does each transaction. It is not recommended to use this option unless it is actually needed, otherwise staff will soon tire of entering their password constantly. Password always required if Office If a program requires (Say) an Office Attendant level employee, program access is greater Attendant then the system will require an Office Attendant level or higher than or equal to password to be entered, even if a high level employee is already logged in. This system enables users to log in once and perform low level work without having to re-enter their password all the time. However, if a high level program is required, then a password must be entered, regardless of the level of the employee currently logged in. Chapter 11: Setup Center Command to suit your needs 84 Field Force change of password every X days With minimum length of X characters. Default Setting 0 or Blank 0 or Blank Password must be Alphanumeric. False Comment This optional field allows you to mandate that every staff member’s password must be changes after the specified number of days since the last time that it was changed. This help reduce the common situation that staff passwords often become well known over time. To disable this feature, enter 0 days or leave the field blank. This optional field will mandate that all staff passwords (Whether they will expire after a specified number of days or not) must be at least the entered number of characters long. A common value for this field is which will force all passwords to be at least 4 characters long. This optional field will mandate that all passwords must contain both letters and numbers. This is done in order to stop staff from using easily guessed passwords. Enable Password Security By default, there are no employees entered into the system when it is first installed. Often, in an owner/operator situation, it is desirable that there be no security passwords at all. This is because where the people than own the center, run the center, typing password would only get in the way. However, for virtually all other Bowling Centers, security is definitely required. To enable the security system, click on the Employee Details button in the System Management menu. Click on the Add button to create a new employee. A warning screen will pop up telling you that once the security system is activated, it can’t be turned off. Click on the OK button to continue. Make sure that the first employee you add has a General Manager security level. This is because a General Manager is required to enter the Employee Details screen. Fill in all the contact details and enter a password for the General Manager. Select General Manager from the List of Access Levels. The description of these Access Levels is as follows: Access Level Comment No Access This is the lowest level that should be used when an Employee has left the company and should no longer be able to use the computer. The name should be kept is case you wish to look through any historical records of the employee’s history. You should also change the employee’s password in this situation. Console Operator Console Operator is designed to be junior staff members who are permitted to perform basic functions, but who are not trusted to perform end of shift and end of day functions. Shift Manager Shift Managers are those main staff who are responsible for the correct counting of the Cash Drawers on a daily basis, but who are not responsible for viewing any Point of Sale figures or performing any Point of Sale setup operations. Office Attendant Office Attendants are responsible for the general smooth running of the business including performing any adjustments to the POS figures and creating POS Items and Macros. General Manager A General Manager is able to perform all other tasks including Adding Employee passwords, updating the software and Closing Databases. System Administrator There should be no need to create any System Administrator level employees. This is only used by Computer Score support staff. Chapter 11: Setup Center Command to suit your needs 85 The default Access Level for each main menu item is as follows: from the Menu Security screen. Menu Item Control Lanes Audit Report League Secretary League Setup League Secretary Team Details League Secretary League Bowlers League Secretary League Schedule League Secretary Edit Game Scores League Secretary List Leagues Print League Secretary Bowlers Record Print League Secretary Team Record Print League Secretary League Record Print League Secretary Standing Sheet Print League Secretary League Bowlers Print League Secretary Recap Sheets Print League Secretary League Schedule Print Address Book & Brackets Edit Address Book Address Book & Brackets Add / Edit Mailing File Address Book & Brackets Brackets & Sweepers Address Book & Brackets Address Book Print Address Book & Brackets Mailing File Print Address Book & Brackets Absent Bowlers Print Address Book & Brackets Bowler Notes Print Address Book & Brackets Print Brackets Point Of Sale POS Item Setup Point Of Sale Display POS Transactions Point Of Sale Edit Daily Totals Point Of Sale Quickbooks Export Point Of Sale Database Close Point Of Sale Locker Rental Point Of Sale Add / Edit Deposit Point Of Sale Edit Pro Shop Stock Point Of Sale Financial Reports Print Point Of Sale Transaction Report Print Point Of Sale List Lockers Report Print Point Of Sale Deposit List Print Point Of Sale Pro Shop Stock Print Point Of Sale Macro Report Print Café & Bar POS Item Setup Café & Bar Display POS Transactions Café & Bar Edit Daily Totals Café & Bar Database Close Café & Bar Quickbooks Export Café & Bar Financial Reports Print Café & Bar Transaction Report Print Café & Bar Macro Report Print System Management Employee Details System Management Control Setup System Management Awards Setup System Management Update System System Management Staff Menu Log Print System Management League Statistics System Management Zip Code Analysis System Management Congress Awards Chapter 11: Setup Center Command to suit your needs Any items missing are controlled separately Default Access Level Shift Manager Shift Manager No Security Required No Security Required Shift Manager Shift Manager No Security Required No Security Required No Security Required No Security Required No Security Required No Security Required No Security Required No Security Required No Security Required No Security Required No Security Required No Security Required No Security Required No Security Required No Security Required No Security Required Office Attendant Office Attendant Office Attendant Office Attendant General Manager Office Attendant Office Attendant Office Attendant Office Attendant Office Attendant Shift Manager Shift Manager Shift Manager Office Attendant Office Attendant Office Attendant Office Attendant General Manager Office Attendant Office Attendant Office Attendant Office Attendant General Manager Office Attendant Shift Manager General Manager General Manager Console Operator No Security Required No Security Required 86 Enable Tabs and Accounts Center Command allows you to ring up transaction (Most commonly for regular School and Corporate Groups) and place them on an account, instead of paying Cash. This account can then be paid off on another day. For more information on Tabs and Accounts, see either the Online Help system or the Operations manual. By default, the Tabs and Accounts system is disabled. To turn it on, first you must enable this section of the software from the Enable Features button in the Register Software screen in the System Management menu. See your Computer Score representative for the code to turn this feature on. Creating Accounts It is a good idea to create accounts for some of your customers who you know will want this feature. To do this, follow these steps: (It is assumed at this point that a Point Of Sale Shift has been opened and you are trading normally) 1. From the Control Lanes Screen, select the F6 POS tab and click on the Pay Account Button. This button will be hidden unless the Tabs and Accounts Feature is turned on from the Enable Features screen. 2. Click on the New Account button. Select New Account. For more information on the difference between a Tab and an Account, see the Online Help system. 3. Enter all the Accounts details including Address and Phone number. 4. Enter a unique Account Code to identify this account. 5. Click OK and finish adding the Account. 6. Click on the Close button to back out without making an Account Payment. Once this has been done, an Account button will appear on the Amount Tendered screen at the end of every transaction. Click on this button to select which account to assign to the transaction. For more information on Transactions on account, see the Online Help system. Warning: Resist the temptation to add a Tab or Account for anyone who asks for one. This usually results in an enormous list of Tabs or Accounts, which could eventually prove to become unworkable and confusing. Consider creating a series of tabs or accounts that you could reuse by changing the details, rather than creating a new one for each customer. Eg Table numbers, or Lane numbers, or use colored wristbands for Birthday parties. Create some POS Items Although Center Command comes installed with a basic set of pre-installed Point of Sale items and Macros, you will want to customise these to suit your own situation. See the Operations Manual or the Online Help system for more information on creating your own POS Items and Macros. Pay particular attention to the function of the various Unit Type and Report Types available for each POS Item. Some functions require the existence of particular POS Items in order to function. Chapter 11: Setup Center Command to suit your needs 87 Creating pictures to customise the system. There are a number of images that can be created in order to customise the software to your center. Most of these images must be a specific size and format and must also saved as a specific file name in a specific location. The following images are not required if the Duo Units are not connected to the optional system management computers. Scoresheets If no images exist for the scoresheets, then the system will automatically use a set of default images with a standard Logo. Otherwise, create the following images as below: Graphic Name: Description: Graphic Type: File Location: Dimensions: Color Depth: header.bmp Scoresheet Heading Windows Bitmap (BMP) p:\programs\reports\scoresheet 674 pixels (W) x 144 pixels (H) 24 bit (RGB True Color) Graphic Name: Description: Graphic Type: File Location: Dimensions: Color Depth: footer.bmp Scoresheet Footer Windows Bitmap (BMP) p:\programs\reports\scoresheet 674 pixels (W) x 144 pixels (H) 24 bit (RGB True Color) Internet League List The Internet League List is a special report in the List Leagues screen which lists only those leagues for which HTML standing sheets are required for a Bowlers Info Terminal or FTP upload to a web site. A graphic is required to place your logo on the top of this report. This image is only used if the optional League Secretary software module is installed. Graphic Name: Description: Graphic Type: File Location: Dimensions: Color Depth: logo.gif Company Logo on the top of Bowlers Info Terminal List of Leagues Compu Serve (GIF) p:\html\pictures (You may need to create this directory) unlimited, but usually 674 pixels (W) x 144 pixels (H) 8 Bit (256 Colors, optimised palette) Invoices The system will give you the option to print a plain paper invoice for any account transaction. Two graphics are required to place your logo and remittance details on the top and bottom of this invoice. The following images are only required if the optional Point of Sale software module is installed and the Tabs / Accounts feature is enabled. Graphic Name: Description: Graphic Type: File Location: Dimensions: Color Depth: invoiceheader.gif Logo on top of Letter size Invoice for account transactions Compu Serve (GIF) p:\programs\reports\invoice 674 pixels (W) x 144 pixels (H) 8 Bit (256 Colors, optimised palette) Graphic Name: Description: Graphic Type: File Location: Dimensions: Color Depth: invoicefooter.gif Remittance advice on bottom of Letter size Invoice for account transactions Compu Serve (GIF) p:\programs\reports\invoice 674 pixels (W) x 144 pixels (H) 8 Bit (256 Colors, optimised palette) Chapter 11: Setup Center Command to suit your needs 88 $SSHQGL[$ - 8VLQJWKH7URXEOHVKRRWLQJ6FUHHQV Because the Setup Wizard is designed to be a simple step by step process to enable the Duo module to start scoring quickly, there are several advanced features and diagnostic tools that are contained in the Troubleshooting screens. These tools will allow you to set and review all aspects of the Duo hardware’s behavior. Checking the Machine Connections Options 1 and 2 of the Troubleshooting screen allow you to review and test the Pinsetter connection Inputs and Outputs that are used by the Duo Hardware Module to control the Pinsetter. Depending of the Pinsetter model, not all the options shown below will be available and this screen will change depending on the Pinsetter Model Type selected in the Setup Wizard. When testing some of the Input or Output connections, a corresponding LED on the Duo Camera Module (If fitted) will also be lit to show that the command has been received. Appendix A – Using the Troubleshooting Screens 89 Outputs Turn Pinsetter On / Off Cycle Pinsetter Raise / Lower Bumpers Sweep can Reverse Send Miss to Pinsetter Send Strike to Pinsetter This command will turn the Pinsetter on and off when pressing the S button on the keypad. This command tests the cycle connection to the Pinsetter. Press the C button to cycle the machine. The Pinsetter must first be on to test this. This command tests the connection to Automatic Bumpers that are directly connected to the Duo units. It does not test bumpers centrally controlled from the computers, such as Brunswick Ball Wall. Press B to raise the bumpers on this lane. Press B again to lower them. This command is only available on certain Pinsetter Model types, such as the AMF 82_90 MP chassis. It specifies where the Pinsetter is able to accept a sweep reverse command from the Duo unit. Not all MP chassis or MK Extender 82_70 pinsetters have sweep motors wired to accept these commands. You are able to alter the behaviour of the Duo Unit to match the capabilities of your pinsetter. This command is only available on certain Pinsetter Model types, that are able to perform a short cycle on a first ball miss. If available, press 0 to make the Pinsetter perform a Miss cycle, without bowling a ball. This command is only available on certain Pinsetter Model types, which are able to perform a strike cycle on command from an external source. If available, press X to make the Pinsetter perform a Strike cycle, without bowling a ball. Inputs Ball Detect Beam Foul Input Second Ball Input Sweep Input Every time the Ball Detector beam is cut, the indicator will go green to let you know that a ball has gone past. If this light is green all the time or flashing green, then you need to readjust the Ball Detector eyeball mount. If your Foul Units are connected to the Duo unit (Optional) then this indicator will go green every time the Foul signal is received by the Duo unit. Depending on your Pinsetter type, the second ball light may be connected to the Duo unit. (Most commonly done with 82-70MP chassis, 82-90 and 82-90XL) If this is the case then this indicator will go green every time the second ball light signal is received by the Duo unit. GS series Pinsetters will also use this second ball Input, but the signal is received directly from the Pinsetter via the communications port. Again, this indicator will go green whenever this signal is received. This is only available from the AMF 82-90XL and XLi pinspotters and is received by the Duo via the serial communications plug. When the sweep drops, this light should turn green. When the sweep is up, the light should be red. Appendix A – Using the Troubleshooting Screens 90 Reviewing the Last Score Bowled The options 3 and 4 of the Troubleshooting screen allow you to review the last ball that was scored on either the Odd or Even Lane. In this example, we will use the Even Lane on an AMF 82-70 equipped center. Save the Last Score At any time, you are able to save an animation of the score to an AVI file. This will allow you to e-mail an example of a recurring scoring problem to your sales representative so that the problem can be quickly diagnosed and corrected. Press the S button to save the animation to the Duo’s hard drive as c:\comscore\savedscoreXX.avi where XX is the lane number of the score saved. The overwhelming source of scoring problems occurs from the incorrect behaviour, timing or lighting of Pinsetting machines. However, it can be very difficult to diagnose these problems without seeing a replay frame by frame. The Review Last Score screens allow you to do this. Press the Move Cursor Right and Move Cursor Left buttons to scroll forward and back through the four stages that are captured for every score. Stage 1. Scoring Cycle Started This first stage represents the image taken at the time when the Duo software first becomes aware of a change circumstance, which will result in a score being taken. For most Pinsetters, this is when the Ball cuts the Ball Detector beam at the Duo Hardware Module. However for Pinsetters using the Pinsetter Communications Port (For example, AMF 82-90XL and GS series Pinsetters) this Stage is triggered via a signal from the Pinsetter itself. Things to Check If you are having scoring issues, check the following areas: 1. Make sure the correct Pinsetter type is displayed in the Software Flags area. 2. Check that the number of pins down reported in the Software Flags area, is correct compared to the number of green bars in the brightness section. 3. Check for any Hardware flags being reported directly for the Pinsetter (Depending on Machine Type), such as Second Ball light or Sweep Down. 4. Make sure that the Ball Speed report is approximately correct. An incorrect Ball Speed can affect the timing of the scoring software because it uses the ball’s speed to compensate for slow balls. In this example, the default Take Data Delay for 82-70 Pinsetters is 4.5 seconds, the Ball Speed Delay is calculated at 0.4 seconds, therefore the score will be taken in 4.9 seconds from this time. Appendix A – Using the Troubleshooting Screens 91 Stage 2. Score Determined The second stage represents the expiration of the Take Data Delay. This delay can be set from the Fine Tune the Scoring Setup screen and is preset for each type of Pinsetter. You should never need to change this Take Data Delay, but if it is set too long you could see an image of the Table on first ball and if it is set too short, you could see an image of the pins still falling. At this point the number of pins the Duo sees will be the score reported. A pin is determined to be present whenever the level of brightness at the Pin Position Indicator is higher than the threshold level. The Pin brightness is indicated by the height of the bar in the bottom left of the screen and the two horizontal lines on each side of the brightness bars represent the threshold level. This threshold level is calculated by the brightness of the pit area between the 6 & 10 pins on the Odd lanes and between the 7 & 4 pins on the Even lanes. This level will automatically change as general lighting conditions change. This means that the Duo scoring software is just as effective during disco and glow conditions as normal bowling. No adjustments are needed to be made when changing from one condition to the other. In this example, the default Delay from Score Taken to Pins Set is 6.0 seconds. Therefore, the next stage (Event) will occur at that time. Things to Check If you are having scoring issues, check the following areas: 1. Make sure that the number of pins down equals the number of green bars in the Brightness section and is also correct in the Player’s Score section. 2. Make sure that there are no red bars that are close to going over the Pin Brightness threshold. (Thus a pin being considered present.) If any of these red bars are close to the threshold line, then there is a danger that variations in lighting conditions from ball to ball could cause a pin to be falsely detected. Check to see if things such as oil streaks down the curtain are causing the pit to look bright in the relevant area. 3. Check that the Pin Position Indicators are not being blocked by the Sweep / Rake. Usually, the Sweep / Rake should be in the guard position when the Take Data Delay expires and the score is determined. Make sure that rake is not blocking the pins and the deck/table should not be moving. This is particularly important with Brunswick A2 pinsetters, because the deck will block the pit light and make the pins (especially the head pin) appear dark, possibly dropping the light level below the threshold and causing the pin to be missed. The only exception to this is a Brunswick A machine where the Rake and Deck move together on first ball. In this case, the score is determined before the Rake falls. Make sure that the Rake is not blocking the pins. Appendix A – Using the Troubleshooting Screens 92 Stage 3. Setting Pins This stage represents the expiry of the Score Taken to Pins Set timer. It is at this point the Duo software will start looking to see when the image has stopped moving and the cycle has completed. Again, this timer can be adjusted from the Fine Tune the Scoring Setup screen, but they have been pre-configured for each type of Pinsetter and should not need to be altered. In this example, the default Delay from Pins Set to Pinsetter at Rest is 3.0 seconds. Therefore, the next stage (Event) will occur at that time. Stage 4. Scoring Cycle Ended The final stage represents when the Pinsetter has completed its cycle, either by observing that all movement has finished, or by the expiration of the Pins Set to Pinsetter at Rest timer, whichever occurs first. Again, this timer can be adjusted from the Fine Tune the Scoring Setup screen, but they have been pre-configured for each type of Pinsetter and should not need to be altered. Things to Check If you are having scoring issues, check the following areas: 1. Check that the Pinsetter has finished it’s cycle and is stationary in the image. If the machine is still in motion, you can extend the Delay from Pins Set to Pinsetter at Rest in the Advanced Tuning Screen. Appendix A – Using the Troubleshooting Screens 93 Network Connection Options The Network Options screen is accessed by pressing on the N button from the Troubleshooting screen and is concerned with how the Duo Hardware Module will communicate with the lane control computers (If installed) The Duo Hardware Module uses the TCP/IP protocol and as such needs an IP address before it can communicate with others. This IP address can either be automatically assigned from a DHCP server (or use an automatic private IP address if no DHCP is found) or the IP address can be manually assigned using a fixed IP address. Computer administrators often prefer to fix IP addresses because it gives them more control and allows them to know exactly what the IP address is for every device on a network. However, IP addresses are usually set to Automatic so that each Duo unit will attempt to obtain its own IP address based on what it can see on the network, or ideally be assigned an IP from a Network Router which includes a DHCP function. Auto IP Address At any time the Automatic IP address can be set by pressing the A button. This will cause the Duo Hardware Module to look for a DHCP server (Router) and obtain an IP address from it. Even if no DHCP server exists, the Duo unit will still give itself an IP address after one minute. If you are unsure, select Auto IP Addresses. Fixed IP Address To fix the IP address to a desired value, press the F button and then type the desired IP address and Subnet Mask. For more information on IP addresses, see your network administrator. Viewing the Scoring Log The Scoring Log is accessed by pressing the V button and shows you a list of every system message that has been generated by the Duo unit. This log is useful in diagnosing system problems and is often requested by Duo support staff to help determine the sequence of events with system issues. Saving the System Log The system log can be saved to a text file by pressing the S button. This will save the file onto the Duo Hardware Module’s hard drive to C:\comscore\scoreXX-XX.log where XX is the lane pair of the Duo Module. This file can then be e-mailed to your support representative upon their direction. Reboot and run Check Disk This button allows you to restart the Duo CPU unit and schedules the windows Check Disk function to run automatically when the unit is restarted. When you press the R button, the unit will immediately shut down, reboot, and then run the Check Disk function. There is no requirement to perform this function on a regular basis, and should only be done when errors are displaying over the top of the play grid when the Duo CPU unit is started in the mornings and on advice of your Computer Score support personnel. Appendix A – Using the Troubleshooting Screens 94 Fine Tuning the Scoring Setup The next option in the Troubleshooting Screen allows you to Fine Tune the Scoring Setup by modifying the timing of the scoring software. Press the F button to enter this screen. As already shown in the Reviewing the Last Score section of this manual, the scoring software relies on the expiry of three timers to help determine the correct score at the correct time in the Pinsetter’s cycle. Take Data Delay The Take Data Delay is by far the most important timer for scoring reliability. This represents the amount of time from when the Pinsetter’s cycle starts to when the score should be determined. This timer is preset for each type of Pinsetter, and should only be changed if your Pinsetter is faster or slower than usual. A good example of this are Brunswick A2 machines modified with a quick drop rake. This would require the delay to be set a little bit faster. To make the delay shorter press the Move Cursor Left button repeatedly, to make the delay longer press the Move Cursor Right button repeatedly. To set the delay back to the default amount for the selected Pinsetter, press the D button. To modify the other two timers, press the A button to view the Advanced Pinsetter Timings screen. Advanced Pinsetter Timings The Advanced Pinsetter Timings screen allows you to change the other two time delays in the scoring software as already discussed in the Review the Last Score section. These time delays are preset depending on the type of Pinsetter chosen in the Setup Wizard and should not need to be altered. The only time they would need to be changed is if the images in the Review the Last Score screen show the Pinsetter still in motion in Stage 4. To change either timer, press 1 or 2 respectively and then press Move Cursor Left or Move Cursor Right buttons repeatedly until the timer is at the desired length. Press D to set the delay back to the default time. Appendix A – Using the Troubleshooting Screens 95 Synchronise the frame to 1st Ball This button will enable or disable the failsafe feature called FrameSync. FrameSync is usually set ON. FrameSync is a method of making sure that the Pinsetter and the Duo unit are both on first ball or second ball, by looking at the action of the Pinsetter to see if the Pins are picked up (First Ball) or wiped away. (Second Ball) If the Duo is on second ball and a first ball score is detected, then the new score will overwrite the old one, making sure that the Pinsetter and the Duo are both now on second ball. Adjust Camera Duo allows you to have the option of a second camera that captures video of the bowler’s form at the foul line, nd when delivering the ball. If this 2 camera is present, then the first screen shown when selecting the Adjust Camera function allows you to select which camera you would like to adjust. Make sure that the correct camera image is being shown in the correct location. If the wrong image is being shown, (Eg: Score Camera Image being shown in the Player Camera position) then you can swap the cameras by pressing the C Key. Press 1 to Manually adjust the Score Camera, Press 2 to adjust the Player Camera. Note: If you do not have the optional Player Camera installed, then selecting the Adjust Camera function will go straight into the Score Camera section, below. Score Camera The Advanced Camera Adjustments screen has three functions. All these functions should be correctly set after completing the Setup Wizard. You should only change these settings from the default if you repeatedly encounter scoring problems. Select which lane to change by pressing the Move Cursor Left button for the Odd Lane or Move Cursor Right for the Even Lane. Find the Pins Press the F button to automatically re-configure all the pins for the selected lane, the same as during the Wizard. Often, if a Pin is incorrectly detected, then pressing F a second time will then correctly find the pin. It is very rare to have to manually move the Pin Position Indicators. Appendix A – Using the Troubleshooting Screens 96 Manually Moving a Pin If a pin is incorrectly detected repeatedly when doing the Automatic procedure, then it may be necessary to manually specify the Pin Position Indicator. The real cause of this is most likely due to poor lighting in the pit area. Consider swapping fluorescent tubes to white, high brightness tubes known as Triphosphorus. If this is not immediately practical, then you can manually set a pin position. To do this, press the number for the desired pin. (Press 0 for the 10 pin) In this example, the 8 pin is green to show that it has been selected. Once selected, move the Pin Position Indicator by pressing the W for Up, A for Left, S for Right & Z for Down until the Indicator Dot is in the middle of the head of the pin. Changing Brightness Levels The brightness level indicator is shown in the top right corner of the screen and acts as an electronic iris for the camera. Press the L button to make the image lighter and press the D button to make the image darker. Press the N button to set the brightness back to the default level. This adjustment is pre-set and should only need to be changed if the image is excessively bright or dark. If the image is too dark, a pin that is standing may not be bright enough to be above the brightness threshold, therefore the Duo will think the pin has been knocked down. If the image is too light, then a pin that has been knocked over could still be detected because the pit is too bright. Specify the type of Camera Press the C button to enter the Score Camera Setup screen. This screen allows to you specify what type and model of score camera is present by pressing the S button repeatedly until the desired camera type is highlighted. Note: This setting is correctly set in the factory and shouldn’t need to be changed, unless on the advice of your Computer Score support representative. Appendix A – Using the Troubleshooting Screens 97 Player Camera The Player Camera screen is a convenient spot to allow you to point the camera in the correct direction and rotation to give a good image of the foul line as shown below. Press the Enter Key to Save the settings and return to the Troubleshooting Menu. Zoom In and Adjust position Once the correct camera orientation and rotation has been done and the camera has been secured, you can then adjust the camera zoom and position via the software. By default, the camera field of view is set to max Zoom out. If desired, you can Zoom the image In using the I key. Once the image is Zoomed in, you can adjust the image position by pressing the W for Up, A for Left, S for Right & Z for Down. Press C key to place the camera back to the default, centered position. Press the O key to Zoom Out. Save Last Delivery The Duo CPU Module buffers the Player Camera for the last delivery made on each lane. It is possible to Save this video to a file for either the Odd or the Even lane. This may be useful in a situation where, say, the bowler steps over the foul line and injures him or herself. Press the Move Cursor key to save the video for the Odd Lane. The network path for the file is \\SOLOXX-XX\COMSCORE\ODDPLAYER.AVI where XX-XX is the lane numbers. Press the Move Cursor key to save the video for the Even Lane. The network path for the file is \\SOLOXX-XX\COMSCORE\EVENPLAYER.AVI where XX-XX is the lane numbers. You can then use Windows Explorer to browse to the Duo’s Hard Drive and copy the file for safekeeping. Note: When the video is saved, any existing file will be overwritten. Only the last ball bowled for each lane is kept in memory, so it is only possible to save the desired ball if there has been no further bowling done on that lane. (As is likely to be the case with an injury) Appendix A – Using the Troubleshooting Screens 98 $SSHQGL[% – $XWRPDWLF%XPSHUV AMF (and others) Automatic Bumpers The Majority of Automatic Bumpers can be activated up or down by the closure of a switch. The Duo Units include a relay for this purpose. The contacts for this replay can be found on pins 4 and 12 of the Machine Connection plugs for both the Odd and Even lanes. Run the Automatic Bumper Connection cable (SBC) from the Duo Hardware Unit to the Automatic Bumper Controller for your bumpers. Note: The relay on the Duo Unit will only handle the switching of low voltage (or preferably no voltage) only. DO NOT attempt to place any high voltage across the relay contacts or you WILL DAMAGE the Duo unit. If you are unsure how to connect your Automatic Bumpers, contact the manufacturer of the bumper units. Appendix B – Automatic Bumpers 99 1. Setup Duo CPU Module The Duo CPU Module must be configured to control automatic bumpers. This is done from Step 3 of the Setup Wizard as described in the “Using the Setup Wizard” section of this manual. An example of this arrangement is the Qubica AMF BCUII Bumper Control Unit. The Duo Bumper contacts are wired in parallel with the pneumatic relays that are part of this controller. 2. Setup Center Command 1. 2. 3. 4. 5. 6. 7. Make sure that the Duo units have Automatic Bumpers enabled, as described in Step 3 of the Setup Wizard. Run the Center Command Score software and go to the System Management menu and click on Control Setup. When the Control Setup screen appears, click on the Center Setup tab. Edit and change the Bumpers drop down list to AMF Bumpers. Place a Tick in the field Name entry required after Start Open Play Save and exit Center Command back to Windows Reboot the Computer. Appendix B – Automatic Bumpers 100 Brunswick Automatic Bumpers Most automatic bumper systems are designed so that they are operated by the closure of a switch contact so that when the switch is closed, the bumpers go up and when the switch is open the bumpers will go back down. The one exception to this rule is the Brunswick Automatic Bumper system, which is controlled on a communications network via a control box under the lanes. The Duo system is able to directly control the Brunswick Bumper Controller by supplying a LLAN Hub and an additional LLAN cable. Type A Systems Type B Systems Appendix B – Automatic Bumpers 101 Type C Systems Note: This method of operating Brunswick Bumpers is only valid for Pinball Wizard bumpers or later. If you have automated Ball Wall Bumpers, please contact your Computer Score support representative for advice on how to best integrate Ball Wall into Duo’s operation. Appendix B – Automatic Bumpers 102 1. Configure the Brunswick Bumper Controller Each Bumper Controller, which is located under each lane pair, approx. mid way up the lane, must be configured to Frameworx mode in order to function with the Duo system. To do this, follow these steps: 1. Pull out the power cable to isolate the Brunswick Bumper Controller and make it safe to work on. 2. Remove the top cover of the Controller. 3. Set all 8 Switches on DIP Switch S1 to the OFF position. 4. Ensure jumper on JP1 is set to U (Un-terminated) 5. Replace the top cover of the Controller. 6. Plug the power cable to re-activate the controller. Appendix B – Automatic Bumpers 103 2. Setup Duo CPU Module The Duo CPU Module must be configured to control automatic bumpers. This is done from Step 3 of the Setup Wizard as described in the “Using the Setup Wizard” section of this manual. 3. Setup Center Command 1. 2. 3. 4. 5. 6. 7. Make sure that the Duo units have Automatic Bumpers enabled, as described in Step 3 of the Setup Wizard. Run the Center Command software and go to the System Management menu and click on Control Setup. When the Control Setup screen appears, click on the Center Setup tab. Click on Edit and change the Bumpers drop down list to Brunswick Bumpers. Place a Tick in the field Name entry required after Start Open Play Save and exit Center Command back to Windows Run Center Command again to activate the bumper functionality. Appendix B – Automatic Bumpers 104 Using Automatic Bumpers There a three ways of controlling the bumpers from the Center Command Software. Method 1: Via the Name Entry Screen. Bumpers can be set up or down on an individual Bowler by bowler basis. 1. Click on an individual Lane (Name entry is not valid if multiple lanes are selected) 2. Click on the Name Entry button and then select the bumper icons on the desired bowlers. This will still work even if no names have been entered yet. 3. Click on OK and the bumper will raise on Bill, Ness and Hank’s turn and automatically lower on Jane, Frank and Tom’s. Note: To minimise wear and tear on the bumper mechanism, you should group bowlers with bumpers together. Method 2: Via League Setup Individual bowlers can be specified as bumper bowlers on a league by league basis. This is only available if the League Secretarial package has been enabled in the Register Software screen. 1. Click on the Bowler Details button in the League Secretary menu. 2. Edit the desired bowler and click on the Bumper Bowler check box. 3. When that bowler bowls in that league (In other Leagues he or she can bowl normally) the bumpers will automatically raise during his or her turn. Method 3: Via the Override buttons. Bumpers can also be raised or lowered for the entire lane, irrespective of what players are bowling. Select the lane or lanes you want to control. Click on the Overrides Tab in the Control Lanes screen. Click on the Raise Bumpers button to raise the bumpers irrespective of who is on the lanes. Click on the Lower Bumpers button to remove bumpers of the selected lane or lanes irrespective of who is bowling. 5. Click on the Bumpers Auto button to set the bumpers back to Automatic Computer control. 1. 2. 3. 4. Appendix B – Automatic Bumpers 105 $SSHQGL[& – $0)0DQDJHUV&RQWURO8QLWFRQQHFWLRQ AMF 82-90, 8800 Gold and 82-90XL Pinsetters do not include a mechanism to turn the machine On or Off by way of direct connection to the pinsetter’s electronics. Instead, this model of Pinsetter in controlled via a small interface box on the Control Counter, called the Managers Control Unit (MCU). Center Command includes software to connect a USB to RS-422 serial converter from a computer to the MCU. This software runs on the Windows System Tray (Systray) and sends commands to the MCU to tell it to turn the 82-90 machines on and off at the appropriate time. Appendix C - AMF Manager’s Control Unit connection 106 Note: 90XLi and 70XLi pinsetters do not require MCU connection. The machine start function is done via the Cam/Scoring plug on the XLi chassis. Other chassis do not have this facility, and so require the MCU connection as above. Note: Some MCUs that have been installed in a stand-alone center may have the LIU function turned off. Your MCU must have the LIU functionality enabled. Use Spec 10 to enable this function. Appendix C - AMF Manager’s Control Unit connection 107 Installing the MCU Interface Controller To install the Windows Bumper Interface controller, there are three basic stages: A. Install driver for USB to RS232 converter B. Create a Startup Shortcut C. Setup the Center Command Software There are several steps in each of these stages, however anyone with a good general knowledge of Windows can perform them. A. Install driver for USB to RS232 converter 1. Insert USB plug into a free USB socket at the rear of the computer. Wait for the “Found New Hardware” wizard to appear. 2. The computer will automatically search for a software driver, but will probably not find one. If this is so, select the option to browse for the correct driver. 3. Insert the Center Command Installation CD into the CD drive. When the Computer Score Setup program starts, cancel it. 4. In the Found New Hardware Wizard, click on Browse and navigate to the Drivers\ADAM-4561 4562 USB to Serial\98_2K_XP_VISTA folder on your CD drive. 5. When the screen stating that “Windows can’t verify the publisher of this driver software” appears, click on the Install this Driver Software Anyway button. 6. When complete click finish. Appendix C - AMF Manager’s Control Unit connection 108 B. Create Startup Shortcut 1. 2. 3. 4. Right click My Computer and select properties. Click on the Device Manager task. Click on the Plus sign next to Ports (COM & LPT) Note the COM number at the end of ADAM-4561 USB to RS232/422/485 Comm Port (Usually COM3 but it can be different) 5. Exit Device manager and System Properties back to Windows Desktop. 6. Right click on the Desktop and select New Shortcut 7. When the create shortcut wizard appears asking you to Type the Location of the Item, type the following: C:\COMSCORE\PROGRAMS\WINONOFF.EXE COM3 or \\COMSCORE\COMSCORE\PROGRAMS\WINONOFF.EXE COM3 in the area provided and click Next. (Substitute the correct COM port number if different to COM3. Also note there is a space before COM) 8. Type a name for the shortcut, such as 82-90 MCU Interface and click Finish. 9. This should create a Shortcut to the Bumper Interface program on the desktop. 10. Drag and Drop the Shortcut into the Start All Programs Startup folder to make sure that the Interface program is running every time this computer is started. C. Setup the Center Command Software 1. Open My Computer and browse to the P: drive. Create a new folder inside and name it ONOFF (No spaces in the name) 2. Run the Center Command software by double clicking on the desktop icon. Go to the System Management menu and click on Control Setup. 3. When the Control Setup screen appears, click on the Center Setup tab. 4. Make sure that the Pinsetter Type field is set to AMF 82/90 XL 5. Reboot the computer to start the MCU interface. Using the MCU Interface Once the Computer has been rebooted, you should see the WinOnOff icon down on the bottom right of the Windows taskbar, near the time. This is the interface software that sends out MCU commands out to the Pinsetters to turn on the lanes via the MCU. There is nothing that need to be done by the operator in order to achieve this, it will occur automatically whenever the software is running. The interface MUST be running in order for the Pinsetters to turn on and off. Appendix C - AMF Manager’s Control Unit connection 109 $SSHQGL[’ – 6ZLWFKLQJWRD9LGHR6RXUFH The Duo CPU Module has the ability to communicate with your monitors via an RS-232 serial link. Certain monitors include an external control port at the rear panel and upon receiving the correct control code from the Duo unit, will perform functions such as switch to and from an AV source. In order to allow this function to occur, three areas must be addressed first: 1. Your AV supplier must cable a video source to each monitor. 2. The correct configuration file must be specified in Step 3 of the configuration Wizard. See Chapter 8 for more details on the Setup Wizard. 3. The correct DVT Serial cable must be made and connected. Appendix D – Switching to Video Source 110 DVT Serial Cable Unfortunately the various manufacturers of TV displays worldwide do not all adhere to any pre-set standard for external control for their products. Different manufactures use different commands to switch to another video source. The external control connecters used also differ from manufacturer to manufacturer. The three most common types are shown below: Appendix D – Switching to Video Source 111 Appendix D – Switching to Video Source 112 $SSHQGL[( – 6HWWLQJ%,26(QWULHVRQWKH’XR&380RGXOH What is the BIOS? The Duo CPU Module is essentially a computer, and like any computer, it has a BIOS. The BIOS is section of battery backed up memory which holds all the settings which determine how a computer should function. When would I need to set the BIOS defaults? You should not normally have to change any BIOS defaults for normal operation. However, sometimes, after a number of years the small battery that holds this BIOS memory can go flat. If this happens, when a computer is turned on after being off for a period of time, it will no longer know what settings it should use to operate. If this happens, then first replace the battery with a new one of the same type, and then re-enter the BIOS defaults. The battery model number is CR2032 3Volt Lithium. Setting BIOS Defaults in the Duo Hardware Modules If a Duo CPU Module loses battery power, it may be necessary to re-set the BIOS defaults before normal operation can continue. In order to do this perform the following operation: 1. Plug in a keyboard into the one of the USB ports on the CPU module. 2. Re-boot the Duo CPU Module and press the DEL key when the message appears at the beginning of the boot process. 3. This will display the System CMOS Setup screen as shown below. 4. Using the Arrow keys and the Page Up & Page Down keys, change the BIOS settings to be the same as the screens below. The Optimized Defaults should be all the settings that are needed, however, the settings required for normal operation are fully listed below. Review each screen and verify that the settings are specified as below. 5. Once finished, press the F10 button to save the changes and re-boot the Duo Unit. Note: If this problem re-occurs the next time that the Duo unit is turned off overnight, then you will need to return the unit to your Computer Score representative so that the battery can be replaced. DO NOT attempt to replace the battery yourself. It cannot be replaced by the end user and attempting to do so will void your warrantee. Appendix E – Setting BIOS Entries on the Duo Units 113 Main Menu Phoenix – Award BIOS CMOS Setup Utility > Standard CMOS Defaults > Frequency / Voltage Control > Advanced BIOS Features Load Fail Safe Defaults > Advanced Chipset Features Load Optimized Defaults > Integrated Peripherals Set Supervisor Password > Power Management Setup Set User Password > PnP/PCI Configuration Save and Exit Setup > PC Health Status Exit Without Saving ESC : QUIT F10 : SAVE & EXIT SETUP 89:;6(/(&7,7(0 Time, Date, Hard Disk Type . . . Menu Item 1: Standard CMOS Features Phoenix – Award BIOS CMOS Setup Utility Standard CMOS Features Date (mm:dd:yy) Time (hh:mm:ss) Tue, May 26 2009 9 : 39 : 34 IDE Channel 0 Master IDE Channel 0 Slave IDE Channel 2 Master IDE Channel 2 Slave IDE Channel 3 Master IDE Channel 3 Slave [ InnoDisk Corp. - iCF ] [ None ] [ None ] [ None ] [ None ] [ None ] Video Halt On [ EGA / VGA ] [ All, But Keyboard ] Base Memory Extended Memory Total Memory 640K 1038336K 1039360K Item Help Menu Level > > > > > 89:;0RYH(QWHU6HOHFW F5 : Previous Values +/-/PU/PD : Value F10 : Save F6 : Fail – Safe Defaults Appendix E – Setting BIOS Entries on the Duo Units Change the Day, Month, Year and Century ESC : Exit F1 : General Help F7 : Optimized Defaults 114 Menu Item 2: Advanced BIOS Features Phoenix – Award BIOS CMOS Setup Utility Advanced BIOS Features > > x x CPU Feature Hard Disk Boot Priority Virus Warning CPU L1 & L2 Cache CPU L3 Cache Hyper Threading Technology Quick Power On Self Test First Boot Device Second Boot Device Third Boot Device Boot Other Device Boot Up NumLock Status Gate A20 Option Typematic Rate Setting Typematic Rate (Chars/Sec) Typematic Delay (Msec) Security Option APIC Mode MPS Version Control for OS OS Select for DRAM > 64MB Report No FDD For WIN 95 Small Logo (EPA) Show 89:;0RYH(QWHU6HOHFW F5 : Previous Values [Press Enter] [Press Enter] [Disabled] [ Enabled ] [ Enabled ] [ Enabled ] [ Enabled ] [ USB-FDD ] [ Hard Disk ] [ LS120 ] [ Enabled ] [ On ] [ Fast ] [ Disabled ] 6 250 [ Setup ] [ Enabled ] [ 1.4 ] [ Non-OS2 ] [ No ] [ Disabled ] +/-/PU/PD : Value F10 : Save F6 : Fail – Safe Defaults Item Help Menu Level > ESC : Exit F1 : General Help F7 : Optimized Defaults Menu Item 3: Advanced Chipset Features Phoenix – Award BIOS CMOS Setup Utility Advanced Chipset Features X X X X DRAM Timing Selectable CAS Latency Time DRAM RAS# to CAS# Delay DRAM RAS# Precharge Precharge dealy (+RAS) System Memory Frequency System BIOS Cacheable Video BIOS Cacheable Memory Hole at 15M – 16M PCI Express Root Port Func [ By SPD ] Auto Auto Auto Auto Auto [ Enabled ] [ Disabled ] [ Disabled ] [ Press Enter ] ** VGA Setting ** On-Chip Frame Buffer Size DVMT Mode DVMT/FIXED Memory Size Boot Display Panel Number TV Standard Video Connector TV Format [ 8MB ] [ DVMT ] [ 128MB ] [ Auto ] [ 640 x 480 18/1 ] [ Off ] [ Automatic ] [ Auto ] 89:;0RYH(QWHU6HOHFW F5 : Previous Values +/-/PU/PD : Value F10 : Save F6 : Fail – Safe Defaults Appendix E – Setting BIOS Entries on the Duo Units Item Help Menu Level > ESC : Exit F1 : General Help F7 : Optimized Defaults 115 Menu Item 4: Integrated Periphals Phoenix – Award BIOS CMOS Setup Utility Integrated Peripherals > > > [ Press Enter ] [ Press Enter ] [ Press Enter ] [ Disabled ] [ Press Enter ] On Chip IDE Device On Board Device Super IO Device Watch Dog Timer Select USB Device Setting 89:;0RYH(QWHU6HOHFW F5 : Previous Values +/-/PU/PD : Value F10 : Save F6 : Fail – Safe Defaults Item Help Menu Level > ESC : Exit F1 : General Help F7 : Optimized Defaults Menu Item 4 – 1: On Chip IDE Device Phoenix – Award BIOS CMOS Setup Utility On Chip IDE Device IDE HDD Block Mode IDE DMA transfer access On-Chip Primary PCI IDE IDE Primary Master PIO IDE Primary Slave PIO IDE Primary Master UDMA IDE Primary Slave UDMA On-Chip Secondary PCI IDE IDE Secondary Master PIO IDE Secondary Slave PIO IDE Secondary Master UDMA IDE Secondary Slave UDMA IDE HDD Block Mode *** On-Chip Serial ATA Setting *** SATA Mode On-Chip Serial ATA SATA PORT Speed Settings PATA IDE Mode SATA Port 89:;0RYH(QWHU6HOHFW F5 : Previous Values [ Enabled ] [ Enabled ] [ Enabled ] [ Auto ] [ Auto ] [ Auto ] [ Auto ] [ Enabled ] [ Auto ] [ Auto ] [ Auto ] [ Auto ] [ Enabled ] Item Help Menu Level > [ IDE ] [ Enhanced Mode ] [ Disabled ] Secondary P0, P2 is Primary +/-/PU/PD : Value F10 : Save F6 : Fail – Safe Defaults Appendix E – Setting BIOS Entries on the Duo Units ESC : Exit F1 : General Help F7 : Optimized Defaults 116 Menu Item 4 – 2: Onboard Device Phoenix – Award BIOS CMOS Setup Utility Onboard Device [Auto] [ Enabled ] [ Enabled ] [ Disabled ] Azalia/AC97 Audio Select Onboard LAN1 Device Onboard LAN2 Device Onboard LAN Boot ROM 89:;0RYH(QWHU6HOHFW F5 : Previous Values +/-/PU/PD : Value F10 : Save F6 : Fail – Safe Defaults Item Help Menu Level > ESC : Exit F1 : General Help F7 : Optimized Defaults Menu Item 4 – 3: Super IO Device Phoenix – Award BIOS CMOS Setup Utility Super IO Device x Onboard Serial Port 1 Onboard Serial Port 2 COM2 RS232/422/485 Setting Onboard Parallel Port Parallel Port Mode ECP Mode Use DMA [ 3F8/IRQ4 ] [ 2F8/IRQ3 ] [ RS232 ] [ 378/IRQ7 ] [ SPP ] 3 Item Help Menu Level > x 89:;0RYH(QWHU6HOHFW F5 : Previous Values +/-/PU/PD : Value F10 : Save F6 : Fail – Safe Defaults Appendix E – Setting BIOS Entries on the Duo Units ESC : Exit F1 : General Help F7 : Optimized Defaults 117 Menu Item 4 – 4: USB Device Setting Phoenix – Award BIOS CMOS Setup Utility USB Device Setting x USB 1.0 Controller USB 2.0 Controller USB Operation Mode USB Keyboard Function USB Mouse Function USB Storage Function [ Enabled ] [ Enabled ] [ High Speed ] [ Enabled ] [ Enabled ] [ Enabled ] Item Help Menu Level > x 89:;0RYH(QWHU6HOHFW F5 : Previous Values +/-/PU/PD : Value F10 : Save F6 : Fail – Safe Defaults ESC : Exit F1 : General Help F7 : Optimized Defaults Menu Item 5: Power Management Setup Phoenix – Award BIOS CMOS Setup Utility Power Management Setup x Video Off Method Video Off in Suspend Suspend Type MODEM use IRQ Suspend Mode HDD Power Down Soft-Off by PWR BTTN Power On by Ring Resume by Alarm Date (of Month) Alarm Time (hh:mm:ss) Alarm x** Reload Global Timer Events ** Primary IDE 0 x Primary IDE 1 x Secondary IDE 0 Secondary IDE 1 FDD, COM, LPT Port PCI PIRQ(A-D)# 89:;0RYH(QWHU6HOHFW F5 : Previous Values [ DPMS ] [ Yes ] [ Stop Grant ] [3] [ Disabled ] [ Disabled ] [ Instant-Off ] [ Enabled ] [ Disabled ] 0 0:0:0 Item Help Menu Level > [ Disabled ] [ Disabled ] [ Disabled ] [ Disabled ] [ Disabled ] [ Disabled ] +/-/PU/PD : Value F10 : Save F6 : Fail – Safe Defaults Appendix E – Setting BIOS Entries on the Duo Units ESC : Exit F1 : General Help F7 : Optimized Defaults 118 Menu Item 6: PnP / PCI Configuration Phoenix – Award BIOS CMOS Setup Utility PnP / PCI Configuration Init Display First Reset Configuration Data [ PCI Slot ] [ Disabled ] Resources Controlled By IRQ Resources [ Auto (ESCD) ] Press Enter PCI/VGA Palette Snoop INT Pin 1 Assignment INT Pin 2 Assignment INT Pin 3 Assignment INT Pin 4 Assignment INT Pin 5 Assignment INT Pin 6 Assignment INT Pin 7 Assignment INT Pin 8 Assignment [ Disabled ] [ Auto ] [ Auto ] [ Auto ] [ Auto ] [ Auto ] [ Auto ] [ Auto ] [ Auto ] ** PCI Express relative items ** Maximum Payload Size [ 128 ] Item Help Menu Level > x x 89:;0RYH(QWHU6HOHFW F5 : Previous Values +/-/PU/PD : Value F10 : Save F6 : Fail – Safe Defaults ESC : Exit F1 : General Help F7 : Optimized Defaults Menu Item 7: PC Health Status Note: Values will be not be exactly the same as the ones shown here Phoenix – Award BIOS CMOS Setup Utility PC Health Status Item Help +5VSB CPU Voltage DDR2 Voltage +5V +12V +1.05V +1.5V +3.3V Voltage Battery System FAN Fan 1 Speed Fan 2 Speed 89:;0RYH(QWHU6HOHFW F5 : Previous Values 4.97V 0.88V 1.84V 5.02V 12.03V 1.04V 1.47V 3.16V 3.08V 41ºC 0 RPM 0 RPM +/-/PU/PD : Value F10 : Save F6 : Fail – Safe Defaults Appendix E – Setting BIOS Entries on the Duo Units Menu Level > ESC : Exit F1 : General Help F7 : Optimized Defaults 119 $SSHQGL[) – 3UHYHQWDWLYH0DLQWHQDQFH The CPU on the Duo Hardware module is designed to throttle down in speed or even re-boot in the event of overheating in order to protect the unit from damage. The main cause of system overheating is either excessive dust build up or failure of the CPU fan. Duo CPU Module It is highly recommend that approximately every six months you should perform the following procedure: 1. Turn off the Duo CPU module with the power switch and remove the power cord. 2. Clean the Duo CPU Module by blowing out any dust that has accumulated. You can use either an air compressor, or a can of compressed air, which should be available from your local electronics store. DO NOT use any solvents or any other cleaning products on the Duo CPU Module. DO NOT open the Duo CPU module, there are no user serviceable parts inside. 3. Plug in the power cord and turn the unit on. Duo Camera Module (If fitted) It is highly recommend that approximately every six months you should perform the following procedure: 1. Remove the top cover. (There is no need to remove the entire module) 2. Pull out the LLAN In plug to turn the Duo Unit Off. 3. Clean the Duo Camera Unit by blowing out any dust that has accumulated. You can use either an air compressor, or a can of compressed air, which should be available from your local electronics store. DO NOT use any solvents or any other cleaning products on the Duo Camera Unit. 4. Clean any dust away from the Camera Lens by using a clean, dry, soft cloth. Do not move the camera or you will then need to re-configure the camera. 5. Replace the top cover and check that the scoring operation is still OK. Appendix F – Preventative Maintenance 120