1
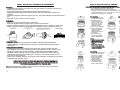
Make sure open end of burner
mount faces between cooker
stand legs. This is necessary in
order to mount burner/hose
assembly.
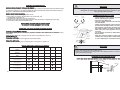
Before assembly read
instructions carefully.
Tools needed for assembly:
Phillips Head Screwdriver
Adjustable Wrench
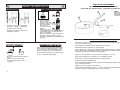
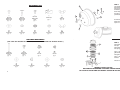
STEP 3a.
5
5
Assemble unit on a clean, flat
surface.
Do not tighten screws all the
way. Cooker stand legs may
need to be adjusted during
assembly.
Attach burner mount (14) to cooker
head using phillips head flange
screw (B) as shown.
B
STEP 3b.
B
Remove burner nut from
burner/hose assembly.
Burner Bolt
Insert burner bolt through burner
mount.
STEP 1.
Attach cooker stand legs (5) to
cooker head (4) using phillips head
flange screws (B) as shown.
Secure with burner nut.
Burner Nut
14
B
B
Now tighten all screws.
4
STEP 2.
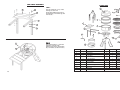
STEP 4.
Burner Hose Assembly:
Place base pan (3) on top of cooker
stand and align slots with cooker
stand legs.
13
Spring
20
Place air shutter on burner (13)
venturi.
A
D
Align bottom two holes of each
smoker leg (6) with base pan and
secure with phillips head flange
screw (A) and wing nuts (E).
Slide small end of spring onto end of
hose (20).
Burner Venturi
Air Shutter
Thread end of hose into burner
clockwise to tighten. Do NOT
overtighten.
E
6
3
11
Position grill bracket (D) on inside of
base pan so it is aligned with top
hole of smoker leg. Insert phillips
head flange screw (A) through
smoker leg, base pan and grill
bracket.
12