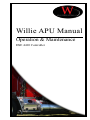
1
Willie APU Manual
Operation & Maintenance
DSE 4410 Controller
Willie Owner’s Manual
Copyright © 2012 by Willis Power Systems
All rights reserved. No part of this book may be reproduced
in any form by any electronic or mechanical means including
photocopying, recording, or information storage and retrieval
without permission from the author.
Willis Power Systems
www.willisapu.com
E-mail: [email protected]
Rev C 05/02/12
Printed in U.S.A.
Willis Power Systems
Owner’s Manual
Willie APU & DSE 4410
Rev C 05/02/2012
NOTE
The Willie APU offers up to 50% more engine power than competitive products and its compact and lightweight design allows for easy
installation. Willie™ provides the power and quality while priced
competitively to meet the needs of the average driver and trucking company. Willie™ gives built-in redundancy to a big rig’s critical
systems.
It is designed to be serviceable and is backed by parts availability.
The company provides products that achieve maximum APU-related
savings in fuel and maintenance designed to offset the costs of
installing emissions control equipment mandated by state idling and
federal emissions laws.
Important APU Details
All parts for the Willis APU are available from the factory and authorized
installation centers. Warranty repairs and service must be performed by
authorized service centers unless prior authorization has been obtained.
Willis Power Systems
http://www.willisapu.com
1-800-825-4631
[email protected]
Have your contact information and engine serial number ready when calling. Please leave a message with the information if the line is busy.
APU SERIAL NUMBER
APU STYLE
INSTALL REPRESENTATIVE
INSTALL DATE
INSTALL LOCATION
PHONE
Contents
Important APU Details . . . . . . . . . . . . . . . . . . . . . . . . . . . . 4
OWNER/OPERATOR Safety . . . . . . . . . . . . . . . . . . . . . . . . . 7
Required Maintenance Schedule . . . . . . . . . . . . . . . . . . . . . 8
Every 50 Hours of APU Runtime . . . . . . . . . . . . . . . . . . . . . . . . 8
Every 500 Hours of Runtime . . . . . . . . . . . . . . . . . . . . . . . . . . . 8
Every 2000 Hours of APU Runtime . . . . . . . . . . . . . . . . . . . . . . . 8
Engine Oil . . . . . . . . . . . . . . . . . . . . . . . . . . . . . . . . . . . . . . 8
Engine Coolant . . . . . . . . . . . . . . . . . . . . . . . . . . . . . . . . . . . 8
How to Start Your APU . . . . . . . . . . . . . . . . . . . . . . . . . . . . 9
How to Set Auto Battery Monitor . . . . . . . . . . . . . . . . . . . . . 9
How to STOP Engine . . . . . . . . . . . . . . . . . . . . . . . . . . . . 10
Set Fan Blower . . . . . . . . . . . . . . . . . . . . . . . . . . . . . . . 10
Thermostat settings . . . . . . . . . . . . . . . . . . . . . . . . . . . . 11
Special Instructions For Unit Type . . . . . . . . . . . . . . . . . . . 12
Closed Loop System for A/C only . . . . . . . . . . . . . . . . . . . . . . . 12
Standard Integrated System . . . . . . . . . . . . . . . . . . . . . . . . . . 13
Extreme Cold Weather System . . . . . . . . . . . . . . . . . . . . . . . . . 14
For Heat . . . . . . . . . . . . . . . . . . . . . . . . . . . . . . . . . . . . . 14
For Air Conditioning . . . . . . . . . . . . . . . . . . . . . . . . . . . . . 15
DSE Operation Guide . . . . . . . . . . . . . . . . . . . . . . . . . . . . 16
Stop / Reset and Manual . . . . . . . . . . . . . . . . . . . . . . . . . . . . 16
Auto . . . . . . . . . . . . . . . . . . . . . . . . . . . . . . . . . . . . . . . . . 16
Start . . . . . . . . . . . . . . . . . . . . . . . . . . . . . . . . . . . . . . . . . 16
Page . . . . . . . . . . . . . . . . . . . . . . . . . . . . . . . . . . . . . . . . . . . . . . . . . . . . . . . 17
Scroll . . . . . . . . . . . . . . . . . . . . . . . . . . . . . . . . . . . . . . . . . . . . . . . . . . . . . . 17
Mode for Viewing the Instruments . . . . . . . . . . . . . . . . . . . 17
Metering . . . . . . . . . . . . . . . . . . . . . . . . . . . . . . . . . . . . . . . 18
Indicators . . . . . . . . . . . . . . . . . . . . . . . . . . . . . . . . . . . . . . 18
WILLIS POWER SYSTEMS
OPERATION — PAGE 5
Contents Cont’d
EVENT LOG . . . . . . . . . . . . . . . . . . . . . . . . . . . . . . . . . . . . . 18
Module Display . . . . . . . . . . . . . . . . . . . . . . . . . . . . . . . . . . . 19
Backlight . . . . . . . . . . . . . . . . . . . . . . . . . . . . . . . . . . . . . 19
Graphical Display . . . . . . . . . . . . . . . . . . . . . . . . . . . . . . . 19
Mode Icon . . . . . . . . . . . . . . . . . . . . . . . . . . . . . . . . . . . . . . 19
Instrumental Icons . . . . . . . . . . . . . . . . . . . . . . . . . . . . . . . . . 20
Alarm Icons . . . . . . . . . . . . . . . . . . . . . . . . . . . . . . . . . . . . . 21
Thermostat Guide . . . . . . . . . . . . . . . . . . . . . . . . . . . . . 22
Fan Operating Mode . . . . . . . . . . . . . . . . . . . . . . . . . . . . . . . . 22
Displaying the Temperature . . . . . . . . . . . . . . . . . . . . . . . . . . . 22
Setting the Temperature . . . . . . . . . . . . . . . . . . . . . . . . . . . . . 23
Backlight . . . . . . . . . . . . . . . . . . . . . . . . . . . . . . . . . . . . . . . 23
Manual/Permanent Hold Mode . . . . . . . . . . . . . . . . . . . . . . . . . 23
Programmable Mode . . . . . . . . . . . . . . . . . . . . . . . . . . . . . . . 23
Temporary Bypass . . . . . . . . . . . . . . . . . . . . . . . . . . . . . . . . . 23
Configuration Menu . . . . . . . . . . . . . . . . . . . . . . . . . . . . . . . . 23
Setting the Time and Day . . . . . . . . . . . . . . . . . . . . . . . . . .
Setting the Date . . . . . . . . . . . . . . . . . . . . . . . . . . . . . . . .
Energy Savings Schedule . . . . . . . . . . . . . . . . . . . . . . . . . .
Modifying your Schedule . . . . . . . . . . . . . . . . . . . . . . . . . .
24
24
24
25
Basic Troubleshoot . . . . . . . . . . . . . . . . . . . . . . . . . . . . . 26
Battery Replacement Indicator . . . . . . . . . . . . . . . . . . . . . . . . 26
Recognizing a Blown Fuse . . . . . . . . . . . . . . . . . . . . . . . . . . . . 27
Fuse Box Overview . . . . . . . . . . . . . . . . . . . . . . . . . . . . . 28
To Change a Fuse . . . . . . . . . . . . . . . . . . . . . . . . . . . . . . . . . 28
AC/HT Fuse Box & Cover . . . . . . . . . . . . . . . . . . . . . . . . . . . . . 28
EH Fuse Box & Cover . . . . . . . . . . . . . . . . . . . . . . . . . . . . . . . 29
Condenser Fan Fuse . . . . . . . . . . . . . . . . . . . . . . . . . . . . . . . . 29
A/C Compressor Fuse . . . . . . . . . . . . . . . . . . . . . . . . . . . . . . . 30
Common Parts & Part Numbers . . . . . . . . . . . . . . . . . . . . . 31
Service centers . . . . . . . . . . . . . . . . . . . . . . . . . . . . . . . 32
Warranty . . . . . . . . . . . . . . . . . . . . . . . . . . . . . . . . . . . 35
OPERATION — PAGE 6
WILLIS POWER SYSTEMS
OWNER/OPERATOR SAFETY
Thank you for choosing an APU from Willis Power Systems. It is our
goal to make sure you have the best unit on the market.
Willis Power Systems is proud to provide options to our customers in
order to best serve individual needs on the road. Because of the customized options, different APU systems will have their own operating
instructions that must be followed to ensure that you get the maximum performance from your unit.
Please read all leaflets and manuals provided with your APU in order
to best understand how to properly operate your system type. If you
need assistance or would like more information, contact your nearest service center or call Willis Power Systems. Visit our website to
download manuals, diagrams, and other information made available
for you.
Below are important instructions that apply to the use of all units,
and should be followed at all times when operating an APU.
• Do not remove or replace the APU cover while the unit is
running.
• If the unit is running with the cover off, stay clear of the
accessory drive belt.
• The APU contains hot oil and coolant under pressure. Inspect
hoses and connections frequently when the engine is NOT
running for signs of leakage or damage.
• Do not insert objects in the transmission case while the APU is
running. Do not leave any foreign objects in the transmission
case.
• Do not work on any Willis APU components located on or near
the truck engine when the truck engine or the APU is running.
• Only qualified maintenance personnel should service the Willis
APU or you risk damage to the unit, yourself, or void existing
warranty coverage.
• Visit Willis Power Systems online to find a service location near
you, and download manuals and diagrams. You can also call
WPS by phone to request service, purchase parts, or to speak
with a technician.
WILLIS POWER SYSTEMS
OPERATION — PAGE 7
REQUIRED MAINTENANCE SCHEDULE
Performing simple maintenance checks, and following the schedule
will result in a long lasting engine that improves the performance of
your APU, the life of your unit, and long term savings on the road.
Ignoring the maintenance schedule can result in a void warranty,
and/or preventable engine problems.
Every 50 Hours of APU Runtime
• Check the APU engine oil level on dipstick
Every 500 Hours of Runtime
•
•
•
•
Check and/or change thermostat batteries
Replace the APU’s engine oil and filter
Replace the APU engine fuel filter
Disconnect/clean ALL grounds and power connections & reseal
with Plasti-Dip or equivalent.
• Check the engine air filter
• Check belts and hoses for wear
• Check wires, harnesses, clamps, & tie wraps for wear
Every 2000 Hours of APU Runtime
• Check the fuel hoses on the APU
• Check the five water hoses on the APU
• Replace the APU engine’s water pump belt
Engine Oil
Use SAE 15W-40 engine oil for all temperatures. Oil should meet
API classification CC/CD/CE and be replaced every 500 hours of APU
runtime or when truck’s oil is changed, whichever comes first.
Engine Coolant
Low-silicate 40% permanent anti-freeze by volume for temperatures
down to -12ºF and 50% by volume below -12ºF.
The Willis APU Cab Controller is mounted on the truck’s instrument
panel. The Cab Controller’s menu screen shows all selected actions.
• When the APU has power, it will display a menu saying “Select
Mode” or “Shutdown.”
• When the Controller is not in use it will cycle between being
blank and being on at half brightness. This is normal.
OPERATION — PAGE 8
WILLIS POWER SYSTEMS
HOW TO START YOUR APU
1. Select Stop for the manual mode.
2. Then press the Start button to crank the engine.
3. Select Stop/Reset to shutdown the APU
HOW TO SET AUTO BATTERY MONITOR
WILLIS POWER SYSTEMS
OPERATION — PAGE 9
HOW TO STOP ENGINE
SET FAN BLOWER
1. Set the fan blower to AC or Heat.
2. Select the blower settings to adjust the airflow.
3. The system automatically cycles to the thermostat settings.
4. When you are finished with the temperature controls, or are
shutting down your APU, always return the blower to the OFF
position.
OPERATION — PAGE 10
WILLIS POWER SYSTEMS
THERMOSTAT SETTINGS
1. Set the Thermostat to A/C or Heat.
2. Use the selector switch to set the fan to automatic mode (AUTO)
or continuous mode (ON).
• AUTO-The fan regulates cabin temperature according to
selected temperature on the thermostat.
• ON-The fan operates continuously and does not regulate to
the selected temperature.
3. Select your temperature setting.
The cabin temperature is normally displayed. To view the set
point, press a button once. The set point & icon is displayed
for 5 sec. Pressing either of the buttons more than once will
change the set point Press one of the buttons until the desired
temperature is displayed.
WILLIS POWER SYSTEMS
OPERATION — PAGE 11
SPECIAL INSTRUCTIONS FOR UNIT TYPE
Closed Loop System for A/C only
Coolant Flow
Hose Fittings
Direction of Coolant
Flow
Hoses pictured above do not show the proper installation, and is provided solely
as an overview of connections. Refer to your installation manual for specific
instructions or contact WPS.
• The small fan only turns on when the AC is engaged to pull the
heat out of the chassis that is produced by the engine and the
AC compressor.
• The condenser’s cooling fan should run anytime the APU is on.
• This unit alone supplies no heat whatsoever.
• The APU is designed to automatically monitor and charge the
truck batteries with 150 AMP alternator.
• Leave the thermostat on AC, and set the temperature.
• Because the coolant is self contained, always change coolant
yearly with 50/50 coolant premix. Remember to use the proper
coolant to water ratio to prevent damage to your unit in cold
temperatures.
OPERATION — PAGE 12
WILLIS POWER SYSTEMS
Standard Integrated System
This system integrates the APU into the coolant flow of the truck
engine, allowing the APU to heat the coolant as it circulates through
your truck engine to prevent cold starts.
The sleeper heater core of the truck engine accesses the heated
coolant which keeps the sleeper heater core warm for a few hours.
If you were to run your sleeper heater blowers on, you can take
advantage of this heat for approximately 6 to 8 hours.
Tips for increasing heat with a Standard Integrated System:
• Start your APU, and then turn the truck key to the “On” position
to power the truck blowers.
• If you need additional heat, you can close the valve located on
your truck’s thermostat housing block. See image below.
WARNING: This is not recommended because if you forget to turn the valves
back on in summer temperatures, your APU can overheat.
• During unusually cold temperatures, the truck’s engine will absorb
a large amount of heat from the coolant flow before reaching
your heater core & blowers. Under these circumstances, you may
have to restart your truck engine for additional heat.
WARNING: The thermostat housing valve must be open during warm weather.
If the valve closed during the summer, it may cause your unit to shut down.
WILLIS POWER SYSTEMS
OPERATION — PAGE 13
Extreme Cold Weather System
The standard system is integrated into the truck engine’s coolant
flow to keep the truck engine warm at all times. Included in the
standard system is a valve assembly that uses the coolant flow to
produce maximum heat in cold temperatures.
Below are the instructions on how to use the valve system when you
are running the A/C or the heat. Please follow these directions in
order for your system to operate properly.
For Heat
1. Both parallel valves on the evaporator side must be open.
2. The cross valve between the two coolant lines must be closed.
This allows the hot coolant to flow into the heater core of the evaporator, and then back out to the APU.
See image below:
OPERATION — PAGE 14
WILLIS POWER SYSTEMS
For Air Conditioning
A. Both parallel valves on the evaporator side must be closed.
B. The cross valve between the two coolant lines must be open.
This prevents the hot coolant from flowing into the heater core of
the evaporator when you are running the AC.
See image below:
WILLIS POWER SYSTEMS
OPERATION — PAGE 15
DSE OPERATION GUIDE
Stop / Reset and Manual
1. This button places the module into its Stop/Reset Manual
mode. This will clear any alarm conditions for which the triggering criteria have been removed.
2. Once in Manual mode the module will respond to the start
button or Auto button, start the engine, and run off load.
3. The return delay timer operates to ensure that the starting
request has been permanently removed and isn’t just a short
term removal.
4. Should another start request be made during the cooling
down period, the set will return on load. If there are no
starting requests at the end of the return delay timer, the
load is removed from the generator to the mains supply and
the cooling timer is initiated.
5. The cooling timer allows the set to run off load and cool
sufficiently before being stopped. After the cooling timer has
expired, the set is stopped.
Auto
1. This button activates the ‘Automatic’ mode. The icon is
displayed to indicate Auto Mode operations if no alarms
are present. Auto mode will allow the APU to operate fully
automatically, starting and stopping as required with no use
intervention to charge the truck batteries.
2. The AUTO option can only be used when the APU is in it’s
Stop/Reset Manual mode (when APU is NOT running).
3. If your APU is running, press the red Stop button to shut
down the APU, and then press the Auto button.
Start
1. Pressing this button will start the engine after the 90 second
safety delay. If your APU is in Auto mode and you wish to
start the APU engine, press the red Stop button first and
then the start button.
2. If the engine fails to fire during this cranking attempt then
OPERATION — PAGE 16
WILLIS POWER SYSTEMS
the starter motor is disengaged for the crank rest duration after which the next start attempt is made. Should this
sequence continue beyond the set number of attempts, the
start sequence will be terminated and the display shows Fail
to Start when the engine fires, the starter motor is disengaged. Speed detection is factory configured to be derived
from the main alternator output frequency but can additionally be measured from a Magnetic Pickup mounted on the
flywheel (Selected by PC using the 3000 series configuration
software). Additionally, rising oil pressure can be used to
disconnect the starter motor (but cannot detect under speed
or overspeed).
3. After the starter motor has disengaged, the Safety On timer
activates, allowing Oil Pressure, High Engine Temperature,
Under-speed, Charge Fail and any delayed Auxiliary fault
inputs to stabilize without triggering the fault.
4. Once the engine is running and all starting timers have expired, the animated icon is displayed. If all start requests are
removed, the stopping sequence will begin.
NOTE: The load transfer signal remains inactive until the oil pressure has
risen; this prevents excessive wear on the engine.
Page
1. Toggles the display between instrumentation and event log
mode. For additional information on the instrumentation
icons, see the chapters Mode for Viewing Instruments and
the chapter DSE Icons.
Scroll
1. This buttons scrolls through the instruments in the currently
displayed page.
Mode for Viewing the Instruments
It is possible to scroll to display the different pages of information
by repeatedly operating the down button. Once selected, the page
will remain on the LCD display until the user selects a different page
or after a period of inactivity. The display will automatically return
to the Status page if no buttons are pressed for the duration of the
configurational LCD Page Timer. If an alarm becomes active while
viewing the status page, the display shows the Alarms page to draw
the operator’s attention to the alarm condition.
WILLIS POWER SYSTEMS
OPERATION — PAGE 17
Metering
Generator Voltage,
3-phase, L-L and L-N
Engine hours Run/ Oil Pressure Gauge
Generator Frequency
Engine Temperature Gauge
Mains Voltage, 3-phase,
L-L and L-N
Fuel Level
Battery Voltage
Fail to Start
Indicators
Fail to Stop
Low Oil pressure
High Engine Temp
Under/Over-speed
Failed to reach loading voltage
Failed to reach loading frequency
Charge Fail
Over Current – Warning, Shutdown
or Electrical Trip
Under/Over voltage –
Warning, Shutdown or Low DC Voltage; AMF indications
Electrical Trip
Emergency Stop; +
CAN diagnostics
At power up, the display will
display the software version and
then display the default display
screen, which will display Generator
Frequency
EVENT LOG
The info
button toggles between the display of the instrumentation and the event log. Pressing the down button will move to the
previous event. A number in the bottom left indicates the event log
entry currently being displayed.
There are five event log entries. When the event log is displayed,
the alarm icon area indicates the alarm type at that position of the
event log. The hours run at the time of the alarm will be displayed in
the instrumentation area. The bottom right icon indicates the current
mode as normal.
OPERATION — PAGE 18
WILLIS POWER SYSTEMS
Module Display
Backlight
The backlight will be on if the unit has sufficient voltage on the power connection while the unit is turned on, unless the unit is cranking
for which the backlight will be turned off.
Graphical Display
A 48x132 pixel LCD is used for the display. The display is segmented
into areas for instrumentation, units, alarm icons and various other
icons.
MODE ICON
An icon is displayed in the mode icon area of the display indicates
the current mode of the unit.
Icon
Stopped
Image Details
Appears when the engine is at rest and the
unit is in stop mode.
Auto
Appears when the engine is at rest and the
unit is in auto mode.
Manual
Appears when the engine is at rest and the
unit is in manual mode.
Timer
Appears when a timer is active, for example
cranking time, crank rest etc.
Running
animation
Appears when the engine is running, and all
timers have expired, either on or off load. The
animation will be rate is reduced when running
in idle mode.
Editor
Appears when the unit is in front panel editor
WILLIS POWER SYSTEMS
OPERATION — PAGE 19
INSTRUMENTAL ICONS
When displaying instrumentation a small icon appears in the screen
to indicate what is currently displayed. This allows you to distinguish
icons for oil pressure, voltage, and coolant temperature for consistency.
Icon
Image Details
Generator
Used for generator voltage and frequency
Mains
Used for mains voltages and frequency.
The WPS compact APU has NO generator.
Eng Speed
Engine speed instrumentation screen
Hrs Run
Hours run instrumentation screen
Battery Volt
Battery voltage instrumentation screen
Engine Temp
Coolant temp instrumentation screen
Oil Pressure
Oil pressure instrumentation screen
Sensor
Flexible sender instrumentation screen
Even Log
OPERATION — PAGE 20
Appears when event log is displayed
WILLIS POWER SYSTEMS
ALARM ICONS
When current instrumentation is being displayed the icons area will be
used to display currently active conditions. In instances where more
than one alarm is present the icon area will transition between icons
to display all active alarm conditions. When the event log is being
displayed the alarm icon area will be used to indicate which alarm was
logged.
Alarm
Icon
Alarm
External Input Alarm
Emergency Stop
Failed to Start
Loss of MPU
Failed to Skip
Flexible Sender
Alarms
Low Oil Pressure
MPU Open Circuit
Water Temperature
Under speed
Over speed
Charge Alternator
Icon
Mains Failure
Mains Return
Over Voltage
Under Frequency
Low Fuel
Plant Battery Volts
(under/over)
Under Voltage
Over Frequency
CAN data Fail
ECU Warning/Fail
WILLIS POWER SYSTEMS
OPERATION — PAGE 21
THERMOSTAT GUIDE
The following information reflects the standard instructions for operating a common thermostat. Making adjustments to the settings of
your controller is not recommended without reviewing the provided
information. For detailed information, view the instruction guide that
accompanies your thermostat.
Use the selector switch to place the system in heating mode or cooling mode or to set both modes to off.
Note: When you place the thermostat in cool mode, it may take up to five
minutes before cooling can start. This is a safety feature for the compressor.
Fan Operating Mode
Use the selector switch to set the fan to auto mode or to continuous
mode. The auto mode allows the fan to operate only when the heating or cooling system is on. This is a typical setting. The ON mode
forces the fan to operate continuously.
Displaying the Temperature
The actual temperature is displayed on the controller display.
1. To view the set point, press the up or down arrow buttons.
2. The set point is displayed for 5 seconds with the arrow icon.
Note: Pressing either of the arrow buttons more than once will change the set
point.
OPERATION — PAGE 22
WILLIS POWER SYSTEMS
Setting the Temperature
Press one of the arrow buttons until the desired temperature is displayed.
Backlight
The display illuminates for 12 seconds when the backlight button or
either of the arrow buttons is pressed.
Manual/Permanent Hold Mode
This mode maintains the temperature at a fixed set point. To place
the thermostat in this mode, press [Mode]. The house icon will disappear.
Programmable Mode
This mode maintains the temperature according to the energy-saving
schedule. To place the thermostat in this mode, press [Mode]. The
current period will be displayed.
Temporary Bypass
If you modify the set point (using the arrow buttons) when the thermostat is in programmable mode, the thermostat will use the new
set point for the next 2 hours.
The house icon flashed during the bypass. Afterwards, the thermostat will return to the temperature setting of the period currently
underway.
Configuration Menu
1. To access the configuration menu, press the backlight button
for 3 seconds.
2. To go to the next parameter (menu item), briefly press the
backlight button.
3. To modify the parameter, press the up or down arrow buttons.
4. Repeat steps 2 and 3 if necessary.
5. Press the backlight button for 3 seconds to exit the configuration menu.
WILLIS POWER SYSTEMS
OPERATION — PAGE 23
Setting the Time and Day
1. Press [Clk] once to set the hour, then press the up and down
arrow buttons to appropriate time.
2. Press [Clk] again to set the minutes, and press the up and
down arrow buttons to appropriate time.
3. Press the [Clk] button a third time to set the day (day will
flash), and use the arrow buttons to set the day.
4. Press [Exit] to exit the controls.
Setting the Date
The date is needed for automatic daylight savings changeover.
1. Press [Clk] and hold down for 3 seconds to display the year.
2. Set the year using the arrow buttons, press [Clk] again to
display the month.
3. Set the month using the arrow buttons, press [Clk] again to
display the date.
4. Set the date using the arrow buttons, press [Exit] to exit the
control settings.
Energy Savings Schedule
The schedule automatically controls your heat/cool system by
switching between set points according to the preset times.
OPERATION — PAGE 24
WILLIS POWER SYSTEMS
Modifying your Schedule
You can program up to 4 periods per day, each period having its own
temperature settings. You can have a different program for each day
of the week. For each period, you can set the start time, the heating
set point and the cooling set point.
If you wish to use on 2 periods, set periods “1 and 4” or periods “2
and 3”. Early start will not work if you set periods “1 and 2” or 3 and
4”.
1. Press [Pgm] to display the period 1 settings.
2. During programming, to skip a period, press [CLR] while the
period is displayed. For example, in the predefined energysaving schedule, periods 2 and 3 have been skipped for
Saturday and Sunday.
3. Press [Day] to select the day. Press for 3 seconds to select
all 7 days.
4. Set the time (in increments of 15 minutes) using the arrow
buttons.
5. Press [P#]. The heating or cooling set point flashes depending on the position of the Heat/Cool selector.
6. Set the desired temperature for the displayed period using
the arrow buttons.
7. Use the Heat/Cool selector to switch to the other mode (
E.g., if you were in Heating mode, switch to Cooling mode).
The set point for that mode flashes.
8. Set the desired temperature using the arrow buttons.
9. Press [P#] to go to the next period.
10.Repeat steps 2 to 8 for the remaining periods.
11.Press [Exit] to exit control settings.
WILLIS POWER SYSTEMS
OPERATION — PAGE 25
BASIC TROUBLESHOOT
Battery Replacement Indicator
• Immediately install new batteries when the icon starts flashing.
• The icon flashes for 120 days before the batteries are depleted.
• You should replace batteries once a year or before leaving your
thermostat unattended for more than a month even if the icon
has not appeared.
WARNING: It is extremely important to keep the batteries charged in the
thermostat.
• After replacing the batteries, set the time, day, and date.
• The temperature and program settings are saved and do not
need to be re-entered.
WARNING: Before removing the batteries, place the system switch on the
thermostat to off. Otherwise, the unit will continue to run even after the
batteries are removed.
OPERATION — PAGE 26
WILLIS POWER SYSTEMS
Recognizing a Blown Fuse
A blown fuse is common, although it does not happen often it is usually the first place to look when diagnosing your system.
To check a fuse, pull the fuse out of the fuse box, and look carefully
at the filament inside the plastic shell. If there is a break in the filament, the fuse is blown as shown in image two below.
Image 1 - Working Fuse
Image 2 - Blown Fuse
WARNING: Do not install the incorrect fuse size.
A fuse will regulate the power to components of your APU system.
It protects those components from overheating, power surges, and
it keeps your system running properly. On occasion, a fuse will fail
whether it is from wear over time or from other variables.
Changing a blown fuse is simple, but you must remember two very
important rules before changing or installing a fuse.
1. A Fuse with Insufficient Amps is Bad
A fuse with insufficient amperage will blow more frequently and will
have to be changed quite often. Because it can’t handle the required
power, it can blow immediately after attempting to run the system.
2. A Fuse with Too Much Amps is Worse
Installing a fuse with higher than recommended amperage can, and
most likely will cause serious damage to the component. A proper
size fuse prevents any electrical damage to the wiring system and to
the components of the APU system.
WILLIS POWER SYSTEMS
OPERATION — PAGE 27
FUSE BOX OVERVIEW
Your APU system has two main fuse boxes. The Engine Harness (EH)
Fuse Box, and the A/C or A/C & Heat (AC/HT) fuse box depending
on your system. The fuse box has two rows.
• The right side row is labeled from R1 to R5.
• The left row is labeled from F1 to F10.
Your relays are large square blocks with metal prongs. The only way
to check a relay is by replacing and testing it with a new, working
relay. A fuse requires a visual check shown on the previous page.
Inside the fuse box cover is a sticker that lists the proper fuse size,
the component the fuse is protecting, and the installation location.
To Change a Fuse
Simply pull the fuse out of the fuse box slot, and insert the prongs of
the new fuse into the correct slot, pressing it securely into place.
AC/HT Fuse Box & Cover
The AC/HT Fuse Box has five relays and three fuses that protect your
air conditioning system.
Image 1 - AC/HT Fuse Box
Image 2 - AC/HT Fuse Box Cover
Fuse
Relay
OPERATION — PAGE 28
WILLIS POWER SYSTEMS
EH Fuse Box & Cover
The engine harness fuse box protects the auxiliary power unit’s
engine components.
When you replace a fuse, remember to make sure that you have
installed the fuse in the proper slot as described in the information
label inside the fuse box cover.
Image 1 - AC/HT Fuse Box
Image 2 - AC/HT Fuse Box Cover
Condenser Fan Fuse
The fuse for the condenser fan is located below the EH fuse box on a
single fuse holder. To change, simply pull the fuse out and replace it.
WILLIS POWER SYSTEMS
OPERATION — PAGE 29
A/C Compressor Fuse
The A/C compressor has a 15 amp fuse located inside the APU chassis.
If you need service assistance, please call Willis Power Systems.
Office hours are Monday - Friday from 8 AM to 5 PM central time.
Willis Power Systems, LLC
2950 N. Martin Springfield, MO 65803
Toll Free: (800) 825-4631
Phone: (417) 831-2520
Fax: (417) 831-0030
[email protected]
[email protected]
www.willisapu.com
OPERATION — PAGE 30
WILLIS POWER SYSTEMS
COMMON PARTS & PART NUMBERS
All APU parts are available for replacement. Orders can be submitted
on our website, by e-mail, or over the phone with our parts department at Willis Power Systems. Most Kubota parts are available at
WPS only. For your convenience, we have included outside options
for parts.
Willis Power Systems
2950 N Martin Ave, Springfield, MO 65804
Toll Free: 800-825-4631 | Fax: 417-831-0030
Web: http://www.willisapu.com
[email protected] | [email protected] | [email protected]
Part Description
WPS PN
Availability
Relay
01700
Any Auto Store
5 Amp Fuse
02471
Any Auto Store
10 Amp Fuse
02220
Any Auto Store
15 Amp Fuse
01843
Any Auto Store
30 Amp Fuse
01468
Any Auto Store
40 Amp Fuse
02804
Any Auto Store
200 Amp Mega Fuse
00582
Any Auto Store
A/C Compressor Belt
02186
O’Reilly 02186
Alternator Belt
02186
O’Reilly 02186
Water Pump Belt
00171
Kubota/WPS
Silencer Air Filter
00770
Wix 46449
Element Fuel Filter
00234
Wix 33548
Oil Filter
00373
Wix 51064
Valve Fuel Check
00248
Kubota/WPS
Glow Plugs
03370
Kubota/WPS
Exhaust Manifold Gasket
00236
Kubota/WPS
Heat Exchanger Exhaust Gasket
00237
Kubota/WPS
00958-1
Kubota/WPS
Water Pump Gasket
00959
Kubota/WPS
Condenser Fan
02181
WPS Only
Water Pump
WILLIS POWER SYSTEMS
OPERATION — PAGE 31
SERVICE CENTERS
Location of Sales, Installation, and Service centers for WPS auxiliary
power units. Please call your nearest location to confirm your needs
as some sites are sales, installation, service, or maintenance specific
while other locations offer both installation and service.
General maintenance is available at all Travel Centers of America
locations nationwide. Visit our service locator on our website to find
a location nearest you. www.willisapu.com
For all service, installation, and sales centers see listing below.
Service Only
Sale Only
Service & Installation
Arkansas
Peterbilt of Fort Smith
6915 Alma Hwy.
Van Buren
72956
866-318-9826
2165 W. Atlantic Ave.
Del Ray Beach
33445
561-455-2820
Peterbilt of St. Louis
2350 Sauget Industrial
Pkwy
Sauget
62206
866-727-7383
The Larson Group
1945 N. Morton Ave.
Morton
61550
309-263-1126
Clark Power Services
1430-B East of Chain
Rocks Rd.
Granite City
62040
618-797-3320
Peterbilt of Louisville
4415 Hamburg Pike
Jeffersonville
47131
800-554-1478
The Larson Group
8401 Baumgart Rd.
Evansville
47725
812-868-6000
The Larson Group
4415 Hamburg Pike
Jeffersonville
47131
800-554-1478
Hoesli Diesel
5716 E. Morgan Ave
Evansville
47715
812-473-5604
Clark Power Services
2610 Independence Dr
Ft. Wayne
46808
800-513-9592
Clark Power Services
1240 W Thompson Rd
Indianapolis
46217
800-513-9594
Clark Power Services
2410 S. 30th St
Lafayette
47909
765-471-7818
Goins Automotive
1098 N Bardstown Rd
Mt. Washington
40047
502-538-7200
The Larson Group
635 Viox Dr.
Erlanger
41018
859-534-6010
Clark Power Services
4680 Louisville Rd
Bowling Green
42101
270-781-1134
Clark Power Services
401 Triport Rd
Georgetown
40324
502-867-0800
Clark Power Services
751 US Highway 41 S
Henderson
42420
800-513-9593
Clark Power Services
2697 Grassland Dr
Louisville
40299
502-491-2021
Florida
German Auto World
Illinois
Indiana
Kentucky
OPERATION — PAGE 32
WILLIS POWER SYSTEMS
Minnisota
AllState Peterbilt N
21701 John Deere Ln
Rogers
55374
763-428-4333
AllState Sales
558 E. Vilaume Ave
S. St. Paul
55075
800-328-0104
AllState Peterbilt
27053 County Rd 12
Winona
55987
800-533-7384
AllState Peterbilt
2265 Howard Dr. W.
N. Mankato
56003
507-388-9312
Peterbilt Mid America
#1 North Central Dr.
O’Fallon
63366
800-765-7383
Peterbilt of Springfield
3026 N. Mulroy Rd.
Strafford
65757
800-666-7383
Peterbilt
4044 Coyote Dr.
Joplin
64804
800-74- 0472
Peterbilt
443 Western
Sikeston
63801
888-310-7383
Clark Power Services
4200 PCR 800
Perryville
63775
573-547-5506
Clark Power Services
788 N. Interstate Dr
Sikeston
63801
573-472-9717
Clark Power Services
1411 S. Service Drive
Sullivan
63080
573-468-5138
Clark Power Services
2252 E. Pitman Ave.
Wentzville
63385
636-332-3854
Clark Power Services
645 Highway 45 South
Columbus
39701
662-328-1153
Clark Power Services
7604 US Hwy 49 N
Hattiesburg
39402
601-261-9253
Clark Power Services
620 Highway 49 South
Richland
39218
800-897-8918
Clark Power Services
407 S. Eason Blvd
Tupelo
38804
662-844-2212
AllState Peterbilt
3739 38th Street SW
Fargo
58107
800-342-4949
Peterbilt of Bismark
3800 E. Century Ave.
Bismark
58501
701-255-7555
Hunter Truck Sales
524 Monmouth Rd.
Clarksburg
08510
609-259-5950
Hunter Truck Sales
454 N. Broadway
Pennsville
08070
856-299-5010
2970 Walden Ave.
Buffalo
14225
716-684-0010
The Larson Group
2550 Annuity Dr.
Cincinnati
45241
513-554-2200
The Larson Group
222 S. Wheatley St.
Empire
43926
740-537-2141
M Technologies
1818 Hopple Ave SW
Canton
44706
330-477-9009
AllState Peterbilt of
Eastern OH
327 Stone Creek Rd.
New Philadelphia
44663
800-362-6680
Cleveland Peterbilt
8650 Brookpark Rd
Brooklyn
44129
216-749-3302
Peterbilt
3680 LeHarps Rd
Youngstown
44509
330-793-4421
Clark Power Services
3133 E. Kemper Rd
Cincinnati
45241
800-513-9591
Clark Power Services
6061 Executive Blvd
Huber Heights
45424
937-684-4402
Missouri
Mississippi
North Dakota
New Jersey
New York
Hunter Truck Sales
Ohio
WILLIS POWER SYSTEMS
OPERATION — PAGE 33
Pensylvania
Hunter Truck Sales
9981 Old Route 22
Breinigsville
18031
610-285-2244
Hunter Truck Sales
519 Pittsburgh Rd.
Butler
16002
724-586-7744
Hunter Truck Sales
1503 Airstream Way
Clearfield
16830
814-768-7679
Hunter Truck Sales
101 E. Main St
Eau Claire
16030
724-791-2525
Hunter Truck Sales
6390 Clintonville Road
Emlenton
16373
724 867 5290
Hunter Truck Sales
8125 Wattsburg Rd.
Erie
16509
814-825-3330
Hunter Truck Sales
1463 Mainheim Pike
Lancaster
17601
717-299-6630
Hunter Truck Sales
4637 Campbells Run
Pittsburgh
15205
412-787-0600
Hunter Truck Sales
100 Hunters Way
Smithfield
15478
724-564-4292
Larson Truck Sales
27115 S. Parklane Dr.
Soux Falls
57106
605-368-5217
Northwest Peterbilt
11720 J.B. Drive
Black Hawk
57718
800-697-3024
Clark Power Services
2211 Express Dr
Richfield
38305
731-668-7939
Clark Power Services
3070 Sandbrook St
Memphis
38116
800-897-8901
310 N. Rogers Rd
Irving
75061
972-241-6674
Advanced Diesel
2666 Mayfield Way
Richfield
53076
262-305-4453
AllState Peterbilt
6500 Texaco Dr.
Eau Claire
54703
877-874-4747
AllState Peterbilt
211 Hammond Ave.
Superior
54880
800-408-5264
AllState Peterbilt
926 Commercial Court
Lacross
54650
800-665-0433
AllState Peterbilt
1620 Winnebago Ave.
Tomah
54660
608-372-0917
South Dakota
Tenessee
Texas
Manex
Wisconsin
OPERATION — PAGE 34
WILLIS POWER SYSTEMS
WARRANTY
Upon warranty activation, Willis Power Systems, LLC (WPS), warrants to
the original buyer that the Willis APU (less Major Components), configured
with closed loop cooling, will be free from defects in material and workmanship for two years or 2000 hours of operation, whichever comes first,
from the date of original truck installation by a WPS Authorized Service
Center or Dealer. Failed components may be required to be returned to WPS
for verification of defect and normal use prior to Warranty claim processing.
Kubota Engine
The Kubota engine is warranted separately by Kubota Engine America
Corporation for two years or 2000 hours, whichever comes first, from the
date of original truck installation by a WPS Authorized Installation Center
or Dealer.
Major Components
The following APU major components are covered by the Original Equipment Manufacturer One Year warranty (Alternator, Air Conditioning
Compressor, Evaporator, Pneumatic Compressor, Cooling Fan, Radiator,
Air Conditioning Remote Condenser Unit, ECU, and Cab Display or APU
controller).
WPS will repair or replace any part covered by this warranty that becomes
defective, malfunctions or otherwise fails to conform to this warranty under
normal use and during the term of this warranty, at no charge for parts or
labor. Labor is in accordance with current WPS labor allowance schedule
which is the only labor remedy. Repair and replacement of components
under this warranty shall not extend the warranty period for the Willis APU,
or for any component of the Willis APU, except as may be provided in
manufacturers’ warranties for individual components at their option.
In order to obtain warranty repairs, you should deliver the product, together
with proof of purchase, to a WPS Authorized Installation Center or Dealer
at your expense. The names and addresses of WPS Authorized Installation
Centers or Dealers are listed at www.willisapu.com or you may write or
telephone us to obtain them.
This warranty does not cover:
1. Defects, malfunctions, or failures resulting from accidents, abuse,
modifications, alteration, improper servicing, improper installation or
failure to perform required service.
2. Normal maintenance services or parts associated with such services,
WILLIS POWER SYSTEMS
OPERATION — PAGE 35
including but not limited to filters, filter elements, oils, lubricants,
coolant, belts and glow plugs.
3. Non-approved parts.
4. Parts that are returned for warranty credit and verified to be in good
working order.
5. Used parts.
6. Any damage caused by overheating the Willis APU that is not a
direct result of a defect in APU materials or workmanship.
7. Damage caused to the host truck due to improper maintenance or
utilization of such truck, whether or not such damage is related in any
way to the presence of the Willis APU on the truck.
We neither assume nor authorize anyone to assume for us any other express
warranty. The Authorized Installation Center or Dealer has no authority to
make any representation or promises on behalf of Willis Power Systems,
LLC, or to modify this warranty.
All other expressed or implied warranties arising under law of equity, and
including without limitation, the implied warranties of merchantability
and fitness for a particular purpose are hereby expressly excluded from the
sale and purchase of the Willis APU and related apparatus sold hereunder,
regardless of whether a claim arises under contract tort principles. The
Buyer’s sole remedy hereunder shall be limited to the repair or replacement
of any nonconforming equipment or parts, but only if returned to the Company’s factory or a WPS Authorized Installation Center or Dealer within the
warranty period defined above, or with the express approval of WPS management. Willis Power Systems’ liability on any and all claims for damage
or loss related to the delivery, installation and use of the Willis APU shall
not exceed the original installed price of the Willis APU. IN NO EVENT
WILL WPS BE LIABLE FOR LOSS OF USE, LOSS OF PROFITS, LOSS
OF, OR DAMAGE TO, SHIPPED GOODS, INCONVENIENCE, COMMERCIAL LOSS, OR ANY OTHER INCIDENTAL OR CONSEQUENTIAL DAMAGES.
Maintenance
Proper use of the Willis APU requires that it be maintained according to the
schedule defined in the Willis APU Instruction Manual. As a condition of
this warranty, Willis Power Systems may require written substantiation that
scheduled service performed on the Willis APU has been carried out.
OPERATION — PAGE 36
WILLIS POWER SYSTEMS
Warranty Activation
Activation of the WPS APU warranty requires that the following be completed in full and returned within 30 days of install to WPS via website,
mail or fax (417) 831-0030. The WPS APU warranty is void and non-valid
until the information is returned. A letter of receipt will be sent to the purchaser’s address acknowledging the below information has been received
and warranty is activated.
1. Warranty registration form (SER 001-001)
2. Installation Checklist (SER 001-013)
3. Operator Training Checklist (SER 001-011)
Transfer of Warranty
This warranty shall be for the benefit of the initial purchaser. If a truck upon
which the Willis APU is installed is sold, the new owner may request in
writing that WPS transfer the remainder of the original warranty. Such a
request shall note the hours accumulated by the Willis APU at the time of
ownership transfer, as well as the initial date of installation.
No warranty transfer will be granted for a Willis APU unit that has been
removed from one truck and installed on another, unless such installation is
done at a WPS Authorized Installation Center or Dealer, and the transfer is
requested in writing as described previously.
WPS reserves the right to deny transfer of warranty if these conditions are
not met. WPS also reserves the right to deny warranty extension if the transfer and reinstallation of the Willis APU is not done to the satisfaction of a
company-authorized inspector.
This warranty is extended under the laws of the State of Missouri. Enforcement of this warranty shall be conducted according to the laws of the State
of Missouri. By acceptance of this warranty, the owner of the Willis APU
agrees that any litigation and the resolution of any dispute between Willis
Power Systems shall be conducted exclusively in courts of the State of Missouri.
WILLIS POWER SYSTEMS
OPERATION — PAGE 37