1
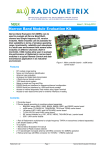
NRVP
RV Products
A Division of AIRXCEL, Inc.
OPERATION AND MAINTENANCE INSTRUCTIONS
FOR 7000 & 8000 SERIES
ROOF TOP AIR CONDITIONERS
AND
7300 SERIES CEILING PLENUMS
MODE D'EMPLOI ET UTILISATION
DES CLIMATISEURS DE TOIT DES
SERIES 7000 ET 8000 ET
PLENUM DE PLAFOND DE LA SERIE 7300
BETRIEBS- UND WARTUNGSANLEITUNG
FUR DACHSEITIGE KLIMAANLAGEN
DER SERIEN 7000 & 8000
UND INTEGRIERTE VERTEILERSCHACHTE DER SERIE 7300
INSTRUCCIONES PARA LA OPERACION Y EL
MANTENIMIENTO DE LOS DISPOSITIVOS DE AIRE
ACONDICIONADO PARA MONTAJE ENCIMA DEL
TECHO DE LAS SERIES 7000 Y 8000 Y DE LOS
VENTILADORES IMPELENTES PARA
TECHO DE LA SERIE 7300
TABLE OF CONTENTS
I.
II.
III.
IV.
V.
VI.
VII.
2
2
3
5
6
8
10
General Information
Standard Ceiling Plenum Control Panel
Standard Ceiling Plenum Operation
Maintenance
Wall Thermostat Identification And Operation
Optional Solar Battery Chargers
Warranty Service
SECTION I - GENERAL INFORMATION
The size of the vehicle, amount of window area, amount of
insulation, direct exposure to the sun, outside temperature and
the number of people in the recreational vehicle may increase
the heat gain to such an extent that the capacity of the air
conditioner is exceeded.
NOTE
The optional Elect-A-Heat heating assembly is intended to
take the chill out of the indoor air when the air is a few
degrees too cool for comfort. The heating assembly is an
effective "chill chaser". It is not a substitute for a furnace.
As a general rule, air entering the air conditioner will be
cooled about 15 to 20 degrees, depending on the outside
temperature and humidity conditions.
These air conditioners were designed to operate from a
115 VAC, 60 HZ, 1 Phase power supply. Anytime an air
conditioner is not operating properly, the power supply should
be examined by a qualified technician to verify that the air
conditioner is receiving the proper power supply.
For example, if the air entering the return air grilles in the air
conditioner is 80°F, the air leaving the discharge grilles in the
air conditioner will be 60° to 65°F.
When searching for a qualified technician, please reference
your RV Products Authorized Service Center List. The
servicers listed are familiar with your Recreation Vehicle
product. If the air conditioner is still under warranty, an
authorized servicer must be used for any repair required on the
air conditioner. Using an unauthorized servicer may void
your warranty.
As long as this temperature difference is being maintained
between the return air and discharge air, the air conditioner is
operating at its capacity. If the desired inside temperature
(normally 80°F) cannot be maintained, then the heat gain of
the RV is too great for the capacity of the air conditioner.
Parking the vehicle in a shaded area, keeping windows and
doors shut and avoiding the use of heat producing appliances
in the vehicle will help to reduce the heat gain. When
possible, the addition of insulation and tinted glass (especially
in uninsulated vans) should be considered.
This is due to the limited electrical power normally available
in most trailer parts and/or economic limitations on the use of
generators with enough capacity to handle large air
conditioners. If more than 1 ton of cooling is desired, then the
use of two air conditioners is recommended.
The ability of the air conditioner to maintain the desired inside
temperature depends on the heat gain of the recreational
vehicle.
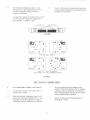
SECTION II - CONTROL PANEL
If your RV air conditioner is operated from the control panel
located in the ceiling assembly, then there are three controls
on the ceiling assembly that help you control the air
conditioner. They are as follows:
functions vary depending upon options of both the
roof top unit and ceiling assembly. Figures 1 and 2
show selector switch location and list all available
functions by model.
A.
The "Operation" section explains the operational
characteristics of each mode of operation.
The Selector Switch - The selector switch determines
which mode of operation the air conditioner will be
in. By rotating the selector switch, the operator can
obtain any system function desired. System
2
B.
The Thermostat (temperature control) - In the
cooling mode, the thermostat regulates the "ON"
and "OFF" temperature setting at which the
compressor will operate.
C.
Louvers - The louvers are located at both ends of the
ceiling assembly shroud and are used in directing the
discharge air from the unit.
For "Heat/Cool" models, the thermostat also controls
the "ON" and "OFF" temperature settings of the
heater assembly. See Figures 1 and 2.
TEWPERATURE SWITCH
SELECTOR SWITCH
LOUVERS
FIGURE 1
• NI IAN
WARNER • •
911ci\
0 •
_ •
0
COM
•
LO
■
ram -:
•
[
NI
COOL
SELECT
COMER w
orr•
•
TEMP
COOLING ONLY MODELS
• NI IAN
LO •
SELECT
• • •
•
•
•
•
LO
•
f/i11011:14W
LO •
rAN
GONER
"1 "
•
HEAT
arr.
NI
COOL
••
• TEMP
COOLING / HEATING MODELS
7330 SERIES CEILING ASSEMBLY DECALS
FIGURE 2
SECTION III - OPERATION
I.
For Cooling (Refer to Figure 1 and 2, page 3).
A.
Turn the selector switch to the "LOW COOL" or
"HIGH COOL" position.
B.
Rotate the thermostat (temperature control) to the
position that is the most comfortable to you. The
thermostat will turn the compressor on when the
temperature of the air entering the air conditioner
rises a few degrees above the setting you have
selected. When the temperature of the air entering
continue to cycle the compressor on and off in the
above mentioned fashion until the selector switch is
turned to another mode of operation.
C.
3
Position the louvers to the desired direction the
discharge air is to flow.
II.
Do not expect the heating coil on your heater to glow.
Because the fan draws in cold air and forces it over the coil,
the coil will not turn red. A hint of red may occur where the
moving air does not directly touch the coil.
Operation During Cooler Nights (Cooling
Operation).
It is important, when the outdoor temperature drops in the
evening or during the night to below 75°F, that the thermostat
(temperature control) be set at a midpoint between "Warmer"
and "Cooler". If the setting is at "Cooler", the cooler
(evaporator) coil may become iced-up and stop cooling.
During the day when the temperatures have risen above 75°F,
reset the thermostat switch to the desired setting.
A.
Turn the selector switch to the "LOW HEAT"
position. At "LOW HEAT", the fan operates on
low speed with heat output at maximum.
B.
Rotate the thermostat (temperature control) switch
to the position that is the most comfortable to you.
The thermostat will turn the heater on when the
temperature of the air entering the air conditioning
unit drops below this setting a few degrees and
automatically turns off when the temperature of the
air entering the air conditioner rises a few degrees
above this setting. The heater will continue to cycle
on and off in this fashion until the selector switch
is turned to another mode of operation.
C.
Position the louvers to the desired direction the
discharge air is to flow.
NOTE
Should icing-up occur, it is necessary to let the cooling
(evaporator) coil defrost before normal cooling operation is
resumed. During this time, operate the unit in the "HIGH
FAN" position with the system at maximum air flow. When
increased or full air flow is observed, the cooling coil should
be clear of ice.
III.
Short Cycling
When an air conditioner is in operation, its compressor
circulates refrigerant under high pressure. Once off, it will
take two to three minutes for this high pressure to equalize.
Discharge air temperature can be controlled to some
extent by opening or closing the louvers.
The air conditioning compressor is unable to start against high
pressure. Therefore, once the air conditioner is turned off, it is
important to leave it off for two to three minutes before
restarting.
When the louvers are closed, the warmest localized
discharge air is achieved. Fully opened louvers
will throw the warm discharge air to the back and
front of the vehicle for more efficient circulation and
faster warm-up. Although the air temperature is
lower with the louvers fully opened, the heating
capacity is still the same.
Short cycling the compressor (or starting it before pressures
have equalized), will in some instances, kick the circuit
breaker or overload.
For Air Circulation Only (Refer To Figure 1 & 2, pg. 3).
IV.
For Heating ("Elect-A-Heat" Ceiling Assembly
Model Only) Refer To Figure 1 and 2, page 3).
The optional Elect-A-Heat heating assembly is intended to
take the chill out of the indoor air when the air is a few
degrees too cool for comfort. The heating assembly is an
effective "chill chaser". It is not a substitute for a furnace.
A.
Turn the selector switch for "LOW FAN" or for
maximum air flow, to "HIGH FAN".
B.
Position the louvers to the desired direction the
discharge air is to flow.
NOTE
When the selector switch is in the "LOW FAN" or "HIGH
FAN" position, the blower motor will operate continuously.
4
SECTION IV - MAINTENANCE
1.
6.
Owner
One of the biggest advantages to your new RV Products air
conditioner is that the maintenance needed to keep the unit in
good care is minimal. In fact about the only thing you, the
owner, must take care of is the cleaning and replacement of
the filters.
Remove filter from grill and either clean or
exchange with new filters.
NOTE
If replacement filters are necessary, the filters can be
purchased from most RV Products Authorized Service
Centers. It is recommended that spare filters be carried with
the RV at all times to replace worn, torn or deteriorated filters.
Filters are made from long life non-allergenic natural fibers
which can be cleaned and reused, and which completely filter
the circulated air when the air conditioner is in operation. If
the filters are not cleaned at regular intervals, they may
become partially clogged with lint, dirt, grease, etc. A
clogged filter will produce a loss of air volume and may
eventually cause an icing-up of the cooling (evaporator) coil.
IMPORTANT
Do not operate your air conditioner for extended periods
of time without the filter installed.
An even more serious condition occurs when the air
conditioner is operated without a filter. When this
happens the lint, dirt, grease, etc. that are normally
stopped by the filter are now accumulating in the cooling
coil. This not only leads to a loss of air volume and a
possible icing-up of the cooling coil, but could also result in
serious damage to the operating components of the air
conditioner.
IL
A.
Electrical - All electrical work and/or inspection
should be performed only by qualified service
personnel. Contact your nearest RV Products Service
Center if electrical problems should arise.
B.
Check Points - Failure to start or to cool the air are
sometimes problems with air conditioning units.
The RV Products RV air conditioner is designed to
operate on 115 volt electrical power. If the
compressor on the air conditioner fails to start, check
with your RV Products Service Center to determine
that the proper wire size is connected to the unit, the
proper circuit breakers are installed as protection
devices on the electrical circuit and the proper sized
extension cord is being used for the distance covered
from the utility outlet to the RV. The required
minimum wire size is #12 AWG for lengths up to 25
feet (larger wire size for greater distances). Each air
conditioning unit must be protected with a 20 amp
time delay fuse or circuit breaker.
We recommend that the filters be cleaned and changed at
least every two weeks when the air conditioner is in
operation.
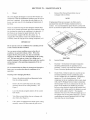
Cleaning and/or changing the filters:
1.
Remove the selector switch and thermostat knobs
from the ceiling assembly.
2.
Remove the two screws that secure the ceiling
assembly shroud to the ceiling assembly. See
Figure 3.
3.
Lower the shroud and gently slide it off the control
knob shafts.
4.
Take filters out and either clean or exchange with
other filters (See Figure 3).
5.
If the vehicle is equipped with a flush mount ceiling
assembly, remove the four return air grill screws.
5
FIGURE 3
Service Person
shape. Also, an examination of the plastic shroud
covering the air conditioner on the top of the roof
should be made periodically. Be sure the four
mounting screws and washers are snug and holding
the shroud to the air conditioner. Also examine the
shroud to be sure it is not developing cracks or has
suffered damage from impact.
If the air conditioner continues to trip off the circuit
breakers, have an electrician check the starting
amperage and running amperage on the unit. If
the circuit breaker continues to trip off and the
electrical consumption is found to be normal, it will
require the replacement of the faulty circuit breaker.
If all electrical power to the air conditioner is normal
but neither the fan or the compressor will operate,
the connector plug located behind the ceiling
assembly control box should be checked to
determine whether it is faulty.
Lubrication
DANGER
DISCONNECT THE POWER SUPPLY TO THE UNIT
BEFORE SERVICING TO PREVENT A SHOCK
HAZARD OR POSSIBLE INJURY FROM MOVING
PARTS.
On the heating-cooling air conditioner models, if all
electrical power to the unit is normal and the fan
runs but you never get any heated air, then the
electrical plug to the heating unit should be checked
for a secure connection. If this does not correct the
malfunction, the heating thermostat or limit switch
may be faulty.
C.
The blower drive motor on some units may include oiling
cups at the top of the motor. There is no requirement to
oil the journals under normal operating conditions.
However, if lubrication to the unit is desired, use only SAE
20 non-detergent type oil. DO NOT OVER OIL - three to
four drops in each oil hole once a year is sufficient.
Mechanical Integrity - The air conditioner should be
inspected periodically to be sure that the bolts which
secure the unit to the roof are tight and in good
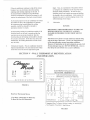
SECTION V - WALL THERMOSTAT IDENTIFICATION
AND OPERATION
90
95
80
COOL
FAN
OFF
HEAT
HIGH
LOW
LOW
HIGH
SYSTEM
FAN
B
75
AUTO
70
ON
65
ELECTRONIC SINGLE STAGE
HEAT/COOL THERMOSTAT
AIR CONDITIONING WIRING
— — — — OPTIONAL FURNACE WIRING
60
55
UPPER A/C UNIT
Y GH GL
B (-)
BUILT IN TINE DELAY AND FUSE PROTECTION
FURNACE A
W
(+)
(-)
000 0
FIGURE 4
r>
..1
r,4
z
;i61
L.LZ
>"
.1:::-)
cn
LI
g
—
.-1
as
_I
I
__J
000 0
Heat/Cool Thermostat Shown.
Y GH GL
"Cool Only" Model Has No Reference
To Heat On Face Of Thermostat.
B (-)
2A
FUSE
.
THERMOSTAT R
12 VDC
POWER
SUPPLY
t Suggested Fuse To Protect Winng Leading To Thermostat
A Not Found In "Cool Only" Applications
FIGURE 5
6
OPERATION
The chart below shows the system functions with the "Heat/Cool" thermostat. After the entire air conditioning
system (and furnace system) is installed, check each position function. Disregard references to heat functions
when using the "Cool Only" thermostat.
■
SHOWS POSITION OF SWITCH
SYSTEM
HEAT COOL OFF FAN
■
■ 0 0
■
■
■
■
■
■
FAN
ON
AUTO
HI LO LO HI
OPERATION
No functions occur.
Air conditioner fan runs at high speed continuously regardless
of fan switch setting or setpoint. No other functions occur.
■
■
■
n■
■
■
•
■
Air conditioner compressor and high speed fan cycle to satisfy
setpoint.
Air conditioner compressor and low speed fan cycle to satisfy
setpoint.
Air conditioner compressor cycles to satisfy setpoint. Air
conditioner low speed fan runs continuously.
Air conditioner compressor cycles to satisfy setpoint. Air
conditioner high speed fan runs continuously.
Furnace and furnace blower cycles to satisfy setpoint. Furnace
blower operates from sequencer or time delay in furnace. Air
conditioner blower does not run.
All cooling functions controlling to setpoint have a short cycle protection time delay of 3 minutes. There will be
no delay if the cycle OFF time exceeds 3 minutes.
* There is no heat switch or furnace function available with the "Cool Only" thermostat.
7
SECTION VI - OPTIONAL SOLAR BATTERY CHARGERS
FOR RV PRODUCTS AIR CONDITIONERS
OPERATING INSTRUCTIONS
RV Products supplies custom engineered photovoltaic systems
using the highest quality components available. To enjoy the
maximum benefit from your solar maintenance system, please
take a few moments to read the important information in this
section.
This maintenance kit provides a single 5 watt solar panel
mounted on top of the RV Products air conditioner shroud,
located on the roof. This panel generates enough power to
keep your house battery fully charged during storage, but is
self-regulating in power output to prevent overcharging.
The Problem
Your solar panel will operate even on cloudy days or with
partial shading, although the amount of charging power
generated will be reduced.
When not in use over a period of time, the house battery for a
motor home will naturally "self-discharge". This is true even
when the battery disconnect switch is open, preventing any
power draw. Batteries allowed to self-discharge can result in
"sulfation"; a condition which results in permanent damage,
decreasing the effective life of the battery. It isn't always
convenient to run power for battery maintenance to where a
motor home is stored, and it's even less convenient to remove
and relocate the battery each time the motor home will be
stored.
In total darkness, the solar panel and monitor will not
discharge the battery in any manner because of our special
circuit design.
Maintenance
Your solar panel is virtually maintenance free. Occasional
cleaning of the solar panel will assure optimum performance.
Simply use the same product used for cleaning your
windshield, avoiding harsh chemicals. During winter months,
accumulation of snow will reduce the effectiveness of the
panel and should be brushed away. No other maintenance is
required.
The Solution
Your solar electric maintenance system provides an ideal
method of keeping your battery maintained during storage.
All that is required to keep a full charge on the house battery
is for your RV to be stored where the solar panel is exposed to
direct sunlight. When kept properly charged, your house
battery will provide many years of trouble-free performance.
Performance Limitations
Your solar maintenance system is designed to generate
enough power to maintain a full charge on your house battery
only during storage when all devices and appliances are off
(or when so equipped, the battery disconnect switch is
activated). It will not maintain the charge on a battery which
is subject to discharge by any type of power draw, nor is it
powerful enough to recharge a discharged battery.
Operation
Your solar maintenance system will operate any time the solar
panel is exposed to sufficient sunlight and the voltage output
from the panel is greater than the supply voltage in your house
batteries.
Note
The red L.E.D. solar monitor light, located on the rear of the
ceiling assembly will be illuminated only when the batteries
are actually needing and receiving a charge from the panel.
So don't be alarmed if your indicator light is not on all the
time. The batteries may be fully charged already.
The RV Products Solar Battery Charger is also available as an
aftermarket add-on kit. This product is called the Solar Pal
(part #7330-4101). It attaches easily to any full sized RV
Products air conditioner. See your local dealer for details.
How Your System Works
Solar electric generation (technically known as photovoltaic
power) is the technology of producing electricity directly
from sunlight. Your solar charging system is 100% "Solid
State" -- meaning that there are absolutely no moving parts
when solar charging occurs.
8
CUT
APPLICATION FOR OPTIONAL FOUR (4) YEAR
COMPRESSOR PARTS CONTRACT
(DOES NOT INCLUDE LABOR)
APPLICATION MUST BE MADE WITHIN 90 DAYS OF
PURCHASE DATE OF THE AIR CONDITIONER OR THE
RECREATIONAL VEHICLE IF THE AIR CONDITIONER IS
ORIGINAL EQUIPMENT.
Date of Purchase (Air Conditioner)
Air Conditioner Model Number
Air Conditioner Serial Number
Name of Purchaser
Address
City
State
Zip
BE SURE TO ENCLOSE A CHECK OR MONEY ORDER FOR $39.95
(US DOLLARS)
CUT
*This compressor replacement contract is not available (offered) for
compressors that are a component of Roughneck or Packaged off-roof
air conditioners.
MAKE CHECK PAYABLE:
RV PRODUCTS
A DIVISION OF AIRXCEL, INC.
CUSTOMER SERVICES DEPT. 546
P.O. BOX 4020
WICHITA, KS 67204
9
SECTION VII - WARRANTY SERVICE
The optional four year parts contract begins upon the
expiration of the initial warranty. Before applying,
carefully read the parts contract reproduced on
the back page of this manual.
Let's face it. Sometimes even the best products may need
service. If that's true of your RV Products air conditioner,
you can get service on your unit at most of the firms listed in
the Authorized Service Center List included with your
product. If you fail to receive your Service Center List or you
need to obtain qualified factory trained service, contact us at
the following address:
RV Products
A Division of Airxcel, Inc.
P.O. Box 4020
Wichita, KS 67204
3.
Any applications for the extended compressor parts
contract must be made within 90 days from the
purchase date of the air conditioner or the
recreational vehicle if the air conditioner is original
equipment.
4.
Inquiries to your RV Products Representative or
RV Products on this unit must include the units
model and serial number. The model number and
serial number can be found on the I.D. Label located
at the bottom of the roof unit, See Figure 6. Access
to this label is accomplished by lowering the ceiling
assembly. The rating plate can be read without
requiring the removal of any parts, See Figure 8. Use
only the roof unit model and serial numbers when
sending in the optional four year parts contract.
5.
Inquiries on the Ceiling Assembly should contain
the ceiling assembly part, serial or code date number.
This information can be found on the I.D. Label,
See Figure 6.
IMPORTANT
1.
Carefully read your limited one year product
warranty which is packed with the product.
2.
An optional limited four year parts contract on the
compressor ONLY is available at an additional
cost of $39.95. To obtain this optional four year
parts contract, fill out the application included in
this book and send it with a check or money order to:
RV Products
A Division of Airxcel, Inc.
Customer Services Dept. 546
P.O. Box 4020
Wichita, KS 67204
vIEW OF BOITOU OF
AIR CONDITIONER
ROOF UNIT
uODEL/SERIAL
NUUBER
LOCATION
FIGURE 6
10
r4nva
OPTIONAL FOUR YEAR COMPRESSOR
REPLACEMENT CONTRACT
RV Products
0 4 AIHXCEL,
NOT RENEWABLE
A/C MODEL NUMBER
CONTRACT #
RECREATIONAL VEHICLE AIR CONDITIONING COMPRESSORS
(OPTIONAL at ADDITIONAL COST)
A/C SERIAL NUMBER
EFFECTIVE COMPRESSOR CONTRACT DATE
NOT REFUNDABLE
SAMPLE
See Cut Out Application in This Publication
1. Upon receipt of the required fee, RV Products agrees to replace its RV Products recreational vehicle refrigerant compressors
for four years if defective in material and workmanship. This compressor replacement contract is in addition to the original oneyear warranty. The compressor replacement contract is transferable from owner to owner. This agreement must be purchased
within 90 days of the purchase of a new recreational vehicle or of a new air conditioner, if purchased separately from a
recreational vehicle. The consumer must establish these dates by copy of the sales receipt.
2. Any defective compressor will be replaced on an exchange basis when returned with transportation charges prepaid to RV
Products, 3050 N. St. Francis, Wichita, KS 67219. Compressors replaced under the term of the contract may contain
recycled parts. The replacement compressor will be shipped from Wichita, Kansas transportation charges prepaid. This
compressor contract does not cover any labor charges or other charges.
3. The compressor replacement contract duration shall be calculated as follows:
3.1 The contract duration on replacement compressors furnished under this compressor replacement cent act shall be for the
unexpired duration under this contract.
3.2 If the air conditioner is installed as original equipment in a recreational vehicle, the duration shall begin one (1) year from
the date of the original purchase of the recreational vehicle.
3.3 If the air conditioner is installed in a recreational vehicle previously purchased by the consumer, the duration shall begin
one (1) year from the date of the purchase of the air conditioner.
3.4 The consumer must establish these dates by presenting this certificate at the time the claim is made.
4. The consumer should proceed as follows to obtain contract performance:
4.1 Consult the Authorized Service Center List packed with the product or the yellow pages of the telephone book under Air
Conditioning Equipment for the name, address and telephone number of the nearest Authorized RV Products Service
Center. Schedule appointments for service assistance. It is the contracted consumer's responsibility to transport the air
conditioner to the servicers location. Collect service agreement calls will not be accepted by RV Products or field servicers.
EXCEPTIONS AND EXCLUSIONS
5. To the extent any or all of the following exclusions or any other provisions of this compressor replacement contract are prohibited
by any federal, state or municipal law, and cannot be preempted, they shall not be applicable.
5.1 THERE ARE NO OTHER COMPRESSOR REPLACEMENT CONTRACTS.
5.2 THIS COMPRESSOR REPLACEMENT CONTRACT DOES NOT COVER CONSEQUENTIAL DAMAGES, INCIDENTAL
DAMAGES OR INCIDENTAL EXPENSES, INCLUDING DAMAGE TO PROPERTY.
5.3 This compressor replacement contract applies only to products sold at retail in the United States or Canada.
5.4 This compressor replacement contract does not cover damages caused by mishandling, neglect, lightning, corrosive
atmosphere, improper installation, improper application or improper energy supply.
5.5 This compressor replacement contract does not cover damages caused by failure to perform normal and routine
maintenance as set out in the operation and maintenance instructions.
5.6 This compressor replacement contract does not cover damages or equipment failure caused by the use of non-RV
Products parts or components.
5.7 This compressor replacement contract shall not apply if the nameplate is removed or defaced.
5.8 This compressor replacement contract shall not apply if the vehicle on which the air conditioner is installed for maritime
activities.
5.9 This compressor replacement contract shall not apply if the vehicle on which the air conditioner is installed is used for
commercial purposes involving off highway travel.
5.10 This compressor replacement contract shall not apply if the air conditioner is installed on a semi-tractor and/or trailer.
5.11 This compressor replacement contract is not available (offered) for compressors that are a component of Roughneck or
Packaged off-roof air conditioners.
RV Products
A Division of Airxcel, Inc.
Customer Service Dept. 546
P.O. Box 4020
Wichita, KS 67204
1970K635 (9-98) PP
Ifc
NRVP
RV Products
A Division of AIRXCEL, Inc.
RV Products
A Division of Airxcel, Inc.
P.O. Box 4020
Wichita, KS 67204