1
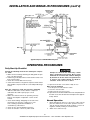
TROUBLESHOOTING GUIDE
PERFORMING REPAIRS MAY EXPOSE VOLTAGE SOURCES, MOVING PARTS OR COMPRESSED
AIR SOURCES. PERSONAL INJURY MAY OCCUR. PRIOR TO ATTEMPTING ANY REPAIRS,
UNPLUG THE COMPRESSOR AND BLEED OFF ALL TANK AIR PRESSURE.
PROBLEM
CAUSE
CORRECTION
Excessive tank pressure - safety valve
pops off.
Pressure switch does not shut off motor
when compressor reaches “cut-out” pressure.
Move the pressure switch lever to the “OFF”
position. If the outfit doesn’t shut off, and
the electrical contacts are welded together, replace the pressure switch.
Pressure switch “cut-out” too high.
Return the outfit to an Authorized Warranty
Service Center to check, remove or replace switch.
Air leaks at fittings.
Tube fittings are not tight enough.
Tighten fittings where air can be heard
escaping. Check fittings with soapy water
solution. DO NOT OVER-TIGHTEN.
Defective or dirty check valve.
Air leaks at or inside check valve.
A defective check valve results in a constant air leak at the pressure release valve
when there is pressure in the tank and the
compressor is shut off. Remove and clean
or replace check valve. DO NOT OVERTIGHTEN. (See page 11)
Air leaks continously at pressure switch
release valve.
Defective pressure switch release valve.
Remove and replace the release valve.
Defective check valve.
A defective check valve results in a constant air leak at the pressure release valve
when there is pressure in the tank and the
compressor is shut off. Remove and clean
or replace check valve. DO NOT OVERTIGHTEN. (See page 11)
Air leaks in air tank or at air tank welds.
Defective air tank.
Air tank must be replaced. Do not repair the
leak.
DO NOT DRILL INTO, WELD OR OTHERWISE MODIFY AIR TANK OR IT
WILL WEAKEN. THE TANK CAN RUPTURE OR EXPLODE.
Air leak from safety valve.
Possible defect in safety valve.
Operate safety valve manually by pulling on
ring. If valve still leaks, it must be replaced
with a valve of the same rating.
Knocking noise.
Restricted or defective check valve.
Remove and clean or replace.
Loose pulley.
Tighten pulley set screw, 70-80 in.-lbs.
Low oil level.
Maintain prescribed oil level. Add oil.
Loose flywheel.
Tighten screw 15-20 ft. lbs.
Loose compressor mounting screws.
Check screws. Tighten as required. (15-20
ft.-lbs.)
Loose belt.
See "Adjusting Belt Tension" on page 12.
Carbon build-up.
Remove the head and valve plate. Clean
the valve plate and top of the piston. (Be
sure carbon does not fall into the cylinder.)
Reassemble to 25-30 ft. lbs. using new
gasket and torque screws.
Belt too tight.
Adjust belt tension (See page 12).
13
Available from Allparts Equipment and Accessories - 1-877-475-5660 - www.allpartsinc.com