1
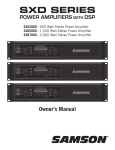
SXD3000 - 900 Watt Stereo Power Amplifier
SXD5000 - 1,500 Watt Stereo Power Amplifier
SXD7000 - 2,000 Watt Stereo Power Amplifier
Owner's Manual
Important Safety Information
CAUTION: TO REDUCE THE RISK OF ELECTRIC SHOCK, DO NOT REMOVE COVER (OR BACK). NO
USER-SERVICEABLE PARTS INSIDE. REFER SERVICING TO QUALIFIED SERVICE PERSONNEL.
AVIS
RISQUE DE CHOC ÉLECTRONIQUE NE PAS OUVRIR
This lightning flash with arrowhead symbol within an equilateral triangle is intended to alert
the user to the presence of non-insulated “dangerous voltage” within the product’s enclosure
that may be of sufficient magnitude to constitute a risk of electric shock.
The exclamation point within an equilateral triangle is intended to alert the user to the presence of important operating and maintenance instructions in the literature accompanying
the appliance.
1.
2.
3.
4.
5.
Read these instructions.
Keep these instructions.
Heed all warnings.
Follow all instructions.
This apparatus shall not be exposed to dripping or splashing liquid and no object filled with liquid, such as a vase,
should be placed on the apparatus.
6. Clean only with a dry cloth.
7. Do not block any of the ventilation openings. Install in accordance with the manufacturer's instructions.
8. Do not install near any heat sources such as radiators, heat registers, stoves, or other apparatuses (including amplifiers)
that produce heat.
9. Only use attachments/accessories specified by the manufacturer.
10.Unplug this apparatus during lightning storms or when not in use for long periods of time.
11.Do not override the intended purpose of the polarized or grounding-type plug. A polarized plug has two blades, with
one wider than the other. A grounding-type plug has two blades and a third grounding prong. The wide blade, or third
prong, is provided for your safety. If the provided plug does not fit your outlet, consult an electrician to replace the
obsolete outlet.
12.Protect the power cord from being walked on or pinched, particularly at the prongs, convenience receptacles, the point
where they exit from the apparatus.
13.Use only with the cart stand, tripod bracket, or table specified by the manufacture, or sold with the apparatus. When a cart is used, utilize caution when moving the cart/apparatus combination to avoid injury
from tip-over.
14.Refer all servicing to qualified service personnel. Servicing is required if the apparatus has been damaged in any way, such as power-supply cord or plug breakage, damage due to liquid or objects falling
onto the apparatus, exposure to rain or moisture, or if the apparatus does not operate normally, or has been dropped.
15.MAINS DISCONNECT: The plug should remain readily operable. For rack-mount or installation where plug is not accessible, an all-pole mains switch with a contact separation of at least 3 mm in each pole shall be incorporated into the
electrical installation of the rack or building.
16.FOR UNITS EQUIPPED WITH EXTERNALLY ACCESSIBLE FUSE RECEPTACLE: Replace fuse with same type and
rating only.
17.MULTIPLE-INPUT VOLTAGE: This equipment may require the use of a different line cord, attachment plug, or both,
depending on the available power source at installation. Connect this equipment only to the power source indicated on
the equipment rear panel. To reduce the risk of fire or electric shock, refer servicing to qualified service personnel or
equivalent.
If you want to dispose this product, do not mix it with general household
waste. There is a separate collection system for used electronic products
in accordance with legislation that requires proper treatment, recovery
and recycling.
Private household in the 28 member states of the EU, in Switzerland and Norway
may return their used electronic products free of charge to designated collection
facilities or to a retailer (if you purchase a similar new one).
For Countries not mentioned above, please contact your local authorities for a
correct method of disposal.
By doing so you will ensure that your disposed product undergoes the necessary
treatment, recovery and recycling and thus prevent potential negative effects on
the environment and human health.
THIS DEVICE COMPLIES WITH PART 15 OF THE FCC RULES
CLASS B. OPERATION IS SUBJECT TO THE FOLLOWING TWO
CONDITIONS:
(1) THIS DEVICE MUST NOT CAUSE HARMFUL
INTERFERENCE, AND
(2) THIS DEVICE MUST ACCEPT ANY INTERFERENCE
RECEIVED INCLUDING INTERFERENCE THAT MAY CAUSE
UNDESIRED OPERATION. SUITABLE FOR HOME OR OFFICE
USE. Table of Contents
Introduction . . . . . . . . . . . . . . . . . . . . . . . . . . . . . . . . . . 4
Getting Started with the SXD Power Amplifier . . . . . . . . . . . . . . . . . . 6
Front Panel Callouts . . . . . . . . . . . . . . . . . . . . . . . . . . . . . . 7
Rear Callouts . . . . . . . . . . . . . . . . . . . . . . . . . . . . . . . . . 8
Getting Started - DSP . . . . . . . . . . . . . . . . . . . . . . . . . . . . . 9
Presets . . . . . . . . . . . . . . . . . . . . . . . . . . . . . . . . . . . . 11
System Setup Examples . . . . . . . . . . . . . . . . . . . . . . . . . . . . 12
Wiring Guide . . . . . . . . . . . . . . . . . . . . . . . . . . . . . . . . . 14
Specifications . . . . . . . . . . . . . . . . . . . . . . . . . . . . . . . . . 15
Copyright 2014
v1
Samson Technologies Corp.
45 Gilpin Avenue
Hauppauge, New York 11788-8816
Phone: 1-800-3-SAMSON (1-800-372-6766)
Fax: 631-784-2201
www.samsontech.com
SXD Series Power Amplifiers with DSP
3
Introduction
The Samson SXD Series stereo power amplifiers have been designed to provide robust, clean output with low distortion and
wide dynamic range, along with the dependability demanded by professional front-of-house engineers and installers.
The convenient two rack-space design is compact, and yet there’s plenty of power available, with 2 x 450 Watts at 4Ω for
the SXD3000, 2 x 750 Watts at 4Ω for the SXD5000, and 2 x 1000 Watts at 4Ω for the SXD7000 over the full frequency
spectrum, from 20 Hz to 20 kHz.
The SXD has a full-featured DSP and front panel LCD display with settings for high- and low-pass filters, three-band equalizer, output limiter, delay time for speaker alignment, and digital pass-code security lock to ensure settings are not changed
accidentally. There are also four presets designed for typical speaker configurations. These presets will allow you to quickly
get up and running with your system by displaying the parameters that are essential to the speaker arrangement.
Input connections are made via both balanced XLR and balanced ¼” TRS connections. For the outputs, the SXD Series
provides standard binding posts as well as a Speakon® connectors. To help you set the correct operating levels, the SXD
amplifiers include front panel Signal, Output Level, Limiter and Protection LED indicators.
Like all Samson power amplifiers, the SXD Series' internal electronics are based around a serious power-core, with oversized toroidal transformers and large heat sinks. To keep the SXD amplifiers running cool, the design employs forced-air
cooling via a temperature-sensitive, variable speed fan, which greatly reduces the chance of thermal and overheating problems. Multi-stage protection for power-up, over-heating, over-current, short circuit, low output impedance and DC voltage,
assures high reliability under the most demanding situations.
The SXD amps are designed for the rigors of either portable PA system or a fixed installation system with all-steel chassis,
19-inch rack mount design, and convenient carry handles.
Optimized for live sound venues, houses of worship, commercial installations, and for driving live PA systems, the SXD
amplifiers will deliver reliable power from gig-to-gig and venue-to-venue. In the following pages, you’ll find a detailed
description of the many features of the SXD Series power amplifier, as well as a guided tour through its front and rear panels, step-by-step instructions for its setup and use, and full specifications.
We recommend you keep the following records for reference, as well as a copy of your sales receipt.
Serial number: ____________________________________________
Date of purchase: __________________________________________
Dealer name: _____________________________________________
With proper care and maintenance, your SXD amplifier will operate trouble-free for many years. Should your speaker ever
require servicing, a Return Authorization (RA) number must be obtained before shipping your unit to Samson. Without this
number, the unit will not be accepted. Please call Samson at 1-800-3SAMSON (1-800-372-6766) for an RA number prior
to shipping your unit. Please retain the original packing materials and, if possible, return the unit in its original carton.
If your SXD amplifier was purchased outside of the United States, contact your local distributor for warranty details and
service information.
4
Features
• High power for performance and installation speaker configurations:
SXD30002 x 300 Watts at 8Ω and 2 x 450 Watts at 4Ω
SXD50002 x 400 Watts at 8Ω and 2 x 750 Watts at 4Ω
SXD70002 x 550 Watts at 8Ω and 2 x 1000 Watts at 4Ω • High performance DSP technology offers complete control over many performance features
• Digital Security Lock prevents unwanted changes to the DSP settings
• Front panel LCD for navigating DSP settings, including Filters, EQ, Limiter, Delay, and more
• Clean, crisp sound, 0.02% THD, dynamic range of 100 dB, and frequency response of 20 Hz to 20 kHz, guarantee
ultra-clean sound quality
• Independent level controls for each channel allow precision adjustments
• LED signal indicators for each channel continuously display input signals and output levels
• Temperature-sensitive, variable speed fan provides reliable performance without thermal and overheating problems
• Protection relay circuitry that guards against overheating or faulty wiring conditions and also prevents “thumps” when
powering on or off
• Input connectors for each channel accommodate both balanced XLR or balanced ¼-inch TRS plugs
• Output connections are made via binding posts and Speakon® connectors
• The SXD Series can be mounted in any standard 19” rack, making it easy to integrate the amp into any fixed or traveling PA rig
• Rugged construction makes the SXD Series completely roadworthy
SXD Series Power Amplifiers with DSP
5
Getting Started with the SXD Power Amplifier
Setting up your SXD Series is a simple procedure which takes only a few minutes:
Remove all packing materials (save them in case your units needs future service) and decide where the amplifier is to be
physically placed—it can be used free-standing or mounted in a standard 19” rack, requiring two rack spaces. When installed, make sure that both the front and rear panels are unobstructed and that there is good ventilation around the entire
unit.
E S E
E S S
T O
R
T
P
R
Make the speaker connections, using the binding posts, or Speakon® output connectors
on the rear panel. It is never a good idea to power up any amplifier that is not connected to
loudspeakers.
E S E
E S S
T O
R
T
P
R
Next, make the signal input connections, using the input connectors on the rear panel (if
operating the SXD Series in Ch A Parallel mode, use the Ch A input only). If your mixer has
balanced outputs, we recommend the use of three-conductor cabling and connectors.
On the front panel of the SXD Series, turn both Channel level controls fully counterclockwise (to their “MIN” setting). Then
connect the supplied heavy-gauge 3-pin “IEC” cable to the rear panel IEC connector and to any grounded AC socket.
Turn the Power switch ON.
E S S
T O
R
6
E S E
Apply an input signal to the SXD Series at or about +4dBu
(if sending signal from a mixer, drive the output meters at
approximately 0 vu). While the input signal is present, slowly
raise the Channel level controls until the desired sound level
is achieved. The SIGNAL and Limiter LED indicators next to
each Channel input control will show you the continuous power
output of the SXD Series as signal is being passed. For the
best signal-to-noise ratio, the SXD Series should normally be
run with the Channel Input controls at or near maximum (fully
clockwise, at the “MAX” position) and the LIMITER segments
should light occasionally (but not frequently) during peak
levels. If you are using a mixer that has a master output level
control, use it to attenuate the signal as necessary to achieve
the desired speaker level.
T
P
R
Front Panel Callouts
LCD Display
Backlit display shows current
setup information and navigation
through the DSP settings
LED Indicators
The front panel LED indicators continuously monitor the
power output level for the corresponding channel.
THERMAL: L
ights red whenever the thermal protection is
activated
LIMITER: L
ights red whenever the output limiter is activated
-20/-10: L
ights whenever the output level reaches -20dB or
-10dB, respectively, below the distortion or clipping
SIGNAL: Lights whenever input signal is present
Power Switch
Use this to power the
SXD Series on or off
E S S
T O
SXD Series Power Amplifiers with DSP
EDIT Knob/Button
Use this knob/button
to adjust and save
parameters in the DSP
E S E
Rack Ears
Mounts into a standard
19-inch rack
Channel Level Controls
Two detent controls to precisely
adjust the output level of each
channel
R
UP/DOWN/BACK Buttons
Use these buttons to
navigate through the
DSP functions
T
P
R
Handles
Two steel handles located conveniently
on the left and right side of the front
panel for easy transport or installation
7
Rear Callouts
Circuit Breaker
This circuit breaker will trip if there is a
fault with the mains voltage or if maximum
output is overloaded for an period. Push it
in to restart the amplifier after a short rest
period.
Exhaust Fan
This variable-speed fan provides cooling to amplifier. Make sure that both
the front and rear panels are kept
free of all obstructions and that cool,
fresh air is accessible at all times.
Speakon® Output Connectors
Use these to connect each channel of the
amplifier to 4- or 8-ohm loudspeakers
E S E
E S S
T O
R
T
Input Connectors
Connect incoming signals to these electronically balanced connectors, using either XLR or ¼”
TRS (Tip/Ring/Sleeve) plugs. The amplifier accepts
input levels of any strength but needs at least +4
dBu to achieve maximum power. The inputs are
wired in parallel, so they can be used to daisy chain
out of each channel to a second power amplifier.
8
P
R
AC Input - Connect
the supplied heavygauge 3-pin “IEC”
power cable here
Binding Post
Use these to connect each channel of the
amplifier to 4- or 8-ohm loudspeakers. Be
sure to connect the loudspeaker correctly,
with the red (+) terminal normally connected
to the positive input of the speaker and the
black (ground) terminal normally connected to
the negative input of the speaker.
Getting Started - DSP
The SXD power amplifier features sophisticated high-performance DSP with control for the input and output routing, filter
network, EQ, limiter, and time alignment delay. Follow these steps to navigate through the SXD internal DSP settings:
1. Turn the SXD power ON. The startup screen will be displayed (figure 1).
Samson
SXD7000
2. Press the UP & DOWN buttons to step through the DSP parameters (figure 2).
figure 1
3. Rotate the EDIT knob to adjust settings. A box will flash in the upper right corner when a setting has been changed (figure 3).
figure 2
4. Press the EDIT button to confirm and set the changes. Press any other button to cancel the
adjustment.
I/O
Parallel A link
5. Press the BACK button to exit out of a parameter and return to the top level of the menu.
figure 3
DSP Flowchart
PRESET
I/O
FILTER
A
A
B
B
GAIN OFFSET
EQ
LIMITER
DELAY
SETUP
DSP Settings
Preset - Choose either Manual Mode, which provides access to the full set of adjustable parameters, or from the four speaker presets: 2 full range, Mono 2-way, Sub/Sat, or 2 subs.
I/O - The I/O screen adjusts the settings for how the inputs will be routed through the DSP to the output connectors.
Stereo: Ch A Input -> Ch A Output & Ch B Input -> Ch B Output
Mono A+B dual: Ch A and Ch B inputs are mixed together, each level control adjusts the corresponding output level
Mono A+B link: Ch A and Ch B inputs are mixed together, Ch A level control adjusts both Ch A and Ch B output levels
Parallel A dual: Ch A input is sent to both Ch A and Ch B outputs, each level control adjust the corresponding output level
Parallel A link: Ch A input is sent to both Ch A and Ch B outputs, CH A level control adjusts the output level for both channels.
Filter (Manual mode) - The filter section allows you to build you own crossover or add speaker protection by stetting the
filters to remove the upper and lower limits of the audio bandwidth.
Filter Ch A - Press the Edit button to enter the filter parameters for channel A.
Filter Ch B - Press the Edit button to enter the filter parameters for channel B. If the Ch A filter is On, then the Ch B filter
can be set to the same settings by choosing A=B
LPF Freq - Rotate the EDIT knob to adjust the low pass filter frequency.
LPF Slope - Rotate the EDIT knob to adjust the filter type and slope roll off in dB per octave.
HPF Freq - Rotate the EDIT knob to adjust the high pass filter frequency.
HPF Slope - Rotate the EDIT knob to adjust the filter type and slope roll off in dB per octave.
X-Over (speaker preset) - When using a speaker preset, the filters are already configured for a crossover. This allows you to
easily set the crossover frequency for your speaker configuration.
Gain Offset (Manual mode) - This adjustment allows you to set an overall balance between the outputs of the amplifier. This
allows you to match the difference of output level of the speakers in a system without needing to constantly adjust the front
panel level controls.
SXD Series Power Amplifiers with DSP
9
Getting Started - DSP
EQ - In Manual mode there are three EQ filters per channel. The Low frequency adjustment can be set to a Low Frequency
Shelf or to a parametric equalizer (PEQ) with Frequency, Q, and Gain adjustments. The mid band is a parametric equalizer (PEQ) with Frequency, Q, and Gain adjustments. The high frequency band can be set to a High Frequency shelf or to
a parametric (PEQ) band. Press the Edit button to enter the EQ parameters. If Ch A EQ is set ON, Ch B can be set to the
same settings by choosing A=B. If using a speaker preset, the SXD offers seven EQ preset frequency curves to match your
performance setting: DJ, Vocal, Live Sound, Install, Rock, Dance, Jazz.
Limiter - The limiter provides additional protection to your speakers from overload. Press the EDIT button to adjust. The
Limiter can be set to -1dB, -3dB, and -9dB.
Delay - The delay time can be used to align speakers in a system. This is useful when using a subwoofer and satellite
speaker for front of house to ensure the speakers are in phase for optimal performance. Click the Edit button to adjust. The
Delay settings are displayed in milliseconds, inches/feet, and centimeters/meters.
Setup - In the Setup mode the amplifier can be locked and the user can create a four-digit code so settings are not accidentally changed. Click to set Lock Code. Rotate the EDIT knob to adjust the code number, and press the DOWN and UP
buttons to move through each digit. Click the EDIT button to set the lock code.
Factory Reset - This sets all parameters and presets back to the original factory default settings.
10
Presets
The SXD DSP features four speaker presets that will allow you to quickly have your amplifier up and running with your
speaker configuration. The presets only display the parameters that are essential to the speaker arrangement. If you require
additional adjustments, all parameter adjustments are available in Manual mode. Below are typical wiring configurations for
the four presets.
Mono 2-way (Input Mono A+B link)
E S S
E S S
T O
T
R
P
R
R
2 subs (Input Mono A+B Dual)
E S S
T O
E S S
R
R
T O
P
E S E
R
E S E
T
SXD Series Power Amplifiers with DSP
R
Sub/Sat
P
E S E
E S E
T
T O
2 full range
T
P
R
11
System Setup Examples
Typical SXD amplifier and speaker configurations for each Input and Output (I/O) setting in the DSP
Stereo Input: Stereo Full Range Speakers
Ch A level control adjusts Ch 1 Output
Ch B level control adjusts Ch 2 Output
E S S
T O
R
E S E
T
P
R
Mono A+B Dual: Subwoofer and Satellite
Ch A level control adjusts Ch 1 Output
Ch B level control adjusts Ch 2 Output
E S S
T O
R
E S E
T
P
R
Mono A+B Link: Subwoofer and Satellite
Ch A level control adjusts Ch 1 and Ch 2 Output
E S S
T O
R
E S E
T
12
P
R
System Setup Examples
Parallel A Link: Mono 2-Way Cabinet
Ch A level control adjusts Ch 1 and Ch 2 Output
HF
T O
E S S
R
E S E
T
P
R
LF
Parallel A Dual: Subwoofer and Satellite
Ch A level control adjusts Ch 1 Output
Ch B level control adjusts Ch 2 Output
E S S
T O
R
E S E
T
SXD Series Power Amplifiers with DSP
P
R
13
Wiring Guide
Unbalanced ¼” Connector
Signal
Signal
Ground
Ground
Balanced TRS ¼” Connector
XLR Balanced Connector
Sleeve (ground)
-Signal (tip)
Tip (-signal)
Ring (+signal)
+Signal (tip)
+Signal (tip)
-Signal (ring) Ground
Ground
Common (ground)
Common (1)
(ground)
+Hot
Tip (signal)
Sleeve (ground)
+Hot (2)
Solder Points End View
Female XLR
-Cold
Tip (signal)
-Cold (3)
Common (1)
(ground)
+Hot (2)
Common (ground) Tip
+Hot
(signal)
Tip (signal)
End View Solder Points
-Cold (3)
RCA Connector
Sleeve (ground)
Sleeve (ground)
Tip (signal)
Tip (signal)
Tip (signal)
Sleeve (ground)
Sleeve (ground)
2
1 2
3
3
Tip (signal)
1
Cold (Pin 3)
(no connection)
End View Solder Points
Cold (3)
Male XLR
2
3
Sleeve (ground)
Sleeve (ground)
Tip (signal)
Hot (2) Common (1)
Speakon® Wiring Guide
1 2
3
Sleeve (ground)
Tip (signal)
Hot (2) Common (1)
Tip (signal)
1
Cold (Pin 3)
(no connection)
End View Solder Points
Cold (3)
Male XLR
1- 1+
2+ 2-
Not Connected
14
-Cold
Male XLR
Sleeve (ground)
Sleeve (ground)
Sleeve (ground)
Specifications
Model
SXD3000
SXD5000
SXD7000
8 ohms
300W
500W
700W
4 ohms
450W
750W
1000W
Rated Output Power
Stereo both channel driven
Signal to Noise Ratio (20Hz-20k)
100dB
Distortion (SMPTE-IM)
0.02%
Input sensitivity @8ohms Voltage Gain
Voltage Gain
Output Circuitry
5dBu
30dB
32dB
34dB
AB
2-Tier Class H
2-Tier Class H
Current Consumption (115VAC)
@1/8 rated power 4ohms
4.5A
3.8A
5.5A
@1/3 rated power 4ohms
7.2A
10A
9.2A
@ rated power 4ohms, max.
10A
13.6A
16A
0.02%
0.02%
0.02%
1%
1%
1%
Distortion (typical @4 ohms)
20Hz-20kHz,10dB below rated power
IkHz,rated power
Frequency Response @8ohms 1Watt
0/-1dB: 20Hz-20kHz
Damping Factor (400Hz)
120
Input Impedance
20K ohm (balanced)
Input Clipping
10Vrms (22dBu)
Cooling
Continuously variable speed fan cooling
Connectors (each channel)
Inputs
3-pin XLR and ¼” TRS, balanced
Outputs
Controls
Binding post and Speakon®
Power switch, CH A & CH B volume
DSP Controls: UP, DOWN, BACK buttons & EDIT encoder/button
Indicators
Signal, -20dB, -10dB, Limit, Thermal
Protection
Short Circuit, Open Circuit, Thermal, RF protection Load protected
against DC faults
Display
2x16 Character LCD
Modes
Manual mode, 2 Full Range, Mono 2-Way, Sub/Sat, 2 Subs
I/O Settings
DSP
Digital Dynamics function
Stereo, Mono A+B Dual, Mono A+B Link, Parallel A Dual, Parallel
A Link
Filter, Crossover, Gain Offset, EQ, Limiter
Digital Delay Function
Digital EQ function per channel
Setup
Dimensions (LxWxH)
Net Weight
SXD Series Power Amplifiers with DSP
Max 20ms per channel
f0: 1/12 Octave at 20~20kHz, Gain: +/- 12dB, Q: 0.5~5.0
Presets: DJ, Vocal, Live Sound, Install, Rock, Dance and Jazz
Lock Controls with Code, Factory Reset
19” x 13” x 3.5” (482mm x 330mm x 88mm)
26.4lbs / 12kg
28.6lbs / 13kg
33lb / 15kg
15
Samson Technologies Corp.
45 Gilpin Avenue
Hauppauge, New York 11788-8816
Phone: 1-800-3-SAMSON (1-800-372-6766)
Fax: 631-784-2201
www.samsontech.com