1
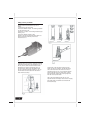
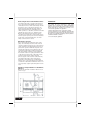
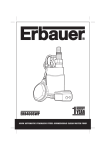
77014 / 65041
Submersible Water Pumps
Automatic
Users Manual
Carefully read this entire Instruction Manual before using this product
IURQWFRYHU
Please read these operating instructions carefully and ensure they are strictly
followed. Please retain these instructions for future reference.
77014
Plastic Clean Water - Automatic
65041
Plastic Dirty Water - Automatic
PRODUCT DESCRIPTION
PRODUCT DESCRIPTION
1.
2.
3.
4.
5.
6.
1.
2.
3.
4.
5.
6.
Electrical cable
Handle
Bracket for float switch
Universal connecting piece
Float switch
Intake port
TECHNICAL INFORMATION
Electrical cable
Handle
Bracket for float switch
Universal connecting piece
Float switch
Intake port
TECHNICAL INFORMATION
Nominal power:
Rated voltage /frequency:
Max. pumping height:
Max. flow rate:
Max. particle size:
Max. immersion depth:
Max. pumping pressure:
Cable 10 m H05RN-F 3 Gx:
Dia pump connecting pieces:
400 W
240V - 50Hz
8m
9,000 l/h
5 mm
5m
0.8 bar
0.75 mm 2
1” & 1 1/4 ”
Nominal power:
Rated voltage /frequency:
Max. pumping height:
Max. flow rate:
Max. particle size:
Max. immersion depth:
Max. pumping pressure:
Cable 10 m H05RN-F 3 Gx:
Dia pump connecting pieces:
400 W
240V - 50Hz
6m
9,000 l/h
30 mm
5m
0.6 bar
0.75 mm 2
1” & 1 1/4 ”
2
1
3
4
5
6
77014
Plastic Dirty Water - Automatic
Plastic Clean Water - Automatic
2
1
2
3
4
5
6
65041
SAFTEY INSTRUCTIONS
Please note: Before assembling and putting the
pump into operation, in all cases read through the
operating manual. For safety reasons, those persons
who have not read through the operating manual
may not use the pump. The pump is intended for use
ONLY by adults who have fully read and understand
these instructions. Whenever Water and Electric are
in the same place there are risks of electrocution and
serious injury or death. Always disconnect the pump
RCCB from the mains before placing your hand in the
water to service maintain or clean the pump. The
pump is ONLY intended for use with water or water
based (aqueous solutions ) which have a content of
at least 90% water. DO NOT use this pump for
flammable, toxic , corrosive or irritant fluids.
a) The user is responsible towards third parties
with regard to the use of the pump
(water installations, etc.)
b) Only operate on connections with residual
current circuit breakers! Your pump is fitted
with an RCCB as standard. If removed for pump
installation, it must be replaced before the pump
is switched on.
c) Before putting into operation, a qualified
electrician must check that the required electrical
safety measures are place.
d) The electrical connection is to be made via an
electrical socket.
e) Check the voltage. The specified technical
information on the label must correspond to the
voltage of the electrical equipment.
f) During the operation of the pump, persons may
not remain in the pumped medium.
g) The temperature of the fluid to be pumped
may not exceed 35?. In the event that extension
cables are used, they must be exclusively made
out of rubber, type H07 RN-F, and in compliance
with norm DIN 57282 or DIN 57245. Never
handle, lift or carry the pump connected to
electrical power by the cord. Make sure that
the connection power outlet is kept away from
water and moisture and that the power plug is
protected from moisture.
h) Before putting the pump into operation, check
that the electrical cord and electrical residual
current circuit breaker are not damaged.
i) Always pull out the residual current circuit
breaker from the electrical socket before
performing work on the pump.
j) In the event that the pump is to be installed in
a storm drain, one must subsequently close the
storm drain with a cover in order to safeguard
the safety of pedestrians.
k) Reinforce the mounting of the discharge pipe
with the use of a pipe clip. Adhere to the
maximum immersion depth (See: Technical
Information). The owner (user)of the pump has
the duty to take precautionary measures
(installation of an alarm device, back-up pump,
etc.)for the avoidance and prevention of potential
damages (such as flooded rooms, etc.) due to
faulty pump operation (because of breakdowns
or defects).On sandy or silty ground it is
necessary to let the pump run hanging by a
rope or chain or to situate the pump on a suitable
base in order to prevent the sinking of the intake
section.
l) In the event that the pump is damaged, the
repair should only be made by an
authorised service agent. Only original
replacement parts must be used.
m) The failure to correctly use, clean and maintain
the pump or to modify the pump or its
accessories in any way other than that described
in these instructions will prevent use for
accepting any responsiblity for damages , loss or
injury. The following illustrate some of the cases
where claims be refused :• Inappropriate repairs not made by an authorised
agents service agent
• Use of other than original replacement parts.
n) The connecting cable of this device may not be
replaced. In the event of damage to the cable,
the device should be scrapped.
o) Note this product has internal lubricant which
may escape contaminating the water ,
consequently the pump is not suitable for ponds
with fish or other aquatic organisms In addition
the pump can only be used to with water that is
NOT for drinking at a later date
p) The pump must always be powered via a
residual-current-operated protective device
(RCCB) with a rated current of not more than
30 mA.
The same rules apply for the accessories.
ELECTRICAL SAFETY
Connection to the electrical socket. The pumps may
only be connected to electrical sockets, which are
equipped with a residual current circuit breakers
and earthing in working order for safety, your pump
is fitted with an RCCB. The pump is put into operation
by inserting the power plug into an appropriate
electrical socket.
3
Safety point for your RCCB
Please test the instrument before you use it
Notice:
1.Insert the plug into the socket
2.Press the “RESET” button. The working indication
on light will become red.
3.Press the “T” button. The working indication light
should go out.
4.Press the “RESET” button to start.
Please do not use this instrument when there is a
fault in the above-mentioned process test.
Test before use it.
PUTTING THE PUMP INTO OPERATION
Attach the hose (Fig. C and D). Screw the provided
accessories onto the pump as illustrated in Fig. A.
32 mm, 25 mm, 19mm and 13mm hoses can be
attached to the universal connecting piece (4).
The 19mm and 13mm hoses are attached with
the use of special connecting pieces (Fig. C). It is
recommended to secure the 32 mm and 25 mm
hoses with hose clamps.
Components of the universal connecting piece,
which you need (for example, with 32 mm hoses),
can be removed with a knife from the universal
connecting piece (Fig .D). You will achieve optimal
results with a 32 mm hose. Please note: A spiral
hose significantly impairs the pumping height and
flow rate. Use only flat hoses!
The on and off switching levels can vary. The
specified values are average values and do not apply
if the float switch is not affixed to the bracket for
the float switch (3) .
4
UTILISATION / RANGE OF APPLICATIONS
Electric submersible pumps are used in the following
areas:
Draining of cisterns, rainwater reservoirs, wells,
ponds, swimming pools and storm drains.
Draining of flooded cellars, boats and yachts.
For aeration and water circulation.
Please Note:
Special Instructions:
Avoid the intake of larger stones!
maximum percentage of 5% solid materials for dirty
water pump.
Basically, all other fluids are not permitted. Not
suitable for biological wastewater treatment plants
and cesspools.
No flammable fluids, gaseous or explosive
substances may be pumped using these pumps.
The maximum temperature of pumped fluids
may not exceed 35°C in continuous operation.
The pump is supplied complete with a H05 RN-F
electrical cable with a RCCB and 11/4 fitting
for 32mm hose. Attach the necessary discharge
pipe and reinforce the seal with a pipe clip. Water
flow, among other things, also depends on
the diameter of the discharge pipe. A large diameter
means a greater flow rate, while a smaller diameter
has a lower flow rate as a consequence. Immerse
the pump in the fluid to be pumped out (Check the
maximum discharge head.)
Please Note! Prevent the Pump from Dry Running.
The pump is put into operation when the RCCB
is plugged in and switched on. Note if using any
external 3 pin plug socket ensure that when the
RCCB is fitted the socket is still weather proof. In
the event that the pump is lifted or handled, this
must be done by the attached handle, not by the
connecting cable. In the event that the pump is
submerged, if necessary, a rope or something similar,
which is tied to the handle, must be used.
On silty, sandy or pebbly ground, the pump run
must be hung by a rope or chain or situated on a
suitably wide base plate in order to allow it to work
submerged. Sand and other abrasive substances
reduce the service life of the components as well
as the pump gaskets and should therefore be
avoided. In freezing temperatures, the pumped
liquid should be removed from the pump.
Exposure of the pump to the risk of freezing must
be avoided in all cases. The pump must be drained
and be taken to a place protected against freezing
temperatures. In order to make the draining of the
pump easier, it is recommended to let the air
escape by submerging the pump with the outlet
connections directed upwards.
Note: Please put the pump into the water at an
angle so that the air at the bottom of the pump
can escape.
Setting of the On / Off Switching Points:
The on or off switching point of the float switch can
be set by means of a change of the float switch in
the float switch fixing / pivot point. Please, check
the following before putting it into operation:
The float switch must be attached in such a
way that the ON and OFF switching point levels
can be reached with little expenditure of energy.
Check this by putting the pump in a tank filled
with water and carefully lifting the float switch
by hand and then letting it sink. In this way,
you can see whether the pump switches itself
on and off.
Make sure that the space between the float
switch head and float switch fixing / pivot point
is not too small. In the event of too small a
space, faultless functioning is not ensured.
When setting the float switch, make sure that
the float switch does not touch the bottom before
the pump is switched off. Please note! Risk of
dry running.
5
Overloading Protection / Thermal Motor Switch
The submersible pump is equipped with a thermal
motor switch. In the event that the motor becomes
overheated, the motor switch automatically switches
the pump off. The cooling period amounts to 25
minutes and subsequently, the pump switches on
again automatically. In the event that the motor
switch operates, it is absolutely essential to find and
eliminate the cause (Also see; Troubleshooting
Guide). The information given here may not be
considered as instructions for “home-made” repairs
because repairs require specific technical expertise.
In the event of potential malfunctions, one must
always contact customer service.
Maintenance and Care
Before performing any maintenance work on the
pump, one must always disconnect the electrical
connection (pull the power plug out of the electrical
outlet.) and make sure that that the pump does not
put itself into operation. With the exception of the
following described cases, the pump must be sent
to authorised agent when it requires repair. Sand
and other abrasive substances cause premature
wear and the reduction of pump performance. Work
on the electrical components of the pump may be
performed exclusively by authorised agent
(this also applies to the electrical cable and float).
The submersible pumps require praclically no
maintenance. The bearings are self-lubricating
bearings. The occasional cleaning of the filter base
is sufficient so that further maintenance work is not
necessary. Only original replacement parts must be
used.
Example of a Pump Installation in a Storm Drain,
See Fig. 2.
Observe the minimum installation dimensions as
given in Fig.2.
6
GUARANTEE
This product has been constructed to high quality
standards and is guaranteed for against manufacturing
faults for a period of 12 months from the data of purchase.
Normal wear and tear, including accessory wear, is not
covered under guarantee. This guarantee
is invalid if the pump has been overloaded of subject
to neglect, improper use or an attempted repair other than
by an authorised agent. Heavy duty daily professional or
hire sage are not guaranteed. Damage caused by failure to
follow the maintenance schedule
is not covered by this guarantee.
TROUBLESHOOTING GUIDE
Problem:
Possible Causes:
Remedy:
The pump switches itself off
because of overheating.
(thermal motor switch)
The water level is too low.
Submerge the pump more deeply.
Clogged by drawn-in particles Foreign matter jammed in
the pump rotor.
Check and clean the pump.
The temperature of the pumped
fluid is too high.
Reduce the temperature of the fluid.
It may not exceed +35° C in
continuous operation.
Wait for approx. 26 minutes for
the motor to cool (motor switch).
The water level is below the
minimum intake level.
Switch the pump off.
Air bubbles can accumulate
with the immersion of the pump
or its automatic operation because
of an inappropriate positioning of
the float switch.
Let the air out by tilting the pump
and again submerging it in water.
This occurs at the minimum water
level when the pump does not stop,
but instead takes in air.
Remove impurities.
Intake filter clogged.
Clean the pipe.
Discharge pipe clogged.
Newly position and clean the pipe.
The discharge pipe is bent, kinked
or its diameter is reduced.
Straighten the pipe.
Increase the diameter.
The base / rotor is dirty.
Clean.
Partially clogged./
Pull the power plug out of
the socket.
The pump runs,
but takes in nothing.
Reduction in the quantity
of water delivered.
The pump does not start or
The float is not functioning.
Stops suddenly during operation.
Check the cord/plug/fuses.
Please note:Send the pump to
customer service.
The motor switch did not
switch itself on.
The temperature of the fluid is too
high, a maximum of +35° C.
The rotor is jammed.
The intake section is clogged.
Clean.
Check the power source. Pull the
The overheating protection switches
off the pump because it is overheated. power plug out of the electrical
socket and clean the impeller.
No electrical power.
Make sure that the permitted
highest temperature limit of
+35° C is not exceeded.
Dirt particles (for example, pebbles)
have settled in the intake port.
Check the fuse and electrical
connections. Clean the intake
port. Check the power source.
7
Declaration of Conformity
We, Importer
SFD Ltd BA22 8RT
Declare that the product
Automatic submersible Water Pumps
Complies with the essential health and safety requirements of the following directives:
89/336/EEC – EMC Directive.
73/23/EEC, 93/68/EEC – Low Voltage Directive
Standards and technical specifications referred to:
EN60335-1:2002+A1+A11+A12
EN60335-2-41:2003+A1
EN50366:2003
EN55014-1:2000+A1+A2
EN55014-2:1997+A1
EN61000-3-2:2000+A2
EN61000-3-3:1995+A1
Authorised Signatory
Date:
Signature:
01/03/07
Name:
SFD Ltd BA22 8RT
Quality Manager
8
2007
EDFNFRYHU