1
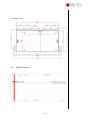
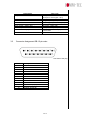
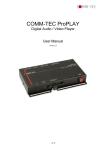
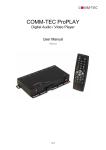
COMM-TEC ProPLAY Audio
Digital Audio Player
User Manual
Version 1.1
1 of 10
1. Table Of Content
1. Table Of Content.....................................................................................................2
2. General Notes .........................................................................................................3
3. Product Description..............................................................................................3
3.1 Product Dimensions .........................................................................................3
3.2 System Features ..............................................................................................4
3.3 Connector Assignment DB-15 pin male...........................................................5
4. User Instruction ....................................................................................................6
4.1 Quick Start Instruction......................................................................................6
4.2 Notes for Correct Use ......................................................................................6
4.3 System Setup...................................................................................................7
4.4 Operating Instructions ......................................................................................8
5. Technical Specifications.....................................................................................10
Author:
Date:
Alex Tempel, CTCS
5. Juli 2005
2 of 10
2. General Notes
The COMM-TEC ProPLAY Audio is a remote controllable Digital Audio Player
designed to use with simple speakers or a separate amplifier. The data will be
played back from a Sandisk Compact Flash Card, which is not in the scope of
delivery.
Please check the scope of supply, after you have received the shipment. Following
has to be included:
•
•
•
•
•
ProPLAY Audio
12V power supply
IEC power cord with EU plug
DB-15pin male plug
User manual
If you realize a hidden transport damage, please contact your insurance company or
supplier immediately.
3. Product Description
3.1
Product Dimensions
Side View (in mm)
3 of 10
Top View (in mm)
3.2
System Features
4 of 10
Description
Compact Flash Card Slot
USB
Power LED
Status LED
Discrete control / Speaker output
Audio output – stereo right
Audio output – stereo left
12V DC Power input jack
Power on/off
3.3
Type / Use
25x2 pin Hirose CF-II Socket
(accepts CF Card types 1 & 2)
Mini USB Port
On (green) / Off (clear)
Enabled (green) / disabled (clear)
DB-15 pin female connector
RCA jack – Right (red)
RCA jack – Left (white)
DC power jack. Center pin positive,
2.5mm diam.
Rocker switch
Connector Assignment DB-15 pin male
front view of the plug
Pin Nr.
1
2
3
4
5
6
7
8
9
10
11
12
13
Description
Button 1
Button 2
Button 3
Button 4
Button 5
Button 6
Button 7
Button 8
Button Ground
Speaker Ground
Speaker Output (L)
Speaker Ground
Speaker Output (R)
5 of 10
4. User Instruction
4.1
Quick Start Instruction
Never connect or disconnect parts of the system when the system is powered up as
this may cause serious damage.
Connection and usage are straightforward. However, care needs to be taken with
the following:
•
•
•
•
Ensuring parts have been correctly connected – both power & signal
considerations.
Checking that all switches are set correctly.
The input signal is compatible.
Legal & safety requirements have been met.
Now connect the system as follows:
•
•
•
•
4.2
Connect amplifier signal connections.
Connect the power supply (DC 12V @ 1.2A minimum. - ensure correct + & orientation) to the ProPLAY Audio.
Power on the amplifier.
Power on the ProPLAY Audio unit.
Notes for Correct Use
The ProPLAY Audio is designed for use with speakers or stereo amplifiers. Here are
some notes for correct use:
•
Preparation - Before you proceed, please familiarize yourself with the various
connectors, jacks, switches and function buttons of the ProPLAY Audio unit (see
item 3.2 - System Features diagrams).
•
The unit - Handle the unit with care; any knocking may cause components to
come loose and disconnect. Operate in a cool and dry place.
•
Power Input: 12V DC1.2A (minimum) is required; this should be a regulated
supply. It is recommended to use the power supply, which is delivered with the
ProPLAY Audio unit.
•
Audio Output: Audio - Stereo output. Volume is controlled by the switch mount
buttons or preset with the ProPLAY Studio software.
•
Discrete Control: An external port for remote button control. Maximum up to 8
buttons can be accessed.
•
Disccrete Control Cable: The cables to any remote button control should be of
suitable quality and length so that impedance does not affect performance.
Generally lengths up to 1 metre (3 feet) should be acceptable.
•
Power LED: The power LED indicator shows power is being supplied to the
player – LED light activated by the power on/off switch.
•
Status LED: The LED indicates the status of CompactFlash card.
6 of 10
•
USB Port: A port to upload or download content to or from the CompactFlash
Card. The port has to be used while the ProPLAY Audio is switched off or
disconnected from the power supply.
•
Service & Warranty: Warranty is invalidated if the unit is dismantled in any way.
The unit is not user serviceable or repairable.
CAUTION: Do not attempt to remove any part of the casing or internal parts.
4.3
•
System Setup
Installation / Mounting
The ProPLAY Audio can be installed in different ways, by using the mounting
wholes, which are available at three sides of the unit. For applications with
limited installation space, the mounting ears at the left and right side can be
removed. To remove them, bend them up and down.
•
Power Up
The Autoplay and Sleep playback mode are selected when writing the MP3 files
on to the CompactFlash Card by using ProPLAY Studio software.
Auto-Play start up mode
•
•
•
•
Plug in the external power supply
Insert CompactFlash Card containing ProPLAY Studio exported “.pll /
.prj” and other digital files. (e.g. .mpg, .mp3) All filename should be in 8+3
format (i.e. xxxxxxxx.xxx) and avoid using any illegal characters like “~”,
“_”, “-“, etc
Switch the power 'on/off' switch to 'on'.
The first track of the collection of MPEG files will be auto-played.
Sleep mode
•
•
•
•
•
Plug in the external power supply
Insert CompactFlash Card containing ProPLAY Studio exported “.pll /
.prj” and other digital files. (e.g. .mpg, .mp3) All filename should be in 8+3
format (i.e. xxxxxxxx.xxx) and avoid using any illegal characters like “~”,
“_”, “-“, etc
Switch the power 'on/off' switch to 'on'.
Press the 'play' button'.
The first track of the collection of MPEG files will be played.
Special specific track playback activated by assigned button can also be
performed in sleep mode using ProPLAY Studio software.
Auto-Loop Playback
After Track 1 is set to play, it will play to the end, then Track 2 will start playing from
beginning to end, then Track 3 etc. When the ProPLAY plays to the end of the last
track, it will automatically jump back to the beginning of Track 1, repeating tracks 1,2
then 3 etc. The ProPLAY will play in auto-loop play mode, so long as none of the
7 of 10
function buttons are pressed. Loop playback is the standard playback setting of the
ProPLAY (in simple play and playlist mode) but the track playback sequence can be
changed as required using ProPLAY Studio software.
4.4
Operating Instructions
There are two operating modes in ProPLAY– “playlist mode” and “simple play mode”
.
• Playlist mode
When operating in playlist mode, both project file (*.prj) and playlist file (*.pll)
must be present on the Compact Flash card. These are used to control the
sequence for all audio tracks.
The project and playlist file are created using ProPLAY Studio software. Using
this software, you can set simple sequences or complex sequences including
“jump track“ or “next track” actions. ProPLAY Studio can also program buttons
with different function like “play”, “stop”, “pause”, “mute”, “previous”, “next” and
“volume”.
Note: Make sure all capital letters in filename defined in playlist are consistence
with the filename on CompactFlash card. All filename should be in 8+3 format
(i.e. xxxxxxxx.xxx) and avoid using any illegal characters like “~”, “_”, “-“, etc
•
Simple play mode
In simple play mode, the user just copies all audio files (.mp3) onto the
Compact Flash card. The ProPLAY Audio will play these files in alphabetical
sequence.
Operating Functions
The following key buttons are default in “Simple Play mode”.
PLAY (Button 1)
• Resumes playback of audios from track 1 after STOP has been pressed.
• Resumes playback of the track from the point that it has been set to PAUSE.
• Playback is reset back to the beginning of the specific track which is being
played at the time the PLAY button is pressed.
STOP (Button 2)
• When STOP is pressed the audio stops playing.
PAUSE (Button 3)
• When PAUSE is pressed the audio stops playing.
• Press Pause again or PLAY to resume normal playback from the position where
it was paused.
REPEAT (Button 4)
• When REPEAT is pressed the current track loop back on itself continuously.
8 of 10
•
To disable the repeat mode press REPEAT, PLAY, PREVIOUS TRACK or
NEXT TRACK . When the track plays to the end it will playback the next track
(and etc.) as normal.
NEXT TRACK (Button 5)
• The NEXT TRACK function can be activated only when a track is already
playing. When NEXT TRACK is pressed the current audio stops playing and
jumps directly to the start of the next track.
VOLUME DECREASE (Button 6)
• Decreases audio output volume setting for both, speaker an line out.
VOLUME INCREASE (Button 7)
• Increases audio output volume setting for both, speaker an line out.
MUTE (Button 8)
• When MUTE is pressed, all the tracks will be still played but without sound.
• Press MUTE again to resume the normal sound in all tracks.
All above buttons can be re-defined by ProPLAY Studio software if operating in
playlist mode.
9 of 10
5. Technical Specifications
Playable formats:
Storage medium:
MP3 Audio
32 kbit/s to 320 kbit/s
CompactFlash Memory Cards : Type 1 & Type 2
Output Systems:
Speakers and/or amplifier
Audio Outputs:
Signal-to-Noise:
Stereo output,
connector – RCA jack, 3.2 V p-p max. 5K ohm
96 dB
Speaker Output:
2W at 4 Ohm
Select Switches:
Power ON/OFF switch
Indicators:
Power LED, Status LED
Start-up Modes:
Power Input:
Autoplay (at power-on)
Sleep mode (after power-on)
12V DC, 500mA typical
Power Consumption:
6W
Environment:
0 °C to 50 °C , free air circulation
Relative Humidity
5-95% relative humidity, non-condensing
Dimensions:
209 (187) x 26 x 105mm (W x H x D)
Weight :
net weight: 400g
USB Port:
USB 2.0
connector – Mini USB
8 External Buttons Connection (DB-15 pin)
Discrete Control
Storage Accessories:
CompactFlash Card – various memory capacities
available
16,32,48,64,96,128,192,256,512MB,1,2,4,8GB
10 of 10