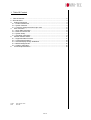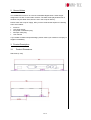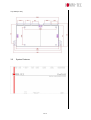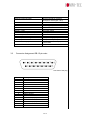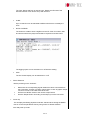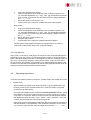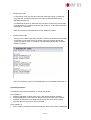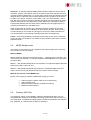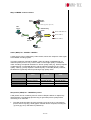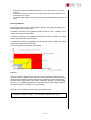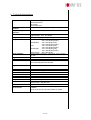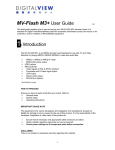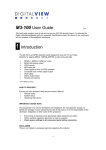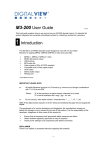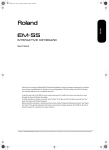
1
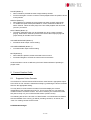
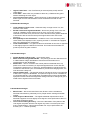
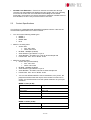
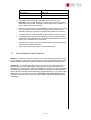
COMM-TEC ProPLAY Digital Audio / Video Player User Manual Version 2.2 1 of 19 1. Table Of Content 1. Table Of Content.....................................................................................................2 2. General Notes .........................................................................................................3 3. Product Description..............................................................................................3 3.1 Product Dimensions .........................................................................................3 3.2 System Features ..............................................................................................4 3.3 Connector Assignment DB-15 pin male...........................................................5 4. User Instruction ....................................................................................................6 4.1 Quick Start Instruction......................................................................................6 4.2 Notes for Correct Use ......................................................................................6 4.3 System Setup...................................................................................................7 4.4 Operating Instructions ......................................................................................9 5. Content Creation Guide .....................................................................................11 5.1 Supported Video Formats ..............................................................................11 5.2 Content Specifications ...................................................................................13 5.3 General Display Design Guidelines ...............................................................14 5.4 MPEG Backgrounder .....................................................................................15 5.5 Creating .MPG files ........................................................................................15 6. Technical Specifications.....................................................................................19 Author: Date: Alex Tempel, CTCS 24/01/06 2 of 19 2. General Notes The COMM-TEC ProPLAY is a remote controllable Digital Audio / Video Player designed to use with TV and Video monitors. The data will be played back from a Sandisk Compact Flash Card, which is not in the scope of delivery. Please check the scope of supply, after you have received the shipment. Following has to be included: • • • • • ProPLAY 12V power supply IEC power cord with EU plug DB-15pin male plug User manual If you realize a hidden transport damage, please contact your insurance company or supplier immediately. 3. Product Description 3.1 Product Dimensions Side View (in mm) 3 of 19 Top View (in mm) 3.2 System Features 4 of 19 Description Compact Flash Card Slot USB Power LED Status LED PAL / NTSC Graphic output Graphic / Video Remote control / Speaker output S-Video output Composite video output Audio output – stereo right Audio output – stereo left 12V DC Power input jack Power on/off 3.3 Type / Use 25x2 pin Hirose CF-II Socket (accepts CF Card types 1 & 2) Mini USB 2.0 Port On (green) / Off (clear) Enabled (green) / disabled (clear) 6mm stem switch HD-15 pin female connector 6mm stem switch DB-15 pin female connector 5-pin mini DIN socket RCA jack (yellow) RCA jack – Right (red) RCA jack – Left (white) DC power jack. Center pin positive, 2.5mm diam. Rocker switch Connector Assignment DB-15 pin male front view of the plug Pin Nr. 1 2 3 4 5 6 7 8 9 10 11 12 13 14 15 Description Button 1 Button 2 Button 3 Button 4 Button 5 Button 6 Button 7 Button 8 Button Ground Speaker Ground Speaker Output (L) Speaker Ground Speaker Output (R) RS-232 RX RS-232 Ground 5 of 19 4. User Instruction 4.1 Quick Start Instruction Never connect or disconnect parts of the system when the system is powered up as this may cause serious damage. Connection and usage are straightforward. However, care needs to be taken with the following: • • • • • Ensuring parts have been correctly connected – both power & signal considerations. Checking that all switches are set correctly. The input signal is compatible. Legal & safety requirements have been met. If you are using supplied accessories, ensure they are correct for the model of video monitor. Now connect the system as follows: • • • • • • 4.2 Connect Video Monitor signal connections. Switch settings. (e.g. PAL/NTSC switch setting) Connect the Video and Audio cables from the ProPLAY to the Video Monitor. Connect the power supply (DC 12V @ 1.2A minimum. - ensure correct + & orientation) to the ProPLAY. Power on the video monitor display. Power on the ProPLAY unit. Notes for Correct Use The ProPLAY is designed for use with Video Monitors and other analogue signal input displays. Here are some notes for correct use: • Preparation - Before you proceed, please familiarize yourself with the various connectors, jacks, switches and function buttons of the ProPLAY unit (see item 3.2 - System Features diagrams). • The unit - Handle the unit with care; any knocking may cause components to come loose and disconnect. Operate in a cool and dry place. • Power Input: 12V DC1.2A (minimum) is required; this should be a regulated supply. It is recommended to use the power supply, which is delivered with the ProPLAY unit. • Digital Video: use MPEG-1/MPEG-2 video. For MPEG-2 video, the encoding rate is limited to 5Mb/s. See item 6. - Content Creation Guide for more details and proper encoding rate. • Audio & Video output: Video - displays PAL & NTSC signals with either Composite, S-video signal. The PAL/NTSC switch should be set correctly. Audio 6 of 19 - Stereo output. Volume is controlled by the switch mount buttons or preset with the ProPLAY Studio software. • Graphic output: Graphic displays with VGA resolution (60Hz). Graphic / Video switch has to be set correctly. S-Video cable should be disconnected. • Discrete Control: A external port for remote button control. User can use this port as a touch screen or button interface. Maximum up to 8 touches/buttons can be accessed. • Disccrete Control Cable: The cables to any remote button control should be of suitable quality and length so that impedance does not affect performance. Generally lengths up to 1 metre (3 feet) should be acceptable. • Power LED: The power LED indicator shows power is being supplied to the player – LED light activated by the power on/off switch. • Status LED: The LED indicates the status of CompactFlash card. • USB 2.0 Port: A port to upload or download content to or from the CompactFlash Card. The port has to be used while the ProPLAY is switched off or disconnected from the power supply. • RS-232 Control: Baud rate must be set to (2400, n,8,1) and record suffix is set to CR (0DH). Individual RS-232 commands can be set up with the ProPLAY Studio software. • RS-232 Port: Please connect your control system to the DB-15 pin port of the ProPLAY according to the wirering diagramm shown under 3.3 • Service & Warranty: Warranty is invalidated if the unit is dismantled in any way. The unit is not user serviceable or repairable. CAUTION: Do not attempt to remove any part of the casing or internal parts. 4.3 • System Setup Setup To enter the setup of the ProPLAY, please press button 8 while you power on the unit. Use buttons 6 and 7 to change settings and button 8 to confirm and jump to the next setup item. Depending on the firmware version of the ProPLAY, the following settings can be changed: • VOLUME The volume default when you power on the unit can be changed. • YMD / HMS 7 of 19 The Year, Month and Day as well as Hour, Minute and Second of the internal real time clock can be set up with this item. • ID NO Up to 10.000 ID’s can be allocated to different ProPLAYs to identify the units. • DATA LOGGING The ProPLAY is able to write a logfile onto the CF Card. ID number, date and time as well as the played tracks will be reported as shown below. The logging option can be switched on or off with this setting. • OSD The On Screen Display can be switched on or off. • Select Switches Before powering on the ProPLAY: • • • • Make sure the corresponding signal cables have been connected from the Composite, S-Video or graphic output jacks. In case of graphic output use, don’t connect a S-Video cable to the unit. Set the 'PAL/NTSC' switch to the chosen output format. Set the ‘Graphic/Video‘ according to the output you have connected. Power Up The Autoplay and Sleep playback mode are selected when writing the MPEG files on to the CompactFlash Card by using ProPLAY Studio software. Auto-Play start up mode 8 of 19 • • • • Plug in the external power supply Insert CompactFlash Card containing ProPLAY Studio exported “.pll / .prj” and other digital files. (e.g. .mpg, .mp3, .jpg) All filenames should be in 8+3 format (i.e. xxxxxxxx.xxx) and avoid using any illegal characters like “~”, “_”, “-“, etc Switch the power 'on/off' switch to 'on'. The first track of the collection of MPEG files will be auto-played. Sleep mode • • • • • Plug in the external power supply Insert CompactFlash Card containing ProPLAY Studio exported “.pll / .prj” and other digital files. (e.g. .mpg, .mp3, .jpg) All filename should be in 8+3 format (i.e. xxxxxxxx.xxx) and avoid using any illegal characters like “~”, “_”, “-“, etc Switch the power 'on/off' switch to 'on'. Press the 'play' button'. The first track of the collection of MPEG files will be played. Special specific track playback activated by assigned button can also be performed in sleep mode using ProPLAY Studio software. Auto-Loop Playback After Track 1 is set to play, it will play to the end, then Track 2 will start playing from beginning to end, then Track 3 etc. When the ProPLAY plays to the end of the last track, it will automatically jump back to the beginning of Track 1, repeating tracks 1,2 then 3 etc. The ProPLAY will play in auto-loop play mode, so long as none of the function buttons are pressed. Loop playback is the standard playback setting of the ProPLAY (in simple play and playlist mode) but the track playback sequence can be changed as required using ProPLAY Studio software. 4.4 Operating Instructions There are two operating modes in ProPLAY– “playlist mode” and “simple play mode” . • Playlist mode When operating in playlist mode, both project file (*.prj) and playlist file (*.pll) must be present on the Compact Flash card. These are used to control the sequence for all video tracks. The project and playlist file are created using ProPLAY Studio software. Using this software, you can set simple sequences or complex sequences including “jump track“ or “next track” actions. ProPLAY Studio can also program buttons with different function like “play”, “stop”, “pause”, “mute”, “previous”, “next” and “volume” as well as RS-232 commands to play tracks. Note: Make sure all capital letters in filename defined in playlist are consistence with the filename on CompactFlash card. All filename should be in 8+3 format (i.e. xxxxxxxx.xxx) and avoid using any illegal characters like “~”, “_”, “-“, etc 9 of 19 • Simple play mode In simple play mode, the user just copies all video files (.mpg) or JPEG files (.jpg) onto the Compact Flash card. The ProPLAY will play these files in alphabetical sequence. For MPEG still pictures or JPEG files, the play time can be set by the last digit of the filename. (For example: APPLE5.mpg, where “5” means the track will be displayed for 5 seconds.) Note: Do not use the same filename on both MPEG and JPEG. • Schedule play mode The ProPLAY is able to play back playlists, controlled by date and time settings. A schedule.ini named file has to be written in the below shown format and copied onto the CF card. To create the corresponding playlist files, ProPLAY Studio is required. Note: The maximum number of schedule tasks you can defined is limited to 40. Operating Functions The following key buttons are default in “Simple Play mode”. PLAY (Button 1) • Resumes playback of videos from track 1 after STOP has been pressed. • Resumes playback of the track from the point that it has been set to PAUSE. • Playback is reset back to the beginning of the specific track which is being played at the time the PLAY button is pressed. STOP (Button 2) • When STOP is pressed the video stops playing and a blank screen is displayed. 10 of 19 PAUSE (Button 3) • When PAUSE is pressed the video image instantly freezes. • Press Pause again or PLAY to resume normal playback from the position where it was paused. REPEAT (Button 4) • When REPEAT is pressed the current track loop back on itself continuously. • To disable the repeat mode press REPEAT, PLAY, PREVIOUS TRACK or NEXT TRACK . When the track plays to the end it will playback the next track (and etc.) as normal. NEXT TRACK (Button 5) • The NEXT TRACK function can be activated only when a track is already playing. When NEXT TRACK is pressed the current video stops playing and jumps directly to the start of the next track. VOLUME DECREASE (Button 6) • Decreases audio output volume setting. VOLUME INCREASE (Button 7) • Increases audio output volume setting. MUTE (Button 8) • When MUTE is pressed, all the tracks will have no sound. • Press MUTE again to resume the normal sound in all tracks. All above buttons can be re-defined by ProPLAY Studio software if operating in playlist mode. 5. Content Creation Guide 5.1 Supported Video Formats The ProPLAY is conform to both NTSC and PAL video formats. Appropriate output to an NTSC or PAL monitor is switched manually by positioning the device mounted switch to the appropriate setting. You may elect to create content into either format and display this content independent of the requirements of the TV. This is to say that you can send PAL created content to an NTSC monitor. This can be useful if your content has small text (PAL is best) or if your content has fast motion. (NTSC is best) The following are the Pro’s and Con’s of both formats. You should become familiar with the standard of the country you will be providing content to, as well as, the “rules” for creating content for this format. NTSC/525 Advantages 11 of 19 • • • Higher Frame Rate – Use of 30 frames per second (really 29.97) reduces visible flicker. Color Edits – With NTSC it is possible to edit at any 4 field boundary point without disturbing the color signal. Less inherent picture noise – Almost all pieces of video equipment achieve better signal to noise characteristics in their NTSC/525 form than in their PAL/625. NTSC/525 Disadvantages • • • • Lower Number of Scan Lines – Reduced clarity on large screen TVs, line structure more visible. Smaller Luminance Signal Bandwidth – Due to the placing of the color subcarrier at 3.58MHz, picture defects such as moire, cross-color, and dot interference become more pronounced. This is because of the greater likelihood of interaction with the monochrome picture signal at the lower sub-carrier frequency. Susceptibility to Hue Fluctuation – Variations in the color subcarrier phase cause shifts in the displayed color, requiring that the TV receivers be equipped with a Hue adjustment to compensate. Lower Gamma Ratio – The gamma value for NTSC/525 is set a 2.2 as opposed to the slightly higher 2.8 defined for PAL/625. This means that PAL/625 can produce pictures of grater contrast. PAL/625 Advantages • • • • Greater Number of Scan Lines – more picture detail. Wider Luminance Signal Bandwidth – The placing of the color Sub-Carrier at 4.43MHz allows a larger bandwidth of monochrome information to be reproduced than with NTSC/525. Stable Hues – Due to reversal of sub-carrier phase on alternate lines, any phase error will be corrected by an equal and opposite error on the next line, correcting the original error. In early PAL implementations it was left to the low resolution of the human eye’s color abilities to provide the averaging effect; it is now done with a delay line. Higher Gamma Ratio – The gamma value for PAL/625 is set at 2.8 as opposed to the lower 2.2 figure of NTSC/525. This permits a higher level of contrast than on NTSC/525 signals. This is particularly noticeable when using multi-standard equipment as the contrast and brightness settings need to be changed to give a similar look to signals of the two formats. PAL/625 Disadvantages • • • More Flicker – Due to the lower frame rate, flicker is more noticeable on PAL/625 transmissions; particularly so for people used to viewing NTSC/525 signals. Lower Signal to Noise Ratio – The higher bandwidth requirements cause PAL/625 equipment to have slightly worse signal to noise performance than it’s equivalent NTSC/525 version. Loss of Color Editing Accuracy – Due to the alternation of the phase of the color signal, the phase and the color signal only reach a common point once every 8 fields/4frames. This means that edits can only be performed to an accuracy of +/- 4 frames (8 fields). 12 of 19 • 5.2 Variable Color Saturation – Since PAL achieves accurate color through canceling out phase differences between the two signals, the act of canceling out errors can reduce the color saturation while holding the hue stable. Fortunately, the human eye is far less sensitive to saturation variations than to hue variations, so this is very much the lesser of two evils. Content Specifications The ProPLAY is a dedicated solid-state MPEG playback machine. Here are the recommended specifications for content creation: • You can use the following media types: • MPEG-1 • MPEG-2 • MPEG Stills • DivX • MPEG-1 encoding rates: • Screen size: • PAL: 352 x 288 • NTSC: 352 x 240 • Bit Rate: 260kBps (2 Mbit/s) • Audio Stream Type: MPEG-1 Layer 2 • Audio Bit Rate: 224 Kbit/s, 44.1 kHz at 16 bits sample rate • Frame Rate: PAL: 25 Hz / NTSC: 30 Hz • MPEG-2 encoding rates • Screen size (recommended): • PAL: 720 x 576 • NTSC: 720 x 480 • Bit Rate: 640kBps (5 Mbit/s) • Audio Stream Type: MPEG-1 Layer 2 • Audio Bit Rate: 224 Kbit/s, 48 kHz at 16 bits sample rate • Frame Rate: PAL: 25 Hz / NTSC: 30 Hz • You can use different MPEG-2 source resolutions, but if you do, the playback machine scales the output, which results in some loss on quality. It is therefore best to use the optimal resolution as your input resolution: MPEG-2 / PAL (25 Hz) Source Resolution Output Resolution 720 x 576 (recommended) 720 x 576 704 x 576 720 x 576 352 x 576 720 x 576 352 x 288 720 x 576 MPEG-2 / NTSC (30 Hz) Source Resolution Output Resolution 720 x 480 (recommended) 720 x 480 13 of 19 5.3 704 x 480 720 x 480 352 x 480 720 x 480 352 x 240 720 x 480 • The playback machine uses a Compact Flash memory card. Important: Your content should be no larger than the memory on the Flashcard minus 0.5 MB. Preferably, leave more memory available – at least 5 MB is a good rule of thumb. • Keep in mind that videos can be transferred via the Internet, often using slow connections. It is recommended that you keep the size of your variable content (i.e. content that changes often) down to a minimum. • To avoid confusion, keep all filenames and all links in lower case only. • Long filenames are supported by renaming: ProPLAY Studio software renames the files. Nevertheless, it is best to keep filenames short (“8.3” format, e.g. “12345678.123”) to start with. • Once you have content, you should create project file(s) and playlist(s) using “ProPLAY Studio” software. • Copy it to the flash card, using a CF card reader/writer. General Display Design Guidelines Graphics - a monitor or television screen has a lower resolution (less than 72 dpi) than a computer screen. Make your graphics as "clean" as possible, therefore. Use the anti-aliasing capabilities of graphics software to eliminate the "stairstep" effect. Interlacing - TV monitors paint the screen in two passes, the even lines first and then the odd ones. The entire image is actually never on the screen all at once; persistence of human vision makes up the difference. Small (1 or 2 pixel-high) areas of detail in the image flicker in reaction to interlacing. Computer monitors paint the screen all at once (known as de-interlaced or progressive scan), so you won't notice this problem on your computer screen. Feathering and/or anti-aliasing areas of detail can avoid this defect. Use the blur tool. Areas of significant detail should be made larger. 14 of 19 Safe Area - an industry standard display area has been created to ensure that an animation, graphic or text will be seen on an NTSC screen when transferred from a computer using an RGB screen. An "action safe" area is where movement will most likely be seen. A "title safe" area is where stationary text or graphics will be sure to be seen. For instance, for NTSC, Action Safe = 432 x 576, and Title Safe = 384 x 504. But every monitor or television displays the signal it receives differently: Some will show less than the outer edge of the "Action Safe" area. Therefore, if there is anything that definitely must be seen (mainly stationary text and graphics) then it must be placed within the "Title Safe Area.". Text - Use at least 18-24 point type. Use 96 point type or greater for text when output needs to be seen from a distance of about 20 feet or more. Rule of thumb: Text should stay on the screen long enough for someone to read it at least twice. Use drop-shadows or 3D lettering to set titles apart from the background. Colour - Avoid using drastically contrasting colours side by side. Use “in-between” colours to soften the transition. Use shades of grey instead of pure white to avoid a washed-out look. 5.4 MPEG Backgrounder This section is included for you as a refresher. We expect people who create play lists to know most of this already! What is MPEG? MPEG stands for “Moving Picture Expert Group”, - a working party of the ISO – IEC Joint Technical Committee 1, working on algorithm standardization for compression of motion video. MPEG-1 ISO standard designed for low resolution of compressed digital video and audio (for the web, Video CD, etc) MPEG-2 ISO standard designed high resolution compressed digital audio and video such as that used by broadcast television (DVD uses this format). What do you need to create MPEG files? Before you are going to create the MPEG files (.mpg), you need: • • • • 5.5 Camera (used to capture video movie or still picture) Video Capture Card MPEG encoding hardware (for MPEG encoding) MPEG encoding software Creating .MPG files The extension “.MPG” covers MPEG-1, MPEG-2 and MPEG still files. How you create MPG files depends on the MPEG encoding method used and the source of your video input. The MPEG encoding system includes both hardware and software. (e.g. Optibase, or a fast PC with the right PC-software). 15 of 19 Ways of MPEG content creation: Graphic Utilities Digital Camera Still picture file (.jpg, .bmp, .gif,.tif, etc) Video Camera MPEG Encoding System .MPG file (MPEG Still Picture) .MPG file (MPEG-1) Betacam/VHS video .MPG file (MPEG-2) Betacam/VHS Recorder DVD Video DVD Player Video (.MPG) file - MPEG-1 / MPEG-2 A video source can be captured by video camera, which then outputs a video signal to the MPEG encoding system. The basic resolution required for MPEG-1 video encoding is 352x288 (PAL) or 352x240 (NTSC) and it is very close to VHS or VCD image quality. For MPEG-2 video encoding, the optimal resolution for “Good” quality video (e.g. SVCD) required is 480x576 (PAL) or 480x480 (NTSC), and the optimal resolution for very “High” quality video (e.g. DVD) required is 720x576 (PAL) or 720x480 (NTSC). However, the MPEG-2 is generally used for producing a high quality video. VCD Resolution Video Compression File Size (per min) Quality 352x288 (PAL) 352x240 (NTSC) MPEG-1 7.5MB-12MB Good SVCD 480x576 (PAL) 480x480 (NTSC) MPEG-2 15MB-25MB Great DVD 720x576 (PAL) 720x480 (NTSC) MPEG-2 30MB-50MB Excellent Still picture (.MPG) file - MPEG Still picture A still picture can be created by most of common Graphic Utilities or captured by digital Camera. The following tips will help you get better picture quality before converting to an .MPG file: • The ideal original graphic file type is bitmap (.bmp) as it has no compression. (but file size is very big!). Other graphic formats can be accepted, including tiff, .gif, and .jpg, etc (in that order of preference). 16 of 19 • • • The ideal resolution for MPEG still pictures is 704 x 576 (PAL) or 704 x 480 (NTSC). The optimal choice of font size is not less than 22 points when creating a still picture with text content. For better visual quality, the ideal line thickness should always be more than one point. Encoding Bit Rate Bit rate is the number of bits compressed per second. The higher the bit rate, the better MPEG video quality we get. For MPEG-1 encoding, the suggested encoding bit rate is 1.0M – 1.5Mbit/s. This is roughly the bit rate for VCD quality. For MPEG-2 encoding, the suggested encoding bit rate is 2M – 4Mbit/s. The output quality will look like the same as SVCD For MPEG-2 encoding, the suggested encoding bit rate is 5M – 7Mbit/s. The output quality will look like the same as DVD. This chart shows bit rate against video quality: File size When encoding an MPEG file, the higher the bit rate selected, the larger the file generated. When creating content, the total .mpg file size (total content) should not larger than the maximum amount of the storage contained on the CompactFlash card size minus 0.5M (used for the system, networking, playlist). Try to keep 5MB free. E.g., for a 32MB CompactFlash card, this means your total .mpg file content can be a maximum of 31.5MB, but 27 MB is better. File size can be obtained from the bit rate and playback time: MPEG file (.mpg) size (Byte) = [bit rate (bit/s) x playback time (s)] / 8 17 of 19 For example: MPEG-1 file • Encoding rate = 1.5Mbit/s (1,572,864 bit/s) • Playback time = 60s (1 minute) • File size ~ 11MByte MPEG-2 file • Encoding rate = 6Mbit/s (6,291,456 bit/s) • Playback time = 60s (1 minute) • File size ~ 45MByte 18 of 19 6. Technical Specifications Playable formats: Video Storage medium: Output Display Systems: Video Output: Graphic Output: Output Resolution: Audio Outputs: Signal-to-Noise: Speaker Output: Select Switches: MPEG-1/2 files (up to 5 Mbit/s) MPEG still picture MP3 audio JPEG still picture CompactFlash Memory Cards : Type 1 & Type 2 TV and Video, Computer Monitors Signal type : Composite and S-Video Output format : PAL and NTSC VGA (640x480) @ 60Hz (RGBHV) MPEG1 Res. : 352 x 288 pixels (PAL) : 352 x 240 pixels (NTSC) MPEG2 Res. : 720 x 576 pixels (PAL) : 720 x 480 pixels (NTSC) DivX : 720 x 576 pixels (PAL) : 720 x 480 pixels (NTSC) MPEG2 Still : 704 x 576 pixels (PAL) : 704 x 480 pixels (NTSC) JPEG picture : 800 x 600 pixels Stereo output, connector – RCA jack, 3.2 V p-p max. 5K ohm 96 dB 2W at 4 Ohm Power ON/OFF switch PAL/NTSC playback format select Indicators: Power LED, Status LED Start-up Modes: Power Input: Power Consumption: Environment: Relative Humidity Dimensions: Weight : RS-232 Port: Autoplay (at power-on); Sleep mode (after power-on) 12V DC, 500mA typical 6W 0 °C to 50 °C , free air circulation 5-95% relative humidity, non-condensing 187 x 26 x 107,5mm (W x H x D) net weight: 400g Baud rate: 2400, n,8,1 Record suffix = CR (0D Hex) 8 External Buttons Connection (DB-15 pin) CompactFlash Card – various memory capacities available 16,32,48,64,96,128,192,256,512MB,1,2,4,8GB Discrete Control Video Storage Accessories: 19 of 19