1
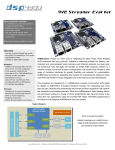
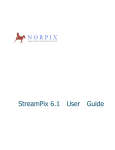
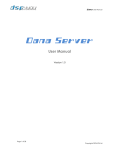
AV2USB AV2USB AVB to USB audio interface User Manual Revision Description Date V1.0 Initial revision 05-05-2013 Page 1 of 24 Copyrights DSP4YOU ltd AV2USB Description The AV2USB is a bridging interface allowing any computer to act as an Audio Video Bridging (AVB) endpoint. In other words giving the ability to stream multiple channels of uncompressed, low latency and tightly synchronized audio over Ethernet networks. By combining asynchronous USB audio to the latest Audio Video Bridging (AVB) standards, high end streaming of AV content is finally a reality. From an operational standpoint on the OS side of the computer, the AV2USB is an 8 channel USB audio device with 24/96kHz support. Routing of the audio channels to the playback/recording software is very simple thanks to the ubiquity of USB audio class 2.0 device. While seen from the AVB Ethernet network side, the interface is now a so called “Talker/Listener” device. In other words, a streaming interface able to receive and transmit up to 8 audio channels, packetized as required in upto 8 streams. The configuration & routing to the AVB world is as simple as a Drag & Drop process thanks the AVBStreamer software or any IEEE 1722.1 protocol compliant software. From a multichannel background music processor to a PC based recorder (court/meeting), the AV2USB rises to your audio streaming challenges by providing an affordable Plug & Play interface that does not compromise latency & audio quality Features o USB Audio to Ethernet AVB interface o Low cost, Low power, small form factor o OEM friendly Network o 2 auto-sensing 10/100Mbps ports o Automatic fall over for redundancy o Optional powering by PoE port Audio Video Bridging (AVB) o Support for AVBTP 1722 o Up to 8 x streams of recording & playback USB Audio o Asynchronous USB Audio Class 2 (UAC2) o Windows/Mac/Linux compliant o Up to 8ch @ 24bit – 48kHz Page 2 of 24 Copyrights DSP4YOU ltd AV2USB Table of Content 1 2 3 4 5 6 7 Product Overview ..................................................................................................................................................................... 4 1.1 Front Panel Description .................................................................................................................................................. 4 1.2 Rear panel description................................................................................................................................................... 4 1.3 Feature description......................................................................................................................................................... 4 1.3.1 Audio Video Bridging............................................................................................................................................... 4 Setup guide................................................................................................................................................................................ 5 2.1 AV2USB Box content....................................................................................................................................................... 5 2.2 Connectivity .................................................................................................................................................................... 5 2.2.1 Network...................................................................................................................................................................... 5 2.2.2 DC power connectivity or PoE ............................................................................................................................... 5 2.3 System setup requirements ........................................................................................................................................... 6 2.3.1 PC systems ................................................................................................................................................................. 6 Software configuration............................................................................................................................................................. 6 3.1 USB Audio drivers installation under Windows OS ...................................................................................................... 6 3.1.1 Download the latest driver version from DSP4YOU.com.................................................................................... 6 3.1.2 Connect your AV2USB unit ..................................................................................................................................... 6 3.1.3 Setup the driver package....................................................................................................................................... 7 3.2 AV2USB configuration .................................................................................................................................................. 11 3.2.1 Driver general info.................................................................................................................................................. 11 3.2.2 Buffer settings .......................................................................................................................................................... 11 3.2.3 Device configuration............................................................................................................................................. 11 3.2.4 Input channel volume control (recording) ........................................................................................................ 12 3.2.5 Output channel volume control (playback) ..................................................................................................... 12 3.2.6 Clock source ........................................................................................................................................................... 12 3.2.7 Stream formats........................................................................................................................................................ 13 3.3 Mac OSx configuration ................................................................................................................................................ 13 3.3.1 Device configuration............................................................................................................................................. 13 3.3.2 Speaker output for default output channel ...................................................................................................... 14 AVB Streamer Tools setup guide ........................................................................................................................................... 16 4.1 User interface overview of the AVB Streamer toolbox ........................................................................................... 17 4.2 AV2USB Stream configuration..................................................................................................................................... 17 4.2.1 Device info page ................................................................................................................................................... 17 4.2.2 Audio Video Bridging (AVB) stream configuration ........................................................................................... 18 Virtual Stream – AVB configuration for 3rd party AVB products ....................................................................................... 21 3rd party Software and configuration................................................................................................................................... 21 6.1 Audio Recording........................................................................................................................................................... 21 6.2 Audio Playback............................................................................................................................................................. 21 6.2.1 Foobar (Open Source) .......................................................................................................................................... 22 Technical specifications......................................................................................................................................................... 24 7.1 AV2USB Technical specifications................................................................................................................................ 24 Page 3 of 24 Copyrights DSP4YOU ltd AV2USB 1 Product Overview 1.1 Front Panel Description 1 1. 2. 3. 1.2 2 3 Network connection #1 on RJ45 connector. Use this connector if you want to power the AV2USB from a PoE AVB switch Network connection#2 on RJ45. Redundant connection for network. USB Audio 2.0 on miniUSB connector Rear panel description 1 1. DC input for device powering. Requires a stable +5VDC supply supplied with the product 1.3 1.3.1 Feature description Audio Video Bridging AVB defines a group of network protocols for the distribution of time synchronized and low latency Audio & Video streams over IEEE802 networks. By leveraging a combination of existing 802 network technologies along with standards specifically designed for the purpose, AVB technology lays the ground work for un-paralleled guaranteed media streaming over Ethernet networks. The overall concept of AVB is actually rather simple. Without getting into too much detail, the three core protocols specify: Timing and synchronization Bandwidth allocation through the Stream Reservation Protocol (SRP) Traffic shaping to ensure that low priority Ethernet traffic does not interfere with AVB traffic Engineered from the ground up for media streaming applications, AVB has a definitive edge over legacy Ethernet technology in the sense that it allows bandwidth allocation and priority rules based on timing. Unlike similar audio over IP (AOIP) technology, AVB will dynamically assign and defend bandwidth allocation for AVB streaming thanks to the concept of Stream Reservation Protocol (SRP). Terminology for AVB streaming goes as follow: o Audio Video Bridging (AVB): General descriptive for a group of protocols providing audio/ video streaming, timing, synchronization, Quality of service (QoS) , control and discovery. o AVB Endpoint: AVB powered device, capable of transmitting and/ or receiving audio streams using P1722/ P1733 transport protocol. o Talker: AVB endpoint transmitting audio to the network. (Source) o Listener: AVB endpoint receiving audio from the network. (Sink/ Destination) Page 4 of 24 Copyrights DSP4YOU ltd AV2USB o o o o 2 2.1 Talker/Listener: AVB endpoint that is both transmitting and receiving. All AVB endpoints used on Dana series are by default Talker/Listener devices. Precision Time Protocol (PTP): Allows devices on the network to get a notion of global time in the effort to synchronize with each other. PTP component in each AVB module can act as a Grand Master (providing clock) or as a slave (receiving clock). Once a grand master negotiates and is selected as a sync source, all units will synchronize to it. Streams: General term describing packetization of one or multiple audio/ video channels over the network. Stream can be unicast or multicast. For the time being, the AVB module only supports unicast streaming. Future revisions will provide additional features. Stream ID: Unique 64-bit stream identifier used by AVB transport protocols to identify streams. Setup guide AV2USB Box content Box Content AV2USB module in steel enclosure Removable wall mount ears Step-by-step startup guide 1 x CAT6 patch cable 1 x USB2.0 Audio cable Mounting instructions The AV2USB unit ships with removable ears allowing wall/ceiling mount installation. Remove the 4 x M3 screws to modify the configuration of your unit. 2.2 2.2.1 Connectivity Network AV2USB requires at least one Ethernet connection for configuration and audio streaming. Configuration is performed using the provided AVBStreamer toolbox software and using a single Ethernet cable. A standard-straight through Ethernet CAT5/6 network is required for connectivity through a network switch. A crossover CAT-5/6 cable is required for direct connectivity to a PC/Mac machine that doesn’t support auto-switching. AV2USB devices utilize “Zeroconf” technology for plug&play integration. If a DHCP server is present at boot up, the AV2USB will automatically acquire an IP address If no DHCP server is present at boot up, the AV2USB will use the Link Local Address (Auto IP) P 169.254.0.xxx Network requirements: Audio Video Bridging systems requires special AVB enabled network switches ( so called AVB bridge) to enjoy the advanced features of AVB such as the Stream Reservation Protocol. Such AVB bridge has the ability to shape the traffic of the network such that any AVB traffic has higher priority. If in doubt, don’t hesitate to contact our technical support team at [email protected] 2.2.2 DC power connectivity or PoE The AV2USB requires an external DC supply either provided by an external 5VDC SMPS or a PoE switch. OPTION A: +5VDC power supply (provided with the AV2USB). Here is a picture of the power supply provided along with the plugs. Page 5 of 24 Copyrights DSP4YOU ltd AV2USB OPTION B: 3rd party AVB Switch with PoE capability(not provided) 2.3 System setup requirements 2.3.1 Windows based PC systems 2.3.2 CPU 1GHz or higher 128MB video card 1 x 10/100MB network connection Latest version of Adobe Flash web plug-in from Adobe.com website : http://get.adobe.com/flashplayer/ Latest version of the Adobe Air environment from Adobe Website: http://get.adobe.com/air/ Keyboard & Mouse OS: WinXP/Vista/7 Mac OSX While the USB Audio section is supported under Mac OSx by default, an initial configuration of the stream via the AVBStreamer toolbox (Windows only) makes the AV2USB not a fully MAC OSX compliant device. An alternative option can be as follow: a) Configure the stream/routing of your network using a Windows based PC running the AVBStreamer toolbox b) Once the network and stream configured, the AVBToolbox software won’t be required anymore and you can stream audio from your Mac via USB Audio. 3 3.1 Software configuration USB Audio drivers installation under Windows OS The AV2USB is an audio class 2.0 device which requires some driver installation under Windows OS. Installation of the drivers allows any audio playback or recording software to access the USB audio section of the AV2USB. It is compliant to two standard audio drivers: - Windows Driver Model (WDM): Almost all software support this scheme but may require some testing since it’s not as flexible when it comes to routing of the audio channels. - Audio Stream Input/Output (ASIO) is another driver format optimized for low latency. It is a widely used solution when it comes to multi-channel audio for professional audio applications e.g. recording/post production software/ 3.1.1 Download the latest driver version from DSP4YOU.com The driver is made available in the User Download section of the dsp4you website. Please log-in with your user account credentials and look for the AV2USB section at the following link: http://www.dsp4you.com/user-downloads Once the driver downloaded, please unzip the folder on your PC, unzip the files to a temporary folder. 3.1.2 Connect your AV2USB unit In order to automatically detect the AV2USB following the driver installation, you need connect a USB cable between your PC and the AV2USB. Page 6 of 24 Copyrights DSP4YOU ltd AV2USB 3.1.3 Setup the driver package Click on the setup.exe application to start the installation process. After clicking next, the setup wizard will check your system capabilities. If you didn’t connect the USB audio cable and provided power to the AV2USB unit, you will receive the follow message. Make sure you connect both the USB cable and +5V external DC power to the unit. Next step is to choose a location on your harddrive for the installation. Wait for the installation to begin Page 7 of 24 Copyrights DSP4YOU ltd AV2USB .Click on Continue Anyway at the warning about driver certificate. A successful installation will show the following dialog box. Following the pre-installation of the drivers on your PC, the connected AV2USB will now be detected by Windows (pop up window as follow) Page 8 of 24 Copyrights DSP4YOU ltd AV2USB Click on Install the software automatically. Click on “Continue Anyway” to the warning message about driver signing. Page 9 of 24 Copyrights DSP4YOU ltd AV2USB Page 10 of 24 Copyrights DSP4YOU ltd AV2USB 3.2 3.2.1 AV2USB USB Audio driver configuration Driver general info This panel is just a general information panel with the driver version. 3.2.2 Buffer settings The buffer setting is meant for those looking to optimize the buffering and latency settings of the interface. Note that change of these settings may result in unstable operation since such modifications are PC resource-dependant. In other words your PC + OS configuration may not have the horsepower/memory sufficient to have the lowest latency settings. If you do not require lowest latency (e.g. simple audio playback), we recommend that you do not modify the default safe settings. 3.2.3 Device configuration This panel is the configuration panel for the device currently connected to the PC. Note that only one AV2USB can be connected to a PC. Multiple AV2USB can however be connected to the network. Page 11 of 24 Copyrights DSP4YOU ltd AV2USB As displayed on the screenshot, the AV2USB is currently locked at 48kHZ sample rate which is a common sample rate for most AVB products currently shipping on the market. 3.2.4 Input channel volume control (recording) This panel is self explanatory but here is some basic information of the control available: o 1 x Master volume control for all 8 input channels o 8 x volume controls for all AVB input channels coming from the Network Note that controls of each channel pair can be linked (stereo case) or unlinked (mono). The M button is equivalent to the Mute button. 3.2.5 Output channel volume control (playback) This panel is self explanatory but here is some basic information of the control available: o 1 x Master volume control for all 8 output channels o 8 x volume controls for each AVB outputs channels from PC to the Network 3.2.6 Clock source This panel just confirms that the clock source is from the AVB network which is the way you would expect. Being an Asynchronous USB audio device (clock coming from USB audio endpoint), it’s not possible to select another clock source (e.g. PC). Page 12 of 24 Copyrights DSP4YOU ltd AV2USB 3.2.7 Stream formats Since the AV2USB is always defaulted to 8x IN, 8 x OUT, no configuration is available from the following page. 3.3 Mac OSx configuration Mac OSx has native support for USB Audio class 2.0 device and therefore doesn’t require any drivers. The device will automatically be detected as a compliant multichannel USB audio interface. See below some screenshot of the interface. 3.3.1 Device configuration Once plugged, the device will automatically appear in Utilities - > Audio Midi setup. Select the interface to configure the settings such as format/Clock source. Page 13 of 24 Copyrights DSP4YOU ltd AV2USB To enable this sound card as a default output device, you need to right click on the AV2USB interface to tick “Use this device for sound output”. It will default the AV2USB as the default output device for all your media player applications. 3.3.2 Speaker output for default output channel Being a multichannel device, one can easily configure the AV2USB for a 7.1 application if I2S is being used to feed a multichannel DAC. Here are the 2 most common configurations. Stereo configuration using the Toslink output to your 3rd party DAC. Click on Configure Speakers and the below dialog box will appear. Default channels are I2S 1&2. You need to select Ch9&10 (Toslink TX). Page 14 of 24 Copyrights DSP4YOU ltd AV2USB 7.1 multichannel configuration using the I2S outputs Similar to before but this time, select the 7.1 Surround configuration from the drop down menu. You then just need to assign the I2S channels as per your DAC configuration. Page 15 of 24 Copyrights DSP4YOU ltd AV2USB 4 AVB Streamer Tools setup guide The AVB Streamer tool is the application used to configure the AVB network and stream routing. It is based on the Adobe Air environment and currently only operates on PC environments. See below system requirements Software Microsoft• ® Windows® Vista® SP1/ XP pro SP2 Microsoft• ® .NET framework v3.5 Adobe AIR environment Hardware PC with 1GHz or higher processor clock speed recommended / Intel® Pentium®/Celeron® family, or AMD K6®/AMD Athlon®/AMD Duron® family, or compatible processor recommended. 256 megabytes (MB) of RAM or higher recommended USB 2.0 port Keyboard and mouse or compatible pointing device Step1: Pre-installation steps Install .net framework and .Air environment on your PC. Step2: Getting AVBStreamer Tools install package Get the latest version of AVBStreamer tools from www.dsp4you.com. Login with your user account to gain access to the secure section of the website. Step3: Installation Launch AVBStreamer Toolbox.exe Following a successful installation, AVBStreamer tools will be automatically launched and discover modules on the network. See the default startup screen below. AVB Device Tree lists devices discovered on the network & Virtual devices Page 16 of 24 Copyrights DSP4YOU ltd AV2USB 4.1 User interface overview of the AVB Streamer toolbox AV2USB configuration software provides a simple user interface for configuration of the AVB A Device tree on the left side lists all discovered AVB devices on the network A center section tabbed based structure allows access to the various sections of the user interface Tabbed Structure Device info: Provides overall view of the current settings of AV2USB device including the model number, firmware version, IP settings. Audio settings: Digital Signal Processing section of the interface. Provides control to the basic gain control and advanced DSP algorithms running on the on board Digital Signal Processor. Note that the digital signal processing section will only be enabled if this feature was purchased. 4.2 4.2.1 AV2USB Stream configuration Device info page AVB end points are automatically discovered and listed as part of the AVB tree. Once your PC connected to the network, simply open the AVB Streamer toolbox to have access to all settings. To access the settings of a specific device, click on the AVB device tree on the left. The device info page will automatically load the settings for this device. See below an example. 4.2.1.1 Rename device By default, AVB endpoints will carry the name of the MAC Address of the network interface. The default name can however be modified to a more meaningful “hostname”. To change the name of the device, simply type a new name in the text window and click on the SET button. The renaming is instantaneous and the device will appear in the tree with its new name. Page 17 of 24 Copyrights DSP4YOU ltd AV2USB 4.2.1.2 Static IP mode The AVStreamer toolbox allow for setting up the device as DHCP/AutoIP (i.e. automatic addressing) or Static IP addressing. Click on the SET button below to access the IP settings page. By default, all units ship with DHCP/AutoIP mode and is the mode we recommend for all operation. If using static, insure that you’re aware of what you’re doing else you may not be able to correctly configure the unit. If you do set the unit in static mode and forget the IP address of the unit, you can easily retrieve it looking at the AVB bridge window (little window application running in the background of the main application). Here is a screenshot as an example showing that 2 devices were discovered and their respective Mac address/IP. 4.2.1.3 Firmware upgrade The AV2USB can easily be upgraded to new version over the Ethernet. Click Browse to select the firmware you would like to upgrade the unit with. Make sure not to un-plug the device during the firmware upload to prevent any corruption of the device. 4.2.2 Audio Video Bridging (AVB) stream configuration The AV2USB AVB configuration requires limited setup. The following section will highlight steps involved in building/deleting an AVB stream. Please refer to the AVB primer for the basic terminology used through out this section. 4.2.2.1 Build a Stream Click on the “Configure AVB Stream” button to access the following dialog box. The Talker List and Listener list on the Left and Right pane of the dialog box are automatically generated based on the device discovered on the network. They will most likely be different in your case. For the purpose of this demo, we’re using 1 x AV2USB and 1 x Eline unit. Page 18 of 24 Copyrights DSP4YOU ltd AV2USB To select one listener for configuration, drag & drop action as shown by green arrow To select one Talker for configuration, drag & drop action as shown by green arrow 2 simple sections: Talkers (source) on the left, Listeners (destination) on the right. Select one Talker (i.e. Source) from the Talker list and drag&drop it in the “Drop Talker Here” box. Repeat the same step for the Listener side (i.e. destination). Let’s use the case where the AV2USB is a talker (i.e. Audio playback from a software to be played over network) and the Eline is a listener on the AVB network (i.e. AVB to Analog Audio). With the talker and listener selected, the next step in building a stream is to select the source channels from the talker channel section. You can select one or multiple audio channels (press the CTRL key) from the Talker list. Simply ‘drag&drop’ them to the Listener channel list as shown below. In this example, we’re using ch_1 and ch_2 of the AV2USB to be routed to the 2ch of the Eline. Page 19 of 24 Copyrights DSP4YOU ltd AV2USB Although the user interface will automatically pack up the talker channel in consecutive order on the listener side, audio channels can be re-arranged. Using the Up & Down buttons, one can re-organize the order of channels on the listener side as you wish. The final step is to click on the BUILD Stream button at the center of the interface. A confirmation message will appear with the Stream ID information. 4.2.2.2 Delete a stream Once a stream is configured, the stream is listed in the Talker stream list (below the Talker audio channels), and is uniquely identified by the Listener’s hostname. To delete a stream, simply drag from the Taker stream list the particular stream into the garbage bin. To delete a stream, simply drag the stream into the garbage bin as shown by green arrow To configure a new stream with a new device, simply drag the Talker or Listener into the garbage bin. Page 20 of 24 Copyrights DSP4YOU ltd AV2USB The panel is now reset and ready to be configured again. 5 Virtual Stream – AVB configuration for 3rd party AVB products Since the AVBStreamer v1.4, designers can setup streams with a 3rd party AVB product providing you know the 64bit unique stream ID you would like to “subscribe” to. While this information is sometimes available from a managed network switch (or snooping around networks using a tool like Wireshark), it’s easier when a manufacturer provides the ability to “read/write” the StreamID onto a stream. For more information on how to use this feature, please consult your manufacturer to ask the ability of knowing the stream ID. 6 6.1 3rd party Software and configuration Audio Recording The AV2USB will operate with any software compatible with ASIO/WDM driver standards. Remember to configure the software such that it’s recording at the resolution/sample rate of the AVB stream (24bit/48kHz). In most software that will be under preferences or the first dialog box when creating a multi-channel recording. 6.2 Audio Playback Knowing the AV2USB streams audio at 24bit/48kHz by default, some software might require configuration of a sample rate converter especially if you’re using ASIO drivers. If using WDM drivers, you can configure the sample rate and resolution from Windows sound card settings. (Win Vista and up). The below section will highlight some configuration steps for known multichannel playback software. DSP4YOU will update the list and this manual over time. Page 21 of 24 Copyrights DSP4YOU ltd AV2USB 6.2.1 Foobar (Open Source) Step 1 – Configure the target sample rate from the DSP manager of the Resampler plug-in. Step 2 – Configure the ASIO routing from the playback - > Output section. The Audio channels will appear as 4 pairs of 2ch. Step 3 – Make sure to select the correct interface from the drop down list. Page 22 of 24 Copyrights DSP4YOU ltd AV2USB Page 23 of 24 Copyrights DSP4YOU ltd AV2USB 7 Technical specifications 7.1 AV2USB Technical specifications Item Description Network Processor XMOS G4 - 4 core for up to 1600Mips Network port 2 auto speed sensing 10/100 Mbps RJ45 ports Audio streaming Resolution: 24bit Supported sample rate: 48kHz Up to 8 channels Audio Video Bridging (AVB) standards Audio Video Bridging (AVB) for streaming of low latency, un-compressed audio over Ethernet networks Supports IEEE standards: 802.1as, 802.1Qat, 802.1 Qav, P1722 Audio streaming capability: Up to 8 input channels (AVB to USB), Up to 8 output channels (USB to AVB) Power over Ethernet (PoE) 1 port with with PoE capability for remote powering of device over Ethernet USB 2.0 USB Audio class 2 device, USB 2.0 High speed Asynchronous transport with ASIO based drivers / Driverless on Mac, Thesycon driver provided for Windows Front/Rear connectors FRONT: 2 x RJ45 connectors, 1 x miniUSB connector REAR: 1 x 2.1mm DC connector Power Supply +5VDC Universal power supply, 1A Weight 300g Dimensions (H x W x D) mm 31 x 98 x 81 mm Safety CE Mark, CE/LVD Mounting Removable brackets with keyhole mounts for ceiling or under the desk mounting Page 24 of 24 Copyrights DSP4YOU ltd