1
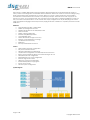
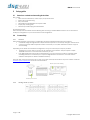
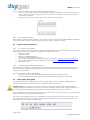
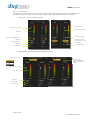
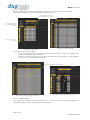
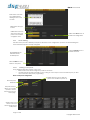
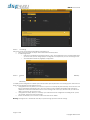
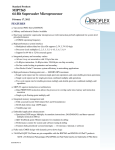
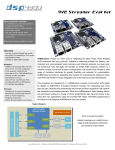
Dana User Manual
Dana Server
User Manual
Version 1.0
Page 1 of 28
Copyrights DSP4YOU ltd
Dana User Manual
Description
Dana Server is a flexible Digital Audio Network Appliance (Dana) designed for the professional audio market. In
today’s world of increasing call for customizable solutions, DSP4YOU answers the needs of customers looking for plug
& play solutions fitting their sophisticated A/V systems. Based on a server + plug-in architecture, Dana enables
customization for both hardware and software. Our philosophy is simple: “Pick and choose and only pay for the
features you need”. On the hardware side, users can select from a wide range of analog and digital I/O cards to fit
with your audio sources/destinations. On the software side, simply configure one of the pre-built plug-in for a wide
range of applications ranging from a BGM processor playing audio from a USB drive to a speaker processor for audio
distribution.
Hardware
32-bit Floating point DSP – Analog Sharc
Flexible I/O configuration in 4 slots
Digital Audio Module slot for AVB/USB I/O card
24-bit conversion
48 KHz / 96 KHz sampling rate
Ethernet AVB (IEEE1722) module
16 configurable GPIO
2GB on-board flash storage for recovery
External + Internal USB drive for storage
10/100 Ethernet connectivity
RS232 port
Euro-style detachable connectors
Control
Adobe Flash based web configuration
SSL protected Web interface
Platform independent (PC/Mac/Linux)
Live/Real time configuration over Ethernet/Internet connection
Bonjour powered platform allows convenient naming of the unit
DHCP/Static/Auto-IP configuration
Embedded FTP server saves configuration
Extensive logs saved on flash
Third party control over telnet/rs232
Remote Backup/Recovery/Upgrade
Secure user accounts
Advance preset configuration
System Diagram
Page 2 of 28
Copyrights DSP4YOU ltd
Dana User Manual
Table of Content
1
2
3
4
5
Product Overview......................................................................................................................................................................4
1.1
Front Panel Description...................................................................................................................................................4
1.2
Rear panel description ...................................................................................................................................................4
1.3
Feature description .........................................................................................................................................................5
1.3.1
Digital Signal Processing ..........................................................................................................................................5
1.3.2
Audio Video Bridging ...............................................................................................................................................5
1.3.3
Multi-track USB Audio playback/recording..........................................................................................................5
1.3.4
Networking at its core ..............................................................................................................................................6
1.3.5
USB audio music playback......................................................................................................................................6
Setup guide ................................................................................................................................................................................7
2.1
Dana box content and mounting instructions ...........................................................................................................7
2.2
Connectivity.....................................................................................................................................................................7
2.2.1
Network ......................................................................................................................................................................7
2.2.2
Analog audio I/O card ............................................................................................................................................7
2.2.3
Digital Audio I/O card..............................................................................................................................................8
2.2.4
Serial port (RS232) .....................................................................................................................................................8
2.2.5
GPIO............................................................................................................................................................................9
2.2.6
AC power connection.............................................................................................................................................9
2.3
System setup requirements............................................................................................................................................9
2.3.1
PC / Mac / Linux systems .........................................................................................................................................9
2.3.2
Control Network minimum requirements ..............................................................................................................9
2.4
Step by Step setup guide...............................................................................................................................................9
System Configuration..............................................................................................................................................................10
3.1
Web interface overview...............................................................................................................................................10
3.2
Dana Server configuration...........................................................................................................................................11
3.2.1
Audio settings ..........................................................................................................................................................11
3.2.2
AVB Configuration..................................................................................................................................................16
3.2.3
GPIO programming................................................................................................................................................18
3.2.4
Preset Building .........................................................................................................................................................19
3.2.5
System settings ........................................................................................................................................................20
3.2.6
User access ..............................................................................................................................................................22
3.3
AVB End point configuration .......................................................................................................................................22
3.3.1
E-line/E-power configuration panel.....................................................................................................................22
3.4
Remote networking configuration .............................................................................................................................24
3.4.1
Firewall configuration.............................................................................................................................................24
3.4.2
Port forwarding........................................................................................................................................................24
Open Control Protocol (OCP) for 3rd party control ............................................................................................................25
4.1
General description ......................................................................................................................................................25
4.1.1
Commands strings ..................................................................................................................................................25
4.1.2
Reply string...............................................................................................................................................................25
4.2
Recovery of IP address and hostname .....................................................................................................................25
Technical specifications .........................................................................................................................................................26
5.1
Dana Server specifications ..........................................................................................................................................26
5.2
I/O card specifications.................................................................................................................................................27
5.3
Digital Audio Interface Specifications .......................................................................................................................28
Page 3 of 28
Copyrights DSP4YOU ltd
Dana User Manual
1
1.1
SYSTEM
LAN
DATA
D.A.I
POWER
Product Overview
Front Panel Description
2
1
1. Signal LED illuminates, clips depending on the input/output signal. The three LED states indicate:
OFF state: No signal
ON state: Signal below-40dBu threshold.
Blinking state: Signal above -40dBu threshold
2. Clip LED illuminates when the signal is 3dB below the clipping threshold of the audio input/output interface. Please
refer to the card specifications for more information on the maximum input/output.
3. SYSTEM LED after complete power cycle sequence (20sec) illuminates when unit is fully operating. An OFF state
indicates an internal failure (software/hardware) to be investigated by looking at internal logs of the unit.
4. LAN LED illuminates when connectivity is established on the Ethernet LAN connection. In DHCP mode, LED is on
when unit is assigned an IP address by the DHCP server. If no Ethernet cable is connected to the unit, LED is OFF.
5. DATA LED blinks to indicate data traffic with the unit using RS232/Telnet or over the web interface. This LED is
therefore a handy connectivity indicator when it comes to discovering a specific unit within an equipment rack. (e.g.
move a fader and look for a Dana server with a blinking activity light)
6. D.A.I Status indicates the status of the Digital Audio Interface (AVB/USB). Illuminated when module connected to
network/or PC and in an operating mode.
7. Power LED illuminates when AC power is applied to the unit.
1.2
Rear panel description
3
1
2
4
5
6
7
1. IEC Power Receptacle: Flush-mount IEC power receptacle for connecting a compatible IEC power cable
(included). Use only the supplied cable or an equivalent International version.
2. Ethernet LAN for 10/100Base T network connectivity using a CAT5/6 cable. Required for web configuration and 3rd
party TCP/IP control over a secure Telnet session
3. RS232: Serial connectivity on DB9 female connector required for 3rd party control with control processors such as
Crestron/AMX/Vitty.
4. GPIO: General Purpose Input/Output header on Phoenix connector. Allows up to 14 low voltage (5V) and 2 high
outputs (12V) for relay trigger.
5. Digital Audio Interface (DAI): I/O slot location for Digital Audio Interface. Current options include:
AVB module for Audio streaming over Ethernet networks
USB Audio module for multi-channel recording and multi-channel playback
6. USB host for configuration backup or USB audio playback from USB key or USB Hard drive.
7. I/O card slots for up to 4 Input/Output cards. Refer to the I/O card section for currently available I/O cards.
Page 4 of 28
Copyrights DSP4YOU ltd
Dana User Manual
1.3
1.3.1
Feature description
Digital Signal Processing
Dana Server is fitted with a powerful floating point Digital Signal Processor (DSP) providing the necessary processing
for most small to medium installations. Two types of Audio Digital Signal Processors currently exist on the market:
Fixed DSP architecture where a manufacturer ships a processor with a unique processing signal flow. In 99%
of cases, such product bears the limitation of a fixed I/O architecture. Being a simpler product to design for
manufacturers, fixed DSP architecture come at a lower cost. The obvious limitation of such device is the
fixed DSP configuration of the product which manufacturers typical never modify. As the A/V installation
evolves (.e.g. more in/out), experience tells us that fixed DSP with fixed I/O processors do not scale well.
On the other side of the spectrum, open DSP and flexible I/O architecture processors will provide the
extensive programming flexibility that is required for complex, large scale systems. Their ability to scale and
fit almost all applications however comes at the detriment of high cost and complex programming skills.
With Dana server, our engineering team designed a product at the crossroads of these 2 types of platforms by
providing:
Flexible I/O configuration thanks to our 4 I/O slots and numerous AVB end points products
Inter-changeable pre-configured fixed DSP architecture with plug&play configuration allowing simplicity of
use and simultaneously providing flexibility for a wide range of applications.
Template algorithms included on Dana servers include: Metering, Automatic Gain Control, Parametric equalizers, true
26 x 24 matrixing, Compressor/Limiter, delay, polarity. For more information about Dana server Audio DSP flow
diagram, please consult the plug-in section of the DSP4YOU website.
1.3.2
Audio Video Bridging
AVB defines a group of network protocols for the distribution of time synchronized and low latency Audio & Video
streams over IEEE802 networks. By leveraging a combination of existing 802 network technologies along with
standards specifically designed for the purpose, AVB technology lays the ground work for un-paralleled guaranteed
media streaming over Ethernet networks. The overall concept of AVB is actually rather simple. Without getting into
too much detail, the three core protocols specify:
Timing and synchronization
Bandwidth allocation through the Stream Reservation Protocol (SRP)
Traffic shaping to ensure that low priority Ethernet traffic does not interfere with AVB traffic
Engineered from the ground up for media streaming applications, AVB has a definitive edge over legacy Ethernet
technology in the sense that it allows bandwidth allocation and priority rules based on timing. Unlike similar audio
over IP (AOIP) technology, AVB will dynamically assign and defend bandwidth allocation for AVB streaming thanks to
the concept of Stream Reservation Protocol (SRP).
Terminology for AVB streaming goes as follow:
o
Audio Video Bridging (AVB): General descriptive for a group of protocols providing audio/ video streaming,
timing, synchronization, Quality of service (QoS) , control and discovery.
o
AVB Endpoint: AVB powered device, capable of transmitting and/ or receiving audio streams using P1722/
P1733 transport protocol.
o
Talker: AVB endpoint transmitting audio to the network. (Source)
o
Listener: AVB endpoint receiving audio from the network. (Sink/ Destination)
o
Talker/Listener: AVB endpoint that is both transmitting and receiving. All AVB endpoints used on Dana series
are by default Talker/Listener devices.
o
Precision Time Protocol (PTP): Allows devices on the network to get a notion of global time in the effort to
synchronize with each other. PTP component in each AVB module can act as a Grand Master (providing
clock) or as a slave (receiving clock). Once a grand master negotiates and is selected as a sync source, all
units will synchronize to it.
o
Streams: General term describing packetization of one or multiple audio/ video channels over the network.
Stream can be unicast or multicast. For the time being, the AVB module only supports unicast streaming.
Future revisions will provide additional features.
o
Stream ID: Unique 64-bit stream identifier used by AVB transport protocols to identify streams.
1.3.3
Multi-track USB Audio playback/recording
Dana server not only innovates by introducing AVB at the core of our architecture, it also innovates with our multichannel playback/recording interface. Based on the USB 2.0 protocol, the USB audio card available for the Digital
Audio Interface slot can provide 8 channels of recording and 8channels of playback to a nearby PC/Mac machine.
The current maximum specifications for playback/recording are:
Playback: 48kHz/ 24bit / Up to 8channels
Recording: 48kHz/ 24bit / Up to 8channels
Refer to the USB audio card specifications for more information.
Page 5 of 28
Copyrights DSP4YOU ltd
Dana User Manual
1.3.4
Networking at its core
Dana Server leverages a wide range of proven I.T. networking technologies to simplify installation and monitoring of
the unit. Here is a quick summary:
-
HTML Webserver: No more software, no more cross-compatibility issues. Dana server greatly simplifies your
work thanks to its embedded webserver. Its user interface is used for configuration and monitoring of the
unit.
-
Adobe Flash®: Dana server leverages the latest Web 2.0 Flash technology for a real time user experience
unlike any other interface. A web browser (IE/Firefox/Safari/Chrome..) enabled with the Flash® player is all
you need.
-
ZeroConf: Defines a set of techniques to allow plug&play configuration and discovery of network devices.
Forget about static IP, complex network setup techniques. Zeroconf on Dana server allows you to setup a
device with “Zero knowledge, zero configuration”.
-
Bonjour/mDNS: Nowadays widely supported by Apple devices, mDNS fits in the “ZeroConf” philosophy of
Dana server by providing the ability to give a name to a device, rather than identified by its IP address. By
default enabled on Mac machines, Bonjour requires to be installed on Windows machine. Thanks to the
Bonjour protocol, Dana server can receive a hostname and does not require you to remember by its IP
address.
-
Link Local Addressing (Auto IP): Also part of the ZeroConf philosophy, Link Local Addressing will
automatically assign an IP address in the absence of a DHCP server. Link Local Addressing is a handy
feature when it comes to a direct connection to the unit without the need of using Static IP addressing on
both units.
-
DHCP client: Well known to most of you, a network with a DHCP server (most of the time part of the Router)
allows automatic assignment of the IP address. Dana server supports DHCP to allow automatic addressing.
-
Transport Layer Security (TLS): With today’s growing security concern, DSP4YOU leads the way in the market
by providing a secure communication link to your Dana server. Thanks to TLS, all messages between your PC
and the server are encrypted to provide a secured path for both Ethernet and Internet connectivity.
-
Telnet: Provided as a common user console for monitoring of servers, Dana server provides a telnet
interface on port 23. The most likely use of this interface is remote control from a 3rd party control processor
(AMX/Crestron/Vitty..) over Ethernet networks.
-
File Transfer Protocol (FTP): Widely used for the transfer of large files between servers, Dana server is fitted
with a FTP server for the backup/upload of files such as audio files/firmware files.
1.3.5
USB audio music playback
With Linux at its core, Dana server is much more than a simple Digital Audio Signal Processing unit (DSP). Thanks to the
USB Audio playback feature, Dana server can easily turn into a Background Music Processor. Current supported files
include MP3 audio files located in the root folder of an External USB hard driver or USB key plugged into the rear USB
port.
Page 6 of 28
Copyrights DSP4YOU ltd
Dana User Manual
2
2.1
Setup guide
Dana box content and mounting instructions
Box Content
Dana server loaded with I/O cards as per your purchase order
Rack ears for rack mounting
IEC power cable
2m Straight-through Shielded CAT-6 patch cable
Step-by-step startup guide
Phoenix style terminal plug-in terminal blocks
Mounting instructions
Dana unit ships with removable rack ears allowing rack mounting or shelf installation. Remove the 4 x M3 screws to
modify the configuration of your unit from shelf to rack configuration.
2.2
2.2.1
Connectivity
Network
Dana requires Ethernet connectivity for configuration through its embedded web-based user interface:
•
A standard-straight through Ethernet CAT5/6 network is required for connectivity through a network switch.
•
A crossover CAT-5/6 cable is required for direct connectivity to a PC/Mac machine that doesn’t support
auto-switching.
Depending on the Dana server hardware configuration, two types of network ports may be provided:
•
1x Ethernet port to be used for control over the web based user interface. This port requires a simple
10/100MB connection to a network switch or directly to a PC.
•
If the Digital Audio Slot is fitted with the AVB interface, 2 x RJ-45 connectors provide a redundant audio
streaming interface. If redundancy isn’t required a single Ethernet connection to a network switch is
sufficient. AVB requires at minimum 100MB connectivity.
Note that both network connections can co-exist on the same network/ switch without any issues. Please consult the
minimum system requirements section for more information.
Ethernet port for AVB streaming
Ethernet port for Control
2.2.2
Analog audio I/O card
Page 7 of 28
Copyrights DSP4YOU ltd
Dana User Manual
Dana Server can accept Balanced and Unbalanced audio inputs/ outputs. See the instructions below for audio
connectivity:
Balanced connection
S = > Cable Shield
+ = > Positive cable
- = > Return cable
S
2.2.3
+
Un-balanced audio
S = > Jumper link to + = > Positive cable
- = > Return cable (jumper to shield)
-
+
-
Digital Audio I/O card
Dana Server accepts Balanced (AES/EBU) and Unbalanced (SPDIF) digital audio as well as Fiber (toslink) connectivity.
See the following instructions for the correct pin out.
Note that the Asynchronous Sample Rate Converter (ASRC) allows a wide range of digital input sample rate from
8kHz-192kHz. The digital output sample rate will be synchronized to the Digital Signal Processor sampling rate.
AES/EBU mode
S = > Cable Shield
+ = > Positive cable
- = > Return cable
SPDIF mode
+ = > Positive cable
- = > Return cable
Toslink
One toslink receiver connected to
the digital audio source.
One toslink transmitter connected to
the digital audio destination
Toslink fiber cable
S
2.2.4
+
-
+
-
Serial port (RS232)
1 x RS232 port allows connectivity to an external control processors (e.g. Crestron, AMX, Vitty..). An RS232 null modem
cable is required for connection to a PC. Pin out for the Dana RS232 connector is as follow:
Pin2: Transmit (TX)
Pin3: Receive (RX)
Pin5: Ground (GND)
Note: Dana server RS232 port does not handle hardware handshaking and therefore CTS/RTS pin are not required.
Page 8 of 28
Copyrights DSP4YOU ltd
Dana User Manual
2.2.5
GPIO
Up to 14 x GPIO and 2 relay outputs are provided for external interfacing.
o
GPIO 1 to 14 will connect between +5V and ground. In an input configuration, they can be connected to a
contact closure. In an output configuration, they are able to drive an LED (max 7mA) without the need of
an external power supply.
o
Relay output 15/16 are to be used for relay outputs and can sink up to 500mA.
2.2.6
AC power connection
Dana requires a stable 90 to 240V, 50-60Hz AC supply. UPS protected systems will insure higher reliability in installations
where power quality is unknown. Plug the provided AC power cable to the IEC receptacle.
2.3
2.3.1
System setup requirements
PC / Mac / Linux systems
Dana Server requires an initial configuration to operate correctly. Thanks to its web-based interface powered by Flash
technology, Dana server is cross-platform compatible for PC/MAC/Linux system:
CPU 1GHz or higher
128MB video card
RS232 port or USB-RS232 adapter
Internet browser: IE/Safari/Firefox/Chrome
Latest version of Adobe Flash web plug-in from Adobe.com website : http://get.adobe.com/flashplayer/
Latest version of Bonjour protocol if using Windows platforms: http://support.apple.com/kb/DL999
Keyboard & Mouse
2.3.2
Control Network minimum requirements
Dana requires at the minimum a 100BaseT Ethernet network for configuration and monitoring. Internet connectivity
may be provided to allow remote monitoring over Internet. See the port forwarding section in the configuration
section for more information.
Dana server supports 2 modes of IP addressing:
Automatic with DHCP or Link Local Addressing mode (Auto IP). This is the default mode.
Static IP addressing (only recommended for users knowledgeable enough to setup a network)
2.4
Step by Step setup guide
The following instructions are a high level summary of the basic steps required to configure a single Dana server.
These instructions should be read along with the configuration section of this manual.
Important note: All units will ship in DHCP/Auto IP mode and configured with the hostname danal.local. When
configuring multiple Dana Servers on one network, make sure to configure each unit with a unique hostsname as a
first step. If using Static IP addressing, also remember to modify the default IP to prevent an IP conflict.
Step 1: Following the connectivity instruction the previous section, power on the unit. Power LED of the front panel will
light up. The bootup sequence is about 20second long.
Step 2: Once the System & Network Status Led illuminate, the unit is ready for control. We can now connect to the
unit using the Internet Browser of your choice (IE/Firefox/Chrome/Safari/). Simply type into the address bar of the
browser “danal.local” as shown in below picture.
Page 9 of 28
Copyrights DSP4YOU ltd
Dana User Manual
Step3: A prompt appears for a secure login to the Dana web interface over the TLS protocol (Secure connection).
The default account credentials are:
User name: admin
Password: admin
Step4: Once logged into the user interface, you can now navigate the tabbed interface to configure the unit as
required. You are now live and all settings are automatically applied to the unit real time.
3
3.1
System Configuration
Web interface overview
Dana server web interface allows intuitive control without the typical learning curve of complex software. With the
help of Web 2.0 technology, Dana server provides a real time and dynamic web interface unlike anything you’ve
seen before. While the DSP configuration depends on the firmware version loaded in the unit, the core structure of
the User interface consists of the following core sections:
A Device tree on the left side lists all discovered Dana devices on the network (server + AVB end points)
A center section tabbed based structure allows access to the various sections of the user interface
Page 10 of 28
Copyrights DSP4YOU ltd
Dana User Manual
Tabbed Structure
Status: Provides overall view of the current settings of Dana server including the model number, firmware
version, loaded I/O cards, DSP & CPU usage, IP settings. The bottom side of the page also includes up to 8
button shortcuts which can be assigned to a preset.
Audio settings: Digital Signal Processing section of the interface. Provides control to all DSP algorithms
running on the floating point Sharc DSP. Note that this section is flexible with the choice of plug-ins and
loaded I/O cards.
AVB Configuration: This section allows configuration of AVB streams on the network. Using a simple drag and
drop interface, one can easily configure streams between AVB end points.
GPIO: Section providing control of the General Purpose Input Output interface.
Presets: Section for the programming of preset configuration of the Audio setting section (DSP)
System settings: Section for the general configuration of the Dana server (e.g. RS232/time&date/IP/firmware
upgrade…)
User Access: Section for configuration of the user accounts.
3.2
Dana Server configuration
3.2.1
Audio settings
The audio settings page consists of 2 sections:
A monitoring section allowing metering of audio signals on the card slots as well as audio signals on the
Digital Audio Interface (DAI) such as the AVB signal or USB audio signals.
A center section allowing control of the various algorithms of the fixed architecture DSP.
See below one template plug-in configuration currently available on the Dana series.
The following sections will describe the configuration panel for each processing block.
Page 11 of 28
Copyrights DSP4YOU ltd
Dana User Manual
3.2.1.1
Slot control
Depending on the loaded card in the slot, the user interface will automatically load the correct user interface for the
slot. With two types of I/O cards currently available (analog or digital), the following interfaces are available:
Analog input / output configuration panels
Output RMS meter
Digital Gain (-60 to +24dB)
Digital output attenuation
RMS meter
Analog mute (post DAC)
Analog trim (0 to 60dB in 6dB steps)
Digital Mute
Phantom Power (+48V)
Analog PAD (-14dB) for
Pro/consumer output level
Polarity reversal
Polarity reversal
Custom output label
Custom text label
Digital AES/EBU – SPDIF/Toslink interface configuration panels
Selection of input source
Selection of output
impedance (AES/EBU) or
SPDIF for the terminal block
connector
Digital Gain (-60 to +24dB)
RMS meter
Digital Mute
Polarity reversal
Custom text label
Page 12 of 28
Copyrights DSP4YOU ltd
Dana User Manual
3.2.1.2
USB Audio input
For applications requiring playback of MP3 music files from a USB key or USB hard drive, Dana server provides the
ability to read such file in loop mode. The perfect fit for a background music processor application.
Press to play
3.2.1.3
Parametric
Press to Stop
Equalizer (PEQ) control
Up to 5 bands of PEQ on each input/output section is available. For each band, the typical PEQ settings go as follow:
o
Frequency (Freq): Using the slider or text box, enter the center frequency of the PEQ filter
o
Gain: controls the boost or dip of the equalizer
o
Q: Controls the number of octaves over which the filter affects the signal.
o
Bypass: Control on a per band basis whether the PEQ is enabled or not.
At any times during the tuning, one can easily mouse over the curve to provide a real time reading of the value.
Band selection by radio
button
3.2.1.4
Filter Control
On some plug-ins, the DSP configuration may be fitted with filter block. This block can either be configured as a Low
pass or High pass filter for Butterworth, Linkwitz Riley filters up to 48dB/oct. Use the radio button to toggle between Low
and High pass mode.
Low Pass filter mode
High Pass filter mode
Page 13 of 28
Copyrights DSP4YOU ltd
Dana User Manual
3.2.1.5
Matrix mixer
Dana server ships with a full matrix mixer allowing up to 26 in by 24 out complete with input/output label
automatically tracking the custom label entered on the input/output slots.
Custom labels from Output slots
automatically tracks to the mixer
Custom labels from Input
slots automatically tracks
to the mixer
Click on “+” to expand
the Matrix
Matrix mixer in reduced size
Matrix mixer in expanded mode
Two modes of operations are available:
o
Matrix mode: Toggles the cross point from ON to OFF with a simple click of a mouse. A grey highlight of the
active row and columns guides the selection.
o
Mixer mode: Controls the level at the cross point for the mixing part of the “Matrix Mixer”. A red highlight of
the active row and column guides the selection.
One click toggles on/off crosspoint
Matrix Mode – Single click toggles crossopoint
3.2.1.6
Mixer Mode – Single click opens up gain control
Bandpass filter
At the output of the matrix mixer, a bandpass filter made up of 1 x Low pass filter and 1 x high pass filter provides all
the flexibility required for multi-way speaker processing applications.
Page 14 of 28
Copyrights DSP4YOU ltd
Dana User Manual
Filter type provided include:
o
Butterworth (BW): 6/12/18/24/30/36/42/48dB
o
Linkwitz Riley (LR): 12/24/36/48dB
3.2.1.7
Compressor/Limiter
The control panel for the compressor limiter provides all the typical control settings including:
o
Threshold: 0 to -60dB in 0.1dB increments
o
Ratio: 1 to 50 in 0.1dB increments
o
Gain: 0 to 24dB in 0.1dB increments
o
Knee: 1 to 60 in 0.1dB increments
o
Attack time: 20 to 100ms in 0.1ms increments
o
Release time: 20 to 100ms in 0.1ms increments
o
Bypass: Bypass all compression/limiting on the path
3.2.1.8
Delay
The delay block provide time alignment for up to 3000ms (3s).
Both distance and time are provided for convenience sake.
Page 15 of 28
Copyrights DSP4YOU ltd
Dana User Manual
3.2.2
AVB Configuration
The AVB configuration step consists in building the streams between a talker and listener. In Dana server, the AVB
configuration tab can configure streams for any AVB enabled device on the network (Server or AVB end points).
The hostname is linked to the server hostname and can only be changed from the system settings tab.
Unlike similar Audio over IP (AOIP) technology using fixed “bundle” size, Dana server is very flexible on the channel
assignment to be combined into the AVB “stream”. Current specifications of Dana server AVB interface are as follow:
o
Up to 16 audio channels in, up to 16 audio channels out
o
Up to 6 streams in, up to 6 streams out
Future versions of the platform/firmware will expand the specification of the platform.
The Dana server AVB configuration requires limited setup. The following section will highlight steps involved in
building/deleting an AVB stream. Please refer to the AVB primer for the basic terminology used through out this
section.
3.2.2.1
Build a Stream
Click on the “Configure AVB Stream” button to access the following dialog box.
To select one listener
for configuration,
drag & drop action
as shown by green
arrow
To select one Talker
for configuration,
drag & drop action
as shown by green
arrow
2 simple sections: Talkers (source) on the left, Listeners (destination) on the right.
Select one Talker (i.e. Source) from the Talker list and drag&drop it in the “Drop Talker Here” box. Repeat the same
step for the Listener side (i.e. destination). The dialog box should now look like this:
Page 16 of 28
Copyrights DSP4YOU ltd
Dana User Manual
With the talker and listener selected, the next step in building a stream is to select the source channels from the talker
channel section. You can select one or multiple audio channels (press the CTRL key) from the Talker list. Simply
‘drag&drop’ them to the Listener channel list as shown below:
Although the user interface will automatically pack up the talker channel in consecutive order on the listener side,
audio channels can be re-arranged. Using the Up & Down buttons, one can re-organize the order of channels on the
listener side as shown below.
Once a stream is configured, simply click the “Build Stream” button at the center of the dialog box. If successful, a
dialog box will acknowledge the stream configuration with the stream ID.
Page 17 of 28
Copyrights DSP4YOU ltd
Dana User Manual
3.2.2.2
Delete a stream
Once a stream is configured, the stream is listed in the Talker stream list (below the Talker audio channels), and is
uniquely identified by the Listener’s hostname. To delete a stream, simply drag from the Taker stream list the
particular stream into the garbage bin.
To delete a stream,
simply drag the stream
into the garbage bin as
shown by green arrow
To configure a new stream with a new device, simply drag the Talker/ Listener into the garbage bin.
3.2.3
GPIO programming
The GPIO tab allows for programming of the configuration of the General Purpose Input/outputs (GPIO).
The current plug-in only enables the recall of a pre-built preset on the trigger of a contact closure (Input type). Future
versions of the firmware will allow additional features.
Page 18 of 28
Copyrights DSP4YOU ltd
Dana User Manual
STEP1: Select the GPIO
for configuration by
clicking on one of the
16 GPIO.
STEP2: Select the type
of GPIO
STEP3: Select from the
drop down menu the
preset to be recalled
on high/low state
3.2.4
STEP4: Click Save button to
finalize the configuration.
Preset Building
The Dana server provides a flexible yet simple user interface for the configuration of presets. The default dialog box
show below lists all presets currently configured.
Click the Recall button to
enable the Preset
Red highlighted text
indicates the last
recalled preset.
Click the New button to
create a new preset.
3.2.4.1
Building a new preset
Preset building under Dana can be of two types:
o
Block mode: Saves all the settings of a specific set of blocks.
o
Command mode: Provides the ability to save a string of custom Open Control Commands (OCP) to allow
more customized, finer preset programming.
Block mode preset configuration:
Enable this button if you’d like the
preset to be recalled on power up.
Enter the preset
label here
The preset shortcut
allows you to assign
a preset to one of
the 8 buttons on the
home page.
Tick box next to the
block to save the
block settings as part
of this preset.
Page 19 of 28
Copyrights DSP4YOU ltd
Dana User Manual
Command mode preset configuration:
The dialog box present the same basic configuration at the exception of the bottom part where users can now paste
their custom Open Control Command strings to modify the setting of a specific DSP object of the Dana server.
Paste Open Control
Commands in this
text box.
Note: Please consult the Open Control Command section of this user manual for more information about building the
correct commands to control a specific block.
Once the preset configured, click the Save button to finalize the configuration.
3.2.4.2
Load/Edit or Delete a preset
Once a preset built and configured, its settings can be altered with the Load/Edit feature.
Select one of the
presets already built
Click here to delete
the selected preset.
3.2.5
3.2.5.1
Click here to edit the
settings of one of the
preset.
System settings
Basic settings
The Basic settings tab allows configuration of:
•
Baudrate of the RS232 port: 9600 / 38400 / 115200
•
Date: Click on the calendar to set the embedded Real Time Clock (RTC)
•
Time: Set the hour and time of the device.
Page 20 of 28
Copyrights DSP4YOU ltd
Dana User Manual
3.2.5.2
I.P settings
This section of the system settings panel allows configuration of:
•
Dana server hostname: A unique name which will conveniently allow
•
IP addressing modes
o
Static IP for configurations requiring a static IP . Note, this configuration is not recommended unless
you know what you are doing. Improper configuration could prevent you from accessing the unit.
o
Automatic/DHCP mode for plug&play configuration
3.2.5.3
System
/
Backup
Recovery
To simplify system configuration of similar systems and/or allow rapid replacement of an existing system, Dana server is
fitted with the following system backup/recovery.
•
Configuration recovery allows you to browse on your PC for a binary file (.bin extension). Once selected, the
file is automatically uploaded by FTP to the server. Note that the configured IP address and hostname is
displayed for reference. If different from the current setting, make sure to pay attention else you will not be
able to access the unit at power cycle.
•
Configuration backup allows you to backup your entire Dana server configuration including audio, system,
user settings, presets and even system logs.
•
Restore to default if you ever want to restore the unit back to default.
Warning: Pressing restore to default will clear all your system settings, presets and audio settings.
Page 21 of 28
Copyrights DSP4YOU ltd
Dana User Manual
3.2.5.4
Firmware Upgrade
The firmware upgrade step dialog box is as shown below. Click on Browse for a binary file to locate the .bin file you
downloaded from our website.
3.2.5.5
System Logs
Dana server provides a system log showing a list of last major events. Current logged events include:
System boot up (handy at troubleshooting potential power down of the unit)
IP addressing (handy at troubleshooting potential IP change on the network)
Future logging event to be included in future versions of the firmware.
3.2.6
User access
Dana server offers a secure login interface (TLS) to the webserver with a default username (admin) and password
(admin). We strongly recommend that you modify the user name/password
3.3
AVB End point
configuration
Dana server not only provides
a User interface for the
configuration and monitoring
of the Server, but it also allows
configuration of any device from the Dana series currently connected on the network. By clicking on the device tree
on the left, one can access and configure any device from the Dana series. The following section will describe the
configuration and control of Dana series AVB end points.
3.3.1
E-line/E-power configuration panel
From the Device tree, AVB enpoints are automatically advertised and available for configuration without the need of
any configuration. For easy identification, the default hostname of the Emic module is its Mac Address. One can
easily modify the hostname from the “AVB Streamer” info tab.
The status page provides general information such as the loaded firmware, maximum input and output channels.
Page 22 of 28
Copyrights DSP4YOU ltd
Dana User Manual
AVB routing panel
similar to the Dana
Server panel.
The AVB Streamer audio setting provides access to the de-centralized Digital Signal Processing available on the AVB
End point. The optional DSP feature may or may not be available depending if the AVB End point was purchased
with a DSP plug-in license. Note that all AVB End point are provided on board local Digital Signal Processing meaning
that the optional DSP feature can be enabled at a later time. Contact our sales team for more information.
Label automatically
assigned depending
on the routed AVB
stream.
For more information about the configuration of the AVB end points (E-line/Epower), please consult their respective
user manuals.
Page 23 of 28
Copyrights DSP4YOU ltd
Dana User Manual
3.4
Remote networking configuration
3.4.1
Firewall configuration
Some corporate networks may require a specific firewall setting to enable access of the unit across subnets. Here is a
summary of the ports being used on Dana server:
o
o
o
o
3.4.2
Port 80 – TCP/IP
Port 2009 – TCP/IP
Port 843 – TCP/IP
Port 23 - Telnet
Port forwarding
Dana server fully supports port forwarding, i.e. the ability to control the device over the internet with minimal
configuration and no VPN requirements.
To enable port forwarding on Dana and control from the Web interface, 3 ports needs to be forwarded (80/2009/843)
such that any access from the WAN will be re-directed to the Dana server. We recommend setting up Dana to static
IP address to insure the server IP address does not change.
While every Router interface is different, here is a typical interface for a Dana server with a local IP 192.168.121.73.
Template Router configuration for Dana Server port forwarding
Note that you will need the Public IP provided by your Internet provider (on the Dana side) in order to access the
Dana server. Services of Dynamic DNS such as “DynDNS.org” can provide a free DNS name for your router and allow
you to access the unit remotely without knowing its IP address.
Note that port forwarding is a very common networking feature of the I.T industry that is very well documented online.
We therefore recommend that you perform a bit of research to know the basics of port forwarding setup if you feel
this section didn’t provide the information you needed.
Page 24 of 28
Copyrights DSP4YOU ltd
Dana User Manual
4
Open Control Protocol (OCP) for 3rd party control
4.1
General description
Dana server supports a comprehensive 3rd party protocol (OCP) over RS232 or TCP/IP interface for control by a 3rd
party control processor (AMX/ Crestron/ Vity/ PC..). The ASCII based Open Control Protocol (OCP) has the following
basic rules:
o
OCP is case sensitive
o
Each OCP command consists of an ASCII command string terminated by a line feed (0A in Hex)
o
Each OCP reply consists of an ASCII reply string followed by a carriage return + a line feed (x0Dx0A in Hex)
o
To simplify system programming of Dana server, no lengthy or complex user manual is required. Simply log-in
to the Web user interface and look at the bottom section of
4.1.1
Commands strings
Command strings from a 3rd party processor (e.g. Crestron/AMX/Vity)to a dana server can be of three types:
Command string to “GET” the status of a block
get
localhost
x0A
Command string to “SET” the status of a block
set
address
localhost
address
value
x0A
address
value
x0A
Command string to modify the status of a block with “SETSTATUS”
setstatus
localhost
In this case, value can range from 1 to 3:
1 = mute state
2 = active state
3 = bypass state
4.1.2
Reply string
To provide full monitoring of the structure, dana server provides a comprehensive reply to each command string
issued by the 3rd party control processor. Two types of reply string can be summarized as follow:
If the command string was successfully processed by the server, the following string will be output as a reply:
ACK
State
“Command string received”
Value
x0Dx0A
ACK: String of acknowledgement by the server
State: Three potential arguments
o
active: 1
o
bypass: 2
o
mute: 3
If the command string was unsuccessfully processed by the server, the following string reply will be given:
NACK
4.2
“Command string received”
Value
x0Dx0A
Recovery of IP address and hostname
In the unlikely event that you would have lost the hostname and IP address of the unit, the RS232 port is the only
interface able to troubleshoot the device.
Please refer to the Serial port connectivity for more information about the requirements.
get_sysstatus
x0A
Page 25 of 28
Copyrights DSP4YOU ltd
Dana User Manual
5
Technical specifications
5.1
Dana Server specifications
Feature
Description
Digital Signal Processor
32bit floating point, Sharc Core, 1600MFLOPS peak
Host Processor
400MHz CPU running custom Linux kernel
Storage
On- board 2Gb SD card supports storage of configuration for in-field replacement.
External USB slot allows connection to USB key or external hard drive for audio loop playback
of MP3 files
Sample rate
48kHz or 96kHz depending on plug-in selected
Card slots
4 x configurable slots provide flexible Input/Output configuration for analog & digital audio
cards. See table below
Optional Ethernet AVB interface
Optional Ethernet AVB module provides 16 channels IN, 16 channels OUT, synchronized and
low latency
Maximum cable length 100m/300ft and up to 7 Ethernet switch hops on CAT5/6/7
Optional USB interface
Asynchronous USB interface, Windows/Mac compatible
Up to 8 x channels of Audio recording, 24bits/48kHz
Up to 8 x channels of Audio playback, 24bits/48kHz
Rear panel connectors
Ethernet control: RJ-45, 100Mbps
Ethernet AVB (Optional): RJ-45, 100Mbps
RS-232 serial: Female DB-9 connector for full duplex communication
16 GPIO connector for recall of preset, remote trigger from Dana
USB host: allow for backup/restore of configuration, USB audio playback in loop for
Background music processor
Front panel indicators
I/O card LEDs: Per channel signal and clip LED
Others: System, LAN, Data activity, D.A.I slot status, Power LED indicators
GPIO connector
Up to 14 x configurable control inputs: 0 to 5V, 5kΩ - can be assigned to trigger mute or
preset.
Up to 14 x configurable control outputs: 0 to 5V, 440Ω, 10mA source - can be assigned to
drive LED directly
Up to 2 x configurable control output can drive 12V relays, 500ma sink
Supported Network protocols
HTTP, Secure Telnet, FTP, POP3/SMTP, NTP, Bonjour, SSL, TCP socket connection
Power supply
100 ~ 240 VAC, 50/60Hz, 40W internal power supply
Power consumption
< 55VA
BTU rating
< 180 BTU/hr
Dimensions (H x W x D)
43 x 440 x 320 mm
Certifications
CE, UL (Pending), ROHS
Page 26 of 28
Copyrights DSP4YOU ltd
Dana User Manual
5.2
I/O card specifications
2 x 2 Analog card
Description
Analog input & output card
Channels
2 x balanced input channels
2 x balanced output channels
Frequency response
20 Hz - 20kHz, +/- 0.5dB
20 Hz - 20kHz, +/- 0.5dB
Data format
24bit ADC
24bit DAC
Sample rate
48kHz or 96kHz
48kHz or 96kHz
Analog trim gain/pad
0 to 60dB in 6dB steps
0dB (unity) or –10dB pad
Maximum level, balanced, <1% THD
21dBu @ 0dB gain
20dBu or 10dBu
Dynamic range
>108dBu un-weighted
>108dBu un-weighted
Distortion 20Hz-20kHz @+4dBu
< 0.001%
< 0.001%
Impedance
10k ohms
200 ohms
Phantom Power
+48V - 10mA/ch
n/a
Equivalent Input Noise (EIN),
20Hz-20kHz, @+48dB, Rs = 150Ω
-125dBu
n/a
Connector
Euro-style 3 pin connector
Euro-style 3 pin connector
2 x 2 AES/SPDIF/Toslink card
Description
Specifications
Digital input format
Selectable between AES-EBU/SPDIF/Toslink
Sample Rate Converter (ASRC) allows digital input 8kHz-192kHz
Channels
2 x channels in, 2 x channels out
Frequency response
20 Hz - 20kHz, +/- 0.5dB
Digital output format
Selectable impedance between AES-EBU/SPDIF + Toslink
Sample rate
48kHz or 96kHz
Dynamic range
120dB
THD + N
<-140dB
Impedance
110Ω (AES/EBU), 75Ω(SPDIF)
Connectors
SPDIF/AES EBU: Euro-style 3 pin connector
Toslink: Optical receiver, Optical transmitter
Page 27 of 28
Copyrights DSP4YOU ltd
Dana User Manual
5.3
Digital Audio Interface Specifications
Audio Video Bridging interface for streaming of multiple audio channels over Ethernet based networks.
Audio Video Bridging (AVB) Interface
Description
AVB inputs
AVB Outputs
Channels
16 channels in
16 channels out
Streams
Up to 6 streams
Up to 6 streams
Data format
24bit ADC
24bit DAC
Sample rate
48kHz or 96kHz
48kHz or 96kHz
IEEE standard support
IEEE 802.1as, IEEE 1722, IEEE 802.1Qav
IEEE 802.1 Qat (pending), IEEE 1722.1 (Pending)
Redundancy capability
Dual RJ-45 connector, Dual MAC + Dual PHY
Complete level of redundancy for both cable, I.C and firmware
I.P Addressing
DHCP addressing if DHCP server is found on network
Auto-IP address (Link Local Address) if not DHCP found
Discovery/Control/Naming protocol
ZeroConf based protocol allows naming, self discovery and
automatic status update of the devices on the network
Connectors
Dual RJ-45 connectors
USB audio 2.0 interface for streaming of multiple audio channels to a USB PC/Mac device.
Multi-Channel USB Audio Playback/Recording interface
Description
Specifications
Channels
8 channels in
8 channels out
Frequency response
20 Hz - 20kHz, +/- 0.5dB
20 Hz - 20kHz, +/- 0.5dB
USB transfer
Asynchronous
Asynchronous
Sample Rate
48kHz or 96kHz
48kHz or 96kHz
Resolution
24bit / Uncompressed
24bit / Uncompressed
USB Driver compatibility
Windows / Mac
Windows / Mac
Asio compatibility
Yes
Yes
Connector
Single USB 2.0 Type B connector
Recording/ Playback software
Compatible with any Win/Mac software supporting multi-channel
playback & recording
Page 28 of 28
Copyrights DSP4YOU ltd