1
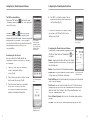
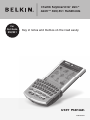
Thumb Keyboard for Dell®
AximTM X50/X51 Handhelds
For
Dell Axim
X50/X51
Key in notes and memos on the road easily
User Manual
F8D0502
Table of Contents
Table of Contents
Introduction . . . . . . . . . . . . . . . . . . . . . . . . . . . . . . . . . . . . . . . . . . . 1
Installing the Thumb Keyboard Software . . . . . . . . . . . . . . . . . . 2
Removing the Thumb Keyboard Software . . . . . . . . . . . . . . . . . . 3
Installing Thumb Keyboard to your Axim . . . . . . . . . . . . . . . . . . 4
Using your Thumb Keyboard . . . . . . . . . . . . . . . . . . . . . . . . . . . .5-6
Configuring the Thumb Keyboard Software . . . . . . . . . . . . . . .7-8
Frequently Asked Questions (FAQs) . . . . . . . . . . . . . . . . . . . . . . . 9
Information . . . . . . . . . . . . . . . . . . . . . . . . . . . . . . . . . . . . . . . . . . 10
Introduction
Congratulations and thank you for your purchase of the Belkin Thumb
Keyboard (F8D0502) for your Dell Axim X50/X51 handheld. Easy to install
and use, the Thumb Keyboard features a compact design that lets you
start writing your email and notes anywhere you go. Please review this
User Manual thoroughly so that you can get the most from this new, handy
innovation from Belkin.
Installing the Thumb Keyboard Software
Before installing the Thumb Keyboard software,
please make sure that:
1.
You have saved all documents;
2.
ActiveSync is installed and active on your PC; and
3.
Your Dell handheld has at least 300KB of free memory.
Follow these instructions to install your Belkin Thumb Keyboard
software on your Dell Axim handheld:
1.
Close all active windows on your Axim.
2.
Connect your Axim to your desktop computer and make sure
Microsoft ActiveSync is “active”.
3.
Insert the Belkin Thumb Keyboard Installation CD into the CD-ROM
drive of the desktop, then the setup program will launch automatically.
4.
Choose the “Next” option in the setup program.
5.
Microsoft ActiveSync’s “Add/Remove Programs” dialog will pop up.
6.
Click “Yes” in response to the question, “Install Belkin ThumbBoard
using the default application install directory?”.
7.
Click “OK” in response to the “Application Downloading
Complete” dialog.
Note: For X51 Pocket PC (Window Mobile 5.0), please click “Yes”
when asked if you trust the publisher to continue.
8.
The Thumb Keyboard software is successfully installed on your Axim.
You can disconnect your Axim from the desktop at this time.
9.
On the Axim side, the “ThumbBoard” configuration page will launch
automatically. If not, tap the “Thumb keyboard” icon on the “Start”
menu of your Axim to enter the configuration screen.
10. Connect the Thumb Keyboard to your Axim and start typing in the test
area. You can also customize the other configurations here to suit
your needs.
1
2
Removing the Thumb Keyboard Software
Follow these instructions if you want to remove the Thumb
Keyboard software from your Axim:
1.
Close all active windows on your Axim.
2.
Go to the “Remove Programs” settings page under the “System”
section in the ”Settings” menu.
3.
Select “BelkinThumbBoard” and then tap “Remove”.
4.
Tap “Yes” in response to the “Remove Program” dialog in confirming
the removal of the software.
Note: Make sure you have reinstalled the software before using the
Thumb Keyboard again.
Reinstalling or Upgrading the Thumb Keyboard Software
To reinstall or upgrade the Thumb Keyboard software, you must first
remove the existing software by following the steps outlined above.
Then follow the steps outlined in the “Software Installation” section.
3
Installing Thumb Keyboard to your Axim
Attaching the Thumb Keyboard to your Axim
1.
Hold your Axim face up in the palm of one hand and the Thumb
Keyboard face up in the other hand.
2.
Slide your Axim into the Thumb Keyboard until the connector
latches securely.
Detaching the Thumb Keyboard from your Axim
1.
Hold your Axim face up in the palm of one hand.
2.
Press the release buttons on both sides of the Thumb Keyboard to
release the connector lock.
3.
Remove the Axim by sliding away from the Thumb Keyboard.
Charging your Axim with the Thumb Keyboard
The Thumb Keyboard includes a DC jack on the bottom. To charge
your Axim, just insert the AC adapter plug into the DC jack of the
Thumb Keyboard.
4
Using your Thumb Keyboard
Using your Thumb Keyboard
After installing the Thumb Keyboard driver, the software runs automatically
and you can use the Thumb Keyboard at any time. Simply attach the
Thumb Keyboard to your Axim and start typing.
Navigation Keys
The navigation keys enable you to quickly relocate the cursor on your
Axim. The following table lists available navigation-key commands.
Typing Lowercase Letters
To enter lowercase letters with your Thumb Keyboard, simply type them
as you would on a standard computer keyboard.
Typing Uppercase Letters
To capitalize one letter: press
be capitalized.
once and the next letter you enter will
To capitalize a block of letters: press and hold
enter while holding
will be capitalized.
—all other letters you
To turn on Caps Lock: press
and then press
. As long as
Caps Lock is turned on, all characters will be entered in uppercase.
To release Caps Lock: press
and then press
.
Application Keys
Since the Thumb Keyboard covers the application buttons on your Axim,
these buttons are reproduced on the Thumb Keyboard.
Typing Numbers and Symbols
To type one number or symbol: press
once—the next key you press
will register as the number or symbol printed in orange on the key top.
There are two ways to type a block of numbers or symbols:
1.
Press and hold
—all other keys you press while holding
will register the number or symbol.
2.
Press
twice—the Keyboard will enter “Symbol Lock” mode. All
subsequent keys you press will register as the number or symbol
printed in orange on the key top. To exit “Symbol Lock” mode, press
one more time.
5
6
Configuring the Thumb Keyboard Software
Configuring the Thumb Keyboard Software
The OK/FaceBoard Button
Pressing the “OK” button (
) performs the same
confirmation feature as tapping “OK” on the right-hand
corner of the screen.
4.
Pressing the
and
buttons will pop up
a window containing various less frequently used
symbols and punctuation marks. There are also popular
smiley patterns for your email. To select a symbol,
you can either touch the on-screen button or press the
corresponding key shown on the top of the
on-screen button.
To restore the FaceBoard to its original settings,
you can tap on the “Default” button on the
editing screen (Fig. A).
The FaceBoard is
a unique extended
keyboard that allows
you to easily type extra
symbols and email
smiley patterns.
2.
3.
Configuring the Thumb Keyboard Software
To bring up the Thumb Keyboard configuration screen
) on
Enable – tapping on this button will turn on the Thumb
Keyboard driver and allow the Axim to accept key input
from the Keyboard.
Tap on the “Edit” tab in the FaceBoard
screen to bring up the editing
screen (Fig. A).
Tap on the key you want to redefine, and an
input screen will come up (Fig. B).
Fig. C The FaceBoard
key is changed
(Fig. D), tap “Start” and then “ThumbBoard”(
your Axim.
Customizing the FaceBoard
You can customize the FaceBoard with any
combination of symbols or key string. To configure
the FaceBoard:
1.
Tap “OK” to confirm the change. The new
symbol will be replaced in the relative key in
the FaceBoard (Fig. C).
Disable – this will turn off the Thumb Keyboard driver.
Repeat Rate – this will determine the repeat frequency
of a key when you hold it down continuously.
Fig. A FaceBoard editing
screen
Type the desired characters or symbols in
the edit box. You can use the Axim
on-screen SIP keyboard to input special
symbols or International characters.
Fig. D Thumb Keyboard
configuration screen
Delay Until Repeat – this will determine the delay from your holding down
a key to the key repeating.
Click Sound – you can enable or disable “key click”. For this function to
work properly, you need to first turn on hardware-buttons sound in your
Axim: tap “Start”, then “Settings”. Select “Sounds & Reminders” and
check the “Hardware buttons” box.
Close Software Keyboard – this can close the software keyboard when
you type.
Test Area – you can test your Thumb Keyboard by typing in this area.
Fig. B Type in the new
characters/symbols
7
8
Frequently Asked Questions (FAQs)
Information
What should I do when I type on the Keyboard and nothing
happens?
FCC Regulatory Notice
-
Check that your Axim is charged and working properly.
1. This device may not cause harmful interference, and
-
Make sure your Axim is connected to the
Thumb Keyboard securely.
2. This device must accept any interference received, including
interference that may cause undesired operation.
-
Verify that the Thumb Keyboard software is installed.
-
Confirm that the Thumb Keyboard driver is enabled.
-
Test typing on the test area.
Will ActiveSync be affected?
The Thumb Keyboard is fully compatible with ActiveSync.
Can I send and receive infrared while using the Thumb Keyboard?
Yes, infrared will not be affected.
Can I use the stylus while using the Thumb Keyboard?
Yes, you can use the stylus and Keyboard simultaneously.
Technical Support
In the unlikely event that you encounter a problem with our
Thumb Keyboard, please contact our technical support team at
[email protected]. For the most updated Thumb Keyboard driver or
more FAQs, please visit http://www.belkin.com/support.
This device complies with part 15 of the FCC rules. Operation is subject
to the following two conditions:
Belkin Limited Lifetime Product Warranty
Belkin Corporation warrants this product against defects in materials and
workmanship for its lifetime. If a defect is discovered, Belkin will, at its option, repair
or replace the product at no charge provided it is returned during the warranty
period, with transportation charges prepaid, to the authorized Belkin dealer from
whom you purchased the product. Proof of purchase may be required.
This warranty does not apply if the product has been damaged by accident, abuse,
misuse, or misapplication; if the product has been modified without the written
permission of Belkin; or if any Belkin serial number has been removed or defaced.
THE WARRANTY AND REMEDIES SET FORTH ABOVE ARE EXCLUSIVE IN LIEU OF
ALL OTHERS, WHETHER ORAL OR WRITTEN, EXPRESSED OR IMPLIED. BELKIN
SPECIFICALLY DISCLAIMS ANY AND ALL IMPLIED WARRANTIES, INCLUDING,
WITHOUT LIMITATION, WARRANTIES OF MERCHANTABILITY AND FITNESS FOR A
PARTICULAR PURPOSE.
No Belkin dealer, agent, or employee is authorized to make any modification,
extension, or addition to this warranty.
BELKIN IS NOT RESPONSIBLE FOR SPECIAL, INCIDENTAL, OR CONSEQUENTIAL
DAMAGES RESULTING FROM ANY BREACH OF WARRANTY, OR UNDER ANY
OTHER LEGAL THEORY, INCLUDING BUT NOT LIMITED TO LOST PROFITS,
DOWNTIME, GOODWILL, DAMAGE TO OR REPROGRAMMING, OR REPRODUCING
ANY PROGRAM OR DATA STORED IN OR USED WITH BELKIN PRODUCTS.
Some states do not allow the exclusion or limitation of incidental or consequential
damages or exclusions of implied warranties, so the above limitations or exclusions
may not apply to you. This warranty gives you specific legal rights, and you may also
have other rights that vary from state to state.
9
10
Thumb Keyboard for Dell®
AximTM X50/X51 Handhelds
Belkin Tech Support
US: 800-223-5546, ext. 2263
310-898-1100, ext. 2263
Europe: 00 800 223 55 460
Australia: 1800 235 546
New Zealand: 0800 235 546
Belkin Corporation
501 West Walnut Street
Compton, CA 90220-5221, USA
310-898-1100
310-898-1111 fax
Belkin B.V.
Boeing Avenue 333
1119 PH Schiphol-Rijk, The Netherlands
+31 (0) 20 654 7300
+31 (0) 20 654 7349 fax
Belkin Ltd.
7 Bowen Crescent, West Gosford
NSW 2250, Australia
+61 (0) 2 4372 8600
+61 (0) 2 4372 8603 fax
Belkin Ltd.
Express Business Park, Shipton Way
Rushden, NN10 6GL, United Kingdom
+44 (0) 1933 35 2000
+44 (0) 1933 31 2000 fax
© 2005 Belkin Corporation. All rights reserved. All trade names are registered trademarks of
respective manufacturers listed.
P75051