1
REFERENCE MANUAL
FOR
TEMPEST ® 2400
WIRELESS INTERCOM SYSTEM
Tempest 2400 Wireless Intercom System Reference Manual
© 2009 Vitec Group Communications Ltd. All rights reserved.
Part Number 810511Z Rev. 1
Vitec Group Communications LLC
850 Marina Village Parkway
Alameda, CA 94501
U.S.A
Vitec Group Communications Ltd
7400 Beach Drive
IQ Cambridge
Cambridgeshire
United Kingdom
CB25 9TP
Vitec Group Communications
Room 1806, Hua Bin Building
No. 8 Yong An Dong Li
Jian Guo Men Wai Ave
Chao Yang District
Beijing, P.R. China 100022
® Clear-Com, CellCom/FreeSpeak and the Clear-Com Communication Systems logo are registered trademarks
of The Vitec Group plc
Website: www.clearcom.com
Clear-Com Communication Systems
Tempest 2400 Wireless Intercom System
Page 2 of 100
Table of Contents
Table of Contents ............................................................................................................................................. 3 Important Safety Instructions ......................................................................................................................... 8 A/C Power Warning ........................................................................................................................................ 9 Thank you from Clear-Com .......................................................................................................................... 10 Thank you for choosing Tempest Wireless for your wireless intercom needs. ...................................... 10 Battery Safety ................................................................................................................................................. 11 Battery Transportation .................................................................................................................................. 11 Battery Storage ............................................................................................................................................ 11 Maintenance and Care ................................................................................................................................. 12 Cleaning ................................................................................................................................................... 12 Temperature and Humidity ....................................................................................................................... 12 Quick Start Guide ........................................................................................................................................... 13 What You Will Need ..................................................................................................................................... 13 1. Connect two whip antennas onto the back of the Base Station. ................................................................................13
2. Connect the power cord and Power On the Base Station. .........................................................................................13
3. Install Batteries in Beltstations ........................................................................................................................................13
4. Pair Beltstations to the Base Station ..............................................................................................................................14
5. Connect Headsets to Beltstations ..................................................................................................................................14
6. Operation ...........................................................................................................................................................................14 General Description ....................................................................................................................................... 15 Theory of Operation ..................................................................................................................................... 17 System Features ............................................................................................................................................ 19 Base Station ............................................................................................................................................. 19 Beltstation ................................................................................................................................................. 19 Remote Transceiver ................................................................................................................................. 19 Other Items You May Need .......................................................................................................................... 20 Headsets .................................................................................................................................................. 20 DC Power input cable ............................................................................................................................... 20 RF Cable to remote Antennas .................................................................................................................. 20 CAT-5 Cable for Remote Transceiver ...................................................................................................... 20 Accu-Sync DB-9 Cable(s) ........................................................................................................................ 20 Connections to the Hardwired Intercom ................................................................................................... 20
XLR-3M/F for 2-Wire ................................................................................................................................ 20
RJ-45 Connector Cable for 4-Wire ............................................................................................................. 20
RJ-45 to RJ-12 Adapter ............................................................................................................................ 20
Auxiliary IN/OUT ¼” Tip/Ring/Screen Cable ............................................................................................... 20
Stage Announce XLR-3F Cable ................................................................................................................ 21
Relay Access DB-15 Breakout Cable ......................................................................................................... 21
LAN Connection RJ-45 / CAT-5 Cable ....................................................................................................... 21
Base Station ................................................................................................................................................. 21
Steps to Setup the Base Station .............................................................................................................. 21 Choose a Location ................................................................................................................................... 22 A Tempest Base Station mounted in an equipment rack. ......................................................................... 22 Base Station Location .............................................................................................................................. 22 Power Connections ...................................................................................................................................... 23 AC Power Connection .............................................................................................................................. 23 DC Power Connection (Battery) ............................................................................................................... 23 Powering On the Base Station ................................................................................................................. 23 Antenna Location ......................................................................................................................................... 24 Antenna Configuration ................................................................................................................................. 25 Maximizing System Performance and Operational Range .......................................................................... 26 Configure the Base Station .......................................................................................................................... 28 Clear-Com Communication Systems
Tempest 2400 Wireless Intercom System
Page 3 of 100
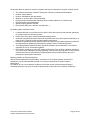
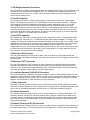
Using the Front Panel Controls .................................................................................................................... 28 Adjust Sidetone ............................................................................................................................................ 29 Selecting a Frequency Band ........................................................................................................................ 30 Network Number and Lockout Key ............................................................................................................... 31 Network Number and Lockout Key ............................................................................................................... 31 Multiple Base Stations in Close Proximity .................................................................................................... 31 Set Display Mode to Static or Dynamic ........................................................................................................ 32 Name Each Station....................................................................................................................................... 32 Base Station Headset Connection and Controls .......................................................................................... 33 Set the Mic Gain for the Local Headset........................................................................................................ 33 Front Panel Lock ....................................................................................................................................... 34 Call Function ............................................................................................................................................. 34 GPO Relay Contacts ................................................................................................................................ 35 DB-15 Relay Wiring ........................................................................................................................................ 35 Tempest DB-15 Connector ............................................................................................................................ 35 Auxiliary Input/Output ............................................................................................................................... 36 Stage Announce (SA) ............................................................................................................................... 36 Reset Memory .......................................................................................................................................... 37 Restore Factory Default ............................................................................................................................ 37 Clear Memory ........................................................................................................................................... 37 Default Settings ............................................................................................................................................ 37 Wired Intercom Interface to the Base Station ............................................................................................. 38 Tempest Base Station Wired Configuration Controls ................................................................................ 38 Controls..................................................................................................................................................... 39 4-Wire (Matrix) Intercom Interface ................................................................................................................ 40 Steps to Configure a 4-Wire Intercom Connection .......................................................................................................... 40 The top RJ-45 jacks are for Channel A or C and the bottom RJ-45 jacks are for Channel B or D......... 40 Tempest 4-Wire / RJ-45 Connection ............................................................................................................. 40 2-Wire (Party-Line) Interface ........................................................................................................................ 41 Steps to Configure a 2-Wire Intercom Connection ................................................................................... 41 Echo Cancellation Menu ........................................................................................................................... 41 Auto-Null Explained .................................................................................................................................. 41 Auto-Null Procedure ................................................................................................................................. 43 Test for Echo ............................................................................................................................................ 43 Manual Null ............................................................................................................................................... 43 Other Causes of Echo .............................................................................................................................. 44 2-Wire Wiring Schemes ............................................................................................................................ 45 Connecting Multiple Base Stations .............................................................................................................. 46 Steps to Configure a Multiple Base Station System ................................................................................. 47 Audio Connections for Multiple Base Stations ............................................................................................. 47 When an external hardwired intercom system is NOT present: ............................................................... 47 When an external 2-Wire hardwired intercom system IS present: ........................................................... 47 Accu-Sync ....................................................................................................................................................... 49 Three Base Stations Accu-Synced ............................................................................................................... 49 BASESYNC IN ................................................................................................................................................. 49 Accu-Sync - DB-9 Connector ........................................................................................................................ 49 Master Mode ................................................................................................................................................. 50 Special RF Considerations with Multiple Base Stations ............................................................................... 51 Multi-System Tempest Technology .............................................................................................................. 52 Base Station Controls ................................................................................................................................... 54 Front Panel Left ............................................................................................................................................ 54 1- Local Headset Connector ..................................................................................................................... 54 2- Talk Button and LED ............................................................................................................................ 54 3- Call Button ............................................................................................................................................ 54 4- Mic Kill Button ....................................................................................................................................... 54 5- Local Headset Channel LEDs A-D ....................................................................................................... 54 Clear-Com Communication Systems
Tempest 2400 Wireless Intercom System
Page 4 of 100
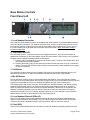
6- Peak LEDs ........................................................................................................................................... 54 7- Volume Control..................................................................................................................................... 55 8- Menu Button ......................................................................................................................................... 55 9- Enter Button ......................................................................................................................................... 55 10- Buttons 1 - 5 ....................................................................................................................................... 55 11- LCD .................................................................................................................................................... 55 Operational Mode Base Station LCD ........................................................................................................... 55 Front Panel Right ......................................................................................................................................... 56 1 2-Wire (TW) Intercom Type Slide Switches A/B & C/D ......................................................................... 56 2- Wired Intercom Channel Select (SEL) Button ...................................................................................... 56 3- Channel (CHAN) LEDs ........................................................................................................................ 56 4- 2-Wire/4-Wire Select (SEL) Button ...................................................................................................... 56 5- 2-Wire/4-Wire LEDs ............................................................................................................................. 56 6- IN Level Control ................................................................................................................................... 57 7- OUT Level Control ............................................................................................................................... 57 8- USB Connector .................................................................................................................................... 57 9- Beltstation Program Connector ............................................................................................................ 57 10- Power ON/OFF Switch ....................................................................................................................... 57 Rear Panel Left ............................................................................................................................................ 58 1- AC Power Input Connector .................................................................................................................. 58 2- DC Power Input Connector .................................................................................................................. 58 3- Antenna Connector .............................................................................................................................. 58 4- Intercom Channel A/B/C/D Connectors ............................................................................................... 58 5- RJ-45 4-Wire Intercom A/B/C/D Connectors ....................................................................................... 58 Rear Panel Right .......................................................................................................................................... 58 1- SA (Stage Announce) Connector ......................................................................................................... 59 2- Aux IN Connector ................................................................................................................................. 59 3- Aux OUT Connector ............................................................................................................................. 59 4- Base Sync IN Connector ...................................................................................................................... 59 5- Base Sync OUT Connector .................................................................................................................. 59 6- Local Area Network (LAN) RJ-45 Connector ....................................................................................... 59 7- Relay Connector .................................................................................................................................. 59 8- Antenna Connector .............................................................................................................................. 59 9- Remote Transceiver RJ-45 Connector ................................................................................................ 59 Base Station Menu ....................................................................................................................................... 60 Remote Transceiver ....................................................................................................................................... 62 Setup the Transceiver .................................................................................................................................. 62 Bottom view of the transceiver..................................................................................................................... 63 Transceiver controls ..................................................................................................................................... 63 RX LED..................................................................................................................................................... 63 TX LED ..................................................................................................................................................... 63 SYNC LED................................................................................................................................................ 63 CONFIG LED............................................................................................................................................ 63 Base Station Link RJ-45 Connector ......................................................................................................... 63 Power LED ............................................................................................................................................... 63 Threaded Mounting Holes ........................................................................................................................ 63 Beltstation..................................................................................................................................................... 64 Configure the Beltstation by the Beltstation Menu ................................................................................... 64 Configure the Beltstation by the Base Station Interface .......................................................................... 64 Configure by the PC Interface .................................................................................................................. 65 Beltstation Setup .......................................................................................................................................... 66 Steps to Setup the Beltstations ................................................................................................................ 66 Battery Selection and Installation ................................................................................................................. 66 Charging the Lithium-Polymer Battery ......................................................................................................... 67 Power Options .......................................................................................................................................... 67 Beltstation Power On/Off .......................................................................................................................... 67 Clear-Com Communication Systems
Tempest 2400 Wireless Intercom System
Page 5 of 100
Pairing with a Base Station........................................................................................................................... 68 Pair Beltstation to Base Station: ........................................................................................................................................ 68
Adjust Beltstation Slot ............................................................................................................................... 68 Name Equipment ...................................................................................................................................... 70 Personal Preferences ............................................................................................................................... 70 Call Function ............................................................................................................................................. 70 Set Mic Gain ............................................................................................................................................. 71 iSelect Roaming – Selecting a Base Station ................................................................................................ 72 Wireless ISO ................................................................................................................................................. 72 Beltstation Overview ..................................................................................................................................... 73 1- Volume- CH A/B and CH C/D ............................................................................................................... 73 2- Stage Button ......................................................................................................................................... 73 3- Menu Button ......................................................................................................................................... 73 4- Enter Button .......................................................................................................................................... 73 5- LCD....................................................................................................................................................... 73 6- CALL Button ......................................................................................................................................... 73 1- Rubberized Access Cover .................................................................................................................... 74 2- USB Mini B Connector.......................................................................................................................... 74 3- Beltstation Pairing Connector ............................................................................................................... 74 1- Belt Clip ................................................................................................................................................ 74 2- Power ON/OFF Button ......................................................................................................................... 74 3- Battery Compartment ........................................................................................................................... 74 4- Headset Connector............................................................................................................................... 74 Talk Button A/B and C/D........................................................................................................................... 75 Channel Indicator LEDs A/B and C/D....................................................................................................... 75 Beltstation Menu ........................................................................................................................................... 76 How Do I …? ................................................................................................................................................... 77 Remove Batteries from Beltstations ............................................................................................................. 77 Install the Rechargeable Battery .................................................................................................................. 77 Charge the Battery ....................................................................................................................................... 77 Install AA Alkaline Batteries.......................................................................................................................... 77 Use the 5-Bay Battery Charger .................................................................................................................... 77 Navigate the Base Station Menu .................................................................................................................. 77 Navigate the Beltstation Menu...................................................................................................................... 77 Adjust Min/Max Beltstation Volume Levels .................................................................................................. 78 From the Beltstation:................................................................................................................................. 78 From the Base Station: ............................................................................................................................. 78 Configure Stage Announce and SA Relay ................................................................................................... 78 From the Beltstation:................................................................................................................................. 78 From the Base Station: ............................................................................................................................. 78 Configure Relays for Individual Beltstations ................................................................................................. 78 From the beltstation: ................................................................................................................................. 78 From the Base Station: ............................................................................................................................. 79 Use the Transceiver ..................................................................................................................................... 79 Trouble Shooting ............................................................................................................................................ 79 Base Station ................................................................................................................................................. 79 Limited RF range ...................................................................................................................................... 79 Cannot hear one or more channels of hardwired intercom ...................................................................... 79 Headset microphone sounds distorted or cuts off parts of words ............................................................ 80 There is no audio passing when not using an external hardwired intercom system ................................ 80 There is no audio passing when using an external hardwired intercom system ...................................... 80 iSelect roaming not functioning ................................................................................................................ 80 Beltstation ..................................................................................................................................................... 81 Beltstation will not power up ..................................................................................................................... 81 Beltstation will not Pair with Base Station ................................................................................................. 81 Beltstation will not log into Base Station ................................................................................................... 81 Clear-Com Communication Systems
Tempest 2400 Wireless Intercom System
Page 6 of 100
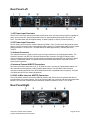
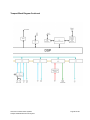
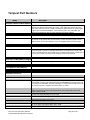
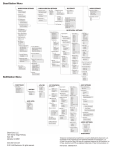
Buttons on the Beltstation do not function................................................................................................ 81 Call Function............................................................................................................................................. 82 Stage (SA) function does not work properly ............................................................................................. 82 Tempest Remote Transceiver ...................................................................................................................... 82 Remote Transceiver RX or TX LEDs do not light..................................................................................... 82 Tempest 2400 Wireless Intercom System Specifications .......................................................................... 84 Tempest 2400 Base Station Specifications ................................................................................................. 85 Tempest 2400 Beltstation Specifications .................................................................................................... 86 Tempest 2400 Remote Transceiver Specifications ..................................................................................... 86 FCC Information ............................................................................................................................................. 87 Contains Transmitter Module FCCID: HSW-2492 ....................................................................................... 87 Important FCC and Safety Information ........................................................................................................ 87 I. Digital Device Statement ............................................................................................................................ 87 II. Intentional Radiator Statement ................................................................................................................. 87 III. RF-Exposure Statement ........................................................................................................................... 87 Tempest 2400 System Block Diagram ......................................................................................................... 88 Tempest Block Diagram Continued.......................................................................................................... 89 Tempest Part Numbers .................................................................................................................................. 90 Glossary .......................................................................................................................................................... 91 Limited Warranty ............................................................................................................................................ 93 Technical Support & Repair Policy .............................................................................................................. 96 Index .............................................................................................................................................................. 100 Clear-Com Communication Systems
Tempest 2400 Wireless Intercom System
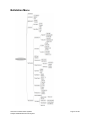
Page 7 of 100
Important Safety Instructions
The word "Caution" is the lowest of the three signal words (Caution, Warning and Danger) with "Danger" being
the highest. Therefore, whenever the word "Caution" is used, it may be replaced with either of the higher rated
signal words; "Warning" or "Danger:
a) DANGER – indicates a situation which, when not avoided, results in death or severe injury;
b) WARNING – indicates a situation which, when not avoided, has the potential to result in death or
severe injury;
c) CAUTION – indicates a situation which, when not avoided, results or has the potential to result in
minor injury.
•
•
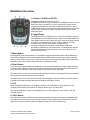
•
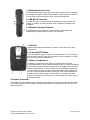
•
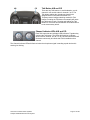
WARNING – To reduce the risk of fire or electric shock, do not expose this apparatus to rain or
moisture.
Do not expose the apparatus to dripping or splashing. Do not place objects filled with liquids, such as
vases, on the apparatus.
The base station shall be connected to a mains socket outlet having a protective earthing connection.
Install the base station such that the appliance coupler (AC power inlet) is readily accessible and
operable.
Read these instructions. Keep these instructions.
Heed all warnings.
Follow all instructions.
Do not use this apparatus near water.
Clean only with a dry cloth.
Install in accordance with manufacturer’s instructions.
Do not install near any heat sources such as radiators, heat registers, stoves, or other apparatus (including
amplifiers) that produce heat.
Do not defeat the safety purpose of the polarizing or grounding type plug. A polarized plug has two blades with
one wider than the other. A grounding type plug has two blades and a third grounding prong. The wide blade or
third prong is provided for your safety. When the provided plug does not fit into your outlet, consult an electrician
for replacement of the obsolete outlet.
Protect the power cord from being walked on or pinched, particularly at plugs, convenience receptacles, and the
point where they exit the apparatus.
Only use attachments/accessories specified by the manufacturer.
Unplug this apparatus during lightning storms or when unused for long periods of time.
Refer all servicing to qualified service personnel. Servicing is required when the apparatus has been damaged in
any way, such as if the power-supply cord has been damaged, liquid has been spilled or objects have fallen into
the apparatus, or if the apparatus has been exposed to rain or moisture, does not operate normally, or has been
dropped.
Clear-Com Communication Systems
Tempest 2400 Wireless Intercom System
Page 8 of 100
A/C Power Warning
Users should exercise extreme care when working with electricity. Additional care should be used
when working with electricity outdoors, in inclement weather. When working outdoors, or near water always
connect the system into a ground-fault interrupting circuit.
There are no user serviceable parts inside the Tempest base station, Transceiver, or beltstation. Opening
the case may expose dangerous electrical components, and will void the warranty.
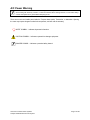
ALERT SYMBOL – Indicates important information.
CAUTION SYMBOL – Indicates a potential to damage equipment.
DANGER SYMBOL – indicates a potential safety hazard.
Clear-Com Communication Systems
Tempest 2400 Wireless Intercom System
Page 9 of 100
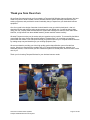
Thank you from Clear-Com
We at Clear-Com want to thank you for purchasing a Tempest 2400 Wireless Intercom System. We have
made every effort to build a reliable, intuitive wireless intercom system that easily interfaces with your
existing equipment, and provides the same functionality that you expect from your hard-wired intercom
equipment.
One of our goals in the design of was that it should work the way you think it should work – that is, it
should be intuitive and similar to other equipment that you may already use. You will be able to begin
using your new Tempest 2400 Wireless Intercom System with nothing more than the Quick Start Guide.
However, to fully benefit from the available features, please read this manual carefully.
We want Tempest to make your job easier and your experience to be positive. To successfully familiarize
yourself with the many diverse and powerful features Tempest offers, it is crucial that you acquaint
yourself with the manual. Your time spent will help you get the most from your Tempest Wireless Intercom
by making setup easy and interfacing to your existing equipment, fast.
We are committed to providing you with a high quality product that will deliver years of trouble free
service. Should you experience any problem with your Tempest Wireless equipment, whether it is a
warranted problem, or service after you have owned the system for several years, we will be there to take
care of you.
Thank you for choosing Tempest Wireless for your wireless intercom needs.
Clear-Com Communication Systems
Tempest 2400 Wireless Intercom System
Page 10 of 100
Battery Safety
Battery Transportation
Rechargeable lithium batteries are subject to special regulation by U.S. and International
laws, particularly regarding transportation on passenger aircraft. However, individual
batteries installed in consumer electronics are not restricted, provided there are only the
correct numbers and types of batteries as may be needed to operate the electronic
equipment.
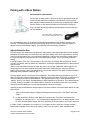
Your Tempest 2400 Wireless Intercom System includes rechargeable lithium-polymer batteries that
power the beltstations. To insure that there is no violation of U.S or international laws, and to ensure your
own safety, always:
o
o
o
o
Transport rechargeable lithium batteries installed in the equipment they are intended to power.
Transport spare batteries in a padded case, separated from one another.
Never transport your rechargeable lithium batteries bundled together.
Never transport more than 12 lithium batteries in a single package.
Lithium-polymer batteries include a chemistry that is intended to overcome the dangers associated with
lithium ion batteries. In addition, the batteries that accompany your Tempest Wireless system include
protective circuits to further reduce the possibility of a dangerous reaction associated with charging or
discharging beyond safe limits. With reasonable care you can expect many years of safe and reliable
power from your batteries.
Tempest’s batteries are not subject to transport regulations of dangerous goods because they fulfill the
following regulatory provisions:
o
o
o
ADR 188
IATA A45
IMDG 188
Battery Storage
Long term storage of batteries at maximum charge can result in permanent loss of capacity.
For long term storage of batteries, charge/discharge the batteries to approximately 60% of capacity.
Batteries stored for longer than one year should be recharged to 60%, annually.
Trickle charging is not recommended due to the very low self discharge rate of the batteries.
As with all batteries:
o
o
o
o
o
Do not burn.
Do not expose batteries to excessive heat such as sunshine, fire or other heat sources.
CAUTION – Danger of explosion if battery is incorrectly replaced. Replace only with the same or
equivalent type.
Properly dispose of used batteries promptly.
Keep away from children.
Clear-Com Communication Systems
Tempest 2400 Wireless Intercom System
Page 11 of 100
Maintenance and Care
Cleaning
Generally, the Tempest Wireless hardware should be cleaned only with a damp cloth. A soft cloth with
rubbing alcohol may be used to wipe the units, if more than water is needed. Never spray solvents or
chemicals onto the units.
Because of Tempest’s weather resistant design it is not highly susceptible to dust or airborne
contaminants. However, all electronic devices can be susceptible to particulate contamination. If exposed
to an extremely dusty environment, contact an authorized Tempest service center for internal cleaning.
Temperature and Humidity
Ideally, all electronics should be stored and used in a controlled environment with moderate temperature
and humidity. Tempest components are designed to be very durable, and can tolerate a wide range of
environmental conditions.
Install the base station in a location where it will not be exposed to extreme weather conditions. Protect
the unit against dust or moisture. Always protect any AC power connections from the elements with safety
in mind.
For more extreme environmental conditions, the base station can remain in a secure location with
antennas for the base station located remotely and connected by low-loss 50 Ohm coax cable, or the
optional Remote Transceiver can be used.
The Tempest Remote Transceiver is weather resistant, with gaskets intended to prevent moisture entry
from the top and sides. The CAT-5 cable connection on the bottom is not water tight. If it is to be used in
an environment subject to blowing rain, snow, fog or high humidity, protect the transceiver with a cover
that will not interfere with the RF.
The beltstations are designed to work wherever people work. While the beltstation design is weather
resistant, the headset XLR connector on the bottom is not watertight. beltstations should not be
submerged in liquids. Protect the battery compartment from water when changing batteries. The battery
compartment offers a route to the electronic circuitry.
Clear-Com Communication Systems
Tempest 2400 Wireless Intercom System
Page 12 of 100
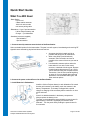
Quick Start Guide
What You Will Need
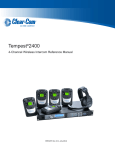
-Base Station
Power cord
2 Base station antennas
1⁄8th inch male-to-male
mini-stereo pairing cable
-Beltstations - Up to 5 per base station
Lithium-Polymer battery and
Charger - 1 per beltstation
-Headsets (customer supplied)
1 per beltstation
1 per base station
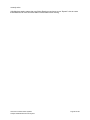
1. Connect two whip antennas onto the back of the Base Station.
Select a suitable location for the base station. Tempest is a radio system, broadcasting and receiving RF
signals that are affected by physical and electronic barriers.
•
Antennas should be located as high as
possible and away from all obstructions.
• When using Whip (Omni-directional)
antennas, select a location as close as
possible to the center of the area you want to
cover.
• Use alternative antenna options when the
base station is in a rack or other metal
structure, or stacked with other gear. Remote
location antenna placement of up to 1,500 ft.
can be achieved using the Tempest Remote
Transceiver. See the user manual beginning
on page 24, for more details about antenna
placement, recommended cable types, and
other antenna options.
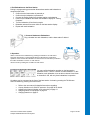
2. Connect the power cord and Power On the Base Station.
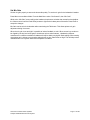
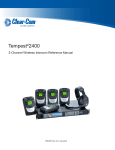
3. Install Batteries in Beltstations
Install the Lithium‑Polymer battery in each beltstation. Be certain
that the gold contacts on the battery touch the contacts in the
battery compartment. The battery is shipped with a partial
charge, so charging will be necessary before maximum run time
will be achieved
or
Insert 3 AA alkaline batteries in the battery compartment.
Always replace the battery cover.
To power on the beltstation press and hold the power button for
approximately 2 seconds. The display will indicate “None
Selected”. Turn the power Off by holding the power button for
four seconds.
Clear-Com Communication Systems
Tempest 2400 Wireless Intercom System
Page 13 of 100
4. Pair Beltstations to the Base Station
Pairing is a programming process that allows a base station and beltstation to
recognize each other.
• Confirm that the base station is powered on.
• Confirm that the beltstation is powered off.
• Connect the Pairing Cable from the base station to a beltstation.
• Power on the beltstation and watch the beltstation display for “Pairing
Complete”.
• Turn the beltstation off and back on again.
• Beltstation status will become visible on the base station display.
• Repeat with each beltstation.
5. Connect Headsets to Beltstations
Plug a headset into each beltstation, and the base station if desired.
6. Operation
Select a channel on the beltstations by pressing the CH A/B or CH C/D control.
Press the TALK button. A quick press latches the Talk button for “Hands Free”
operation. Press and hold the Talk button for more than 2 seconds while you talk and
the button will release in a Push‑To‑Talk manner.
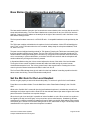
Set the volume by rotating the CH A/B or CH C/D control.
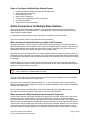
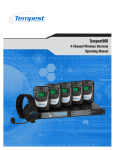
You may confirm beltstation operation on the base station
Operation screen. There is a section for each beltstation. In this
illustration, each beltstation is set to talk on channel A and listen
on channels A & D, with only three beltstations in operation.
A headset may be connected to the front of the base station. Activate by pressing the TALK button.
Select a channel by pressing the volume knob.
•
•
•
•
•
Refer to the user manual for detailed instructions regarding:
Country limitation on 2.4GHz RF spectrum. See page 30 for details.
Adjusting the Network Number and Lockout Key on page 31.
Assigning names for equipment on page 32.
Charging batteries on page 67.
Clear-Com Communication Systems
Tempest 2400 Wireless Intercom System
Page 14 of 100
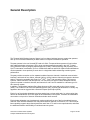
General Description
The Tempest 2400 Wireless Intercom System is a four-channel wireless intercom system that operates
with up to five wireless beltstations per base station in full duplex simultaneous operation.
Tempest operates in the non-licensed RF band at 2.4GHz. Tempest wireless systems will not interfere
with traditional wireless microphone, IFB or in-ear monitor systems that operate in the UHF TV band.
Using patented Frequency Hopping Spread Spectrum (FHSS), TDMA technology and proprietary AccuSync™ base station coordination, up to ten 2.4GHz base stations and 50 full duplex wireless beltstations
can be operated in close proximity to each other in a single band while maintaining excellent system
performance.
Tempest provides connection to four separate hardwired intercom channels. Hardwired communication
interface is achieved via four distinct, external 2-Wire or 4-Wire intercom channels connected to the base
station. Tempest is compatible with Clear-Com®, RTS®, Telex® and most other 2-Wire (TW) intercom
systems, 4-Wire intercoms, and other devices. You can select one type of 2-Wire hardwired intercom
system to operate on channels A and B, and channels C and D can be enabled for a different type of 2Wire intercom system.
In addition, Tempest base stations offer a Stage Announce (SA) output with a relay closure contact
(GPO). This is ideal for use with Public Address Systems (PA), city-wide IFB transmitters or virtually any
application that can be triggered with a General Purpose Input/Output (GPIO).
Each of up to five wireless beltstations per base station has a unique audio path (i.e. point-to-point) that
delivers an individualized, mix minus signal to each beltstation in the system. Therefore each beltstation
can monitor a unique mix of intercom channels and other audio sources.
Each wireless beltstation can simultaneously monitor and/or talk on two of the four hardwired intercom
channels. Each wireless beltstation user may select between channels A or B and C or D. This true duallisten capability supports the preferred production work flow of TV and live-event professionals, and offers
the additional freedom and flexibility of a wireless intercom system.
Clear-Com Communication Systems
Tempest 2400 Wireless Intercom System
Page 15 of 100
Wireless beltstations are also compatible with hardwired system features such as Call and Mic Kill. In
addition to the shared Stage Announce relay, each wireless beltstation controls its own unique relay that
can be associated with additional events or actions at the beltstation.
Tempest 2400 series base station comes standard with two RP-TNC RF antenna connectors and an RJ45 connector for remote RF transceiver operation. Antennas can be fixed directly to the back of the base
station or remotely mounted using 50 ohm low loss RF cable from the RP-TNC connectors.
For instances where antennas must be located at a much longer distance from the base station, a
standard CAT-5 cable connects an optional Remote Transceiver unit that can be located up to 1,500 feet
away and is line-powered from the base station.
Large installations often require users to move from one work zone to another throughout the day.
Tempest handles these transitions with iSelect™ on-command roaming technology. Using the intuitive
LCD user interface on the beltstation and iSelect, a user can easily change their association with another
base station location in just a few seconds. Tempest Wireless beltstations remember the last 64 base
stations to which they have been paired.
Clear-Com Communication Systems
Tempest 2400 Wireless Intercom System
Page 16 of 100
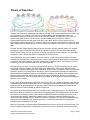
Theory of Operation
Tempest uses Frequency Hopping Spread Spectrum (FHSS), Time Division Multiple Access (TDMA), and
2xTX technology. For example, on Frequency 1 the base station and each beltstation take turns
broadcasting, each with its own time slot to send audio data (TDMA). The total time for one cycle is 5
milliseconds (1/200 second). The base station and all beltstations hop (FHSS) to a different
predetermined frequency and the same audio data is sent again, but on a new frequency and on a
different base station antenna (2xTX). Therefore, each receiver has two opportunities to receive the audio
data. Duplicate data is discarded by the receiver and the process starts over with the next packet of audio
data.
Tempest is a DSP (Digital Signal Processor) based, full duplex, wireless intercom system. It is a digital,
point-to-point communications system, operating in 80MHz of spectrum in the 2.4GHz ISM frequency
band. This band allows users to operate with no license requirements in most locations. The world-wide
acceptance of the 2.4GHz band makes Tempest ideal for traveling users.
The 2.4GHz band offers many benefits. There are, however, a wide variety of technologies and users
competing for clear spectrum in this limited band. Tempest utilizes patented and proprietary technologies
to ensure a robust and reliable RF link under a wide variety of physical and RF environments. This level
of reliability is the most important attribute of any wireless system.
Tempest utilizes proprietary, Frequency Hopping Spread Spectrum (FHSS) technology that has seven
U.S. patents. Multiple beltstation access is achieved by implementing Time Domain Multiple Access
(TDMA) with Frequency Shift Keying (FSK) modulation. Tempest uses an Algebraic Code - Excited Linear
Prediction (A-CELP) voice compression algorithm to reduce the bandwidth necessary for transmission
and yet maintain the highest possible voice intelligibility. In addition, this algorithm utilizes advanced lost
packet masking technology, which greatly reduces the affect of packet loss, possible in all Digital RF
transmission schemes. The loss of audio packets is managed by the algorithm to reduce the possibility of
detecting a loss of audio.
In the 2.4GHz RF band multipath interference occurs frequently. The Tempest RF scheme is dramatically
enhanced with the addition of proprietary 2xTX™ technology that transmits each data packet twice. This
technique reduces spectral efficiency by half, but greatly increases audio intelligibility by reducing the
Effective Packet Error Rate (EPER) by orders of magnitude.
The system transmits packet data every 5ms and then “hops” or changes frequency. The sequence of
frequency changes is controlled by a predetermined hopping pattern. Each hopping pattern is optimized
such that any new frequency has a quasi-orthogonal relationship to the last operating frequency. This
quasi-orthogonal frequency relationship ensures maximum frequency separation between any two
consecutive hops. Because of this, if an interfering source is present in one area of the operational band,
and interferes on a particular hop, the next hop will be in a clear area of the spectrum with the best
possible chance of transmission success.
With 2xTX technology, each audio packet is transmitted twice, each on one of two consecutive hops. The
loss of one packet transmission in a harsh RF environment is common. However, because of the quasiClear-Com Communication Systems
Tempest 2400 Wireless Intercom System
Page 17 of 100
orthogonal frequency relationship of the consecutive redundant packet transmission, the potential for loss
of any single audio packet (2 consecutive data packet transmissions) is dramatically reduced. In addition,
each packet transmission is sent out from different antennas. This unique approach enables Tempest to
utilize spatial diversity, frequency diversity, time diversity and polarization diversity.
Transmission redundancy and the incorporation of various diversity techniques provide an RF system that
is robust and reliable under greatly varying operational conditions. Because of this inherent design,
Tempest delivers superior operational range and greater levels of interference and multipath fade
rejection.
Covering extremely large areas or multiple coverage locations can be problematic with traditional wireless
intercom systems. Tempest utilizes iSelect™ on-command roaming to allow users to move from one area
of coverage to another. iSelect allows Tempest users to easily choose the desired coverage area by
selecting the base station they want to communicate through. The beltstation (remote) remembers the
last 64 base stations with which it has been Paired. When a different base station is selected, the hopping
pattern and key code of the beltstation is synchronized to the selected base station and the beltstation
logs into the base station.
Audio latency is a critical factor in all digital systems. The hop duration in Tempest is intentionally kept
very short - under 5ms. This short hop duration limits the amount of data that may be lost in any one hop.
More importantly, it reduces system latency, which can cause undesirable echo. Total one-way
(beltstation to base station) system latency is less than 50ms.
Even with this short system latency, unwanted and distracting echo will occur when interfacing with
hardwired party-line intercom systems unless echo-reduction technology is implemented. Echo is
primarily the result of inefficiencies in the conversion of the two-wire signal. This condition exists in analog
systems as well, but it does not cause unwanted echo because there is no system latency delay.
Tempest uses advanced echo-cancellation algorithms to eliminate this echo.
Wireless intercom systems are often used in high-noise environments that require special design
consideration for effective operation. Tempest operates extremely well even in very high ambient noise
levels. This is primarily due to specific design criteria which allow Tempest to achieve an audio dynamic
range of greater than 94dB. This is more than double that of most other digital wireless communication
systems. This design makes Tempest ideal for use at sporting venues, concerts and other events where
unwanted noise levels are high.
Tempest offers a host of features and technology to ensure that it performs well in almost all production
environments virtually anywhere in the world with no licensing requirements or fees.
Clear-Com Communication Systems
Tempest 2400 Wireless Intercom System
Page 18 of 100
System Features
What’s In The Box
Base Station
Base station
AC Power Cord
2 X Whip Antenna ½ Wave
Pairing Cable
Documentation CD
Quick Start Guide
Beltstation
Beltstation
Lithium-Polymer Rechargeable Battery
Battery Charger/Power Supply
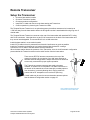
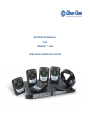
Remote Transceiver
Remote Transceiver
CAT-5 Cable for base station Connection - 15 Feet
2 X Whip Antenna ½ Wave
Mounting Bracket
Screws for Mounting Bracket (2)
Clear-Com Communication Systems
Tempest 2400 Wireless Intercom System
Page 19 of 100
Other Items You May Need
Headsets
A Headset is required for each user (XLR-4F connectors).
Headsets may use Electret or Dynamic microphones. Most major
brand
headsets that have the correct XLR-4F connector should be
compatible, requiring nothing more than a simple Mic Gain
adjustment.
DC Power input cable
If you plan to power the Tempest base station via DC power (Battery) instead of AC power, you
will need to provide a DC Power input Cable.
RF Cable to remote Antennas
If you plan to remotely locate your antennas to improve antenna positioning and maximize range,
you must provide high quality 50 Ohm RF cables with RP-TNC connectors.
CAT-5 Cable for Remote Transceiver
If you plan to locate the Remote Transceiver more than 15 feet from the Tempest base station,
you will need to provide a longer CAT-5 cable. The maximum CAT-5 cable length recommended
is 1,500 feet.
Accu-Sync DB-9 Cable(s)
If you use multiple base stations, to use Accu-Sync base station synchronization, you will need to
provide one Accu-Sync DB-9 cable per additional base station. This cable is described under
“Accu-Sync”.
Connections to the Hardwired Intercom
XLR-3M/F for 2-Wire
If you plan to connect the Tempest base station to external 2-Wire party-line intercom systems,
you will need to provide the appropriate 3-PIN XLR cabling. This cabling is described under “2Wire Wiring Schemes”.
RJ-45 Connector Cable for 4-Wire
If you plan to connect the Tempest base station to external Clear-Com 4-Wire intercom systems,
you will need to provide the appropriate cabling. This is described under “4-Wire (Matrix)
Intercom Interface”.
RJ-45 to RJ-12 Adapter
If you plan to connect to an RTS 4W system you will need adapters.
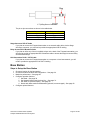
Auxiliary IN/OUT ¼” Tip/Ring/Screen Cable
If you plan to connect the Tempest base station to external audio devices via the Auxiliary IN
and/or the Auxiliary OUT connectors, you will need to provide the appropriate balanced ¼” TRS
cabling.
Clear-Com Communication Systems
Tempest 2400 Wireless Intercom System
Page 20 of 100
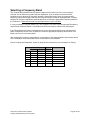
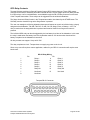
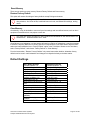
¼” Tip/Ring/Screen Connector
The pin-to-pin connections are shown in the table below.
Connector 1
Screen
Ring
Tip
Connector 2
Screen
Ring
Tip
Stage Announce XLR-3F Cable
If you plan to connect the Tempest base station to an external audio device via the Stage
Announce connector, you will need to provide the appropriate XLR-3F cabling.
Relay Access DB-15 Breakout Cable
If you plan to utilize any of the six available relays on the back of the Tempest base station, you
will need to provide an appropriate DB-15 breakout cable to access the Stage Announce Relay
and Individual Relays.
LAN Connection RJ-45 / CAT-5 Cable
If you plan to connect the Tempest base station to a computer or local area network, you will
need to provide the appropriate RJ-45 CAT-5 cabling.
Base Station
Steps to Setup the Base Station
•
•
•
•
•
Choose a location for the base station
Choose an antenna location and configuration – See page 24.
Maximize performance – See page 26.
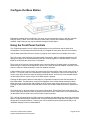
Configure operation features
1. Set Band – See page 30
2. Set Network Number and Lockout Key – See page 31.
3. Set Static or Dynamic Display – See page 32.
4. Name each base station and beltstation (optional, but encouraged) – See page 32.
Configure optional features
Clear-Com Communication Systems
Tempest 2400 Wireless Intercom System
Page 21 of 100
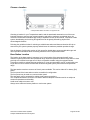
Choose a Location
A Tempest Base Station mounted in an equipment rack.
Choosing a location for your Tempest base station and the associated antennas is one of the most
important factors to ensure proper system operation and achieve maximum operational range. As
covered in the General Information and Theory of Operation section of this manual, Tempest is a radio
system, broadcasting and receiving RF signals that can be greatly affected by physical and
electromagnetic barriers.
Following the guidelines below for selecting a suitable base station and Antenna location will help to
ensure that your system operates properly and achieves the maximum possible operational range.
See the Antenna Configuration section of this manual for details about recommended cable type and
other important information about connecting antennas to the Tempest base station.
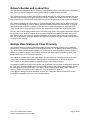
Base Station Location
The location of the base station is important, but it is the location of the antennas that will insure
maximum system performance and operational range. Whenever possible locate the base station in close
proximity to the desired coverage area. If this is not possible consider using the optional Remote
Transceiver to achieve optimal antenna positioning. It is not recommended to use RF coaxial cable runs
longer than 25 feet to remote the antennas as this will degrade system performance and operational
range.
The base station must have a source of electric power available. This can be either AC or battery (DC)
power.
The front panel of the base station must be accessible for configuration.
The front panel may be used as a communication portal.
The rear panel may be accessed for making wired system connections.
The Tempest base station should be in a location that has adequate ventilation and is not subject to
extreme temperatures and humidity.
Avoid areas subject to water or rain.
Always use a stable and secure platform or rack mount system.
Clear-Com Communication Systems
Tempest 2400 Wireless Intercom System
Page 22 of 100
Power Connections
AC Power Connection
The Tempest base station can be powered from AC or DC (battery) power sources.
Always connect the power cord to the Tempest base station before connecting to the outlet.
Only use approved IEC AC power cords.
Only use AC power from 85 to 260 VAC at 50 – 60 Hz.
DC Power Connection (Battery)
To power the Tempest base station from DC power you must provide an appropriate DC power input
cable. The DC power input jack on the base station is a Switchcraft 722RA. The mating plug is a
Switchcraft S760 - 2.1mm x 5.5mm power plug. The connector should be wired as center positive. Always
use appropriate wire of an acceptable gauge and length for your application. The minimum recommended
wire is 26 gauge at not more than five feet. If 10 feet is required the minimum gauge would be 24.
Only use DC power from 11 to 32 VDC. The Tempest base station will draw approximately 12 Watts
(990mA at 12VDC)
Powering On the Base Station
The Tempest base station can be powered from AC or DC power. The front panel ON/OFF switch
controls AC and DC power coming into the base station. If AC and DC are both connected, the DC will
act as a power supply backup in the event AC power is interrupted.
Turn the front panel ON/OFF switch to the ON position.
The base station undergoes an initialization cycle. During this power up cycle the LEDs flash and the LCD
screen updates.
Approximately 4 seconds after turning on the power switch you will see a splash screen showing the
installed firmware version. The splash screen last approximately 6 seconds before advancing to the
normal Operation screen. If connected to a Local Area Network, the DHCP settings (IP address, MAC
address, etc) will then display until MENU is pressed to escape or until the normal timeout is completed.
The system will then display the main Operation screen and will be ready for normal use.
Clear-Com Communication Systems
Tempest 2400 Wireless Intercom System
Page 23 of 100
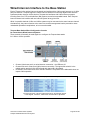
Antenna Location
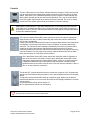
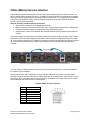
Wired Intercom
Connection
Proper antenna location is essential for the best system
performance and maximum range. Antenna positioning is
important with all RF systems and in all applications.
Locate the Tempest base station antennas as high as possible
for your application to maximize line-of-sight RF operation.
Positioning the antennas higher than head level is the minimum
acceptable height for most applications. Maintaining line of
sight between the base station antennas and the beltstation(s)
is ideal.
If possible, locate the two antennas at least 10 feet apart from
each other, but not more than 50 feet apart from each other, to
add spatial diversity.
This illustration has compressed antenna
spacing due to print limitations. Antenna
pairs should be at least 24 inches apart.
Arrange the two antennas in different physical orientations, to
add polarization diversity. Positioning the antennas in a “V”
formation at an angle of between 45 and 90 degrees to each
other is recommended.
When using multiple base stations, keep as much space
between the antenna pairs as possible, but at least twenty-four
inches is recommended. Increase the distance between
antennas to improve performance.
When rack mounting the Tempest base station or when it is stacked with other equipment always remote
mount antennas or use the Tempest Remote Transceiver to assure maximum operational range.
If possible, locate the antennas away from any metal obstructions and away from walls or other significant
structures, by at least 24 inches.
When using omni-directional (Whip) antennas always locate the antennas as close to the center of the
coverage area as possible. Omni-directional antennas have a circular pattern and radiate RF energy
equally in all directions at approximately a 90° angle to the element of the antenna.
Always make sure that both base station antennas are connected securely. Proper antenna connection
and location of both antennas at all times is necessary for satisfactory system performance and maximum
operational range.
Other antenna options are available including directional and higher gain antennas. Please contact your
dealer for more information on optional antennas. Only use approved antennas. Unauthorized antennas
may be illegal.
Using more than one base station permits an increase in the number of wireless beltstations within an
area, or by utilizing the iSelect roaming feature, allows increasing the area covered and even allows for
the creation of separate but adjacent or overlapping coverage areas. The number of base stations that
can be utilized in a system is limited by RF competition between systems and several other RF
conditions. Judicious placement of antennas can help facilitate a large number of wireless beltstation
users on a single system.
Clear-Com Communication Systems
Tempest 2400 Wireless Intercom System
Page 24 of 100
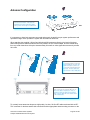
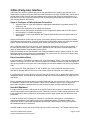
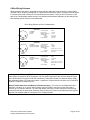
Antenna Configuration
Install the base station in the center of the
area of Communication, with antennas
installed on the back of the base station,
having a clear line of sight in all directions.
It is necessary to have both antennas connected and properly located for proper system performance and
operational range. Never operate the system with less than two antennas.
When attaching the supplied ½ Wave Omni-directional Whip antennas directly to the back of the base
station always ensure that the antennas are firmly seated, are not cross threaded, and are located away
from any metal obstructions. Keep the antennas away from walls or other significant structures by at least
24 inches.
Install the base station in a
convenient location and use two
optional LMR-400, 50 ohm coax
cables in lengths up to 25 ft. to
connect two optional directional
antennas. 15 feet of LMR-400
induces about 1 dB of attenuation.
Install the base station in an equipment
rack (1 RU) and use optional LMR-195, 50
ohm coax cable in lengths up to 10 ft. to
mount the antennas above the equipment
rack. 5 feet of LMR-195 coax induces about
1 dB of attenuation.
To remotely locate antennas always use high quality, low loss, 50 Ohm RF cable terminated with an RPTNC connector for the base station side connection and the appropriate antenna mating connector on the
Clear-Com Communication Systems
Tempest 2400 Wireless Intercom System
Page 25 of 100
other end. LMR-195 (or equivalent) coaxial cables can satisfactorily be used in lengths up to 10 feet.
LMR-400 coaxial cables (or equivalent) can be used at lengths up to 25 feet. Longer RF coaxial cable
runs are not recommended due to signal attenuation in the cable.
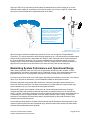
Install the base station in a convenient
location and use the Tempest Remote
Transceiver connected with CAT 5
cable and RJ-45 connectors to
position antennas in the most suitable
locations. Use omni-directional
antennas on the Transceiver or use
short lengths of LMR-195 coaxial
cable to separate antennas for
additional spatial diversity.
Pairs
of Directional Antennas must
be aimed to cover the same area
When locating the antennas at distances greater than 25 feet, use the optional Tempest Remote
Transceiver. The remote transceiver allows locating antennas up to 1,500 feet away from the base station
without the RF signal loss that is associated with using RF cable. Antennas can be mounted directly to
the Tempest Remote Transceiver or they can be separated from the remote transceiver using high
quality, low loss, 50 Ohm RF cable as listed above. See the Tempest Remote Transceiver section on
page 62 of this manual for more information on the setup and use of the remote transceiver.
Maximizing System Performance and Operational Range
Radio waves (especially those at 2.4GHz) can be significantly affected by walls, windows, or other
physical barriers. Concrete or metal walls can be of particular concern. Some tinted windows are also
significant barriers to RF. Always position antennas to minimize interference from all barriers.
A human body can be a barrier to the radio signal, especially when operating near the limit of the signal’s
range. If you experience interference, turn the beltstation toward the base station antenna.
Electronic equipment can generate radio interference. Install the base station antennas away from
sources of electrical interference. Be aware of the presence of nearby electronic equipment that may
cause interference as you move about while wearing the beltstation.
Reflected RF signals called multipath interference can cause intersymbol interference resulting in
compromised audio and should be suspected when audio is imperfect and there is no other obvious
cause. Typically, intersymbol interference requires a reflection path that is at least a few hundred feet, so
is most likely to occur in a large enclosed venue with highly reflective walls or ceiling. If intersymbol
interference is suspected relocate the base station antennas and/or try directional antennas to help
eliminate received reflected signals.
Line-of-sight operation between the base station antennas and the beltstations will always produce the
maximum system performance and operational range. Minimize obstructions between the base station
antennas and the beltstations when possible.
Clear-Com Communication Systems
Tempest 2400 Wireless Intercom System
Page 26 of 100
Use optional directional antennas to improve system performance and operational range. A directional
antenna focuses the RF signal into a smaller area. When the beltstation is located within this focused
area of energy it will have a more powerful signal which will improve range.
Only use approved antennas. Unauthorized antennas may be illegal.
Clear-Com Communication Systems
Tempest 2400 Wireless Intercom System
Page 27 of 100
Configure the Base Station
Base station settings can be configured in two ways: from the base station menu or with the Computer
interface called “T-Desk” via a LAN connection. While many functions are available through both
methods, certain features may only be available through the base station.
Using the Front Panel Controls
The Tempest base station can be configured depending on user preferences and the tasks to be
accomplished. The following instructions will help you navigate the front panel and LCD user interface.
See the base station Menu Structure section on page 60 of this manual for more details of the menu.
The LCD screen is the focal point of the base station functionality. While in Operational Mode the LCD
displays the status of all wireless beltstations that are currently logged on to the base station. In Menu
Mode the LCD shows the menu items or information.
The function of the Volume Control depends upon current the Mode of the base station. In Operational
Mode turning the Volume control adjusts the volume of the audio for the local headset. Press the Volume
control to select the channel selection of the local headset connector.
In Menu Mode turn the Volume control to scroll through the menu options of the current menu screen. A
pointer “>” on the left of the menu indicates the current option. Pressing the Volume control selects the
current menu option and is the same as pressing the Enter button. A menu item is not selected and will
not take affect until the Volume control or the Enter button is pressed.
Pressing the Menu button while the base station is in Operational mode will cause the base station to
enter Menu Mode. The Main Menu screen will be displayed. Once in Menu Mode pressing the Menu
button will act as an escape key and will back out of the current menu screen and move up one level.
Pressing the Menu button while at the Main Menu screen will exit Menu Mode and return to Operational
Mode.
The Enter button on the base station is only used in Menu Mode. Pressing the Enter button selects the
current menu option and is the same as pressing the Volume control. A menu item is not selected and will
not take affect until the Enter button or the Volume Control is pressed.
The 1 through 5 buttons below the LCD screen have multiple uses depending upon the mode of the base
station. In Operational Mode a beltstation that is communicating with the base station will appear in a slot
directly above a numbered button. Pressing one of the numbered buttons will advance directly to the
“beltstation Settings” menu for that beltstation.
Clear-Com Communication Systems
Tempest 2400 Wireless Intercom System
Page 28 of 100
In Menu Mode pressing one of the five numbered buttons selects the menu item with the corresponding
number from the current list of displayed menu items. This action produces the same result as scrolling
with the Volume control to the desired menu item and pressing Enter or the Volume control. To view and
select additional menu items, rotate the scroll knob and press Enter to select. A complete menu list is
available beginning on page 60.
Adjust Sidetone
To demonstrate the use of the controls, this details instructions to adjust the “Sidetone” for the front panel
headset connector:
•
•
•
•
•
Press MENU to enter Menu Mode,
Rotate the “Volume” knob and scroll to “Base Station Settings”,
Press ENTER.
Scroll to “Sidetone”.
Press ENTER to select the “Sidetone” adjustment.
You will see a numeric value between 0 – 99, and a level indicator. Speak into the headset microphone at
a typical speaking level and adjust the sound of your own voice in your headset. Press Enter to accept
the changes.
Press MENU to move up one level in the menu tree. Press MENU repeatedly to exit Menu Mode and
return to Operational Mode. If no other items are selected Menu Mode automatically exits and returns to
Operational Mode after about three minutes.
The base station controls may seem to react slowly. Some of the menu controls send a signal to a
beltstation and require a reply from the beltstation. There is a fraction of a second delay built into
some functions of the buttons and knobs. It is possible to press buttons or turn knobs faster than they
are permitted to react.
Clear-Com Communication Systems
Tempest 2400 Wireless Intercom System
Page 29 of 100
Selecting a Frequency Band
The Tempest 2400 Wireless Intercom System is approved for license free use in most countries.
However, due to differences in radio spectrum regulations, some countries require that 2.4GHz
equipment limit or adjust its RF spectrum operation. Always determine if there are country specific
frequency restrictions that apply and select the required frequency band as described below. Tempest
performs RF frequency adjustment automatically when you select the appropriate frequency band from
the Tech Menu. Remember that this is a legal requirement in some countries.
It is only necessary to use this feature if you use Tempest in one of the countries with special frequency
requirements. Otherwise, Band 1 is the default and should be used for maximum RF performance.
If the Tempest Wireless system is transported to a country with special requirements, navigate to the
Radio Configuration screen in the Tech Menu to select the appropriate frequency band from the “Set
Band” menu screen in the base station.
After changing the frequency band selection it is necessary to Pair each beltstation with the base station
so the information can be transmitted from the base station to the beltstation.
See the “Pairing with Beltstations” section on page 68 of this manual for more information on Pairing.
GHz
Band
1
2
3
4
5
6
7
Start
2400
2400
2423
2431
2400
2423
2453
Clear-Com Communication Systems
Tempest 2400 Wireless Intercom System
End
2480
2450
2473
2480
2428
2450
2480
MHz
Width
80
50
50
49
28
27
27
Avoid 802.11b/g
None
11
1
1,2
7,8,9,10,11
1,11
1,2,3,4,5,6,7
Page 30 of 100
Network Number and Lockout Key
The Network Number determines the RF frequency hopping pattern for the base station and its beltstations.
This is a key operational parameter and is represented by a number between 0 and 63.
The Lockout Key prevents systems with the same Network Number from trying to communicate with each
other and is represented by a number between 0 and 255. Together the Network Number and Lockout
Key represent over 16,000 possible combinations to minimize the possibility of inter-system interference.
The Network Numbers and Lockout Keys for Tempest Wireless base stations are set before leaving the
factory, by incrementing by one digit. Always adjust the Network Number and Lockout Key of Tempest
base stations that are known to operate in close proximity to other base stations as described below.
Users should confirm these settings to minimize the opportunity for “mysterious” performance issues.
Failure to set a unique Network Number and Lockout Key may result in poor system performance caused
by interference from another Tempest Wireless system using the same Network Number and Lockout
Key. Because of the requirement to pair every beltstation to each base station that it will communicate
with, it is not possible to manipulate Network Numbers and Lockout Keys to gain unauthorized access to
a communication channel.
Multiple Base Stations in Close Proximity
The Network Numbers of closely located base stations should be offset by at least four, for maximum
performance. For example, on Base-A select Network Number “02”, on Base-B select Network Number
“06”, and on Base-C select Network Number “10”. In this manner each base station Network Number is
different by at least four digits. This procedure will ensure that each system is operating properly and
independently from an RF network perspective.
Also, adjust the Lockout Key on each base station. All base stations in one facility may have the same
Lockout Key if all Network Numbers are offset by four as described above, or all may be different.
Lockout keys are only differentiators for systems using the same Network Number.
The Network Number and Lockout Key settings can be adjusted from the “Radio Configuration” section of
the Tech Menu. Press the MENU button. Press the ENT button to select “base station Settings”. Rotate
the Volume control to scroll and select “Tech Menu”. Select “Radio Configuration”. Select “Network
Number”. Rotate the Volume control to adjust the value and press ENT to save.
Press MENU to escape one level and select “Lockout Key”. Adjust the value and press ENT to save.
Press MENU repeatedly to escape to the Operation screen.
Clear-Com Communication Systems
Tempest 2400 Wireless Intercom System
Page 31 of 100
Set Display Mode to Static or Dynamic
The Static or Dynamic selection only affects the order that the base station LCD Operational screen
displays beltstation information. “Static” will be the preferred choice for users who want to ensure that a
beltstation that is logged in will always appear in the same location (slot) on the base station display and
are using only one base station.
“Dynamic” is the default setting. Dynamic display mode always displays beltstations in alpha-numeric
order by name, so “Dir” appears before “LitMgr”, which appears before “StgMgr”. Beltstations can change
slots depending on which beltstations are logged in at any given moment. Empty slots are always on the
right of the Operation screen. “Dynamic” is the preferred choice for users utilizing iSelect roaming
between multiple base stations.
On the base station, under Tech menu, in the “Display Slot Assignments” menu, choose Static or
Dynamic.
When selecting ‘Static’ slot assignments, you must also enter the “Base Slot” section of the Tech Menu
on each beltstation and assign each beltstation a different slot (1 – 5).
Name Each Station
Name the base station with a descriptive name. This is especially helpful when iSelect Roaming will be
used to roam between base station coverage areas. The base station name can include up to 14
characters.
The base station name will appear on the Banner (top line of the base station display, with white-on-black
lettering), on the beltstation display, and in the beltstation’s menu under “Select Base”.
Name each beltstation with a descriptive name. This is especially helpful when the base station or T-Desk
is used to monitor and manage the beltstations. Prior to a name being assigned, a hexadecimal serial
number is displayed.
The beltstation will accept 14 characters in the name but only the first six characters of the beltstation
name can be displayed on the base station Operation screen. If the beltstation is named “Camera 1” then
“Camera” will be displayed on the base station slot for that beltstation because of the six character limit. If
the base station will be used to monitor and manage the beltstations, the beltstation name should be
limited to six characters.
On the base station press MENU and select “Base Station Settings” and “Name Base Station”.
Rotate the Volume control to move the underscore “_” to select the character to be changed.
Press Enter and notice the underscore changes to a pointer “Λ” under the selected character.
Rotate the Volume control to scroll through the character list. Press Enter to select the new character.
Characters always replace and never insert.
Repeat as needed.
Press Enter to save the new name after all characters are complete. Failure to press Enter to save will
clear all changes.
Press Menu to escape to the Operation screen.
Naming the beltstation works the same as naming the base station. On the beltstation press MENU and
select “Beltstation Settings” and “Name Beltstation”. Use the Volume control and the Enter button to
select and change characters. Press Enter to save the changes.
beltstation names can be changed wirelessly from the base station’s menu or from T-Desk when the
system is on a local area network.
Clear-Com Communication Systems
Tempest 2400 Wireless Intercom System
Page 32 of 100
Base Station Headset Connection and Controls
The base station headset connection is a functional user communication point, and may also be used for
setup and troubleshooting. The Front Panel Headset can communicate on any one of the four intercom
channels. Controls for this headset are located just to the right of the connector, and in the Menu on the
base station Settings screen.
The front panel headset connector is a 4-PIN XLR male. A compatible headset must be provided by the
user.
The Talk button enables or disables the microphone for the local headset. A blue LED will backlight the
word “TALK” on the Talk button when the mic is enabled. Always keep the microphone disabled, TALK
off, when not in use.
Tempest uses an intelligent latching method for Talk buttons. Pressing the Talk button momentarily (less
than two seconds) will latch the mic button. The blue TALK LED will remain lit and the microphone will
remain enabled. Pushing and holding the Talk button for more than two seconds will cause the button to
act in a momentary or push-to-talk fashion, so the blue Talk LED will remain lit and the microphone will
remain enabled only as long as the button is pressed.
In Operational Mode turning the Volume control adjusts the volume of the audio of the local headset.
Turning the Volume control clockwise increases the audio level while turning the control counter
clockwise decreases the level. The Volume control knob is also a push button. Pressing the Volume
control cycles the Channel selection and LEDs in order from A to D.
The four Peak LEDs indicate when the mic audio from the local headset is reaching a peak level and is
about to enter into limiting. These LEDs should normally be off.
Set the Mic Gain for the Local Headset
Set the mic gain properly to assure the best audio quality. To set the mic gain for the Local Headset:
Press Menu to enter Menu Mode. From the Main Menu select “Base Station Settings”, then “Set Mic
Gain”.
While at the “Set Mic Gain” screen talk into the local headset microphone in a louder than normal level
and adjust the Volume control until the Peak LED for the selected channel just starts to light at the loudest
parts of the audio. Press Enter to accept the changes.
When the mic gain is set too high it is possible to induce feedback or echo. When set too low, words can
be clipped by the low level noise gate, or may sound too quiet to other listeners. Headsets by different
manufacturer’s or different models of headsets will require widely varying Mic Gain settings. When setting
microphone gain it is best to err toward a setting that is too low, rather than too high. This will help reduce
unwanted echo in the system when that microphone is enabled.
Clear-Com Communication Systems
Tempest 2400 Wireless Intercom System
Page 33 of 100
Front Panel Lock
The Front Panel Lock function is intended to minimize the probability of unintentional adjustments to the
system. Press MENU, select “Base Station Settings”, select “Front Panel Lock”, press 1 or ENTER to
select “Lock”. Press MENU to exit to the main Operational screen. The buttons and knobs on the front of
the base station will not function until unlocked, except the power switch will power the unit off. When the
base station is powered on it is always unlocked.
Press MENU + ENTER to unlock.
Call Function
On the base station front panel, select a channel by pressing the Volume control. Press and hold CALL
for as long as you want the Call signal to go out on the channel.
A Call signal will be received by users who are listening on the channel that originated the Call signal.
On the base station an active Talk button is not required to send a Call signal, and the Call signal is routed
to the channel selected for monitoring.
On the beltstation a Call signal is sent only when the Talk button is enabled, and only on the channel(s)
selected for Talk.
Clear-Com Communication Systems
Tempest 2400 Wireless Intercom System
Page 34 of 100
GPO Relay Contacts
Tempest Wireless provides six General Purpose Output (GPO) contact closures. These GPO contact
closures can be used for interfacing with other external devices. The SA (Stage Announce) Relay and the
five GPO relays, one for each beltstation, are available through the DB-15 Relay Connector on the back
of the Tempest base station. These relays can be triggered from the wireless beltstations.
The Stage Announce Relay function in the Tempest base station is activated by the STAGE button. The
SA Relay remains closed as long as the Stage button is pressed.
The user can reassign the following beltstation buttons and features to control an individual relay uniquely
assigned to that beltstation: Talk A/B, Talk C/D, Ch A/B, Ch C/D, Stage, Enter, or Battery < 10%. The
relay is made when the assigned button is pressed and remains closed for as long as the button is
pressed.
The individual GPO relay can also be triggered by the low battery level alert of the beltstation. In this case
the relay is made when the battery level of the beltstation reaches 10% and remains closed until the
battery is replaced or the beltstation is turned off.
All relay contacts can support 1 Amp at 30 VDC.
The relay completes a circuit. Tempest does not supply any power to the circuit.
Since every user will require a custom application, cables for your RELAY connections will require some
bench work.
DB-15 Relay Wiring
Pin
1
2
3
4
5
6
7
8
Pin
Relay 1
Relay 2
Relay 3
Relay 4
Relay 5
Relay SA
Not Used
Not Used
9
10
11
12
13
14
15
Relay 1
Relay 2
Relay 3
Relay 4
Relay 5
Relay SA
Not Used
Tempest DB-15 Connector
Clear-Com Communication Systems
Tempest 2400 Wireless Intercom System
Page 35 of 100
Auxiliary Input/Output
Auxiliary IN can be used to bring program or other audio into the Tempest base station. Audio supplied to
the Aux IN Connector can be assigned to any combination of the four intercom channels with individual
volumes for each channel at the “Aux In/Out Assignment/Level” menu. Audio from the Aux IN port is
routed only to wireless users and is not routed out to the hardwired system.
Audio from the Auxiliary OUT Connector can be assigned from any combination of the four intercom
channels with volume control at the “Aux In/Out Assignment/Levels” menu.
While in the “Aux In/Out Assignment/Level” menu, the front panel channel select (SEL) button is used to
advance through the channels, and the IN Level Control is used to adjust the Aux In volume. The OUT
Level control is used to adjust the Aux Out volume (page 57). Adjust to “0” to restrict audio from a
channel.
The Aux IN and OUT connectors are ¼” Tip/Ring/Sleeve jacks that accept standard ¼” TRS plugs. The
Aux IN and OUT connections are balanced and transformer isolated and operate at a nominal line level
audio of - 4 to + 8 dBu.
Stage Announce (SA)
The Stage Announce (SA) function in the Tempest base station is used to send a wireless beltstation
microphone signal to a dedicated external audio output. When a wireless user presses the Stage button
on the beltstation, their audio is re-routed from the selected intercom channel(s) and is sent to the base
station rear panel SA connector. In addition, a relay closure contact is available on the RELAY connector
on the back of the base station. Pressing the Stage button enables the headset microphone regardless of
the status of the Talk buttons. If enabled, all beltstations can access this feature.
The Stage Announce output connector is an XLR-3M. The Stage Announce connector is balanced and
transformer isolated and outputs nominal line level audio from -4 to +8 dBu. The Stage Announce
connector output level can be adjusted at the Stage Announce screen.
In addition the Stage button may be configured to also control an additional relay assigned to the users
beltstation. See the GPO Relay section for more details.
Clear-Com Communication Systems
Tempest 2400 Wireless Intercom System
Page 36 of 100
Reset Memory
There are two options to reset memory: Restore Factory Default and Clear memory.
Restore Factory Default
This option will restore all settings to factory defaults except Pairings and names.
Be aware that restoring factory defaults will have an immediate effect on volume, sidetone,
relay selection, Aux In/Out levels, hardwired intercom levels, and Shared Slot settings, among
others.
Clear Memory
Occasionally, it may be desirable to remove all previous settings and user defined names, such as when
equipment is transferred to a new project or work site.
This option will restore all settings to factory defaults and will delete all user defined names. All
entries will be deleted and there is no “undo”.
Clear Memory on a beltstation or a base station will require re-Pairing of beltstations. It may be necessary
to select a Frequency Band due to country specific RF requirements, on the base station. Both the base
station and each beltstation has a “Factory Default” option in the Tech Menu. Browse to the Tech Menu,
select “Factory Default”, and choose “Factory Default” or “Clear Memory”.
From the base station, “Restore Factory Defaults” only resets base station defaults. beltstation factory
defaults can be reset in each beltstation and changes are relayed wirelessly to the base station.
Default Settings
Base Station Defaults
Headset Sidetone: 70
Headset MIC gain: 0 / 65
LCD Contrast: 30
LCD Backlight Brightness: 80
LED Brightness: 40
Headset Talk Button: Latch
Set Base as Master: Off
Front Panel Lock: Off
Wired intercom levels In/Out:
7/12
Aux In/ Out: 00/00
Stage Announce Audio: 50
S/A Relay: Enabled
Security: Disabled
Frequency Band: 24002480Mhz
Display Slot Assignment:
Dynamic
TCP/IP Mode: DHCP
Clear-Com Communication Systems
Tempest 2400 Wireless Intercom System
Beltstation Defaults
Headset Sidetone: 70
Headset MIC gain: 0 / 65
Low Battery Alert: Enable
LCD Back Light: Enable
Talk LED: High
Talk A/B: Latch
Talk C/D: Latch
Lock Keys: Off
Volume Limits: 0 - 99
Call Alert: Both
Call Button: Enable
Relay Key: Not selected
Select Relay: Not selected
SA: Disable
SA Relay: Enable
Security: Disabled
Page 37 of 100
Wired Intercom Interface to the Base Station
Each of Tempest’s four wireled intercom channels can interface with a 4-Wire matrix intercom or a 2-Wire
party-line intercom. Tempest supports a 4-Wire intercom interface to most major digital matrix intercom
systems and other intercom 4-Wire devices. Tempest also interfaces with 2-Wire intercom systems
including Clear-Com, RTS, and AudioCom (Bal) systems, as well as compatible brands. Each Tempest
intercom channel can interface with one intercom system at any given time.
While it is possible that both 2-Wire and 4-Wire systems may be connected to the same intercom channel
simultaneously, they cannot function at the same time, and this arrangement has the potential to cause
undesirable operational complications, so is not recommended.
Tempest Base Station Wired Configuration Controls
for Connection to Wired Intercom Systems
These controls will normally be used together to configure the Tempest base station
for 2-Wire or 4-Wire operation.
•
•
•
Channel A has been set for no wired intercom connection – the LEDs are off.
Channel B is set for Clear-Com 2-Wire intercom connection. The upper slide switch is in the
middle position and the 2-Wire LED aligned with channel B is illuminated.
Channels C and D have been set for a 4-Wire interface. The position of the slide switch does not
impact 4-Wire operation.
Tempest base station LCD display for IN and OUT adjustment
Use the IN and OUT controls to adjust the levels on the selected channel.
In this diagram, Channel A, 2-Wire levels are selected for adjustment.
Clear-Com Communication Systems
Tempest 2400 Wireless Intercom System
Page 38 of 100
Controls
The two 2-Wire Intercom Type Select Switches determine the type of 2-Wire intercom that
may be connected to the corresponding 2-Wire connectors on the rear panel of the base
station. Clear-Com, RTS, or Balanced (AudioCom) can be selected. These switches only
affect 2-Wire operation and do not control 4-Wire operation. The CHAN A/B switch selects
the 2-Wire system type for both the A and the B intercom channels. The CHAN C/D switch
selects the 2-Wire system type for both the C and the D intercom channels.
Always set the 2-Wire Intercom Type Select Switches prior to connecting the 2-Wire intercom
to the back of the Tempest base station. Never change the switch setting while connected to a
wired intercom system. Failure to follow this procedure could damage the Tempest base station
or the 2-Wire hardwired system.
The Intercom Channel Select (SEL) button selects one of the four intercom channels to
allow selection of 2-Wire or 4-Wire functionality and to allow the intercom audio IN and
OUT levels to be adjusted.
Pressing the Intercom Channel Select button once selects Menu Mode on the base station
and displays the Intercom Levels screen on the LCD display. A second press selects
channel A. The intercom channel selected is indicated by one of the four Channel LEDs
located to the right of the Intercom Channel Select button and on the LCD screen.
Additional presses of the Intercom Channel Select button advances through the remaining
intercom channels. The next press of the Intercom Channel Select button will exit Menu
Mode and will cause all of the LEDs to be illuminated.
The 2-Wire/4-Wire Select (SEL) button selects the connection mode for operation of
each of the four intercom channels. Pressing the 2-Wire/4-Wire Select (SEL) button
changes the selected intercom mode between 2-Wire, 4-Wire or no wired connection.
In Operational Mode the eight 2-Wire/4-Wire LEDs indicate the currently selected
hardwired intercom connection mode for each of the four intercom channels: 2-Wire, 4Wire, or no wired intercom connection.
The IN and OUT controls adjust the intercom volume level coming in to the Tempest base
station from the hardwired intercom system or out to the hardwired intercom from the base
station.
To adjust the levels press the SEL button to enter Menu mode, advance to the desired
channel and rotate the IN or Out controls. Note that the LCD display indicates the currently
selected levels.
IN is represented by values from 0 through 13.
OUT is represented by values from 0 through 13.
The IN and OUT controls are only active in Menu Mode.
Clear-Com Communication Systems
Tempest 2400 Wireless Intercom System
Page 39 of 100
4-Wire (Matrix) Intercom Interface
4-Wire intercom systems use two pairs of wires to carry one full duplex channel of intercom audio - one
pair for send and the second pair for receive. In addition to intercom audio, most systems have separate
data lines that carry system data from the matrix to the remote devices. The Tempest 4-Wire connection
is an audio-only interface to 4-Wire systems. Data can be present on the input cable but no data is
utilized in the Tempest base station.
Steps to Configure a 4-Wire Intercom Connection
•
•
•
•
Select 4-Wire connection for the appropriate channels.
Make the physical connections with RJ-45s, to the Tempest base station and the 4-Wire system.
Configure the 4-Wire system to recognize the Tempest Wireless system.
Adjust IN/OUT volume levels between the Tempest Wireless System and the 4-Wire system as
needed.
Connect the 4-Wire intercom system to the desired channel RJ-45 jack on the rear panel of the Tempest
base station. Select the 4-Wire setting as described in “Wired Intercom Configuration Controls” on page
39. That is all that is necessary for Tempest to be ready to communicate with the 4-Wire system. Perform
any necessary configuration for the 4-Wire intercom System and the communication link should be
complete.
RJ-45 Jacks
The top RJ-45 jacks are for Channel A or C and the bottom RJ-45 jacks are for Channel B or D.
You may choose to adjust the In/Out levels on the front of the base station if the volume level between
the systems is not acceptable.
Wiring schemes vary and it is important to ensure that the cable is wired correctly for proper system
operation. Tempest utilizes RJ-45 jacks for 4-Wire connection to the base station. Only two pairs of wires
are utilized - one to send audio and one to receive audio. A standard CAT-5 patch cable can be used to
connect between the matrix and the Tempest system.
Tempest 4-Wire / RJ-45 Connection
Pin #
1
2
3
4
5
6
7
8
Use
No Connection
No Connection
Audio Input (+)
Audio Output (+)
Audio Output(-)
Audio Input (-)
No Connection
No Connection
Clear-Com Communication Systems
Tempest 2400 Wireless Intercom System
Page 40 of 100
2-Wire (Party-Line) Interface
2-Wire party-line intercom systems carry one or two (depending on the system type) channels of full
duplex intercom audio plus system power and other information on a single XLR-3M cable (2 wires and a
ground). Each 2-Wire intercom type has a different wiring scheme and unique line characteristics. It is
imperative to have the rear panel connections and the front panel settings adjusted correctly for audio to
pass correctly between the systems.
Steps to Configure a 2-Wire Intercom Connection
•
•
•
•
•
Adjust the Intercom Type Slide Switches to appropriate manufacturer compatible setting- RTS,
Clear-Com, Bal.
Select 2-Wire connection for the appropriate channels.
Make the 3-pin XLR physical connections to the Tempest base station and the 2-Wire system.
Null the system. For details see page 43.
Adjust IN/OUT volume levels between the Tempest 2400 Wireless Intercom System and the 2Wire system.
Always confirm that the 2-Wire intercom system is functioning properly before connecting the Tempest
2400 Wireless Intercom System. Test each wired communication station before connecting the wireless
system. Confirm operation of the wireless system before connecting to the wired system.
After 1) the slide switches are set correctly; 2) the appropriate channels are set for 2-Wire operation; 3)
the XLR cable connections are made; 4) power is provided by the 2-W system or Master Mode; then
audio will pass between Tempest and the wired system.
Audio may develop an echo that is heard in the wireless beltstations until the system is nulled. The echo
should not prevent communication but is undesirable. The volume levels in to or out from Tempest, may
need adjusting so that relative volumes are the same.
Echo Cancellation Menu
In the base station’s Tech Menu is a selection for “Echo Cancellation” (Ecan). This refers to software that
assists in removing echo from 2-Wire intercom connections. Hardware connections need to be optimized
with the null procedure to minimize echo in the physical link so that the software can remove any residual
echo.
In the Tech menu, “Echo Cancellation” is “ON” by default, but is only enabled for channels that are
selected for operation with a 2-Wire intercom and have a physical connection to a 2-Wire system.
If a 2-Wire intercom is never utilized in a system, Ecan can be turned “Off” to assure that it cannot create
undesirable effects. This should not be necessary though and it is recommended that you keep Ecan “on”
at all times.
Ecan is disabled while the base station’s Auto-Null or Manual Null menu screens are active, to insure that
the hardware is optimized for echo reduction. When Ecan is enabled it requires up to 10 seconds of
active audio to achieve maximum efficiency. Brief loud active audio can help accelerate efficiency.
Auto-Null Explained
In 2-Wire intercom systems, inefficiencies in the hybrid circuitries that combine or separate the send and
receive audio signals onto the same pair of wires, inherently cause echo. Within analog systems the echo
is not noticeable but when connected to an extremely sensitive digital system the echo becomes more
problematic.
In order to minimize echo resulting from connection to an external 2-Wire system, it is necessary to
optimize the hardware of the hybrid circuitry in the Tempest base station. Tempest provides a user
initiated AUTO-NULL feature that automatically optimizes the 2-Wire interface. Nulling only impacts 2Wire hardwired intercom connections.
Auto-Null sends a tone to each of the 2-Wire intercom channel connections. The Tempest Wireless base
Clear-Com Communication Systems
Tempest 2400 Wireless Intercom System
Page 41 of 100
station DSP monitors the echo and adjusts the line characteristics (Resistance and Capacitance) to
optimize the interface to the external 2-Wire system. When Auto-Null is initiated, all of the functions of the
base station including communication are interrupted. The Auto-Null process takes approximately 10
seconds. Intercom levels may need to be adjusted after the 2-Wire intercom lines have been nulled.
During Auto-Null, wired intercom users will hear the nulling tones and communication will be interrupted. It is
recommended that this feature should be used only during setup and not during live events.
Clear-Com Communication Systems
Tempest 2400 Wireless Intercom System
Page 42 of 100
Auto-Null Procedure
Turn off all TALK buttons on both the wired and wireless systems. Since Tempest monitors a self
generated tone to adjust the Null characteristics, any sounds entering through either the wired or wireless
intercom systems will interfere with the nulling process. When the Auto-Null or Manual Null menu screens
are accessed, Tempest sends a Mic Kill signal to all wireless beltstations, but the wired communication
stations will need to be turned off individually, or a hardwired Mic Kill signal will need to be initiated.
On the Tempest base station press MENU to open the Main Menu. Rotate the Volume Control to scroll
through the menu options to the “Wired Intercom Settings” and select “Auto-Null”. Select “Null Now” to
start the Auto-Null process. Normal functions will be interrupted for about 10 seconds during the Auto-Null
process. Progress of the null process can be observed on the base station LCD display.
The base station display will indicate “Auto-Null Complete” once the Auto-Null process is completed.
Press MENU to escape to the Operational screen.
Activate Auto-Null for new connections, or whenever the 2-Wire system changes significantly such as
when additional wired belt packs are added or removed, or when cable lengths are changed significantly.
Test for Echo
Talk into the wireless system for at least 10 seconds to test for echo. Echo cancellation (Ecan) software is
disabled in the Auto-Null and Manual Null screens, to insure the best hardware null. Press MENU to exit
the nulling menu screen, and to enable Ecan. When Ecan is first enabled it requires up to 10 seconds for
it to achieve convergence. There will usually be some noticeable echo during the first few seconds of
testing and the echo will diminish over time as the Ecan software converges to an inaudible level. Brief
louder active audio can help accelerate efficiency.
If multiple base stations are connected by 2-Wire intercom connections, each base station must be nulled
separately. Null one base station at a time.
Manual Null
Generally Auto-Null will adequately control the inherent echo caused by the 2-wire hybrid circuitry.
However, “Manual Null” is available if there is residual echo.
If echo persist after testing for at least thirty seconds:
1. Turn off all TALK buttons. Since Tempest analyzes a tone to adjust the Null characteristics, any
sounds entering through the wired or wireless systems will interfere with the nulling process.
2. Press MENU and advance to the Manual Null screen.
3. Press Channel SEL to advance to the desired channel.
4. Rotate the “IN” knob to adjust the “RBAL” null value until the “Amplitude” is minimized.
5. Rotate the “OUT” knob to adjust the “CBAL” value until the “Amplitude” is minimized.
6. Repeat the “RBAL” and “CBAL” adjustment. The repeat process and order of adjustment of the
process is important because the “CBAL” adjustment is most effective when the “RBAL” is close
to its absolute minimum.
7. Once the best null is achieved, turn the “IN” knob clockwise to add ten to the “RBAL” value. For
example, if the minimum “RBAL” value is 123, adjust to 133.
8. Exit the Manual Null screen. Test for echo for at least 10 seconds. It will take up to 10 seconds for
echo cancellation software to achieve maximum efficiency.
If the echo is not acceptable, use the IN knob to adjust the “RBAL” null value up one and test again. If
necessary, turn the “RBAL” value down two and test again. Continue with this trial and error method until
the echo is minimized.
Manual null requires each channel to be nulled individually. Return to the Null Screen and press SEL to
advance to the next channel. Repeat for all channels.
Clear-Com Communication Systems
Tempest 2400 Wireless Intercom System
Page 43 of 100
Other Causes of Echo
Please be aware that echo can be cause by several sources. A type of echo referred to as acoustic echo
can be caused by another user’s headset, but is inaudible to that user. Have other users turn off their
TALK button and determine if the echo stops. Acoustic echo is minimized by software resident in each
beltstation. Acoustic echo may be mitigated by decreasing the Mic gain, sidetone or volume on the
headset causing the echo. Occasionally it is necessary to replace headsets that continually cause
unacceptable echo.
If a user removes his headset, the Mic may detect and repeat the sound from the earpiece. Whenever a
headset is removed, always turn off the Talk function.
Clear-Com Communication Systems
Tempest 2400 Wireless Intercom System
Page 44 of 100
2-Wire Wiring Schemes
Wiring schemes vary and it is important to ensure that the cables are wired correctly for proper system
operation. When Tempest is configured for a particular manufacturer’s system, Tempest routes the signal
to internal circuitry that conforms to the requirements of that system. The 3-pin XLR connectors on the
back of the Tempest base station can have very different characteristics depending on the setting of the
slide switches, as can be seen in the table below.
3-Pin Wiring Scheme and Line Characteristics
Clear-Com
1 COMMON
2 POWER
3 AUDIO
1
2
3
Input Impedance
Output Level
Bridging Impedance
Call Signaling:
Send
Receive
Power voltage
200Ω
1.0 Vrms
>10 kΩ
12 ±3 VDC
4 VDC Min
30.0 VDC
MALE
AudioCom
1 COMMON
2 AUDIO(-) & POWER
3 AUDIO(+) & POWER
1
2
3
Input Impedance
Output Level
Bridging Impedance
Call Signaling:
Send
Receive
Power voltage
300Ω
1.0 Vrms
>10 kΩ
20 kHz ±100 Hz, 5 mVrms
20 kHz ±800 Hz, 100 mVrms
24.0 VDC
MALE
RTS
1 COMMON
2 AUDIO 1 & POWER
3 AUDIO 2
1
2
3
Input Impedance
Output Level
Bridging Impedance
Call Signaling:
Send
Receive
Power voltage
200Ω
0.775 Vrms
>10kΩ
20 kHz ±100 hz, 240 mVrms
20 kHz ±800 Hz, 100 mVrms
28.0 VDC
MALE
Note for 2-Wire RTS Users: RTS TW (2-Wire) systems support two intercom channels on a single XLR
cable. When connecting an RTS TW system, only one cable is required for two intercom channels. When
set to RTS mode all four of the 3-PIN XLR connectors (2 male and 2 female) for channels A&B (or C&D)
are paralleled together. RTS intercom channel 1 is placed on Tempest intercom channel A (or C) and RTS
channel 2 is place on channel B (or D).
Note for 2-Wire Clear-Com and Balanced (Audiocom) Users: For Clear-Com and Balanced 2-Wire
intercoms, use the A, B, C, and D, male or female 3-pin (XLR-3M/F) connectors on the rear panel to
connect up to 4 intercom channels. The male and female connectors for each channel are loop-through
connections and are the same point electrically. Each channel of a Clear-Com or Balanced 2-Wire system
requires one separate cable for connection to one Tempest channel.
Clear-Com Communication Systems
Tempest 2400 Wireless Intercom System
Page 45 of 100
Connecting Multiple Base Stations
2-W Audio links
Accu-Sync
Tempest base stations may be used together to form large
wireless systems, and may include external wired intercom
systems. Intercom audio for any or all channels can be linked
across multiple base stations. Audio from one base station can
be passed via a 2-Wire, wired connection to another base
station if they are to share a single channel of audio. Through
this method many complex combinations of intercom channels
can be achieved.
Because all RF devices have the potential to cause
interference, Tempest includes a feature called Accu-Sync™,
designed to minimize potential interference when using
multiple base stations. Base stations are synchronized via the
Accu-Sync connections on the back of the base station. See
the Accu-Sync section on page 49 for more information on
using Accu-Sync.
Tempest includes a Master Mode which provides required
audio power when only Tempest base stations are linked
without external intercom. See the Master Mode section on
page 50.
If intercom channels are connected across multiple base stations without connection to an active 2-Wire
intercom, one of the base stations must be placed into Master Mode.
A multi-base system will generally utilize Tempest Remote Transceivers to distribute the wireless signal,
sometimes extending the number of users by overlapping the wireless coverage area, and sometimes
extending the wireless range with the iSelect Roaming feature. In this application always try to separate
antennas by at least 10 feet whenever possible.
If multiple base stations are linked on a common audio channel, each base station must be
nulled separately. Null one base station at a time.
A 4-Wire matrix intercom system may be configured to connect to multiple Tempest base stations so that
all share the same channels. Configure each base station individually as described in 4-Wire (Matrix)
Intercom Interface on page 40. The following information relates to multiple base station configurations
without a matrix system.
Clear-Com Communication Systems
Tempest 2400 Wireless Intercom System
Page 46 of 100
Steps to Configure a Multiple Base Station System
•
•
•
•
•
•
•
Locate and configure antennas to minimize RF interference.
Make Accu-Sync connections.
Confirm BaseSync “ON”.
Make 2-Wire Connections.
Configure for the appropriate 2-Wire connections.
Null each base station.
Adjust IN/OUT levels if necessary.
Audio Connections for Multiple Base Stations
When using multiple Tempest base stations it is often desirable to share the same communication
channels across some or all base stations. To accomplish this, 2-Wire intercom connections must be
made between the base stations.
It is advisable to configure the Accu-Sync option prior to making the audio connections.
There are two specific modes of operation when using this feature.
When an external hardwired intercom system is NOT present:
Tempest is designed to use any connected 2-Wire intercom system’s power source and termination to
power the base station’s internal hybrid circuitry. When no hardwired system is present, Tempest uses a
feature called Master Mode to power and terminate this circuitry. Audio will not be shared among the
base stations until one of the linked base stations is set to Master Mode.
Master Mode only functions when there is no 2-Wire hardwired intercom system connected. If there is a
hardwired intercom connected to any channel of any of the shared Tempest base stations, Master Mode
will automatically disengage and only channels connected to the hardwired intercom system will continue
to be shared.
In Master Mode, the number of Tempest base stations that can be linked is only limited by RF factors,
which is impacted by antenna location and other environmental factors. Widely distributed antennas may
permit up to 10 base stations to be linked.
The 2-Wire Intercom Type Select Switches on the Tempest base station front panel must be
set to “ClearCom” for Master Mode to function.
Using the 3-PIN XLR male or female connectors on the back of the base station, connect the intercom
channels of each base station that will share audio.
Set any one of the base stations to Master Mode “On”. It is only necessary to set one base station to
Master Mode. Master Mode settings are found at the “Set Base as Master” screen under the “Multi-Base
Settings” of the Main Menu.
Once one base station is in Master Mode, audio will be shared among all base stations that are
connected to that intercom channel. Lines must be nulled for proper operation.
When an external 2-Wire hardwired intercom system IS present:
Set the 2-Wire Intercom Type Select Switches to the proper type and select 2-Wire mode. Connect the
hardwired intercom to the base station. In this configuration each connected Tempest base station
intercom channel will receive power and termination from the wired intercom system. The Tempest base
station functions as an additional wired beltstation from the perspective of the connected 2-Wire system.
Connect either male or female (male and female connectors are electrically identical) 3 pin XLR from the
2-Wire intercom channel to be shared, to the base station that will use the intercom channel. Loop to
other base stations as needed. Repeat for all channels to be shared. See the Wired Intercom Interface
Clear-Com Communication Systems
Tempest 2400 Wireless Intercom System
Page 47 of 100
section in this manual for more information about connecting to external wired intercom systems.
When using an external 2-Wire hardwired connection, only channels that are connected to a
wired intercom will be able to share audio between base stations.
Clear-Com Communication Systems
Tempest 2400 Wireless Intercom System
Page 48 of 100
Accu-Sync
Three Base Stations Accu-Synced
Accu-Sync provides a common timing signal between connected base stations. This signal ensures that
transmission cycles for all Accu-Synced base stations occur simultaneously. This synchronized
transmission eliminates the negative RF effect called desensing. See the following section, “Special RF
Considerations for Multiple base stations”, for more information on connecting multiple base stations.
When two or more Tempest base stations are to be operated in the same location, connecting the base
stations via the BaseSync connector on the back of the base station minimizes potential RF interference
between base stations. The more base stations there are in close proximity to each other the more
important it is to use Accu-Sync.
One base station must always act as the sync source when using Accu-Sync. The sync source is any
base station that does not have a BaseSync cable plugged into the BaseSync IN connector. Always
ensure that one, and only one base station has an open (no connection) BaseSync IN connector.
When a base station does not have a BaseSync cable plugged into the BaseSync IN connector, that base
station uses an internally generated timing pulse to control its own transmission cycle.
When a base station has a BaseSync cable plugged into the BaseSync IN connector, that base station
uses the external sync signal (timing pulse) to control its transmission cycle.
The BaseSync signal is enabled by default but can be disabled in the Tech Menu under Radio
Configuration. Unless directed by Tech Support personnel, BaseSync should remain enabled.
The BaseSync cable is a DB-9F To DB-9M wired straight through on pins 1-5.
Never connect Accu-Sync cables between 2.4GHZ and 900MHz Tempest models.
BASESYNC IN
Accu-Sync - DB-9 Connector
Clear-Com Communication Systems
Tempest 2400 Wireless Intercom System
Page 49 of 100
Master Mode
Master Mode is a Tempest base station function that allows multiple base stations to share audio without
the presence of an external hardwired intercom system power supply. Master Mode provides the
necessary system termination to the 2-Wire hybrid circuitry in each of the Tempest base stations so that
common audio transfer can take place. Each base station in a linked system provides its own power for
audio. Any combination of channels may be linked, from just one channel to all four channels.
The only limit to the number of base stations that can be linked to share an audio channel is the impact of
multiple RF sources in close proximity. As the number of base stations goes up and they begin to
compete for RF spectrum, the range will begin to decrease. See the section on Accu-Sync on page 49
and the section on Antenna Location on page 24, to minimize the effect of RF competition.
It is necessary to use Master Mode when two or more Tempest base stations will be linked to share audio
and an external hardwired intercom system is NOT present to provide a power. When an external 2-Wire
intercom system is connected to Tempest, the external 2-Wire intercom system provides the required
power and system termination and Master Mode is automatically disabled.
On the base station that will be set to Master Mode, set both 2-Wire Intercom Type Select slide switches
(A/B & C/D) to the Clear-Com position. Master Mode only works as Clear-Com type. If “RTS” or “BAL” is
selected, an attempt to set the base station as master will result in an error message. If a slide switch is
changed from Clear-Com to RTS or BAL, Master Mode will turn off, and it will be necessary to return to
the “Multi-Base Setting” menu to re-enable Master Mode.
On slave base stations, set the slide switch for channels that will be connected to the master base station,
to Clear-Com. Channels not connected to the master base station may be connected to other systems.
On each base station, set the shared intercom channel(s) to the 2-Wire mode. Master Mode only works
for channels selected for 2-Wire connection. Channels that will not be connected across base stations
should not be set for 2-Wire connection.
Connect the appropriate intercom channel(s) of each base station that will share audio using the 3-PIN
XLR male and female connectors on the back of the base station.
Complete all settings and connections before activating Master Mode. Set one base station to Master
Mode. Master Mode settings are found at the “Set Base as Master” screen under the “Multi-Base
Settings” main menu selection. It is only possible to set one base station as Master. The words “Master
Mode” appear in the top line of the base station display, to the right of the base station name, when
Master Mode is active. An attempt to set a second base station as master will result in an error message.
It does not matter which base station in a linked series is set to Master Mode.
Slave base stations – those not set as master – detect the master base station as a Clear-Com
connection. For example, if only channels A and B are connected to the master base station, then
channels C and D of the slave base stations work normally and can have alternate configurations. In this
case, Channels C and D may be set to RTS, or BAL, or even 4-Wire, as long as those channels are not
linked to the master base station.
An attempt to set a base station to Master Mode while connected to a 2-Wire system will result in an error
message. If a base station has “Set Base As Master” first turned on, and an external hardwired intercom
system is connected later, the Tempest base station will turn off Master Mode.
The “Set Base As Master” setting will remain on through a power cycle.
Clear-Com Communication Systems
Tempest 2400 Wireless Intercom System
Page 50 of 100
Special RF Considerations with Multiple Base Stations
Whenever multiple Tempest base stations are operated together in close proximity, special consideration
must be taken to ensure proper system operation and maximize operational range.
See the Antenna Location section on page 24 of this manual for more information on antenna placement.
See the Antenna Configuration section on page 25 of this manual for details about recommended cable
type and other important information about connecting your antennas to your Tempest base station.
See the Accu-Sync section on page 49 for more information on using Accu-Sync.
Up to 10 base stations may be used in simultaneous operation in close proximity to each other with
proper antenna placement under ideal conditions. Closely spaced antennas will cause adverse system
performance and will reduce operational range.
Always set each base station to a different Network Number and Lockout Key. See the Set Network
Number and Lockout Key section on page 31 of this manual for more setup information.
When two or more Tempest base stations are to be operated in the same location, connecting the
base stations via the Accu-Sync connector on the back of the base station can significantly
increase system performance and operational range.
Clear-Com Communication Systems
Tempest 2400 Wireless Intercom System
Page 51 of 100
Multi-System Tempest Technology
Tempest is a digital, frequency hopping spread spectrum (FHSS) radio device. Using 80 MHz of spectrum
in the 2.4GHz ISM frequency band, Tempest changes frequency (hops) 200 times per second, following
one of 64 hopping patterns (Tempest Network Numbers 0 – 63). The hopping pattern determines the
order in which frequencies will be utilized. Each hopping pattern has the same frequencies as all other
hopping patterns; the only difference is the order of use.
Also, Tempest utilizes proprietary 2xTX technology to send each digital packet twice, once each on
consecutive hops, and so on different frequencies.
When using more than one Tempest system within a given operational area, occasionally the systems will
try to utilize the same frequency. When two systems that are located physically close to each other try to
use the same frequency at the same time, harmful interference is likely to occur. One or both systems
may loose a digital data packet due to inter-system RF interference.
Because of the ordering of frequencies in each hopping pattern and the fact that each packet is sent twice
on consecutive hops, after any packet conflict, both systems will hop to a different frequency and send a
duplicate packet on a clear frequency where the audio data may be delivered. As more Tempest systems
are operated within a given area, more inter-system RF interference will take place. If a system
encounters RF data packet loss on two consecutive hops, one packet of audio data will be lost.
Tempest utilizes an audio compression algorithm that employs advanced Lost Packet Concealment
(LPC) technology. One lost packet of audio data will be covered over by the LPC technology and the end
user will not notice any interruption in audio. Two consecutive lost packets of audio data (four to five
consecutive lost RF data packets) may be noticed by a user, but will not be objectionable. More than two
consecutive lost packets of audio will likely cause interruption of audio that will be noticeable and will
likely be objectionable to users. Even with 2xTX and LPC, when enough Tempest systems are collocated,
there will be a sufficient inter-system RF interference causing lost packets to cause adverse audio
performance.
Accu-Sync is a proprietary technology that synchronizes transmit/receive timing to avoid harmful
desensing of receivers. Desensing occurs when one transmitter is broadcasting while a nearby receiver is
trying to “listen” to a different source and the broadcaster overwhelms the signal the “listener” is listening
for. Desensing happens even when the transmitter and receiver in question are not on, or even near, the
same frequency. This effect is extraordinarily harmful to wireless systems and must be avoided at all
costs.
Accu-Sync sends a very precise timing signal to all base stations that are connected to the Base-Sync
circuit, to control when those base stations (and consequently their associated beltstations) transmit. This
forces all of the base stations to transmit simultaneously ensuring that there are no closely located
transmitters that are active during the receive cycle of any other base station, effectively eliminating
desensing. Eliminating desensing greatly improves system performance when there are collocated
systems. Whenever multiple systems are being used in a collocated situation it is strongly suggested that
Accu-Sync be utilized.
Accu-Sync does not do anything to avoid packet collisions stemming from more than one Tempest
system attempting to use the same frequency at the same time. This would require frequency hopping
pattern synchronization, and the FCC does not allow frequency hopping pattern synchronization as it
would allow a single system or group of systems to monopolize the 2.4GHz ISM band.
Clear-Com Communication Systems
Tempest 2400 Wireless Intercom System
Page 52 of 100
Factors that affect the maximum number of systems that may be collocated in any given location include:
•
•
•
•
•
•
•
•
The existence and extent of harmful interference caused by in-band external radiators.
Number of base stations.
Number of beltstations per base station.
Whether or not Accu-Sync is being employed.
Physical location of base station antennas (either on base stations or on Transceivers).
Physical location of the beltstations.
Specific hopping patterns selected.
Environment (wide open, reflective, through walls…).
Favorable system conditions include:
•
•
•
•
•
•
Locations with little or no interference from other 2.4GHz devices will provide the best opportunity
for a large number of collocated systems.
Proper use of Accu-Sync resolves potential desensing issues.
Antennas of any particular system should be separated from every other system’s antennas by at
least 10 feet (3 meters) for best collocated system performance.
beltstations operating at similar distances from their respective base station antennas provide the
best opportunity for satisfactory performance of a large number of collocated systems.
The hopping pattern (Network Number) should be selected to ensure that there is a numerical
separation of four for all collocated systems.
Environment can play a big role in RF system performance. Every location is different and has its
own unique set of challenges. Generally speaking, locations with very long paths to very reflective
surfaces tend to be the most difficult for digital wireless communication systems due to the
prevalence of inter-symbol interference.
Maximum Number of Collocated Systems
With all factors listed above being favorable, a maximum of 10 Tempest systems, each with five
beltstations, may be collocated with minimal or no user perceived impact on system range or
performance.
The addition of one or more adverse conditions will limit the number, effectiveness and range of
collocated systems in any given environment proportionally to the extent of the adverse condition(s).
Clear-Com Communication Systems
Tempest 2400 Wireless Intercom System
Page 53 of 100
Base Station Controls
Front Panel Left
1- Local Headset Connector
The 4-PIN XLR male headset connector is compatible with most Dynamic or Electret headsets that have
4-PIN XLR female connectors. This headset connector allows a user to communicate on any one of the
four intercom channels. Controls for this connector are located to the immediate right. The mic gain for
the Local Headset can be adjusted from the Set Mic Gain menu screen. (Note: the headset must be
purchased separately).
2- Talk Button and LED
The Talk button works in conjunction with the Local Headset Connector. The Talk button enables or
disables the microphone for the local headset. A blue LED will illuminate ‘TALK’ when the mic is enabled.
Tempest uses an intelligent latching method for talk buttons.
1) Pressing TALK momentarily will cause the mic button to latch. The blue Talk LED will stay lit and
the microphone will remain enabled.
2) Pressing and holding TALK for more than 2 seconds will cause the button to act in a momentary
fashion. The blue Talk LED will remain lit and the microphone will remain enabled only as long as
the button is pressed.
3- Call Button
The Call button sends a wired intercom compatible call signal to any wireless beltstation and any 2W
hardwired intercom device on the intercom channel currently selected for the Local Headset.
4- Mic Kill Button
The Mic Kill button sends a signal to wireless beltstations that disables Talk buttons that are enabled.
This button is for the wireless system only. No Mic Kill signal is sent out to the hardwired intercom. Mic Kill
signals from the hardwired intercom are accepted and passed through to the wireless users.
A momentary press and release of the MIC KILL disables any wireless beltstation Talk button currently
enabled on the selected channel, as well as the base station local headset connector. If the Mic Kill
button is pressed and held for three seconds, all wireless beltstation Talk buttons on all channels, are
disabled. A wireless beltstation user may enable a Talk button at any time after the Mic Kill button is
pressed and released. The “KILL” indicator appears in place of the “TALK” indicator on the beltstation
display and the user will not hear sidetone if both Talk buttons are off.
5- Local Headset Channel LEDs A-D
The four Local Headset Channel LEDs labeled A through D indicate the currently selected intercom
channel for the base station local headset. Only one channel may be selected at a time. Pressing the
Volume control while in Operational mode cycles the Channel LEDs in order from A thru D.
6- Peak LEDs
The four Peak LEDs indicate when the mic audio from the local headset is reaching a peak level and is
Clear-Com Communication Systems
Tempest 2400 Wireless Intercom System
Page 54 of 100
about to enter into limiting. These indicators should not be illuminated during normal use. The mic gain for
the Local Headset connector can be adjusted from the Set Mic Gain menu screen. Setting the mic gain
correctly is critical for quality communication audio.
7- Volume Control
The multipurpose Volume control operates differently depending on the mode of the base station.
In Operational Mode turning the Volume control adjusts the volume of the local headset. Turning the
Volume control clockwise increases the audio level while turning the control counter-clockwise decreases
the level.
Press the Volume control to select the intercom channel to be monitored at the local headset connector.
The intercom channel selected for the local headset connector is indicated by the four Channel LEDs
located to the left of the Volume control.
In Menu Mode turn the Volume control to scroll through the menu options of the current menu screen.
Pressing the Volume control selects the current menu option and is the same as pressing the Enter
button. A menu item is not selected and will not take affect until the Volume control (or the Enter button) is
pressed.
8- Menu Button
Pressing MENU while the base station is in Operational mode will enter Menu Mode. The Main Menu
screen will be displayed. Once in Menu Mode pressing the Menu button will act as an escape key and will
back out of the current menu screen and move up one level. Pressing MENU while at the Main Menu
screen will exit Menu Mode.
9- Enter Button
The Enter button on the base station is only used while in Menu Mode. Pressing the Enter button selects
the current menu option and is the same as pressing the Volume control. A menu item is not selected and
will not take affect until ENTER (or the Volume control) is pressed.
10- Buttons 1 - 5
The five buttons below the LCD display, labeled 1 through 5, have multiple uses depending on the mode
of the base station. In Operational Mode the beltstation that is associated with a base station Slot will
appear directly above the corresponding numbered button. Pressing any of the numbered buttons will
select the beltstation Menu screen for the beltstation that is located in base station Slots 1 through 5.
In Menu Mode pressing a numbered button selects the menu item with the corresponding number from
the current list of menu items. This selection produces the same result as using the Volume control to
scroll down to the desired menu item and pressing Enter.
11- LCD
While in Operational Mode the LCD displays the status of all wireless beltstations that are currently
communicating with the base station including the name of the beltstation, RF strength, battery level, and
other data. The LCD contrast and backlight intensity can be adjusted from the LCD Adjustments menu
screen.
Operational Mode Base Station LCD
•
•
•
WBP-1 and 2 are listening and talking on channel A, while also listening on channel D.
WBP-3 is utilizing the Stage Announce feature and has the Battery Alert turned off.
WBP-4 is listening on channels B and C.
Clear-Com Communication Systems
Tempest 2400 Wireless Intercom System
Page 55 of 100
Front Panel Right
The Front Panel Right controls 1 – 7, will normally be used together to configure the Tempest
base station for 2-Wire or 4-Wire operation.
1 2-Wire (TW) Intercom Type Slide Switches A/B & C/D
The two 2-Wire Intercom Type slide switches configure the base station for the type of intercom that will
be connected to the corresponding 2-Wire connectors on the rear panel of the base station. Clear-Com,
RTS, or Balanced (AudioCom) can be selected. This switch only affects 2-Wire operation and not 4-Wire
operation. The A/B switch selects the 2-Wire system type for both the A and the B intercom channels.
The C/D switch selects the 2-Wire system type for both the C and the D intercom channels.
Select the appropriate 2-Wire switch setting prior to connecting the 2-Wire intercom. Do not switch
between 2-Wire types while connected to a 2-Wire system and powered on. The different voltages
in each system may damage equipment.
2- Wired Intercom Channel Select (SEL) Button
The Intercom Channel Select (SEL) button is used to select one of the four intercom channels so that the
intercom mode-- 2-Wire or 4-Wire, and audio input and output levels, may be adjusted.
Pressing the Intercom Channel Select button puts the base station into Menu Mode and advances to the
Intercom Levels screen.
Pressing the Intercom Channel Select button a second time selects channel A, for the opportunity to
select 2-Wire or 4-Wire or No wired connection, and “IN’ and ‘OUT’ levels can be adjusted (see [4]
below).
Additional presses advance through the intercom channels, and returns to Operational mode. The
intercom channel selected is indicated by the four “CHAN” [3] LEDs located to the immediate right of the
SEL button.
Also, in the Aux In/Out menu, SEL advances through the channels to adjust the Aux In and Aux Out
levels. See page 59.
3- Channel (CHAN) LEDs
In Operational Mode the four Channel (CHAN) LEDs labeled A through D are always illuminated.
Enter Menu Mode, by pressing the Channel Select (SEL) button ([2] above). In Menu Mode the Channel
LEDs indicate the channel currently selected for adjustment. Only one channel may be selected at a time.
4- 2-Wire/4-Wire Select (SEL) Button
The 2-Wire/4-Wire Select (SEL) button sets the wired intercom mode for each of the four intercom
channels. When a channel is selected with the Intercom Channel Select (SEL) button [2], pressing the 2Wire/4-Wire Select (SEL) button [4] changes the selected intercom mode between 2-Wire, 4-Wire, or no
connection.
5- 2-Wire/4-Wire LEDs
The eight 2-Wire/4-Wire LEDs indicate the currently selected intercom mode for each of the four intercom
Clear-Com Communication Systems
Tempest 2400 Wireless Intercom System
Page 56 of 100
channels. If either a 2-Wire or 4-Wire connection has been enabled for a particular intercom channel, the
corresponding 2-Wire or 4-Wire LED indicator will be illuminated. When no intercom has been enabled,
the corresponding 2-Wire or 4-Wire LED indicators will be off.
6- IN Level Control
In Menu Mode, from the Intercom Levels screen, the IN control adjusts the incoming level of the currently
selected wired intercom channel, from the hardwired intercom system to the Tempest base station. If 2Wire is selected the IN Level control adjusts the incoming level of the 2-Wire signal. If 4-Wire is selected
the IN Level control adjusts the incoming level of the 4-Wire signal. If neither 2-Wire nor 4-Wire is
selected the IN Level control is inactive.
7- OUT Level Control
In Menu Mode, from the Intercom Levels screen, the OUT level control adjusts the outgoing level of the
currently selected wired intercom channel, going to the hardwired intercom system from the Tempest
base station. If 2-Wire is selected the OUT Level control adjusts the outgoing level of the 2-Wire signal. If
4-Wire is selected the OUT Level control adjusts the outgoing level of the 4-Wire signal. If neither 2-Wire
nor 4-Wire is selected the OUT Level control is inactive.
8- USB Connector
The USB connector is used to update the Tempest base station firmware and is not used in normal
operation.
9- Beltstation Program Connector
The Beltstation Program connector is used to Pair the base station with beltstations. To pair the base
station with a particular beltstation, ensure that the base station is powered on and in Operational Mode
(not in Menu Mode). Ensure that the beltstation is powered off. Plug one end of the Pairing cable into the
base station, and plug the other end of the Pairing cable into the beltstation. Turn the beltstation power on
by pressing and holding the beltstation Power ON/OFF switch for two seconds. The Pairing process
happens automatically and the message “Pairing Complete” will appear on the beltstation LCD for
approximately three seconds when done. Always power cycle the beltstation after pairing.
10- Power ON/OFF Switch
The ON/OFF switch is used to turn the base station power (AC or DC) on and off.
Clear-Com Communication Systems
Tempest 2400 Wireless Intercom System
Page 57 of 100
Rear Panel Left
1- AC Power Input Connector
The IEC AC Power Input Connector accepts the AC power cord. Use this connector with the supplied AC
power cord to power the Tempest base station from AC power between 85 and 260 VAC at 50 – 60
Hertz. The base station will draw approximately 15 Watts (125mA at 120VAC, 65mA at 230VAC)
2- DC Power Input Connector
The DC Power Input Connector accepts a Switchcraft S760 2.1mm x 5.5mm power plug wired as center
positive. Use this connector with a user-supplied cable to power the Tempest base station from DC power
(battery) between 11 and 32 VDC. The base station will draw approximately 12 Watts (990 mA at
12VDC).
3- Antenna Connector
The Antenna Connector is used to connect one of the two antennas to the Tempest base station. The
Antenna Connector is an RP-TNC (Reverse Polarized-TNC) connector. 50 Ohm RF cables used to
connect to this Antenna Connector must be properly terminated with mating RP-TNC connectors. When
using the 2.4GHz base station it is important to ensure that both antennas are connected to ensure
proper system operation.
4- Intercom Channel A/B/C/D Connectors
The Intercom Channel connectors (A, B, C, D) allow the user to connect the Tempest base station to 2Wire external intercom systems or other Tempest base stations. The XLR-3M/F 2-Wire intercom
connectors interface with Clear-Com, RTS, Balanced and other compatible intercom systems. The pairs
of XLR3-M and XLR-3F are electrically identical.
5- RJ-45 4-Wire Intercom A/B/C/D Connectors
The RJ-45 4-Wire Intercom connectors (A/B/C/D) interface with 4-Wire intercom systems and devices
including Clear-Com matrix systems. This is an intercom audio-only connector and does not support data
transfer. The connector is balanced and transformer isolated. Nominal line level is -4 to +8 dBu.
Rear Panel Right
Clear-Com Communication Systems
Tempest 2400 Wireless Intercom System
Page 58 of 100
1- SA (Stage Announce) Connector
The SA connector is used to output beltstation audio to a dedicated audio output. The SA Connector is an
XLR-3M connector and accepts a standard XLR-3F. The SA Connector is balanced and transformer
isolated. Nominal line level is -4 to +8 dBu. The SA Connector output level can be adjusted under the
Wired Intercom Settings menu.
2- Aux IN Connector
The Auxiliary IN Connector is used to supply program or other audio sources to the Tempest base
station. The Auxiliary IN Connector is a ¼” Tip/Ring/Sleeve jack that accepts a standard ¼” TRS plug.
The Auxiliary IN Connector is balanced and transformer isolated. Nominal line level is -4 to +8 dBu.
Audio supplied to the Aux IN Connector can be assigned to any combination of the four intercom
channels with individual levels for each channel at the Aux In/Out Assignment/Level menu. While in the
Aux In/Out Assignment/Level menu, the front panel channel select (SEL) button or the Volume control
can be used to advance through the channels, and the IN Level Control (page 57) is used to adjust the
Aux In level. Adjust to “0” to restrict audio from a channel.
3- Aux OUT Connector
The Auxiliary OUT Connector is used to supply intercom audio sources from the Tempest base station.
The Auxiliary OUT Connector is a ¼” Tip/Ring/Sleeve jack that accepts a standard ¼” TRS plug. The
Auxiliary OUT Connector is balanced and transformer isolated. Nominal line level is -4 to +8 dBu. Audio
supplied from the Auxiliary OUT Connector can be assigned from any combination of the four intercom
channels with level control at the Aux In/Out Assignment/Levels menu. While in the Aux In/Out
Assignment/Level menu, the front panel channel select (SEL) button or the Volume control can be used
to advance through the channels, and the OUT Level Control (page 57) is used to adjust the Aux Out
level. Adjust to “0” to restrict audio from a channel.
4- Base Sync IN Connector
The Accu-Sync, BaseSync IN Connector is used to input an external sync signal that ensures that
multiple Tempest base stations all transmit and receive at the same time, thus avoiding inter-base station
RF interference.
5- Base Sync OUT Connector
The Accu-Sync, BaseSync OUT Connector is used to output a sync signal that ensures that multiple
Tempest base stations all transmit and receive at the same time, thus avoiding inter-base station RF
interference. Any base station that has a BaseSync OUT connection but does not have a BaseSync IN
connection will generate a sync signal for connected base stations.
6- Local Area Network (LAN) RJ-45 Connector
The Local Area Network (LAN) RJ-45 Connector is used to connect the Tempest base station to a user
supplied PC running Tempest T-Desk software. The user can then monitor and/or adjust base station and
beltstation settings via the PC interface. This connection can be made directly or through a Local Area
Network. See the separate T-Desk instructions for more information.
7- Relay Connector
The Relay Connector provides access to all of the relay closure contacts for the Tempest base station.
There are six relays including one common Stage Announce relay and five individually assignable relays one for each of the wireless beltstations. See the section on “GPO Relay Contacts on page 35
8- Antenna Connector
The Antenna Connector is used to connect one of the two antennas to the Tempest base station. The
Antenna Connector is an RP-TNC (Reverse Polarized-TNC) connector. Cables used to attach to this
Antenna Connector must be properly terminated with mating RP-TNC connectors and the proper cable
type. When using the 2.4GHz base station it is important that both antennas are connected to ensure
proper system operation.
9- Remote Transceiver RJ-45 Connector
The Tempest Remote Transceiver RJ-45 connector is used to connect the optional remote transceiver to
the Tempest base station. The remote transceiver can be located up to 1,500 feet from the base station.
Clear-Com Communication Systems
Tempest 2400 Wireless Intercom System
Page 59 of 100
Base Station Menu
Clear-Com Communication Systems
Tempest 2400 Wireless Intercom System
Page 60 of 100
Clear-Com Communication Systems
Tempest 2400 Wireless Intercom System
Page 61 of 100
Remote Transceiver
Setup the Transceiver
•
•
•
•
•
Choose a base station location.
Choose a Transceiver location.
Choose an antenna configuration.
Install CAT-5 cable and connect to the base station and Transceiver.
Confirm operation by observing the Transceiver LEDs.
The Tempest Remote Transceiver is an optional accessory that allows antennas to be located up to
1,500 feet away from the base station without the RF signal loss that is associated with using long runs of
coaxial cable.
The Tempest Remote Transceiver connects to the rear of the base station with standard CAT-5 wiring
with RJ-45 connectors. Note that there are two RJ-45 connectors on the back of the base station and
they are not interchangeable. The second RJ-45 is for a LAN connection.
Install the base station in a convenient location.
Install CAT-5 cable so that it is protected from electronic interference as much as possible.
Install the Transceiver and antennas in a location that provides the best RF coverage.
Connect the CAT-5 cable to the base station and the Transceiver.
When the base station detects the presence of the Transceiver, there is a brief automatic configuration
process before the Transceiver takes over the radio function from the base station.
There are two RP-TNC antenna connectors on the top of the
transceiver allowing for connection of two half wave antennas or
alternate antenna configurations. Always ensure that two antennas
are securely connected for proper system operation.
The Transceiver antenna connectors are made to be water
resistant, so outdoor use is acceptable. The cable connections on
the bottom of the transceiver are not water tight, so always protect
from immersion. In severely blowing rain it may be prudent to
protect with an RF transparent cover such as a Ziploc bag.
Coaxial cable may be used to connect alternative antenna options.
See the Antenna Configuration section on page 25.
Pairs of Directional Antennas must
be aimed to cover the same area
Clear-Com Communication Systems
Tempest 2400 Wireless Intercom System
Page 62 of 100
Bottom view of the transceiver
Transceiver controls
RX LED
The RX LED illuminates when data is being received by the Remote Transceiver. This LED will remain
illuminated during normal system operation.
TX LED
The TX LED illuminates when data is being sent from the Remote Transceiver. This LED will remain
illuminated during normal system operation.
SYNC LED
The Sync LED illuminates when the Transceiver Sync signal is present. This LED will remain illuminated
during normal system operation.
CONFIG LED
The Config LED illuminates only when the base station puts the Remote Transceiver into configuration
mode to change settings. This LED should be on for only a few seconds when first powered on, and off
during normal operation.
Base Station Link RJ-45 Connector
The Base Station Link RJ-45 connector is used to connect the Transceiver to the Tempest base station
via standard CAT-5 cable with RJ-45 connectors.
Power LED
The Power LED illuminates whenever the base station is providing adequate power to the Transceiver
over the CAT-5 cable. If the Power LED does not light, The CAT-5 cable is damaged or too long to deliver
adequate power for the Transceiver to operate reliably.
Threaded Mounting Holes
Two Threaded Mounting Holes are provided on the back of the Remote Transceiver for use with the
mounting bracket to mount the Transceiver in a convenient location. The mounting holes are #8-32 thread
and accept a #8-32 x 3/8” pan head screw.
Clear-Com Communication Systems
Tempest 2400 Wireless Intercom System
Page 63 of 100
Beltstation
The beltstation can be configured in three ways. It can be configured by the beltstation menu, wirelessly
by the base station menu, or using the PC interface called T-Desk. While many functions are available
through all three methods, certain features are only available through the beltstation.
Configure the Beltstation by the Beltstation Menu
Using a combination of controls and Menu settings you can set a variety of levels and options directly
from the beltstation controls. The multipurpose “CH A/B” and “CH C/D” controls operate differently
depending on the mode of the beltstation. In Operational Mode rotating the control adjusts the volume of
the audio of the local headset connected into the bottom of the beltstation. Turning the Volume control
clockwise increases the audio level while turning the control counter clockwise decreases the level.
Pressing the Volume control changes the selected intercom channel between channels A or B and C or
D. The intercom channel selected is indicated by two Channel Indicator LEDs located surrounding the talk
buttons, “TALK A/B” and “TALK C/D”.
In Menu Mode turning either Volume control allows the user to scroll through the menu options of the
current menu screen. Pressing either control selects the current menu option and is the same as pressing
ENTER. A menu item is not selected and will not take affect until the control, or ENTER, is pressed.
For example, to adjust the Sidetone setting:
•
•
•
•
•
Connect a headset to the beltstation.
Press MENU to enter Menu Mode.
Rotate the CH A/B knob and scroll to “Set Controls”.
Press ENTER to select, and scroll to “Sidetone”.
Press ENTER to select the “Sidetone” adjustment.
You will see a numeric value between 0 – 99, and a level indicator. You should speak into the headset
microphone at a normal speaking level and adjust the sound of your own voice to a comfortable level by
rotating the CH A/B knob to adjust the Sidetone level. When satisfied, press ENTER to save the
adjustment. Press MENU to move up one level in the menu tree. Press MENU repeatedly to exit Menu
Mode and return to Operational Mode. If no other items are selected Menu Mode will automatically exit
and return to Operation Mode after a few seconds.
For additional information on the available beltstation menu settings, see the menu tree diagram and
details on page 76 of this manual.
Configure the Beltstation by the Base Station Interface
Many of the settings of the beltstation can be adjusted wirelessly from the base station. On the base
station press MENU, select beltstation Settings, and scroll to the required options. This feature allows the
communications engineer to control many of the beltstation’s functions without the need to remove the
beltstation from the user. Certain personal preference options such as Sidetone level are only configured
at the beltstation.
As an example, to adjust the Battery Alert on a beltstation, from the base station:
•
•
•
•
On the base station, press MENU to enter Menu Mode
Rotate the “Volume” knob to scroll to “Beltstation Settings” and press ENT.
Select the beltstation to be adjusted and press ENT.
Scroll to “Battery Alert” and press ENT to select the “Battery Alert” adjustment.
You will see options for ON and Off. Rotate the “Volume” knob to select your preference and press
ENTER to select. Confirm the selection on the beltstation display. Press MENU to move up one level in
the menu tree. Press MENU repeatedly to exit Menu Mode and return to Operational Mode. If no other
items are selected Menu Mode will automatically exit after three minutes.
Clear-Com Communication Systems
Tempest 2400 Wireless Intercom System
Page 64 of 100
For additional information on the beltstation menu settings available from the base station menu, see the
menu information on page 60 of this manual.
Configure by the PC Interface
“T-Desk” software is available to manage your Tempest system. See the T-Desk Instruction manual for
details.
Clear-Com Communication Systems
Tempest 2400 Wireless Intercom System
Page 65 of 100
Beltstation Setup
Steps to Setup the Beltstations
•
•
•
•
•
•
•
Install the battery.
“Pair” beltstations to the base station.
Adjust slot settings as needed.
Connect a headset.
Adjust Mic Gain.
Adjust Sidetone.
Configure optional features
1. Name the beltstation
2. Disable unused functions, channels, and buttons.
3. Select/disable relay options as needed.
4. Adjust personal preferences.
Battery Selection and Installation
The Tempest beltstation battery compartment holds either one Tempest
Lithium-Polymer rechargeable battery or three standard alkaline AA cells.
Lithium-Polymer batteries are the primary power source. High quality
alkaline AA cells may be used in situations where Lithium-Polymer
batteries are not available or are not charged. One Lithium-Polymer battery
comes standard with each Tempest. Additional Lithium-Polymer batteries
may be purchased. Contact your dealer to purchase additional batteries.
The Lithium Ion batteries supplied with your Tempest Wireless system are
warranted for 90 days from the date of purchase.
Lithium-Polymer batteries offer up to 9 hours of battery life and recharge in approximately 2¾ hours.
Lithium-Polymer batteries ship from the factory with approximately 50% charge. It will not damage the
Lithium-Polymer batteries to use them without charging them first. This will, however result in shorter run
time until the Lithium-Polymer battery is fully charged. When possible, charge Lithium-Polymer batteries
to full capacity to ensure full battery life prior to use.
Using 3 alkaline AA batteries can provide up to 4 hours of battery life. Use only high quality alkaline AA
cells. This will provide enough time to fully charge the Lithium-Polymer battery.
To remove the Battery Door, press down on the thumb markings and pull the Battery Door toward the
bottom of the beltstation.
To remove batteries from the Battery Compartment turn the beltstation battery side down and tap the
bottom of the beltstation on the palm of your other hand.
Please be careful to insert alkaline AA batteries according to the marked polarity. All of the alkaline AA
cells must be oriented the same direction.
If the battery cover does not close properly, the battery may not be inserted correctly.
Clear-Com Communication Systems
Tempest 2400 Wireless Intercom System
Page 66 of 100
Charging the Lithium-Polymer Battery
With the Lithium-Polymer batteries installed in the battery compartment, plug the
AC end of the supplied 5VDC Charger/Power Supply into a standard AC wall
outlet. Open the Rubberized Access Cover on the side of the beltstation and plug
the USB end of the Charger/Power Supply into the USB connector. The LithiumPolymer batteries will take approximately 2¾ hours to charge from completely
empty to completely full. This time is the same with the beltstation turned on or
off. A new, fully charged battery should power a Tempest beltstation for
approximately nine hours.
Fast charging with the supplied fast charger requires a temperature range of 32°
– 113° F.
Batteries can receive more than 500 charge cycles, and continue to maintain
more than 70% of their power rating. The Tempest battery indicator will maintain
its accuracy as battery life decreases.
Alternatively, remove the Lithium-Polymer rechargeable battery from the beltstation
and insert it into the optional 5-Bay battery charger. The Lithium-Polymer batteries
will take approximately 2½ hours to charge from completely empty to completely full.
See the battery charger manual for additional details.
Power Options
The Tempest beltstation can be powered by
•
•
•
Supplied Lithium-Polymer battery;
AA batteries; Note: It is safe to connect a power supply to a beltstation with AA batteries installed.
It will not harm the beltstation, but will not charge the AA batteries.
Supplied battery charger / power supply.
Beltstation Power On/Off
To turn the beltstation On or Off:
•
•
•
The Power ON/OFF button is used to turn the beltstation on or off.
Press and hold the Power ON/OFF button for 2 seconds to turn the beltstation on.
Press and hold for 4 seconds to turn the beltstation off.
Clear-Com Communication Systems
Tempest 2400 Wireless Intercom System
Page 67 of 100
Pairing with a Base Station
Pair Beltstation to Base Station:
Confirm that the base station is powered on and in Operational Mode (not
in Menu Mode) and that the beltstation is powered off. Confirm that the
base station’s Network Number and Lockout Key are adjusted as needed.
See the section on Set Network Number and Lockout Key on page 31.
Plug one end of the Pairing cable into the base station and the other end
into the beltstation.
The pairing cable is a standard 3.5mm
(1/8 in.) male to male stereo patch cord.
Turn the beltstation power on by pressing and holding the beltstation Power ON/OFF button for two
seconds. The Pairing process will begin automatically. Watch for the message “Pairing Complete” to
appear briefly on the beltstation display. The beltstation will automatically re-initialize.
Adjust Beltstation Slot
The base station slot assignment only affects the order that the base station Operational screen displays
beltstation information when the base station is in the Static display mode. If the base station is routinely
used as a communication port or for monitoring beltstations, it may be more convenient to always have
the same user appear in the same position on the base station display. This is a personal preference
setting.
In the base station Tech menu, choose Static or Dynamic from the “Display Slot Assignments” screen.
‘Dynamic’ the default, will work without any adjustment, and always displays beltstations in alpha-numeric
order by name.
“Static” will be the preferred choice for users who want to ensure that a beltstation that is logged in will
always appears in the same location (slot) on the base station display and are using only one base
station. When selecting ‘Static’ slot assignments, you must also enter the Tech Menu for each beltstation
and assign each beltstation a different slot (1 – 5).
The base station default is for Dynamic Slot Assignment. This means that when beltstations log in to a
base, the information about the beltstations is displayed on the base station LCD screen in alpha-numeric
order according to the name of the beltstation-- “Dir” appears before “Light1”, which appears before
“StgMgr”, but they can change slots depending on which beltstations are turned on. If the default settings
are used, nothing is necessary. If the base station is located in an equipment room and is not routinely
used as a communication port or to manage beltstations, nothing is necessary.
Adjusting so that each beltstation always appears in the same position of the base station display is a two
step process:
1. Advance to the base station’s “Display Slot Assignment” section of the “Tech Menu” and select
“Static”.
2. In each beltstation, advance to the “Base Slot” section of the “Tech Menu” and adjust each
beltstation to a different slot (1 – 5). The beltstation designated to slot 1 will always appear on the
far left of the base station display, with slot 2 appearing in the next position to the right, and so on.
In “Static” mode, if a beltstation is not turned on, or is logged out due to being out of range, the base
station LCD will display a very obvious X, making it easy to see at a glance, which beltstations are
Clear-Com Communication Systems
Tempest 2400 Wireless Intercom System
Page 68 of 100
currently active.
A Multiple base station system that uses iSelect Roaming must choose to use “Dynamic” slots to ensure
that beltstations can move from base station to base station when roaming.
Clear-Com Communication Systems
Tempest 2400 Wireless Intercom System
Page 69 of 100
Name Equipment
Name the base station with a descriptive name which will appear on the beltstation LCD display. This is
most helpful when iSelect Roaming will be used to roam between base station coverage areas. The base
station name can include up to 14 characters.
Name each beltstation with a descriptive name. Until the name is changed a hexadecimal serial number
is displayed. The first six characters of the beltstation name will be displayed on the base station LCD
display. Naming is a personal preference option and is not essential.
Personal Preferences
To configure each beltstation, adjust any of the following to suit individual needs. None of these
adjustments are required. Note that more options are available under the “Set Controls” menu and
become visible by scrolling.
•
•
•
•
•
•
•
•
•
•
•
“Lock Keys” to prevent inadvertent changes.
Disable “Battery Alert” to prevent the battery alert tone in the headset.
Dim the LCD and LEDs to be less conspicuous in a dark environment.
Limit talking to push-to-talk mode by selecting “Momentary”. “Latch” is the default.
Disable the ability to talk on any channel, but allow listening.
Disable the ability access any channel not required.
Adjust minimum and maximum volume levels. In loud environments a higher minimum volume
may be desirable, while in quiet environments a lower maximum volume may be preferable.
When Stage Announce functionality is enabled in the base station, the STAGE button can be
disabled for individual beltstations.
The CALL alert can be set to tone or vibrate. The default is “Both”.
When relay functionality is enabled in the base station, select the relay to be activated by the
beltstation. Then select the beltstation control that will activate the relay.
Wireless ISO can be disabled, if desired.
Call Function
Press MENU, select Set Controls, select Call Button, and select Enable. This is the default setting.
Press MENU, select Set Controls, and select Call Alert. Choose to receive a Call signal alert with tone in
the headset, or with a vibration of the beltstation or both. The default setting is Both.
Select a channel for talking with the channel select CH AB or CH CD and activate the TALK button. Press
and hold CALL for as long as you want the Call signal to go out on the channel.
A Call signal will be received by users who are listening on the channel that originates the Call signal.
A call signal is sent only when the Talk button is enabled, only on the channel selected for
Talk.
Clear-Com Communication Systems
Tempest 2400 Wireless Intercom System
Page 70 of 100
Set Mic Gain
Set the mic gain properly to assure the best audio quality. To set the mic gain for the beltstation Headset:
Press Menu to enter Menu Mode. From the Main Menu select “Set Controls”, then “Mic Gain”.
While at the “Mic Gain” screen talk into the headset microphone at a louder than normal level and adjust
the Volume control until the Peak LEDs just start to light at the loudest parts of the audio. Press Enter to
accept the changes.
Mic Gain can be set in the beltstation without activating the Talk button. This allows private mic gain
adjustment during live events.
When the mic gain is set too high it is possible to induce feedback or echo. When set too low, words can
be clipped by the low level noise gate or sounds too quiet to other listeners. Headsets by different
manufacturer’s or different models of headsets will require widely varying Mic Gain settings. When setting
microphone gain it is best to err toward a setting that is too low, rather than too high. This will help reduce
unwanted echo in the system when that microphone is enabled.
Clear-Com Communication Systems
Tempest 2400 Wireless Intercom System
Page 71 of 100
iSelect Roaming – Selecting a Base Station
Installations with multiple base station coverage zones often require users to move from one work zone to
another throughout the day. Tempest handles these transitions with iSelect™ on-command roaming.
Using iSelect, a user can easily change their communication from one base station to another base
station in just a few seconds.
Confirm that the beltstation has been Paired with all required base stations.
Confirm that there is an available slot on the desired base station. If no slot is open, power off one of the
connected beltstations, wait for 15 seconds, and proceed.
In the beltstation menu select the desired base station: Press MENU and select “Select Base”. Scroll to
the desired base station and press ENTER. Press MENU to exit.
Tempest Wireless beltstations remember the last 64 base stations to which they have been Paired.
Wireless ISO
Wireless ISO (isolate), sometimes referred as wireless talk-around is a wireless-only intercom feature that
allows communication among wireless beltstations only. When a wired intercom system is connected,
Wireless ISO communicates through the wireless portion of the system only. The base station front panel
headset does not receive ISO audio.
Wireless ISO is enabled by default and is available only on channel A or B. It is activated by pressing and
holding ENTER for the selected channel A or B. ENTER enables the headset mic regardless of the A/B
Talk button.
Wireless ISO only operates in Operational mode. It does not operate in Menu mode.
Clear-Com Communication Systems
Tempest 2400 Wireless Intercom System
Page 72 of 100
Beltstation Overview
1- Volume- CH A/B and CH C/D
Multipurpose Volume A/B and C/D control.
In Operational Mode turning the Volume control adjusts the volume of the
audio from channel A and B or C and D. Pressing the Volume control
changes the selected intercom between channels A and B, or C and D.
In Menu Mode turning the A/B Volume control allows the user to scroll the
options of the current menu screen. Pressing the A/B Volume control
selects the option.
2- Stage Button
The Stage Announce (STAGE) button re-routes the microphone signal of
the beltstation from the selected intercom channel to the base station rear
panel Stage Announce (SA) output connector. If desired, when this button
is pressed, a momentary relay contact closure is made at the Relay
connector. See Page 35 for the section on GPO Relays.
Pressing the Stage Announce button automatically enables the
microphone, regardless of Talk Button status. The Stage button settings
may be adjusted at the Stage Announce menu screen under the “Set
Controls” menu section.
3- Menu Button
Pressing MENU while the beltstation is in Operational mode will select Menu Mode and the Main Menu
screen will be displayed. Once in Menu Mode pressing MENU again, will act as an escape key and will
back out of the current menu screen moving the user up one level. Pressing the Menu button while at the
Main Menu screen will exit Menu Mode and return to Operational mode.
4- Enter Button
The Enter button operates differently depending on the mode of the beltstation. In Menu Mode pressing
the Enter button selects the current menu option and is the same as pressing the A/B Volume control. A
menu item is not selected until the Enter button (or the Volume control) is pressed.
The Enter button can also activate Wireless ISO (wireless talk around), providing wireless communication
isolated from any connected wired intercom system.
The Enter button is also one of the buttons that can be assigned to activate a Relay in the base station. It
is possible to activate the Relay whenever the Wireless ISO feature is used.
5- LCD
While in Operational Mode the LCD displays the status of the beltstation including the name of the
currently communicating base station, RF strength, battery level, and other data.
The LCD backlight and contrast can be adjusted from the LCD Adjustments menu screen under the
LCD/LED section.
6- CALL Button
The CALL Button sends a 2-Wire intercom system compatible call signal to any wireless beltstation and
any hardwired intercom device on the intercom channel currently selected with Talk enabled. The Call
signal will be routed to intercom channels indicated by the user’s active Talk button(s).
Clear-Com Communication Systems
Tempest 2400 Wireless Intercom System
Page 73 of 100
1- Rubberized Access Cover
The Rubberized Access Cover helps prevent dust, dirt and liquid from entering
the beltstation through the USB or the beltstation Pairing connectors. Keep this
cover securely closed at all times to ensure the best possible seal.
2- USB Mini B Connector
The USB Connector is used to charge the beltstation with the supplied wall
charger. In addition, the USB connect is used to update the firmware of the
beltstation.
3- Beltstation Pairing Connector
The Beltstation Pairing Connector is used to Pair the base station with
beltstations using the supplied 1/8” stereo mini connector.
1- Belt Clip
The Belt Clip enables the beltstation to be worn on the user’s belt or other
clothing item.
2- Power ON/OFF Button
The Power ON/OFF button is used to turn the beltstation on or off. Press and
hold the Power ON/OFF button for 2 seconds to turn the beltstation on. Press
for 4 seconds to turn the beltstation off.
3- Battery Compartment
The Battery Compartment holds either one Tempest Lithium-Polymer
rechargeable battery or three standard alkaline AA cells. To remove the Battery
Door, press down on the thumb markings and pull the Battery Door toward the
bottom of the beltstation. To remove batteries from the Battery Compartment
turn the beltstation battery side down and tap the bottom of the beltstation on
the palm of your other hand. Please be careful to insert alkaline AA batteries
according to the marked polarity. All of the alkaline AA cells face the same
direction. If the battery cover does not fit or close properly, the battery may not
be inserted correctly.
4- Headset Connector
The 4-PIN XLR male headset connector mates with most Dynamic or Electret headsets that have 4-PIN
XLR female connectors. This Headset connector allows a user to communicate on up to two of the four
intercom channels.
Clear-Com Communication Systems
Tempest 2400 Wireless Intercom System
Page 74 of 100
Talk Button A/B and C/D
There are two Talk buttons on each beltstation, one for
channel A or B and the other for channel C or D. The
Talk button enables the microphone signal for the
assigned intercom channels A/B and/or C/D.
Tempest uses an intelligent latching method for Talk
buttons. Pressing the Talk button momentarily will cause
the Talk button to latch. Pressing and holding the Talk
Button for more than two seconds will cause the button to
act as a momentary switch.
Channel Indicator LEDs A/B and C/D
Each Talk button has two individual LED indicators. Together they
surround the Talk button. The LEDs will flash blue to indicate
which intercom channel, A or B, C or D, has been selected and will
illuminate continuously to indicate that Talk is enabled on that
channel.
The Channel Indicator LEDs will flash red when the microphone signal is reaching a peak level and is
entering into limiting.
Clear-Com Communication Systems
Tempest 2400 Wireless Intercom System
Page 75 of 100
Beltstation Menu
Clear-Com Communication Systems
Tempest 2400 Wireless Intercom System
Page 76 of 100
How Do I …?
Remove Batteries from Beltstations
Remove the battery cover from the back of the beltstation by pressing lightly on the thumb grooves, and
sliding.
Hold the beltstation in one hand with the battery compartment facing downward over the open palm of
your other hand. Firmly tap the beltstation against the palm of your open hand, and the battery will fall into
your open hand. Follow the same procedure for AA batteries.
Install the Rechargeable Battery
The gold battery contacts must mate with the contacts in the battery compartment. If the battery is not
properly seated, the cover will not close easily.
Charge the Battery
Connect the plug-in battery charger (included with beltstation) to a standard wall outlet and to the MiniUSB connector on the beltstation. This connector is located under the rubber protective cover on the side
of the beltstation. The batteries will charge from completely empty to a full charge in about 2¾ hours. The
batteries will not overcharge.
Install AA Alkaline Batteries
Remove the battery cover on back of beltstation. Insert three AA alkaline batteries according to the
polarization shown inside the battery compartment. Replace the battery cover. All batteries install with the
positive terminal toward the side with Mini-USB charger connector.
Use the 5-Bay Battery Charger
Place up to five rechargeable, Lithium-Polymer batteries into the charger.
Plug charger into local AC power source.
Charging is complete when the indicator turns green.
Re-charge time is 2½ hours and the charge provides approximately nine hours of operation.
Navigate the Base Station Menu
Press MENU to open the Main Menu. MENU also functions as an Escape key.
Turn the Volume Control to scroll through the menu.
To select, press ENT, or press the Volume Control.
The keys numbered 1 through 5 under the LCD screen take you directly to the corresponding beltstation
menu.
If no entry is made within 3 minutes, the display will automatically return to the Operation Screen.
Navigate the Beltstation Menu
Press MENU to open the Main Menu. MENU also functions as an Escape key.
Turn the CH A/B knob to scroll through the menu.
To select, press ENT, or press the CH A/B knob.
If no entry is made within a few seconds, the display will automatically return to the Operation Screen.
Clear-Com Communication Systems
Tempest 2400 Wireless Intercom System
Page 77 of 100
Adjust Min/Max Beltstation Volume Levels
From the Beltstation:
To set the minimum volume, press MENU, select “Set Controls”, then “Volume Limit” and “Min
Volume”. Use the CH A/B knob to adjust the level and press ENTER to save the new setting.
To set the maximum volume, advance to “Volume Limit” as above, and then “Max Volume”. Use
the CH A/B knob to adjust the level and press ENTER to save the new setting.
From the Base Station:
Select the number key 1 through 5 that corresponds to the beltstation desired and select “Volume
Limit”.
To set the minimum volume setting, select “Min Volume”. Use the Volume/Scroll Knob to adjust
the level and press ENTER to save.
To set the maximum volume setting, select “Max Volume”. Use the Volume/Scroll Knob to adjust
the level and press ENTER to save.
Configure Stage Announce and SA Relay
From the Beltstation:
To set Stage Announce, press MENU; select “Set Controls;” select “Stage Announce;” select
“Momentary”. This is the default setting.
To set SA Relay, press MENU; select “Set Controls;” select “Stage Announce;” Select “SA Relay
Enable”. This is the default setting.
From the Base Station:
To set Stage Announce, select the numbered key 1 through 5 that corresponds to the beltstation
desired.
Select “Stage Announce;” select “Momentary”.
To set SA Relay, select the numbered key 1 through 5 that corresponds to the beltstation desired.
Select “Stage Announce;” select “SA Relay Enable”.
The STAGE button is always Momentary when enabled.
Configure Relays for Individual Beltstations
From the beltstation:
Press MENU; select “Set Controls;” select “Select Relay”. Note that there are more options under
“Set Controls” than fit on the screen. Scroll to the bottom of the screen and scroll one more detent
too see the “Select Relay” option. Select one of the relays: “Relay 1” thru “Relay 5”. When a relay
is selected a check mark will be visible beside the selection.
To activate the relay, a “Relay Button” must be selected. To select a “Relay Button”, one of the
relays must already have been selected.
To select a Relay Button: Press MENU; select “Set Controls;” select “Relay Button;” select one of
the button choices.
If Talk A/B or Talk C/D is selected to activate the relay, the relay will remain closed whenever the
button is selected for active talk.
If Ch A/B or Ch C/D is selected to activate the relay, the relay will remain closed whenever
channel B or D is selected.
If STAGE or ENTER is selected to activate the relay, the relay will remain closed whenever the
button is pressed, for as long as the button is held.
If STAGE is selected to activate the relay, and if Stage Announce Audio is enabled, and if the
Stage Announce Relay is enabled, all three functions will operate simultaneously.
If ENTER is selected to activate the relay, and if Wireless ISO is enabled, both functions will
Clear-Com Communication Systems
Tempest 2400 Wireless Intercom System
Page 78 of 100
operate simultaneously while in Operational mode. When in Menu mode, ENTER only functions
as an Enter button.
From the Base Station:
To enable the Relay: Select the numbered key 1 through 5 that corresponds to the beltstation
desired. Select “Select Relay”. Select one of the relays: “Relay 1” thru “Relay 5”.
To select a Relay button: Select the numbered key 1 through 5 that corresponds to the
beltstation desired.
Select “7 - Relay Button;” select a button.
Since every user will be require a custom application, cables for your RELAY connections will
require some bench work with a soldering iron.
Use the Transceiver
Choose an optimum location for the Tempest Remote Transceiver and antennas.
Using standard CAT5 cable, connect the Transceiver to the base station RJ-45 connector labeled
TRANSCEIVER.
The “Power” LED on the Transceiver will light if the base station is powering the unit. If the “Power” LED
does not illuminate when connections are made and the base station is on, the Cat-5 cable may be too
long to deliver adequate power to the Transceiver.
Local base station whip antennas are disabled when the remote transceiver is connected.
Trouble Shooting
Base Station
Limited RF range
Base station antennas should be located as high as possible. Locating the base station antenna(s) above
head level is critical for optimizing performance and range.
Both antennas must be connected.
Confirm that base station antennas are in an appropriate location and orientation.
Confirm that antennas are not close to any metal structures or racks.
Locate the base station and base station antennas away from potentially interfering devices.
Ensure that antenna connections are securely made. If using coaxial cable to remotely locate antennas,
the cable must be a low loss 50 ohm coax, not more than 25 feet long.
If you are using multiple Tempest base stations in close proximity to each other, Accu-Sync should be
used to achieve maximum performance.
Cannot hear one or more channels of hardwired intercom
Set the Front panel headset to monitor the intercom channel in question. Ensure that the Talk button is
enabled for the front panel headset. Turn the headset volume up to a comfortable listening level to hear
your own voice in your headset.
Confirm that the channel is working wirelessly, from the base station to a beltstation.
Confirm that the wired system is working correctly, separately from the Tempest Wireless system.
If using a 2-Wire external wired intercom system, make sure that the 2-Wire Intercom Type Select
Switches A/B & C/D on the front of the base station are in the appropriate position for the type of
hardwired system you are using.
Ensure that the correct 2-Wire or 4-Wire LED is lit for the intercom channel that you are using. If neither
the 2-Wire nor the 4-Wire LED is lit, or if the wrong LED is lit for the hardwired intercom type you wish to
use, no external intercom audio will be present.
Adjust the IN and OUT level for the appropriate intercom channel to achieve the desired audio levels.
Ensure that all external 2-Wire or 4-Wire hardwired intercom connections have been properly made on
Clear-Com Communication Systems
Tempest 2400 Wireless Intercom System
Page 79 of 100
the back of the base station.
If all connections are made correctly with all front panel controls properly set, and there is still no external
hardwired intercom audio present in the Tempest system, substitute another cable (3-PIN XLR for 2-Wire
or RJ-45 for 4-Wire) making sure that it is connected properly to both the external hardwired system and
the Tempest base station.
Perform the above tests on another intercom channel. If using 2-Wire on channels A or B, try the test on
channel C or D. If possible, test with another wired intercom system.
Headset microphone sounds distorted or cuts off parts of words
If the microphone gain is set too low for the specific headset microphone being used, the audio coming
from that microphone may sound choppy or clip off the first part of words or sounds.
If the microphone gain is set too high for the specific headset microphone being used, the audio coming
from that microphone may sound distorted at higher audio levels. In this case the peak LED will light
almost continuously when audio is present.
There is no audio passing when not using an external hardwired intercom system
and Tempest base stations are sharing intercom channels.
Confirm that no wired intercoms are connected to the system.
Confirm a 3 pin XLR cable connection for each channel (A – D) to be shared, between each of the base
stations.
Set all of the base station 2-Wire Intercom Type Select Switches to the Clear-Com position.
Select 2-Wire for the relevant channels.
Set only one of the Tempest base stations to Master Mode.
Audio can only be passed from one base station to another in the “Clear-Com mode” unless
actually connected to another type of intercom system.
Connecting any wired intercom to any base station will automatically disable Master Mode and
disconnect all shared channels that do not have a wired intercom connected.
There is no audio passing when using an external hardwired intercom system
and Tempest base stations are sharing intercom channels.
Confirm a 3 pin XLR cable connection for each channel (A –D) to be shared, between each of the base
stations.
Set all of the base station 2-Wire Intercom Type Select Switches to the appropriate position.
Select 2-Wire for the relevant channels.
For each channel to be shared, connect the wired intercom to one of the base stations.
When connecting any shared base stations to any wired intercom system, only channels
connected to the wired system can be shared.
iSelect roaming not functioning
Confirm that the beltstation has been paired with all required base stations.
Select the desired base station from the beltstation menu: Press MENU, select “Select Base”, select the
desired base station.
If the beltstation name does not appear on the Base’s LCD, confirm that there is an available slot on the
desired base station. If no slot is open, power off one of the connected beltstations, wait for 15 seconds,
and try again.
Clear-Com Communication Systems
Tempest 2400 Wireless Intercom System
Page 80 of 100
Beltstation
Beltstation will not power up
Confirm that battery(ies) is (are) installed correctly.
When using a Lithium-Polymer rechargeable battery, ensure that the battery is fully charged.
When using alkaline AA batteries ensure that batteries are fresh and are all facing the same way. Note
the illustration in the battery compartment.
Press and hold the Power button on the back of the beltstation for 2 seconds to power on.
Beltstation will not Pair with Base Station
Confirm that the base station you are Pairing with is powered on and in Operational Mode and the
beltstation is powered off. Connect the Pairing cable from the base station to the beltstation. Turn the
beltstation power on. The Pairing process takes approximately four seconds.
If Pairing is successful the message “Pairing Complete” will appear on the beltstation LCD for
approximately five seconds and the beltstation name will appear in the first available slot on the base
station LCD. The base station name will appear on the beltstation LCD.
If Pairing is not successful no message will appear.
If Pairing is not successful try to Pair a different beltstation with the base station. If neither of the
beltstations will Pair, substitute a new Pairing cable.
If successful Pairing any beltstation with the base station, try the following procedure on the beltstation
that will not Pair:
Restore memory settings to Factory Defaults by pressing MENU, select “Belt Settings;” select “Tech
Menu;” press ENTER to proceed; select “Set Defaults;” select “Restore Factory Defaults;” press ENTER
to confirm; press MENU repeatedly to exit. If still not successful, repeat the above procedure but select
“Clear Memory” to delete all memory settings, Pairings, and user settings.
If no beltstation will Pair with the base station, reset the base station memory to “Factory Defaults”.
The final option is to select “Clear Memory” to fully reset the base station. All beltstation Pairings will be
lost with the “Clear Memory” option.
Beltstation will not log into Base Station
Confirm that the beltstation is powered on and has a battery with ample charge.
Confirm that the proper base station is selected on the beltstation’s Select Base menu.
Confirm that there is an available slot on the base station.
Check Static / Dynamic display settings on the base station. If Static is selected check the beltstation slot
assignment.
Determine if any beltstation is logged on to the base station.
Re-Pair the beltstation to the base station.
Attempt to log into another base station, if available.
Follow the memory reset procedure.
Buttons on the Beltstation do not function
A number of buttons on the beltstation can have alternate functions that the user can select.
If a button on the beltstation is not working as expected, re-confirm all settings and any alternate function
assignment in the menu. The button may have been reassigned wirelessly from the base station or by TDesk. Confirm that the function is available for use. If the reassignment involves any GPO, confirm that
menu selection, the connections, and the equipment functionality.
Clear-Com Communication Systems
Tempest 2400 Wireless Intercom System
Page 81 of 100
Call Function
A beltstation CALL signal is sent only when the Talk button is enabled.
Check to make sure that the CALL function is enabled.
Confirm that a TALK button is enabled for the channel that you wish to call.
A Call signal will be received by the beltstation only on the channel(s) that are currently being monitored.
Stage (SA) function does not work properly
The Stage button has two separate functions.
When you press the STAGE button it reroutes the beltstation user’s microphone to the SA output on the
back of the base station.
Optionally, it controls the shared Stage relay contact on the back of the base station.
When pressing the STAGE button, if there is no audio present at the SA, confirm that the Stage
Announce function is enabled in the beltstation.
If the SA relay does not close, ensure that the Stage Relay is enabled in the beltstation. If problems
persist, confirm the operation with another beltstation.
Tempest Remote Transceiver
Remote Transceiver RX or TX LEDs do not light
While the Transceiver is properly connected to the base station, turn the base station Power Switch to the
off position. Wait for 30 seconds and turn the base station Power Switch back to the ON position. This
should initialize the Remote Transceiver. The Config LED should light momentarily and then go out. Once
the Config LED goes out the Remote Transceiver TX LED should light. If there are beltstations
communicating to the base station through the Remote Transceiver the RX LED should light as well.
To manually re-initialize the Transceiver, power off the base station for at least 15 seconds and
power the base station back on, with the Transceiver connected.
All digital, frequency hopping spread spectrum technology - no frequency coordination needed
2.4GHz offers World-Wide operation with no licensing requirements in most world-wide locations
2xTX™ transmission voice data redundancy technology
Accu-Sync™ timing system for improved performance with multiple base stations
iSelect™ On-Command roaming
4 intercom channels and up to 5 full duplex beltstations per base station
Configure up to 10, 2.4GHZ base stations with 50 full duplex beltstations in a single system
Beltstations can access all 4 intercom channels and “Dual-Listen” to 2 of the 4 channels
Weather resistant beltstations
Beltstations can send and receive “Call Alert” signal from wired intercom systems
Clear-Com Communication Systems
Tempest 2400 Wireless Intercom System
Page 82 of 100
Silent vibrate mode on beltstations
Both “Stage Announce” and “Unique Address” Relay function available for each beltstation
Talk switches can be de-latched from either the base station or the hard-wire intercom
Auxiliary audio input and output
LAN control interface
Electret or Dynamic Mic auto select
Multiple Antenna connection options
Compatible with Clear-Com®, RTS®, Telex®, and other 2-Wire and 4-Wire intercom systems
Clear-Com Communication Systems
Tempest 2400 Wireless Intercom System
Page 83 of 100
Tempest 2400 Wireless Intercom System
Specifications
RF Frequency
2400 to 2480
RF Scheme
FHSS with TDMA
Effective Radiated Power
100mW using 2dBi antenna
Receiver Sensitivity
-93 dBm for 10
Radio Certification
FCC Part 15.247 and ETS 300.328 rules, license free
Transmission Range
1,000 feet under ideal conditions (500 ft to 900 ft typical)
Audio Dynamic Range
>94dB
Audio Frequency Response
300Hz–3.8KHz with proprietary audio voice shaping
System Latency
Less than 50ms direct
Clear-Com Communication Systems
Tempest 2400 Wireless Intercom System
−5
BER
Page 84 of 100
Tempest 2400 Base Station Specifications
Intercom Audio Channels
4
Full Duplex beltstations per base station
5
Half-Duplex, Shared beltstations per
base station
25
Number of Antenna Ports per base station
2
Antenna Connector Type
RP-TNC
Number of Synchronized base stations
10
Base station/beltstation pairing
Via supplied Mini-jack/cable
Programming Port
USB
Stage Announce and GPO Closures
6 relays via DB15
2-Wire Intercom Interface
4 channels via XLR-3F with XLR-3M loop thru
2-Wire Compatibility
Clear-Com, RTS, and Balanced compatible
4-Wire/Matrix Connection
4 ports via RJ-45
Aux Input
¼“ 3-conductor jack accepts -4 to +8 dB, balanced,
transformer isolated
Aux Output
¼“ 3-conductor jack nominal -4 to +8 dB, balanced,
transformer isolated
Stage Announce Output
XLR-3M, nominal -4 to +8 dB, balanced,
Transformer isolated
Front-Panel Headset
4-pin male connector
Microphone Type
Dynamic or Electret, auto-selected
Front-Panel LCD Display
240 x 64 resolution 32 level grayscale
Dimensions (inches)
1-RU unit, H 1.75” x W 19.0” x D 12”
Weight
10.5 lbs
Power Input
AC:
DC:
85–264 VAC at 50–60 Hertz, 15 Watts
11–32 VDC, 12 Watts
Operating Environment
-20° to 50° C (-4° to 122° F) Æ 10% to 90% Humidity
Clear-Com Communication Systems
Tempest 2400 Wireless Intercom System
Page 85 of 100
Tempest 2400 Beltstation Specifications
Intercom Audio Channels
4
Simultaneous Listen Paths
True Dual Listen
Headset Connector
4-pin male
Microphone Type
Dynamic or Electret, auto-selected
LCD Display
102 x 80 pixels
Antenna
Internal +2 dBi patch
Charger
Input 100-240V, 0.3A, 50-60Hz Output 5V, 1.25A
Battery Charging
Via supplied charger
Battery Life, Rechargeable Lithium-Polymer
Up to 9+ hours
Charge time for Lithium-Polymer battery
2¾ hours in the beltstation or
2½ hours in the 5 bay charger (from empty)
Optional Power
3 Standard AA alkaline cells
Battery Life, alkaline batteries
Approximately 4 Hours
Dimensions (inches)
H 6.1” x W 4.0” x D 1.75”
Weight (with Lithium-Polymer battery)
14.3 oz
Operating Environment
-20° to 50° C (-4° to 122° F) Æ 10% to 90% Humidity
Tempest 2400 Remote Transceiver Specifications
Maximum Distance, Base to Transceiver
1,500 ft., powered from the base station
Connection to base station
CAT-5 standard wiring
Base stations Supported per Transceiver
1
Number of Antenna Ports per Transceiver
2
Antenna Connector Type
RP-TNC
Supplied Antenna
Whip antenna, 2 each
Dimensions with Antennas (inches)
H 12” x W 3.7” x D 1.7”
Weight
11 oz
Operating Environment
-20° to 50° C (-4° to 122° F) Æ 10% to 90% Humidity
Clear-Com Communication Systems
Tempest 2400 Wireless Intercom System
Page 86 of 100
FCC Information
This unit has been tested and found to comply with the limits for a class A digital device, pursuant to part
15 of the FCC Rules. These limits are designed to provide reasonable protection against harmful
interference when the equipment is operated in a commercial environment. This equipment generates,
uses, and can radiate radio frequency energy and, if not installed and used in accordance with the
instruction manual, may cause harmful interference to radio communications. Operation of this equipment
in a residential area is likely to cause harmful interference in which case the user will be required to
correct the interference at his own expense. Commensurate with EIRP limits specified in FCC Rules
15.247b, this device may not be used with antennas that exceed 9dB of gain in multi-point applications.
Contains Transmitter Module FCCID: HSW-2492
Important FCC and Safety Information
I. Digital Device Statement
A.
Tempest base stations and wireless beltstations have been tested and found to comply with the limits for Class
B digital devices, pursuant to Part 15 of the Rules and Regulations of the U.S. Federal Communications Commission (the FCC) .
Tempest products are marketed as Class A digital devices. These limits are designed to provide reasonable protection against
harmful interference when the equipment is operated in a commercial environment.
B.
This equipment generates, uses, and can radiate radio-frequency energy. If not installed and used in
accordance with all instructions, it may cause harmful interference to radio communications.
C.
Operation of this equipment in a residential area is likely to cause harmful interference, in which case the user
will be required to correct the interference at his own expense.
II. Intentional Radiator Statement
A.
Tempest base stations and wireless beltstations each employ a modular, low-power radio transceiver module
that operates pursuant to Part 15 of the FCC’s Rules. The module’s FCC Identifier is HSW-2492.
B.
Operation is subject to the following conditions:
1.
A Tempest system may not cause harmful interference to other users of the radio spectrum.
2.
Upon notification by a representative of the FCC that a Tempest system is causing harmful
interference, use of the system must be suspended. Operation must not resume until the condition causing the harmful
interference has been corrected.
and
3.
A Tempest system must accept any interference received, including interference that may cause
undesired operation.
C.
Tempest Wireless beltstations contain an internal antenna that is not user replaceable Tempest base stations
must be used only with approved antennas either the standard 4” Rubber Whip Antenna supplied with every Tempest base stations,
with the 9bBi Directional Corner Reflector Antenna that is available as an option or another approved antenna. Use of any nonapproved antenna, or any modification to any part of a Tempest unit, violates the Tempest System’s warranty, and also constitutes a
violation of the FCC’s Rules and Regulations and of § 302 of the Communications Act of 1934, as amended.
D.
To reduce potential radio interference to other users, the antenna type and its gain should be so chosen that the
equivalent isotropically radiated power (e.i.r.p.) is not more than that permitted for successful communication.
III. RF-Exposure Statement
A.
The FCC has adopted limits on the exposure to radio-frequency energy from devices such as the Tempest system.
The FCC adopted these limits by drawing upon the efforts of independent scientific organizations that have engaged in periodic
evaluations of the scientific literature. The FCC’s standards are intended to assure the safety of all persons, regardless of age or health.
B.
Tempest has been designed and manufactured to comply with the FCC’s exposure limits. When used with
approved antennas, and when used in accordance with all instructions, the Tempest system complies with those exposure limits.
C.
Tempest beltstations have been designed to be worn and used in close proximity to the human body.... what the
FCC calls a “portable” use. The beltstation unit complies with FCC exposure limits for portable use.
D.
To ensure compliance with FCC exposure limits, no person must come closer than 26 cm (ten inches) from either
the standard 4” Rubber Whip Antenna, the optional Directional Corner Reflector Antenna, or other approved antenna whichever is used
with the Tempest base station.
Clear-Com Communication Systems
Tempest 2400 Wireless Intercom System
Page 87 of 100
Tempest 2400 System Block Diagram
Clear-Com Communication Systems
Tempest 2400 Wireless Intercom System
Page 88 of 100
Tempest Block Diagram Continued
Clear-Com Communication Systems
Tempest 2400 Wireless Intercom System
Page 89 of 100
Tempest Part Numbers
Model
Description
Tempest® 2400 Series Base Stations
CM-244
Tempest® 2.4 GHz 4 channel, full feature base station. Features two RP-TNC RF
antenna ports, Remote Transceiver port, 2-wire, 4-wire, Stage Out, Aux IN, Aux OUT,
relay cluster, Sync IN, Sync OUT, USB, LAN, Belt Prog port and AC & DC power inputs.
Supports up to 5 wireless beltstations. Comes with AC power cord, USB cable, 1/8"
stereo mini programming cable, two whip antennas and T-Desk software.
Tempest® 2400 Series Beltstations
CP-242
Tempest® 2.4 GHz 4 channel, dual-listen wireless beltstation. Features stage announce,
call, remote mic kill, vibrate alert, internal antenna, 4-PIN male XLR, program port and
USB connector. Comes with 2000mAh Li-Poly rechargeable battery and wall charger.
Tempest® 2400 Series Transceivers
CCT-RT
Tempest® 2.4 GHz Remote Transceiver. Allows remote transmit/receive function with no
loss of RF signal. Connects to compatible base station via standard CAT-5 RJ45 cable.
Power is provided down the CAT-5 cable for up to 1500 feet (450 meters). Comes with 15
ft (4.5 m) CAT-5 cable, mounting bracket assembly and two whip antennas
Tempest® Five-Bay Battery Chargers
T-BC5
Five-bay battery charger for charging Lithium-Polymer batteries outside of the beltstation
Rechargeable Li-Poly Batteries
T-LP1
Tempest® 3.6VDC, 2000mAh rechargable Lithium-Polimer battery
Tempest® Accessories
CCT-WA
CCT-DA
2 dBi Omni-Directional whip antenna with RP-TNC connector
9 dBi Directional corner reflector antenna with N connector
Mounting bracket for 9 dBi corner reflector antenna for use with any 5/8" stud
Mounting bracket with two 5/8" studs for use with two 9 dBi corner reflector antennas PCANT-EXTDIR, two 5/8" stud mounting brackets TMA-MB9DBANT and two RP-TNC to N
4 foot cables PC-ANTCABLE. Requires one Bogen "C" clamp BOG-C1575B. Comes with
two screws, #10-32 X ½” Phillips Pan Head, to attach "C" clamp.
Bogen C clamp for use with Mounting Bracket TMA-DMB5/8. Also attaches directly to
Remote Transceiver using two user supplied #8-32 X 3/8" Phillips Flat Head screws.
Bogen number C1575B
RP-TNC to N coaxial low loss RF cable 20 feet in length
RP-TNC to N coaxial RF cable 10 feet in length
RP-TNC to N coaxial RF cable 4 feet in length
Tempest® 5 VDC Wall charger with Mini USB connector, US blades
USB to Mini USB cable 6 foot in length
RJ45 Ethernet cable 15 foot in length
USB A to USB B cable 6 foot length
1/8" to 1/8" stereo mini pairing cable 6 foot in length
Tempest® beltstation battery cover
Clear-Com Communication Systems
Tempest 2400 Wireless Intercom System
Page 90 of 100
Glossary
2-Wire or TW: A type of intercom system characterized by audio signals transmitted and received on the
same pair of wires at the same time. The connector usually associated with 2-Wire or TW is a 3-PIN XLR.
4-Wire: A type of intercom system characterized by audio signals transmitted on one pair of wires and
received on a different pair of wires.
2xTX: Tempest Wireless proprietary technology that wirelessly transmits duplicate audio data packets from
two antennas, a fraction of a second apart and on different frequencies, to minimize the possibility of lost
data packets.
Accu-Sync: Tempest Wireless technology that synchronizes transmission timing for up to 10 base stations
to prevent interference.
Auto-Null: A process that automatically optimizes the base station 2-Wire, intercom interface hybrid to
match the line characteristics of the external 2-Wire system.
AUX IN: Inputs program or other audio sources into the Tempest base station to one or more intercom
channels. The Auxiliary IN connector is a ¼” Tip/Ring/Sleeve jack that accepts a standard ¼” TRS plug.
AUX OUT: Outputs intercom audio from one or more intercom channels to an external system. The Auxiliary
OUT connector is a ¼” Tip/Ring/Sleeve jack that accepts a standard ¼” TRS plug.
Banner: The top line of the base station display, with white-on-black lettering. Usually the banner is the title
of a menu screen.
Call Alert: A feature of intercom belt packs intended to visually and/or audibly alert users to a
communication transmission.
Channel: A duplex communication path to transmit and receive voice communication.
Desensing or receiver desensitization: Desensing occurs when a transmitter is operating in close,
physical proximity to a receiver, even if that transmitter is not on or near the receiver’s operating frequency.
Receiver desensitization occurs because receivers must maintain critical voltage and current levels
throughout the front-end stages and a strong (i.e. physically close) transmitter can cause these levels to vary
greatly. As these levels widely fluctuate, the receiver performance will be greatly degraded. Increasing the
physical distance between transmitter and receiver will decrease desensing. The greater the frequency
separation between the two, the less the receiver performance will be affected.
Dual Listen: This beltstation feature permits an operator to simultaneously listen to two channels.
Frequency Hopping, Spread Spectrum (FHSS): Radio technology that utilizes many frequencies in quick
succession, intended to minimize the probability of radio frequency interference.
Full Duplex: Simultaneous two-way conversations (i.e. telephone communication).
GPIO: General Purpose Input Output – a simple device control method.
Half Duplex: Two-way conversations, one-way at a time, such that one person cannot interrupt the other
(i.e. walkie-talkie).
IFB: Interrupted Feedback, or Interrupted Fold-Back - The IFB system connects control room personnel such
as the director, or producer with the performers or “talent”. The performer wears a small earpiece that carries
Clear-Com Communication Systems
Tempest 2400 Wireless Intercom System
Page 91 of 100
the program sound unless the director or another member of the production team interrupts the program
sound with special instructions through the IFB.
iSelect On-Command Roaming: Permits the beltstation user to select the base station appropriate for the
current location or activity.
License Free: The 2.4 GHz ISM band is approved for non-licensed use in virtually every country. It is the
responsibility of the user to ensure that the system is operated in accordance with local laws and regulations.
Lithium-polymer battery: A re-chargeable battery that provides long lasting, reliable power, with a
minimum of space and weight, utilizing lithium based chemistry in a stable polymer.
Loop -Thru Connectors: Allow multiple base stations to share a common channel.
Master Base Station: A Tempest base station that powers the 2-Wire Hybrid circuitry in itself and up to 9
additional base stations across the looped-thru shared channel. The Master base station provides power and
line termination.
Mix minus signal: A mix of all audio that the beltstation user needs to hear, minus the audio coming from
the beltstation itself.
Pairing: A programming process that allows a base station and beltstation to recognize each other.
Slot: One of five time intervals in the FHSS TDMA RF schema. Each beltstation occupies a slot. Also, one
of the five display locations on the base station LCD screen.
Stage Announce: A Tempest system feature that permits connection of the base station to a public address
system (PA), and allows a beltstation user to be heard through the PA. The option includes a relay that can
be used to activate the PA system.
Status Screen: Normal operational mode screen on the base station or beltstation LCD display.
T-Desk Software: Software, used to configure and monitor the Tempest Intercom System with a computer
over a Local Area Network.
Time Domain Multiple Access (TDMA): Radio technology that takes advantage of the relatively slow
speed of sound and much faster speed of RF, to create the illusion of multiple simultaneous transmissions.
Tempest Base Station: The control station for a group of Tempest Wireless Intercom beltstations with the
ability to interface with most commonly used wired intercom systems.
Tempest beltstation: An intercom user station, designed to be worn on the users belt in conjunction with a
headset that provides a dedicated communication link and freedom of movement.
Tempest Remote Transceiver: An accessory used with the Tempest base station to
locate the antennas apart from the base station without RF signal loss or attenuation.
USB-A:
USB-B:
Clear-Com Communication Systems
Tempest 2400 Wireless Intercom System
USB mini-B:
Page 92 of 100
Limited Warranty
This document details the Clear-Com Standard Limited Warranty for all new products for sale within all
regions with the exception of Military, Aerospace, and Government (MAG).
EXCEPT AS SET FORTH HEREIN ("LIMITED WARRANTY"), CLEAR-COM MAKES NO OTHER
WARRANTIES, EXPRESS, IMPLIED OR STATUTORY, INCLUDING WITHOUT LIMITATION ANY
WARRANTIES OF MERCHANTABILITY, NONINFRINGEMENT OF THIRD PARTY RIGHTS, OR FITNESS
FOR A PARTICULAR PURPOSE, ALL OF WHICH ARE EXPRESSLY DISCLAIMED.
1. Standard Limited Warranty. Clear-Com Communication Systems (“Clear-Com”) warrants its products,
including supplied accessories, against defects in material or workmanship for the time periods as set forth
below provided it was purchased from an authorized Clear-Com dealer or distributor.
a) Pursuant to this Limited Warranty, Clear-Com will, at its option:
i)
repair the product using new or refurbished parts, or;
ii)
replace the product with a new or refurbished product.
b)
Remedies: In the event of a defect, the rights detailed in 1 (a) are your exclusive remedies. For purposes of this
Limited Warranty, “refurbished” means a product or part that has been returned to its original specifications.
c)
Standard Warranty Period (by Product):
i)
All Clear-Com brand systems and products, including belt packs, have a Limited Warranty of two years,
with the exception of;
(1) Cables, accessories, components & consumable items have a Limited Warranty of 90 days.
(2) Any Clear-Com product that has been classified as obsolete at the time of sale has a Limited Warranty
of 90 days from sales and will be replaced with the same product or a sales credit will be issued, at the
sole discretion of Clear-Com.
(3) Headsets, handsets, microphones, and associated spare parts, as well as UHF wireless IFB products,
have a Limited Warranty of one year.
(4) UHF WBS Analog wireless intercom systems have a Limited Warranty of three years.
(5) All software products, including Concert (Client and Server), ECS, Production Maestro and Logic
Maestro are warranted for one year and shall substantially conform to published specifications. The
media on which the Software is furnished is warranted to be free of defects in material and
workmanship (under normal use) for a period of one year.
(6) Any Clear-Com products that are listed within the last time buy period have the same Limited Warranty
for their type 1.i 1 - 1.i.5 as above.
d)
Any Clear-Com product that is repaired or supplied as a replacement under the terms of this Limited Warranty
shall inherit the remaining warranty period from the original product.
e)
Standard Warranty Period Start Date
Dealer / Distributor Sales: In view of Dealer or Distributor stocking practices, the Standard Warranty
Period for products sold through Dealers or Distributors will commence from the Clear-Com invoice date
and will include an automatic extension of three months. Any valid warranty claim within the Standard
Warranty Period as determined by the Clear-Com invoice date will be covered without further supporting
Clear-Com Communication Systems
Tempest 2400 Wireless Intercom System
Page 93 of 100
evidence. All warranty claims after this date must be supported by the Customer’s proof of purchase that
demonstrates the product is still within the Standard Warranty Period (as detailed in Section 1.c.i above,
plus the automatic three month extension) from their purchase date.
Direct Sales: The Standard Warranty Period will commence from the date the product was shipped from
Clear-Com to the Customer. The Standard Warranty Period start date for contracts that include
commissioning will be the date of the Site Acceptance Test (SAT) or one month from conclusion of the
commissioning project, whichever is earlier.
f)
Invalidation of Warranty
i)
g)
Software Updates
i)
h)
This Limited Warranty shall be invalidated if the product’s outer case has been opened and internal
modifications have been made or damage has occurred, or upon the occurrence of other damage or failure
not attributable to normal wear and tear. Authorized modifications with Clear-Com’s express written
permission will not invalidate the warranty.
Software Updates are released periodically to correct discovered program bugs. During the Warranty
Period, software updates are available to Customers free of charge.
Software Upgrades
i)
Software Upgrades include new Features and/or Functional Enhancements and are not included as part of
the Standard Warranty but may be purchased at the published rates.
ii)
Note: In the absence of a Software Update containing a program correction and no available workaround
to mitigate the problem, at the discretion of Service, Sales, Engineering, or Product Management, the
Customer may be provided a Software Upgrade under warranty.
Exclusions. Services do not cover damage or failure caused by any occurrence beyond Clear-Com’s
reasonable control, including without limitation acts of God, fire, flooding, earthquake, lightning, failure of
electric power or air conditioning, neglect, misuse, improper operation, war, government regulations,
supply shortages, riots, sabotage, terrorism, unauthorized modifications or repair, strikes, labor disputes
or any product failure that Clear-Com determines is not a result of failure in the Services provided by
Clear-Com. Further Services excluded from this Agreement include: services required due to errors or
omissions in Customer purchase orders; installation or maintenance of wiring, circuits, electrical conduits
or devices external to the products; replacement or reconditioning of products which, in Clear-Com’s
opinion cannot be reliably maintained or properly serviced due to excessive wear or deterioration;
Customer’s failure to maintain the installation site in accordance with the environmental specifications of
the products; or service on products removed from the location originally specified by Customer and/or
reinstalled without the prior written approval of Clear-Com. Customer will pay Clear-Com’s then current
published charges to restore such Covered Products to a condition eligible for further service under this
Agreement. Clear-Com shall be excused from and shall not be liable for any failure or delay in
performance under this Agreement due to the foregoing or any causes beyond its reasonable control.
Limitation of Liability. IN NO EVENT WILL CLEAR-COM BE LIABLE UNDER THIS AGREEMENT FOR
ANY INDIRECT, SPECIAL, INCIDENTAL OR CONSEQUENTIAL DAMAGES (INCLUDING WITHOUT
LIMITATION LOST PROFITS), REGARDLESS OF THE FORM OF ACTION, EVEN IF ADVISED IN
ADVANCE OF THE POSSIBILITY OF SUCH DAMAGES.
Assignment. Neither party may assign this Agreement or any portion thereof without the prior written
consent of the other, except in the event of a merger, sale of all or substantially all of the assets or other
corporate reorganization.
Ownership of replaced parts or product. All replaced parts or products become the property of ClearCom.
Clear-Com Communication Systems
Tempest 2400 Wireless Intercom System
Page 94 of 100
Entire Agreement. This Agreement constitutes the entire agreement between the parties with respect
to the subject matter hereof, and supersedes all prior or contemporaneous proposals, oral or written, and
all other communications between them relating to the subject matter of this Agreement.
Clear-Com Communication Systems
Tempest 2400 Wireless Intercom System
Page 95 of 100
Technical Support & Repair Policy
November 1, 2008
In order to ensure that your experience with Clear-Com and our World Class products is as
beneficial, effective and efficient as possible, we would like to define the policies and share some
“best practices” that can accelerate any problem solving processes which we may find necessary
and to enhance your customer service experience. Our Technical Support, Return Material
Authorization, and Repair Policies are set forth below. These Policies are subject to revision and
constantly evolve in order to address our Customers’ and the Market’s needs. Accordingly these are
provided by way of guidance and for information only and may be changed at anytime with or without
Notice.
TECHNICAL SUPPORT POLICY
Telephone, online, and e-mail technical support will be provided by the Customer Service Center free of charge
during the Warranty Period.
Technical support will be provided free of charge for all software products under the following conditions:
The application, operating, and embedded software is installed on a product covered by Clear-Com’s Limited
Warranty, and:
The software is at the current release level; or,
The software is one (1) version removed from current.
Older versions of software will receive “best-effort” support, but will not be updated to correct reported bugs or
add requested functionality.
For Technical Support:
North and South America, (incl Canada, Mexico, and the Caribbean) & US Military:
Hours: 0800 – 1700 Pacific Time
Days: Monday - Friday
Tel:
+1 510 337 6600
Email: [email protected]
Europe, the Middle East and Africa:
Hours: 0800 – midnight Central European Time
Days: Monday - Friday
Tel:
+49 40 853 999 700
Email: [email protected]
Asia-Pacific:
Hours: 0800 – 1700 Pacific Time
Days: Monday - Friday
Tel:
+1 510 337 6600
Email: [email protected]
Email Technical Support is available for all Clear-Com branded products free of charge for the life of the
product, or two years after a product has been classified as obsolete, whichever comes first.
Support for Distributor and Dealer Sales
Distributors and Dealers may utilize the Customer Service Centers once a system has been installed
and commissioned. Clear-Com Systems and Applications Engineers will provide support to the
Distributor from the pre-sales stage through to satisfactory installation for new system purchases.
Clear-Com Communication Systems
Tempest 2400 Wireless Intercom System
Page 96 of 100
Customers will be encouraged to contact their Dealer or Distributor with their installation and
technical support enquires rather than using the Customer Service Centers directly.
Support for Direct Sales
Customers may utilize the Customer Service Centers once a system has been installed and
commissioned by Clear-Com Systems and Applications Engineers, or in the case of project
installations, once the Project Team has completed the hand-over to the Support Centers.
RETURN MATERIAL AUTHORIZATION POLICY
Authorizations: All products returned to Clear-Com or a Clear-Com Authorized Service Partner must
be identified by a Return Material Authorization (RMA) number.
The Customer will be provided with an RMA number upon contacting Clear-Com Sales Support as
instructed below.
The RMA number must be obtained from Clear-Com via phone or email prior to returning product to
the Service Center. Product received by the Service Center without a proper RMA number is subject
to return to the Customer at the Customer’s expense.
Damaged equipment will be repaired at the Customer’s expense.
Returns are subject to a 15% restocking fee.
Advance Warranty Replacements (AWRs);
During the first 30 days of the Standard Warranty Period: Once the equipment fault has been verified
by Clear-Com or its authorized representative, Clear-Com will ship a new replacement product. The
Customer will be provided with an RMA number and be required to return the faulty equipment within
14 days of receipt of the replacement or will be invoiced for the list price of a new product.
During days 31-90 of the Standard Warranty Period: Once the equipment fault has been verified by
Clear-Com or its authorized representative, Clear-Com will ship a like-new, fully refurbished
replacement product. The Customer will be provided with an RMA number and be required to return
the faulty equipment within 14 days of receipt of the replacement or will be invoiced for the list price
of a new product.
To obtain an RMA number or request an AWR:
North and South America, Asia-Pacific, and US Military:
Hours: 0800 – 1700 Pacific Time
Days: Monday - Friday
Tel:
+1 510 337 6600
Email: [email protected]
Europe, the Middle East and Africa:
Hours: 0800 – 1700 GMT + 1
Days: Monday - Friday
Tel:
+ 44 1223 815000
Email: [email protected]
Note: AWRs are not available for UHF WBS Analog wireless intercom systems. UHF WBS Analog
wireless intercom systems out-of-box failures must be returned to Alameda for repair.
Note: Out-of-box failures returned after 90 days will be repaired and not replaced unless approved by
Clear-Com Communication Systems
Tempest 2400 Wireless Intercom System
Page 97 of 100
Clear-Com Management.
Note: AWRs are not available after 90 days of receipt of product unless an AWR Warranty Extension
is purchased at the time of product purchase.
Note: Shipping charges, including duties, taxes, and insurance (optional), to Clear-Com’s factory is
the responsibility of the Customer. Shipping AWRs from Clear-Com is at Clear-Com’s expense
(normal ground or international economy delivery). Requests for expedited shipping (E.g. “Next-Day
Air”) and insurance are the responsibility of the Customer.
REPAIR POLICY
Repair Authorizations: All products sent to Clear-Com or a Clear-Com Authorized Service Partner for repair
must be identified by a Repair Authorization (RA) number (see above).
The Customer will be provided with an RA number upon contacting Clear-Com Customer Services as instructed
below.
The RA number must be obtained from Clear-Com via phone or email prior to returning product to the Service
Center. Product received by the Service Center without a proper RA number is subject to return to the
Customer at the Customer’s expense.
Return for Repair
Customers are required to ship equipment at their own cost (including transportation, packing, transit,
insurance, taxes and duties) to Clear-Com’s designated location for repair.
Clear-Com will pay for the equipment to be returned to the Customer when it is repaired under warranty.
Shipping from Clear-Com is normal ground delivery or international economy. Requests for expedited shipping
(E.g. “Next-Day Air”) and insurance are the responsibility of the Customer.
Clear-Com does not provide temporary replacement equipment (“loaner”) during the period the product
is at the factory for repair. Customers should consider a potential prolonged outage during the repair cycle,
and if required for continuous operations purchase minimum spare equipment required or purchase an AWR
Warranty Extension.
No individual parts or subassemblies will be provided under warranty, and warranty repairs will be completed
only by Clear-Com or its Authorized Service Partners.
Customers requesting a non-warranty repair will be provided an estimate of the total repair cost prior to the
return of the equipment. In the event that Clear-Com is unable to estimate the cost of repair, the Customer may
elect to return the product to the factory for an estimate. The Customer is responsible for shipping costs both to
and from the factory in the event they choose not to accept the estimate.
The Customer must provide either a purchase order for the repair work, or will be required to make an advance
payment (as a debit against the Dealer’s line of credit, or credit card) prior to the repaired product being
returned to the Customer.
For requesting a Repair Authorization number:
North and South America, Asia-Pacific, and US Military:
Hours: 0800 – 1700 Pacific Time
Days: Monday - Friday
Tel:
+1 510 337 6600
Email: [email protected]
Europe, the Middle East and Africa:
Hours: 0800 – midnight Central European Time
Days: Monday - Friday
Tel:
+49 40 853 999 700
Email: [email protected]
Clear-Com Communication Systems
Tempest 2400 Wireless Intercom System
Page 98 of 100
Note: Clear-Com’s Limited Warranty does not cover normal wear and tear. The Customer will be
charged the full cost of the repair if their equipment has been tampered with by non-approved
personnel, or has been subject to damage through electrical failure, liquid damage or mishandling.
The Customer Service Center will provide the Customer with a cost estimate for any such repairs prior to
undertaking the work.
Clear-Com Communication Systems
Tempest 2400 Wireless Intercom System
Page 99 of 100
Index
2
iSelect ................................................................. 71
2-Wire ..................................................... 38, 40, 55
2-Wire/4-Wire ..................................................... 55
L
4
M
4-Wire ..................................................... 20, 39, 45
Master Mode....................................................... 49
Mic Gain ....................................................... 32, 70
Mic Kill ................................................................ 53
Multiple base stations ......................................... 45
Multiple Base Stations .................................. 46, 50
5
5-Bay Battery Charger........................................ 76
A
AC....................................................................... 23
Accu-Sync .................................................... 48, 58
Auto-Null ............................................................. 40
Aux In/Out........................................................... 35
B
Lock .................................................................... 33
N
Network Number................................................. 30
O
OUT .............................................................. 56, 58
Base Station Controls......................................... 53
Base Station Menu ............................................. 59
Battery ................................................................ 65
BeltStation .......................................................... 72
BELTSTATION ................................................... 63
BeltStation Menu ................................................ 75
Block Diagram .................................................... 87
P
C
S
Call ..................................................................... 53
CALL................................................................... 72
Clear Memory ..................................................... 36
Safety ................................................................... 8
Safety - Battery ................................................... 11
Safety, AC Warning .............................................. 9
Setup – Base Station .......................................... 21
Setup - BeltStation.............................................. 65
Setup - Transceiver ............................................ 61
Specifications - 2.4GHz ...................................... 83
Specifications - BeltStation................................. 85
Specifications - System ...................................... 19
Specifications - Transceiver ............................... 85
Specifications- Base Station............................... 84
Stage .................................................................. 72
Stage Announce ........................................... 35, 58
D
DC ...................................................................... 23
F
Factory Defaults ................................................. 36
FCC Information ................................................. 86
Frequency Band ................................................. 29
Front Panel Lock ................................................ 33
H
Pairing ................................................................ 67
R
Relay .................................................................. 34
Relays ................................................................. 77
Remote Transceiver ........................................... 61
Headset .............................................................. 32
Headset Connector ............................................ 53
HEADSETS ........................................................ 20
T
I
Wireless ISO....................................................... 71
Talk ............................................................... 53, 74
W
IN .................................................................. 56, 58
Clear-Com Communication Systems
Tempest 2400 Wireless Intercom System
Page 100 of 100