1
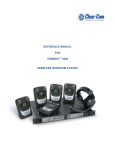
Tempest2400 MasterBelt®
2-Channel Wireless Intercom
Operating Manual
Thank You
Thank you for purchasing a Tempest® MasterBelt® Wireless Intercom System. We have made every effort to build a reliable, intuitive wireless
intercom system that provides the same functionality that you expect from your hard-wired intercom equipment.
One of our goals in the design of Tempest was that it should work the way you think it should work – that is, it should be intuitive and similar to
other equipment that you may already use. You will be able to begin using your new Tempest wireless intercom system with nothing more than
the Quick Start Guide. However, to fully benefit from the available features, please read this manual carefully.
We want Tempest to make your job easier and your experience to be positive. To successfully familiarize yourself with the many diverse and
powerful features Tempest offers, it is crucial that you acquaint yourself with the manual. Your time spent will help you get the most from your
Tempest wireless intercom by making setup easier.
We are committed to providing you with a high quality product that will deliver years of trouble-free service. Should you experience any problem
with your Tempest equipment, whether it is a warranted problem or service after you have owned the system for several years, we will be there
to take care of you.
Thank you for choosing Tempest for your wireless intercom needs.
Tempest MasterBelt Operating Manual
Tempest 2400 MasterBelt 2-Channel Wireless Intercom Operating Manual
D0000153
MasterBeltManual_D0000153_B
Legal Information
CoachComm, LLC
Tempest®
205 Technology Parkway
Auburn, AL 36830
www.tempestwireless.com
1.844.475.4268 or +1.334.321.1160
COPYRIGHT © 2015 CoachComm, LLC. All rights reserved. The CoachComm®, Tempest®, and MasterBelt® logos are registered trademarks of
CoachComm, LLC. Any and all other trademark references within this document are property of their respective owners.
This document /content contains proprietary information which is protected by copyright. No part of this document and/or content may be
transcribed, distributed, stored, translated into any language or computer language, copied, reverse engineered, reproduced, or transferred in
other form whatsoever without the previous express written approval of CoachComm, LLC.
The software described in this document is furnished under a license agreement and may be used only in accordance with the terms of the
agreement.
In no event shall CoachComm, LLC. be held liable for any loss, expenses, or damages of any kind whatsoever, whether direct, indirect, incidental,
or consequential arising from the use of this product or the support materials provided with the product. We have done our utmost to ensure
that the information in this user guide is complete, accurate and up-to-date. No warranties are made, either expressed or implied, with regard
to the contents of this work, its merchantability, or fitness for a particular use. CoachComm, LLC assumes no responsibility for errors and
omissions or for the uses made of the material contained herein or reader decisions based on such use. No warranties are provided for changes
to third-party equipment, which could be referred to in this guide and will have no effect on the applicability of the information provided within.
The author reserves all rights, including the right to reproduce this guide in full or part in any form. The content is subject to change without
prior notification. The product is subject to technical change without prior notification.
www.tempestwireless.com
ii
Tempest MasterBelt Operating Manual
Table of Contents
Important Safety Instructions..................................................................................................................................................1
A/C Power Warning................................................................................................................................................................2
Battery Safety.........................................................................................................................................................................2
Maintenance and Care...........................................................................................................................................................3
MasterBelt Overview..............................................................................................................................................................4
BeltStation Overview..............................................................................................................................................................7
MasterBelt Setup.................................................................................................................................................................. 10
Pairing BeltStations to MasterBelt......................................................................................................................................... 14
Configure BeltStation Settings.............................................................................................................................................. 15
Modes of Operation............................................................................................................................................................. 18
Radio Compliance................................................................................................................................................................ 20
Warranty Information........................................................................................................................................................... 22
Technical Support................................................................................................................................................................. 23
MasterBelt Menu................................................................................................................................................................. 24
BeltStation Menu ................................................................................................................................................................ 25
iii
Tempest MasterBelt Operating Manual
This page is intentionally blank.
iv
Tempest MasterBelt Operating Manual
Important Safety Instructions
The word “Caution” is the lowest of the three signal words (Caution, Warning and Danger), with “Danger” being the highest. Therefore,
whenever the word “Caution” is used, it may be replaced with either of the higher rated signal words: “Warning” or “Danger.”
•
DANGER – indicates a situation which, when not avoided, results in death or severe injury;
•
WARNING – indicates a situation which, when not avoided, has the potential to result in death or severe injury;
•
CAUTION – indicates a situation which, when not avoided, results or has the potential to result in minor injury.
1.
Read these instructions.
2.
Follow all instructions.
3.
Heed all warnings.
4.
Keep these instructions.
WARNING – To reduce the risk of fire or electric shock, do not expose this apparatus to rain or moisture.
Do not use this apparatus near water.
Do not expose the apparatus to dripping or splashing. Do not place objects filled with liquids, such as vases, on the apparatus.
The MasterBelt shall be connected to a main socket outlet having a protective earthing connection.
Install the MasterBelt so that the appliance coupler (AC power inlet) is readily accessible and operable. Clean only with a dry cloth.
Install in accordance with manufacturer’s instructions.
Do not install near any heat sources such as radiators, heat registers, stoves, or other apparatus (including amplifiers) that produce heat.
Do not defeat the safety purpose of the polarizing or grounding type plug. A polarized plug has two blades with one wider than the other. A
grounding type plug has two blades and a third grounding prong. The wide blade or third prong is provided for your safety. When the provided
plug does not fit into your outlet, consult an electrician for replacement of the obsolete outlet.
Protect the power cord from being walked on or pinched, particularly at plugs, convenience receptacles, and the point where they exit the
apparatus.
Only use attachments/accessories specified by the manufacturer.
Unplug this apparatus during lightning storms or when unused for long periods of time.
Refer all servicing to qualified service personnel. Servicing is required when the apparatus has been damaged in any way, for example if the
power-supply cord has been damaged, liquid has been spilled or objects have fallen into the apparatus, or if the apparatus has been exposed to
rain or moisture, does not operate normally, or has been dropped.
1
Tempest MasterBelt Operating Manual
A/C Power Warning
Users should exercise extreme care when working with electricity. Additional care should be used when
working with electricity outdoors in inclement weather. When working outdoors or near water, always
connect the system into a ground-fault interrupting circuit.
There are no user-serviceable parts inside the Tempest MasterBelt. Opening the case may expose dangerous electrical components, and will
void the warranty.
ALERT SYMBOL – Indicates important information.
CAUTION SYMBOL – Indicates a potential to damage equipment.
DANGER SYMBOL – indicates a potential safety hazard.
Battery Safety
Battery Transportation
Rechargeable lithium batteries are subject to special regulation by U.S. and International
laws, particularly regarding transportation on passenger aircraft. However, individual
batteries installed in consumer electronics are not restricted, provided there are only
the correct numbers and types of batteries as may be needed to operate the electronic
equipment.
Your Tempest MasterBelt Wireless Intercom System includes rechargeable lithium-polymer batteries that power the MasterBelt and BeltStations.
To ensure that there is no violation of U.S. or International laws, and to ensure your own safety, always:
•
Transport rechargeable lithium batteries installed in the equipment they are intended to power.
•
Transport spare batteries in a padded case, separated from one another.
•
Never transport your rechargeable lithium batteries bundled together.
•
Never transport more than 12 lithium batteries in a single package.
Lithium-polymer batteries include a chemistry that is intended to overcome the dangers associated with lithium ion batteries. In addition, the
batteries that accompany your Tempest Wireless system include protective circuits to further reduce the possibility of a dangerous reaction
associated with charging or discharging beyond safe limits. With reasonable care you can expect many years of safe and reliable power from
your batteries.
2
Tempest MasterBelt Operating Manual
Tempest batteries are not subject to transport regulations of dangerous goods because they fulfill the following regulatory provisions:
•
ADR 188
•
IATA A45
•
IMDG 188
Battery Storage
Long-term storage of batteries at maximum charge can result in permanent loss of capacity.
For long term storage of batteries, charge/discharge the batteries to approximately 60% of capacity. Batteries stored for longer than one year
should be recharged to 60% annually. Trickle charging is not recommended due to the very low self discharge rate of the batteries.
As with all batteries:
•
Do not burn.
•
Do not expose batteries to excessive heat such as sunshine, fire or other heat sources.
•
CAUTION – Danger of explosion if battery is incorrectly replaced. Replace only with the same or equivalent type.
•
Properly dispose of used batteries promptly.
•
Keep away from children.
Maintenance and Care
Cleaning
Generally, the Tempest Wireless hardware should be cleaned only with a dry cloth. A soft cloth with rubbing alcohol may be used to wipe the
units if needed. Never spray solvents or chemicals onto the units.
Because of Tempest’s weather resistant design, it is not highly susceptible to dust or airborne contaminants. However, all electronic devices can
be susceptible to particulate contamination. If exposed to an extremely dusty environment, contact an authorized Tempest service center for
internal cleaning.
Temperature and Humidity
Ideally, all electronics should be stored and used in a controlled environment with moderate temperature and humidity. Tempest components are
designed to be very durable, and can tolerate a wide range of environmental conditions.
Install the MasterBelt in a location where it will not be exposed to extreme weather conditions. Protect the unit against dust or moisture. Always
protect any AC power connections from the elements with safety in mind.
The MasterBelt and BeltStations are designed to work wherever people work. While the design is weather resistant, the headset XLR connector
on the bottom is not watertight. MasterBelts or BeltStations should not be submerged in liquids. Protect the battery compartment from water
when changing batteries. The battery compartment offers a route to the electronic circuitry.
3
Tempest MasterBelt Operating Manual
MasterBelt Overview
The Tempest MasterBelt is a 2-Channel Tempest BeltStation that serves as a Tempest BaseStation. The MasterBelt is compatible with existing
2-Channel Tempest BeltStations. Like a Tempest BaseStation, the MasterBelt is capable of hosting and supporting up to five standard
BeltStations in full duplex communication when operating in Normal mode. When operating in Shared or Split mode, the MasterBelt can
support an unlimited number of standard BeltStations in a listen/push-to-talk capacity.
The MasterBelt can be situated in a fixed location (like a BaseStation) or worn in a mobile capacity (like a BeltStation). This type of flexibility and
mobility enables users to overcome challenges associated with AC power needs, fixed antenna placement and limited coverage area. With a
MasterBelt, groups of Tempest users can effectively move together and maintain wireless communication with one another without the need of
a traditional BaseStation or fixed antenna.
A MasterBelt has many of the same functional and cosmetic characteristics of a standard BeltStation. Talk buttons, channel buttons, volume
knobs, and many other features remain the same.
1- Volume- CH A and CH B
In Operational Mode, turning the Volume control adjusts the volume of the audio.
Volume indicators appear on the display during adjustment and are expressed in
Decibels (dB).
The Volume control has an option to be set to “Volume Press” where it requires a
“press and turn” to adjust the volume level. The “Volume Press” option can be
adjusted under the “Set Controls” section of the MasterBelt menu.
Pressing the Volume control in “Dual-listen” mode does nothing. In “Single-listen”
mode, pressing “CH A” enables channel A, and pressing “CH B” enables channel B .
The Volume control has a channel “Delay Switch” option which requires the knob to
be pressed and held slightly longer in order to switch from one channel to the other.
This feature can be enabled under the “Set Controls” section of the MasterBelt
menu.
In Menu Mode, turning either Volume control allows the user to scroll the options of
the current menu screen. Pressing the Volume control selects the option.
2- Base Button
BASE Button Display
The BASE button (when pressed) changes the
MasterBelt’s display to show the telemetry status of all current BeltStations logged into the MasterBelt. Once on
this screen, pressing the BASE button will cycle through each BeltStation’s telemetry based on their assigned slot
position.
3- MENU Button
Pressing MENU while the MasterBelt is in Operational mode will select Menu Mode, and the Main Menu screen will be displayed. Once in Menu
Mode, pressing MENU again will act as an escape key and will back out of the current menu screen moving the user up one level. Pressing the
MENU button while at the Main Menu screen will exit Menu Mode and return to Operational mode. The menu can be locked via a “Menu Lock”
feature per MasterBelt.
4- ENTER Button
The ENTER button operates differently depending on the mode of the MasterBelt. In Menu Mode, pressing the ENTER button selects the current
menu option and is the same as pressing a Volume control. A menu item is not selected until the ENTER button (or Volume control) is pressed.
The ENTER button can also activate Wireless ISO (wireless talk around).
4
Tempest MasterBelt Operating Manual
5- LCD
While in Operational Mode, the LCD displays the number of BeltStations currently in use with
the MasterBelt. In addition, it includes the name of the MasterBelt, battery life remaining,
channel indicators and other data. The LCD backlight and contrast can be adjusted from the LCD
Adjustments menu screen under the LCD/LED section of the MasterBelt menu.
Operational Display
6- CALL Button
The CALL Button sends a call signal to any wireless BeltStation on the same intercom channel. The Call signal will be routed to intercom
channels indicated by the user’s active Talk button(s).
Note: The TALK button must be enabled to send a call signal.
1- Rubberized Access Cover
The Rubberized Access Cover helps prevent dust, dirt and liquid from entering the MasterBelt through the
USB or the BeltStation pairing connector. Keep this cover securely closed at all times to ensure the best
possible seal.
2- USB Mini B Connector
The USB Connector is used to charge the MasterBelt with the supplied wall charger. In addition, the USB
connect is used to update the firmware of the MasterBelt.
3- Pairing Connector
The Pairing Connector is used to pair the MasterBelt to BeltStations using the supplied 3.5mm stereo mini
connector.
1- Belt Clip
The Belt Clip enables the MasterBelt to be worn on the user’s belt or other clothing item.
2- Power ON/OFF Button
The Power ON/OFF button is used to turn the MasterBelt ON or OFF. Press and hold the
Power ON/OFF button for two seconds to turn the MasterBelt ON. Press for four seconds to
turn the MasterBelt OFF.
3- Battery Compartment
The Battery Compartment holds either one Tempest Lithium-Polymer rechargeable battery
or (3) standard alkaline AA cells. To remove the battery door, press down on the thumb
markings and pull the battery door toward the bottom of the MasterBelt. To remove
batteries from the battery compartment turn the MasterBelt battery side down and tap the
bottom of the MasterBelt on the palm of your other hand. Please be careful to insert alkaline AA batteries according to the marked polarity. All
of the alkaline AA cells face the same direction. If the battery cover does not fit or close properly, the battery may not be inserted correctly.
5
Tempest MasterBelt Operating Manual
4- Headset Connector
The 4-pin XLR male headset connector mates with most Dynamic or Electret headsets that have 4-pin XLR female connectors. This Headset
connector allows a user to communicate in “Dual-listen” or “Single-listen” mode on either intercom channel.
The mic detect circuit (dynamic/electret) will indicate dynamic when it sees a load of 600Ω or less. It will indicate an electret when it sees 1kΩ or
greater. Between 600Ω and 1kΩ is not recommended as it may not accurately detect mic type.
Talk Button A and B
There are two TALK buttons on each MasterBelt, one for channel A and the other
for channel B. The Talk button enables the microphone signal for the assigned
intercom channels.
Tempest uses an intelligent latching method for TALK buttons. Pressing the TALK
button momentarily will cause the TALK button to latch. Pressing and holding the
TALK button will cause the button to act as a momentary switch.
Talk tones can be enabled or disabled per MasterBelt. If enabled, users will here a
tone each time the TALK button is pressed.
Channel Indicator LEDs A and B
Each Talk button has two individual LED indicators. Together they surround the Talk
button. The LEDs will flash blue to indicate which intercom channel, A or B, has been
selected and will illuminate continuously to indicate that “Talk” is enabled on that
channel.
The Channel Indicator LEDs will flash red when the microphone signal is reaching a
peak level and is entering into limiting.
MasterBelt Display Overview
1. Mode Setting - indicates the mode the MasterBelt is currently operating in (NORM, SHARE, or SPLIT.)
2. Battery Alert - indicates that the battery alert is enabled or
disabled (shown as enabled).
3. Battery Status - visual indicator of battery level.
4. Battery Time - the operational time remaining on the battery.
5. MasterBelt Name - the name assigned to the MasterBelt.
6. Belt Slot/Status - surrounding box indicates a BeltStation is
logged into that slot.
7. Channel Indicators - available channels and active channel
shown with surrounding box.
8. Talk Status - TALK is displayed when latched/pressed.
6
Tempest MasterBelt Operating Manual
BeltStation Overview
1- Volume- CH A and CH B
In Operational Mode, turning the Volume control adjusts the volume of the audio.
Volume indicators appear on the display during adjustment and are expressed in
Decibels (dB).
The Volume control has an option to be set to “Volume Press” where it requires a
“press and turn” to adjust the volume level. The “Volume Press” option can be
adjusted under the “Set Controls” section of the BeltStation menu.
Pressing the Volume control in “Dual-listen” mode does nothing. In “Single-listen”
mode, pressing “CH A” enables channel A, and pressing “CH B” enables channel B .
The Volume control has a channel “Delay Switch” option which requires the knob to be
pressed and held slightly longer in order to switch from one channel to the other. This
feature can be enabled under the “Set Controls” section of the BeltStation menu.
In Menu Mode, turning either Volume control allows the user to scroll the options of the
current menu screen. Pressing the Volume control selects the option.
2- STAGE Button
The Stage Announce (STAGE) button has no functionality when a BeltStation is
operating with a MasterBelt.
3- MENU Button
Pressing MENU while the BeltStation is in Operational mode will select Menu Mode, and the Main Menu screen will be displayed. Once in Menu
Mode, pressing MENU again will act as an escape key and will back out of the current menu screen moving the user up one level. Pressing the
MENU button while at the Main Menu screen will exit Menu Mode and return to Operational mode. The menu can be locked via a “Menu Lock”
feature per BeltStation.
4- ENTER Button
The ENTER button operates differently depending on the mode of the BeltStation. In Menu Mode, pressing the ENTER button selects the current
menu option and is the same as pressing a Volume control. A menu item is not selected until the ENTER button (or Volume control) is pressed.
The ENTER button can also activate Wireless ISO (wireless talk around), providing wireless communication isolated from any connected wired
intercom system.
5- LCD
While in Operational Mode, the LCD displays the status of the BeltStation including the name of the
currently communicating MasterBelt, radio strength, battery level, and other data. The LCD backlight
and contrast can be adjusted from the LCD Adjustments menu screen under the LCD/LED section of
the BeltStation menu.
6- CALL Button
Operational Display
The CALL Button sends call signal to any wireless BeltStation on the same intercom channel. The Call signal will be routed to intercom channels
indicated by the user’s active Talk button(s).
Note: The TALK button must be enabled to send a call signal.
7
Tempest MasterBelt Operating Manual
1- Rubberized Access Cover
The Rubberized Access Cover helps prevent dust, dirt and liquid from entering the BeltStation through the USB or
the BeltStation pairing connector. Keep this cover securely closed at all times to ensure the best possible seal.
2- USB Mini B Connector
The USB Connector is used to charge the BeltStation with the supplied wall charger. In addition, the USB connect
is used to update the firmware of the BeltStation.
3- Pairing Connector
The Pairing Connector is used to pair the MasterBelt to BeltStations using the supplied 3.5mm stereo mini
connector.
1- Belt Clip
The Belt Clip enables the BeltStation to be worn on the user’s belt or other clothing item.
2- Power ON/OFF Button
The Power ON/OFF button is used to turn the BeltStation ON or OFF. Press and hold the
Power ON/OFF button for two seconds to turn the BeltStation ON. Press for four seconds
to turn the BeltStation OFF.
3- Battery Compartment
The Battery Compartment holds either one Tempest Lithium-Polymer rechargeable
battery or (3) standard alkaline AA cells. To remove the battery door, press down on
the thumb markings and pull the battery door toward the bottom of the BeltStation.
To remove batteries from the battery compartment turn the BeltStation battery side
down and tap the bottom of the BeltStation on the palm of your other hand. Please be
careful to insert alkaline AA batteries according to the marked polarity. All of the alkaline
AA cells face the same direction. If the battery cover does not fit or close properly, the
battery may not be inserted correctly.
4- Headset Connector
The 4-pin XLR male headset connector mates with most Dynamic or Electret headsets that have 4-pin XLR female connectors. This Headset
connector allows a user to communicate in “Dual-listen” or “Single-listen” mode on either intercom channel.
The mic detect circuit (dynamic/electret) will indicate dynamic when it sees a load of 600Ω or less. It will indicate an electret when it sees 1kΩ or
greater. Between 600Ω and 1kΩ is not recommended as it may not accurately detect mic type.
8
Tempest MasterBelt Operating Manual
Talk Button A and B
There are two TALK buttons on each BeltStation, one for channel A and the other
for channel B. The Talk button enables the microphone signal for the assigned
intercom channels.
Tempest uses an intelligent latching method for TALK buttons. Pressing the TALK
button momentarily will cause the TALK button to latch. Pressing and holding the
TALK button will cause the button to act as a momentary switch.
Talk tones can be enabled or disabled per BeltStation. If enabled, users will here a
tone each time the TALK button is pressed.
Channel Indicator LEDs A and B
Each Talk button has two individual LED indicators. Together they surround the Talk
button. The LEDs will flash blue to indicate which intercom channel, A or B, has been
selected and will illuminate continuously to indicate that “Talk” is enabled on that
channel.
The Channel Indicator LEDs will flash red when the microphone signal is reaching a peak level and is entering into limiting.
BeltStation Display Overview
1. RSS Indicator - indicates the Radio Signal Strength of the BeltStation’s
internal radio.
2. Battery Alert - indicates that the battery alert is enabled or disabled
(shown as enabled).
2
3
4
1
3. Battery Status - visual indicator of battery level.
5
4. Battery Time - the operational time remaining on the battery.
6
5. MasterBelt Name - the name assigned to the MasterBelt.
6. BeltStation Name - the name assigned to the BeltStation.
7. Channel Indicators - available channels and active channel shown with
surrounding box.
8
7
8. Talk Status - TALK is displayed when latched/pressed.
9
Tempest MasterBelt Operating Manual
MasterBelt Setup
Selecting MasterBelt Location
Antenna Pattern
The Tempest MasterBelt and BeltStation have the same internal patch antenna located at the top-end
of the unit. It is important to understand the antenna propagation when determining the location
of the MasterBelt during operation. The MasterBelt and BeltStation antenna is a linear polarized
omnidirectional antenna. However, due to its positioning at the top of the BeltStation, the antenna is
attenuated at its bottom, thus creating a directional pattern.
Fixed Location
Despite having no external antenna, the Tempest
MasterBelt can be used in the same manner as traditional
Tempest BaseStations. However, there could be an impact
on the system’s range depending on the chosen location
and orientation.
MasterBelt
BeltStations
When determining a location to place the MasterBelt,
use the same approach used with Tempest BaseStations
and/or Remote Transceivers. Be sure that line-of-sight
from MasterBelt to standard BeltStations is maintained
for optimal performance. Any obstructions can cause the
RF signal to become attenuated and diminish range and
performance.
Mobile Operation
When using the MasterBelt in a mobile application, system range will be less due to body shielding.
BeltStations
MasterBelt
10
Tempest MasterBelt Operating Manual
Battery Charging and Installation
With the Lithium-Polymer batteries installed in the battery compartment, plug the AC end of the supplied
5VDC Charger/Power Supply into a standard AC wall outlet. Open the rubberized access cover on the side of
the MasterBelt or BeltStation and plug the USB end of the Charger/Power Supply into the USB connector. The
Lithium-Polymer batteries will take approximately 2¾ hours to charge from completely empty to completely
full. This time is the same with the unit turned ON or OFF. A new, fully charged battery should power a Tempest
MasterBelt or BeltStation for approximately nine hours. Fast charging with the supplied fast charger requires a
temperature range of 32° – 113° F.
Batteries can receive more than 500 charge cycles, and continue to maintain more than 70% of their power
rating. The Tempest battery indicator will maintain its accuracy as battery life decreases.
Alternatively, remove the Lithium-Polymer rechargeable battery from the unit
and insert it into the optional 5-Bay Battery Charger. The Lithium-Polymer
batteries will take approximately 2½ hours to charge from completely empty to
completely full. See the battery charger manual for additional details.
The Tempest MasterBelt and BeltStation Battery Compartment holds either one Tempest Lithium-Polymer
rechargeable battery or three standard alkaline AA cells. Lithium-Polymer batteries are the primary power source.
High quality alkaline AA cells may be used in situations where Lithium-Polymer batteries are not available or
are not charged. One Lithium-Polymer battery comes standard with each Tempest MasterBelt or BeltStation.
Additional Lithium-Polymer batteries may be purchased. Contact your dealer or distributor to purchase
additional batteries. The Lithium-Polymer batteries supplied with your Tempest Wireless system are warranted for 90 days from the date of
purchase.
Lithium-Polymer batteries offer 7+ hours of battery life in a MasterBelt and up to 9 hours of battery life in a BeltStation. The batteries recharge
in approximately 2¾ hours.
Lithium-Polymer batteries ship from the factory with approximately 50% charge. It will not damage the Lithium-Polymer batteries to use them
without charging them first. This will, however result in shorter run time until the Lithium-Polymer battery is fully charged. When possible, charge
Lithium-Polymer batteries to full capacity to ensure full battery life prior to use.
Using (3) alkaline AA batteries can provide up to four hours of battery life. Use only high quality alkaline AA cells. This will provide enough time
to fully charge the Lithium-Polymer battery.
To remove the battery door, press down on the thumb markings and pull the battery door toward the bottom of the unit.
To remove batteries from the battery compartment, turn the MasterBelt battery side down and tap the bottom of the unit on the palm of your
other hand.
Please be careful to insert alkaline AA batteries according to the marked polarity. All of the alkaline AA cells must be oriented the same
direction. If the battery cover does not close properly, the battery may not be inserted correctly.
11
Tempest MasterBelt Operating Manual
MasterBelt Power ON/OFF
•
The Power ON/OFF button is used to turn the MasterBelt ON or OFF.
2 sec
POWER ON
•
Press and hold the Power ON/OFF button for two seconds to turn the MasterBelt
ON.
•
Press and hold for four seconds to turn the MasterBelt OFF.
Selecting a Frequency Band
The Tempest MasterBelt 2.4GHz model is approved for license-free use in most countries.
However, due to differences in radio spectrum regulations, a few countries require that 2.4GHz equipment limit or adjust its RF spectrum
operation. Always determine if there are country specific frequency restrictions that apply and select the required frequency band as described
below. Tempest performs RF frequency adjustment automatically when you select the appropriate frequency band from the “Tech Menu.” It is
only necessary to use this feature if you use Tempest in one of the countries with special frequency requirements. Otherwise, Band 1 should be
used for maximum RF performance.
If the Tempest Wireless system is transported to a country with special requirements, navigate to the Radio Configuration screen in the “Tech
Menu” to select the appropriate frequency band from the “Set Band” menu screen of the MasterBelt.
After changing the frequency band selection it is necessary to “pair” each BeltStation with the MasterBelt so the information can be transmitted
from the MasterBelt to the BeltStation. See the “Pairing BeltStations with MasterBelt” section of this manual for more information on pairing.
MHz
12
MHz
Avoid 802.11 b/g
Band
Start
End
Width
1
2400
2480
80
None
2
2400
2450
50
11
3
2423
2473
50
1
4
2431
2480
49
1, 2,
5
2400
2428
28
7, 8, 9, 10, 11
6
2423
2450
27
1, 11
7
2453
2480
27
1, 2, 3, 4, 5, 6, 7
Tempest MasterBelt Operating Manual
Set Network Number and Lockout Key
The Network Number determines the frequency hopping pattern for the MasterBelt and its respective BeltStations. This is a key operational
parameter and is represented by a number between 0 and 63.
Using different configurations or systems in close proximity can cause interference and diminish performance. Multiple MasterBelt configurations
within the same proximity should maintain a respectable distance from one another and always utilize different network numbers.
The Lockout Key prevents systems with the same Network Number from trying to communicate with each other and is represented by a number
between 0 and 255. Together, the Network Number and Lockout Key represent more than 16,000 possible combinations to minimize the
possibility of inter-system interference.
The Network Numbers and Lockout Keys for Tempest Wireless are set to factory defaults before leaving the factory. Always adjust the Network
Number and Lockout Key of any Tempest Wireless that are known to operate in close proximity to one another as described below. Users should
confirm these settings to minimize the opportunity for improper performance issues.
Failure to set a unique Network Number and Lockout Key may result in poor system performance caused by interference from another Tempest
Wireless system using the same Network Number and Lockout Key. Tempest BeltStations received their Network Number and Lockout Key’s
from their respective MasterBelt, therefore it is not possible to manipulate Network Numbers and Lockout Keys to gain unauthorized access to a
communication channel.
13
Tempest MasterBelt Operating Manual
Pairing BeltStations to MasterBelt
Pair BeltStation to MasterBelt:
Confirm that the MasterBelt is powered ON and in Operational Mode (not in Menu Mode) and that
the BeltStation is powered OFF. Confirm that the MasterBelt’s Network Number and Lockout Key are
adjusted as needed. See the section on Set Network Number and Lockout Key.
Plug one end of the pairing cable into the MasterBelt and the other end into the BeltStation.
The pairing cable is a standard 3.5mm
(1/8 in.) Male to Male stereo patch cord.
Turn the BeltStation power ON by pressing and holding the BeltStation Power ON/OFF button for two seconds. The pairing process will begin
automatically. Watch for the message “Pairing Complete” to appear briefly on the BeltStation display. The BeltStation will automatically reinitialize.
Name MasterBelt
Name the MasterBelt with a descriptive name. The MasterBelt name can include up to 14 characters. Prior to a name being assigned, a
hexadecimal serial number is displayed as a default.
The MasterBelt name will appear on the LCD Display, on the BeltStation LCD display, and in the BeltStation’s menu under “Select Base.”
To name each MasterBelt:
1. On the MasterBelt press MENU and select “Belt Settings,” then “Name BeltStation.”
2. Rotate the Volume control to move the underscore “_” to select the character to be changed.
3. Press ENT and notice the underscore changes to a pointer “^” under the selected character.
4. Rotate the Volume control to scroll through the character list. Press ENT to select the new character. Characters always replace and never
insert. Repeat as needed.
5. Press ENT to save the new name after all characters are complete. Failure to press ENT to save will clear all changes.
6. Press MENU to escape to the Operation Mode screen.
Naming the BeltStation works the same as naming the MasterBelt.
14
Tempest MasterBelt Operating Manual
Configure BeltStation Settings
Name BeltStations
Naming BeltStations is the same as naming a MasterBelt. See the “Name MasterBelt” for more information on naming BeltStations.
Adjust Mic Gain
Set the Mic Gain properly to ensure the best audio quality. To set the Mic Gain for the BeltStation Headset:
1. Press MENU to enter Menu Mode. From the Main Menu, select “Set Controls,” then “Mic Gain.”
2. While at the Mic Gain screen, talk into the headset microphone at a louder than normal level and adjust the Volume control until the PEAK
LEDs just start to light at the loudest parts of the audio. Press ENT to accept the changes.
Mic Gain can be set in the BeltStation without activating the Talk button. This allows private mic gain adjustment during live events.
When the Mic Gain is set too high, it is possible to induce feedback or echo. When set too low, words can be clipped by the low level noise gate
or sound too quiet to other listeners. Headsets by different manufacturers or different models of headsets will require widely varying Mic Gain
settings. When setting microphone gain, it is best to err toward a setting that is too low, rather than too high. This will help reduce unwanted
echo in the system when that microphone is enabled.
Adjust Sidetone
1. Press MENU to enter Menu Mode. From the Main Menu, select “Set Controls,” then “Mic Gain.”
2. Rotate the Volume knob and scroll to “Belt Settings” on the display.
3. Press ENT.
4. Scroll to “Sidetone” and press ENT (or the Volume knob) to select.
Sidetone value is expressed in Decibels (dB). You will see a level indicator with a numeric value between -30 dB to -6 dB. Speak into the
headset microphone at a typical speaking level and adjust the sound of your own voice in your headset. Pay close attention to the TALK button
LED when speaking into the mic. The LED will light red when clipping is occurring. Once you’ve determined a proper level, press ENT to accept
the changes.
Press MENU to move up one level in the menu tree. Press MENU repeatedly to exit Menu Mode and return to Operational Mode. If no other
items are selected, Menu Mode automatically exits and returns to Operational Mode after about three minutes.
Adjust BeltStation Slot
The MasterBelt Slot Assignment only affects the order that the MasterBelt Operational screen displays the BeltStation information when the
MasterBelt is in the Static display mode. If the MasterBelt is routinely used as a communication port or for monitoring BeltStations, it may be
more convenient to always have the same user appear in the same position on the MasterBelt display. This is a personal preference setting.
In the MasterBelt “Tech Menu,” choose Static or Dynamic from the “Slot Assignment” screen. Dynamic, the default, will work without any
adjustment, and always displays BeltStations in alpha-numeric order by name.
Static will be the preferred choice for users who are using only one MasterBelt and want to ensure that a BeltStation that is logged in will
always appear in the same location (slot) on the MasterBelt display. When selecting Static slot assignments, you must also enter the Tech Menu
for each BeltStation and assign each BeltStation a different slot (1 – 5).
15
Tempest MasterBelt Operating Manual
The MasterBelt default is for Dynamic Slot Assignment. This means that when BeltStations log in to a MasterBelt, the information about the
BeltStations is displayed on the MasterBelt LCD screen in alpha-numeric order according to the name of the BeltStation. For example, “Dir”
appears before “Light1,” which appears before “StgMgr,” but they can change slots depending on which BeltStations are turned ON. If the
default settings are used, nothing is necessary.
Adjusting so that each BeltStation always appears in the same position of the MasterBelt display is a two step process:
1. Advance to the MasterBelt’s “Slot Assignment” section of the “Tech Menu” and select Static.
2. In each BeltStation, advance to the “Base Slot” section of the “Tech Menu” and adjust each BeltStation to a different slot (1 – 5). The
BeltStation designated to slot 1 will always appear on the far left of the MasterBelt display, with slot 2 appearing in the next position to the
right, and so on.
In Static Mode, if a BeltStation is not turned ON, or is logged out due to being out of range, the MasterBelt LCD display will not have a shadow box around the respective slot number.
A Multiple MasterBelt system that uses iSelect Roaming must choose to use “Dynamic” slots to ensure that BeltStations can move from
MasterBelt to MasterBelt when roaming.
Additional Settings and Features
Below are additional MasterBelt and BeltStation settings that can be set based on individual preferences. None of these adjustments are
required and some features are limited to either the MasterBelt or BeltStation:
•
Select Base - BeltStations can be paired with up to 64 MasterBelts (or BaseStations); Press MENU, select “Select Base” and choose
the to enable that BeltStation to access a respective MasterBelt or BaseStation.
•
Lock Keys - To prevent inadvertent changes. Press MENU, select “Lock Keys” to access lock options. Default setting is unlocked.
•
Menu Lock - Allows you to lock individual users out of their respective BeltStation menu entirely. Access can only be regained by
entering a 3-digit security key code (which is initially set at the MasterBelt) on each BeltStation. Default key code setting is 000 and
menu lock is disabled.
•
To set key code at MasterBelt - Press MENU, select Belt Settings>Tech Menu>Belt Key; use volume knob to scroll and set a key
code. Press ENT to save.
•
To enable “Menu Lock” at BeltStation - Press MENU, select Lock Keys>Menu Lock.
•
Battery Alert - Enable or disable the audible “Battery Alert” tone in the headset; Press MENU, select “Battery” and Enable or Disable.
Default setting is Enable.
•
LCD/LED - Dim the LCD and LEDs to be less conspicuous in a dark environment.
•
To enable or disable “LCD Light”: Press MENU, select LCD/LED>LCD Light.
•
To adjust the LED brightness: Press MENU, select LCD/LED>Talk LEDs and select either High/Med/Low/Off.
•
Talk Buttons - Set the TALK buttons to operate in Latch or Momentary mode or Disable them completely. Press MENU, select Set
Controls>Talk Buttons>Talk # and select either Latch/Momentary/Disable. Default setting is Latch.
•
Channel (CH) Select - Determine which channels are accessible and audible per MasterBelt or BeltStation. Unit must be set to access
at least one channel. Press MENU, select Set Controls>Ch Select and choose from the channel configurations available. Default setting
is access to all channels.
•
Mic Gain - Refer to the section “Adjust Mic Gain” in this manual.
•
Sidetone - Refer to the section “Adjust Sidetone” in this manual.
16
Tempest MasterBelt Operating Manual
•
Volume Limit - A minimum and maximum volume level can be set per MasterBelt or BeltStation. In loud environments a higher
minimum volume may be desirable, while in quiet environments a lower maximum volume may be preferable. Default setting is OFF for
both Min Volume and Max Volume.
•
To set a minimum volume: Press MENU, select Set Controls>Volume Limit>Min Volume and use the volume knob to adjust to the
desired level. Press ENT to save.
•
To set a maximum volume: Press MENU, select Set Controls>Volume Limit>Max Volume and use the volume knob to adjust to the
desired level. Press ENT to save.
•
Stage Announce - The Stage Announce functionality is not applicable when using BeltStations in a MasterBelt application.
•
Call Alert - A call alert can be used to send an audible or vibrating signal to other users’ BeltStations on the same channel. A call
signal is only sent when the originator’s TALK button is active. Press MENU, select Set Controls>Call Alert and choose either Audible,
Vibrate, Both or Disable. Default setting is Both.
•
Call Button - The CALL button is used to trigger call alerts. Press MENU, select Set Controls>Call Button and Enable or Disable the
button. Default setting is Enable.
•
Select Relay - The relay functionality is not applicable when using BeltStations in a MasterBelt application.
•
Relay Button - The relay functionality is not applicable when using BeltStations in a MasterBelt application.
•
Wireless ISO - This functionality is not applicable when using BeltStations in a MasterBelt application.
•
Volume Press - The volume controls can be set to “Volume Press” which requires a “press and turn” action to adjust the volume
levels. This helps prevent inadvertent adjustments. Press MENU, select Set Controls>Volume Press and Enable or Disable this feature.
Default setting is Disable.
•
Talk Tones - This is an audible tone that can be heard in the headset when the TALK button is pressed. Press MENU, select Set
Controls>Talk Tones and Enable or Disable this option. Default setting is Enable.
•
Delay Switch - When enabled this requires the channel knobs to be pressed and held slightly longer in order to change channels.
This helps prevent inadvertent adjustments. Press MENU, select Set Controls>Delay Switch and Enable or Disable this option. Default
setting is Disable.
17
Tempest MasterBelt Operating Manual
Modes of Operation
Tempest MasterBelts offer three modes of operation: Normal, Shared, and Split Mode. The mode of operation can be set by going into menu
mode on the MasterBelt. Press MENU, select Mode Settings>OP Mode and choose from one of the three modes.
Note: In addition to the MasterBelt, the BeltStations must be in “Shared” mode to use with either Shared or Split modes
of operation.
Normal Mode
In Normal mode, users can have up to 5 BeltStations (per MasterBelt). All
BeltStations in this mode are in the standard operating mode, giving the user control
of the channels on which they operate and dual listen/talk functionality at any given
time.
•
Each BeltStation has dedicated anytime talk back capability.
•
BeltStation talk buttons may be operated in either momentary or latching
mode.
•
Sidetone may be set individually for each BeltStation from -6dB to -30dB.
•
Full BeltStation telemetry is available real-time at the MasterBelt; these
settings cannot be adjusted from the MasterBelt.
Shared Mode
The Shared mode utilizes only BeltStations set into “shared” mode via the BeltStation menu. This mode allows an unlimited number of
BeltStations to listen, but only 5 shared BeltStations can talk (in momentary mode) at any given time; however, they can control the channels in
which they operate.
•
BeltStations are inherently full duplex, push-to-talk (talk/listen at the same
time); “Shared BeltStations” are physically no different than a normal
BeltStation.
•
Shared BeltStations operate in momentary talk mode; no more than 5 talk
paths may be used at any given time.
•
Shared BeltStations are unable to provide telemetry to the MasterBelt.
•
Volume of the BeltStation that is actively talking is dynamically reduced to
minimize the effect of echo.
18
Tempest MasterBelt Operating Manual
Split Mode
In Split mode, some users are operating in Normal and some in Shared mode. This mode
offers the use of 4 BeltStations (per MasterBelt) that utilize the standard anytime talk back
capability and allows an unlimited number of “shared” BeltStations to listen and talk on
the final slot. In this mode, shared BeltStations have no control over which channel they
operate on. The channel is designated at the MasterBelt.
•
Unlimited number of (shared) BeltStations may be used in addition to the 4
BeltStations operating in Normal mode; BeltStations are inherently full duplex
(talk/listen at the same time, push-to-talk) and are physically no different than a
BeltStation operating in Normal mode.
•
Shared BeltStations operate in momentary talk mode; only one shared BeltStation
may utilize the talk function at any given time.
•
Shared BeltStations are unable to provide telemetry to the MasterBelt. Volume
of the BeltStation that is actively talking is dynamically reduced to minimize the
effect of echo.
Feature or Function
Normal
Split Mode
Shared Mode
Number of Fully-Registered BeltStations (FRB)*
up to 5
up to 4
None
Number of shared belts
None
Unlimited
Unlimited
1 per belt
1 per Belt FRB / 1 for all shared
5 for all Belts
Number of talk-back paths
Full-duplex audio
Yes
Yes
Yes
Talk button may be set to latch
Yes
Yes FRB / No shared
No
Channel selectable at BeltStation
Yes
Yes FRB / No shared
Yes
Dual listen/talk
Yes
Yes FRB / No shared
Yes
Locally generated sidetone in BeltStation
Yes
Yes FRB / No shared
No
Individual sidetone adjust per BeltStation
Yes
Yes FRB / No shared
No
BeltStation sidetone heard via return audio
No
No FRB / Optional shared
Optional
Dip in BeltStation listen level when talking
No
No FRB / Yes shared
Yes
BeltStation LCD shows MasterBelt name
Yes
Yes
Yes
BeltStation LCD shows RF signal strength
Yes
Yes
Yes
Receive call
Yes
Yes
Yes
Initiate Call
Yes
Yes FRB / Yes shared, uses talk-back
Yes, uses 1 talk-back per
Telemetry info from BeltStation on MasterBelt
Yes
Yes FRB
No
*Fully-Registered BeltStations (FRB) are BeltStations that operate in anytime talk back and listen functionality and offer full telemetry to and
from the MasterBelt.
19
Tempest MasterBelt Operating Manual
Radio Compliance
This unit has been tested and found to comply with the limits for a class A digital device, pursuant to part 15 of the FCC Rules. These limits are
designed to provide reasonable protection against harmful interference when the equipment is operated in a commercial environment. This
equipment generates, uses, and can radiate radio frequency energy and, if not installed and used in accordance with the instruction manual,
may cause harmful interference to radio communications. Operation of this equipment in a residential area is likely to cause harmful interference
in which case the user will be required to correct the interference at his own expense. Commensurate with EIRP limits specified in FCC Rules
15.247b, this device may not be used with antennas that exceed 9dB of gain in multi-point applications.
Contains Transmitter Module FCCID: HSW-2492
Important FCC and Safety Information
I. Digital Device Statement
A. .Tempest BaseStations and wireless BeltStations have been tested and found to comply with the limits for Class B digital devices, pursuant to Part 15 of the
Rules and Regulations of the U.S. Federal Communications Commission (the FCC) . Tempest products are marketed as Class A digital devices. These limits are
designed to provide reasonable protection against harmful interference when the equipment is operated in a commercial environment.
B. .This equipment generates, uses, and can radiate radio-frequency energy. If not installed and used in accordance with all instructions, it may cause harmful
interference to radio communications.
C. .Operation of this equipment in a residential area is likely to cause harmful interference, in which case the user will be required to correct the interference at
his own expense.
II. Intentional Radiator Statement
A. .Tempest BaseStations and wireless BeltStations each employ a modular, low-power radio transceiver module that operates pursuant to Part 15 of the FCC’s
Rules. The module’s FCC Identifier is HSW-2492
B. Operation is subject to the following conditions:
1. A Tempest system may not cause harmful interference to other users of the radio spectrum.
2. Upon notification by a representative of the FCC that a Tempest system is causing harmful interference, use of the
system must be suspended. Operation must not resume until the condition causing the harmful interference has been corrected
3. A Tempest system must accept any interference received, including interference that may cause undesired operation.
C. .Tempest Wireless BeltStations contain an internal antenna that is not user replaceable Tempest BaseStations must be used only with approved antennas
either the standard 4” Rubber Whip Antenna supplied with every Tempest BaseStations, with the 9bBi Directional Corner Reflector Antenna that is available as
an option or another approved antenna. Use of any non-approved antenna, or any modification to any part of a Tempest unit, violates the Tempest System’s
warranty, and also constitutes a violation of the FCC’s Rules and Regulations and of § 302 of the Communications Act of 1934, as amended.
D..To reduce potential radio interference to other users, the antenna type and its gain should be so chosen that the equivalent isotropically radiated power
(e.i.r.p.) is not more than that permitted for successful communication.
III. RF-Exposure Statement
A..The FCC has adopted limits on the exposure to radio-frequency energy from devices such as the Tempest system. The FCC adopted these limits by drawing
upon the efforts of independent scientific organizations that have engaged in periodic evaluations of the scientific literature. The FCC’s standards are intended
to assure the safety of all persons, regardless of age or health.
B. .Tempest has been designed and manufactured to comply with the FCC’s exposure limits. When used with approved antennas, and when used in accordance with all instructions, the Tempest system complies with those exposure limits.
20
Tempest MasterBelt Operating Manual
C. .Tempest BeltStations have been designed to be worn and used in close proximity to the human body, what the FCC calls a “portable” use. The BeltStation
unit complies with FCC exposure limits for portable use.
D..To ensure compliance with FCC exposure limits, no person must come closer than 26 cm (ten inches) from either the standard 4” Rubber Whip Antenna, the
optional Directional Corner Reflector Antenna, or other approved antenna whichever is used with the Tempest BaseStation.
Additional Compliance and Safety Information
I. Canada, Industry Canada (IC) Notices
A. Class B digital circuitry of this device complies with Canadian ICES-003.
B. This device complies with Industry Canada license-exempt RSS standard(s). Operation is subject to the following two conditions: (1) this device may not
cause interference, and (2) this device must accept any interference, including interference that may cause undesired operation of the device.
C. Under Industry Canada regulations, the radio transmitter(s) in this device may only operate using an antenna of a type and maximum (or lesser) gain approved for the transmitter by Industry Canada. To reduce potential radio interference to other users, the antenna type and its gain should be so chosen that the
equivalent isotropically radiated power (e.i.r.p.) is not more than that necessary for successful communication.
Please check our website for the latest system specifications and certifications.
21
Tempest MasterBelt Operating Manual
Warranty Information
Limited Warranty
CoachComm, LLC products are warranted to be free from defects in materials and workmanship for a period of two years from the date of sale
to the end user.
The sole obligation of CoachComm, LLC during the warranty period is to provide, without charge, parts and labor necessary to remedy covered
defects appearing in products returned prepaid to CoachComm, LLC. This warranty does not cover any defect, malfunction, or failure caused
by circumstances beyond the control of CoachComm, LLC, including but not limited to unreasonable or negligent operation, abuse, accident,
failure to follow instructions in the Operating Manual, defective or improper associated equipment, attempts at modification and/or repair
not authorized by CoachComm, LLC, inbound shipping, and shipping damage. Products with their serial numbers removed or effaced are not
covered by this warranty.
This limited warranty is the sole and exclusive express warranty given with respect to CoachComm, LLC products. It is the responsibility of
the user to determine before purchase that this product is suitable for the user’s intended purpose. ANY AND ALL IMPLIED WARRANTIES,
INCLUDING THE IMPLIED WARRANTY OF MERCHANTABILITY, ARE LIMITED TO THE DURATION OF THIS EXPRESS LIMITED WARRANTY. NEITHER
COACHCOMM, LLC NOR ANY DEALER WHO SELLS TEMPEST WIRELESS PRODUCTS IS LIABLE FOR INCIDENTAL OR CONSEQUENTIAL DAMAGES
OF ANY KIND.
Parts Limited Warranty
Replacement parts for CoachComm, LLC products are warranted to be free from defects in materials and workmanship for 90 days from the
date of sale to the end user.
This warranty does not cover any defect, malfunction, or failure caused by circumstances beyond the control of CoachComm, LLC, including but
not limited to unreasonable or negligent operation, abuse, accident, failure to follow instructions in the Operating Manual, defective or improper
associated equipment, attempts at modification and/or repair not authorized by CoachComm, LLC, inbound shipping, and shipping damage. Any
damage done to a replacement part during its installation voids the warranty of the replacement part.
This limited warranty is the sole and exclusive express warranty given with respect to CoachComm, LLC products. It is the responsibility of
the user to determine before purchase that this product is suitable for the user’s intended purpose. ANY AND ALL IMPLIED WARRANTIES,
INCLUDING THE IMPLIED WARRANTY OF MERCHANTABILITY, ARE LIMITED TO THE DURATION OF THIS EXPRESS LIMITED WARRANTY. NEITHER
COACHCOMM, LLC NOR ANY DEALER WHO SELLS TEMPEST WIRELESS PRODUCTS IS LIABLE FOR INCIDENTAL OR CONSEQUENTIAL DAMAGES
OF ANY KIND.
22
Tempest MasterBelt Operating Manual
Technical Support
Information about CoachComm’s Technical Support and Repair Procedures is provided below.
Contacting Us
CoachComm, LLC support and service personnel are ready to help you with any issues you may have. All requests and questions should be
directed to our Customer Service department via phone, fax, or email. Additional product support documentation is available for reference at
tempestwireless.com/support.
Customer Service Department
CoachComm, LLC
Voice: 1.844.475.4268 or +1.334.321.1160
Fax: 1.844.475.0523 or +1.334.321.1162
Email: [email protected]
Sending Equipment for Repair
Do not send any equipment directly to the factory without first obtaining a Return Material Authorization (RMA) Number from a dealer or from
CoachComm. Obtaining an RMA Number will ensure that your equipment is handled promptly. In addition, CoachComm personnel will provide
a Service Request Form (SRF) for completion and return via email or fax.
All shipments of CoachComm products should be made via UPS, or the best available shipper, prepaid and insured. The equipment should be
shipped in the original packing carton; if that is not available, use any suitable container that is rigid and of adequate size to surround the
equipment with at least four inches of shock-absorbing material. All shipments should be sent to the following address and must include a
Return Material Authorization Number:
CoachComm, LLC Customer Service Department
Attn: Return Material Authorization #
205 Technology Parkway Auburn, AL 36830-0500
Product returns should follow this same procedure.
23
Tempest MasterBelt Operating Manual
MasterBelt Menu
24
Tempest MasterBelt Operating Manual
BeltStation Menu
Note: BeltStation relays and program volume are not available features when used with a MasterBelt.
25
CoachComm, LLC.
Tempest®
205 Technology Parkway
Auburn, AL 36830
www.tempestwireless.com
1.844.475.4268 or +1.334.321.1160
COPYRIGHT © 2015 CoachComm, LLC. All rights reserved. CoachComm® and the Tempest® logos are registered trademarks of CoachComm, LLC. Any and all other trademark
references within this document are property of their respective owners.