Download UC Voice Admin Guide
Transcript
AT&T Unified Communications Voice System Administration Portal Guide For Customer Administrators v1.2 – November, 2014 Disclaimer The contents of the document may be revised by AT&T at any time without notice. Please consult the Service Guide for details of the service and features available with the product available at http://serviceguidenew.att.com/. This document is provided as a reference document only and is not intended to modify the agreement between the parties. In the event of a conflict between this document and the Customer agreement, the Customer agreement takes priority. © 2014 AT&T Intellectual Property. All rights reserved. AT&T, the Globe logo, and all other marks contained herein are trademarks or service marks of AT&T Intellectual Property and/or AT&T affiliated companies. © 2014 AT&T Intellectual Property Published by: AT&T Intellectual Property Product: AT&T Unified Communications Voice Title: System Administration Portal Guide Product version: V9.2 Publication date: November, 2014 Reference number: <UCS><UCV><SAG><1114> Revision number: 1.2 © 2014 AT&T Intellectual Property. All rights reserved. AT&T, the Globe logo, and all other marks contained herein are trademarks or service marks of AT&T Intellectual Property and/or AT&T affiliated companies. ii Welcome This administrator’s guide for AT&T Unified Communications (UC) Voice discusses the System Administration portal and explains how to use it to perform tasks such as: • Manage phones, including registering phones and selecting which features can be used on a phone • Manage end users, including adding new end users and determining which, if any, features end users can customize on their phones • Manage calls, including call forwarding and Hunt groups There is a menu on the left side of the System Administration Portal pages. When a menu item is selected, a list of links displays. Each chapter in this manual explains the functionality that a specific menu item and its links offer. They are described in the same order that they are listed in the portal. To find instructions about a specific task, please check the index at the end of the manual. © 2014 AT&T Intellectual Property. All rights reserved. AT&T, the Globe logo, and all other marks contained herein are trademarks or service marks of AT&T Intellectual Property and/or AT&T affiliated companies. iii Table of Contents 1. Introduction .................................................................................................................................. 1 Levels of Service ................................................................................................................................ 1 Display Policies: Basic, Standard, and Advanced .............................................................................. 1 Levels of Administration: Location, Division, and Customer ............................................................ 2 2. The System Administration Portal.................................................................................................. 5 Signing into the System Administration Portal ................................................................................. 5 System Administration Portal Home Page ........................................................................................ 7 The Pages in the System Administration Portal................................................................................ 8 Quick Search ................................................................................................................................... 10 Menu Options ................................................................................................................................. 12 Changing Access Levels ................................................................................................................... 13 3. Setup Tools ................................................................................................................................. 14 Global Settings Link ......................................................................................................................... 14 Bulk Load Samples Link ................................................................................................................... 20 4. Resources ................................................................................................................................... 21 E164 Inventory Link......................................................................................................................... 21 Voicemail Services Link ................................................................................................................... 22 Auto Attendant Services Link .......................................................................................................... 25 Conference Services Link ................................................................................................................ 25 Phone Inventory Link ...................................................................................................................... 25 Contact Centre Service Link ............................................................................................................ 28 SMTP Server Link............................................................................................................................. 28 © 2014 AT&T Intellectual Property. All rights reserved. AT&T, the Globe logo, and all other marks contained herein are trademarks or service marks of AT&T Intellectual Property and/or AT&T affiliated companies. v 5. General Tools .............................................................................................................................. 29 Bulk Load Tools Link ........................................................................................................................ 29 Transactions Link............................................................................................................................. 29 Bulk Administration ........................................................................................................................ 32 6. General Administration ............................................................................................................... 33 Administration Users Link ............................................................................................................... 33 Adding an Administrator ........................................................................................................ 34 Changing Information about an Administrator...................................................................... 35 Changing the Password of an Administrator ......................................................................... 35 Deleting an Administrator ...................................................................................................... 35 CLI Groups Link................................................................................................................................ 41 Divisions Link ................................................................................................................................... 41 Adding or Deleting a Division ................................................................................................. 41 Viewing or Changing a Division .............................................................................................. 41 Locations Link.................................................................................................................................. 45 Adding or Deleting a Location ................................................................................................ 45 Viewing or Changing a Location ............................................................................................. 45 Feature Groups Link ........................................................................................................................ 53 Adding a Feature Group ......................................................................................................... 53 Viewing, Changing, and Deleting a Feature Group ................................................................ 53 Number Translation Link................................................................................................................. 64 Feature Configuration Templates Link............................................................................................ 64 End User Migration Link.................................................................................................................. 64 Moving End Users .................................................................................................................. 64 7. Location Administration .............................................................................................................. 68 Switchboards Link ........................................................................................................................... 69 Adding a Switchboard ............................................................................................................ 69 Viewing, Changing, or Deleting a Switchboard ...................................................................... 69 © 2014 AT&T Intellectual Property. All rights reserved. AT&T, the Globe logo, and all other marks contained herein are trademarks or service marks of AT&T Intellectual Property and/or AT&T affiliated companies. vi Telephony Link ................................................................................................................................ 73 Call Park Link .......................................................................................................................... 74 Directed Call Park Link ........................................................................................................... 77 Gateways Link ........................................................................................................................ 80 CTI Management Link ............................................................................................................ 81 Meet-Me Link ......................................................................................................................... 81 Auto Attendant Link ............................................................................................................... 85 Device Pool Link ..................................................................................................................... 87 Presence Monitoring Link ...................................................................................................... 90 Hunt Groups Link ............................................................................................................................ 93 Adding a Hunt Group ............................................................................................................. 93 Viewing, Modifying, and Deleting a Hunt Group ................................................................... 93 Number Groups Link ..................................................................................................................... 100 Adding a Number Group ...................................................................................................... 100 Viewing, Modifying, and Deleting a Number Group ............................................................ 100 Pickup Groups Link ........................................................................................................................ 105 Adding a Pickup Group ......................................................................................................... 105 Viewing, Modifying, and Deleting a Pickup Group .............................................................. 105 End Users Link ............................................................................................................................... 110 Adding a New End User........................................................................................................ 111 Deleting an End User ............................................................................................................ 111 Viewing or Changing End User Information ......................................................................... 117 Phone Inventory Link .................................................................................................................... 118 Phone Registration Link ................................................................................................................ 121 Registering a Telephone....................................................................................................... 121 Phone Management Link .............................................................................................................. 128 Viewing and Modifying Phone Details ................................................................................. 128 Manage Lines Command Button.......................................................................................... 138 Manage Speed Dials Command Button ............................................................................... 141 © 2014 AT&T Intellectual Property. All rights reserved. AT&T, the Globe logo, and all other marks contained herein are trademarks or service marks of AT&T Intellectual Property and/or AT&T affiliated companies. vii Manage Busy Lamp Fields Command Button ...................................................................... 144 Advanced Settings ................................................................................................................ 146 Analog Line Mgt. Link .................................................................................................................... 160 Internal Numbers Link................................................................................................................... 161 Adding and Deleting Extension Ranges................................................................................ 161 External Numbers Link .................................................................................................................. 164 Administration Tools Link ............................................................................................................. 166 8. My Account............................................................................................................................... 167 Account Settings Link .................................................................................................................... 167 Preferences Link ............................................................................................................................ 169 Change Password Link................................................................................................................... 170 Password Requirements ...................................................................................................... 170 9. Help Index ................................................................................................................................ 171 Index Tab....................................................................................................................................... 172 Glossary Tab .................................................................................................................................. 173 Search............................................................................................................................................ 173 Arrow Keys .................................................................................................................................... 173 More Information about the Help Page ....................................................................................... 173 10.About ....................................................................................................................................... 174 11.Logout ...................................................................................................................................... 175 12.The AT&T UC Voice Self-Care Portal ........................................................................................... 177 © 2014 AT&T Intellectual Property. All rights reserved. AT&T, the Globe logo, and all other marks contained herein are trademarks or service marks of AT&T Intellectual Property and/or AT&T affiliated companies. viii 1. Introduction AT&T Unified Communications (UC) Voice offers a rich set of features; however, some customers prefer to use subsets of these features instead of the entire package. Also, some customers may assign certain subsets to one group of end users while assigning more or different subsets to other groups of end users. To accommodate this, UC Voice allows administrators to assign each end user a level of service and a display policy. In addition, UC Voice allows customers to specify which portions of the telephone system that each administrator can view or modify. This is done by assigning a level of administration to each administrator. The level of service, display policy, and level of administration are described in this chapter. Levels of Service The level of service determines which telephone features are available to an end user. There are a number of levels of service, including: Essential, Fundamental, Basic, Standard, and Enhanced. The Essential level supports the fewest number of features and the Enhanced level supports the most. Display Policies: Basic, Standard, and Advanced The display policy assigned to an end user determines which features can be viewed and/or modified by the end user in the Self-Care portal. The Advanced display policy allows the end user to see and change the greatest number of features and the Basic display policy the fewest. The features that cannot be changed in the Self-Care portal by an end user because of the display policy can be changed by an administrator in the System Administration portal. For complete information about the Self-Care portal, see the manual titled Self-Care Portal Guide. © 2014 AT&T Intellectual Property. All rights reserved. AT&T, the Globe logo, and all other marks contained herein are trademarks or service marks of AT&T Intellectual Property and/or AT&T affiliated companies. 1 Chapter 1. Introduction Levels of Administration: Location, Division, and Customer There are three levels of administration (sometimes called levels of service management) that determine which parts of the UC Voice telephone system an administrator can monitor and/or change. The levels are: Location, Division, and Customer. The levels are described below and illustrated in Figure 1. Table 1 provides a sampling of the capabilities supported at each level of administration. • Location Level The Location level contains the smallest group of end users and is often referred to as the hands-on level. It is usually situated in a single geographic area, such as a building or a group of offices in a city, that an administrator or administration team can physically manage. If you are a Location administrator, then you can only view and change the information about the location you are assigned to. A Location administrator cannot access information about any other location or at the Division or Customer level. • Division Level A division is a group of locations. (A location can belong to only one division.) Usually, a division contains locations that are in the same geographic area, such as the same state, or in the same organization of a company. If you are a Division administrator, you can view and change information about the division you are assigned. You can also view and change the information for the locations that belong to your division. A Division administrator cannot access information about any other division, locations that belong to other divisions, or at the Customer level. • Customer Level This is the topmost view. Administrators at this level can see their entire UC Voice telephone system. Customer administrators can view and change all information at the customer, division, and location levels. Note that an administrator can access the information at his/her level or the level below it, but not the level above it. For example, a Division administrator can view the information in his/her division and in the locations assigned to that division, but not the information at the Customer level. Figure 1 is an example of a UC Voice system. In this example, an administrator at the Customer level can see information about all three of the divisions and their locations. An administrator for Division A can view information about Locations 1 and 2, but not information about Divisions B or C or about the locations within Divisions B or C. An administrator for Location 1 can only view information concerning Location 1, but not Locations 2 to 7. © 2014 AT&T Intellectual Property. All rights reserved. AT&T, the Globe logo, and all other marks contained herein are trademarks or service marks of AT&T Intellectual Property and/or AT&T affiliated companies. 2 Chapter 1. Introduction Customer XYZ Division B Division A Location 1 Location 2 Location 3 Location 4 Division C Location 5 Location 6 Location 7 Figure 1. Example of the three levels of administration Table 1. Example of Administrator Capabilities at Each Level of Administration Customer Administrator Division Administrator Location Administrator View all divisions View all locations View all locations within that division View phone Inventory for all divisions and locations View phone Inventory for available locations View phone Inventory within location View all phone information for all divisions and locations View all phone information for available locations View phone information within location View/Add/Modify users for all locations View/Add/Modify users for available locations View/Add/Modify users within location Register/Unregister phones in all locations Register/unregister phones in available locations Register/unregister phones within location Modify phone settings at all locations Modify phone settings at available locations Modify phone settings within location Manage Direct Dialing Inward (DDI) numbers for all locations Manage DDI numbers for available locations Manage DDI numbers within location View/Modify telephony setting for all locations View/Modify telephony setting for available locations View/Modify telephony within location View/Add music on hold tracks View/Add music on hold tracks View/Modify feature groups for all locations View/Add music on hold tracks © 2014 AT&T Intellectual Property. All rights reserved. AT&T, the Globe logo, and all other marks contained herein are trademarks or service marks of AT&T Intellectual Property and/or AT&T affiliated companies. 3 Chapter 1. Introduction Customer Administrator Division Administrator Location Administrator for available locations within location View/Add/Modify Hunt, Number, and Pickup groups for all locations View/Add/Modify Hunt, Number, and Pickup groups for available locations View/Add/Modify Hunt, Number, and Pickup groups within location View/Add/Modify division and location administrators View/Add/Modify location administrators for available locations © 2014 AT&T Intellectual Property. All rights reserved. AT&T, the Globe logo, and all other marks contained herein are trademarks or service marks of AT&T Intellectual Property and/or AT&T affiliated companies. 4 2. The System Administration Portal Signing into the System Administration Portal The internet address you should use to access the System Administration portal depends on where you are located and how you are accessing the portal: United States • Internet access https://ucvuadmin.uccentral.att.com • East Coast network connection https://wtmascp.uccentral.att.com • Midwest network connection https://altxscp.uccentral.att.com Europe • Internet access https://ucvams.uccentral.att.com • Network connection https://amsscp.uccentral.att.com Asia • Internet access https://ucvsin.uccentral.att.com • Network connection https://singscp.uccentral.att.com Before you can begin using the portal, you must login. Follow these steps to log into the System Administration portal. 1. Go to the internet address of the portal. The window shown in Figure 2 displays. 2. Click on the System Administration link. The Login window displays, as shown in Figure 3. 3. Enter your username and password. If this is a new system, AT&T will provide these to you. 4. Select the Login button in the window or press the Enter key on your PC’s keyboard. The System Administration Portal’s home page, shown in Figure 4, displays. The first time you log in, you may be asked to change your password. Follow the instructions on the page. © 2014 AT&T Intellectual Property. All rights reserved. AT&T, the Globe logo, and all other marks contained herein are trademarks or service marks of AT&T Intellectual Property and/or AT&T affiliated companies. 5 Chapter 2. The System Administration Portal © 2014. AT&T Intellectual Property. All rights reserved. Figure 2. Accessing the System Administration portal © 2014. AT&T Intellectual Property. All rights reserved. Figure 3. Login window © 2014 AT&T Intellectual Property. All rights reserved. AT&T, the Globe logo, and all other marks contained herein are trademarks or service marks of AT&T Intellectual Property and/or AT&T affiliated companies. 6 Chapter 2. The System Administration Portal System Administration Portal Home Page After you login, you will see the System Administration Portal home page shown in Figure 4. The menu items listed in the left column of this page provide links to information you may be able to view and modify, depending on your level of administration. The menu items are briefly described in Table 2 and are described in detail throughout the rest of this manual. © 2014. AT&T Intellectual Property. All rights reserved. Figure 4. System Administration Portal home page Table 2. Menu items Link Description Setup Tools Allows administrators to view and change settings that affect the entire UC Voice system (customer, division, and location levels as well as end user information). The information administrators can access depends on their level of administration. Resources Allows administrators to view information about the various services available in the UC Voice system General Tools Allows administrators to see the configuration changes (transactions) made by administrators and end users. These changes can be: in progress, completed, or failed. The information administrators can access depends on their level of administration. General Administration Allows administrators to view and change information about the divisions and locations they have access to Location Allows administrators to view and change information about the locations © 2014 AT&T Intellectual Property. All rights reserved. AT&T, the Globe logo, and all other marks contained herein are trademarks or service marks of AT&T Intellectual Property and/or AT&T affiliated companies. 7 Chapter 2. The System Administration Portal Link Description Administration and end users they have access to My Account Allows administrators to view and change their information in the Corporate directory, such as their names and email addresses. It also allows administrators to change the time zone and day/time format for themselves and their end users. Help Index Provides descriptions and other information About Lists which software version of UC Voice and the System Administration portal is being used Logout Exits the administrator from the System Administration portal The Pages in the System Administration Portal Each page in the System Administration portal is unique; however, the information at the top of each page is the same. Figure 5 is an example of the top portion of a page. Table 3 describes the information. © 2014. AT&T Intellectual Property. All rights reserved. Figure 5. Example of the top of a page © 2014 AT&T Intellectual Property. All rights reserved. AT&T, the Globe logo, and all other marks contained herein are trademarks or service marks of AT&T Intellectual Property and/or AT&T affiliated companies. 8 Chapter 2. The System Administration Portal Table 3. Information Located at the Top of Each Page Element Description Help link Selecting this link opens a Help page. The Help function is described in the Help Index chapter. Quick Search link Selecting this link causes the Quick Search page to display (see Figure 6) Title of Page The title of the page. In this example it is “User Management.” Customer Your company’s name NOTE: Depending on your level of administration, the Division and Location names may also be shown. User Your name Role Your level of administration: Customer Administrator, Division Administrator, or Location Administrator Add button Allows you to add a new entry. For example, on the User Management page, it allows you to add a new user. On the Switchboard Management page, it allows you to add a new switchboard. Search by Use the drop-down menu to select the type of data to search. Each page has different options in its drop-down menu. Max results Use the drop-down menu to select the number of search results you want displayed. Search field Enter the item you want to search for. The search function is case sensitive. Also, the item must be spelled correctly. Search button Clicking on this causes the search to begin © 2014 AT&T Intellectual Property. All rights reserved. AT&T, the Globe logo, and all other marks contained herein are trademarks or service marks of AT&T Intellectual Property and/or AT&T affiliated companies. 9 Chapter 2. The System Administration Portal Quick Search In the top right corner of each page is the Quick Search link. Selecting it opens the page shown in Figure 6. Table 4 discusses the search functions. © 2014. AT&T Intellectual Property. All rights reserved. Figure 6. Quick Search page Table 4. Parameters in the Quick Search page Search Parameter Description Search For Use the drop-down menu to select what you would like to search for. The items in the drop-down menu are described below. Search Description Location Searches Location Find a location by entering its name Location with Site Code Find a location by entering the site code Location of User Find a location by entering a user account name, which is the username for logging into the Self-Care portal Location of Phone Find a location by entering the device name of a phone, which is the MAC (Medium Access Control) address of the phone Extension Searches Extension Find an extension by entering its number Extension associated with DDI Find an extension by entering the external line to which it is registered Extension used by Analog Find an extension assigned to the analog gateway by entering its © 2014 AT&T Intellectual Property. All rights reserved. AT&T, the Globe logo, and all other marks contained herein are trademarks or service marks of AT&T Intellectual Property and/or AT&T affiliated companies. 10 Chapter 2. The System Administration Portal Search Parameter Description Gateway SRST (Survivable Remote Site Telephony) address for the location Extension used by User Find an extension by entering the username of its associated user Extension used by Phone Find an extension by entering the device name of the phone, which is the MAC address of the phone Phone Searches Phone with Device Name Find a phone by entering the device name of the phone, which is the MAC address of the phone Phone with Extension Find a phone by entering the associated extension Phone with DDI Find a phone by entering the external line number of the phone Phone with User Find a phone by entering its associated user account name, which is the username for logging into the Self-Care portal User Searches Username Find a user by entering the user name Last Name Find a user by entering the last name on the user account First Name Find a user by entering the first name on the user account User with Extension Find a user by entering the extension associated with the user User with Phone Find a user by entering the device name (MAC address) of the phone, which is registered to the user User with DDI Find a user by entering the external line number of the phone Search By Use the drop-down menu to select which part of the data to search: the beginning, ending, or all parts of the data. Page Size Use the drop-down menu to select the number of search results you want displayed. Search in Current Context? If this checkbox is selected, the only information that will be searched is the information related to the page you are currently viewing. Search field Enter the item you want to search for. The search function is case sensitive. Also, the item must be spelled correctly. Search button Clicking on this causes the search to be performed. © 2014 AT&T Intellectual Property. All rights reserved. AT&T, the Globe logo, and all other marks contained herein are trademarks or service marks of AT&T Intellectual Property and/or AT&T affiliated companies. 11 Chapter 2. The System Administration Portal Menu Options When you log into the System Administration portal, the level of administration (customer, division, or location) assigned to you determines which parameters you can see and change. It also determines the Menu options available to you, since administrators at different levels of administration need to perform different tasks. For example, Figure 7 shows the links available under General Administration for each level of administration. © 2014. AT&T Intellectual Property. All rights reserved. Customer level Division level Location level Figure 7. The Menu options are different for each level of administration © 2014 AT&T Intellectual Property. All rights reserved. AT&T, the Globe logo, and all other marks contained herein are trademarks or service marks of AT&T Intellectual Property and/or AT&T affiliated companies. 12 Chapter 2. The System Administration Portal Changing Access Levels Depending on your level of administration, you may need to specify which division and/or location you wish to access before you can view or change the information in that division or location. For example, if you are a Division administrator and want to change information about one of the locations assigned to your division, you will need to specify the location you want access to. To access information about a location when you are a Customer administrator: 1. In the menu, select “General Administration.” The links available under General Administration display. 2. Select the Divisions link. The Divisions Management page displays. It lists all the divisions in your company. 3. Select the division that contains the location you want to access. 4. Go back to the links available under “General Administration” in the menu. Select the Locations link. The Location Management page displays. It lists all the locations in the division you selected in Step 3. 5. Select the location whose information you want to view or change. You can now view or change the information in that location. To access information about a location when you are a Division administrator: 1. In the menu, select “General Administration.” The links available under General Administration display. 2. Select the Locations link. The Location Management page displays. It lists all the locations in your division. 3. Select the location whose information you want to view or change. You can now view or change the information in that location. NOTE: The system will prompt you to select a division and/or location if you attempt to access information without first defining which division or location you need access to. This is done by displaying the Division Management page or the Location Management page instead of the page you had requested. © 2014 AT&T Intellectual Property. All rights reserved. AT&T, the Globe logo, and all other marks contained herein are trademarks or service marks of AT&T Intellectual Property and/or AT&T affiliated companies. 13 3. Setup Tools When Setup Tools is selected in the menu, two links display: Global Settings and Bulk Load Samples. See Figure 8. These links are described below. © 2014. AT&T Intellectual Property. All rights reserved. Figure 8. Setup Tools links Global Settings Link Use the Global Settings link to view and possibly change settings (preferences). Customer Level settings affect your company’s entire UC Voice system. Location Level settings only affect the selected location. There are no settings that are specific to divisions. You may be able to change settings if you have the appropriate Administration level. The settings you can see and change also depend on how your system is configured. When you select the Global Settings link, a page similar to Figure 9 displays. Table 5 describes the settings that may be available to Customer administrators. Table 6 describes the settings that may be available to Location administrators. © 2014 AT&T Intellectual Property. All rights reserved. AT&T, the Globe logo, and all other marks contained herein are trademarks or service marks of AT&T Intellectual Property and/or AT&T affiliated companies. 14 Chapter 3. Setup Tools © 2014. AT&T Intellectual Property. All rights reserved. Figure 9. Global Settings page © 2014 AT&T Intellectual Property. All rights reserved. AT&T, the Globe logo, and all other marks contained herein are trademarks or service marks of AT&T Intellectual Property and/or AT&T affiliated companies. 15 Chapter 3. Setup Tools © 2014. AT&T Intellectual Property. All rights reserved. Figure 9 (continued). Global Settings page Table 5. Customer Settings (preferences) and their descriptions Setting Description AllowCrossClusterLogin Enables the Extension Mobility (roaming) feature across locations. This allows end users to log onto any Internet Protocol (IP) telephone in your UC Voice system that has its Extension Mobility feature turned on, including phones at different locations, and that phone acts like the end user’s own phone. This includes displaying the same interface, including line numbers and Speed Dial numbers. AllowFreeTextPickupGroupPilotNumber For AT&T use only AllowRoamingMultiLogin Allows an end user to be logged into multiple IP phones at the same time through the Extension Mobility feature. © 2014 AT&T Intellectual Property. All rights reserved. AT&T, the Globe logo, and all other marks contained herein are trademarks or service marks of AT&T Intellectual Property and/or AT&T affiliated companies. 16 Chapter 3. Setup Tools However, all phones must be in the same location. NOTE: An end user will remained logged in until he/she logs out. There is no time limit. NOTE: Administrators can use the Administration Tools page (Figure 68) under the Location Administration menu item to logout an end user who is currently logged into the Extension Mobility feature. AllowSelfCarePINResetNoPrevious Allows end users to change their Voicemail Personal Identification Number (PIN) without entering the current PIN. AutoFeatureCustomer Not available AutoLastResortFeatureCustomer Not available AutoMoveCustomer Not available AutoRegisterLowestCustomer Not available CustomerDefaultLoginPassword Causes the default passwords to be used when end user passwords are reset. NOTE: If both CustomerDefaultLoginPassword and the Location Level setting LocationDefaultLoginPassword (see Table 6) contain default passwords, then the password provided in LocationDefaultLoginPassword is used. NOTE: If both CustomerDefaultLoginPassword and LocationDefaultLoginPassword do not contain passwords, the administrator can enter any password when resetting the end user’s password. EnableUniquenessIndicator Not available EndUserNamesAllNumeric Specifies that all end user names must be numeric. NOTE: This setting can only be enabled if no end users currently on the system have alphanumeric usernames. ForceOldRoamingLogoff Not available HuntGroupCallFwdCOS Specifies which Class of Service (CoS) is used when calls are forwarded in Hunt groups. The options are: • • • • • • • • • Default CoS Internal CLIP Call Forward Internal Only Call Forward Intl Natl Mobl Call Forward Local Call Forward Natl Mob Call Forward Block All Call Forward CF-Internal Only C-Block All © 2014 AT&T Intellectual Property. All rights reserved. AT&T, the Globe logo, and all other marks contained herein are trademarks or service marks of AT&T Intellectual Property and/or AT&T affiliated companies. 17 Chapter 3. Setup Tools RoleLoginRequirePIN Not available ShowCorporateDir Allows the Corporate directory to display on the system’s telephones ShowCorporateDir-Unreg Allows the Corporate directory to display on unregistered telephones ShowPersonalDir Allows end users’ Personal directories to display on the telephones registered to them ShowSpeedDials Allows end users’ Speed Dial lists to display on the telephones registered to them UniqueEndUserEmailRequired Not available UseUserNameAsVMBoxNum Specifies that an end user’s extension number is also the end user’s mailbox number XML-CallForwardAll Allows end users to specify how to forward calls. They would do this in the Self-Care portal. XML-CallForwardBusy Allows end users to specify how to forward calls when a line is busy. They would do this in the Self-Care portal. XML-CallForwardNoAnswer Allows end users to specify how to forward a call if the call is not answered after a certain number of rings. They would do this in the Self-Care portal. XML-DirDisplayForLocalLocation Specifies which phone numbers display in the Corporate directory on end users’ phones. The options are: • • • • • • • • XML-DirDisplayForRemoteLocation Extension Number Intersite Number Local PSTN Number Local PSTN Number with Area Code Full PSTN Number Diallable Local PSTN Number Diallable Local PSTN Number with Area Code Diallable Full PSTN Number Specifies how phone numbers display in the Corporate directory for end users in a remote location (a location assigned to the same division but situated in a different area). The options are listed below. • • • • • • • • Extension Number Intersite Number Local PSTN Number Local PSTN Number with Area Code Full PSTN Number Diallable Local PSTN Number Diallable Local PSTN Number with Area Code Diallable Full PSTN Number © 2014 AT&T Intellectual Property. All rights reserved. AT&T, the Globe logo, and all other marks contained herein are trademarks or service marks of AT&T Intellectual Property and/or AT&T affiliated companies. 18 Chapter 3. Setup Tools XML-PhoneAutoRegistration Not available XML-PhoneBasedLanguageSelection Allows end users to specify which language to display on their telephones. They would do this in the Self-Care portal. XML-PhoneBasedProvisioning Not available XML-PhoneLastResort Not available XML-RoleLoginRegistration Not available XML-SetCallFwdPerLine Allows individual telephone lines to have Call Forward settings (instead of having all lines on a phone use the same settings) XML-SingleNumberReach Allows the Single Number Reach (SNR) option to display in the Services menu of the IP phone. (This menu can be accessed by pressing the Services button on the IP phone. Some phones have an Applications button instead of a Services button.) Table 6. Location Settings (preferences) and their descriptions Field Description AssociateFNNinRanges Not available AutoDevicePoolLocation Allows the phones in a location to be placed in different groups, called device pools. The currently available device pools are: • Devicepool226 • Faxdevicepool226 • Device Pool Info NOTE: Each device pool can have a different dial plan. AutoFeatureLocation Not available AutoLastResortFeatureLocation Not available AutoMoveLocation Not available AutoRegister Not available AutoRegisterLowestLocation Not available LocationDefaultLoginPassword Causes the default password provided in this setting to be used when an end user’s password is reset in the location. NOTE: If both LocationDefaultLoginPassword and the Customer Level setting CustomerDefaultLoginPassword (see Table 5) contain default passwords, then the password provided in LocationDefaultLoginPassword is used. NOTE: If both CustomerDefaultLoginPassword and LocationDefaultLoginPassword do not contain passwords, © 2014 AT&T Intellectual Property. All rights reserved. AT&T, the Globe logo, and all other marks contained herein are trademarks or service marks of AT&T Intellectual Property and/or AT&T affiliated companies. 19 Chapter 3. Setup Tools the administrator can enter any password when resetting the end user’s password. LocationPhoneDisplay-1st-line The text that displays on the first line of the phone’s screen. It can only include numeric characters (0 to 9) and the special characters *, #, X, and +. It can be a maximum of 24 characters long. The default value is no characters. XML-PhoneBasedPinReset Allows end users to use their phones to change their PIN settings. XML-PhoneBasedUnregister Allows end users to unregister a phone using the Services menu on their IP phones. (The Services menu is accessed by pressing the Services button on the IP phone. Some phones have an Applications button instead of a Services button.) Bulk Load Samples Link This link is no longer available. It has been replaced with a web-based upload system. © 2014 AT&T Intellectual Property. All rights reserved. AT&T, the Globe logo, and all other marks contained herein are trademarks or service marks of AT&T Intellectual Property and/or AT&T affiliated companies. 20 4. Resources When Resources is selected in the menu, seven links display. See Figure 10. These links allow you view information about the services available in UC Voice. You may also be able to add, delete, or change information. The links are described below. © 2014. AT&T Intellectual Property. All rights reserved. Figure 10. Resources links E164 Inventory Link This link allows you to view your E164 inventory. © 2014 AT&T Intellectual Property. All rights reserved. AT&T, the Globe logo, and all other marks contained herein are trademarks or service marks of AT&T Intellectual Property and/or AT&T affiliated companies. 21 Chapter 4. Resources Voicemail Services Link This link allows you to view which voicemail services are available to you and to also see and possibly change details about each service. When the Voicemail Services link is selected, a page similar to the one shown in Figure 11 displays. It lists the voicemail services available for your end users. If you click on the name of any of the services, a page displays providing details about that service (Figure 12). Tables 8 and 9 explain the contents of the page. NOTE: An end user must have a phone number before a voicemail service can be assigned. © 2014. AT&T Intellectual Property. All rights reserved. Figure 11. Example Voicemail Services page Table 7. Information in Voicemail Services page Column Definition Name The name of the Voicemail service Description The description of the Voicemail service © 2014 AT&T Intellectual Property. All rights reserved. AT&T, the Globe logo, and all other marks contained herein are trademarks or service marks of AT&T Intellectual Property and/or AT&T affiliated companies. 22 Chapter 4. Resources © 2014. AT&T Intellectual Property. All rights reserved. Figure 12. Example Manage Voicemail Services page © 2014 AT&T Intellectual Property. All rights reserved. AT&T, the Globe logo, and all other marks contained herein are trademarks or service marks of AT&T Intellectual Property and/or AT&T affiliated companies. 23 Chapter 4. Resources Table 8. Command Buttons in the Manage Voicemail Services page Command Button Description Internal Number Mgt When selected, the Extension Number Management page displays (Figure 65). It allows you to see the extension (internal) numbers that are currently being used in or are available for the Voicemail service. It may also allow you to add and delete extension ranges. PSTN Published Number When selected, the Public Switched Telephone Network (PSTN) Published Number Management page displays. It contains the PSTN number assigned to the Voicemail service. It may also allow you to change or delete the PSTN number. PSTN Number Mgt When selected, the Manage External Number (E164) Usage page displays (Figure 67). From here you can view the E164 numbers assigned to the Voicemail service. Pilot Number When selected, the Pilot Number Management page displays. This page lists the Pilot numbers, their associated PSTN numbers, and the Voicemail service using each Pilot number. It may also allow you to add and modify Pilot numbers. A Pilot number has two purposes: • To identify the Voicemail service within the Voicemail system • Dialed by end users to call the Voicemail system to retrieve messages Voicemail Template Mgt When selected, the Voicemail Template Management page displays. It allows you to see and possibly change the Voicemail template used by the Voicemail service. Table 9. Information in the Manage Voicemail Services page Item Description Name The name of the Voicemail service Description The description of the Voicemail service Site Code The code assigned to the Voicemail service Routing ID (RID) For AT&T only Voicemail Server Hardware Group For AT&T only Voicemail Server For AT&T only Country The country the Voicemail server can be used in Voicemail PSTN Dial Prefix Allows end users to retrieve their voicemail from an outside line Visual Voicemail Specifies if visual voicemail is available on this service © 2014 AT&T Intellectual Property. All rights reserved. AT&T, the Globe logo, and all other marks contained herein are trademarks or service marks of AT&T Intellectual Property and/or AT&T affiliated companies. 24 Chapter 4. Resources Auto Attendant Services Link This link allows you to view the Auto Attendant services available on your system, if there are any. Auto Attendant services are software applications. Conference Services Link This link allows you to view the Conference services available on your system, if there are any. Phone Inventory Link When you select this link, a list of all phones (registered and not registered) in the UC Voice system can display (Figure 13). If you selected a division, then only phones in that division display. If you selected a location, then only the phones assigned to that location display. To see more information about a particular phone, click on the Device Name. A page similar to Figure 14 displays. It contents are described in Table 11. NOTE: Only AT&T can add a phone to the phone inventory. © 2014 AT&T Intellectual Property. All rights reserved. AT&T, the Globe logo, and all other marks contained herein are trademarks or service marks of AT&T Intellectual Property and/or AT&T affiliated companies. 25 Chapter 4. Resources © 2014. AT&T Intellectual Property. All rights reserved. Figure 13. Example Phone Inventory page Table 10. Information in Phone Inventory page Column Description Phone Type The type of phone that has been assigned to the Medium Access Control (MAC) address Device Name The phone’s unique device name. It is the MAC address of the phone and how a phone is identified in the AT&T UC Voice telephone system. NOTE: If you click on a Device Name, details about that device display. See Figure 14 and Table 11. Registered If “Y” is in this column, then the phone is registered to this location. First Ext/Label The “First Ext” is the extension assigned to Line 1 of the telephone. The “Label” is the information that displays on the telephone next to Line 1. Division The division the phone is assigned to Location The location the phone is assigned to Device Group The Device group that the DDI telephone number belongs to. A Device group is a pool of phones created on the Call manager. Service Status Specifies whether the phone and all of its lines are ready to be used. In Service The phone is available for service (is ready to be used). This is an active link. If you click on it, the phone will be placed “out of service.” Out of Service The phone is not available for service (is not ready to be used). This is an active link. If you click on it, the phone will be placed “in service.” © 2014 AT&T Intellectual Property. All rights reserved. AT&T, the Globe logo, and all other marks contained herein are trademarks or service marks of AT&T Intellectual Property and/or AT&T affiliated companies. 26 Chapter 4. Resources Partially out of service One or more of the phone’s lines is not available for service (cannot be used). This is an active link. If you click on it, the phone’s lines will be placed “in service.” © 2014. AT&T Intellectual Property. All rights reserved. Figure 14. Example Phone Inventory – Details page © 2014 AT&T Intellectual Property. All rights reserved. AT&T, the Globe logo, and all other marks contained herein are trademarks or service marks of AT&T Intellectual Property and/or AT&T affiliated companies. 27 Chapter 4. Resources Table 11. Information in Phone Inventory – Details page Item Description Device Name The phone’s unique device name. It is the MAC address of the phone. Reseller AT&T Customer Your company’s name Division The division the phone is assigned to Location The location the phone is assigned to Phone Registered Specifies if the phone is registered IP Address Not available Phone Type Usually contains the name of the phone’s manufacturer and the model number Configuration Profile If this is “Y,” then an actual phone has been assigned to this MAC address. If this is “N,” then the MAC address is being reserved. Button Template Name Specifies the template that defines the functions of the buttons on the telephone. Contact Centre Service Link This link is not currently supported. SMTP Server Link This link is not currently supported. © 2014 AT&T Intellectual Property. All rights reserved. AT&T, the Globe logo, and all other marks contained herein are trademarks or service marks of AT&T Intellectual Property and/or AT&T affiliated companies. 28 
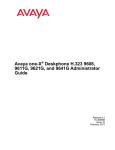
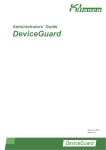
5. General Tools When General Tools is selected in the menu, links display for bulk loading and transactions. See Figure 15. The links are described below. The Transactions link allows you to see changes made to the UC Voice system by administrators and end users. The bulk load links are no longer supported. © 2014. AT&T Intellectual Property. All rights reserved. Figure 15. General Tools links Bulk Load Tools Link This link is no longer available. Transactions Link When the Transactions link is selected, the Manage Transactions page (Figure 16) displays. On this page, you can view the changes (transactions) that administrators have requested through the System Administration portal and that end users have requested through the Self-Care portal. For each transaction, you can see if a transaction is being processed, has been successfully implemented, or failed. This page is especially helpful when troubleshooting the system. A transaction usually consists of a number of sub-transactions. When you select a transaction (click on its ID number), a Transaction Inquiries page displays that lists each of the sub-transactions and the time each was performed. If a sub-transaction failed, the reason is often listed here. © 2014 AT&T Intellectual Property. All rights reserved. AT&T, the Globe logo, and all other marks contained herein are trademarks or service marks of AT&T Intellectual Property and/or AT&T affiliated companies. 29 Chapter 5. General Tools © 2014. AT&T Intellectual Property. All rights reserved. Figure 16. Example Manage Transactions page © 2014 AT&T Intellectual Property. All rights reserved. AT&T, the Globe logo, and all other marks contained herein are trademarks or service marks of AT&T Intellectual Property and/or AT&T affiliated companies. 30 Chapter 5. General Tools Table 12. Transaction Search fields in Manage Transactions page Field Definition Search By Select the type of transaction you wish to examine. The options are: • • • • • • • • • • • • • • • All Transactions (Message) Action My Transactions (Message) Selected User Failed Transactions In Progress Not Processed Succeeded After Transaction # Before Transaction # Cancelled WS UUID WS External UUID WS External Reference Transaction ID Max Results The number of search results you want displayed Time Frame The time frame the search is restricted to. The options are: • Any time • Within hour • Within 24 hours Search field The information you want to search for Search button Selecting this button causes the search to be performed Exclude Web Transactions checkbox When selected, the search results only include transactions executed from an IP phone. Exclude End-User Transactions checkbox When selected, the search results do not include transactions performed by end users. Table 13. Information in Manage Transactions page Column Definition ID Unique identification number of the transaction User ID The individual who requested that the change (transaction) be made Action Procedure the transaction caused. For example, ModPerson indicates that end user details were changed. The following are examples of procedures you might see: • AddAbookEntry • AddLine • AddLocPhoneSpeedDial © 2014 AT&T Intellectual Property. All rights reserved. AT&T, the Globe logo, and all other marks contained herein are trademarks or service marks of AT&T Intellectual Property and/or AT&T affiliated companies. 31 Chapter 5. General Tools • • • • • • • • • • CopyFeatureTemplate DelLineGroup DelSelfAbookEntry ModPhone Feature ModPSTNPubNum ModSelfDetails Password changed ResetPhone Speed Dial added SuspendPhoneService Status The status of the transaction. “Y” means the transaction succeeded – the change was made. “F” means the transaction failed—the change was not made. Message Result of the transaction. This message is the same message that was displayed when the transaction originally completed. Examples include: “Password changed” and “Single number reach destination deleted.” Device Log Not available Bulk Administration This link is no longer available. © 2014 AT&T Intellectual Property. All rights reserved. AT&T, the Globe logo, and all other marks contained herein are trademarks or service marks of AT&T Intellectual Property and/or AT&T affiliated companies. 32 6. General Administration When General Administration is selected in the menu, the links shown in Figure 17 display. These links are described below. © 2014. AT&T Intellectual Property. All rights reserved. Figure 17. General Administration links Administration Users Link When you select the Administration Users link, the User Management page displays (Figure 18). From this page, you can view information about administrators and add new administrators. A Customer administrator can view information about all Division and Location administrators as well as add new Division and Location administrators. A Division administrator can only view information about Division and Location administrators in his/her division and can add Location administrators to that division. Location administrators cannot view information about administrators or add Location administrators to his/her location. © 2014 AT&T Intellectual Property. All rights reserved. AT&T, the Globe logo, and all other marks contained herein are trademarks or service marks of AT&T Intellectual Property and/or AT&T affiliated companies. 33 Chapter 6. General Administration © 2014. AT&T Intellectual Property. All rights reserved. Figure 18. Example User Management page Table 14. Information in User Management page Column Definition Username The username the administrator enters when logging into the System Administration portal Name The actual name of the administrator Role The level of administration (customer, division, or location) assigned to the administrator Division If this is information for a Division administrator, then this is the division the administrator is assigned to. If this is information for a Location administrator, then this is the division that the administrator’s location is assigned to. It is blank for Customer Administrators. Location The location that a Location administrator is assigned to. It is blank for Customer and Division administrators. Device Group The Device group that the DDI telephone number belongs to. Adding an Administrator © 2014 AT&T Intellectual Property. All rights reserved. AT&T, the Globe logo, and all other marks contained herein are trademarks or service marks of AT&T Intellectual Property and/or AT&T affiliated companies. 34 Chapter 6. General Administration To add a new administrator, click on the Add button in the User Management page (Figure 18), located to the left of the search fields. This causes the Add Administrator page (Figure 19) to display. Fill in the fields, then select the Add button at the bottom of the second page to add a new administrator. The field names that have an asterisk (*) next to them are mandatory fields. They must be filled in to add an administrator. Table 15 describes the fields in this page. A Customer administrator can add Division and Location administrators. A Division administrator can add Location administrators to his/her division. To add a Customer administrator, contact AT&T. Changing Information about an Administrator To modify the information about an administrator, click on the username of that administrator in the User Management page (Figure 18). A page similar to Figure 19 displays. See Table 15 for a description of the fields. When you have completed making the changes, click on the Modify button at the bottom of the page. Changing the Password of an Administrator To change the password an administrator uses to log into the System Administration portal: 1. Click on the username of that administrator in the User Management page (Figure 18). Another page displays with the title User Management. 2. Select the Change Password button. The Reset Password page displays. 3. Enter the new password. You do not need to know the old password. 4. Enter the password again to verify that it was correctly entered. 5. Click on the Submit button. The password is changed. Password Requirements • Minimum length: At least nine characters. • Unique: A new password must be different from passwords the administrator has used in the last 180 days. Passwords similar or identical to previously used passwords will not be accepted. • Special characters: Depending on how the system is configured, a password might need to contain a minimum number of special characters, such as: upper case characters, punctuation, and numeric characters. • Dictionary terms: A password cannot be a word in the dictionary (for example: handsome or exciting). • Sequences: A password cannot be a sequence of letters or numbers (for example: ABCD or 123). Deleting an Administrator © 2014 AT&T Intellectual Property. All rights reserved. AT&T, the Globe logo, and all other marks contained herein are trademarks or service marks of AT&T Intellectual Property and/or AT&T affiliated companies. 35 Chapter 6. General Administration To remove an administrator from the system, click on the username of the administrator in the User Management page (Figure 18). The details about that administrator displays. On the bottom right corner is a Delete button. Click on the Delete button. NOTE: The administrator is immediately deleted if not logged into the System Administration portal. If the administrator is logged in, he/she will be deleted after logging out. © 2014 AT&T Intellectual Property. All rights reserved. AT&T, the Globe logo, and all other marks contained herein are trademarks or service marks of AT&T Intellectual Property and/or AT&T affiliated companies. 36 Chapter 6. General Administration © 2014. AT&T Intellectual Property. All rights reserved. Figure 19. Add Administrator page © 2014 AT&T Intellectual Property. All rights reserved. AT&T, the Globe logo, and all other marks contained herein are trademarks or service marks of AT&T Intellectual Property and/or AT&T affiliated companies. 37 Chapter 6. General Administration © 2014. AT&T Intellectual Property. All rights reserved. Figure 19 (continued). Add Administrator page © 2014 AT&T Intellectual Property. All rights reserved. AT&T, the Globe logo, and all other marks contained herein are trademarks or service marks of AT&T Intellectual Property and/or AT&T affiliated companies. 38 Chapter 6. General Administration © 2014. AT&T Intellectual Property. All rights reserved. Figure 19 (continued). Add Administrator page Table 15. Information in the Add Administrator page Items Description Details Username The username the administrator enters when logging into the System Administration portal Security Profile This restricts what information the Administrator can see on a page in the System Administration portal Password The initial password for logging into the System Administration portal. The administrator will be prompted to change the password during the initial login. Password Requirements • Minimum length: At least nine characters. © 2014 AT&T Intellectual Property. All rights reserved. AT&T, the Globe logo, and all other marks contained herein are trademarks or service marks of AT&T Intellectual Property and/or AT&T affiliated companies. 39 Chapter 6. General Administration • Unique: A new password must be different from passwords the administrator has used before. Passwords similar or identical to previously used passwords will not be accepted. • Special characters: Depending on how the system is configured, a password might need to contain a minimum number of special characters, such as: upper case characters, punctuation, and numeric characters. • Dictionary terms: A password cannot be a word in the dictionary (for example: handsome or exciting). • Sequences: A password cannot be a sequence of letters or numbers (for example: ABCD or 123). Role Specifies which division or location the administrator is being assigned to Title Title of the administrator: Mr., Mrs., Ms., Miss First Name First name of the administrator Middle Name Middle name of the administrator Last Name Last name of the administrator Home Telephone Number Home telephone number of the administrator. The maximum number of characters this field accepts is 32. The characters can be alphanumeric or special characters. Mobile Telephone Number Mobile telephone number of the administrator. The maximum number of characters this field accepts is 32. The characters can include alphanumeric or special characters. Contact Telephone Number The primary telephone number of the administrator. It is the phone number that the administrator prefers to be reached at. The maximum number of characters this field accepts is 32. The characters can be alphanumeric or special characters. Alternative Telephone Number Alternate telephone number of the administrator. The maximum number of characters this field accepts is 32. The characters can be alphanumeric or special characters. Email Address Email address of the administrator Job Title Job title of the administrator Directory Filter Not used by AT&T Information Additional information about the administrator Misc Additional descriptive information Welcome Message Not used by AT&T Extra 1 Additional descriptive information © 2014 AT&T Intellectual Property. All rights reserved. AT&T, the Globe logo, and all other marks contained herein are trademarks or service marks of AT&T Intellectual Property and/or AT&T affiliated companies. 40 Chapter 6. General Administration Extra 2 Additional descriptive information Extra 3 Additional descriptive information Extra 4 Additional descriptive information Details (page 2) GUI Branding Specifies which Graphical User Interface (GUI) is used on the telephones. Preferred Country The primary country the administrator is located in. (A company can be located in more than one country.) Access Profile Defines what an administrator can see or do in the System Administration portal. The profiles are defined by AT&T. Account Number to use in External Accounting System A reference number that can be used in the accounting system Add button When selected, causes the new administrator to be added to the system CLI Groups Link This link is no longer available. Divisions Link When this link is selected, the Division Management page displays (Figure 20). It lists the names of the divisions you have access to and a short description of each. You may also be able to modify the information about the division. Adding or Deleting a Division Only AT&T can add or delete a division Viewing or Changing a Division If you select the name of one of the divisions in the Division Management page (Figure 20), a page similar to Figure 21 displays. From this page you may be able to see and change the information about that division. To modify the information in the division, make the changes in the required fields, then select the Modify button at the bottom of the page. © 2014 AT&T Intellectual Property. All rights reserved. AT&T, the Globe logo, and all other marks contained herein are trademarks or service marks of AT&T Intellectual Property and/or AT&T affiliated companies. 41 Chapter 6. General Administration © 2014. AT&T Intellectual Property. All rights reserved. Figure 20. Division Management page Table 16. Information in Division Management page Column Description Name The name of the division NOTE: If a name is selected, information about that division displays (Figure 21). Address The physical address of the division © 2014 AT&T Intellectual Property. All rights reserved. AT&T, the Globe logo, and all other marks contained herein are trademarks or service marks of AT&T Intellectual Property and/or AT&T affiliated companies. 42 Chapter 6. General Administration © 2014. AT&T Intellectual Property. All rights reserved. Figure 21. Division Management – Details page © 2014 AT&T Intellectual Property. All rights reserved. AT&T, the Globe logo, and all other marks contained herein are trademarks or service marks of AT&T Intellectual Property and/or AT&T affiliated companies. 43 Chapter 6. General Administration © 2014. AT&T Intellectual Property. All rights reserved. Figure 21 (continued). Division Management – Details page Table 17. Information in Division Management – Details page Item Definition Details Name Name of the division Extended Division Name This is a description Address 1 Address 2 Address 3 Address of the division City City the division is located in State State the division is located in Country County the division is located in Post/ZIP Code Postal code or ZIP code area the division is located in Contact Name Name of the primary contact person for the division Contact Telephone Number The telephone number of the primary contact person for the division. The maximum number of characters this field accepts is 32. The characters can include alphanumeric or special characters. Contact Email Email address of the primary contact person for the division © 2014 AT&T Intellectual Property. All rights reserved. AT&T, the Globe logo, and all other marks contained herein are trademarks or service marks of AT&T Intellectual Property and/or AT&T affiliated companies. 44 Chapter 6. General Administration Item Definition Account Number to use in External Accounting System A reference number that can be used in the accounting system Security Profile Restricts what information can be seen about the division Directory Partition Not used by AT&T GUI Branding Default Branding of User Interface Select the desired GUI from the drop-down list of available GUIs. Please Select Required Branding If you selected the default GUI in the “Default Branding of User Interface” field (described above), select the checkbox of the GUI to apply to the phones in the division. Command Buttons Modify command button When selected, causes the changes made in the Division Management page to be processed. Delete command button For AT&T only Locations Link When this link is selected, the Location Management page displays (Figure 22). It lists the names of the locations you have access to and a short description of each. You may also be able to modify the information about the locations. Adding or Deleting a Location Only AT&T can add or delete a location Viewing or Changing a Location If you select the name of one of the locations in the Location Management page (Figure 22), a page similar to Figure 23 displays. From this page you may be able to see and change the information about that location. To modify the information in the location, make the changes in the required fields, then select the Modify button at the bottom of the page. © 2014 AT&T Intellectual Property. All rights reserved. AT&T, the Globe logo, and all other marks contained herein are trademarks or service marks of AT&T Intellectual Property and/or AT&T affiliated companies. 45 Chapter 6. General Administration © 2014. AT&T Intellectual Property. All rights reserved. Figure 22. Location Management page Table 18. Information in Location Management page Column Description Location Name Name of the location Address Address of the location Site Code The code assigned to the location Location Type Specifies the type of location this is. The options are: • Standard location The default settings are used. You can change the settings of the location. • Linked location parent All locations share the same site code, so they appear to be one large location. The default settings are used. You cannot change the settings of this location. • Unmanaged location © 2014 AT&T Intellectual Property. All rights reserved. AT&T, the Globe logo, and all other marks contained herein are trademarks or service marks of AT&T Intellectual Property and/or AT&T affiliated companies. 46 Chapter 6. General Administration © 2014. AT&T Intellectual Property. All rights reserved. Figure 23. Location Management – Details page © 2014 AT&T Intellectual Property. All rights reserved. AT&T, the Globe logo, and all other marks contained herein are trademarks or service marks of AT&T Intellectual Property and/or AT&T affiliated companies. 47 Chapter 6. General Administration © 2014. AT&T Intellectual Property. All rights reserved. Figure 23 (continued). Location Management – Details page © 2014 AT&T Intellectual Property. All rights reserved. AT&T, the Globe logo, and all other marks contained herein are trademarks or service marks of AT&T Intellectual Property and/or AT&T affiliated companies. 48 Chapter 6. General Administration © 2014. AT&T Intellectual Property. All rights reserved. Figure 23 (continued). Location Management – Details page © 2014 AT&T Intellectual Property. All rights reserved. AT&T, the Globe logo, and all other marks contained herein are trademarks or service marks of AT&T Intellectual Property and/or AT&T affiliated companies. 49 Chapter 6. General Administration Table 19. Command Buttons in Location Management – Details page Command Button Description Advanced Mgt Causes the Advanced Location Management page to display which may allow you to view and change numbers, such as: PSTN number, internal extension number, and the emergency call back number. Preferences Causes the “Preference and Settings: Location page” to display. See Figure 9 and Table 6 for more information. Manage Subnets Not available Modify Causes the changes specified in the Location Management page to be processed Delete For AT&T only Table 20. Information in Location Management – Details page Item Description Location Details Location Name The name of the location Localised Location Name This is a description Extended Location Name This is a description External Location ID A reference identification that can be used by external systems, such as a billing or accounting system. This ID must be unique and be a maximum of 100 characters. Site Code The code assigned to a location Department Departments are used to group or subdivide locations. They are optional. Department Code A code that represents the department. Address 1 Address 2 Address 3 Address of the location City City where the location is situated State State where the location is situated Country Country where the location is situated TimeZone Time zone where the location is situated. The time zones in the drop-down menu are arranged by continents and their major cities. Post/ZIP Code Postal code or ZIP code area where the location is situated Override Language Changes the language (English, French, etc.) on the end users’ IP telephones and GUI in the Self-Care portal. If no language is selected, than the default © 2014 AT&T Intellectual Property. All rights reserved. AT&T, the Globe logo, and all other marks contained herein are trademarks or service marks of AT&T Intellectual Property and/or AT&T affiliated companies. 50 Chapter 6. General Administration language assigned to the location is used. Contact Name The name of the primary contact person for the location Contact Telephone Number The telephone number of the primary contact person for the location Contact Fax Number The fax number of the primary contact person for the location Contact Email The email address of the primary contact person for the location Account Number to use in External Accounting System A reference number that can be used in the accounting system Security Profile Specifies which fields a Location administrator can see and/or change Directory Partition Not used by AT&T Enhanced Emergency Support Enables/disables additional emergency support for the location, such as the emergency number callback feature, which allows a phone that was disconnected during an emergency call to automatically call the number back. Single Number Reach Support Enables/disables Single Number Reach (SNR) functionality in the location Linked Location Parent When selected, all locations share the same site code, so they appear to be one big location. IPPBX Elements Bandwidth Group The name of the bandwidth(s) allocated at the location for voice and video Critical Numbers Published Number PSTN number assigned to location Site Location Number Not used by AT&T Emergency Number PSTN number used when the Call Back feature is enabled Default MoH Track Name The name of the music track played when a caller is placed on hold Media Services Name The name of the media service that controls Music on Hold (MOH). IP Address Allocation Manage Subnets button Not used by AT&T Dial Plan Details Dial Plan Name The name of the dial plan used at the location. The dial plan controls how end users can dial out (international, local only, national, etc.) Hardware Group The network hardware used by the location. The hardware groups were defined during the network build. © 2014 AT&T Intellectual Property. All rights reserved. AT&T, the Globe logo, and all other marks contained herein are trademarks or service marks of AT&T Intellectual Property and/or AT&T affiliated companies. 51 Chapter 6. General Administration PBX Template Chosen The Private Branch eXchange (PBX) dial plan used by the location Default Area Code Specifies the area code for the location. It can be set to an area code or none. RID Code A PSTN setting managed by your Telephony administrator. For more information on this feature, see your Telephony administrator. Extension Length Specifies the number of digits the extension numbers in this location will have Dial this to get an outside line The first number a user must dial to place a call to a phone that is not supported by this UC Voice system. This number was defined when the system was setup. Inter-Site Prefix When this number is placed in front of internal extension numbers, it allows direct calling between locations. Each inter-site prefix must be unique within UC Voice. Local Dialing Specifies whether 7 or 10 digits need to be dialed to reach a local external number. Usually, if the Default Area Code (defined above) is set to none, then 10 digits are needed. If the Default Area Code is set to a number, then 7 digits are usually needed. GUI Branding Default Branding of User Interface Select the desired GUI from the drop-down list of available GUIs. Select Required Branding If you selected the default GUI in the “Default Branding of User Interface” field (described above), select the checkbox of the GUI to apply it to the phones in the location. Notes Notes Notes that can help others manage the location Codecs Intra-Region Max Audio Bit Rate A PSTN setting managed by your Telephony administrator. For more information about this feature, see your Telephony administrator. Inter-Region Max Audio Bit Rate A PSTN setting managed by your Telephony administrator. For more information about this feature, see your Telephony administrator.. © 2014 AT&T Intellectual Property. All rights reserved. AT&T, the Globe logo, and all other marks contained herein are trademarks or service marks of AT&T Intellectual Property and/or AT&T affiliated companies. 52 Chapter 6. General Administration Feature Groups Link From this link, you can see the various Feature groups available and see how each Feature group is configured. You may also be able to add, change, or delete Feature groups. A Feature group defines which functions (set of features) an end user can use. When you select this link, the Feature Group Management page displays (Figure 24). To see the details about a Feature group, click on its name. Adding a Feature Group There are two ways to add a feature group: using the Add command button or using the Create From Template command button in the Feature Group Management page (Figure 24). Adding a Feature Group using the Add Command Button When the Add button is selected, the Add Feature Group page displays. It contains the same fields as the Manage Feature Group page, shown in Figure 25. See Table 23 for information about the page. After you have completed entering information in the Add Feature Group page, click on the Submit button at the bottom of the page. This causes the new Feature group to be created and added to the Feature Group Management page (Figure 24). Adding a Feature Group using the Create From Template Command Button When the Create from Template button is selected, the Feature Group Template Selection page displays. It contains a list of templates that AT&T created. In the blank field next to the template you want to use, enter the name of the Feature group you are creating. Select the Create From Template button next to the template’s name. The Feature group is created and can be seen on the Feature Group Management page (Figure 24). The settings in the Feature group can be changed as described in the section below. Viewing, Changing, and Deleting a Feature Group To see how a Feature group is configured, click on its name in the Feature Group Management page (Figure 24). A page similar to the one shown in Figure 25 displays. The items on the page are described in Table 23. When a checkbox is selected, its feature is enabled in the Feature group. If you deselect (remove) features from a Feature group that is currently being used, some of the features may not be removed if end users are currently using that feature. The type of features that are not immediately removed include: single number reach, voicemail, extension mobility, etc. To save the changes you made to the Feature group, select the Modify button on the bottom of the page. To delete the Feature group, select the Delete button on the bottom of the page. © 2014 AT&T Intellectual Property. All rights reserved. AT&T, the Globe logo, and all other marks contained herein are trademarks or service marks of AT&T Intellectual Property and/or AT&T affiliated companies. 53 Chapter 6. General Administration © 2014. AT&T Intellectual Property. All rights reserved. Figure 24. Example Feature Group Management page Table 21. Information in Feature Group Management page Column Description Name Name of the Feature group Description The set of services and functions provided by the Feature group Table 22. Command buttons in Feature Group Management page Command Button Description Create From Template Allows you to create a Feature group by using the selected template Add Allows you to create a Feature group by selecting individual functions from the complete list of available functions Bulk Update Allows you to configure which features of UC Voice will be available to the various groups listed in the Bulk Feature Group Update page. © 2014 AT&T Intellectual Property. All rights reserved. AT&T, the Globe logo, and all other marks contained herein are trademarks or service marks of AT&T Intellectual Property and/or AT&T affiliated companies. 54 Chapter 6. General Administration © 2014. AT&T Intellectual Property. All rights reserved. Figure 25. Example Manage Feature Group page © 2014 AT&T Intellectual Property. All rights reserved. AT&T, the Globe logo, and all other marks contained herein are trademarks or service marks of AT&T Intellectual Property and/or AT&T affiliated companies. 55 Chapter 6. General Administration © 2014. AT&T Intellectual Property. All rights reserved. Figure 25 (continued). Example Manage Feature Group page © 2014 AT&T Intellectual Property. All rights reserved. AT&T, the Globe logo, and all other marks contained herein are trademarks or service marks of AT&T Intellectual Property and/or AT&T affiliated companies. 56 Chapter 6. General Administration Table 23. Information in the Manage Feature Group page Item Description Details Name Name of the Feature group Description A description of the Feature group Outbound calls limitations For AT&T use only Call forward limitations Helps prevent toll fraud (long distance calls that are made at the expense of your organization and in violation of its policies) by restricting call forwarding to telephone numbers within the Class of Service (CoS) specified here. Secondary call forward limitations (only used for Call forward all) Adds another set of restrictions to the restrictions already set in the Call Forward Limitations field (described above). This is to prevent abuses when the Call Forward Always feature is used. Voicemail Template Specifies which Voicemail template will be used by the Feature group. Each template supports a different set of features. Inbound call options Specifies the maximum number of DDI lines that a phone in the Feature group is allowed. If the “Don’t Allow Direct Dial Inward Calls” option is selected, than the phones in the Feature group can only have internal extension numbers.” Number of extensions or lines Specifies the maximum number of extensions (DDI and non DDI) that a phone in the Feature group is allowed. In other words, it is the number in the “Inbound Call Options” field (defined above) plus the non-DDI lines. Idle URL Specifies what will appear on the telephones’ display screens when a phone has been idle for a period of time. Value Add Conferencing Enables/disables the Conferencing function in this Feature group Extension Mobility Cross Cluster Not available IP Phone Services Management Enables/disables the ability of administrators to change the extension mobility profiles of end users and the phone service delivered to the telephone. Presence Enables/disables the Presence function, which monitors the phones in the telephone system for availability and for Instant Messaging (IM) capabilities between users of the telephone system and also between users of the telephone system and other applications. Single Number Reach / Mobile Connect Capabilities Specifies if the Feature group can use the Single Number Reach (SNR) feature © 2014 AT&T Intellectual Property. All rights reserved. AT&T, the Globe logo, and all other marks contained herein are trademarks or service marks of AT&T Intellectual Property and/or AT&T affiliated companies. 57 Chapter 6. General Administration Item Description Voicemail Enables/disables the Voicemail capability of the phones in the Feature group. Usually, it is disabled if the feature had not been purchased. Video Capability Enables/disables the video capability of the phones, if they have any. Common Line Settings (Line Feature) Alerting Name Enables/disables the ability to have a different name display when a user calls internally. Alerting Name ASCII Not available Auto Answer Enables/disables the ability of the phone to automatically answer calls after one or two rings. The end user will not need to press a button or pick up the handset from the cradle to answer the call. The end user may be able to specify how the call will be answered in the Self-Care portal. The options are: • Auto Answer Off • Auto Answer with Headset • Auto Answer with Speakerphone Call Forward Calling Search Space Activation Policy Enable/disables the ability to restrict call forwarding to telephones within a specific class of service. This helps prevent toll fraud (long distance calls that are made at the expense of your organization and in violation of its policies). The end user may be able to select the following options in the Self-Care portal: • Use system default • With Configured CSS • With Activating Device/Line CSS Where CSS (Calling Search Space) is local, national, or international. Cloned Line Enables/disables the ability to use the same phone number on more than one line Contact Centre Agent Line Not available Hold Reversion Notification Interval Enables/disables the ability to alert an end user when a call has been on hold more than a specified amount of time. If enabled, the end user may be able to specify in the Self-Care portal the number of seconds between the audio tones that alert the user that a call is on hold. Hold Reversion Ring Duration Enables/disables the ability to automatically send a call to voicemail after a specified amount of time. If enabled, the end user may be able to specify in the Self-Care portal the number of rings before an incoming call is sent to the voice mailbox, when the phone has an active call and at least one other call on hold. Hot Line Enables/disables this direct dial feature, which allows a line to be setup so it © 2014 AT&T Intellectual Property. All rights reserved. AT&T, the Globe logo, and all other marks contained herein are trademarks or service marks of AT&T Intellectual Property and/or AT&T affiliated companies. 58 Chapter 6. General Administration Item Description can only send calls to the number assigned to it. It will not be able to receive in-bound calls. If enabled, the end user may be able to specify in the Self-Care portal the telephone number the line can send calls to. Line Class of Service Enables/disables the ability to specify which areas end users can call. If enabled, end users may be able to specify in the Self-Care portal which areas they can call, for example: • Local • National • International Music on Hold Enables/disables the ability to play music to callers that are placed on hold. If enabled, end users may be able to specify in the Self-Care portal which tracks can be played. No Answer Ring Duration Enables/disables the ability to specify the amount of time, in seconds, end users’ phones ring before forwarding calls or sending them to voice mailboxes. If enabled, end users may be able to set this time in the Self-Care portal. Private Line Settings (Phone Line Feature) Call Waiting Busy Trigger Enables/disables the Call Waiting feature and also allows administrators to change the maximum number of incoming calls the line can support. End users may be able to change in the Self-Care portal the maximum number of incoming calls. Display Name (Caller Line ID) The Caller ID that displays on the receiver’s telephone when the end user dials a phone number that is within your AT&T UC Voice telephone system. Display Name ASCII The Caller ID that displays on the receiver’s telephone when the end user dials a number that is within your AT&T UC Voice telephone system. The information is sent using the ASCII format, which is used by older PBX systems. Forward Caller Name Information Display Enables/disables the ability to display on the receiver’s phone the name of the person who placed the call. Forward Caller Number Information Display Enables/disables the ability to display on the receiver’s phone the phone number of the person who placed the call. Forward Dialed Number Information Display Enables/disables the ability to display on the receiver’s phone the phone number of the person who was originally dialed. Forwarded Redirected Number Information Display Enables/disables the ability to display on the receiver’s phone the redirected number. © 2014 AT&T Intellectual Property. All rights reserved. AT&T, the Globe logo, and all other marks contained herein are trademarks or service marks of AT&T Intellectual Property and/or AT&T affiliated companies. 59 Chapter 6. General Administration Item Description Hide Line from Corporate Directory Specifies if information about phones in the Feature group can be seen in the Corporate directory. Label The user name that displays on an end user’s telephone next to the telephone’s Line button. Label ASCII The user name that displays on an end user’s telephone next to the telephone’s Line button. The information is sent using the ASCII format, which is used by older PBX systems. Line Mask Numeric information at the top of the display on the telephone. Max Calls Waiting Enables/disables the ability to specify the maximum number of calls that can be queued for waiting. Once this number is reached, the next caller will hear a busy tone. Message Waiting Lamp Policy Enables/disables the ability to use Message Waiting Lamps on the phone. If enabled, end users may be able to specify in the Self-Care portal how the Message Waiting Lamp will function. The options are: • • • • • Use System Policy Light and Prompt Prompt Only Light Only None Recording Option Used when the Recording feature is enabled Recording Profile Used when the Recording feature is enabled Ring Setting – Phone Active Enables/disables the ability of an end user to change how a phone announces there is an incoming call when the phone is busy with another call. End users may be able to select one of these options in the Self-Care portal: • • • • • • Ring Setting – Phone Idle Use System Default Disable Flash only Ring once Ring Beep only Enables/disables the ability of an end user to change how a phone announces there is an incoming call when the phone is not in use (idle). End users may be able to select one of these options in the Self-Care portal: • • • • • Use System Default Disable Flash only Ring once Ring © 2014 AT&T Intellectual Property. All rights reserved. AT&T, the Globe logo, and all other marks contained herein are trademarks or service marks of AT&T Intellectual Property and/or AT&T affiliated companies. 60 Chapter 6. General Administration Item Description • Beep only Handset Advanced Phone Settings Enables/disables the ability of end users to change the advanced settings of their phones. In the Self-Care portal, end users may be able to change the advanced settings in the Phone Details page. Allow User Login to Phone Determines if users (not the person associated to the phone) can login and use the phone’s Extension Mobility feature. Built-In Bridge For AT&T use only Busy Lamp Fields Enables/disables the Busy Lamps feature on the phones in the Feature group. End Users may be able to specify in the Self-Care portal which telephone number a busy lamp is monitoring and whether calls to the monitored number can also be answered. Cache Username on Phone If enabled, the telephone’s cache memory holds the user name of the last person who logged into the Extension Mobility feature of the phone. That end user will only need to supply a PIN to access the Extension Mobility feature on that phone on subsequent logins. Corporate Phone Book Enables/disables the ability to display the Corporate Phone book on end users’ phones. This phone book is a list of all users currently registered on your UC Voice system (except users not listed for security reasons). Fax Enables/disables placing the analog port in the Fax Device pool on the Cisco Unified Communications Manager (CUCM). Personal Phone Book Enables/disables the ability to display end users’ personal telephone and address books on their phones Privacy Enables/disables the ability to manage privacy settings for the phone, the SNR function, and the Extension Mobility function. End users may be able to turn this feature on and off in the Self-Care portal: • • Default On • Off On Removes call information from all phones that share lines and also blocks other shared lines from barging in on calls. Displays call information on all phones that have shared lines and allows other shared lines to barge in on calls. SRST Enables/disables Survivable Remote Site Telephony (SRST) for the telephones in the Feature group. When enabled, the phones are placed in the SRST device pool. Service URLs Enables/disables the ability to display services when the Services button is selected on a phone. © 2014 AT&T Intellectual Property. All rights reserved. AT&T, the Globe logo, and all other marks contained herein are trademarks or service marks of AT&T Intellectual Property and/or AT&T affiliated companies. 61 Chapter 6. General Administration Item Description Speed Dials Enables/disables the Speed Dial function on the phones in the Feature group. End users may be able to assign phone numbers to their Speed Dial lists on their IP phones and in the Self-Care portal. User User Extension Mobility Enables/disables the Extension Mobility (roaming) function for the phones in the Feature group. Voicemail Settings Alternate Extension Enables/disables the ability of the phones in the Feature group to have alternate extensions. Alternate extensions simplify remote access to Voice mailboxes. End uses may be able to specify alternate extensions in the Self-Care portal. Caller Input Enables/disables the Caller Input function of telephones in the Feature group. This function may simplify the experience of callers who are trying to contact someone who is frequently out of the office by, for example, automatically forwarding the call to another person. End users may be able to specify the parameters of this function in the SelfCare portal. Notification Device Enables/disables the ability to send Voicemail notification messages to the end user’s email or smartphone, if the end user has Unified Messaging. Visual Voicemail Not available Common Line Settings (Call Forward) Forward All Enables/disables the ability to immediately forward an incoming call to voicemail or another destination. If enabled, the end user may be able to specify the destination in the Self-Care portal. The end user may also be able to disable the function. NOTE: This setting overrides all other call forward settings. Forward All Secondary CoS Because call forwarding is a line-based feature, in cases where the device calling search space is unknown, the line calling search space is used to forward the call. If the line calling search space is restrictive and not routable, the forward attempt fails. This field provides a solution to enable forwarding. The primary calling search space for Call Forward All and secondary calling search space for Call Forward All are concatenated (Primary CFA CSS + Secondary CFA CSS). Forward Busy Enables/disables the ability to forward calls to voicemail or to another destination when an end user’s line is busy. If enabled, the end user may be able to specify in the Self-Care portal the telephone number that calls are forwarded to. The end user may also be able to modify in the Self-Care portal how many calls can be placed on hold © 2014 AT&T Intellectual Property. All rights reserved. AT&T, the Globe logo, and all other marks contained herein are trademarks or service marks of AT&T Intellectual Property and/or AT&T affiliated companies. 62 Chapter 6. General Administration Item Description for a line (the Max Calls Waiting field). Forward Busy External Enables/disables the ability to forward PSTN calls from outside the UC Voice platform to voicemail or to another destination when an end user’s line is busy. Forward Busy Internal Enables/disables the ability to forward calls from internal extension numbers to voicemail or to another destination when an end user’s line is busy. Forward No Answer Enables/disables the ability to forward calls to voicemail or to another destination when the phone does not answer. If enabled, the end user may be able to specify in the Self-Care portal the telephone number that a call will be forwarded to when the call is unanswered. The end user may also be able to specify in the Self-Care portal how long the telephone rings before a call is forwarded. Forward No Answer External Enables/disables the ability to forward PSTN calls coming from outside the UC Voice platform to voicemail or to another destination when the phone does not answer. Forward No Answer Internal Enables/disables the ability to forward calls from internal extension numbers to voicemail or to another destination when the phone does not answer. Forward No Coverage Enables/disables the ability to automatically forward calls to voicemail or to another destination when the network bandwidth is insufficient to complete the call. If enabled, the end user may be able to specify in the Self-Care portal the telephone number that calls are forwarded to. Forward No Coverage External Enables/disables the ability to automatically forward PSTN calls that originated outside the UC Voice platform to voicemail or to another destination when the network bandwidth is insufficient to complete the call. Forward No Coverage Internal Enables/disables the ability to automatically forward calls from internal extension numbers to voicemail or to another destination when the network bandwidth is insufficient to complete the call. Call Unregistered Enables/disables the ability to automatically forward calls to voicemail or another destination when an end user’s phone is unable to register or when the network bandwidth is insufficient to complete the call. If enabled, the end user may be able to specify in the Self-Care portal the telephone number that calls are forwarded to. Call Unregistered External Enables/disables the ability to automatically forward PSTN calls that originated outside the UC Voice platform to voicemail or another destination when an end user’s phone is unable to register or when the network bandwidth is insufficient to complete the call. Call Unregistered Internal Enables/disables the ability to automatically forward calls from internal extension numbers to voicemail or another destination when an end user’s phone is unable to register or when the network bandwidth is insufficient to © 2014 AT&T Intellectual Property. All rights reserved. AT&T, the Globe logo, and all other marks contained herein are trademarks or service marks of AT&T Intellectual Property and/or AT&T affiliated companies. 63 Chapter 6. General Administration Item Description complete the call. Forward on CTI Failure Not available Number Translation Link This link is for AT&T use only. Feature Configuration Templates Link This link is for AT&T use only. End User Migration Link With this link, you can move (migrate) users, along with their phones and services, from one location to another. The move can be to a different division. When you select this link, the End User Migration page displays (Figure 26). Its fields are described in Table 24. NOTE: You must update the user-registered location information prior to activating the service at the new location to enable emergency calls to be correctly routed. NOTE: Administrators cannot be moved to a different location. Moving End Users To move end user(s) to a different location: 1. In the Source column, use the drop-down menus to specify where the end user(s) are currently located. The drop-down menus are typically the Building, Customer, Division, and Location dropdown menus, but yours may be different, depending on how your system is set up. 2. In the Destination column, use the drop-down menus to indicate where the end user(s) are being moved (migrated) to. 3. The End Users box contains all the end users in the location you selected. To reduce the number of end users in the box, use the Search field above the box. 4. Select the end user(s) that are moving to the new location: © 2014 AT&T Intellectual Property. All rights reserved. AT&T, the Globe logo, and all other marks contained herein are trademarks or service marks of AT&T Intellectual Property and/or AT&T affiliated companies. 64 Chapter 6. General Administration • If all users in the End Users box are moving, click on the All>> button. The end users will move from the End Users box to the Migrating box. • Otherwise, select the end user(s) that are moving. If more than one end user is to be moved, hold down your computer’s Ctrl keypad key while clicking on the end users. After all the end users have been selected, click on the Add>> button. The selected end user(s) will move from the End Users box to the Migrating box. • To return end user(s) from the Migrating box back to the End Users box, select the end user(s), then click on the <<Remove button. 5. Click on the Preview Migration button at the bottom of the page. The information you entered is displayed in a different format with more information about the destination. 6. Review the information and make any needed corrections. 7. Click on the Generate Loader button to create Excel files with the migration information. 8. Use the Excel file in the Bulk Load tool. © 2014 AT&T Intellectual Property. All rights reserved. AT&T, the Globe logo, and all other marks contained herein are trademarks or service marks of AT&T Intellectual Property and/or AT&T affiliated companies. 65 Chapter 6. General Administration © 2014. AT&T Intellectual Property. All rights reserved. Figure 26. End User Migration page © 2014 AT&T Intellectual Property. All rights reserved. AT&T, the Globe logo, and all other marks contained herein are trademarks or service marks of AT&T Intellectual Property and/or AT&T affiliated companies. 66 Chapter 6. General Administration Table 24. Items in End User Migration page Items Description Source Column Building In the drop-down menu, select the building where the end user(s) reside Customer Your company’s name Division The division that the end user(s) currently belong to Location The location that the end user(s) currently belong to Search This allows you to reduce the number of users shown in the End Users box. If nothing is entered here, then all users in the location are listed. Destination Column Building In the drop-down menu, select the building the end user(s) are moving to Customer Your company’s name Division The division that the end user(s) are moving to Location The location that the end user(s) are moving to Add Move the selected user(s) from the End Users box to the Migrating box Remove Move the selected user(s) from the Migrating box to the End Users box All>> Move all end users in the End Users box to the Migrating box <<All Move all end users from the Migrating box to the End Users box Preview Migration This command button opens a page that allows you to review the information you just entered in a different format, making it easier to identify issues. It also allows you to change the destination information. If everything is correct, select the Generate Loader button. © 2014 AT&T Intellectual Property. All rights reserved. AT&T, the Globe logo, and all other marks contained herein are trademarks or service marks of AT&T Intellectual Property and/or AT&T affiliated companies. 67 7. Location Administration When Location Administration is selected in the menu, the links shown in Figure 27 display. The links are described below. These links are used to view information about the locations and end users you have access to. You may be able to change which features are available for each location and end user as well as modify how the features can be used. © 2014. AT&T Intellectual Property. All rights reserved. Figure 27. Location Administration links © 2014 AT&T Intellectual Property. All rights reserved. AT&T, the Globe logo, and all other marks contained herein are trademarks or service marks of AT&T Intellectual Property and/or AT&T affiliated companies. 68 Chapter 7. Location Administration Switchboards Link This link allows you to view the switchboards that have been setup for the location. It also allows you to add switchboards. A switchboard is a software application. A switchboard can usually transfer calls, send calls to voice mailboxes, and monitor phone lines from a GUI. When the Switchboards link is selected, the SwitchBoard Management page, shown in Figure 27, displays. Adding a Switchboard To add a switchboard to a location, click on the Add button in the SwitchBoard Management page (Figure 28). The Add SwitchBoard page (Figure 29) displays. Fill in the fields, which are described in Table 25. When you have completed entering the information in the fields, click on the Add button at the bottom of the page. Viewing, Changing, or Deleting a Switchboard If you select the name of a switchboard in the SwitchBoard Management page (Figure 28), a page similar to Figure 29 may display. From this page you may be able to see and change the information about that switchboard or delete it. To modify the information in the switchboard, make the changes in the required fields, then select the Modify button at the bottom of the page. To delete the switchboard, select the Delete button at the bottom of the page. © 2014 AT&T Intellectual Property. All rights reserved. AT&T, the Globe logo, and all other marks contained herein are trademarks or service marks of AT&T Intellectual Property and/or AT&T affiliated companies. 69 Chapter 7. Location Administration © 2014. AT&T Intellectual Property. All rights reserved. Figure 28. Example SwitchBoard Management page Table 25. Information in SwitchBoard Management page Items Description SwitchBoard Name The name of the switchboard. It must be a unique name. Description A description of the switchboard. It should be a useful name such “North lobby” or “Room 234.” Pilot Number Specifies the extension number of the switchboard. Enter an extension number that is not being used – that does not have a user or telephone associated with it. This extension number is in the switchboard’s Hunt group. NOTE: This cannot be a shared line. First SwitchBoard Operator The phone number of the switchboard operator you are assigning to this switchboard. This phone number is not used by the switchboard. SwitchBoard Operator Password The password of the switchboard operator. Periodically, the operator will be asked to change the password upon login. Password Requirements • Minimum length: At least nine characters. • Unique: A new password must be different from passwords used before. Passwords similar or identical to previously used passwords will not be accepted. • Special characters: Depending on how your system is configured, the password might need to contain a minimum number of © 2014 AT&T Intellectual Property. All rights reserved. AT&T, the Globe logo, and all other marks contained herein are trademarks or service marks of AT&T Intellectual Property and/or AT&T affiliated companies. 70 Chapter 7. Location Administration Items Description special characters, such as: upper case characters, punctuation, and numeric characters. • Dictionary terms: The password cannot be a word in the dictionary (for example: handsome or exciting). • Sequences: The password cannot be a sequence of letters or numbers (for example: ABCD or 123). Operator Start Line Specifies which line in the switchboard a call will be forwarded to. If that line is busy, the call will be sent to the next line. This continues until a free line is found or the line assigned to the Operator Last Line field (defined below) is reached. Operator Last Line Specifies the last line the switchboard will attempt to forward a call to before the call is sent to the Last Resort Line (defined below). Hunting Algorithm When the switchboard forwards a call, this algorithm specifies how the forwarding is done. There are two options: First Available Hunt Group Member The call is forwarded to the first available phone. Longest Idle Hunt Group Member The call is forwarded to the phone that has been idle the longest. The Hunt group is the phones assigned to the switchboard’s lines. Select Phone Assigns a phone (not a PBX) to the switchboard. This is not the phone assigned to the operator. Last Resort Line Specifies the line a call will be forwarded to if the switchboard is unable to find a free line (starting with the line defined in the Operator Start Line field and ending with the line defined in the Operator Last Line field (defined above)). Add command button Click on this button when you have finished filling in the fields on this page. It causes the new switchboard to be added to the system. © 2014 AT&T Intellectual Property. All rights reserved. AT&T, the Globe logo, and all other marks contained herein are trademarks or service marks of AT&T Intellectual Property and/or AT&T affiliated companies. 71 Chapter 7. Location Administration © 2014. AT&T Intellectual Property. All rights reserved. Figure 29. Add SwitchBoard page © 2014 AT&T Intellectual Property. All rights reserved. AT&T, the Globe logo, and all other marks contained herein are trademarks or service marks of AT&T Intellectual Property and/or AT&T affiliated companies. 72 Chapter 7. Location Administration Telephony Link When the Telephony link is selected, the Telephony Management page, shown in Figure 30, displays. Table 26 provides a quick overview of the functions you can manage from this page. Each function is described in detail in the sections below. © 2014. AT&T Intellectual Property. All rights reserved. Figure 30. Telephony Management page © 2014 AT&T Intellectual Property. All rights reserved. AT&T, the Globe logo, and all other marks contained herein are trademarks or service marks of AT&T Intellectual Property and/or AT&T affiliated companies. 73 Chapter 7. Location Administration Table 26. Command Buttons and Links in Telephony Management page Item Description Telephony command button Allows you to connect or disconnect all phones in the location to/from the PSTN Call Park Allows you to manage the Call Park feature, including viewing and adding Call Park prefixes, which are the numbers end users dial to retrieve a call that has been parked Directed Call Park Allows you to manage the Directed Call Park feature, including viewing and adding Directed Call Park numbers Gateways Allows you to see the gateways associated to the dial plan CTI Management Not available Meet-Me Allows you to manage the Meet-Me Conference feature, including viewing and adding the phone numbers used to join a Meet-Me conference Device Pool Not available Auto Attendant Allows you to view the list of auto attendants in the location Presence Monitoring The capabilities provided here depend on which Presence applications your company is using. Call Park Link When this link is selected, the Location Call Park Management page displays (Figure 31). From it, you can manage the Call Park feature. The Call Park feature allows end users to park a call so it can be retrieved from another phone in the UC Voice system (for example, a phone in another office or in a conference room) by dialing a Call Park Prefix number. Adding a Call Park Number To add additional Call Park Prefix numbers, select the Add button in the Location Call Park Management page (Figure 31). The Add Call Park page displays (Figure 32). It is described in Table 28. Viewing, Changing, or Deleting a Call Park Number If you select a Call Park Prefix in the Location Call Park Management page (Figure 31), a page similar to Figure 32 may display. From this page you may be able to see and change the information about that Call Park number or delete the number. © 2014 AT&T Intellectual Property. All rights reserved. AT&T, the Globe logo, and all other marks contained herein are trademarks or service marks of AT&T Intellectual Property and/or AT&T affiliated companies. 74 Chapter 7. Location Administration To modify the information about the Call Park number, make the changes in the required fields, then select the Modify button at the bottom of the page. To delete the Call Park Number, select the Delete button at the bottom of the page. © 2014. AT&T Intellectual Property. All rights reserved. Figure 31. Location Call Park Management page Table 27. Items in the Location Call Park Management page Column Description Add command button Allows you to add a Call Park Prefix number Call Park Prefix The number an end user enters on an IP phone in the UC Voice system to connect to a Parked call. NOTE: When the number is entered on the phone, it must begin and end with an asterisk (*). © 2014 AT&T Intellectual Property. All rights reserved. AT&T, the Globe logo, and all other marks contained herein are trademarks or service marks of AT&T Intellectual Property and/or AT&T affiliated companies. 75 Chapter 7. Location Administration Allocated The DDI number that receives Parked calls Name The name associated with the DDI number Description A description of the DDI number © 2014. AT&T Intellectual Property. All rights reserved. Figure 32. Add Call Park page Table 28. Items in the Add Call Park page Items Description Name The name of the Call Park number or range. This name must be unique. Description A description of the Call park number or range. Call Park Prefix The number entered by an end user on an IP phone in the UC Voice system to connect to a Parked call. It must begin and end with an asterisk (*). Call Park Range Size Specifies the number of active calls that can be parked at one time in the location. Submit command button When selected, the changes made in the Add Call Park page are implemented. © 2014 AT&T Intellectual Property. All rights reserved. AT&T, the Globe logo, and all other marks contained herein are trademarks or service marks of AT&T Intellectual Property and/or AT&T affiliated companies. 76 Chapter 7. Location Administration Directed Call Park Link When this link is selected, the Manage Directed Call Parks page displays (Figure 33). Its contents are described in Table 29. From this page, you can manage the Directed Call Park feature. With the Directed Call Park feature, end users can park a call, then the call is retrieved using specific phone(s) by dialing the Retrieval Prefix number. This feature is similar to the Call Park feature, except that calls can only be retrieved when using the assigned phone(s). Adding a Directed Call Park Number To add a Directed Call Park Number, select the Add button in the Manage Directed Call Parks page (Figure 33). The Add Directed Call Park page displays (Figure 34). It is described in Table 29. After you have entered the information in the fields, select the Submit button. Viewing, Changing, or Deleting a Directed Call Park Number If you select a name in the Manage Directed Call Parks page (Figure 33), a page similar to Figure 34 may display. From this page you may be able to see and change the information about that Call Park number or delete the number. To modify the information about the Directed Call Park number, make the changes in the required fields, then select the Modify button at the bottom of the page. To delete the Directed Call Park Number, select the Delete button at the bottom of the page. © 2014 AT&T Intellectual Property. All rights reserved. AT&T, the Globe logo, and all other marks contained herein are trademarks or service marks of AT&T Intellectual Property and/or AT&T affiliated companies. 77 Chapter 7. Location Administration © 2014. AT&T Intellectual Property. All rights reserved. Figure 33. Manage Directed Call Parks page © 2014 AT&T Intellectual Property. All rights reserved. AT&T, the Globe logo, and all other marks contained herein are trademarks or service marks of AT&T Intellectual Property and/or AT&T affiliated companies. 78 Chapter 7. Location Administration © 2014. AT&T Intellectual Property. All rights reserved. Figure 34. Add Directed Call Park page Table 29. Information in Add Directed Call Park page Column Description Name The name of the Directed Call Park number or range. The name must be unique. Description A description of the Directed Call park number or range. Call Park Range Start The first number in the Directed Call Park range of numbers NOTE: The range of numbers must be unique. Call Park Range End The last number in the Directed Call Park range of numbers Reversion Number When a call has been parked for the amount of time specified in this field (in microseconds), the call is sent back to the phone that parked it. The phone will either beep or ring to notify the end user. © 2014 AT&T Intellectual Property. All rights reserved. AT&T, the Globe logo, and all other marks contained herein are trademarks or service marks of AT&T Intellectual Property and/or AT&T affiliated companies. 79 Chapter 7. Location Administration Column Description Reversion Class of Service If the call and the phone picking up the directed parked call have a different Class of Service (CoS), then the call is answered using the CoS specified in this field. Retrieval Prefix The number entered on an IP phone to retrieve a call that was placed on hold using the Directed Call Park feature. Gateways Link When the Gateways link is selected in the Telephony Management page (Figure 30), a page similar to the one in Figure 35 displays. Gateways are associated to the dial plan that was implemented when UC Voice was setup for your company. You may be able to modify or delete gateways by clicking on the name of a gateway in the Local Gateway Dial Plan Provisioning page (Figure 35). A page containing details about that gateway may display. From this page you may be able to change information about the gateway or delete it. © 2014 AT&T Intellectual Property. All rights reserved. AT&T, the Globe logo, and all other marks contained herein are trademarks or service marks of AT&T Intellectual Property and/or AT&T affiliated companies. 80 Chapter 7. Location Administration © 2014. AT&T Intellectual Property. All rights reserved. Figure 35. Gateway Dial Plan page CTI Management Link This link is no longer supported. Meet-Me Link When this link is selected in the Telephony Management page (Figure 30), the Meet-Me Number Management page displays (Figure 36). From it you can view or add the numbers used for Meet-Me conferences. Meet-Me conferences allow participants to dial a number to join a conference call instead of someone calling each participant and adding them to a conference call. The conference must be pre-arranged. The people interested in joining the conference must be told of the date and time of the conference and also given the conference number to dial. The date and time of the conference cannot be reserved on the telephone system. This feature works on a first-come © 2014 AT&T Intellectual Property. All rights reserved. AT&T, the Globe logo, and all other marks contained herein are trademarks or service marks of AT&T Intellectual Property and/or AT&T affiliated companies. 81 Chapter 7. Location Administration first-served basis. A conference call begins when the person initiating the conference (the host) presses the MeetMe soft key on a telephone and enters the conference number. NOTE: The maximum number of people who can join a Meet-Me conference was determined when your UC Voice system was setup. Adding a Meet-Me Number To add a Meet-Me number, select the Add button in the Meet-Me Number Management page (Figure 36). The Add Meet-Me Number page displays (Figure 37). It is described in Table 31. When you have finished entering information in the fields, select the Submit button on the bottom of the second page. Viewing, Modifying, and Deleting a Meet-Me Number If you select the internal number of one of the entries in the Meet-Me Number Management page (Figure 36), a page similar to Figure 37 displays. It is described in Table 31. From this page you may be able to see and change the information about that Meet-Me number or delete it. To modify the information, make the changes in the required fields, then select the Modify button at the bottom of the page. To delete a Meet-Me number, select the Delete button at the bottom of the page. © 2014 AT&T Intellectual Property. All rights reserved. AT&T, the Globe logo, and all other marks contained herein are trademarks or service marks of AT&T Intellectual Property and/or AT&T affiliated companies. 82 Chapter 7. Location Administration © 2014. AT&T Intellectual Property. All rights reserved. Figure 36. Meet-Me Number Management page Table 30. Information in Meet-Me Number Management page Column Description Internal Number Internal extension number reserved for Meet-Me conferencing. It is a number that end users in the UC Voice system dial to join a Meet-Me conference. NOTE: This number must be unique. It cannot be used anywhere else in your UC Voice system. Associated PSTN The telephone number that callers who are not members of the UC Voice system dial to join a Meet-Me conference. NOTE: This number must be unique. It cannot be used anywhere else in your UC Voice system. Description A description of the Meet-Me conference telephone number © 2014 AT&T Intellectual Property. All rights reserved. AT&T, the Globe logo, and all other marks contained herein are trademarks or service marks of AT&T Intellectual Property and/or AT&T affiliated companies. 83 Chapter 7. Location Administration © 2014. AT&T Intellectual Property. All rights reserved. Figure 37. Add Meet-Me Number page © 2014. AT&T Intellectual Property. All rights reserved. Figure 37 (continued). Add Meet-Me Number page © 2014 AT&T Intellectual Property. All rights reserved. AT&T, the Globe logo, and all other marks contained herein are trademarks or service marks of AT&T Intellectual Property and/or AT&T affiliated companies. 84 Chapter 7. Location Administration Table 31. Information in Add Meet-Me Number pages Item Description Start Extension The first extension number in the range that can be used to dial into a Meet-Me conference. NOTE: The range of numbers must be unique. Range The number of extensions that can be used to dial into Meet-Me conferences. Extension An extension number that can be used to dial into a Meet-Me conference. Description A description of the extension number Auto Attendant Link When the Auto Attendant link is selected in the Telephony Management page (Figure 30), the Auto Attendant page shown in Figure 38 displays. It is described in Table 32. This link allows you to view the auto attendants that have been setup for the location. Auto attendants are software applications. Typically, an auto attendant automatically answers calls and transfers them according to the responses callers give to its voice menu system. You may be able to modify or delete an auto attendant. Select its name in the Auto Attendant page (Figure 38). Details about that application may display. If they do, you may be able to change information about the application or delete it. © 2014 AT&T Intellectual Property. All rights reserved. AT&T, the Globe logo, and all other marks contained herein are trademarks or service marks of AT&T Intellectual Property and/or AT&T affiliated companies. 85 Chapter 7. Location Administration © 2014. AT&T Intellectual Property. All rights reserved. Figure 38. Auto Attendant page Table 32. Information in Auto Attendant page Column Description Name The name of the Auto Attendant service Description A description of the Auto Attendant service Pilot Number The phone number that a caller dials to reach the Auto Attendant service. Auto Attendant Service Name Allows you to provide a more descriptive name for the service in case you have more than one auto attendant service. © 2014 AT&T Intellectual Property. All rights reserved. AT&T, the Globe logo, and all other marks contained herein are trademarks or service marks of AT&T Intellectual Property and/or AT&T affiliated companies. 86 Chapter 7. Location Administration Device Pool Link With this link, you can manage the device pools in each location. The devices in a device pool usually have the same default settings. The phones in a location can belong to different device pools, and each device pool can have a different dial plan. The currently available device pools are: • Devicepool226 • Faxdevicepool226 • Device Pool Info © 2014. AT&T Intellectual Property. All rights reserved. Figure 39. Device Pool Management page Table 33. Information in Device Pool Management page Column Description Name The name of the device pool Description A description of the device pool Default If “yes” is in this field, then this device pool is defined as the default device pool for the location Stream Capacity Number of supported audio streams Type Specifies if the device pool belongs to a location or SRST © 2014 AT&T Intellectual Property. All rights reserved. AT&T, the Globe logo, and all other marks contained herein are trademarks or service marks of AT&T Intellectual Property and/or AT&T affiliated companies. 87 Chapter 7. Location Administration © 2014. AT&T Intellectual Property. All rights reserved. Figure 40. Add Device Pool page © 2014 AT&T Intellectual Property. All rights reserved. AT&T, the Globe logo, and all other marks contained herein are trademarks or service marks of AT&T Intellectual Property and/or AT&T affiliated companies. 88 Chapter 7. Location Administration Table 34. Information in Add Device Pool page Column Description Name The name of the device pool Description A description of the device pool Device Pool Type Specifies if the device pool belongs to a location or SRST Default Device Pool When this checkbox is selected, the device pool is the default for the location Device Pool Template The template that defines the functions of the devices in the device pool. The templates were created by AT&T. Call Manager Group Allows you to select a device pool group in the CUCM. Date/Time Group The time zone used on the devices in the device pool. The time zones are arranged by continents and their major cities. Audio Region Sets the audio bit rate Supported Streams Number of supported audio streams Local Route Group AAR CSS The Automatic Alternate Routing (AAR) Calling Search Space (CSS) is used to route a call to the gateway device that connects to the PSTN or other network. AAR Group When there is not enough location bandwidth for a call, the CUCM uses the table of AAR groups and the external number of the terminating directory number to supply the alternate number that is used to reroute the call through the PSTN or other network. Calling Party Transformation CSS Ensures that the device can localize the calling party number Called Party Transformation CSS Ensures that the device can localize the called party number © 2014 AT&T Intellectual Property. All rights reserved. AT&T, the Globe logo, and all other marks contained herein are trademarks or service marks of AT&T Intellectual Property and/or AT&T affiliated companies. 89 Chapter 7. Location Administration Presence Monitoring Link When the Presence Monitoring link is selected in the Telephony Management page (Figure 30), the Presence Monitoring page displays. An example is shown in Figure 41. The information it contains depends on which Presence applications your company is using, such as Cisco Jabber® or Microsoft® Lync®. Typical functions that a Presence application provides includes monitoring the availability of users (presence) and providing Instant Messaging (IM) capabilities. You may be able to modify or delete a Presence application. Select its user name in the Presence Monitoring page (Figure 41). Details about that application may display (Figure 42). If they do, you may be able to change information about the application or delete it from this page. © 2014. AT&T Intellectual Property. All rights reserved. Figure 41. Presence Monitoring page © 2014 AT&T Intellectual Property. All rights reserved. AT&T, the Globe logo, and all other marks contained herein are trademarks or service marks of AT&T Intellectual Property and/or AT&T affiliated companies. 90 Chapter 7. Location Administration Table 35. Information in Presence Monitoring page Column Description Extension Number The extension number of the device Username The 10-digit DDI number of the device All Instances All devices Per Instance Single device Device Name The address of the device. An extension can have two devices associated to it: an IP phone and a Jabber or CUCILync client. Device Type Indicates if the device has SNR and extension mobility enabled First Name The end user’s first name Last Name The end user’s last name © 2014 AT&T Intellectual Property. All rights reserved. AT&T, the Globe logo, and all other marks contained herein are trademarks or service marks of AT&T Intellectual Property and/or AT&T affiliated companies. 91 Chapter 7. Location Administration © 2014. AT&T Intellectual Property. All rights reserved. Figure 42. Presence Configuration page Table 36. Items in Presence Configuration page Items Description License user for Unified CM IM and Presence Select this checkbox if you are a licensed user of Jabber of CUCILync Extn An extension can have two devices associated to it: an IP phone and a Jabber client. Device Name The address of the device Device Type The model number of the device or a description Monitor When selected, the Presence feature is permitted to monitor the device. © 2014 AT&T Intellectual Property. All rights reserved. AT&T, the Globe logo, and all other marks contained herein are trademarks or service marks of AT&T Intellectual Property and/or AT&T affiliated companies. 92 Chapter 7. Location Administration Hunt Groups Link A Hunt group is a group phones that are managed by a set of rules. The rules define where an incoming call to the Hunt group is sent. A caller dials the Pilot number of the Hunt group. The rules determine which member of the Hunt group the call is sent to and how the call is processed if the member does not answer the call. When this link is selected, the Hunt Group Management page (Figure 43) displays. From it, you may be able to view, add, modify, and delete the Hunt groups in the location. Adding a Hunt Group A Hunt group consists of the phones in Number group(s). When you add a Hunt group, you will need to specify which phones (which Number group(s)) the Hunt group will use. To see and/or create Number groups, see Figure 45. To add a Hunt group, select the Add button in the Hunt Group Management page (Figure 43). The Add Hunt Group page displays (Figure 44). Its fields are described in Table 38. Viewing, Modifying, and Deleting a Hunt Group If you select the name of a Hunt group in the Hunt Group Management page (Figure 43), a page similar to Figure 44 displays. It contains the configuration details about the Hunt group. They are described in Table 38. From this page you may be able to see and change the information about that Hunt group or delete the Hunt group. To modify the information, make the changes in the required fields, then select the Modify button at the bottom of the page. To delete a Hunt Group, select the Delete button at the bottom of the page. © 2014 AT&T Intellectual Property. All rights reserved. AT&T, the Globe logo, and all other marks contained herein are trademarks or service marks of AT&T Intellectual Property and/or AT&T affiliated companies. 93 Chapter 7. Location Administration © 2014. AT&T Intellectual Property. All rights reserved. Figure 43. Hunt Group Management page Table 37. Information in the Hunt Group Management page Items Description Name The name of the Hunt group. Pilot Number The phone number of the Hunt group. When a caller dials the Pilot number, the call is automatically forwarded to members in the Hunt group. NOTE: If a call is made to a member’s phone in the Hunt group, it is managed in the same way as a call to the Pilot number. Description A description of the Hunt group Device Group The Device group that the DDI telephone number belongs to. © 2014 AT&T Intellectual Property. All rights reserved. AT&T, the Globe logo, and all other marks contained herein are trademarks or service marks of AT&T Intellectual Property and/or AT&T affiliated companies. 94 Chapter 7. Location Administration © 2014. AT&T Intellectual Property. All rights reserved. Figure 44. Add Hunt Group page © 2014 AT&T Intellectual Property. All rights reserved. AT&T, the Globe logo, and all other marks contained herein are trademarks or service marks of AT&T Intellectual Property and/or AT&T affiliated companies. 95 Chapter 7. Location Administration © 2014. AT&T Intellectual Property. All rights reserved. Figure 44. Add Hunt Group page (continued) © 2014 AT&T Intellectual Property. All rights reserved. AT&T, the Globe logo, and all other marks contained herein are trademarks or service marks of AT&T Intellectual Property and/or AT&T affiliated companies. 96 Chapter 7. Location Administration Table 38. Information in the Add Hunt Group page Items Description Details Name The name of the Hunt group. The name must be unique. Any combination of letters, numbers, and special characters can be used. Description A description of the Hunt group Device Group If the location is subdivided into Device groups, then this is the Device group the Hunt group is assigned to. Pilot Number The phone number of the Hunt group. When a caller dials the Pilot number, the call is automatically forwarded to members in the Hunt group. NOTE: If a call is made to a member’s phone in the Hunt group, it is managed in the same way as a call to the Pilot number. Number Group Name Specifies the Number group(s) assigned to this Hunt group. A Number group can be used by only one Hunt group; however, a Hunt group can use multiple Number groups. The configuration (settings) of the Number group defines the order in which calls are sent to its members. NOTE: Number groups are defined in the Number Group Management page (Figure 45). Ex directory If this checkbox is selected, the Pilot number will not appear in the Corporate directory. Hunt Pilot Configuration Maximum Hunt Timer (seconds) Specifies when an unanswered incoming call is sent to the phone entered in the Forward Hunt No Answer or the Forward Hunt Busy fields (described below). This timer can contain values from 1 to 3600 seconds. Call Pickup Group Specifies the Call Pickup group(s) that can answer incoming calls for the Hunt group. NOTE: Call Pickup groups are defined in the Pickup Group Management page (Figure 47). Hunt Forward Settings Selecting this radio button enables the “Forward Hunt No Answer” and the “Forward Hunt Busy” fields, described below. Forward Hunt No Answer Specifies where a call will be forwarded when no one answers a call in the Hunt group. It also specifies how the call will be managed. • Use Personal Preferences: © 2014 AT&T Intellectual Property. All rights reserved. AT&T, the Globe logo, and all other marks contained herein are trademarks or service marks of AT&T Intellectual Property and/or AT&T affiliated companies. 97 Chapter 7. Location Administration Enables/disables the Forward Hunt No Answer option • Call Forward Destination: The telephone number a call will be forwarded to when no one in the Hunt group answers the call. This can be an extension or 10-digit number. • Class of Service: Specifies how the forwarded call will be managed. The options are: − Default CoS − Internal CLIP Call Forward − Internal Only Call Forward − Intl Natl Mobl Call Forward − Local Call Forward − Natl Mob Call Forward − Block All Call Forward − CF-Internal Only − CF-BlockAll NOTE: The setting in this field overrides the setting in the “Hunt No Answer” field on the Add Number Group page (Figure 46), if the two fields are setup differently. Forward Hunt Busy Specifies where a call will be forwarded to when all lines are busy in the Hunt group. It also specifies how the call will be managed. • Use Personal Preferences: Enables/disables the Forward Hunt Busy option • Call Forward Destination: The telephone number a call will be forwarded to when all lines are busy in the Hunt group. This can be an extension or 10-digit number. • Class of Service (CoS): Specifies how the forwarded call will be managed. The options are: − − − − − − − − − Default CoS Internal CLIP Call Forward Internal Only Call Forward Intl Natl Mobl Call Forward Local Call Forward Natl Mob Call Forward Block All Call Forward CF-Internal Only CF-BlockAll NOTE: The setting in this field overrides the setting in the “Hunt On Busy” field on the Add Number Group page (Figure 47), if the two fields are setup differently. Queue Calls Queue Calls Enables/disables the fields in this section of the Add Hunt Group page. © 2014 AT&T Intellectual Property. All rights reserved. AT&T, the Globe logo, and all other marks contained herein are trademarks or service marks of AT&T Intellectual Property and/or AT&T affiliated companies. 98 Chapter 7. Location Administration Network Hold MOH Source & Announcements The track used for Music On Hold (MOH) and announcements Maximum Number of Callers Allowed in Queue The maximum number of calls that can be in the queue. The value must be between 1 and 100. When Queue is Full Select the action that will occur when the queue is full: • • Disconnect the call Route the call to specified destination using the specified class of service Maximum Wait Time in Queue The maximum amount of time a call can wait in the queue. This time can be from 10 to 3600 seconds. If the maximum time is exceeded, the action specified in the “When Maximum Wait Time is Met” field, described below, is taken. When Maximum Wait Time is Met Select the action that will occur when the wait time exceeds the number specified in the “Maximum Wait Time in Queue” field, defined above: • • Disconnect the call Route the call to specified destination using the specified class of service When no hunt members answer, are logged in, or registered Select the action that will occur when no members of the Hunt group answer, are logged in, or are registered: Add button Clicking on this button causes the Hunt group to be created. • • Disconnect the call Route the call to specified destination using the specified class of service © 2014 AT&T Intellectual Property. All rights reserved. AT&T, the Globe logo, and all other marks contained herein are trademarks or service marks of AT&T Intellectual Property and/or AT&T affiliated companies. 99 Chapter 7. Location Administration Number Groups Link A Number group is a group of phones. A Number group can be used by only one Hunt group; however, a Hunt group can use multiple Number groups. Supporting Hunt groups are the only way Number groups are used. When the Number Groups link is selected, the Number Group Management page displays (Figure 45). Adding a Number Group To add a Number group, select the Add button in the Number Group Management page (Figure 45). The Add Number Group page displays (Figure 46). Its fields are described in Table 40. Viewing, Modifying, and Deleting a Number Group If you select the name of a Number group in the Number Group Management page (Figure 45), a page similar to Figure 46 displays. It contains the configuration details about the Number group. They are described in Table 40. From this page you may be able to see and change the information about that Number group or delete the Number group. To modify the information, make the changes in the required fields, then select the Modify button at the bottom of the page. To delete a Number group, select the Delete button at the bottom of the page. © 2014 AT&T Intellectual Property. All rights reserved. AT&T, the Globe logo, and all other marks contained herein are trademarks or service marks of AT&T Intellectual Property and/or AT&T affiliated companies. 100 Chapter 7. Location Administration © 2014. AT&T Intellectual Property. All rights reserved. Figure 45. Number Group Management page Table 39. Information in Number Group Management page Item Description Name Name of the Number group Description Description of the Number group Device Group If the location is subdivided into Device groups, then this is the Device group the Number group is assigned to. © 2014 AT&T Intellectual Property. All rights reserved. AT&T, the Globe logo, and all other marks contained herein are trademarks or service marks of AT&T Intellectual Property and/or AT&T affiliated companies. 101 Chapter 7. Location Administration © 2014. AT&T Intellectual Property. All rights reserved. Figure 46. Add Number Group page © 2014 AT&T Intellectual Property. All rights reserved. AT&T, the Globe logo, and all other marks contained herein are trademarks or service marks of AT&T Intellectual Property and/or AT&T affiliated companies. 102 Chapter 7. Location Administration © 2014. AT&T Intellectual Property. All rights reserved. Figure 46. Add Number Group page (continued) Table 40. Information in the Add Number Group page Item Description Name The name of the Number group. It must be unique. Any combination of letters, numbers, and special characters can be used. Description Description of the Number group Device Group If the location is subdivided into Device groups, then this is the Device group that the Number group is assigned to. Hunt On Busy Specifies how an incoming call will be managed if the first phone it is sent to is busy. There are four options: Stop hunting The call is sent to the first member of the Hunt group, but is not sent to another member if the first member does not answer. © 2014 AT&T Intellectual Property. All rights reserved. AT&T, the Globe logo, and all other marks contained herein are trademarks or service marks of AT&T Intellectual Property and/or AT&T affiliated companies. 103 Chapter 7. Location Administration Try next member, then, try next group in Hunt List The call is sent to the first idle member in the Number group. If the call is unanswered, the call is sent to the next idle member. This continues until the call is answered or there are no idle members left to try. If there are no idle members left, the process is repeated using the next Number group assigned to the Hunt group. Skip remaining members, and go directly to next group The call is sent to a member of the Number group. If this member is busy, the call is sent to the next Number group assigned to the Hunt group. Try next member but do not go to next group The call is sent to the first idle member in the Number group. If the call is unanswered, the call is sent to the next idle member. This is repeated until the call is answered or all members of that Number group have been tried. If no one is available to answer the call, the caller will hear a busy signal. Hunt No Answer Specifies how an incoming call is managed if the first phone it is sent to does not answer. The options in its drop-down menu are the same as those provided for the Hunt On Busy field (described above). Automatically Logout Hunt Member on No Answer If this checkbox is selected, then any member of the Hunt group that does not answer an incoming call is automatically logged off. They can log back in using the HLOG soft key. If a programmable line key is setup on the phone for this purpose, they can use it instead. Hunt Not Available Specifies how an incoming call is managed if the end user of the first phone it is sent to is not logged in. The options in its drop-down menu are the same as those provided for the Hunt On Busy field (described above). Distribution Method Specifies the order in which phones in the Hunt group are contacted. Longest Idle time An incoming call is forwarded to the phone in the Hunt group that has been idle the longest. If the call is unanswered, it is sent to the phone with the next longest amount of idle time. This is repeated until the call is answered. Circular The system remembers the last member of the Hunt group that received a call. An incoming call is sent to the next member of the Hunt group. Top Down An incoming call is sent to the first idle phone in the Hunt group. If the call is unanswered, it is sent to the next idle phone in the Hunt group. This continues until the call is answered. Broadcast An incoming call is sent to all idle members of a Hunt group simultaneously. RNA (Ring No Answer) When the system sends a call to a member of the Hunt group, this is the amount of time it will wait for the call to be answered before it sends the call © 2014 AT&T Intellectual Property. All rights reserved. AT&T, the Globe logo, and all other marks contained herein are trademarks or service marks of AT&T Intellectual Property and/or AT&T affiliated companies. 104 Chapter 7. Location Administration Reversion Timeout to another phone. NOTE: Set this timer so it times out before the Maximum Hunt Timer (in the Add Hunt Group page (Figure 44)) times out. Line Number Specifies the extension number of the Number group. It is the number that phones not in the group will use to call the group. Add command button Selecting this button causes the Number group to be added to the system. Pickup Groups Link There are two Call Pickup functions: Call Pickup and Group Call Pickup. • The Call Pickup function enables end users to answer an incoming call for someone within their group. When a call comes into their group, their Message waiting lights flashes red, their ringtones sounds, and their displays shows that a call is available for them to pick up (depending on how alerts are setup in the Pickup Group page (Figure 46). These alerts are sent only once. End users should respond to them quickly before the call is sent to voicemail. • The Group Call Pickup function enables end users to answer an incoming call for an extension outside of their group. Group Pickup works differently than Call Pickup. With Group Pickup, there will be no alerts on their telephones. End users will only be aware of a call to another group when they hear a phone ring on another desk. Also, to pick up a call from another group, they must know the number designation for that group (the Pickup number) and input it on their telephone. Like Call Pickup, they should act quickly before the call is transferred to voicemail. When the Pickup Groups link is selected, the Pickup Group Management page displays (Figure 47). It is described in Table 41. Adding a Pickup Group To add a Pickup group, select the Add button in the Pickup Group Management page (Figure 47). The Add Pickup Group page displays (Figure 48). It is described in Table 42. When you have finished entering information in the fields, select the Add button on the bottom of the page. Viewing, Modifying, and Deleting a Pickup Group If you select the name of a Pickup group in the Pickup Group Management page (Figure 47), a page similar to Figure 48 displays. From this page you may be able to see and change the information about that Pickup group or delete the group. To modify the information, make the changes in the required fields, then select the Modify button at the bottom of the page. To delete a Pickup group, select the Delete button at the bottom of the page. © 2014. AT&T Intellectual Property. All rights reserved. © 2014 AT&T Intellectual Property. All rights reserved. AT&T, the Globe logo, and all other marks contained herein are trademarks or service marks of AT&T Intellectual Property and/or AT&T affiliated companies. 105 Chapter 7. Location Administration Figure 47. Pickup Group Management page Table 41. Information in Pickup Group Management page Item Description Name The name of the Call Pickup group. Pickup Group Number The DDI or extension number of the Call Pickup group. It is a unique number. Description Description of the Call Pickup group Device Group If the location is subdivided into Device groups, then this is the Device group that the Pickup group is assigned to. © 2014 AT&T Intellectual Property. All rights reserved. AT&T, the Globe logo, and all other marks contained herein are trademarks or service marks of AT&T Intellectual Property and/or AT&T affiliated companies. 106 Chapter 7. Location Administration © 2014. AT&T Intellectual Property. All rights reserved. Figure 48. Add Pickup Group page © 2014 AT&T Intellectual Property. All rights reserved. AT&T, the Globe logo, and all other marks contained herein are trademarks or service marks of AT&T Intellectual Property and/or AT&T affiliated companies. 107 Chapter 7. Location Administration © 2014. AT&T Intellectual Property. All rights reserved. Figure 48. Add Pickup Group (continued) Table 42. Information in Add Pickup Group page Item Description Details Name The name of the Call Pickup group. It must be unique. Any combination of letters, numbers, and special characters can be used. Description Description of the Call Pickup group Device Group If the location is subdivided into Device groups, then this is the Device group that the Pickup group is assigned to. Pickup Number This is the DDI or extension number of the Call Pickup group. This phone number must be unique. © 2014 AT&T Intellectual Property. All rights reserved. AT&T, the Globe logo, and all other marks contained herein are trademarks or service marks of AT&T Intellectual Property and/or AT&T affiliated companies. 108 Chapter 7. Location Administration Call Pickup Group Notification Settings Call Pickup Group Notification Policy Specifies how the Call Pickup group will be notified when an incoming call is not being answered by the called party (a member of the Call Pickup group). The notification methods include: No alert The Call Pickup group will not be notified of the unanswered incoming call. Audio alert The phones of the Call Pickup group will ring. Visual alert On each phone in the Call Pickup group: the Message waiting light will flash red and the display will show that a call is available for pickup. Audio and Visual alert On each phone in the Call Pickup group: the phone will ring, the Message waiting light will flash red, and the display will show that a call is available for pickup. NOTE: These alerts are sent only once. The call must be answered quickly or the call will be sent to voicemail. Call Pickup Group Notification Timer Specifies how long a call will ring (1 to 300 seconds) on the original called party’s phone before the Call Pickup group is notified that a call is unanswered. The Call Pickup group will be notified using the method specified in the Call Pickup Group Notification Policy field (defined above). Call Information Display for Call Pickup Group Notification Calling Party Information checkbox When selected, the identification information of the calling party will be included when a Visual notification message is sent to the Call Pickup group. See the Call Pickup Group Notification Policy field defined above. NOTE: When multiple incoming calls trigger notification messages to the Call Pickup group and visual alerts are being used, the most recent notification message will display on the phones of the Call Pickup group. However, when someone performs a call pickup, the call being answered is the one that has been waiting the longest. Called Party Information checkbox When selected, the identification information about the called party will be included when a visual notification message is sent to the Call Pickup group. See the Call Pickup Group Notification Policy field defined above. Add button Causes a new Call Pickup group to be created using the information supplied in the fields above. © 2014 AT&T Intellectual Property. All rights reserved. AT&T, the Globe logo, and all other marks contained herein are trademarks or service marks of AT&T Intellectual Property and/or AT&T affiliated companies. 109 Chapter 7. Location Administration End Users Link When this link is selected, the User Management page (Figure 49) displays. It lists all end users in the location. The contents of the page are described in Table 43. © 2014. AT&T Intellectual Property. All rights reserved. Figure 49. User Management page Table 43. Information in the User Management page Column Description Username The telephone (DDI) number assigned to the telephone Name The name of the end user Associated Device(s): Extn “Associated Devices(s)” is the MAC address of the phone(s) assigned to the end user. “Extn” is the extension number assigned to Line 1 of the telephone. Voicemail Indicates if voicemail can be used on this phone Conferencing Indicates if this phone can initiate or join a conference Presence Indicates if the Presence feature is currently being supported on the phone Extension Mobility Indicates if Extension Mobility is enabled on the phone. Single Number Reach The name of the device your calls are forwarded to Mobility Identity Indicates if you are using a UC client such as Jabber or CUCILync © 2014 AT&T Intellectual Property. All rights reserved. AT&T, the Globe logo, and all other marks contained herein are trademarks or service marks of AT&T Intellectual Property and/or AT&T affiliated companies. 110 Chapter 7. Location Administration Adding a New End User To begin adding a new end user, select the Add button in the User Management page (Figure 49). The Add End User page displays (Figure 50). Fill in the fields. They are described in Table 44. When you have completed adding information, select the Add button on the bottom of the second page. The new user is created. After you have created the end user, associate a registered phone to the user. This can be done by performing the following: 1. Go to the User Management page (Figure 49) and select the new user. 2. In the page that opens, select the Associate Device button. The Associate Device page opens, which contains a list of available phones. NOTE: If there are no registered phones available for the location, no phones will be listed. Go to the Phone Registration page (Figure 53) and register a phone. 3. Select the Associate button next to the desired phone. (To examine the information about a phone before selecting it, click on the Device Name.) Deleting an End User To delete an end user, perform the following steps in the order they are presented: 1. A few features used in the end user’s phone must be disabled or deleted. This includes: voicemail, the Extension Mobility profile, and the speed dial numbers. − To disable voicemail, go to the User Management page (Figure 49) and select the username of the end user. In the page that opens, select the Voicemail button. Next to “Personal Voicemail” there will be “Y” or “Add.” If “Y” is displayed, select it. This will disable voicemail. − To disable the Extension Mobility profile, go to the User Management page (Figure 49) and select the username of the end user. In the page that opens, select the Extension Mobility Profile button. Next to “Extension Mobility Profile” there will be “Y” or “Add.” If “Y” is displayed, select it. − To delete the Speed Dial numbers, go to the User Management page (Figure 49) and select the associated device (MAC address) of the end user. The Phone Management – Details page (Figure 56) displays. Select the Manage Speed Dials button. The Speed Dials page (Figure 59) displays. Select the Delete All button. 2. All device(s) assigned to the end user must be disassociated from the end user. This is done by performing these steps: − Open the User Management page (Figure 49) and select the user. − Click on the Associate Device button. The Associate Device page opens. − Select the Un-Associate button next to each device associated to the user. 3. Delete the end user by selecting the Delete button in the User Management page (Figure 49). © 2014 AT&T Intellectual Property. All rights reserved. AT&T, the Globe logo, and all other marks contained herein are trademarks or service marks of AT&T Intellectual Property and/or AT&T affiliated companies. 111 Chapter 7. Location Administration © 2014. AT&T Intellectual Property. All rights reserved. Figure 50. Add End User page © 2014 AT&T Intellectual Property. All rights reserved. AT&T, the Globe logo, and all other marks contained herein are trademarks or service marks of AT&T Intellectual Property and/or AT&T affiliated companies. 112 Chapter 7. Location Administration © 2014. AT&T Intellectual Property. All rights reserved. Figure 50 (continued). Add End User page © 2014 AT&T Intellectual Property. All rights reserved. AT&T, the Globe logo, and all other marks contained herein are trademarks or service marks of AT&T Intellectual Property and/or AT&T affiliated companies. 113 Chapter 7. Location Administration © 2014. AT&T Intellectual Property. All rights reserved. Figure 50 (continued). Add End User page © 2014 AT&T Intellectual Property. All rights reserved. AT&T, the Globe logo, and all other marks contained herein are trademarks or service marks of AT&T Intellectual Property and/or AT&T affiliated companies. 114 Chapter 7. Location Administration Table 44. Information in Add End User page Item Description Details Username The username for logging into the Self-Care portal Security Profile Specifies which fields the user can see and/or change in the Self-Care portal. Password The initial password for logging into the Self-Care portal. The user will be prompted to change the password during the initial login. Password Requirements • Minimum length: At least nine characters. • Unique: A new password must be different from passwords used before. Passwords similar or identical to previously used passwords will not be accepted. • Special characters: Depending on how the system is configured, the password might need to contain a minimum number of special characters, such as: upper case characters, punctuation, and numeric characters. • Dictionary terms: The password cannot be a word in the dictionary (for example: handsome or exciting). • Sequences: The password cannot be a sequence of letters or numbers (for example: ABCD or 123). Role Specifies the location that the user belongs to Title Title of the user (Mr., Mrs., Ms., etc.) First Name First name of the user Middle Name Middle name of the user Last Name Last name of the user Home Telephone Number Home telephone number of the user. The maximum number of characters this field accepts is 32. The characters can be alphanumeric or special characters. Mobile Telephone Number Mobile telephone number of the user. The maximum number of characters this field accepts is 32. The characters can be alphanumeric or special characters. Contact Telephone number The primary telephone number of the user. It is the phone number at which the user prefers to be reached. The maximum number of characters this field accepts is 32. The characters can be alphanumeric or special characters. Alternative telephone Number Alternate telephone number of the user. The maximum number of characters this field accepts is 32. The characters can be alphanumeric © 2014 AT&T Intellectual Property. All rights reserved. AT&T, the Globe logo, and all other marks contained herein are trademarks or service marks of AT&T Intellectual Property and/or AT&T affiliated companies. 115 Chapter 7. Location Administration Item Description or special characters. Email Address The email address of the user Job Title Job title of the user Directory Filter Not used by AT&T Information Additional information about the user Misc Additional descriptive information Welcome Message Additional descriptive information Extra 1 Additional descriptive information Extra 2 Additional descriptive information Extra 3 Additional descriptive information Extra 4 Additional descriptive information Details (page 2) Phone PIN The Personal Identification Number (PIN) used to access the Extension Mobility feature. The PIN must be a minimum of five numeric characters. Do not use alphabetic or special characters. Digest Credentials Not used by AT&T Confirm Digest Credentials Not used by AT&T Department The department that the user is assigned to, if the location is grouped or subdivided into departments. Department Code The code of the department (described in the field above) Ex directory When selected, the user’s information is not displayed in the Corporate directory. Override Language Changes the language (English, French, etc.) on the user’s IP telephone and Self-Care portal. If no language is selected, than the language assigned to the location is used. Feature Group Specifies which group of features will be available on the user’s IP telephone and Self-Care portal. Access Profile Defines what level of access a user has in the Self-Care portal Directory Partition Not used by AT&T Feature Display Policy Specifies the menu options and fields the user can see and change in the Self-Care portal Account Number to use in External Accounting System Specifies a reference number that can be used in the accounting system IPPBX Settings © 2014 AT&T Intellectual Property. All rights reserved. AT&T, the Globe logo, and all other marks contained herein are trademarks or service marks of AT&T Intellectual Property and/or AT&T affiliated companies. 116 Chapter 7. Location Administration Item Description Service Profile Not used by AT&T Allow Control of Device from CTI checkbox Not used by AT&T Viewing or Changing End User Information To view an end user’s information, go to the User Management page (Figure 49) and select the username of the end user. The details page that opens contains information about the end user. It is similar to the Add End User page (Figure 50), which is described in Table 44, plus it contains the command buttons listed in Table 45. Your details page may not have all the command buttons listed in the table. If you select the MAC address in the Associated Device(s): Extn column, the Phone Management page displays. It is shown in Figure 55. If you change any information in either page, select the Modify button at the bottom of the page to have the system accept the changes. Table 45. Command Buttons in User Management – Details Page Command Button Description Single Number Reach Allows you to setup the SNR profile for the end user Change Password Allows you to change the end user’s password for logging into the SelfCare portal Change PIN Allows you to change the end user’s PIN for the Extension Mobility feature Extension Mobility Profile Allows you to setup the Extension Mobility profile of the phone Voicemail Allows you to create a voicemail account for the end user Conference Allows you to enable/disable conference services for the end user Associate Device Lists the registered devices that are available at the location © 2014 AT&T Intellectual Property. All rights reserved. AT&T, the Globe logo, and all other marks contained herein are trademarks or service marks of AT&T Intellectual Property and/or AT&T affiliated companies. 117 Chapter 7. Location Administration Phone Inventory Link When you select this link, a list of all phones (registered and not registered) in the UC Voice system can display (Figure 51). If you selected a division, then only phones in that division display. If you selected a location, then only the phones assigned to that location display. To see more information about a particular phone, click on the device name. A page similar to Figure 52 displays. It contents are described in Table 46. NOTE: Only AT&T can add a phone to the phone inventory. © 2014. AT&T Intellectual Property. All rights reserved. Figure 51. Example Phone Inventory page Table 46. Information in Phone Inventory page Column Description Phone Type The type of phone that has been assigned to the Medium Access Control (MAC) address Device Name The phone’s unique device name. It is the MAC address of the phone and how a phone is identified in the AT&T UC Voice telephone system. NOTE: If you click on a Device Name, details about that device display. See Figure 52 and Table 47. Registered Indicates if the phone is registered or not registered First Ext/Label The “First Ext” is the extension assigned to Line 1 of the telephone. The “Label” is the information that displays on the telephone next to © 2014 AT&T Intellectual Property. All rights reserved. AT&T, the Globe logo, and all other marks contained herein are trademarks or service marks of AT&T Intellectual Property and/or AT&T affiliated companies. 118 Chapter 7. Location Administration Column Description Line 1. Division The division the phone is assigned to Location The location the phone is assigned to Device Group If the location is subdivided into Device groups, then this is the Device group the phone is assigned to. Service Status Specifies whether the phone and all of its lines are ready to be used. In Service The phone is available for service (ready to be used). This is an active link. If you click on it, the phone will be placed “out of service.” Out of Service The phone is not available for service (not ready to be used). This is an active link. If you click on it, the phone will be placed “in service.” Partially out of service (limited calling options) One or more of the phone’s lines is not available for service (cannot be used). This is an active link. If you click on it, the phone’s lines will be placed “in service.” © 2014 AT&T Intellectual Property. All rights reserved. AT&T, the Globe logo, and all other marks contained herein are trademarks or service marks of AT&T Intellectual Property and/or AT&T affiliated companies. 119 Chapter 7. Location Administration © 2014. AT&T Intellectual Property. All rights reserved. Figure 52. Example Phone Inventory – Details page © 2014 AT&T Intellectual Property. All rights reserved. AT&T, the Globe logo, and all other marks contained herein are trademarks or service marks of AT&T Intellectual Property and/or AT&T affiliated companies. 120 Chapter 7. Location Administration Table 47. Information in Phone Inventory – Detail page Item Description Device Name The phone’s unique device name. It is the MAC address of the phone. Reseller AT&T Customer Your company’s name Division The division the phone is assigned to Location The location the phone is assigned to Phone Registered Specifies if the phone is registered IP Address Not available Phone Type Usually contains the name of the phone’s manufacturer and the model number Configuration Profile If this is “Y,” then an actual phone has been assigned to this MAC address. If this is “N,” then the MAC address is being reserved. Button Template Name The template that defines the functions of the buttons on the telephone. The templates were created by AT&T. Phone Registration Link When this link is selected, the Phone Registration page (Figure 53) displays. It contains all the phones assigned to the location that have not yet been registered (not assigned a phone number). NOTE: If the Phone Registration page does not list any phones, then all phones in the location have been used. Contact AT&T if more phones are needed in the location. Registering a Telephone To begin the registration process, select the device name of the telephone in the Phone Registration page (Figure 49). The Phone Registration – Details page displays (Figure 54). You can change the information in some of the fields. When you have completed updating the fields, select the Registration button at the bottom of the third page. During the registration process, the phone will be assigned the telephone (DDI) number you selected in the Phone Registration – Details page. When the registration process has completed, the phone will no longer be in the Phone Registration page (Figure 53). It is now in the Phone Management page (Figure 55). Also, its entry in the Phone Inventory page (Figure 51) is updated. © 2014 AT&T Intellectual Property. All rights reserved. AT&T, the Globe logo, and all other marks contained herein are trademarks or service marks of AT&T Intellectual Property and/or AT&T affiliated companies. 121 Chapter 7. Location Administration © 2014. AT&T Intellectual Property. All rights reserved. Figure 53. Phone Registration page Table 48. Information in Phone Registration page Column Description Phone Type The type of IP telephone IP Address The IP address of the phone Configuration Profile If set to “Y,” then this is a physical IP phone. If set to “N,” then this is a virtual phone. Device Name The MAC address of the phone Device Group If the location is subdivided into Device groups, then this is the Device group the phone is assigned to. © 2014 AT&T Intellectual Property. All rights reserved. AT&T, the Globe logo, and all other marks contained herein are trademarks or service marks of AT&T Intellectual Property and/or AT&T affiliated companies. 122 Chapter 7. Location Administration © 2014. AT&T Intellectual Property. All rights reserved. Figure 54. Phone Registration – Details page © 2014 AT&T Intellectual Property. All rights reserved. AT&T, the Globe logo, and all other marks contained herein are trademarks or service marks of AT&T Intellectual Property and/or AT&T affiliated companies. 123 Chapter 7. Location Administration © 2014. AT&T Intellectual Property. All rights reserved. Figure 54 (continued). Phone Registration – Details page © 2014 AT&T Intellectual Property. All rights reserved. AT&T, the Globe logo, and all other marks contained herein are trademarks or service marks of AT&T Intellectual Property and/or AT&T affiliated companies. 124 Chapter 7. Location Administration © 2014. AT&T Intellectual Property. All rights reserved. Figure 54 (continued). Phone Registration – Details page © 2014 AT&T Intellectual Property. All rights reserved. AT&T, the Globe logo, and all other marks contained herein are trademarks or service marks of AT&T Intellectual Property and/or AT&T affiliated companies. 125 Chapter 7. Location Administration Table 49. Information in Phone Registration – Details page Item Description Phone Features Phone Type The type of phone Device Name The MAC address of the phone Description The description of the phone. It will be used in the Phone Management page (Figure 55). Softkey Template The template that defines the functions of the soft keys on the telephone. Button Template Name The template that defines the functions of the buttons on the telephone. The templates are defined by AT&T. Phone Security Profile For AT&T use only Media Services The media service that controls Music on Hold (MOH). Select Phone Feature Group The Feature group the phone is assigned to Phone Details Feature Group Specifies the features the end user will see in the Self-Care portal for that phone Device Group The Device group that the DDI telephone number belongs to. A Device group is a pool of phones created on the Call manager. Description Description of the phone Softkey Template The template that defines the functions of the soft keys on the telephone. Feature Control Policy The features the phone will have after registration Button Template Name The template that defines the functions of the buttons on the telephone. The templates are defined by AT&T. Expansion Module 1 Sidecar added to the phone Expansion Module 2 Sidecar added to the phone Expansion Module 3 Sidecar added to the phone Limits Outbound Calls To For AT&T use only Device Use Specifies if the devices will be used as a phone or a fax machine Device Pools SRST Enables/disables Survivable Remote Site Telephony (SRST) for the telephone. When enabled, the phone is placed in the SRST device pool. © 2014 AT&T Intellectual Property. All rights reserved. AT&T, the Globe logo, and all other marks contained herein are trademarks or service marks of AT&T Intellectual Property and/or AT&T affiliated companies. 126 Chapter 7. Location Administration Item Description Device Pools Not available Number Details Clear Lines command button Removes the lines from the phone, deleting the DDI number along with the CoS and the label Button The programmable buttons on the phones. They are physical buttons, not soft keys. Button Type The function assigned to each programmable button, for example: line, speed dial, hot line, busy lamp, etc. Number The DDI telephone number (extension number and possibly the PSTN number) that will be assigned to the phone. Also indicates if the line is shared. Label The text that displays on the telephone next to the button. Class of Service Places restrictions on where the phone can place calls to, for example: • Local • National • International Copy Lines command button Makes an exact copy of the first line on all available lines on the telephone User Details Associated User The DDI number (10-digit phone number) of the end user that will be associated to the device. Register button When selected, the registration process for this phone takes place. © 2014 AT&T Intellectual Property. All rights reserved. AT&T, the Globe logo, and all other marks contained herein are trademarks or service marks of AT&T Intellectual Property and/or AT&T affiliated companies. 127 Chapter 7. Location Administration Phone Management Link This link displays the Phone Management page (Figure 55), which allows you to see information about the phones in the location. If you select a phone by clicking on its device name (MAC address), the details about that phone display (Figure 56). You may be able to change information about that phone, including its Speed Dial numbers, the telephone numbers assigned to its Busy Lamp buttons, and its advanced settings. Viewing and Modifying Phone Details To see and possibly change the information about a telephone, select its device name in the Phone Management page (Figure 55). The Phone Management – Details page displays (Figure 56). It is described in Tables 51 and 52. © 2014. AT&T Intellectual Property. All rights reserved. Figure 55. Phone Management page © 2014 AT&T Intellectual Property. All rights reserved. AT&T, the Globe logo, and all other marks contained herein are trademarks or service marks of AT&T Intellectual Property and/or AT&T affiliated companies. 128 Chapter 7. Location Administration Table 50. Information in Phone Management page Column Description Phone Type The type of IP telephone Usage The amount of voice and video bandwidth the phone is using. Device Name The MAC address of the phone. This is an active link. Clicking on a device name causes the Phone Management – Details page to display (Figure 56) that may allow you to modify the details of the device. First Line Ext/Label The “First Line Ext” is the extension assigned to Line 1 of the telephone. The “Label” is the information that displays on the telephone next to Line 1. Device Group If the location is subdivided into Device groups, then this is the Device group the phone is assigned to. Configuration Profile If set to “Y,” then this is a physical IP phone. If set to “N,” then this is a virtual phone. Associated User DDI number of the end user associated with the phone. IP Address IP address of the phone Service Status Indicates whether the phone and all of its lines are ready to be used. In Service The phone is available for service (ready to be used). This is an active link. If you click on it, the phone will be placed “out of service.” Out of Service The phone is not available for service (not ready to be used). This is an active link. If you click on it, the phone will be placed “in service.” Partially out of service (limited calling options) One or more of the phone’s lines is not available for service (cannot be used). This is an active link. If you click on it, the phone’s lines will be placed “in service.” © 2014 AT&T Intellectual Property. All rights reserved. AT&T, the Globe logo, and all other marks contained herein are trademarks or service marks of AT&T Intellectual Property and/or AT&T affiliated companies. 129 Chapter 7. Location Administration © 2014. AT&T Intellectual Property. All rights reserved Figure 56. Phone Management – Details page © 2014 AT&T Intellectual Property. All rights reserved. AT&T, the Globe logo, and all other marks contained herein are trademarks or service marks of AT&T Intellectual Property and/or AT&T affiliated companies. 130 Chapter 7. Location Administration © 2014. AT&T Intellectual Property. All rights reserved. Figure 56 (continued). Phone Management – Details page © 2014 AT&T Intellectual Property. All rights reserved. AT&T, the Globe logo, and all other marks contained herein are trademarks or service marks of AT&T Intellectual Property and/or AT&T affiliated companies. 131 Chapter 7. Location Administration © 2014. AT&T Intellectual Property. All rights reserved. Figure 56 (continued). Phone Management – Details page Table 51. Command Buttons in Phone Management – Details page Command Button Description Phone Reset Resets the phone. If someone is on a call, the call is immediately terminated. (This reset is the same thing that would happen if the end user turned off the power to a phone then restored power.) Replace Phone Allows you to replace the phone with another of the same type. All the settings of the phone are saved and used on the new phone. When this command button is selected, a list of available phones in the location displays. NOTE: If someone is on a call, the call is immediately terminated. Login User Allows the administrator to log specific users into the Extension Mobility feature of this phone. It also allows the administrator to logout a user who is logged into the Extension Mobility feature of the phone. Manage Lines Allows you to determine which telephone numbers are assigned to a telephone line (see Figure 57 and Table 53) Manage Speed Dials Allows you to view, add, and delete Speed Dial numbers. The Speed Dials page is shown in Figure 59 and described in Table 55. Manage Busy Lamp Fields Allows you to view, add, and delete Busy Lamp numbers. The Busy Lamps Fields page is shown in Figure 61 and described in Table 56. Advanced Settings Causes the list of advanced settings to display. They are shown in Figure 63 and described in Table 57. Modify Saves the changes you made about the phone Unregister When this button is selected, the following items are removed from the phone: • All telephone numbers on all lines associated with the phone © 2014 AT&T Intellectual Property. All rights reserved. AT&T, the Globe logo, and all other marks contained herein are trademarks or service marks of AT&T Intellectual Property and/or AT&T affiliated companies. 132 Chapter 7. Location Administration • Speed Dial numbers • Busy Lamp numbers • IP phone service subscriptions The phone keeps its IP address in the location, and it is placed in the location’s device pool. Table 52. Information in Phone Management – Details page Item Description Phone Details Device Name The phone’s unique device name. It is the MAC address of the phone. Phone Type The type of IP telephone assigned to the user. IP Address IP address of the phone Feature Group The Feature group the phone is assigned to Description Description of the phone Default Music On Hold Track The music callers will hear if they are placed on hold. Associated User The user of this phone Configuration Profile If this is “Y,” then an actual phone has been assigned to this MAC address. If this is “N,” then the MAC address is being reserved. Button Template Name The template that defines the functions of the buttons on the telephone. The templates are defined by AT&T. SIP Profile Defines the type of signaling: Session Initiation Protocol (SIP) or Signaling Connection Control Part (SCCP) (skinny) Feature Control Policy The features the phone will be assigned Phone Security Profile For AT&T use only Phone Locale Where the phone is registered. Idle URL Specifies what will appear on the telephone’s display screen when the phone has been idle for a period of time. Idle Timeout The amount of time (in seconds) the phone is idle before the phone’s display automatically becomes blank. If the Auto option is selected, the phone will use the time that AT&T preset. First Expansion Module The type of sidecar added to the phone Second Expansion Module The type of sidecar added to the phone Date Added The day the phone was added to the phone inventory © 2014 AT&T Intellectual Property. All rights reserved. AT&T, the Globe logo, and all other marks contained herein are trademarks or service marks of AT&T Intellectual Property and/or AT&T affiliated companies. 133 Chapter 7. Location Administration Item Description Media Services The media service that controls Music on Hold (MoH). Phone Layout Button The programmable buttons on the phones. They are physical buttons, not soft keys. Button Type The function assigned to each button, for example: line, speed dial, hot line, busy lamp, etc. Line Details The DDI and extension information of each button Phone Feature SRST Enables/disables Survivable Remote Site Telephony (SRST) for the telephones in the Feature group. When enabled, the phones are placed in the SRST device pool. Allow User Login To Phone Determines if users (not the person associated to the phone) can login and use the phone’s Extension Mobility feature. Cache Username On Phone If selected, the telephone’s cache memory holds the user name of the last person who logged into the Extension Mobility feature of the phone. That end user will only need to supply a PIN to access the Extension Mobility feature on that phone on subsequent logins. Device Pool Not available Settings (per line) Label The text that displays on the telephone next to the line’s button. Label ASCII The text that displays on the telephone next to the line’s button. The information is sent using the ASCII format, which is used by older PBX systems. Message Waiting Lamp Policy How the Message Waiting Lamp will function. The options are: Ring Setting – Phone Active How a phone announces there is an incoming call when the phone is busy with another call. Select from these options: • • • • • • • • • • • Ring Setting – Phone Use System Policy Light and Prompt Prompt Only Light Only None Use System Default Disable Flash only Ring once Ring Beep only How a phone announces there is an incoming call when the phone is not in © 2014 AT&T Intellectual Property. All rights reserved. AT&T, the Globe logo, and all other marks contained herein are trademarks or service marks of AT&T Intellectual Property and/or AT&T affiliated companies. 134 Chapter 7. Location Administration Item Description Idle use (idle). Select from these options: • • • • • • Use System Default Disable Flash only Ring once Ring Beep only Display Name (Caller Line ID) The Caller ID that displays on the receiver’s telephone when a call is made from this phone to another within your AT&T UC Voice telephone system. Line Mask Numeric information at the top of the telephone’s display. Forwarded Call Display – Caller Name Enables/disables the ability to display on the receiver’s phone the name of the person who placed the call. Forwarded Call Display – Caller Number Enables/disables the ability to display on the receiver’s phone the phone number of the person who placed the call. Forwarded Call Display – Redirected Number Enables/disables the ability to display on the receiver’s phone the redirected number. Forwarded Call Display – Dialed Number Enables/disables the ability to display on the receiver’s phone the phone number of the person who was originally dialed. Hide Line from Corporate Directory Specifies if information about the phone can be seen in the Corporate directory. Private Line Settings for line x Call Waiting Busy Trigger Specifies the maximum number of incoming calls a line can support. For example, if this field is set to 2, then incoming call 3 will be rejected with a busy signal (or will be forwarded if a telephone number has been entered in the Call Forward When Busy field (described below)). If this line is shared, all the lines must be busy before incoming calls are rejected. Max Calls Waiting The maximum number of incoming calls that can be queued for waiting. These calls are not on hold; they are in the call waiting queue and have not been answered. Once this number is reached, the next call will be forwarded to the telephone number specified in the Call Forward When Busy field (described below). If the Call Forward When Busy field is empty, the caller will hear a busy tone. Common line settings for line x No Answer Ring Duration The amount of time, in seconds, the phone rings before forwarding calls or sending calls to voice mailboxes. If the amount of time is too short, the user may not be able to answer calls in time. If too long a time is selected, callers may hang up before being sent to your voice mailbox. © 2014 AT&T Intellectual Property. All rights reserved. AT&T, the Globe logo, and all other marks contained herein are trademarks or service marks of AT&T Intellectual Property and/or AT&T affiliated companies. 135 Chapter 7. Location Administration Item Description It takes approximately three second for a phone to ring once, however, this varies depending on the type of phone. Call Forward Calling Search Space Activation Policy Helps prevent toll fraud (long distance calls that are made at the expense of your organization and in violation of its policies) by restricting call forwarding to telephone numbers within your class of service. Select an option from the pull-down menu: • Use system default • With Configured CSS • With Activating Device/Line CSS Where CSS (Calling Search Space) is local, national, or international. Auto Answer Allows the phone to automatically answer a call after one or two rings. The end user will not need to press a button or pick up the handset from the cradle to answer the call. The end user may be able to specify how the call will be answered in the Self-Care portal. The options are: • Auto Answer Off • Auto Answer with Headset • Auto Answer with Speakerphone Music on Hold The music callers will hear if they are placed on hold. Hot Line This feature is a direct dial feature. If a line is setup as a Hot Line, it can only send calls to the number assigned to it. It cannot receive in-bound calls. It can only support outgoing calls to that one number.* To use this feature, pick up the handset and/or press the appropriate Line button. The phone automatically dials the Hot Line number. Alerting Name The name that displays when a user calls internally. Line Class of Service Specifies which areas the phone can call, for example: • Local • National • International Hold Reversion Ring Duration The amount of time, in seconds, the phone rings before forwarding the call or sending it to the voice mailbox. If the amount of time is too short, the user may not be able to answer calls in time. If too long a time is selected, callers may hang up before being sent to the voice mailbox. It takes approximately three second for a phone to ring once, however, this varies depending on the type of phone. Hold Reversion Notification Interval The number of seconds between the audio tones that alert the end user that a call is on hold. Common line settings for line x (Call Forward) © 2014 AT&T Intellectual Property. All rights reserved. AT&T, the Globe logo, and all other marks contained herein are trademarks or service marks of AT&T Intellectual Property and/or AT&T affiliated companies. 136 Chapter 7. Location Administration Item Description Call Forward Limitations Helps prevent toll fraud (long distance calls that are made at the expense of your organization and in violation of its policies) by restricting call forwarding to telephone numbers within the class of service specified here. Forward All* Enables/disables the ability to immediately forward an incoming call to voicemail or another phone number. If enabled, the end user may be able to disable it in the Self-Care portal. NOTE: This setting overrides all other call forward settings. Forward All Secondary CoS Because call forwarding is a line-based feature, in cases where the device calling search space is unknown, the line calling search space is used to forward the call. If the line calling search space is restrictive and not routable, the forward attempt fails. This field provides a solution to enable forwarding. The primary calling search space for Call Forward All and secondary calling search space for Call Forward All are concatenated (Primary CFA CSS + Secondary CFA CSS). Forward Busy* Enables/disables the ability to send calls to voicemail or to another phone number when the telephone line is busy. If enabled, you can specify how many calls can be placed on hold for a line (in the Max Calls Waiting field, defined above). Forward No Answer* Enables/disables the ability to automatically forward calls to voicemail or another phone number when a call is not answered. If enabled, the end user may be able to specify in the Self-Care portal how long the telephone rings before a call is forwarded. Forward Unregistered* Enables/disables the ability to automatically forward calls to voicemail or another destination when an end user’s phone is unable to register. * The telephone number entered in the Destination field must be exactly the number that will be dialed, so do not add spaces, hyphens, or parenthesis to the numbers—just the digits. If forwarding calls to an external line, remember to begin with the correct prefix, including an access code (usually 9), 1 + area code, or the international code. For example, enter 912125551234 into the field when: • 9 is the access code • 1 for long distance calling • 212 is the area code • 555-1234 is the telephone number © 2014 AT&T Intellectual Property. All rights reserved. AT&T, the Globe logo, and all other marks contained herein are trademarks or service marks of AT&T Intellectual Property and/or AT&T affiliated companies. 137 Chapter 7. Location Administration Manage Lines Command Button When the Manage Lines button is selected in the Phone Management – Details page (Figure 56), the Line Management page, shown in Figure 57, displays. From this page you can remove telephone numbers from lines, reassign telephone numbers to different line buttons on the telephone, and assign new telephone numbers and clones to unused Line buttons on the telephone. © 2014. AT&T Intellectual Property. All rights reserved. Figure 57. Line Management page Table 53. Information in Line Management page Item Description Phone Details Phone Type The type of phone Device Name The phone’s unique device name. It is the MAC address of the phone and how a phone is identified in the AT&T UC Voice telephone system. © 2014 AT&T Intellectual Property. All rights reserved. AT&T, the Globe logo, and all other marks contained herein are trademarks or service marks of AT&T Intellectual Property and/or AT&T affiliated companies. 138 Chapter 7. Location Administration Item Description Feature Group The Feature group assigned to this phone. Maximum Lines supported The number of lines used by this phone. Limits outbound calls to For AT&T use only Number Details Button # The physical buttons located around the phone’s display screen. They include line buttons and programmable buttons, such as: Speed Dial buttons, Busy Lamp buttons, and Hot Line buttons. Line If this is a Line button, the DDI and PSTN numbers assigned to the button are listed here. If this is a programmable button, then its use is displayed here, for example “Speed Dial.” Action Either a Delete or Add button is seen in this column. • Delete Removes all lines from the phone • Add Allows you to add a line or a clone to a button (see Figure 54 and Table 50) Move Up button If a checkbox next to a Line button is selected, clicking on the Move Up button will cause the line (and its settings) to move to the Line button above the selected Line button. Move Down button If a checkbox next to a Line button is selected, clicking on the Move Down button will cause the line (and its settings) to move to the Line button below the selected line button. Delete Selection button Removes the lines from the Line buttons that have a checkbox selected. Undo Changes button Removes all changes made to the Line Management page since it was opened. Select None button Deselects any selected checkboxes (next to the button numbers) Swap Selected button The checkboxes of two Line buttons must be selected. Clicking on the Swap Selected button causes the two lines (and their phone numbers and settings) assigned to these Line buttons to switch Line buttons. Cancel button Deletes all changes made on this page and closes the Line Management page Apply button Causes the changes specified on this page to be performed on the phone. © 2014 AT&T Intellectual Property. All rights reserved. AT&T, the Globe logo, and all other marks contained herein are trademarks or service marks of AT&T Intellectual Property and/or AT&T affiliated companies. 139 Chapter 7. Location Administration © 2014. AT&T Intellectual Property. All rights reserved. Figure 58. Add Line window Table 54. Information in Add Line window Item Definition Add Line radio button Select this radio button if you are adding a new line to the phone Number Select the DDI and PSTN number Label The text that displays next to the Line button on the telephone. COS The Class of Service (CoS) previously assigned to the line. Add Clone radio button Select this radio button to duplicate a line; for example, duplicate line 1 on line 2. This includes the line’s telephone numbers and settings. Select Line Use the drop-down menu to select the extension and PSTN number that will be cloned Number of Clones Specifies the number of lines that will be given the exact same telephone numbers and settings as the selected line. The numbers in the drop-down box reflect how many phone lines the phone has. Add command button Causes the changes made in the Set Line page to be processed Cancel command button Deletes any changes made in the Set Line page and displays the Line Management page (Figure 57) © 2014 AT&T Intellectual Property. All rights reserved. AT&T, the Globe logo, and all other marks contained herein are trademarks or service marks of AT&T Intellectual Property and/or AT&T affiliated companies. 140 Chapter 7. Location Administration Manage Speed Dials Command Button When the Manage Speed Dials button is selected in the Phone Management – Details page (Figure 56), the Speed Dials page displays (Figure 59). From this page you can view, add, and delete Speed Dial numbers. Adding a Speed Dial Number To add a Speed Dial number, select the Add button in the Speed Dials page (Figure 59). The Add Speed Dial page displays (Figure 60). Enter the information in the fields, then select the Add button. Its fields are described in Table 55. NOTE: End users can add Speed Dial numbers from their IP telephones and also in the Self-Care portal. Modifying a Speed Dial Number You cannot change the information about a Speed Dial number. You can, however, delete the number then add it back in using the correct information. Deleting a Speed Dial Number At the end of each Speed Dial entry on the Speed Dials page (Figure 59), there is a Delete button. Select this button if you want to remove the Speed Dial entry. If all Speed Dial entries need to be removed, click on the Delete All button. © 2014 AT&T Intellectual Property. All rights reserved. AT&T, the Globe logo, and all other marks contained herein are trademarks or service marks of AT&T Intellectual Property and/or AT&T affiliated companies. 141 Chapter 7. Location Administration © 2014. AT&T Intellectual Property. All rights reserved. Figure 59. Example Speed Dials page Table 55. Information in the Speed Dials page and the Add Speed Dial page Item Description Speed Dial Number Specifies the one- or two-digit Speed Dial number (from 1 to 99) to assign to the telephone number. The drop-down menu in the Add Speed Dial page displays all Speed Dial numbers that are available. If the telephone has Speed Dial buttons, the end user can press a Speed Dial button instead of dialing its assigned telephone number. If more Speed Dial numbers are programmed than there are Speed Dial buttons on the telephone, the end user can dial those numbers using the Abbreviated Dialing feature. Label The text that displays next to the Speed Dial button on the telephone. It is also the text that displays next to the Speed Dial number in the Speed Dial Numbers list on the telephone. This list is accessed through the phone’s Services button (or Applications button). Label (ASCII) The text that displays next to the Speed Dial button on the telephone. It is also the text that displays next to the Speed Dial number in the Speed Dial Numbers list. This list is accessed through the phone’s Services button (or Applications button). This information is sent using the ASCII format, which is used by older PBX systems. Telephone Number The telephone number assigned to the Speed Dial number* © 2014 AT&T Intellectual Property. All rights reserved. AT&T, the Globe logo, and all other marks contained herein are trademarks or service marks of AT&T Intellectual Property and/or AT&T affiliated companies. 142 Chapter 7. Location Administration Add command button Select this button after you complete entering the information. It will add the new Speed Dial number to the telephone. Delete command button A Delete button is located at the end of each Speed Dial entry. Selecting it will remove that Speed Dial entry from the system. Delete All command button Removes all Speed Dial numbers from the telephone. * The telephone number entered in the field must be exactly the number that will be dialed, so do not add spaces, hyphens, or parenthesis to the numbers—just the digits. If forwarding calls to an external line, remember to begin with the correct prefix, including an access code (usually 9), 1 + area code, or the international code. For example, enter 912125551234 into the field when: • 9 is the access code • 1 for long distance calling • 212 is the area code • 555-1234 is the telephone number © 2014. AT&T Intellectual Property. All rights reserved. Figure 60. Add Speed Dial page © 2014 AT&T Intellectual Property. All rights reserved. AT&T, the Globe logo, and all other marks contained herein are trademarks or service marks of AT&T Intellectual Property and/or AT&T affiliated companies. 143 Chapter 7. Location Administration Manage Busy Lamp Fields Command Button When the Manage Busy Lamp Fields button is selected in the Phone Management – Details page (Figure 56), the Busy Lamp Fields page displays (Figure 61). From this page you can view how the Busy Lamp Field button(s) on the telephone are configured, if there are any. You can also add and delete telephone number(s) from the Busy Lamp Fields button(s). The Busy Lamp Fields page and Add Busy Lamp Fields page are described in Table 56. Adding a Busy Lamp Number To assign a telephone number to a phone’s Busy Lamp button, select the Add button in the Busy Lamp Fields page (Figure 61). The Add Busy Lamp Field page displays (Figure 62). Enter the requested information in the page, then select the Add button. NOTE: A phone has a limited number of Busy Lamp buttons. Some have no Busy Lamp buttons. If all the Busy Lamp buttons have been assigned telephone numbers (of if the phone has no Busy Lamp buttons), this will be indicated in the Add Busy Lamp Field page. Modifying a Busy Lamp Number You cannot change the information about a Busy Lamp button. You can, however, delete the entry then add it back in using the correct information. Deleting a Busy Lamp Number At the end of each Busy Lamp entry in the Busy Lamp Fields page (Figure 61), there is a Delete button. Select this button if you want to remove the entry. If all Busy Lamp entries need to be removed, click on the Delete All button. © 2014 AT&T Intellectual Property. All rights reserved. AT&T, the Globe logo, and all other marks contained herein are trademarks or service marks of AT&T Intellectual Property and/or AT&T affiliated companies. 144 Chapter 7. Location Administration © 2014. AT&T Intellectual Property. All rights reserved. Figure 61. Busy Lamp Fields page Table 56. Information in Busy Lamp Fields page and Add Busy Lamp Fields page Item Description Busy Lamp Field Number The number assigned to the phone’s Busy Lamp button. Label The text that displays on the telephone next to the Busy Lamp button. Label (ASCII) The text that displays on the telephone next to the Busy Lamp button. The information is sent using the ASCII format, which is used by older PBX systems. Telephone Number The telephone number assigned to the Busy Lamp button on the telephone. This is not the end user’s telephone number; it is the telephone number the end user is monitoring. It will light when that phone is being used. Destination The programmable button on the IP phone that the busy lamp is assigned to. Call Pickup Enables/disables the ability of the end user to answer calls that are being sent to the telephone number being monitored by the Busy Lamp button. The monitored telephone number must be in the end user’s Call Pickup group. Add command button Causes the Add Busy Lamp Field page (Figure 61) to display. Delete All command button Deletes all entries in the Busy Lamps Fields page (Figure 61) Delete command button A Delete button is located at the end of each entry. Select a Delete button to remove the entry. © 2014 AT&T Intellectual Property. All rights reserved. AT&T, the Globe logo, and all other marks contained herein are trademarks or service marks of AT&T Intellectual Property and/or AT&T affiliated companies. 145 Chapter 7. Location Administration © 2014. AT&T Intellectual Property. All rights reserved. Figure 62. Add Busy Lamp Field page Advanced Settings When “(+) Advanced Settings” is selected in the Phone Management – Details page (Figure 55), the list of Advanced Settings appears. These settings cover a broad range of topics, from enabling/disabling the speakerphone and phone ports to determining how the phone’s display will function, and from enabling/disabling RTCP and LLDP functionality to determining which IPv6 switch to use. The list of advanced settings is shown in Figure 63 and described in Table 57. © 2014 AT&T Intellectual Property. All rights reserved. AT&T, the Globe logo, and all other marks contained herein are trademarks or service marks of AT&T Intellectual Property and/or AT&T affiliated companies. 146 Chapter 7. Location Administration © 2014. AT&T Intellectual Property. All rights reserved. Figure 63. Phone Management – Details page – Advanced Settings © 2014 AT&T Intellectual Property. All rights reserved. AT&T, the Globe logo, and all other marks contained herein are trademarks or service marks of AT&T Intellectual Property and/or AT&T affiliated companies. 147 Chapter 7. Location Administration © 2014. AT&T Intellectual Property. All rights reserved. Figure 63 (continued). Phone Management – Details page – Advanced Settings © 2014 AT&T Intellectual Property. All rights reserved. AT&T, the Globe logo, and all other marks contained herein are trademarks or service marks of AT&T Intellectual Property and/or AT&T affiliated companies. 148 Chapter 7. Location Administration © 2014. AT&T Intellectual Property. All rights reserved. Figure 63 (continued). Phone Management – Details page – Advanced Settings © 2014 AT&T Intellectual Property. All rights reserved. AT&T, the Globe logo, and all other marks contained herein are trademarks or service marks of AT&T Intellectual Property and/or AT&T affiliated companies. 149 Chapter 7. Location Administration © 2014. AT&T Intellectual Property. All rights reserved. Figure 63 (continued). Phone Management – Details page – Advanced Settings Table 57. Information in Phone Management – Details page – Advanced Settings (alphanumeric order) Setting Description 80-bit SRTCP (SRTCP80bit) Enables or disables the 80-bit authentication tag for SRTCP (Secure Real-time Transport Control Protocol). 802.1x Authentication (eapAuthentication) Specifies the 802.1x authentication feature status. Actionable Incoming Call Alert (actionableAlert) Causes the Alert with Answer, Divert, and Ignore soft keys to display when there is an incoming call. The options are: • Disabled • Show for incoming call • Show for invisible incoming call (an invisible call is a second call that comes in on a line that is currently being used) Advertise G.722 and ISAC Codecs (g722CodecSupport) Allow EnergyWise Overrides (allowEnergyWiseOverrides) Specifies if the phone will advertise G.722 CODEC to the Unified CallManager: • Use System Default The phone will defer to the setting specified in the enterprise parameter, Advertise G.722 CODEC • Enabled The phone will advertise G.722 CODEC to the Unified CallManager • Disabled The phone will not advertise G.722 CODEC to the Unified CallManager Enables/disables the EnergyWise domain function. For the EnergyWise features to work, this field must be selected and one or more days must be selected in the Enable Power Save Plus field. © 2014 AT&T Intellectual Property. All rights reserved. AT&T, the Globe logo, and all other marks contained herein are trademarks or service marks of AT&T Intellectual Property and/or AT&T affiliated companies. 150 Chapter 7. Location Administration Setting Description Auto Call Select (autoCallSelect) When enabled, the phone automatically switches focus to calls with activity on the same line if there is no user interaction for 10 seconds. NOTE: If this field is set to disabled, it also disables the Auto Line Select field (described below). Auto Line Select (autoSelectLineEnable) Specifies how the phone will shift the call focus: • Enabled Shifts the call focus to incoming calls on all lines • Disabled Shifts the call focus to incoming calls on the currently used line Automatic Port Synchronization (PortAutoLinkSync) Allows the phone to synchronize its PC and SW (Station Wire) ports to the same speed and also to duplex, if the ports are configured to automatically negotiate speed changes. Back USB Port (usb1) Enables/disables the USB port on the phone Background Image (defaultWallpaperFile) Enable/disables the ability of the end user to select the background (wallpaper) shown on the telephone’s display. Bluetooth (bluetooth) Enables/disables Bluetooth functionality on a phone (only for 8900 and 9900 series phones) Bluetooth Profiles (bluetoothProfile) Enables/disables Bluetooth profiles on a phone (only for 8900 and 9900 series phones) Cisco Camera (ciscoCamera) Enables/disables the camera on the phone (only for 8900 and 9900 series phones) Cisco Discovery Protocol (CDP): PC Port (enableCdpPcPort) Enables/disables Cisco Discovery Protocol (CDP) on the PC port Cisco Discovery Protocol (CDP): Switch Port (enableCdpSwPort) Enables/disables CDP on the switch port Days Display Not Active (daysDisplayNotActive) Specifies which days the telephone’s display will not be lit. To select more than one day, hold down the Control key and click on each day you wish to select. Default Line Filter (defaultLineFilter) If you do not want all lines to receive alerts or toasts when there is an incoming call, enter the lines you want to receive the notifications. Separate the line numbers with a comma. If this field is left blank, all lines will be notified. Detect Unified CM Connection Failure (detectCMConnectionFailure) The phone’s sensitivity for detecting a connection failure to the Unified Communications Manager: • Normal Detection of the connection failure occurs at the standard system speed • Delayed Detection of the connection failure is approximately four times slower than the Normal setting © 2014 AT&T Intellectual Property. All rights reserved. AT&T, the Globe logo, and all other marks contained herein are trademarks or service marks of AT&T Intellectual Property and/or AT&T affiliated companies. 151 Chapter 7. Location Administration DF bit (dfBit) Configures the Don’t Fragment (DF) bit in the IP header to 0 or 1, depending on what you select in the drop-down menu. Disable Speakerphone (disableSpeaker) Enables/disables the speakerphone capability of the telephone. When set to enabled, the end user can have a conversation over the phone without taking the handset off the cradle. Disable Speakerphone and Headset (disableSpeakerAndHeadset) Enables/disables both the speakerphone and the headset capabilities of the telephone. Display Idle Timeout (displayIdleTimeout) When the display is turned on because of user activity instead of a programmed timer, this field specifies how long the display will remain lit. The format is in hours and minutes, where 1:15 indicates one hour and 15 minutes. If this field is left blank, the display will turn off in one hour. Display On Duration (displayOnDuration) Specifies the amount of time the display will remain lit. The format is in hours and minutes, where 9:30 would be nine hours and 30 minutes. If this field is left blank, then the display will remain lit for eight hours. Display On Time (displayOnTime) Specifies the time of day the telephone’s display will turn on. The time is in the 24-hour format, for example, where 13:00 is 1:00pm. Display On When Incoming Call (displayOnWhenIncomingCall) Allows the phone’s display to turn on when a call is received, if the phone’s display had turned off. Enable Audible Alert (enableAudibleAlert) Causes the phone to make a warning sound ten minutes before the phone powers off, on the days selected in the Enable Power Save Plus field. Enable/Disable USB Classes (usbClasses) Specifies which USB classes are available on the phone. The options are: • Mass Storage • Human Interface Device • Audio Class Enable Power Save Plus (enablePowerSavePlus) Specifies which days the phone will be powered off according to the times selected in the Phone Off Time and Phone On Time fields (described below). To select more than one day, hold down the Control key and click on each day you wish to select. NOTE: To repower the phone after it has powered off, the user must use a power adapter. This feature will not work on power over the Ethernet. Enable VXC VPN for MAC (enableVXCVPNForMAC) Indicates if the phone will establish a Virtualization eXperience Client (VXC) VPN tunnel for the specified MAC address used by the VXC device that is connected to the phone’s PC port. When this field is: Blank © 2014 AT&T Intellectual Property. All rights reserved. AT&T, the Globe logo, and all other marks contained herein are trademarks or service marks of AT&T Intellectual Property and/or AT&T affiliated companies. 152 Chapter 7. Location Administration The phone will not establish a VXC VPN tunnel. One broadcast MAC address The phone will establish a VXC VPN tunnel and allow any VXC device to access the tunnel. (When a MAC address is broadcast, it is visible over the VPN tunnel, which allows it to connect to the call manager over the VPN tunnel.) One non-broadcast MAC address The phone will establish a VXC VPN tunnel and only allow the specified VXC device’s MAC address to access the tunnel. The default is blank. Enbloc Dialing (useEnblocDialing) Specifies how dialing will be done: • Enabled • Disabled Sends the entire telephone number at one time Sends each digit of the telephone number as it is being dialed EnergyWise Domain (energyWiseDomain) Specifies the EnergyWise domain in which the phone is participating. If any days were selected in the Enable Power Save Plus list box, then an EnergyWise domain must be specified. EnergyWise Endpoint Security Secret (enegyWiseSecret) The password used to access the EnergyWise domain. NOTE: If any days were selected in the Enable Power Save Plus list box, then this password is required. FIPS Mode (fipsMode) This parameter sets the FIPS (Federal Information Processing Standards) mode for the telephone, which is for secure data such as a government agency might use. For example, the Cisco model 7975 is a FIPS 140-2 level 1 compliant device when this option is enabled. Forwarding Delay (forwardingDelay) Specifies when the internal switch forwards packets between the PC and switched ports of the phone after the phone becomes active. • Enabled The internal switch waits eight seconds before forwarding packets • Disabled The internal switch begins forwarding packets immediately NOTE: Select “Enabled” if an end user’s phones are daisy chained together or if both ports are connected to switches for redundant uplinks. Gratuitous ARP (garp) Specifies whether the phone will learn MAC addresses from Gratuitous ARP (Address Resolution Protocol) responses. • Enabled Use when applications need to learn MAC addresses from Gratuitous ARP responses for monitoring and recording voice streams • Disabled Use when monitoring capability is not needed © 2014 AT&T Intellectual Property. All rights reserved. AT&T, the Globe logo, and all other marks contained herein are trademarks or service marks of AT&T Intellectual Property and/or AT&T affiliated companies. 153 Chapter 7. Location Administration Handset/Headset Monitor (handsetHeadsetMonitor) When enabled, someone can use the inactive handset or headset to listen to a call in progress; however, the microphone of the inactive handset or headset is disabled. Headset Sidetone Level (sideToneLevel) Adjusts the headset sidetone level. If the sidetone level is too high, you will hear an echo. A lower sidetone level encourages a higher talking level for headset users. Hide Video By Default (hideVideoByDefault) Enables/disables the ability to see the video window on the telephone. Only 89xx and 99xx series phones currently support video. HTTPS Server (webProtocol) If Web Access (defined below) is enabled, the phone can have one of these connections: • HTTP (HyperText Transfer Protocol) and HTTPS (HyperText Transfer Protocol Secure) • HTTPS only Incoming Call Toast Timer (incomingCallToastTimer) Specifies the maximum amount of time (in seconds) that an incoming call alert displays on the telephone. IP Address Autodetection URL (IpDetentionURL) Specifies if a fully qualified URL (Uniform Resource Locator) will be used to detect the IP Communicator’s address as seen by other phones. This URL is required for compatibility with NATs (Network Address Translations), some non-Cisco VPN (Virtual Private Network) clients, and other similar network topologies. Before you can use this option, you must install and configure an address detection web page. IPv6 Load Server (Ipv6LoadServer) Causes the phone to use the server entered in this field to obtain firmware loads and upgrades, instead of the defined IPv6 (Internet Protocol Version 6) server. Enter the hostname or the IPv6 address of the alternate server, using the standard IPv6 addressing format. The alternate server must be running TFTP (Trivial File Transport Protocol) services and have the load file in the TFTP path. IPv6 Log Server (Ipv6LogServer) Specifies the remote system where log messages are sent. Enter the IPv6 address and port of a remote system. You can view the log data by using a network packet sniffer. LDAP Server Information File (IdapServers) Location of the LDAP server’s information file on the TFTP server. The default address is Communicator/LdapServers.xml. Link Layer Discovery Protocol (LLDP): PC Port (enableLldpPcPort) Enables/disables the Link Layer Discovery Protocol (LLDP) on the PC port Link Layer Discovery Protocol – Media Endpoint Discover (LLDPMED): Switch Port (enableLldpSwPort) Enables/disables the Link Layer Discovery Protocol-Media Endpoint Discover (LLDP-MED) on the switch port © 2014 AT&T Intellectual Property. All rights reserved. AT&T, the Globe logo, and all other marks contained herein are trademarks or service marks of AT&T Intellectual Property and/or AT&T affiliated companies. 154 Chapter 7. Location Administration LLDP Asset ID (lldpAssetId) Sets the Asset ID for the LLDP LLDP Power Priority (powerPriority) Sets the power priority for the LLDP Load Server (loadServer) Causes the phone to use the server entered in this field to obtain firmware loads and upgrades, instead of the defined TFTP (Trivial File Transfer Protocol) server. Enter the hostname or the IP address of the alternate server, using the standard IP addressing format. The alternate server must be running TFTP services and have the load file in the TFTP path. Log Server (logServer) Specifies the IP address and port of the remote system where log messages will be sent. Logging Display (loggingDisplay) Specifies which type of console logging is permitted (for the computer connected to the PC port). • Enabled Logs are sent both to the console and to the downstream port. (Use “Enabled” to force logs on so they can be captured with a packet sniffer.) • Disabled Logging does not display to the console or to the connected downstream port. • PC Controlled The workstation attached to the PC port will determine if logging is enabled. Minimum Ring Volume (minimumRingVolume) Controls the minimum ring volume on an IP phone. “More” Soft Key Timer (moreKeyReversionTimer) The number of seconds before the telephone’s soft keys revert to their initial settings after the More soft key is pressed. Enter a value between 5 and 30. The default value is 5 seconds. Enter 0 to disable the timer. PC Port (pcPort) Enables/disables the PC port on the phone. The port is labeled “10/100 PC.” This port allows the phone to share a single network connection with a PC or workstation. PC Port Remote Configuration (PCRemoteConfig) Specifies the speed and duplex capabilities of the phone’s PC port. If “Auto Negotiate” is selected in the drop-down menu, then remote configuration of the speed and duplex capabilities can occur, which overrides any manual configuration at the phone. NOTE: If you select the speed (10 half, 10 full, etc.), it must match the speed of the computer connected to the PC port of the phone. The speed of some computers is hardcoded. PC Voice VLAN Access (voiceVlanAccess) Specifies if the phone will allow a phone attached to the PC port to access the UC Voice VLAN (Virtual Local Area Network). Peer Firmware Sharing Enables/disables PPID (Peer-to-Peer Image Distribution) that © 2014 AT&T Intellectual Property. All rights reserved. AT&T, the Globe logo, and all other marks contained herein are trademarks or service marks of AT&T Intellectual Property and/or AT&T affiliated companies. 155 Chapter 7. Location Administration (peerFirmwareSharing) allows a single phone in a subnet to retrieve an image firmware file then distribute it to its peers, reducing TFTP bandwidth and increasing firmware upgrade time. Phone Off Idle Timeout (phoneOffIdleTimeout) Specifies the amount of time the phone is idle before the display turns off. Enter a number between 20 and 1440 minutes. The default value is 60 minutes. Phone Off Time (phoneOffTime) Specifies when the phone will power off on the days selected in the Enable Power Save Plus field (described above). The time is in the 24-hour format, for example, where 16:30 is 4:30 pm. If this field is left blank, the phone will turn off at midnight. NOTE: If any days were selected in the Enable Power Save Plus field, but both the Phone Off Time and Phone On Time fields are blank, then the phone will remain on continuously during those days. Phone On Time (phoneOnTime) Specifies when the phone will power on for the days selected in the Enable Power Save Plus field (described above). The time is in the 24-hour format, for example, where 13:00 is 1:00 pm. If this field is left blank, the phone will power up at midnight. Power Negotiation (powerNegotiation) Set this field to enable if the phone is connected to a Power over Ethernet (PoE) switch, which allows the phone to manage whatever power the switch is sending. Otherwise, set this field to disable. NOTE: When the Power Negotiation feature is disabled, the phone can power up accessories up to 12.9W. Provide Dial Tone from Release Button (dialToneFromReleaseKey) Not available Record Call Log from Shared Line (logCallFromSharedLine) Specifies if the Call log for a shared line will be recorded. Recording Tone (recordingTone) Enables or disables the recording tone of the phone. If enabled, the parties on each end of the call will hear the tone. Recording Tone Duration (recordingToneDuration) The length of time that the recording tone will be heard. Enter a value between 1 and 3000 milliseconds. If the field is left blank, the default value will be used. Recording Tone Local Volume (recordingToneLocalVolume) Sets the volume of the recording tone that the user will hear on the handset, headset, and speakerphone. Enter a value between 0 and 100%, with 0% being no tone and 100% being the same as the current volume setting. The default setting is 100%. Recording Tone Remote Volume (recordingToneRemoteVolume) Sets the volume of the recording tone that the party the user is speaking with will hear on their handset, headset, and speakerphone. Enter a value between 0 and 100%, with 0% being less than -66dBM and 100% being -4dBM. The default © 2014 AT&T Intellectual Property. All rights reserved. AT&T, the Globe logo, and all other marks contained herein are trademarks or service marks of AT&T Intellectual Property and/or AT&T affiliated companies. 156 Chapter 7. Location Administration setting is 50%, which is -10dBM. Revert to All Calls (revertToAllCalls) Not available RTCP (rtcp) RTCP (Real-Time Conferencing Protocol) maintains statistics for audio that measures the quality of calls. RTCP for Video (VideoRTCP) When enabled, provides RTCP for both video and audio FTP (File Transfer Protocol) streams, which supports RTP (Real-time Transport Protocol) statistics and synchronizes the audio and video streams. When disabled, the Free Run mode will be used by the system to synchronize the audio and video streams. RTP Port Range End (rtpPortRangeLast) The highest port number that can be used for transmitting and receiving RTP audio packets. Enter the port number in decimal notation. The default value is 32768 (0x8000). RTP Port Range Start (rtpPortRangeFirst) The lowest port number that can be used for transmitting and receiving RTP (Real-time Transport Protocol) audio packets. This option is useful for compatibility with NATs, firewalls, and other network topologies that require applications to use a well-known set of ports. Enter the port number in decimal notation. The default value is 24576 (0x6000). Settings Access (settingsAccess) Determines the functionality of the Settings button on the phone: • Enabled Allows the end user to change the phone network configuration, the ring type of the phone, and the phone’s volume • Disabled When the Settings button is pressed, no options will display • Restricted Allows the end user to change the User Preferences and Volume settings Show All Calls on Primary Line (allCallsOnPrimary) Enables/disables the ability to display all calls to the phone’s primary line. Show Call History for Selected Line Only (showCallHistoryForSelectedLine) When enabled, the Call History directories on the telephone will only display calls for the selected line. Side USB Port (usb2) Enables/disables the USB port on the phone Simplified New Call UI (simplifiedNewCall) Enables/disables the simplified call User Interface (UI) style when the phone is off-hook. When enabled, both the New Call Window and the Simplified New Call Session can be used. © 2014 AT&T Intellectual Property. All rights reserved. AT&T, the Globe logo, and all other marks contained herein are trademarks or service marks of AT&T Intellectual Property and/or AT&T affiliated companies. 157 Chapter 7. Location Administration Span to PC Port (spanToPCPort) Enables/disables the ability to forward packets that were transmitted and received on the Phone port to the PC port. NOTE: To use this feature, the PC Voice VLAN Access field must be selected. SSH Access (sshAccess) Indicates whether the phone will accept SSH (Secure Shell) connections. This is generally used if there is no direct access to the call manager with VPN. Switch Port Remote Configuration (SWRemoteConfig) Specifies the speed and duplex capabilities of the phone’s Switch port. If “Auto Negotiate” is selected in the drop-down menu, then remote configuration of the speed and duplex capabilities can occur, which overrides any manual configuration at the phone. Verify Software Versions (VerifySoftwareVersions) Specifies when the IP communication will verify the authenticity and completeness of its installed software components. • On Upgrade Verifies the software when it is upgraded; however, it will not be able to automatically heal itself if any of its files are deleted or modified by the user. • At Startup Verifies the software at startup. It can detect and repair most modifications or corruption. Video Capabilities (VideoCapability) When enabled, allows the IP phone to participate in video calls when connected to an appropriately equipped PC. VXC Challenge (vxcChallenge) This field indicates whether or not to challenge the VXC device. Its options are: Challenge and No Challenge. Challenge The VXC device will be challenged. Also, if the VXC VPN Option field (described below) is set to: • • Single Tunnel – The phone’s VPN tunnel will be torn down and the “VXC VPN Sign in” window displays asking the user to input credentials and re-establish the phone’s VPN tunnel. Dual Tunnel – The “VXC VPN Sign in” window displays, asking the user to input credentials and re-establish the VXC VPN tunnel. No Challenge The VXC challenge will be bypassed. Also, if the VXC VPN Option field (described below) is set to: VXC-M Servers (vxcManagers) • Single Tunnel – The VXC traffic will silently be permitted to go over the phone’s VPN without a VXC challenge. • Dual Tunnel – The credentials of the phone’s VPN tunnel will be reused to re-establish the VXC VPN tunnel. Enter the addresses of the VXC servers. Place a comma between addresses. © 2014 AT&T Intellectual Property. All rights reserved. AT&T, the Globe logo, and all other marks contained herein are trademarks or service marks of AT&T Intellectual Property and/or AT&T affiliated companies. 158 Chapter 7. Location Administration VXC VPN Option (vxcVpnOption) This feature is only available on 89xx and 99xx series phones. This field indicates how the VXC VPN is supported. Its options are single or dual channel. Single Channel The IP phone establishes one VPN tunnel. Using this tunnel, the phone and VXC device share the 89/99xx processor and memory resources across the voice, video, and VDI services. This prevents the phone from prioritizing data handling of one service over another (how data is sent to the phone’s CPU). This can result in degradation of performance of the phone’s voice/video media handling and/or the phone’s UI functions. Use the Single Channel option for those customers who are willing to trade off potential voice/video quality for a simplified operating model. Dual Channel The phone establishes two VPN tunnels, one for the IP phone and the other for the VXC device. The use of two VPN tunnels allows the phone to prioritize its CPU and memory resources. The phone will give higher priority to the data associated with the phone’s voice/video functions and lesser priority to the data associated with the VXC VPN tunnel. This approach requires two manual login entries (depending on security parameters), one for phone’s voice/video VPN and another for the VXC VPN. The two tunnel approach also requires two VPN concentrator ports and two IP addresses. Use the Dual Channel option when uncompromised voice/video quality is required. Web Access (webAccess) Specifies whether the phone will accept connections from a web browser or other HTTP (HyperText Transfer Protocol) client. Disabling the web server functionality of the phone blocks access to the phone’s internal web pages. These pages provide statistics and configuration information. Wideband Headset (headsetWidebandEnable) Enables/disables the use of a wideband headset on the phone. This field is used when the headset is a standalone device and you must manually take the phone off hook to use the headset. Wideband Headset UI Control (headsetWidebandUIControl) Enables/disables the Wideband Headset option on the phone’s user interface. This field is used when the headset is controlled by the phone. Wireless Headset Hookswitch Control (ehookEnable) Enables/disables the hookswitch control of the wireless headset © 2014 AT&T Intellectual Property. All rights reserved. AT&T, the Globe logo, and all other marks contained herein are trademarks or service marks of AT&T Intellectual Property and/or AT&T affiliated companies. 159 Chapter 7. Location Administration Analog Line Mgt. Link If the location is setup with Survivable Remote Site Telephony (SRST), then the phone lines are analog lines. They are not identified by IP addresses. When the Analog Line Mgt. link is selected, the Analog Line Management page displays (Figure 64). Its information details how the analog lines are managed (see Table 58). © 2014. AT&T Intellectual Property. All rights reserved. Figure 64. Analog Line Management page Table 58. Information in Analog Line Management page Column Description Gateway Name The name of the gateway IOS Device Name The router that is being used for SRST, which controls the analog phone lines. Protocol The protocol used for communications between the gateway and the phone line. Gateway Chassis The router that is used if AT&T is managing the IP addresses. IP Address The IP address of the gateway. © 2014 AT&T Intellectual Property. All rights reserved. AT&T, the Globe logo, and all other marks contained herein are trademarks or service marks of AT&T Intellectual Property and/or AT&T affiliated companies. 160 Chapter 7. Location Administration Internal Numbers Link When this link is selected, the Extension Number Management page displays (Figure 65). It allows you to see the extension (internal) numbers that are currently being used in or are available to the location. The contents of the page are described in Table 59. Adding and Deleting Extension Ranges To add or delete extension ranges, select the Extension Range Management button in the Extension Number Management page (Figure 65). The Extension Number Management – Details page displays (Figure 66). The top and bottom of this page perform the same functions. Use whichever method is easiest for your situation. © 2014. AT&T Intellectual Property. All rights reserved. Figure 65. Example Extension Number Management page © 2014 AT&T Intellectual Property. All rights reserved. AT&T, the Globe logo, and all other marks contained herein are trademarks or service marks of AT&T Intellectual Property and/or AT&T affiliated companies. 161 Chapter 7. Location Administration Table 59. Information in Extension Number Management page Column Description Internal Number The extension number of the telephone Associated PSTN Number The DDI number of the telephone NOTE: “None” displays if a DDI number has not been assigned to the phone. Used By The user the telephone is registered to NOTE: “None” displays if the phone is not registered to anyone. Device Groups Lists the Device groups that the DDI number belongs to. A Device group is a pool of phones created on the Call manager. CLI Group Not available © 2014 AT&T Intellectual Property. All rights reserved. AT&T, the Globe logo, and all other marks contained herein are trademarks or service marks of AT&T Intellectual Property and/or AT&T affiliated companies. 162 Chapter 7. Location Administration © 2014. AT&T Intellectual Property. All rights reserved. Figure 66. Example Extension Number Management – Details page © 2014 AT&T Intellectual Property. All rights reserved. AT&T, the Globe logo, and all other marks contained herein are trademarks or service marks of AT&T Intellectual Property and/or AT&T affiliated companies. 163 Chapter 7. Location Administration External Numbers Link When this link is selected, the Manage External Number (E164) Usage page displays (Figure 67). From here you can view and manage the E164 numbers assigned to the location. E164 numbers are DDI numbers. If a location needs more DDI numbers, contact AT&T. © 2014. AT&T Intellectual Property. All rights reserved. Figure 67. Example Manage External Number (E164) Usage page Table 60. Command Buttons in the Manage External Number (E164) Usage page Command Button Definition Associate Range Allows you to associate PSTN numbers to area codes Disassociate Range Allows you to disassociate PSTN numbers from area codes Manage Primary E164 Displays the DDI numbers associated to the location © 2014 AT&T Intellectual Property. All rights reserved. AT&T, the Globe logo, and all other marks contained herein are trademarks or service marks of AT&T Intellectual Property and/or AT&T affiliated companies. 164 Chapter 7. Location Administration Table 61. Information in Manage External Number (E164) Usage page Item Definition Country The country the telephone is located in National Area Code The area code. It will be used as the prefix for the PSTN number. Local Number This is the PSTN number without the area code. If the phone number is followed by “DiscAssoc,” then this is a link. Clicking on it will move the number up to the Provider level and the number will no longer be available to assign to end users. Internal Extension This extension number can be 4- to 10-digits long, depending on how the system is configured. If “Not Associated” appears in the column, then the DDI number has not been associated to the location. Template Not used by AT&T Device Group The Device group that the DDI telephone number belongs to. A Device group is a pool of phones created on the Call manager. User Data Allows you to add information about each DDI number CLI Group Not used by AT&T © 2014 AT&T Intellectual Property. All rights reserved. AT&T, the Globe logo, and all other marks contained herein are trademarks or service marks of AT&T Intellectual Property and/or AT&T affiliated companies. 165 Chapter 7. Location Administration Administration Tools Link When you select this link, the page shown in Figure 68 displays. When its commands are used, all phones in the location are affected. The commands are described in Table 62. © 2014. AT&T Intellectual Property. All rights reserved. Figure 68. Location Administration Tools page Table 62. Information in Location Administration Tools page Tool Definition Logout all extension mobility end users of a location from all phones Logs out anyone in the location that is logged into the Extension Mobility (roaming) feature. If someone is on a call, the call will immediately be terminated. Reset all phones at a location Resets all phones in the location. If someone is on a call, the call will immediately be terminated. (A reset is the same thing that would happen if you turned off the power to a phone then restored power.) Set location Codecs Allows you to specify the CODEC for the Intra- and Inter-Region Maximum Audio Bit Rate. Voicemail caller input extension search Allows end users to access their Voice mailboxes remotely using internal extension numbers. © 2014 AT&T Intellectual Property. All rights reserved. AT&T, the Globe logo, and all other marks contained herein are trademarks or service marks of AT&T Intellectual Property and/or AT&T affiliated companies. 166 8. My Account The Account Settings link (Figure 69) allows you to change your information in the Corporate directory. It also allows you to change the time zone and how dates and times are displayed on your phone and your end users’ phones. © 2014. AT&T Intellectual Property. All rights reserved. Figure 69. Account Settings link Account Settings Link Use the Account Settings link to modify your information in the Corporate Directory. When the Account Settings link is selected, the Account Details page displays (Figure 70). The Corporate Directory will be updated with any changes made to the fields in this page when you click on the Modify button. NOTE: An asterisk (*) next to the name of a field indicates that the information is mandatory. If the field is left blank, you will be prompted to enter the information. © 2014 AT&T Intellectual Property. All rights reserved. AT&T, the Globe logo, and all other marks contained herein are trademarks or service marks of AT&T Intellectual Property and/or AT&T affiliated companies. 167 Chapter 8. My Account © 2014. AT&T Intellectual Property. All rights reserved. Figure 70. Account Details page Table 63. Information in the Account Details page Field Description Username Used by the administrator to log into the System Administration portal First Name The administrator's first name Middle Name The administrator's middle name Last Name The administrator's last name Email Address The administrator’s email address Ex Directory Select this checkbox to exclude the administrator’s information from the Corporate directory. Preferred Country Select the country the administrator is located in from the drop-down list. Preferences command button Allows you to change the time zone and the formatting of the day and time. See Figure 67. Change Password command button Allows you to change your password. See the “Change Password Link” section below. Modify command button When selected, causes the changes made in the Account Details page to be processed. © 2014 AT&T Intellectual Property. All rights reserved. AT&T, the Globe logo, and all other marks contained herein are trademarks or service marks of AT&T Intellectual Property and/or AT&T affiliated companies. 168 Chapter 8. My Account Preferences Link When you select the Preferences button in the Account Details page (Figure 70), a page similar to the one in Figure 71 displays. This page provides three links, which are described in Table 64. © 2014. AT&T Intellectual Property. All rights reserved. Figure 71. Preference and Settings page Table 64. Links in the Preference and Settings page Link Description ShowDateTimeFormat When selected, a window displays that allows you to change how the date and time will be displayed on your and your end users’ phones (for example, 12 hour or 24 hour format). Click on the Modify button to save any changes. The change will be applied after you log out of the System Administration portal. ShowTimeZone When selected, a window displays that allows you to set the time zone that will be used on your and your end users’ phones. The time zones are arranged by continents and their major cities. Click on the Modify button to save any changes. The change will be applied after you log out of the System Administration portal. © 2014 AT&T Intellectual Property. All rights reserved. AT&T, the Globe logo, and all other marks contained herein are trademarks or service marks of AT&T Intellectual Property and/or AT&T affiliated companies. 169 Chapter 8. My Account Link Description SuppressAutoPageRefresh When selected, a window displays that allows you to determine whether the information in the Manage Transactions page (Figure 16) automatically refreshes every 15 seconds. Click on the Modify button to save any changes. The change will be applied after you log out of System Administration portal. Change Password Link The Change Password button in the Account Details page (Figure 70) lets you change the password you use to log into the System Administration portal. You should change your password often to protect both your telephone and the telephone system. To change your password: 1. Type your password in the Enter Current Password field. 2. Type your new password in the Enter New Password field and enter it again in the Re-enter Password field for verification. 3. To save your new password, click on the Submit button. Depending on how your system is configured, you may be required to periodically renew your password. You will receive a message showing the number of days before your password expires. Failure to change your password within that time period will result in your account being locked. Password Requirements • Minimum length: At least nine characters. • Unique: A new password must be different from passwords you have used before. Passwords similar or identical to previously used passwords will not be accepted. • Special characters: Depending on how your system is configured, your password might need to contain a minimum number of special characters, such as: upper case characters, punctuation, and numeric characters. • Dictionary terms: Your password cannot be a word in the dictionary (for example: handsome or exciting). • Sequences: Your password cannot be a sequence of letters or numbers (for example: ABCD or 123). © 2014 AT&T Intellectual Property. All rights reserved. AT&T, the Globe logo, and all other marks contained herein are trademarks or service marks of AT&T Intellectual Property and/or AT&T affiliated companies. 170 9. Help Index Use the Help Index link (Figure 72) to find descriptions and instructions about the pages in the System Administration portal. Selecting this link causes a Help page to display. It will look similar to the one shown in Figure 73. You can select the Help Index link from anywhere in the System Administration portal. © 2014. AT&T Intellectual Property. All rights reserved. Figure 72. Help Index link © 2014 AT&T Intellectual Property. All rights reserved. AT&T, the Globe logo, and all other marks contained herein are trademarks or service marks of AT&T Intellectual Property and/or AT&T affiliated companies. 171 Chapter 9. Help Index © 2014. AT&T Intellectual Property. All rights reserved. Figure 73. Example Help page There are three ways to find information in a Help page: use the Index or Glossary (located in the left column of the page) or search for answers using the Search field (located at the top of the page). Index Tab When you select the Index tab located on the left side of the Help page, a list of topics displays. If a plus sign (+) appears to the left of a topic, click on the plus sign. Subcategories for that topic appear. Select any of the topics or subcategories under the Index tab and its description displays on the right side of the Help page. © 2014 AT&T Intellectual Property. All rights reserved. AT&T, the Globe logo, and all other marks contained herein are trademarks or service marks of AT&T Intellectual Property and/or AT&T affiliated companies. 172 Chapter 9. Help Index Glossary Tab When you select the Glossary tab, a list of telecommunication terms and acronyms displays. Select any item in the list to see the definition of that item. Search To search for a subject: 1. Type the topic of interest in the Search field (see Figure 74). 2. Click on the Search button located next to the Search field or press the Enter key on your PC’s keyboard. © 2014. AT&T Intellectual Property. All rights reserved. Figure 74. Search Function in the Help page Arrow Keys The arrow buttons work the same way they do in a browser. They allow you to quickly return to Help pages you recently visited. Selecting the arrow pointing left returns you to previous Help pages. Selecting the arrow pointing right forwards you to the page you visited after the currently displayed page. More Information about the Help Page Selecting the Using Help button next to the Search button (Figure 74) at the top of the page provides you with more information on how to use the Help function. © 2014 AT&T Intellectual Property. All rights reserved. AT&T, the Globe logo, and all other marks contained herein are trademarks or service marks of AT&T Intellectual Property and/or AT&T affiliated companies. 173 10. About Use the About link to check which versions of the software your system is using: • Software version The version of the System Administration portal you are using • Server Platform version The version of UC Voice on which the System Administration portal is running © 2014. AT&T Intellectual Property. All rights reserved. Figure 75. About page © 2014 AT&T Intellectual Property. All rights reserved. AT&T, the Globe logo, and all other marks contained herein are trademarks or service marks of AT&T Intellectual Property and/or AT&T affiliated companies. 174 11. Logout When you select the Logout link (Figure 76), you are immediately exited from the System Administration portal and the Login page (Figure 77) displays. To re-enter the System Administration portal, type your Username and Password in this page’s fields, then click on the Login button. For more information about signing onto the System Administration portal, see the section titled “Signing into the System Administration Portal” at the beginning of this manual. © 2014. AT&T Intellectual Property. All rights reserved. Figure 76. Logout link © 2014 AT&T Intellectual Property. All rights reserved. AT&T, the Globe logo, and all other marks contained herein are trademarks or service marks of AT&T Intellectual Property and/or AT&T affiliated companies. 175 Chapter 11. Logout © 2014. AT&T Intellectual Property. All rights reserved. Figure 77. Login page © 2014 AT&T Intellectual Property. All rights reserved. AT&T, the Globe logo, and all other marks contained herein are trademarks or service marks of AT&T Intellectual Property and/or AT&T affiliated companies. 176 12. The AT&T UC Voice Self-Care Portal The Self-Care portal allows end users to modify many of their phone settings themselves. The settings an end user can see or modify in the Self-Care portal depends on which level of service (Basic, Standard, or Enhanced) and which display policy (Limited, Standard, or Advanced) has been assigned to the end user. See the Self-Care Portal Guide for information about the Self-Care portal. © 2014 AT&T Intellectual Property. All rights reserved. AT&T, the Globe logo, and all other marks contained herein are trademarks or service marks of AT&T Intellectual Property and/or AT&T affiliated companies. 177 Index About Menu item, 174 About page, 174 Access level, 13 Access number for outside line, 52 Access profile Administrator, 41 Self-Care portal, 116 Account Details page, 168 Account settings Menu item, 167 ActionableAlert setting, 150 Add Administrator, 35 Busy lamps, 144 Call Park number, 74 Clone, 139, 140 Directed call park, 77 Division, 41 End user, 111 Extension numbers, 161 Feature group, 53 Hunt group, 93 Line, 139 Location, 45 Meet-Me conference, 82 Number group, 100 Pickup group, 105 Speed dial number, 141 Switchboard, 69 Voicemail account, 117 Add Administrator page, 37 Add Busy Lamp Field page, 146 Add Call Park page, 76 Add Device Pool page, 88 Add Directed Call Park page, 79 Add End User page, 112 Add Hunt Group page, 95 Add Meet-Me Number Management page, 84 Add Number Group page, 102 Add Pickup Group page, 107 Add Speed Dial page, 143 Add SwitchBoard page, 72 Administration levels, 2 Administration Tools link, 166 Administration Users link, 33 Administrator Access profile, 41 Add, 35 Capabilities, 3, 12 Changing information, 35 Delete, 36 Information, 33 Security profile, 39 Advanced settings, 146 Advertise G.722 and ISAC Codecs, 150 Alerting name, 136 AllCallsOnPrimary setting, 157 AllowEnergyWiseOverrides setting, 150 Analog Line Management page, 160 Analog Line Mgt link, 160 © 2014 AT&T Intellectual Property. All rights reserved. AT&T, the Globe logo, and all other marks contained herein are trademarks or service marks of AT&T Intellectual Property and/or AT&T affiliated companies. 178 Index Associate device, 117 Audio Inter-region max audio bit rate, 52 Intra-region max audio bit rate, 52 Audio packets RTP, 157 Audio statistics, 157 Authentication, 802.1, 150 Auto answer, 136 Enable/disable, 58 Auto attendant Pilot number, 86 Auto Attendant link, 85 Auto Attendant page, 86 Auto Attendant services link, 25 AutoCallSelect setting, 151 AutoSelectLineEnable setting, 151 Bandwidth Audio and video, 51, 129 Inter-region max audio bit rate, 52 Intra-region max audio bit rate, 52 Bit rate Inter-region max audio bit rate, 52 Intra-region max audio bit rate, 52 Bluetooth profiles setting, 151 Bluetooth setting, 151 Bulk Load Samples link, 20 Bulk Load Tools link, 29, 32 Busy Lamp Fields page, 145 Busy lamps, 144 Add, 144 Call pickup, 145 Change information, 144 Delete, 144 Manage, 132 Telephone number, 145 Button template, 28, 121, 126 Cache memory, 134 Call alert, 150, 151, 154 Call focus, 151 Call forward, 135 All, 62 Busy, 63, 137 Call search space, 136 Calling search space activation policy, 58 Information forwarded with call, 59 Limitations, 57, 137 No answer, 63 No coverage, 63 Secondary CoS, 62, 137 Unregistered, 63, 137 Call history directories, 157 Call log, 156 Call park Connect to parked call, 76 Directed call park, 77 Prefix, 75 Retrieve call, 75 Call Park link, 74 Call Park number Add, 74 Change information, 74 Delete, 74 Call park prefix, 75, 76 Call pickup Busy lamps, 145 Call Pickup function, 105 Call Pickup group Add, 105 Change information, 105 Delete, 105 Hunt group, 97 Notification policy, 109 Notification timer, 109 Pickup number, 108 Call waiting busy trigger, 59, 135 Caller ID, 58, 59 Privacy settings, 61 Calls queue, 99 Full, 99 Hunt group, 99 Maximum allowed, 99 Maximum wait time, 99 Camera, 151 CDP on PC port, 151 CDP on switch port, 151 Change Password link, 170 Changes made using System Administration portal, 29 CiscoCamera setting, 151 Class of service, 127 Delete, 127 Directed call park, 80 © 2014 AT&T Intellectual Property. All rights reserved. AT&T, the Globe logo, and all other marks contained herein are trademarks or service marks of AT&T Intellectual Property and/or AT&T affiliated companies. 179 Index Hunt group, 17 Line, 136 Clear lines, 127 CLI Groups link, 41 Clone, add, 139, 140 Cloned line, enable/disable, 58 Codecs, G.722 and ISAC, 150 Conference Services link, 25 Conference, enable/disable, 57, 117 Connection failure, detecting, 151 Console logging, 155 Contact Centre Service link, 28 Copy lines, 127 Corporate directory, 60, 135, 167, 168 Enable/disable, 61 ShowCorporateDir, 18 ShowCorporateDir-Unreg, 18 User name hidden, 116 XML-DirDisplayForLocalLocation, 18 XML-DirDisplayForRemoteLocation, 18 Customer administrator Defined, 2 Customer level Defined, 2 Day and time format, 169 DaysDisplayNotActive setting, 151 DDI lines Maximum on a phone, 57 DDI number, 127 Delete, 127 Line, 139 Phone, 121 DefaultLineFilter setting, 151 DefaultWallpaperFile setting, 151 Delete Administrator, 36 Busy lamps, 144 Call Park number, 74 Directed call park, 77 Division, 41 End user, 111 Extension number, 161 Feature group, 53 Hunt group, 93 Lines from phone, 139 Location, 45 Meet-Me conference, 82 Number group, 100 Pickup group, 105 Speed dial number, 141 Switchboard, 69 Voicemail account, 117 DetectCMConnectionFailure setting, 151 Device group, 126 Device Pool link, 87 Device Pool Management page, 87 Device use, 126 DfBit setting, 152 Dial plan, 51, 80 Dialing Enbloc, 153 Directed call park Add, 77 Changing information, 77 Connecting to a parked call, 80 Delete, 77 Number or range, 79 Time limit, 79 Directed Call Park link, 77 DisableSpeaker setting, 152 DisableSpeakerAndHeadset setting, 152 Display, 151, 152, 156 Idle, 133 Timeout, 133 Display name, 135 Display policy, 1, 116 DisplayIdleTimeout setting, 152 DisplayOnDuration setting, 152 DisplayOnTime setting, 152 DisplayOnWhenIncomingCall setting, 152 Division Add, 41 Changing information, 41 Defined, 2 Delete, 41 Security profile, 45 Division administrator Defined, 2 Division Management – Details page, 43 Division Management page, 42 Divisions link, 41 E164 Inventory link, 21 E164 numbers, 24, 164 EapAuthentication setting, 150 EhookEnable setting, 159 Emergency call back © 2014 AT&T Intellectual Property. All rights reserved. AT&T, the Globe logo, and all other marks contained herein are trademarks or service marks of AT&T Intellectual Property and/or AT&T affiliated companies. 180 Index PSTN, 51 Emergency support, enhanced, 51 EnableAudibleAlert setting, 152 EnableCdpPcPort setting, 151 EnableCdpSwPort setting, 151 EnableLldpPcPort setting, 154 EnableLldpSwPort setting, 154 EnablePowerSavePlus setting, 152 EnableVXCVPNForMAC setting, 152 Enbloc dialing, 153 End user Add, 111 Associate device, 117 Change information, 117 Conference feature, enable/disable, 117 Delete, 111 Extension mobility profile, 117 Phone(s) assigned to, 110 End Users link, 110 EndUserNamesAllNumeric, 17 EnegyWiseSecret setting, 153 EnergyWise, 150 EnergyWiseDomain setting, 153 Enhanced emergency support, 51 Extension length, 52 Extension mobility Across locations, 16 AllowCrossClusterLogin, 16 Cache memory, 134 Enable/disable, 57, 61, 62, 134 End user profile, 117 Login user by administrator, 132 Logout user by administrator, 132, 166 One user multiple phones, 17 PIN, 117 Extension Number Management – Details page, 163 Extension Number Management page, 161 Extension numbers Add, 161 Delete, 161 Internal only, 57 External Numbers link, 164 Fax, 61 Feature Configuration Templates link, 64 Feature control policy Telephone, 126 Feature display policy Self-Care portal, 1, 116 Feature group Add, 53 Change, 53 Delete, 53 Self-Care portal, 126 Telephone, 116, 126 Feature Group Management – Details page, 55 Feature Group Management page, 54 Feature Groups link, 53 FipsMode setting, 153 Focus, 151 Forward calls, 18 Hunt group, 98 Forward packets, 158 PC port and switched port, 153 ForwardingDelay setting, 153 Function group, 53 G.722 and ISAC Codecs, 150 G722CodecSupport setting, 150 Garp setting, 153 Gateway, 160 Gateway Dial Plan page, 81 Gateways link, 80 General Administration menu item, 33 Administration Users link, 33 CLI Groups link, 41 Divisions link, 41 Feature Configuration Templates link, 64 Feature Groups link, 53 Locations link, 45 Number Translation link, 64 General Tools menu item, 29 Bulk Load Tools link, 29, 32 Transactions link, 29 Global Settings link, 14 Global Settings page, 15 Gratuitous ARP MAC address, 153 Group Call Pickup function, 105 Group Call Pickup group Add, 105 Pickup number, 108 Handset Using inactive, 154 HandsetHeadsetMonitor setting, 154 © 2014 AT&T Intellectual Property. All rights reserved. AT&T, the Globe logo, and all other marks contained herein are trademarks or service marks of AT&T Intellectual Property and/or AT&T affiliated companies. 181 Index Headset Enable/disable, 152 Sidetone level, 154 Using inactive, 154 Wireless, 159 HeadsetWidebandEnable setting, 159 HeadsetWidebandUIControl setting, 159 Help index Menu item, 171 Help page, 172 HideVideoByDefault setting, 154 Hold reversion notification interval, 58, 137 Hold reversion ring duration, 58, 136 Home page, 7 System Administration portal, 7 Hot line, 59, 136 Hunt forward settings, 97 Hunt group Add, 93 Call Pickup group, 97 Change information, 93 Class of service, 17 Forward calls, 98 Manage calls, 97, 103 Number group, 97, 100 Pilot number, 93, 94, 97 Timer, 97 Hunt Group Management page, 94 Hunt Groups Link, 93 IM, 90 Inbound call options, 57 Incoming calls Maximum, 135 IncomingCallToastTimer setting, 154 Instant messaging, 90 Internal Numbers link, 161 Inter-region max audio bit rate, 52 CODEC, 166 Inter-site prefix, 52 Intra-region max audio bit rate, 52 CODEC, 166 IOS device name, 160 IP communicator address, 154 IpDetentionURL setting, 154 Ipv6LoadServer setting, 154 Ipv6LogServer setting, 154 ISAC Codecs, 150 Language, 51 Self-Care portal, 116 Telephone, 116 XML-PhoneBasedLanguageSelection, 19 LDAP server Information file, 154 LdapServers setting, 154 Level of access, 13 Level of service, 1 Levels of administration, 2, 34 Levels of service management, 2 Line class of service, 136 Line management, 138 Line Management page, 138 Line mask, 135 Lines Call forward, 19 Copy, 127 Linked Location parent, 51 LldpAssetId setting, 155 LoadServer setting, 155 Location Add, 45 Bandwidth,audio and video, 51 Change information, 45 Defined, 2 Delete, 45 Dial plan, 51 Extension length, 52 Inter-site prefix, 52 Linked location parent, 51 PBX, 52 PSTN, 51 Security profile, 51 Types, 46 Location administration Menu item, 68 Location Administration menu item Administration Tools link, 166 Analog Line Mgt link, 160 End Users link, 110 External Numbers link, 164 Hunt Groups Link, 93 Internal Numbers link, 161 Number Groups link, 100 Phone Inventory link, 118 Phone Management link, 128 Phone Registration link, 121 Pickup Groups link, 105 © 2014 AT&T Intellectual Property. All rights reserved. AT&T, the Globe logo, and all other marks contained herein are trademarks or service marks of AT&T Intellectual Property and/or AT&T affiliated companies. 182 Index Switchboards link, 69 Telephony link, 73 Location Administration Tools page, 166 Location administrator Defined, 2 Location Call Park Management page, 75 Location Management – Details page, 47 Location Management page, 46 Locations link, 45 LogCallFromSharedLine setting, 156 LoggingDisplay setting, 155 Logout Menu item, 175 LogServer setting, 155 MAC addresses, 26 Gratuitous ARP, 153 Phone, 118 Reserved, 133 Manage Directed Call Parks page, 78 Manage External Number (E164) Usage, 164 Manage Transactions page, 30 Manage Voicemail Services page, 23 Max calls waiting, 60, 135 Maximum hunt timer, 97 Media service, 126 Meet-Me conference, 81 Add, 82 Change information, 82 Delete, 82 Joining, 83 Meet-Me link, 81 Meet-Me Number Management page, 83 Menu, 12 Menu item About, 174 Account settings, 167 General administration, 33 General tools, 29 Help index, 171 Location administration, 68 Logout, 175 Resources, 21 Setup tools, 14 Menu items Defined, 7 Message waiting lamp, 60, 134 MinimumRingVolume setting, 155 MoreKeyReversionTimer setting, 155 Music on hold, 51, 136 Enable/disable, 59 Media service, 126 My Account menu item Change Password link, 170 Preferences link, 169 Name displayed when calling internally, 58 No answer ring duration, 59 Notification device, 62 Number group Add, 100 Change information, 100 Delete, 100 Hunt group, 97, 100 Line number, 105 Manage calls, 103 Number Group Management page, 101 Number Groups link, 100 Number Translation link, 64 Outside line access number, 52 Packets forward, 158 PC port and switched port, 153 Password Change, 168, 170 CustomerDefaultLoginPassword, 17 Extension mobility, 117 LocationDefaultLoginPassword, 19 Phone, 116 Self-Care portal, 115, 117 Switchboard operator, 70 System Administration portal, 39 PBX for location, 52 PcPort setting, 155 PCRemoteConfig setting, 155 PeerFirmwareSharing setting, 156 Personal directory ShowPersonalDir, 18 Phone Assigned to end user, 110 Button template, 126 Buttons - functions assigned to each, 127 DDI number, 121 Delete lines, 139 Device name, 118 Display, 151, 152, 156 Feature control policy, 126 Feature group, 116, 126 Line PSTN, 140 © 2014 AT&T Intellectual Property. All rights reserved. AT&T, the Globe logo, and all other marks contained herein are trademarks or service marks of AT&T Intellectual Property and/or AT&T affiliated companies. 183 Index Not registered, 25, 121 PIN (password), 116 Power off, 152 Registered, 25 Registered and non-registered, 118 Replace with identical phone, 132 Reset, 132, 166 Ring setting, 134 Set lines, 139 Settings button, configuring, 157 Timeout when idle, 133 Unregister, 132 Phone Inventory – Detail page, 27, 120 Phone Inventory link, 25, 118 Phone Inventory page, 26, 118 Phone Management – Details page, 130 Phone Management – Details page – Advanced Settings, 147 Phone Management link, 128 Phone Management page, 128 Phone Registration – Details page, 123 Phone Registration link, 121 Phone Registration page, 122 PhoneOffIdleTimeout setting, 156 PhoneOffTime setting, 156 PhoneOnTime setting, 156 Pickup group Add, 105 Change information, 105 Delete, 105 Pickup Group Management page, 106 Pickup Groups link, 105 Pickup number, 108 Pilot number Auto attendant, 86 Hunt group, 93, 94, 97 Number group, 105 Switchboard, 70 Voicemail service, 24 PIN Extension mobility, 117 Phone, 116 PortAutoLinkSync setting, 151 PowerNegotiation setting, 156 PowerPriority setting, 155 Preference and Settings page, 169 Preferences link, 169 Presence Configuration page, 92 Presence function, enable/disable, 57 Presence Monitoring link, 90 Presence Monitoring page, 90 Privacy settings, 61 Programmable buttons on phone, 127 PSTN E164, 165 Emergency call back, 51 Line, 139, 140 Location, 51 Meet-Me conference, 83 Voicemail service, 24 Queue calls, 99 Full, 99 Hunt group, 99 Maximum allowed, 99 Maximum wait time, 99 Quick Search link, 10 Quick Search page, 10 Recording, 60 RecordingTone setting, 156 RecordingToneDuration setting, 156 RecordingToneLocalVolume setting, 156 RecordingToneRemoteVolume setting, 156 Register a phone, 121 Registered phones, 25, 118 Reset phone, 132, 166 Resource menu item E164 Inventory link, 21 Resources Menu item, 21 Resources menu item Auto Attendant services link, 25 Conference Services link, 25 Contact Centre Service link, 28 Phone Inventory link, 25 SMTP Server link, 28 Voicemail Services link, 22 Retrieval prefix, 80 Reversion class of service, 80 Reversion number, 79 Ring setting, 60, 134 Ring time, 59, 135 Roaming, 16 RTCP for audio and video, 157 RTCP setting, 157 RTP audio packets, 157 RtpPortRangeFirst setting, 157 © 2014 AT&T Intellectual Property. All rights reserved. AT&T, the Globe logo, and all other marks contained herein are trademarks or service marks of AT&T Intellectual Property and/or AT&T affiliated companies. 184 Index RtpPortRangeLast setting, 157 Search (Quick Search) link, 10 Security profile Administrator, 39 Division, 45 Location, 51 Self-Care portal, 115 Self-Care portal, 177 Access profile, 116 Feature display policy, 1, 116 Feature group, 126 Password, 115, 117 Security profile, 115 Username (login name), 115 Server IPv6, 154 LDAP, 154 Service management levels, 2 Service status, 26, 119, 129 Services, 21 Set Line window, 140 Settings button Configuring, 157 SettingsAccess setting, 157 Setup Tools menu item, 14 Bulk Load Samples link, 20 Global Settings link, 14 ShowCallHistoryForSelectedLine setting, 157 SideToneLevel setting, 154 SimplifiedNewCall setting, 157 Single number reach, 51, 117 Enable/disable, 57 SMTP Server link, 28 SNR, 51, 117 Enable/disable, 57 Services menu on IP phone, 19 Soft keys template, 133 SpanToPCPort setting, 158 Speakerphone, enable/disable, 152 Speed dial, 141 Speed Dial lists ShowSpeedDials, 18 Speed dial number, 142 Add, 141 Change, 141 Delete, 141 Manage, 132 Telephone number, 142 Speed dial, enable/disable, 62 Speed Dials page, 142 SRST, 61, 134, 160 SRTCP, 150 SRTCP80bit setting, 150 SshAccess setting, 158 Survivable remote site telephony, 61, 134 Switchboard Add, 69 Changing information, 69 Delete, 69 Managing calls, 71 Pilot number, 70 SwitchBoard Management page, 70 Switchboard operator Password, 70 Switchboards link, 69 SWRemoteConfig setting, 158 Synchronize PC and SW ports, 151 System Administration portal Home page, 7 Menu items, defined, 7 Password, 39 Telephone Assigned to end user, 110 Buttons - functions assigned to each, 127 DDI number, 121 Delete lines, 139 Device name, 118 Display, 151, 152, 156 Feature control policy, 126 Feature group, 116 Line PSTN, 140 Not registered, 25, 121 PIN (password), 116 Power off, 152 Registered, 25 Registered and non-registered, 118 Replace with identical phone, 132 Reset, 132, 166 Ring setting, 134 Set lines, 139 Settings button, configuring, 157 Timeout when idle, 133 Unregister, 132 Telephone Buttons template, 28, 121 Telephone ring time, 59, 135 Telephony link, 73 © 2014 AT&T Intellectual Property. All rights reserved. AT&T, the Globe logo, and all other marks contained herein are trademarks or service marks of AT&T Intellectual Property and/or AT&T affiliated companies. 185 Index Telephony Management page, 73 Template Feature group, 53 Soft keys, 133 Telephone buttons, 28, 121, 126 Voicemail, 57 Voicemail service, 24 Time and day format, 169 Time zone, change, 168, 169 TImeout, phone idle, 133 Timing Ring duration, 59, 135, 136 Transaction Status page Auto refresh, 170 Transactions link, 29 Unregister phone, 132 Usb1 setting, 151 Usb2 setting, 157 usbClasses setting, 152 UseEnblocDialing setting, 153 User Add, 111 Associate device, 117 Change information, 117 Conference feature, enable/disable, 117 Delete, 111 Extension mobility profile, 117 Phone(s) assigned to, 110 User Management page, 34, 110 VerifySoftwareVersions setting, 158 Video calls, 158 Video capability, 58 VideoCapability setting, 158 VideoRTCP setting, 157 VLAN access, 155 Voicemail Access, 166 Enable/disable, 58 End user account, 117 Notification device, 62 Template, 57 Voicemail PIN AllowSelfCarePINResetNoPrevious, 17 Voicemail service Pilot number, 24 PSTN, 24 Template, 24 Voicemail Services link, 22 Voicemail Services page, 22 VoiceVlanAccess setting, 155 VPN tunnel, 152 VxcChallenge setting, 158 VxcManagers setting, 158 VxcVpnOption, 159 Wallpaper, 151 WebAccess setting, 159 WebProtocol setting, 154 © 2014 AT&T Intellectual Property. All rights reserved. AT&T, the Globe logo, and all other marks contained herein are trademarks or service marks of AT&T Intellectual Property and/or AT&T affiliated companies. 186