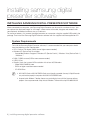
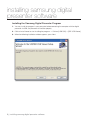
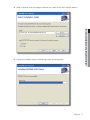
1
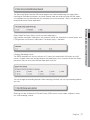
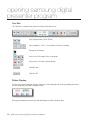
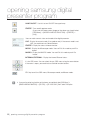
4".46/(%*(*5"-13&4&/5&3 Software User's Manual SDP-860 Samsung Digital Presenter Software User's Manual Copyright ©2010 Samsung Techwin Co., Ltd. All rights reserved. Trademark is the registered logo of Samsung Techwin Co., Ltd. The name of this product is the registered trademark of Samsung Techwin Co., Ltd. Other trademarks mentioned in this manual are the registered trademark of their respective company. Restriction Samsung Techwin Co., Ltd shall reserve the copyright of this document. Under no circumstances, this document shall be reproduced, distributed or changed, partially or wholly, without formal authorization of Samsung Techwin. Disclaimer Samsung Techwin makes the best to verify the integrity and correctness of the contents in this document, but no formal guarantee shall be provided. Use of this document and the subsequent results shall be entirely on the user’s own responsibility. Samsung Techwin reserves the right to change the contents of this document without prior notice. Warranty If the product does not operate properly in normal conditions, please let us know. Samsung Techwin will resolve the problem for free of charge. The warranty period is 3 years. However, the followings are excluded: • If the system behaves abnormally because you run a program irrelevant to the system operation. • Deteriorated performance or natural worn-out in process of time TABLE OF CONTENTS INSTALLING SAMSUNG DIGITAL PRESENTER SOFTWARE 4 4 4 5 5 6 9 9 9 OPENING SAMSUNG DIGITAL PRESENTER PROGRAM 10 TROUBLESHOOTING 10 Installing Samsung Digital Presenter Software System Requirements Installing Program Connecting Samsung Digital Presenter to a Computer Installing the Samsung Digital Presenter Program Installation Q&A How can I check if my computer supports USB? How can I delete USB drivers and the Samsung Digital Presenter program from my computer? 23 24 Opening Samsung Digital Presenter Program Samsung Digital Presenter Main Panel Overview Main Menu Tool Bar Status Display Samsung Digital Presenter Control Panel Overview Overview Mini control USB Viewer Hot Key 25 Troubleshooting 11 12 20 20 21 25 English _3 installing samsung digital presenter software INSTALLING SAMSUNG DIGITAL PRESENTER SOFTWARE When connected to a computer, your Samsung Digital Presenter can be used in a number of ways. You can capture the displayed images as still images, create movies with audio, integrate and annotate with your electronic whiteboard, and even use as a web cam. To use these features, first connect the digital presenter to a computer using the supplied USB cable in the package. Then install the Samsung Digital Presenter software from the supplied software application CD. System Requirements To install the Samsung Digital Presenter software, it is recommended that your computer should have the following system configuration: • CPU: Pentium 4 or above (Core2 duo or higher recommended) • Windows XP Service Pack 3 or higher - Compatible Windows Programs: Windows XP (Service Pack 3) / Windows Vista (Service Pack 1) / Windows 7 • RAM: 512MB or more (2GB or more recommended) • USB 2.0 Port • Graphic Cards that support XGA resolution with at least 65,536 colors - Video RAM 256MB or more - SXGA or higher resolution recommended - CD-ROM Drive M USB 2.0 PCI Cards or USB 2.0 PCMCIA Cards are not formally supported. Samsung’s Digital Presenter may not function properly in computers with USB 2.0 PCI/PCMCIA cards. Usage of certain Windows 7 desktop themes may create display issues with the Samsung software program. Samsung recommends using the basic Windows 7 theme while using SDP-860 USB S/W. 4_ installing samsung digital presenter software Installing Program Please install the program following the instructions below. 1. Connect the Samsung Digital Presenter to a computer using the USB cable and turn on the unit. 2. Insert the CD-ROM and follow the prompts to install the Samsung Digital Presenter program. (For more detailed instructions, please refer to Installing the Samsung Digital Presenter Program.) Connecting Samsung Digital Presenter to a Computer INSTALLING SAMSUNG DIGITAL PRESENTER SOFTWARE Connect the USB cable to the USB port of your computer and digital presenter. Connect the power cable of the digital presenter, and then turn on the power. J When connecting the USB cable to a computer, please use a USB port that is connected directly to the computer main board. (An extended front port and wireless USB hub may cause errors depending on the computer brand and model.) A 4m or shorter USB cable is recommended to connect a digital presenter and a computer. English _5 installing samsung digital presenter software Installing the Samsung Digital Presenter Program 1. You may install the program in your computer before connecting the computer with the digital presenter via USB; the presenter will function properly. 2. Click on install viewer to start installing the program. p Click on [USB S/W] p [SDP USB Viewer] 3. When the following installation window appears, press Next. 6_ installing samsung digital presenter software 4. Select a folder to install the program, and then press Next to start the installation process. INSTALLING SAMSUNG DIGITAL PRESENTER SOFTWARE 5. During the installation process the following screen will be displayed. English _7 installing samsung digital presenter software 6. The installation is complete when the following dialog appears. After the installation is completed, the SDP860 USB Viewer icon appears on the Desktop along with the program and user's manual shortcuts under the Start menu. J If you receive a .Net Framework error message during the installation, it indicates that your computer is not installed with .Net Framework. To resolve this problem, first install the .Net Framework installation file in the enclosed CD, and then the viewer program. (Required: .Net Framework 2.0 or higher). 8_ installing samsung digital presenter software Installation Q&A How can I check if my computer supports USB? 1. This guideline is based on Widows Vista. Other Windows versions may use different steps to check the Device Manager. 2. In Windows Vista, go to [Control Panel] p [System] p [Device Manager]. 3. As shown in the picture below, your computer displays USB-related features--USB Universal Host Controller, USB root hub, etc.-(if USB connections are supported). How can I delete USB drivers and the Samsung Digital Presenter program from my computer? Go to [Control Panel] p [Add or remove programs], select SDP860 USB Viewer, and then click on [Remove/Change] to uninstall or restore the program. Follow instructions on the Remove/Change screen to uninstall or restore the program. Samsung Digital Presenter does not require the installing or deleting of USB drivers. Unlike other brands, the SDP-860 presenter supports (web cam capablities), allowing you to connect it to a computer via USB without installing or deleting additional drivers. English _9 INSTALLING SAMSUNG DIGITAL PRESENTER SOFTWARE 4. As shown in the picture below, your computer will display USB Enhanced Host Controllers if it supports USB 2.0 connections. opening samsung digital presenter program OPENING SAMSUNG DIGITAL PRESENTER PROGRAM 1. Turn on the presenter and computer. 2. To open the presenter program in your computer, double-click on the Samsung Digital Presenter icon on Desktop or go to [Start] p [Programs] p [SDP860 USB Viewer]. 3. The digital presenter program opens with main and control panel. M If the program does not open, please check if both the presenter and computer are turned on or the USB J Do not unplug the USB cable or turn off the digital presenter while playing, capturing, or saving files cable is properly connected to both of them. using the digital presenter program; it may damage your digital presenter and/or computer. 10_ opening samsung digital presenter program Samsung Digital Presenter Main Panel Overview OPENING SAMSUNG DIGITAL PRESENTER PROGRAM Name Description Menu bar Provides 4 options: Function, View, Option and Help. For more detailed information, please refer to Main Menu. Tool Bar The Tool Bar provides quick access buttons for various controls. This menu bar can be hidden to increase the overall viewing area. (Note: All Tool Bar functions can be found on the Main menu bar) View Area Displays a live image of the subject matter displayed by the SDP-860. This area is used as the preview screen to save pictures or record videos using the menu buttons. Video Save Directory: Displays the directory and filename of video assigned when starting the video record function. English _11 opening samsung digital presenter program Main Menu 1. [Function] Clip board Capture the current image to the clipboard. (Hot key: F12) Quick save While viewing a live image from the digital presenter in the Viewer window, select Quick save or click on the Quick Save ICON on the panel to instantly capture and store the image (Hot key: F6). The path (folder) and image quality can be changed under the Option Menu. The filename cannot be customized, however, as it is automatically saved in the name of YYYYMMDDHHMMSS.jpg based on the computer’s current clock settings (date/time). For example, if the captured time is 2009 September 09 at 15:23:40, the captured filename will be 20090909152340.jpg. M Pressing the Quick Save button more than twice per second saves only the latest image in the computer hard disk. 12_ opening samsung digital presenter program Still Image Save the currently displayed image. To save an image, press still image and select the file directory, filename, and type (BMP/JPEG), and then press Save. (Hot key: F7) Creates and saves the live display as a video file; First, press the record button to start recording a movie of the material currently projected by the digital presenter. Once the video recording starts, the status bar displays the current elapsed time of the video along with the Recording message above it to show the current recording status. You can change the Record settings in the Environment Setting: recorded files’ directory, Image quality, and other attributes. (Hot key: F8) Stop AVI Stop capturing AVI file. (Hot key: F9) Time Lapse After pressing the [Time Lapse], you can watch below setting window. Time Lapse sets the frame rate for recording. If you set the “Interval” to 5 sec, you can get only 1 frame image for 5 sec interval. The result will look like high speed recording. You can apply limit to the total recording time. (The playback frame rate of Time Lapse recording will be fixed to 15frame/ sec.) English _13 OPENING SAMSUNG DIGITAL PRESENTER PROGRAM Capture AVI opening samsung digital presenter program Print To print an image, select [Print] to send the currently displayed image to a connected printer. Control Panel Show / Hide the Control Panel. (Hot key: F10) 2. [View] Fit to window The displayed image will be adjusted to the width of the Viewer window. The ratio in length of image will be automatically adjusted according to the ratio in width, regardless of window size. (Hot key: F3) Stretch to window The displayed image will be stretched to fit to the current window size. (Hot key: F4) 50% The displayed image will be set to 50% of original size. (Hot key: F1) 100% The displayed image will be set to the original size. (Hot key: F2) Full Screen The displayed image will be enlarged to a full screen display. Ideal when using electronic whiteboards for annotation and capture. (Hot key: F5) Normal window p Full Screen (Hot key:F1), Full Screen p Normal window (Hot key: ESC) 14_ opening samsung digital presenter program Portrait Mode Crop the image for portrait picture. (Initial value Width: 3, Height: 4) While in the Portrait mode you can only use the Still Image and Quick save features. Movies using the Capture AVI cannot be created. You can set detailed ratio on [Option] p [Portrait Option](Please refer to Portrait mode Option) Input Signal Tool Bar Show / Hide the Tool Bar. English _15 OPENING SAMSUNG DIGITAL PRESENTER PROGRAM The SDP-860 Viewer application supports two input resolution settings: SXGA and VGA. The SXGA mode provides higher quality images 15 frames per second. The VGA mode provides a higher frame rate of 30fps but at a slightly reduced image quality. To capture and display the highest quality images, use the SXGA mode. If full motion display is more critical for your presentation or for movie recording, choose the VGA mode. opening samsung digital presenter program 3. [Option] Recording Setting You can set the detailed recording options. You can change the directory of saving video. Initial value is C:\Samsung Techwin\SDP860 USB Viewer\AVI. 16_ opening samsung digital presenter program The Samsung Digital Presenter USB viewer program can record audio along with video. When checking on the audio input option, the viewer records video and audio using the ADPCM codec. A microphone must be connected to your computer (or use the computer’s built-in microphone) to record audio via the Viewer application. High provides the highest video quality, but increases the file size. Standard is a normal quality, and LOW generates an increase in video noise. The default quality is Standard. Changing Recording Frames The SXGA resolution can save a maximum of 15 frames per second while VGA allows up to 30 frames. A higher frames/sec setting enhances the video quality, but it increases the file size. Select the frames that can satisfy both desired video quality and size. You can change the recording duration. When selecting Unlimited, you can stop recording video at any time. Selecting this box will hide the On Screen Display (OSD) menus such as zoom, brightness, focus, etc. while recording a movie. English _17 OPENING SAMSUNG DIGITAL PRESENTER PROGRAM Select Video File Quality (Affects the file size and video quality.) opening samsung digital presenter program Quick save option The Quick Save option allows the user to select or create a folder rather than the default location to store captured images. Change the path of Quick save. Initial value is C:\Samsung Techwin\SDP860 USB Viewer\Quicksave. Select the quality of saved images. High provides the highest image quality, but increases the file size. 18_ opening samsung digital presenter program Portrait mode option Change the Portrait mode ratio. Choose 1 of 4 popular options or if preferred, create a custom user option. OPENING SAMSUNG DIGITAL PRESENTER PROGRAM Hide Panel Option Sets the delay to hide the mini control when in full screen mode. If it is set to 0, the mini control will not hide. 4. [Help] Displays the current version information for the SDP-860 USBViewer application. Select the [About SDP860 Viewer] button to view the current software version. English _19 opening samsung digital presenter program Tool Bar The Tool Bar is a collection of popular functions from Main menu. Input signal buttons. (VGA, SXGA) View mode(50%, 100%, Fit to window, Stretch to window) Enlarge to Full Screen. Quick save, Still Image, Quick save option Capture AVI, AVI Stop, Capture option Control Panel Tool Bar OFF Status Display Displays the current resolution setting, frame/sec, and recording time. During recording the frame/ sec and recording time color changes to blue. During the recording the frame/sec and recording time color change to blue. 20_ opening samsung digital presenter program Samsung Digital Presenter Control Panel Overview With the Samsung Digital Presenter program, you can control and adjust the features of the SDP-860 from the software. You can also set the OSD menu on the presenter. Using Samsung Digital Presenter Control Panel • You can control Digital functions. (ZOOM, BRIGHTNESS, FOCUS, etc,.) • The buttons on the Control Panel are the same as buttons on Samsung Digital Presenter or those of a remote controller. (For details, refer to Samsung Digital Presenter User’s Manual.) OPENING SAMSUNG DIGITAL PRESENTER PROGRAM Minimize : Hide the control panel. Wide / Tele : Reduces or enlarges the image size on the screen. BRIGHTNESS +/- : Adjust the brightness of the image on the screen. Near / Far : Adjust focus manually. AWB : Adjust auto color (You should set OSD Menu IMAGE ADJUSTMENT WB MODE: AWB(KEY) for using AWB function.). AF : Adjusts auto focus. English _21 opening samsung digital presenter program LAMP ON/OFF : Use this to turn ON/OFF the upper lamp. FREEZE : Turns on/off aperture mode. (If you want to Freeze current image on the viewer you should select [OSD Menu] p [MISCELLANEOUS FUNCTION] p [FREEZE] p [ALL].) You can watch current status and mode of the digital presenter. LIVE : Display the current mode. (Live mode or not). If the current mode is not LIVE, you could not use Control Buttons. FREEZE : Display the status of freeze function. MICRO : Display the Microscope mode. You can Exit this mode to push Esc button. MACRO : Display the MACRO mode. You can Exit this mode to push Esc button. INTERNAL/EXTERNAL : Display the Internal/External status. It is for OSD menu. You can select the any OSD menu using the arrow button. If the menu is open, you could not use Control function buttons. ESC key to exit the OSD menu, Microscope mode, and Macro mode. J If you want to control any functions on the viewer, you would not select [OSD Menu] p [MISCELLANEOUS FUNCTION] p [PC CTRL] p [RS-232C ONLY]. Don’t select THIS option. 22_ opening samsung digital presenter program Overview Mini control In full screen mode, the mini control that is smaller than the normal control panel is to be displayed. Hides the mini control, and switches to control panel. Wide / Tele : Reduces or enlarges the image size on the screen. Instantly capture and store the image. BRIGHTNESS +/- : Adjust the brightness of the image on the screen. FREEZE : Turns on/off aperture mode. (If you want to Freeze current image on the viewer you should select [OSD Menu] p [MISCELLANEOUS FUNCTION] p [FREEZE] p [ALL].) Capture AVI, AVI stop. Displays the current frame/sec and recording time. English _23 OPENING SAMSUNG DIGITAL PRESENTER PROGRAM Return to the Normal Mode (Full Screen p Normal Mode) opening samsung digital presenter program USB Viewer Hot Key [F1] 50% View Function [F2] 100% View Function [F3] Fit to window Function [F4] Stretch to window Function [F5] Full Screen Function [F6] Quick save Function [F7] Still Image Function [F8] Capture AVI Function [F9] Stop AVI Function [F10] Control Panel ON/OFF Function [F11] Tool Bar ON/OFF Function [F12] Clip board Function 24_ opening samsung digital presenter program troubleshooting TROUBLESHOOTING Problem Cause & Solution It indicates a USB connection problem between the digital presenter and a computer. y Please check if the USB cable is properly connected to both the presenter and the computer. y Close all application programs-USB-related or other programs that take up a lot of the system resources-to avoid slowing down the digital presenter program. y Turn off the digital presenter and turn it on after at least 10 seconds. Then attempt to open the program again. Error Message: “A USB connection error has occurred; the program is now being terminated.” It indicates a USB connection problem between the digital presenter and a computer. y Please check if the digital presenter is turned off or the USB cable is unplugged. y A 4m or shorter USB cable is recommended to connect the digital presenter and a computer. y If the computer has too many programs running, it may experience a shortage of memory or system resources and cause the video communication error. Error Message: “The program is already running.” This error message may appear if you try to reopen the program while it is running. y The program cannot be opened twice, the prompt error message will display if tried. y Please wait until the program opens at the first time. If it does not open or terminates itself abnormally, remove and reconnect the USB cable, or restart your computer operating system. If a computer fails to detect the digital presenter y If your computer fails to detect the digital presenter, please restart it and then try again. Error Message: “You don’t have the permission for recording AVI files on this folder.” y In the case of Windows Vista or 7, admin permissions may be different from your account. Please log in using a different account (administrator) or save files on another folder (Normally, we recommend the default folder.) Error Message: “Your OS version is lower.” y In the case of Windows XP or Vista install the latest Service pack. English _25 TROUBLESHOOTING Digital presenter program does not open troubleshooting Problem Cause & Solution Error Message: “Failed to save the image.” Saving an image may fail in the following cases: y You may have selected an improper drive, CD-ROM, or mobile hard disk that is limited in writing the saved image to the Quick Save or image folder. Please change the directory to the local computer hard drive, and try to save it again. y You may have selected a file format that the program does not support. y The program library for saving images may have been deleted or corrupted. Please uninstall and reinstall the digital presenter viewer program. Error Message: “SDP-860 S/W doesn't run in USB1.1 connection.” y The SDP-860 Viewer Application does not support the USB1.1 mode due to limited bandwidth issues of this early standard. Connect to a known USB2.0 port when using the Viewer Application. 26_ troubleshooting SALES NETWORK SAMSUNG TECHWIN CO., LTD. Samsungtechwin R&D Center, 701, Sampyeong-dong, Bundang-gu, Seongnam-si, Gyeonggi-do, Korea, 463-400 TEL: +82-70-7147-8740~60 FAX: +82-31-8018-3745 SAMSUNG TECHWIN AMERICA Inc. New Jersey office 100 Challenger Road, Suite 700, Ridgefield Park, NJ 07660, UNITED STATES TEL: +1-877-213-1222 FAX: +1-201-373-0124 California office 1480 Charles Willard Street, Carson, CA 90746, UNITED STATES TEL: +1-310-632-1234 FAX: +1-310-632-2195 www.samsungpresenterusa.com www.samsungtechwin.com www.samsungpresenter.com SAMSUNG TECHWIN EUROPE LTD. Samsung House, 1000 Hillswood Drive, Hillswood Business Park Chertsey, Surrey, UNITED KINGDOM KT16 OPS TEL: +44-1932-45-5301 FAX: +44-1932-45-5325 P/No: Z6806.1064.02B