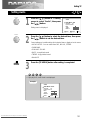
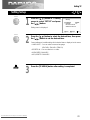
1
TV / DVD COMBO
OWNER’S MANUAL
Model:
•DDQ-20L6SC
Downloaded From Disc-Player.com Daewoo Manuals
CAUTION
RISK OF ELECTRIC SHOCK
DO NOT OPEN
CAUTION : TO REDUCE THE RISK OF ELECTRIC SHOCK,
DO NOT REMOVE COVER (OR BACK)
NO USER-SERVICEABLE PARTS INSIDE.
REFER SERVICING TO QUALIFIED SERVICE PERSONNEL.
The lightning flash with arrowhead symbol, within an equilateral triangle, is intended to alert the
user to the presence of uninsulated “dangerous voltage” within the product’s enclosure that may be
of sufficient magnitude to constitute a risk electric shock.
The exclamation point within an equilateral triangle is intended to alert the user to the presence of
important operating and servicing instructions in the literature accompanying the appliance.
WARNING
TO PREVENT FIRE OR SHOCK HAZARD, DO NOT EXPOSE THIS APPLIANCE TO RAIN OR MOISTURE.
CAUTION
CHANGES OR MODIFICATIONS NOT EXPRESSLY APPROVED BY THE MANUFACTURER COULD VOID THE
USER’S AUTHORITY TO OPERATE THE EQUIPMENT.
NOTE TO CATV SYSTEM INSTALLER
THIS REMINDER IS PROVIDED TO CALL THE CATV SYSTEM INSTALLER'S ATTENTION TO ARTICLE 820-40 OF THE
NEC THAT PROVIDES GUIDELINES FOR PROPER GROUNDING AND, IN PARTICULAR, SPECIFIES THAT THE
CABLE GROUND SHALL BE CONNECTED TO THE GROUNDING SYSTEM OF THE BUILDING, AS CLOSE TO THE
POINT OF CABLE ENTRY AS PRACTICAL.
CAUTION
The AC power cord provided with this product is polarized (one blade wider than the other).
To prevent electrical shock, match wide blade of plug to wide slot, fully insert the AC plug into a standard 120V~,
60Hz polarized outlet.
NOTE
Never connect the plug to an electrical source other than one providing 120V~, 60Hz power. Use only the
attached power cord. If the polarized AC cord does not fit into a non-polarized outlet, do not cut or file the blade.
You are responsible for having the obsolete outlet replaced with a polarized outlet.
If you feel a static discharge when touching the unit, and the unit does not function, simply unplug the unit from the
outlet. When you plug the unit back in, it should work normally.
Do not install power cords near any heating element or cooking appliances.
NOTICE
This product incorporates copyright protection technology that is protected by method claims of certain U.S. patents
and other intellectual property rights owned by Macrovision Corporation and other rights owners. Use of this copyright protection technology must be authorized by Macrovision Corporation, and is intended for home and other
limited viewing uses only unless otherwise authorized by Macrovision Corporation. Reverse engineering or disassembly is prohibited.
Downloaded From Disc-Player.com Daewoo Manuals
IMPORTANT SAFEGUARDS
IMPORTANT SAFEGUARDS
1 Read Instructions - All the safety and operating instructions should be read before the appliance is
operated.
2 Retain Instructions - The safety and operating instructions should be retained for future reference.
3 Heed Warnings - All warnings on the appliance and in the operating instructions should be adhered to.
4 Follow Instructions - All operating and use instructions should be followed.
5 Cleaning - Unplug TV/DVD from the wall outlet before cleaning. Do not use liquid cleaners or aerosol
cleaners. Use a damp cloth for cleaning.
6 Attachments - Do not use attachments not recommended by the TV/DVD manufacturer as they may cause
hazards.
7 Water and Moisture - The apparatus shall not be exposed to dripping or splashing water and that no
object filled with liquids, such as vases, shall be placed on the apparatus.
PORTABLE CABINET WARNING
8 Accessories - Do not place this TV/DVD on an unstable cabinet, stand,
bracket, or table. The TV/DVD may fall, causing serious injury to someone,
and serious damage to the appliance. Use only with a cabinet, stand, bracket,
or table recommended by the manufacturer, or sold with the TV/DVD. Any mounting
of the appliance should follow the manufacturer’s instructions and use a mounting
accessory recommended by the manufacturer. An appliance and cart combination
should be moved with care. Quick stops, excessive force, and uneven surfaces may
cause the appliance and cabinet combination to overturn.
9 Ventilation - Slots and openings in the cabinet and the back or bottom are provided for ventilation and to
ensure reliable operation of the TV/DVD and to protect it from overheating, and these openings must not be
blocked or covered. The openings should never be blocked by placing the TV/DVD on a bed, sofa, rug, or
other similar surface. This TV/DVD should never be placed near or over a radiator or heat register. This
TV/DVD should not be placed in a built-in installation such as a bookcase or rack unless proper ventilation is
provided or the manufacturer’s instructions have been adhered to. Around the unit, the space should be more
than 10cm.
10 Power Sources - This TV/DVD should be operated only from the type of power source indicated on the
marking label. If you are not sure of the type of power supply to your home, consult your appliance dealer or
local power company.
11 Grounding or Polarization - This TV/DVD is equipped with a polarized alternating - current line plug (a
plug having one blade wider than the other). This plug will fit into the power outlet only one way. This is a
safety feature. If you are unable to insert the plug fully into the outlet, contact your electrician to replace your
obsolete outlet. Do not defeat the safety purpose of the polarized plug.
12 Power-Cord Protection - Power-supply cords should be routed so that they are not likely to be walked
on or pinched by items placed upon or against them, paying particular attention to cords at plugs, and the
point where they exit from the appliance.
13 Lightning - For added protection for this TV/DVD receiver during a lightning storm, or when it is left
unattended and unused for long periods of time, unplug it from the wall outlet and disconnect the antenna or
cable system. This will prevent damage to the TV/DVD due to lightning and power-line surges.
14 Power Lines - An outside antenna system should not be located in the vicinity of overhead power lines or
other electric light or power circuits, or where it can fall into such power lines or circuits. When installing an
outside antenna system, extreme care should be taken to keep from touching such power lines or circuits as
contact with them might be fatal.
1
Downloaded From Disc-Player.com Daewoo Manuals
15 Overloading - Do not overload wall outlets and extension cords as this can result in a risk of fire or
electric shock.
16 Object and Liquid Entry - Never push objects of any kind into this TV/DVD through openings as they
may touch dangerous voltage points or short out parts that could result in a fire or electric shock. Never spill
liquid of any kind on the TV/DVD.
17 Servicing - Do not attempt to service this TV/DVD yourself as opening or removing covers may expose you
to dangerous voltage or other hazards. Refer all servicing to qualified service personnel.
18 Damage Requiring Service - Unplug this TV/DVD from the wall outlet and refer servicing to qualified
service personnel under the following conditions:
A. When the power-supply cord or plug is damaged or frayed.
B. If liquid has been spilled, or objects have fallen into the TV/DVD.
C. If the TV/DVD has been exposed to rain or water.
D. If the TV/DVD does not operate normally by following the operating instructions. Adjust only those controls
that are covered by the operating instructions, as improper adjustment of other controls may result in
damage and will often require extensive work by a qualified technician to restore the TV/DVD to its
normal operation.
E. If the TV/DVD has been dropped or damaged in any way.
F. When the TV/DVD exhibits a distinct change in performance - this indicates a need for service.
19 Replacement Parts - When replacement parts are required, be sure the service technician has used
replacements parts specified by the manufacturer that have the same characteristics as the original part.
Unauthorized substitutions may result in fire, electric shock, injury to persons or other hazards.
20 Safety Check - Upon completion of any service or repairs to this TV/DVD, ask the service technician to
perform routine safety checks to determine that the TV/DVD is in proper operating condition.
21 Heat - This TV/DVD product should be situated away from heat sources such as radiators, heat registers,
stoves, or other products (including amplifiers) that produce heat.
22 Electrostatic - In DVD mode, your DVD Disc may be playback from the first parts because of the
electrostatic symptom.
23 Secondary Switch - When switching off, the apparatus is not completely switched off from the mains. To
disconnect it from the mains, you have to unplug mains.
Downloaded From Disc-Player.com Daewoo Manuals
2
Precautions in use
LOCATION
For safe operation and satisfactory performance of your unit, keep the following in mind when selection a
place for its installation :
• Shield it from direct sunlight and keep it away from sources of intense heat.
• Avoid dusty or humid places.
• Avoid places with insufficient ventilation for proper heat dissipation. Do not block the ventilation holes at
the top and bottom of the unit.
Do not place the unit on a carpet because this will block the ventilation holes.
• Install the unit in a horizontal position.
• Avoid locations subject to strong vibration.
• Do not place the unit near strong magnetic fields.
• Do not move the unit from a cold place to a hot place or vice versa (see the warning below).
AVOID THE HAZARDS OF ELECTRICAL SHOCK AND FIRE
• Do not handle the power cord with wet hands.
• Do not pull on the power cord when disconnecting it from an ac wall outlet. grasp it by plug.
• If, by accident, water is spilled on your unit, unplug the power cord immediately and take the unit to an
authorized daewoo service center for servicing.
• Do not put your fingers or objects into the TV/DVD Disc holder.
• Do not place anything directly on top of the unit.
WARNING
Mosture condensation may occur inside the unit when it is moved from a cold place to a warm place, after
heating in a cold room, or under conditions of high humidity. if a tape is played in a TV/DVD that has
moisture, it may damage the Disc and TV/DVD. when condensation occurs inside the unit, turn the power on
and allow at least 2 hours for the unit to dry.
FCC WARNING
This equipment may generate or use radio frequency energy. changes or modifications to this equipment may
cause harmful interference unless the modifications to this equipment may cause harmful interference unless
the modifications are expressly approved in the instruction manual.
The user could lose the authority to operate this equipment if an unauthorized change or modification is
made.
IMPORTANT COPYRIGHT INFORMATION
Unauthorized recording or use of broadcast television programming, video tape, film, or other copyrighted
material may violate applicable copyright laws. we assume no responsibility for the unauthorized duplication,
use or other acts which infringe upon the rights of copyright owners.
LASER SAFETY
This unit employs a laser. Only a qualified service person should remove the cover or attempt to service this
device, due to possible eye injury.
CAUTION
USE OF CONTROLS OR ADJUSTMENTS OR PERFORMANCE OF PROCEDURES OTHER THAN THOSE
SPECIFIED HEREIN MAY RESULT IN HAZARDOUS RADIATION EXPOSURE.
3
Downloaded From Disc-Player.com Daewoo Manuals
Table of Contents
Before use ....
DVD Operation ....
Playing a DVD video disc
25
IMPORTANT SAFEGUARDS
1
Precautions in use
3
Basic Playback
25
Table of Contents
4
Special Playback
26
Identification of Controls
5
(Front Panel, Back Panel, Remote Control)
Using DISPLAY Buttons
Playing the Desired Scene or
Track during Playback
Directly Moving to the Desired Title
Installation ....
Basic Installation
Connecting to Various Equipment
28
30
30
Playing the Disc, Chapter,
10
11
Title, and Track Pepeatedly
31
Repeating the Given Sections
31
Searching by Memorizing the Favorite
Scene
Basic TV operation ....
32
Displaying menus in disc
33
Storing viewed DVD settings
34
Watching TV
15
Changing subtitle Language
35
Setting TV
16
Changing audio language
36
To Display the Setting Screen
16
Using zoom feature
37
Setting Video
17
Viewing from Another Angle or Producing a
Setting Audio
18
3D SURROUND Effect
38
Setting Time
19
Random play
39
Setting Set up
20
Program play
40
Setting Special
21
Playing an MP3 Disc
41
Playing Repeatedly and Editing the Programmed
Mp3 File
43
Initial Settings
44
Others
About DVD
53
Before calling service personnel
Warranty
55
56
IMPORTANT COPYRIGHT INFORMATION
Unauthorized copying, broadcasting, public performance and lending of discs are prohibited.
Downloaded From Disc-Player.com Daewoo Manuals
4
Identification of Controls
Main Body (Front Part)
Disc Loading Tray
Speaker Left
Speaker Right
POWER
CH
VOL
INPUT
STAND-BY
PLAY
STOP
SKIP-
PLAY
POWER button (Power of TV/DVD is fully intercepted.)
CHANNEL
,
TV VOLUME
button
,
button
INPUT button : You can select an item from TV, AV1, AV2, DVD.
STAND-BY indicator
REMOTE SENSOR
PLAY indicator
STOP
SKIPPLAY
SKIP+
button
button
button
button
OPEN/CLOSE
5
Downloaded From Disc-Player.com Daewoo Manuals
button
SKIP+
OPEN/
CLOSE
Identification of Controls
Main Body (Rear and Side Part)
POWER CORD
ANT
VIDEO
CONNECTION TO
ANTENNA CABLE
(MONO)
S-VHS
IN
L
AUDIO
R
AV 1
IN
S-VHS IN
VIDEO
L
AUDIO
R
MONITOR
OUT
DVD
DIGITAL
AUDIO OUT
AV1 IN
VIDEO
AUDIO(Left/Right)
MONITOR OUT
COAXIAL DIGITAL
AUDIO OUT jack
VIDEO
AUDIO(Left/Right)
AV2 IN
VIDEO
AUDIO(Left/Right)
CONNECTION
to EARPHONE
jack
Downloaded From Disc-Player.com Daewoo Manuals
6
Identification of Controls
Remote Control Buttons
POWER button
If you press the ON/OFF button in the front part of this product, power is
on.
DISPLAY button
Operating status and MENU are displayed in a screen.
SLEEP button
You can set automatic POWER OFF.
INPUT button
INPUT
You can select input mode(TV -> AV1 -> AV2 -> DVD).
TV/CABLE button
TV/CABLE
You can select air or cable.
NUMBER button
You can enter the relevant number directly or select a desired channel.
DVD AUDIO
DVD AUDIO button
You can select the desired audio language.
3D button
3D
You can select NORM or 3D surround.
VOLUME button
TV MENU button
M
CH/SELECT
CURSOR(
), CHANNEL SELECT button
This button functions as cursor or channel select button in setting
TV/DVD and operating TV respectively.
CH/SELECT
M
U
TE
MUTE button
Press this button if you only want to turn off the sound.
ENTER button
ER
T
EN
Press this button if DVD setting is completed.
MENU/PBC button
The DVD menu screen is displayed.
STOP button
SKIP BACK/SKIP FORWARD button
SKIP-
7
Downloaded From Disc-Player.com Daewoo Manuals
SKIP+
You can skip a screen while playing back or forward.
Remote Control
PAUSE/STEP button
Pause screen and step screen are displayed while playing and pausing
respectively.
PLAY button
F.R/STEP or F.F/STEP button
You can search screen while playing back or forward.
OPEN/CLOSE
DISC TRAY OPEN/CLOSE button
T/C button
You move into REPEAT mode whenever you press this button.
REPEAT
T/C
A-B
A-B button
You can play the given sections repeatedly.
SETUP
SETUP button
You can set the DVD player.
CLEAR
CLEAR button
You can clear settings.
TITLE
TITLE button
You can select the desired title.
SUB-TITLE
SUBTITLE button
You can select the desired subtitle language.
ANGLE
Angle button
You can select the desired screen angle.
ZOOM
ZOOM button
You can zoom in a screen.
RANDOM
RANDOM button
You can play and CD randomly.
PROGRAM
PROGRAM button
You can program the desired playing order.
ADD button
You can mark the desired scene.
SEARCH button
You can reach the marked scene.
This button functions as a Marker Search button in DVD.
Downloaded From Disc-Player.com Daewoo Manuals
8
Remote Control
Inserting the Batteries
1
2
3
Please respect the environment and prevailing regulations. Before you dispose of batteries, ask your dealer
whether they are subject to special recycling and if he accepts to take them back.
AERIAL SOCKET : (75Ohms-VHF/UHF/cable)
The aerial socket, located at the back of the TV/DVD set, enables the connection of an external aerial or one
from another item of equipment fitted with a modulator (video recorder, satellite receiver, etc.).
(NB: A modulator converts basic video and sound signals to radio frequencies, ‘R.F.’.)
MAINS PLUG:
The mains plug carries the power supply to your TV/DVD set. It should only be connected to an AC supply of
120V ~ 60Hz.
It must not be connected to a DC supply. If the plug is detached from the cable, do not under any
circumstances connect it to a mains socket as there is a danger of electrocution.
9
Downloaded From Disc-Player.com Daewoo Manuals
Basic Installation
Connecting the Antenna Cable
VIDEO
(MONO)
Outdoor antenna or
wall antenna outlet
S-VHS
IN
L
AUDIO
R
AV 1
IN
VIDEO
L
AUDIO
R
MONITOR
OUT
DVD
DIGITAL
AUDIO OUT
If TV picture is not clear, it usually result from the wrong antenna connection.
Please install the antenna in the proper place and in the right direction.
Downloaded From Disc-Player.com Daewoo Manuals
10
Connecting to Various Equipment
Connecting to Audio System
You can enjoy the stereo sound.
VIDEO
(MONO)
S-VHS
IN
L
AUDIO
R
AV 1
IN
L
AUDIO
R
VIDEO
(MONO)
S-VHS
IN
L
AUDIO
R
AV 1
IN
VIDEO
L
AUDIO
R
MONITOR
OUT
DVD
DIGITAL
AUDIO OUT
VIDEO
L
AUDIO
R
MONITOR
OUT
DVD
DIGITAL
AUDIO OUT
Audio Connecting Cable
N
O
T
E
• Refer to the owner’s manual of your audio system to connect.
• Before you connect the TV/DVD to other equipment, be sure to turn off the power and unplug all of
the equipment from the wall outlet before making any connections.
• If you place the TV/DVD near a tuner or radio, the radio broadcast sound might be distorted. In this
case, move the TV/DVD away from the tuner and radio.
• The output sound of TV/DVD has a wide dynamic range. Be sure to adjust the receiver’s volume to a
moderate listening level. Otherwise, the speakers may be damaged by a sudden high volume sound.
• Turn off the audio system before you connect or disconnect the TV/DVD’s power cord. If you leave
the audio system power on, the speakers may be damaged.
Warning!!
Do not select “Dolby Digital” as Digital Audio Output of this TV/DVD unless you
connect the DIGITAL OUT jack of this TV/DVD to an AV decoder that has the Dolby
Digital decoding equipment.
High volume sound may damage your hearing as well as the speakers.
(Refer to “Selecting Digital Audio Output” on page 51)
11
Downloaded From Disc-Player.com Daewoo Manuals
Connecting to Various Equipment
Connecting to a Camcorder or Other Video Player
Connection with A/V Jack (AV1 IN)
Connect the AUDIO/VIDEO OUT terminal of your camcorder (or video player) to AV1 IN of TV/DVD with
Video/Audio Connecting Cable.
VIDEO
(MONO)
S-VHS
IN
L
AUDIO
R
AV 1
IN
VIDEO
L
AUDIO
R
MONITOR
OUT
DVD
DIGITAL
AUDIO OUT
VIDEO
(MONO)
S-VHS
IN
VIDEO
L
L
AUDIO
AUDIO
R
AV 1
IN
R
MONITOR
OUT
DVD
DIGITAL
AUDIO OUT
Connection with A/V Jack (AV2 IN)
Connect the AUDIO/VIDEO OUT terminal of your camcorder (or video player) to AV2 IN of TV/DVD with
Video/Audio Connecting Cable.
Downloaded From Disc-Player.com Daewoo Manuals
12
Connecting to Various Equipment
Connecting to Dolby Digital Amp
You can enjoy the high quality dynamic sound of Dolby Digital, Dolby Pro Logic, and 2 Channel Digital
Stereo.
Dolby Digital?
Dolby Digital is the surround sound technology recently used in theatres, and is now available to
reproduce this realistic effect at home. You can enjoy motion picture and live concert DVD video discs
with this dynamic realistic sound by connecting the TV/DVD to the 6 channel amp equipped with a
Dolby Digital decoder or Dolby Digital processor.
Amp equipped with Dolby Digital decoder
VIDEO
(MONO)
S-VHS
IN
L
AUDIO
R
AV 1
IN
VIDEO
(MONO)
S-VHS
IN
L
AUDIO
R
AV 1
IN
VIDEO
L
AUDIO
R
MONITOR
OUT
DVD
DIGITAL
AUDIO OUT
VIDEO
L
AUDIO
R
MONITOR
OUT
DVD
DIGITAL
AUDIO OUT
Audio Connecting Cable
Connecting cable (separate purchase)
1 To enjoy Dolby Digital sound from this TV/DVD, you need the following:
• DVD recorded in Dolby Digital
• 6 channel amp equipped with a Dolby Digital decoder or Dolby Digital processor and power amp
• 5 speakers and 1 subwoofer
2 To enjoy Dolby Digital sound
You need to select “Dolby Digital” in the SETUP menu.
13
Downloaded From Disc-Player.com Daewoo Manuals
Connecting to Various Equipment
N
O
T
E
• Refer to the owner’s manual of your audio system to connect.
• Before you connect the TV/DVD to other equipment, be sure to turn off the power and unplug all of the
equipment from the wall outlet before making any connections.
• The output sound of TV/DVD has a wide dynamic range. Be sure to adjust the receiver’s volume to a moderate
listening level. Otherwise, the speakers may be damaged by a sudden high volume sound.
• Turn off the audio system before you connect or disconnect the TV/DVD’s power cord. If you leave the audio
system power on, the speakers may be damaged.
This product has been manufactured under technical tie-up with Dolby Laboratories.
“Dolby” and the “double-D
” symbol are registered trademarks of Dolby Laboratories.
Copyright 1992-1997 Dolby Laboratories, Inc. All rights reserved.
Downloaded From Disc-Player.com Daewoo Manuals
14
Watching TV
POWER
CH/SELECT
CH/SELECT
15
1
2
To turn on the TV, press the [POWER] button in the front part
3
4
Adjusting the Volume.
Downloaded From Disc-Player.com Daewoo Manuals
of the set or the [Power] button on the remote control.
Selecting the Channel.
Press the channel [ , ] button or [Number] button to select the desired
channel. If input status is set to AV or DVD, press the [INPUT] button to
select TV.
Press the [ VOL] button to decrease the volume level or [VOL
increase the volume level.
] button to
To turn off the TV, press the [POWER] button on the remote
control.
If power switch of remote control is off, standby LED becomes RED.
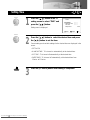
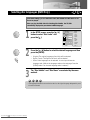
Setting TV
To Display the Setting Screen
M
1
Press the [TV MENU] button in TV
mode.
Main Menu
Video
Audio
Time
Set-up
Special
TV setting menu is displayed.
Select
CH/SELECT
CH/SELECT
CH/SELECT
CH/SELECT
M
2
Press the [
3
Press the [
4
Downloaded From Disc-Player.com Daewoo Manuals
,
Adjust
M Exit
] button to select the desired item.
Current settings and variable settings for the desired item are displayed in the
screen.
• Video
• Audio
• Time
• Set-up
• Special
,
] button and press the [
the desired item, then press the [
,
,
] button to set
] button.
Additional steps may be required as items.
Press the [TV MENU] button to exit the current setting menu.
16
Setting TV
Setting Video
CH/SELECT
CH/SELECT
CH/SELECT
CH/SELECT
1
2
Press the [ , ] button in TV
setting screen to select “VIDEO”
and press the [ , ] button.
Setting menu is displayed.
Video
Settings:
Contrast
Brightness
Sharpness
Color
Tint
Preset
Select
Adjust
M Prev
Press the [ , ] button to select the desired item, then press
the [ , ] button to adjust the desired item.
Current settings and variable settings for the desired item are displayed in the
screen.
• CONTRAST: Adjust brightness and darkness among objects and
background in the screen.
• BRIGHTNESS: Adjust the picture until correct brightness is obtained.
• SHARPNESS: Adjust outlines of objects on screen to be smooth and clear.
• COLOR: Adjust color to display natural human’s face colors.
• TINT: TINT adjustment is displayed if you receive NTSC through DVD play
or AV input.
SETTINGS : You can select the CUSTOM or PRESET. Custom is video setting
to adjust desired video and preset is basic video setting.
CH/SELECT
CH/SELECT
M
17
3
4
Downloaded From Disc-Player.com Daewoo Manuals
Press the [
press the [
,
,
] button to select other video item, then
] button to adjust the desired item.
Press the [TV MENU] button after setting is completed.
Setting TV
Setting Audio
CH/SELECT
CH/SELECT
1
Press the [ , ] button in TV setting
screen to select “Audio”, then press
the [ , ] button.
Setting menu is displayed.
Audio
Audio Mode: SAP
Surround:
off
Dynamic Sound:off
Bass
Treble
Balance
Select
CH/SELECT
CH/SELECT
2
Adjust
M Prev
Press the [ , ] button to select the desired item, then press
the [ , ] button to set the desired item.
Current settings and variable settings for the desired item are displayed on the screen.
• AUDIO MODE : You can select from SAP, MONO, STEREO.
• SURROUND
• DYNAMIC SOUND
• BASS : Low-pitched sound
• TREBLE : High-pitched sound
• BALANCE
M
3
N
Press the [TV MENU] button after setting is completed.
O
T
E
• If you play DVD, Audio Mode is not displayed
Example
Audio
Audio Mode: Stereo
Surround:
off
Dynamic Sound:off
Bass
Treble
Balance
Select
Downloaded From Disc-Player.com Daewoo Manuals
Adjust
M Prev
18
Setting TV
Setting Time
CH/SELECT
CH/SELECT
1
Press the [
,
] button in the TV
setting screen to select “TIME” and
press the [
,
] button.
Setting menu is displayed.
Time
Set Clock:
--:-Wake-Up Time: - - : - Off Time:
--:-Sleep Timer:
0 min
Select
Adjust
M Prev
CH/SELECT
CH/SELECT
2
Press the [
the [
,
,
] button to select the desired item and press
] button to set the item.
Current settings and variable settings for the desired item are displayed in the
screen.
• SET CLOCK
• WAKE-UP TIME : TV is turned on automatically at the desired time.
• OFF TIME : TV is turned off automatically at the desired time.
• SLEEP TIMER : TV is turned off automatically at the desired time from
15mins. to 120mins.
M
19
3
Downloaded From Disc-Player.com Daewoo Manuals
Press the [TV MENU] button after setting is completed.
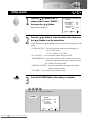
Setting TV
Setting Set up
CH/SELECT
CH/SELECT
1
Press the [ , ] button in TV setting
screen to select “SET UP” and press
the [ , ] button.
Setting menu is displayed.
Set-Up
Language:
English
Reception:
Air
Memorize Channels
Add/Delete Channels
Select
CH/SELECT
CH/SELECT
2
Adjust
M Prev
Press the [ , ] button to select the desired item, then press
the [ , ] button to set the desired item.
Current settings and variable settings for the desired item are displayed on the screen.
• LANGUAGE : You can select on-screen language
(ENGLISH, SPANISH, FRENCH)
• RECEPTION : You can select air or cable.
• MEMORIZE CHANNELS
• ADD/DELETE CHANNELS
M
3
Downloaded From Disc-Player.com Daewoo Manuals
Press the [TV MENU] button after setting is completed.
20
Setting TV
Setting Special
CH/SELECT
CH/SELECT
1
Press the [
,
] button in the TV
setting screen to select “SPECIAL”,
then press the [
] button.
,
Setting menu is displayed.
Special
Closed Caption:
CC on Mute:
Power Restore:
Parental Control
Ch Labels :
To
Select
Adjust
Off
Off
Off
Press
M Prev
CH/SELECT
CH/SELECT
2
Press the [
the [
,
,
] button to select the desired item, then press
] button to set the desired item.
Current settings and variable settings for the desired item are displayed on the
screen.
• CLOSED CAPTION : You can hide words (caption or text) displayed on
your TV/DVD screen.
C1, C2 is caption, T1, T2 is text
• CC ON MUTE : You can select the caption display on MUTE.
• POWER RESTORE : If user have a cable box with AC outlet, then user can
connect the TV power cord to the AC outlet and control
the TV without TV remote control.
• PARENTAL CONTROL : Parents set standard for the program which their
children is going to watch
• CH LABELS : You can memorize the channel names.
M
3
N
Press the [TV MENU] button after setting is completed.
O
T
E
• If you play DVD, CH label is not displayed.
Example
Special
Closed Caption:
CC on Mute:
Power Restore:
Parental Control
Select
21
Downloaded From Disc-Player.com Daewoo Manuals
Adjust
Off
Off
Off
M Prev
Setting TV
Setting Special (Parental Control Settings)
CH/SELECT
CH/SELECT
1
Use the number buttons (0-9) to
enter your password, then
“Parental Control” menu will be
displayed.
Special
Closed Caption:
CC on Mute:
Power Restore:
Parental Control
Ch Labels :
To
Off
Off
Off
Press
If this is the first time you are using your
“Parental Control” menu, after entering your
Select
Adjust
M Prev
password you have to remember it.
CH/SELECT
CH/SELECT
2
Use the [ , ] buttons to select the
Parental Control settings you wish
to adjust.
Descriptions of the Parental Control
settings are on the next page.
Enter a new Password
- - - -
0-9 : Adjust
CH/SELECT
CH/SELECT
3
The Parental Lock feature will be
selected. Use the [ , ] buttons to
toggle “On” or “Off”.
Parental Control
Parental Lock: On
TV Guidelines
Movie Ratings
No Rating :
Unblock
Ext. Source:
Unblock
Change Password
Select
CH/SELECT
CH/SELECT
4
M Prev
Adjust
Use the [ , ] buttons to adjust the
Parental Control settings.
Enter a new Password
# # # #
0-9 : Adjust
M
5
Downloaded From Disc-Player.com Daewoo Manuals
M Prev
M Prev
Press the [TV MENU] button after setting is completed.
22
Setting TV
Setting Special (Description of Parental Control Settings)
CH/SELECT
CH/SELECT
1
The TV Guidelines set the standard
for TV programs excluding sports
and news. Use the [ , ] buttons to
select, [ , ] buttons to adjust.
You can set individual settings with
[ , ] buttons.
Parental Control
Parental Lock:
On
TV Guidelines
Movie Ratings
No Rating :
Unblock
Ext. Source:
Unblock
Change Password
Select
Adjust
M Prev
Rating All FV D L S V
TV-MA
TV-14
TV-PG
TV-G
TV-Y7
TV-Y
Select
CH/SELECT
CH/SELECT
2
The Movie Ratings set the standard
for movie, video, and other media
excluding TV programs.
Use the [ , ] buttons to select, [ ,
] buttons to adjust.
M Prev
Parental Lock:
Off
TV Guidelines
Movie Ratings
No Rating :
Unblock
Ext. Source:
Unblock
Change Password
X
NC-17
R
PG-13
PG
G
NR
Select
23
Adjust
Parental Control
Select
Downloaded From Disc-Player.com Daewoo Manuals
( : Block)
Adjust
M Prev
( : Block)
Adjust
M Prev
Setting TV
Setting Special (Description of Parental Control Settings)
CH/SELECT
CH/SELECT
CH/SELECT
CH/SELECT
3
4
Downloaded From Disc-Player.com Daewoo Manuals
The No Rating item toggles between
“Unblock” and “Block”.
This item determines whether to
block or not the programs which
are not rated by “Movie Ratings”
and “TV Guidelines”.
Use [ , ] buttons to change the
settings.
The Set Password item let you
change the password for entering
Parental Control item.
You had better change the initial
password “0000”. Use [ , ]
buttons to enter the password input
display, and use the number
buttons(0-9) to enter new
password.
After you entered the new
password, confirmation display will
appear. Type again the password.
Parental Control
Parental Lock:
Off
TV Guidelines
Movie Ratings
No Rating :
Unblock
Ext. Source:
Unblock
Change Password
Select
Adjust
M Prev
Parental Control
Parental Lock:
Off
TV Guidelines
Movie Ratings
No Rating :
Unblock
Ext. Source:
Unblock
Change Password
Select
Adjust
M Prev
24
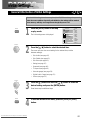
Playing the DVD Video Disc
Basic Playback
When you want to enjoy the sound of DVD video discs or audio CDs from the audio
system, turn on the audio system and select the input source connected to the
TV/DVD.
If you do not have the necessary equipment to enjoy Dolby Digital sound, set the
Digital Audio Output via the SETUP menu to “PCM (Pulse Code Modulation)”.
POWER
OPEN/CLOSE
R
TE
EN
OPEN/CLOSE
1
2
3
4
5
N
Press the [POWER] button on the front part of the set or
press the POWER button on the remote control, then the
TV/DVD turns on.
Press the [OPEN/CLOSE] button to open disc tray.
Place a disc on the disc tray with the playback side down.
Press the [PLAY
] button.
Disc tray is closed automatically and play begins.
DISC indicator is displayed on the TV screen.
In the menu screen displayed on the screen.
Press the [
,
,
,
] button to select the desired item, then press the
[ENTER] button or the relevant number directly.
The selected item is played.
Press the [STOP
Press the [
] button to stop play.
] button to pause play.
Press the [OPEN/CLOSE] button to remove the loaded disc.
O
T
E
• Do not move the TV/DVD during play. Doing so may damage the disc and TV/DVD.
• Use the [OPEN/CLOSE] button on the remote control or TV/DVD to open and close the
disc tray. Do not push the disc tray while it is moving. Doing so may cause TV/DVD to
malfunction.
• Do not push up the disc tray or put any objects other than discs on the disc tray. Doing
so may cause the TV/DVD to malfunction.
• Be careful of the disc tray not to bite your finger as it is closing. Especially, be careful as
it will seriously hurt children.
• When
appears on the TV screen while a button is pressed, it means that this function
is not available on the disc you are playing.
• Depending on the DVD disc, some operations may be different or restricted. Refer to the
instructions of the disc you are playing.
25
Downloaded From Disc-Player.com Daewoo Manuals
Playing the DVD Video Disc
Special Play
RESUME Play
When play is stopped, the unit records the point where the [STOP ] button was
pressed. Press the [Play ] button and play will resume from this point.
N
O
T
E
• Resume function will be cleared when the [STOP] button is pressed in the
STOP mode.
• Resume function will not work if you turn off the TV/DVD and turn on the
TV/DVD again.
• Resume function will not work when the disc tray is opened.
• The Resume function may not be available with some DVD discs.
PAUSE (Still picture)
Press the [PAUSE/STEP ] button during play.
The TV/DVD will be placed in the still picture mode.
* If CD disc is loaded, the TV/DVD will be placed in the pause mode. (Be attention
as loading takes long time.)
Step by Step screen
{DVD (Digital Versatile Disc)/ VCD (Video Compact Disc)}
Press the [PAUSE/STEP
] button during the screen pauses.
Each time you press the [PAUSE/STEP
] button, the picture advances one scene.
* To resume normal play, press the [PLAY] button.
SKIP+
SKIP FORWARD
Press the [SKIP+
] button during play.
It skips forward by one unit(chapter or track) whenever the button is pressed.
SKIP-
SKIP BACK
Press the [SKIP] button during play.
When the button is pressed during playback a unit(chapter or track), it returns to the
start of the unit. When it is pressed again, it skips back whenever the button is
pressed.
If you press the [SKIP+
] button or [SKIP] button when Tuning Play
menu of VCD2.0 is displayed, sometimes menu screen may be displayed again.
Downloaded From Disc-Player.com Daewoo Manuals
26
Playing the DVD Video Disc
Search Forward
Press the [F.F/STEP
] button during playback. Each time the button is pressed, you
can search the picture forward (at Play --->
---> ... speed)
x2 --->
x4 --->
x16 --->
x100
Search Back
Press the [F.R/STEP
] button during playback. Each time the button is pressed, you
can search the picture back (at Play --->
... speed)
x2 --->
x4 --->
x16 --->
x100 --->
Forward Playback in Slow-Motion {DVD/VCD}
Press the [F.F/STEP
] button during the paused mode. Each time the button is
pressed, you can play the screen in slow-motion (at Pause --->
x1/16 --->
x1/8
--->
x1/4 --->
x1/2 ---> ... speed)
Reverse Playback in Slow-Motion {DVD/VCD}
Press the [F.R/STEP
] button during the paused mode. Each time the button is
pressed, you can play the screen in slow-motion (at Pause ---> x1/16 ---> x1/8
---> x1/4 ---> x1/2 ---> ... speed)
N
•
O
T
E
The sound is muted during slow-motion play or search scene. But, the speed sound is
audible during searching an Audio CD forward/back.
•
Search speed increases up to 3 steps for VCD. (x2, x4, x8)
•
Search speed of Audio CD can be increased only up to x2.
•
Subtitles do not appear on the screen during slow-motion play.
•
Slow-motion play increases up to 3 steps for VCD. (x1/4, x1/8, x1/16)
•
Reverse playback in slow-motion is not available for VCD.
•
Slow-motion play is not available for Audio CD.
SCREEN SAVER
The Screen saver is useful for preventing your display from becoming damaged.
The screen saver picture appears when you leave the TV/DVD in stop mode for
about 3 minutes.
27
Downloaded From Disc-Player.com Daewoo Manuals
Using Display Button
To Display GUI Menu
This unit features GUI(Graphic User Interface) Menu showing disc
information (title /chapter /track number, elapsed playing time, audio/
subtitle language, angle, and sound) and TV/DVD information (repeat play,
play mode, marker, etc.) Some icons only show the indicated information.
Other icons allow the settings to be changed.
CH/SELECT
CH/SELECT
1
2
Press the [DISPLAY] button during playback.
Title function can be accessed from the stop mode.
Press the [
,
The current selected item is indicated in yellow on its GUI menu.
(DVD GUI)
1
It shows the current title number. Jump to the desired title
number by pressing the [ , ] button or the [NUMBER] button, then
press the [ENTER] button.
1
It shows the current chapter number. Jump to the desired chapter number by
pressing the [ , ] button or the [NUMBER] button, then press the [ENTER] button. *
You can move at once by pressing the [SKIP+] button or [SKIP-] button.
0:16:57
It shows the elapsed time. Press the [NUMBER] button to set
time, select directly scenes by the desired time, then press the [ENTER]
button.
1 ENG
D
6 CH
It shows the current audio soundtrack language, encoding
method, and channel number. Press the [ , ] button or
[DVD AUDIO] button to change the settings.
OFF
1
NORM.
Downloaded From Disc-Player.com Daewoo Manuals
] button to select the desired item.
It shows the current subtitle language. Press the [
or [SUB-TITLE] button to change the setting.
,
It shows the current angle number. Press the [
[ANGLE] button to change the angle.
] button or
,
] button
It shows the current sound. Press the [3D] button to change the
setting. Press the [ , ] button to change the setting.
28
Using Display Button
To Display GUI Menu
(VCD/CD GUI)
1
16:57
It show the current track number. Jump to the desired track number by pressing
] button or the [NUMBER] button, then press the [ENTER] button.
the [ ,
* You can move at once by pressing the [SKIP-F] button or [SKIP-B] button.
It shows the elapsed time.
STER.
It shows the current audio (STEREO, LEFT, RIGHT). Press the
[ ,
] button or [DVD AUDIO] button to change the desired
audio channel.
NORM.
It shows the current sound. Press the [3D] button to change
the setting.
CH/SELECT
CH/SELECT
3
Press the [
4
To clear the GUI Menu Icons, press the [DISPLAY] button
N
,
] button to select the desired setting.
• When numbers such as title number are displayed, the [NUMBER] button can
also be used for setting instead of the [ , ] button.
• For some functions, the setting will be registered immediately; for others, the
[ENTER] button must be pressed.
again.
O
T
E
• Some of the above GUI menu may not work on certain DVD discs.
• Track icon is not displayed in VCD 2.0.
• Examples of GUI Menu Icons (The screens may differ depending on the disc contents)
(GUI in VCD 2.0)
(GUI in REPEAT PLAY mode)
1/5
STER.
NORM.
CHAPT
TRACK
TITLE
ALL
A B
16:57
OFF
29
Downloaded From Disc-Player.com Daewoo Manuals
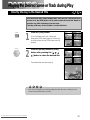
Playing the Desired Scene or Track during Play
Directly Moving to the Desired Title
Some movie discs may contain multiple titles. If the disc has a movie title menu
recorded on it, the [TITLE] button can be used to select the movie title. Details of
operation may differ depending on the disc used.
* Selecting a title may not be available on certain DVD discs.
TITLE
CH/SELECT
CH/SELECT
1
Press the [TITLE] button.
2
Press the [ENTER] button or [PLAY]
A list of the titles on the disc is displayed.
Pressing the [TITLE] button again to resume play
from the scene when the [TITLE] button was first
pressed.
button after pressing the [
,
,
,
] button to select the desired title.
The selected title now starts playing.
N
O
T
E
• In the case of DVD discs not containing multiple titles DVD title menu is displayed on the
screen when the [TITLE] button is pressed.
Downloaded From Disc-Player.com Daewoo Manuals
30
Playing the Desired Scene or Track during Play
Playing the Disc, Chapter, Title and Track Repeatedly
Press the [T/C] button during play.
REPEAT
T/C
A-B
Each time this button is pressed, the TV screen changes and the disc will repeat the
chapter, title or track.
(DVD)
(VCD/CD)
CHAPT
TITLE
OFF
*
Repeat of chapter
being played
TRACK
Repeat of track
being played
Repeat of title
being played
ALL
Repeat of
whole disc
Normal play
OFF
Normal play
If the [REPEAT] button is pressed during program play, repeat play is operated: “Repeat
of the current programmed track” ---> “Repeat of all programs” ---> “Program play”.
*
To return to normal play, press the [T/C] button until “OFF” is displayed.
Repeating the Given Sections
REPEAT
T/C
A-B
REPEAT
T/C
A-B
1
2
Press the [A-B] button where you want to
Play repeatedly.
A
*
A
B
* It directly converts to “OFF” mode when you press the
[CLEAR] button.
Press the [A-B] button where you want to
end repeat play.
Repeat play of the selection between points A and B
starts.
* To return to normal play, press the [A-B] button until
“OFF” is displayed.
N
O
T
E
• Repeat play is available only with discs for which the elapsed playing time appears during
play.
• Repeat play may not work properly on some DVDs.
• A-B repeat play is available only within a title or a track.
• Some subtitles around point A or B may fail to appear according to DVD type.
31
Downloaded From Disc-Player.com Daewoo Manuals
Playing the Desired Scene or Track during Play
Searching by Memorizing the Favorite Scene
You can play the favorite scenes as if you mark the favorite pages of a book.
1
2
Press the [ADD] button on the scene to be
3
Press the [
1/5
viewed(listened) again.
Indication of “1/5” is stored in the memory. Up to 5
scenes can be stored in the memory.
Press the [SEARCH] button during
play.
SCREEN
1
SCREEN
2
SCREEN
3
SCREEN
4
SCREEN
5
CURRENT
SCREEN
The stored scenes and current scene are
displayed in the screen.
CH/SELECT
CH/SELECT
,
,
,
] button to select the scene, then press
the [ENTER] button to play the selected scene.
Play starts from the selected scene.
R
TE
EN
* To clear the selected scene, press the [CLEAR] button. The current scene may
not be cleared.
N
O
T
E
• Some subtitles recorded around the marked scenes may fail to appear on certain DVD discs.
• All the marked scenes are cleared when the power is turned off or the disc is removed.
• The marked scenes are not stored when the DVD or title menu is displayed on the TV
screen.
Downloaded From Disc-Player.com Daewoo Manuals
32
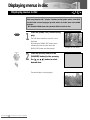
Displaying menus in disc
Displaying menus in disc
Some DVD discs have single menu structures called DVD menus. For example,
DVDs programmed with complex contents provide guide menus, and those
recorded with various languages provide menus for audio menu and subtitle
language.
* The contents of DVD menu and operation differ from disc to disc.
1
CH/SELECT
CH/SELECT
R
TE
EN
2
Press the [MENU/PBC] button during
play.
The DVD menu available on the disc is now
displayed.
By pressing the [MENU/PBC] button again
resumes play from the scene where the
[MENU/PBC] button was first pressed.
Press the [ENTER] button or the
[NUMBER] button(s) after pressing
the [
,
,
,
] button to select
desired item.
The selected item is now displayed.
33
Downloaded From Disc-Player.com Daewoo Manuals
SCENE SELECTIONS
SPECIAL FEATURES
LANGUAGES
PLAY MOVIE
Example of DVD menu
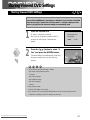
Storing Viewed DVD Settings
Storing Viewed DVD Settings
This function allows you to store viewed DVD settings. Even though you remove a disc
or turn off the [POWER] button, the settings are still stored. If you place the viewed DVD
in the disc tray again, “Resume disc from last position?” message is displayed on the
screen. If you play the DVD, the stored settings are automatically called.
CH/SELECT
CH/SELECT
1
Place the viewed DVD.
2
Press the [
R
TE
EN
N
TV screen is displayed as follows.
But, if you do not press any button within 10
seconds, the DVD player is automatically
played.
,
Resume disc from
last position?
1. No
2. Yes
] button to select “2.
Yes” and press the [ENTER] button.
The stored settings are automatically called and
the player resumes disc play from last play
position.
O
T
E
• The TV/DVD can store the following 6 settings.
- Last viewed scene (Resume function)
- TV Aspect
- Disc Audio language
- Disc Subtitle language
- Disc Menu language
- Camera
• Every setting is stored.
• Only the DVD setting can be stored.
• If you remove a disc or press the [POWER] button to turn off the power when the DVD
or title menu is displayed on the TV, settings are not stored.
Downloaded From Disc-Player.com Daewoo Manuals
34
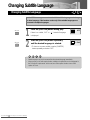
Changing Subtitle Language
Changing Subtitle Language
In the SETUP screen, you can select the initial subtitle language and change
to other language. This function works only if the subtitle languages are
recorded in multiple languages.
SUB-TITLE
SUB-TITLE
1
2
N
Press the [SUB-TITLE] button during play.
If there is no subtitle, “OFF” or “
is displayed.
OFF
” instead of language
Press the [SUB-TITLE] button repeatedly
until the desired language is selected.
1 ENG
* To clear an on-screen subtitle, press the [SUB-TITLE]
button repeatedly and select “OFF”.
O
T
E
• Subtitle language may not be converted into the selected language immediately.
• When you play a disc with caption function, subtitle and caption title can be overlapped in
the TV screen of caption mode. In this case, turn off the caption function or turn off the
caption of TV set.
35
Downloaded From Disc-Player.com Daewoo Manuals
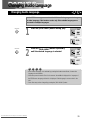
Changing Audio Language
Changing Audio Language
In the SETUP screen, you can select the initial audio language and change
to other language. This function works only if the subtitle languages are
recorded in multiple languages.
DVD AUDIO
1
Press the [DVD AUDIO] button during play.
1 ENG
D
6 CH
- DVD STER.
- VCD/CD DVD AUDIO
2
Press the [DVD AUDIO] button repeatedly
until the desired language is selected.
2 FRE
D
6 CH
- DVD LEFT
- VCD/CD -
N
O
T
E
• If the desired language is not selected by pressing the button several times, it means the
language is not available.
• When the power is turned off or disc is removed, the subtitle is displayed in a language of
the SETUP menu. Language in the disc is displayed if this language is not recorded in the
disc.
• Some discs may not be changed by pressing the [DVD AUDIO] button.
Downloaded From Disc-Player.com Daewoo Manuals
36
Using Zoom Feature
Using Zoom Feature
The Zoom feature allows you to enlarge the Picture image 4 times or 16 times.
ZOOM
R
TE
EN
ZOOM
1
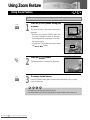
Press the [ZOOM] button during play
or pause.
x4
The region to zoom in the centre of the screen is
displayed.
• Whenever you press the [ZOOM] button, the
TV screen is changed as shown on the right.
Zoom magnification is displayed in the right
top of zoom region.
• If you want to change the zoom region, press
the [ , , , ] button.
2
Press the [ENTER] button.
3
To resume normal screen,
N
x16
The selected screen is displayed as full screen.
Press the [ZOOM] button again to release the Zoom feature, play or pause
screen is displayed.
O
T
E
• Some discs may not respond to the Zoom feature.
• The Zoom Feature is not available with subtitles or menus included on DVD video discs.
37
Downloaded From Disc-Player.com Daewoo Manuals
Viewing from Another Angle Producing a 3D SURROUND Effect
Viewing a Scene from Another Angle
Same DVDs may contain scenes which have been shot simultaneously from
a number of different angles. For these discs, the same scene can be
viewed from each of these different angles using the [ANGLE] button.
* The recorded angles differ depending on the disc used.
ANGLE
ANGLE
1
2
N
Press the [ANGLE] button during play.
1
Press the [ANGLE] button repeatedly until
the desired angle is selected.
O
T
2
E
• This function only works for discs having scenes recorded at different angles.
Producing a 3D SURROUND Effect
This unit can produce a 3D Surround effect, using 3D Surround Sound
technology, which simulates multi-channel audio play from two conventional
stereo speakers instead of five or more speakers required to listen to multichannel audio at home theatre. This feature works with DVD discs encoded with
Dolby Pro Logic and Dolby Digital audio tracks.
3D
3D
1
2
N
Press the [3D] button during play.
NORM.
Press the [3D] button repeatedly until the
desired sound is selected.
O
T
3D SUR
E
• This 3D Surround effect may not be available in some DVD discs recorded with a mono
audio soundtrack.
• Turn off the TV surround sound and other surround effects when using this 3D surround
effect.
• For the best 3D Surround effect using only two speakers, it is recommended that the two
speakers be positioned approximately 183cm to 244cm apart, and the listening position
should be 183cm to 244cm away from the speakers.
Downloaded From Disc-Player.com Daewoo Manuals
38
Playing the Desired Scene or Track during Play
Random Play
You can play titles or tracks in random order (VCD, CD).
RANDOM
RANDOM
1
2
N
Press the [RANDOM] button during stop mode.
TV/DVD automatically begins Random Play.
If you press the [RANDOM] button during Normal Play, the TV/DVD selects
other titles (or tracks) randomly and begins to play.
To return to normal play, press the [RANDOM] button during
random play.
O
T
E
• Notice: This function is only available with music CD, video CD disc.
Random play does not work properly with DVD movie discs.
• Random play may not be available with certain discs.
• If you press the [SKIP+
] or [SKIP-
] button during random play, the TV/DVD
goes to another track randomly and starts play.
39
Downloaded From Disc-Player.com Daewoo Manuals
Playing the Desired Scene or Track during Play
Program Play
The TV/DVD plays the tracks on the disc in the order you specify.
PROGRAM
CH/SELECT
CH/SELECT
1
2
Press the [PROGRAM] button in the
Program
Step 1
Total Time 00:00
play or stop mode.
The program play screen appears on the TV
screen.
* To exit the screen, press the [PROGRAM] button.
Press the [
,
,
,
] button and
press the [NUMBER] button to select
Clear All
Program
1
5
19
Step 3
Total Time 00:00
the desired track number.
Up to 20 tracks can be programmed.
Clear All
Clearing the program...
• To clear the programmed tracks one by one
Press the [
,
,
,
] button to select the unwanted number, then press the
[CLEAR] button.
• To clear all the programmed tracks
Press the [
,
,
,
] button to select “Clear All”, then press the [ENTER]
button. Press the [Play] or [ENTER] button to exit the screen.
N.B. The programs are not cleared when the [PROGRAM] button is pressed
to exit the screen. (The programs are also cleared when the power is
turned off or the disc is removed.)
R
TE
EN
3
N
Press the [PLAY] or [ENTER] button.
The selected tracks are stored in player’s memory and play begins with the first
one programmed.
N.B. If the [PROGRAM] button is pressed to exit the screen, the selected tracks
are not stored in the memory.
* After playing all tracks programmed, play is stopped.
O
T
E
• Notice: Program play function is available only with music CD/video CDs. It does not work
with DVD movie discs and video CD (version 2.0).
Downloaded From Disc-Player.com Daewoo Manuals
40
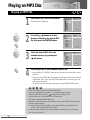
Playing an MP3 Disc
Playing an MP3 File
1
CH/SELECT
CH/SELECT
R
TE
EN
2
Place the an MP3 disc in the machine.
MP3
Program
ABCD
The MP3 menu is displayed.
Press the [
,
] button to select a
directory containing the desired MP3
file, then press the [ENTER] button.
MP3-1
MP3-2
MP3-3
MP3-4
MP3-5
MP3-6
MP3-7
MP3-8
MP3-9
MP3
Clear All
Program
ABCD
..
TRACK_1
TRACK_2
TRACK_3
TRACK_4
TRACK_5
TRACK_6
TRACK_7
TRACK_8
Clear All
CH/SELECT
CH/SELECT
3
R
TE
EN
4
N
•
•
•
•
•
•
Select the desired MP3 file in the
selected directory by pressing the
[
,
] button.
MP3
Program
ABCD
..
TRACK_1
TRACK_2
TRACK_3
TRACK_4
TRACK_5
TRACK_6
TRACK_7
TRACK_8
Clear All
Press the [ENTER] or [PLAY] button to play a file.
• Press the [SKIP-F] or [SKIP-B] button to play the next file or previous file during
playback.
• If you press the [TITLE] button during play, the first page of the current directory
is displayed. Then, if you press the [TITLE] button within 5 seconds again, the
next page is displayed.
• To move to the initial directory during play, press the [MENU/PBC] button.
O
T
E
The file and directory name are only displayed in English.
If there is an impossible code to display, ( _ ) is displayed instead of English.
If there is no MP3 file in a directory, is displayed as the directory name.
This unit can play up to 256 directories or 256 files per disc.
Disc format is compatible with ISO9660 only.
Please record MP3 files using the software that can create a FILE SYSTEM. Otherwise, these
MP3 files cannot be played.
Ex) If you use Direct-CD creator software, it is recommended that you must use “Easy-CD
Creator”, which creates an ISO9660 file system.
• If other files instead of MP3 files are already stored on the CD-R/RW disc, do not use that
disc. Please use a new disc.
41
Downloaded From Disc-Player.com Daewoo Manuals
Playing an MP3 Disc
Programming an MP3 File
1
CH/SELECT
CH/SELECT
R
TE
EN
CH/SELECT
CH/SELECT
PROGRAM
2
3
4
R
TE
EN
5
Place the an MP3 disc in the machine.
Program
ABCD
MP3-1
MP3-2
MP3-3
MP3-4
MP3-5
MP3-6
MP3-7
MP3-8
MP3-9
The MP3 menu is displayed.
Press the [
,
] button to select a
directory containing the desired MP3
file, then press the [ENTER] button.
Select the desired MP3 file in the
selected directory by pressing the
[
,
] button.
Press the [PROGRAM] button to add
the selected file to a program list.
Repeat step 3-4 to select another track.
Up to 60 files can be programmed.
Press the [
] button to select the
MP3
desired MP3 file and press the
[ENTER] button or [PLAY] button to
begin playback.
Clear All
Program
ABCD
..
TRACK_1
TRACK_2
TRACK_3
TRACK_4
TRACK_5
TRACK_6
TRACK_7
TRACK_8
MP3
Clear All
Program
ABCD
..
TRACK_1
TRACK_2
TRACK_3
TRACK_4
TRACK_5
TRACK_6
TRACK_7
TRACK_8
MP3
ABCD
..
TRACK_1
TRACK_2
TRACK_3
TRACK_4
TRACK_5
TRACK_6
TRACK_7
TRACK_8
MP3
ABCD
If you want to enter the main menu, press the
[ ] button.
After playing all tracks, programmed play is
stopped.
Downloaded From Disc-Player.com Daewoo Manuals
MP3
..
TRACK_1
TRACK_2
TRACK_3
TRACK_4
TRACK_5
TRACK_6
TRACK_7
TRACK_8
Clear All
Program
TRACK_2
TRACK_7
TRACK_6
TRACK_9
Clear All
Program
TRACK_2
TRACK_7
TRACK_6
TRACK_9
Clear All
42
Playing an MP3 Disc
Playing Repeatedly and Editing the Programmed MP3 File
Playing an MP3 file repeatedly
•
REPEAT
T/C
If you press the [T/C] button once during play, the current MP3 file will play
repeatedly.
A-B
MP3
ABCD
..
TRACK_1
•
REPEAT
T/C
A-B
ABCD
..
TRACK_1
CH/SELECT
TRACK_2
TRACK_7
TRACK 6
If you press the [T/C] button twice during play, all Files in program files on the disc
will play repeatedly.
MP3
•
Program
Program
TRACK_2
TRACK_7
TRACK 6
If you press the [T/C] button three times, repeat play will be cancelled.
Clearing MP3 files one by one
•
CH/SELECT
Press the [ , , , ] button to select the unwanted MP3 file on the program
list,then press the [CLEAR] button.
CLEAR
Clearing all the MP3 files in the program list
CH/SELECT
•
CH/SELECT
R
TE
EN
43
Downloaded From Disc-Player.com Daewoo Manuals
Press the [
,
,
,
] button to select the Clear All and press the [ENTER] button.
Initial Settings...
General Information of Initial Settings
Once the initial settings have been completed, the TV/DVD can always be operated
under the same conditions. Especially with DVD discs, the settings will be retained
in the memory until they are changed even though the power is off.
SETUP
1
Press the [SETUP] button in the stop
Disc Audio
Disc Subtitle
Disc Menu
Rating
Password
TV Aspect
Menu Language
or play mode.
The initial settings menu is displayed.
Digital Audio Output
Others
Original
English
French
German
Spanish
Italian
Chinese
Polish
Hungarian
Russian
Other - - - -
CH/SELECT
CH/SELECT
2
Press the [
,
] button to select the desired item.
The screen will show the current setting for the selected item, and the
alternate setting(s).
• Disc Audio (see page 45)
• Disc Subtitle (see page 45)
• Disc Menu (see page 45)
• Rating (see page 47)
• Password (see page 48)
• TV Aspect (see page 49)
• Menu Language (see page 50)
• Digital Audio Output (see page 51)
• Others (see page 52)
CH/SELECT
CH/SELECT
R
TE
EN
SETUP
3
Press the [
4
To exit the current SETUP menu, press the [SETUP] or [PLAY]
Downloaded From Disc-Player.com Daewoo Manuals
] button and then the [
,
] button to select the
desired setting and press the [ENTER] button.
Some items require additional steps.
button.
44
Initial Settings...
Selecting disc languages {DVD Only}
In the initial settings, you can select Disc Audio, Disc Subtitle and Disc Menu for all
discs to be played.
When you play the DVD video disc including Disc Subtitle, the TV/DVD
automatically displays the pre-selected subtitle language.
CH/SELECT
CH/SELECT
1
In the SETUP screen, press the [
button to select “Disc Audio” and
press the [
].
,
]
Disc Audio
Disc Subtitle
Disc Menu
Rating
Password
TV Aspect
Menu Language
Digital Audio Output
Others
CH/SELECT
CH/SELECT
R
TE
EN
2
3
N
Press the [
,
Original
English
French
German
Spanish
Italian
Chinese
Polish
Hungarian
Russian
Other - - - -
] button to select the desired language and then
press the [ENTER].
• Original: The original language of each disc will be selected.
• English, French: The English and French will be selected.
• Other: Other languages can be selected. You can input 4-character
language code. (Refer to the language codes on the next page. Press the
[CLEAR] button if an incorrect language code is entered.)
The “Disc Subtitle” and “Disc Menu” are selected by the same
method.
O
T
E
• If the language selected is not recorded on the disc, the original language designated by each
disc will be selected.
45
Downloaded From Disc-Player.com Daewoo Manuals
Initial Settings...
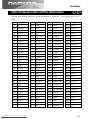
Table of Language Codes and Their Abbreviations
Enter the appropriate language code for the initial settings of “Disc Audio”, “Disc Subtitle” and/or “Disc
Menu”.
Code Language
Code Language
Code Language
Code Language
6565 Afar
7079 Faroese
7678 Lingala
8375 Slovak
6566 Abkhazian
7082 French
7679 Laothian
8376 Slovenian
6570 Afrikaans
7089 Frisian
7684 Lithuanian
8377 Samoan
6577 Ameharic
7165 Irish
7686 Latvian, Lettish
8378 Shona
6582 Arabic
7168 Scots Gaelic
7771 Malagasy
8379 Somali
6583 Assamese
7176 Galician
7773 Maori
8381 Albanian
6588 Aymara
7178 Guarani
7775 Macedonian
8382 Serbian
6590 Azerbaijani
7185 Gujarati
7776 Malayalam
8385 Sundanese
6665 Bashkir
7265 Hausa
7778 Mongolian
8386 Swedish
6669 Byelorussian
7273 Hindi
7779 Moldavian
8387 Swahili
6671 Bulgarian
7282 Croatian
7782 Marathi
8465 Tamil
6672 Bihari
7285 Hungarian
7783 Malay
8469 Telugu
6678 Bengali, Bangla
7289 Armenian
7784 Maltese
8471 Tajik
6679 Tibetan
7365 Interlingua
7789 Burmese
8472 Thai
6682 Breton
7378 Indonesian
7865 Nauru
8473 Tigrinya
6765 Catalan
7383 Icelandic
7869 Nepali
8475 Turkmen
6779 Corsican
7384 Italian
7876 Dutch
8476 Tagalog
6783 Czech
7387 Hebrew
7879 Norwegian
8479 Tonga
6789 Welsh
7465 Japanese
7982 Oriya
8482 Turkish
6865 Danish
7473 Yiddish
8065 Panjabi
8484 Tatar
6869 German
7487 Javanese
8076 Polish
8487 Twi
6890 Bhutani
7565 Georgian
8083 Pashto, Pushto
8575 Ukrainian
6976 Greek
7575 Kazakh
8084 Portuguese
8582 Urdu
6978 English
7576 Greenlandic
8185 Quechua
8590 Uzbek
6979 Esperanto
7577 Cambodian
8277 Rhaeto-Romance
8673 Vietnamese
6983 Spanish
7578 Kannada
8279 Rumanian
8679 Volapük
6984 Estonian
7579 Korean
8285 Russian
8779 Wolof
6985 Basque
7583 Kashmiri
8365 Sanskrit
8872 Xhosa
7065 Persian
7585 Kurdish
8368 Sindhi
8979 Yoruba
7073 Finnish
7589 Kirghiz
8372 Serbo-Croatian
9072 Chinese
7074 Fiji
7665 Latin
8373 Singhalese
9085 Zulu
Downloaded From Disc-Player.com Daewoo Manuals
46
Initial Settings...
Selecting Parental Control Rating Levels {DVD Only}
This is to prohibit playing of DVDs which are unsuitable for children.
Some DVDs have the rating restriction function which enables parents to
prevent children from playing discs.
TV/DVD also include password setting functions to prevent children from
changing the level.
CH/SELECT
CH/SELECT
1
In the SETUP screen, press the [
,
button to select “Rating” and press
the [
] button.
]
Disc Audio
Disc Subtitle
Disc Menu
Rating
Password
TV Aspect
Menu Language
Digital Audio Output
8
7
6
5
4
3
2
1
Unlock
Others
CH/SELECT
CH/SELECT
R
TE
EN
2
N
Press the [
,
] button to select
the desired level and press the
[ENTER] button.
After this process, you must designate
“password”. If not, someone can change
this settings.
O
T
Disc Audio
Disc Subtitle
Disc Menu
Rating
Password
TV Aspect
Menu Language
Digital Audio Output
8 Blocked
7 Blocked
6
5
4
3
2
1
Unlock
Others
E
• You cannot play DVD video discs rated higher than the level you selected unless you release
the parental lock. For example, when you select level 7, discs rated higher than level 7 cannot
be played. (Higher rated means near to adult movie.)
• If you change the level and enter a password, playing all DVDs with ratings higher than your
selection will be locked. If you want to change the rating again, you have to enter the correct
password. For example: if you change the level to “5”, the TV/DVD will not play discs with
ratings of “6”, “7”, or “8”. If you change the level again, you must enter the correct
password.
47
Downloaded From Disc-Player.com Daewoo Manuals
Initial Settings...
Designating Password {DVD Only}
If you change the rating level to “7” or lower, you must enter a 4-number
“password” to prevent playing discs with higher ratings.
CH/SELECT
CH/SELECT
1
In the SETUP screen, press the [
,
]
button to select “Password” and
press the [
] button.
Disc Audio
Disc Subtitle
Disc Menu
Rating
Password
TV Aspect
Menu Language
New
----
Digital Audio Output
Others
R
TE
EN
2
3
Press the [NUMBER] button to input a 4-number password and
press the [ENTER] button.
* Do not forget your password.
Input the 4-number password again and press the
[ENTER] button to verify.
* Setting has been completed.
To change/clear memorized password
1
2
3
In the SETUP screen, press the [ , ] button to
select “Password” and press the [ ] button.
Press the [NUMBER] button to input a 4-number
password and press the [ENTER] button.
To change or clear your password, select the
“Change” or “Clear” and press the [ENTER] button.
Disc Audio
Disc Subtitle
Disc Menu
Rating
Password
TV Aspect
Menu Language
Change
Clear
Digital Audio Output
Others
If you forget your memorized password,
1
In the SETUP screen, press the [
2
Enter 6-digit number “210499” and press the [ENTER] button. The 4-number
password is cleared.
3
Enter a new password.
Downloaded From Disc-Player.com Daewoo Manuals
] button to select “Password”.
48
Initial Settings...
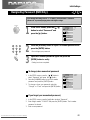
Selecting TV Aspect
Select the appropriate screen type according to your TV set: 4:3 or 16:9.
CH/SELECT
CH/SELECT
1
In the SETUP screen, press the [
,
]
Disc Audio
Disc Subtitle
Disc Menu
Rating
Password
TV Aspect
Menu Language
button to select “TV Aspect” and
press the [
] button.
4:3 Letterbox
4:3 Panscan
16:9 Wide
Digital Audio Output
Others
CH/SELECT
CH/SELECT
R
TE
EN
2
Press the [
,
] button to select the
Disc Audio
Disc Subtitle
Disc Menu
Rating
Password
TV Aspect
Menu Language
desired Aspect and press the [ENTER]
button.
4:3 Letterbox
4:3 Panscan
16:9 Wide
Digital Audio Output
Others
4:3 Letterbox
The video material not formatted in the Pan & Scan
style is played in the letterbox style. Black bands
appear at top and bottom of screen.
4:3 Panscan
Select when a conventional TV set is connected.
formatted in 16:9, then only the centre part of
screen can be displayed).
16:9 Wide
Select when a wide-screen TV set is connected.
The picture is played in full screen. (The widescreen TV is also required to be set to “FULL”.)
49
Downloaded From Disc-Player.com Daewoo Manuals
cut
style is played in such a style. (For screen
cut
The video material formatted in the Pan & Scan
Initial Settings...
Selecting Menu Language
It is for selecting DVD menu language and the language which displays on the TV.
CH/SELECT
CH/SELECT
1
In the SETUP screen, press the [
,
button to select “Menu Language”
and press the [
] button.
]
,
Disc Audio
Disc Subtitle
Disc Menu
Rating
Password
TV Aspect
Menu Language
English
Spanish
French
German
Italian
Digital Audio Output
Others
CH/SELECT
CH/SELECT
R
TE
EN
2
Press the [
,
] button to select the
desired language and press the
[ENTER] button.
Disc Audio
Disc Subtitle
Disc Menu
Rating
Password
TV Aspect
Menu Language
English
Spanish
French
German
Italian
Digital Audio Output
Others
Downloaded From Disc-Player.com Daewoo Manuals
50
Initial Settings...
Selecting Digital Audio Output
Each DVD disc has a variety of audio output options.
CH/SELECT
CH/SELECT
1
In the SETUP screen, press the [
]
,
button to select “Digital Audio
Output” and press the [
] button.
Disc Audio
Disc Subtitle
Disc Menu
Rating
Password
TV Aspect
Menu Language
DOLBY
DIGITAL /PCM
Stream/PCM
PCM
Digital Audio Output
Others
CH/SELECT
CH/SELECT
R
TE
EN
2
Press the [
,
] button to select the
desired digital audio output and
press the [ENTER] button.
Disc Audio
Disc Subtitle
Disc Menu
Rating
Password
TV Aspect
Menu Language
DOLBY
DIGITAL /PCM
Stream/PCM
PCM
Digital Audio Output
Others
DOLBY DIGITAL/PCM
Select “DOLBY DIGITAL/PCM” if a digital output is supplied to a Dolby Digital
decoder (or an amp or other equipment with Dolby Digital decoder).
Stream/PCM
Select “Stream/PCM” if a digital output is supplied to an amp or other equipment with
DTS decoder, Dolby Digital decoder and MPEG decoder.
PCM
Select “PCM” if a digital output is supplied to an amp or other equipment with PCM
only (or MD recorder or DAT deck).
N
O
T
E
• If a digital audio output signal is supplied to a receiver or other equipment without a
corresponding digital decoding capability, a very loud noise may be produced which could
permanently damage the speakers.
• The DTS DVD disc sound is played only when the TV/DVD is connected to an amp with a
DTS decoder.
Stream/PCM
Output
Dolby Digital/PCM
PCM only
PCM
DTS bit stream
Dolby Digital bit stream
MPEG bit stream
PCM
DTS bit stream
PCM
No Output
Dolby Digital bit stream
PCM
PCM
DTS bit stream
PCM
No Output
PCM
PCM
PCM
DTS bit stream
Play disc
96kHz Linear PCM DVD
DTS DVD
Dolby Digital DVD
MPEG DVD
Audio CD/Video CD
DTS Audio CD
51
Downloaded From Disc-Player.com Daewoo Manuals
Initial Settings...
Others
CH/SELECT
CH/SELECT
1
In the SETUP screen, press the [
,
]
button to select “Others” and press
the [
] button.
Disc Audio
Disc Subtitle
Disc Menu
Rating
Password
TV Aspect
Menu Language
DRC Off
PBC On
Vocal On
Digital Audio Output
Others
CH/SELECT
CH/SELECT
R
TE
EN
2
Press the [
,
] button to select the desired item and press
the [ENTER] button.
DRC (Dynamic Range Compression)
What is DRC (Dynamic Range Compression)?
It is also called “Midnight Mode”. It can decrease the difference between the loudest
and the softest tone and prevent sudden loud tone. Therefore, you can get the soft
voice clearly without disturbing others at night.
On: It compresses the dynamic range.
Off: It outputs the dynamic range as it originally was.
PBC (PlayBack Control)
On: Menu mode works when playing a disc with PBC function (Video CD version
2.0).
Off: Menu mode does not work when playing a disc with PBC function (Video CD
version 2.0).
N
O
T
E
• The DRC function works only during playing the Dolby Digital DVD discs.
• The level of Dynamic Range may differ depending on the DVD disc.
Downloaded From Disc-Player.com Daewoo Manuals
52
About DVD
Playable Disc
This TV/DVD can play the following discs.
Type
Disc mark
Contents
Disc size
12cm
DVD video
discs
Audio+Video
8cm
video CDs
Audio+Video
Music CDs
Audio
MP3
Audio
Maximum playback time
Approx. 4 hours (single sided disc)
Approx. 8 hours (double sided disc)
Approx. 80 minutes (single sided disc)
Approx. 160 minutes (double sided disc)
12cm
Approx. 74 minutes
8cm
Approx. 20 minutes
12cm
Approx. 74 minutes
8cm
Approx. 20 minutes
12cm
Approx. 160 minutes
In addition, this unit can play back a CD-R and CD-RW disc. You cannot play back discs other than those
listed above (CD-ROM, CD-EXTRA, CD-G, photo CD, and CD-i discs cannot be played on this TV/DVD.)
This TV/DVD is manufactured to adopt the NTSC colour broadcasting system in operation.
Region Number
TV/DVD and DVD discs are marked for the Region number to be played in the relevant country. Only if the Region
number described on the DVD disc corresponds to the Region number of this TV/DVD, this TV/DVD can play that
disc. The Region number of this TV/DVD is 1. Please use only discs whose Region number is 1 or is not limited to
the Regional Restriction (ALL). Otherwise, this TV/DVD does not work.
1
(Region Number 1)
(No Regional Restriction)
Notes on Copyright
This product incorporates copyright protection technology that is protected by Macrovision Corporation and other
rights owners. Use of this copyright protection technology must be authorized by Macrovision Corporation and
technological interpretation or disassembly is prohibited.
53
Downloaded From Disc-Player.com Daewoo Manuals
Discs
Always...
• handle your discs with care.
Hold a disc with fingers on the border or hole,
• place disc with the label facing upward (in case of a single-sided disc),
• place the disc properly into the tray using the proper guide area,
• use a soft cloth to clean discs if necessary, wipe from the centre to the border,
• always put discs back into their cases after playing and store in a vertical position.
Never...
• never close the tray with two discs on it or with a disc slipping out of the guide area,
• never play cracked, chipped or deformed discs nor try to repair them with adhesive tape or glue,
• never write on the disc,
• never move the player during playback,
• never scratch discs or store them in places of direct sunlight, high humidity or high temperature,
• never try to play a Photo CD , CD-G or CD-i in this TV/DVD.
• never use record cleaning sprays, benzine, static electricity liquids or any other solvent, if the disc surface is
dirty.
• Wipe gently with a soft damp (water only)
cloth, never wipe the disc in a circular
motion, since circular scratches are likely
to occur and could cause noise during
playback.
If you hear strange noises or vibrations coming out of the unit once a disc has started to play,
rapidly press the STOP button of the remote control or front of player.
Downloaded From Disc-Player.com Daewoo Manuals
54
Before Calling Service Personnel
Symptoms
55
Correction
• Colour is not displayed and net
pattern is displayed on the specific
channel.
Check the external antenna and cable TV conditions.
Check whether you select the correct channel.
• Vertical and horizontal line and net
pattern are displayed on the
screen in a moment.
Vibration is also displayed.
Check the interference wave caused by car, neon sign, and
high frequency.
Check the strong interference radio wave from wave of
other devices or radio station. Please stop the use of mobile
phone, hair dryer, and electric drill.
• Pictures are overlapped and white
and black spots are displayed
Check damage of antenna or connection of antenna cable.
Check the height and direction of antenna. If it is incorrect,
please adjust the antenna.
• The original colours are not displayed
in a screen in specific areas.
Remove from magnetic fields or rotate set until purity error
disappears.
• Picture is displayed irregularly.
Check the connection of antenna cable (incorrect connection
or disconnection).
Move this product to another location.
• No picture and sound
Plug the power cord into the wall outlet securely.
Press the [TV/AV/DVD] button to change input mode.
• No sound
[MUTE] button may be pressed.
Check the volume.
• The remote control does not work
properly
Check a stoppage of power supply
Check whether the power cord is plugged into the wall
outlet.
The batteries in remote control may be exhausted or loaded
in wrong polarity.
Check whether the remote control is too far from the player
and is not pointed at the remote sensor of the player.
• The playback picture is poor
Check the contamination of a disc and clean the disc.
• The DVD player does not start
playback
Insert a disc.
Insert a playable disc. Check the disc type, colour system
and Region code.
Place the disc with the playback side down.
Place the disc on the disc tray correctly inside the guide.
Check the contamination of a disc and clean the disc.
Press the [MENU] button to turn off the menu screen.
Cancel the Rating function or change the rating level.
Downloaded From Disc-Player.com Daewoo Manuals
Warranty
Warranty
Daewoo Electronics Corporation of America warrants each new electronic
product manufactured by it to be free from defective material and workmanship and agrees to remedy any such defect or to furnish a new part (at the
Company’s option) in exchange for any part of any unit of its manufacture
which under normal installation, use, and service disclosed such defect, provided the unit is delivered by the owner to us or to our authorized distributor
from whom purchased or authorized service station, intact, for our examination with all transportation charges prepaid to our factory. To establish and
receive warranty service at our factory or authorized service facilities, proof
of purchase/dated sales invoice is required
Return authorization must be obtained before any merchandise is returned to
the factory.
This warranty does not extend to any of our electronic products which have
been subjected to misuse, neglect, accident, incorrect wiring not our own,
improper installation, unauthorized modification, or to use in violation of
instructions furnished by us, nor units which have been repaired or altered
outside of our factory, nor to cases where the serial number thereof has been
removed, defaced, or changed.
This warranty is in lieu of all warranties expressed or implied and no representative or person is authorized to assume for us any other liability in connection with the sake of our electronic products.
Over-the-counter exchange for units that are initially defective
“Initially defective” is described as when the dealer opens the unit and finds
that it is inoperative or a customer opens a new unit and finds that it is inoperable. This unit may be returned to the factory by the dealer for exchange.
Under no circumstances will the customer be permitted to return the defective
unit directly to the factory.
Exchange must be directly with the dealer.
Model
DDQ-20L6SC
Downloaded From Disc-Player.com Daewoo Manuals
Parts
1 year
Labor
1 year
Picture Tube
2 years
56
This instrument is listed by Underwriter’s
Laboratories, Inc. It is designed and
manufactured to meet rigid U.L. safety
standards against X-radiation, fire, casualty
and electrical hazards.
Daewoo Electronics Corporation of America
120 Chubb Avenue
Lyndhurst, NJ 07071
For more information about this or other Daewoo products, please call 1-800-DAEWOO8.
Downloaded From Disc-Player.com Daewoo Manuals
P/N : 48586090E101-R0