1
MATLAB® Distributed Computing Server™
Cloud Center User’s Guide
How to Contact MathWorks
Latest news:
www.mathworks.com
Sales and services:
www.mathworks.com/sales_and_services
User community:
www.mathworks.com/matlabcentral
Technical support:
www.mathworks.com/support/contact_us
Phone:
508-647-7000
The MathWorks, Inc.
3 Apple Hill Drive
Natick, MA 01760-2098
MATLAB® Distributed Computing Server™ Cloud Center User’s Guide
© COPYRIGHT 2012–2015 by The MathWorks, Inc.
The software described in this document is furnished under a license agreement. The software may be used
or copied only under the terms of the license agreement. No part of this manual may be photocopied or
reproduced in any form without prior written consent from The MathWorks, Inc.
FEDERAL ACQUISITION: This provision applies to all acquisitions of the Program and Documentation
by, for, or through the federal government of the United States. By accepting delivery of the Program
or Documentation, the government hereby agrees that this software or documentation qualifies as
commercial computer software or commercial computer software documentation as such terms are used
or defined in FAR 12.212, DFARS Part 227.72, and DFARS 252.227-7014. Accordingly, the terms and
conditions of this Agreement and only those rights specified in this Agreement, shall pertain to and
govern the use, modification, reproduction, release, performance, display, and disclosure of the Program
and Documentation by the federal government (or other entity acquiring for or through the federal
government) and shall supersede any conflicting contractual terms or conditions. If this License fails
to meet the government's needs or is inconsistent in any respect with federal procurement law, the
government agrees to return the Program and Documentation, unused, to The MathWorks, Inc.
Trademarks
MATLAB and Simulink are registered trademarks of The MathWorks, Inc. See
www.mathworks.com/trademarks for a list of additional trademarks. Other product or brand
names may be trademarks or registered trademarks of their respective holders.
Patents
MathWorks products are protected by one or more U.S. patents. Please see
www.mathworks.com/patents for more information.
Revision History
March 2012
September 2012
November 2012
March 2013
December 2013
February 2014
March 2014
October 2014
November 2014
February 2015
May 2015
Online only
Online only
Online only
Online only
Online only
Online only
Online only
Online only
Online only
Online only
Online only
Contents
1
Cloud Computing
Create and Manage Cloud Clusters with MathWorks Cloud
Center . . . . . . . . . . . . . . . . . . . . . . . . . . . . . . . . . . . . . . . . . . .
Access Your Cloud Center Account . . . . . . . . . . . . . . . . . . . .
Cloud Center Navigation . . . . . . . . . . . . . . . . . . . . . . . . . . . .
Set Your AWS Credentials . . . . . . . . . . . . . . . . . . . . . . . . . .
Create a Cloud Cluster . . . . . . . . . . . . . . . . . . . . . . . . . . . . .
View Your Clusters . . . . . . . . . . . . . . . . . . . . . . . . . . . . . . . .
Download Cluster Profile to Local Machine . . . . . . . . . . . . . .
Shut Down a Cluster . . . . . . . . . . . . . . . . . . . . . . . . . . . . . .
Cluster Shared File System . . . . . . . . . . . . . . . . . . . . . . . .
Cluster Access and Security Groups . . . . . . . . . . . . . . . . . .
AWS Identity and Access Management (IAM) . . . . . . . . . . .
Create an Amazon Machine Image (AMI) . . . . . . . . . . . . . .
1-2
1-2
1-3
1-3
1-4
1-9
1-9
1-9
1-10
1-11
1-14
1-16
Access Cloud Cluster from MATLAB . . . . . . . . . . . . . . . . . . .
Import Cluster Profiles . . . . . . . . . . . . . . . . . . . . . . . . . . . .
Create Job on Cloud Cluster Using Command-Line Access .
1-18
1-18
1-19
Transfer Data to or from a Cloud Cluster . . . . . . . . . . . . . .
Transfer Data from Amazon S3 Account . . . . . . . . . . . . . . .
Transfer Data with Job Methods and Properties . . . . . . . . .
Download SSH Key Identity File . . . . . . . . . . . . . . . . . . . . .
Transfer Data with Standard Utilities . . . . . . . . . . . . . . . .
Transfer Data with the remotecopy Utility . . . . . . . . . . . . .
Retrieve Data from Persisted Storage Without Starting a
Cluster . . . . . . . . . . . . . . . . . . . . . . . . . . . . . . . . . . . . . .
1-21
1-21
1-21
1-22
1-22
1-24
1-25
v
1
Cloud Computing
• “Create and Manage Cloud Clusters with MathWorks Cloud Center” on page 1-2
• “Access Cloud Cluster from MATLAB” on page 1-18
• “Transfer Data to or from a Cloud Cluster” on page 1-21
1
Cloud Computing
Create and Manage Cloud Clusters with MathWorks Cloud Center
In this section...
“Access Your Cloud Center Account” on page 1-2
“Cloud Center Navigation” on page 1-3
“Set Your AWS Credentials” on page 1-3
“Create a Cloud Cluster” on page 1-4
“View Your Clusters” on page 1-9
“Download Cluster Profile to Local Machine” on page 1-9
“Shut Down a Cluster” on page 1-9
“Cluster Shared File System” on page 1-10
“Cluster Access and Security Groups” on page 1-11
“AWS Identity and Access Management (IAM)” on page 1-14
“Create an Amazon Machine Image (AMI)” on page 1-16
The Cloud Center lets you create and access compute clusters on the cloud. The cluster
includes a MATLAB® job scheduler (MJSCloudCluster), and you access it from your
client MATLAB session in much the same way you access any other cluster in your own
on-site network.
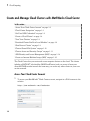
Access Your Cloud Center Account
1
To access your MathWorks® Cloud Center account, navigate in a Web browser to the
website:
https://www.mathworks.com/cloudcenter
1-2
Create and Manage Cloud Clusters with MathWorks Cloud Center
2
Enter your MathWorks Account email address and password.
3
Click Log In.
4
The first time you log in, you must read and accept the Cloud Center Software
License Agreement and the Terms of Use. To proceed, select I Accept for each, and
click Continue.
Cloud Center Navigation
When you are logged in to the Cloud Center, the left-hand navigation pane determines
what view and actions are available:
• My Clusters — Lists your clusters and provides access to cluster details.
• Create a Cluster — Allows you to create and start a new cluster.
• User Preferences — Allows you to modify your Cloud Center account and access
information, including your AWS credentials.
• Cluster Access — Allows you to control which machines can access your cluster by IP
address range.
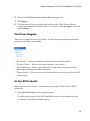
Set Your AWS Credentials
Before you can create a cluster, you must enter your Amazon® Web Services (AWS)
credentials.
1
Click User Preferences in the navigation pane.
If you have never entered your AWS credentials before, the user preferences take
you directly to the AWS Credentials dialog.
1-3
1
Cloud Computing
2
Enter data for the following fields according to your AWS account setup. For your
particular AWS information, see your administrator who set up your Amazon Web
Services account. It is possible that several people will be using the same AWS
account and credentials, even if using separate MathWorks accounts to access Cloud
Center.
• AWS Access Key ID.
• AWS Secret Access Key.
• Description — You can enter any text here for a description of your account or
credentials.
3
Click Update to save your settings.
After you have entered your AWS credentials, when you click User Preferences you get
the options to edit your credentials and time zone.
Create a Cloud Cluster
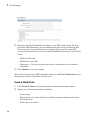
1
Click Create a Cluster to access the page for creating and starting a cluster.
2
Specify your cluster characteristics, including:
• Cluster name.
• Region where your cluster will run. In selecting a region, consider your location
and connectivity.
• Total number of workers.
1-4
Create and Manage Cloud Clusters with MathWorks Cloud Center
• Machine type: types vary by hardware specification including number of cores,
memory, and GPU support.
• MATLAB version.
• An optional timeout for the cluster so that it shuts down automatically:
• When cluster is idle: When the cluster no longer has any jobs to process,
it will eventually shut itself down after a few minutes if no more work is
submitted. This option is available only on clusters of MATLAB version
R2014a and later.
• After a set time period: The cluster shuts down after the specified
amount of time, whether busy or idle.
• Never: The cluster continues to run until you manually shut it down.
• SSH key name
The SSH key is required to start and log in as root to your cloud cluster nodes.
Cluster nodes have no password, so you use a key to log in using SSH. When you
create a cluster, you can select from the existing keys for the specified region of
your AWS account, or you can request that Cloud Center create a new key.
If you click create a new key, the following dialog appears for you to provide a
name.
Enter a name, and click Download Key. Your browser might require you to
identify a location for the download. This is a root access key file having the
extension .pem. Do not lose this file, because you cannot download it again.
(However, you can always create a new key, and download its key file.)
You can specify the same SSH key for multiple clusters. Cloud Center also makes
available a non-root user access key file, unique to each cluster. For information
1-5
1
Cloud Computing
about downloading the user access key file, see “Download SSH Key Identity File”
on page 1-22.
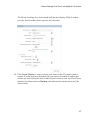
The settings for a standard 32-worker cluster with a 2-hour time limit might look
like this:
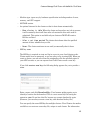
3
Click Advanced Options to specify further optional details:
• Number of workers per node.
• Persisted storage space.
For more information on persisted storage, see “Cluster Shared File System” on
page 1-10.
• Operating system image.
You can choose a MathWorks image, or one of your own customized Amazon
Machine Images (AMI). For information on how to create an AMI for this usage,
see “Create an Amazon Machine Image (AMI)” on page 1-16.
• Data files to add to the worker machines.
If you want to transfer files from your Amazon S3 account to the cluster nodes
when the cluster starts up, click Add Files. You can specify S3 files only when
creating your cluster and starting it for the first time. See “Transfer Data from
Amazon S3 Account” on page 1-21.
1-6
Create and Manage Cloud Clusters with MathWorks Cloud Center
The full set of settings for a cluster might look like the following. With 16 workers
per node, this 32-worker cluster requires only two nodes.
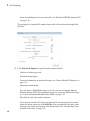
4
Click Create Cluster to create and start your cluster nodes. The cluster starts a
number of nodes (instances) determined by your choices of number of workers and
workers per node. During the time it takes for your cluster to start, the Cloud Center
indicates the cluster status as Starting, and indicates the interim status of all the
cluster nodes:
1-7
1
Cloud Computing
It can take up to several minutes for a cluster to completely start up, with the status
indicating the particular stages of the process.
5
You can click More Details to see further information about your cluster, including
any status messages. To get further status information on any individual cluster
node, click the appropriate Headnode or Worker expanders.
When the cluster is started and ready for use, the Cloud Center indicates the cluster
status as Online.
If the cluster fails to start, its status will indicate that. For information on the failure,
click the appropriate Headnode or Worker expander to read the respective log. Often
you can shut down your failed cluster and attempt to start it again.
1-8
Create and Manage Cloud Clusters with MathWorks Cloud Center
View Your Clusters
You can have more than one cluster, some running (online) and some shut down (offline).
Click My Clusters to see a list of your clusters. The following listing shows a pair of
clusters, one currently online and ready, the other offline:
For detailed information about a particular cluster, click its name in the list.
Download Cluster Profile to Local Machine
When your cloud cluster is starting or online, you can click MATLAB Cluster Profile to
save a cluster profile from Cloud Center onto your local machine, allowing you to access
that cluster from MATLAB and the Cluster Profile Manager. Save the profile in a folder
accessible from your client MATLAB.
Shut Down a Cluster
To shut down a cluster when you are finished with it:
1
Click My Clusters to view your cluster list.
2
Click Shut Down in the Actions column for the cluster you want to stop.
You can also shut down a cluster during its startup if it fails to start, takes too long, or
you change your mind.
Shutting down a cluster does not remove it from your list. You can start the cluster again
at a later time. To permanently remove a cluster, click Delete.
1-9
1
Cloud Computing
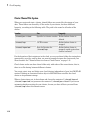
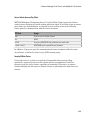
Cluster Shared File System
When you create and start a cluster, shared folders are created for the storage of your
data. These folders are shared by all the nodes of your cluster, but have different
longevity, according to the following table. The path is the same for all nodes of the
cluster.
Location
Size
Longevity
/shared/persisted
Specified at cluster creation Deleted when cluster is
deleted
/shared/tmp
1.6 TB or more
Deleted when cluster is
stopped
/shared/imported
Part of allocation for
/shared/tmp
Deleted when cluster is
stopped; copied again when
cluster is started
For the duration of their existence in the cloud, you can use these folders for storing data
generated by your jobs, and for data you want to transfer between the cluster and your
client location. See “Transfer Data to or from a Cloud Cluster” on page 1-21.
Cloud cluster nodes can share these folders only with nodes of the same cluster; that is,
there is no file sharing between different clusters.
You create, start, stop, and delete your cloud clusters independent of your local MATLAB
session. Deleting an associated cluster object in MATLAB does not affect the cloud
cluster or its persistent storage.
When a cluster times out, it shuts down and clears the contents of /shared/tmp and
/shared/imported, but preserves the content of /shared/persisted. If you use an
automatic shutdown setting for your cluster, be sure you have all data you need from
/shared/tmp before this timeout occurs.
1-10
Create and Manage Cloud Clusters with MathWorks Cloud Center
Cluster Access and Security Groups
Set Cluster Access
Cluster Access settings control which computers can access your Amazon cluster from the
Internet. To access the Cluster Access setting in the Cloud Center, click Cluster Access
beneath Preferences in the navigator. Cluster access comprises a list of IP ranges for
the computers that can access your cloud cluster. Your access might already be set up for
your Amazon Web Services account, or you might have to create or modify them here.
The IP addresses in the listing must be those of the machines as seen from the Internet,
which is often different from their local IP addresses. To be sure you get the proper IP
address, see your administrator, or use one of the many available websites that can
return this information to you.
The format for an access listing is a 4-field IP address, optionally followed by a slash (/)
and a value identifying the number of bits of the address to use for matching starting
from the left of the address. There are eight bits per field in the IP address. For example,
suppose the IP address of your machine is 123.123.234.56. The format to allow only that
exact IP address access to your cluster is:
123.123.234.56/32
The /32 indicates 32 bits, which requires matching on all four fields of the address. (If no
field matching bits are specified, the default is 32, matching the entire address exactly.)
Matching only part of the address allows a range of IP addresses to access your cluster.
This might be useful when accessing the cluster from different client machines on the
same network, or if your client machine has an assigned IP address that might change.
For example, if you want to allow other machines from your network to access your
cluster if their IP addresses start with 123.123, regardless of what the last two fields are,
you could format the address this way:
1-11
1
Cloud Computing
123.123.0.0/16
Caution Make your address formats as strict as possible, using as many fields and bits
as you can. Address formats that are too open can increase the risk of unauthorized
access to your cluster. A format that uses no bits for matching (e.g., 0.0.0.0/0, or
123.123.234.56/0) allows all machines on the Internet to access your cluster.
The computer you are currently accessing the Cloud Center from is automatically added
to the access list.
To add machines to the allowed listing, add the IP address or range in the blank field and
click Add. To remove an allowed address, click Remove next to the address in the list.
You can have up to eight rules in your list; if you already have eight when you add a rule,
the oldest is deleted.
The list is saved between sessions, and is the same for all login names that share the
same AWS account. (See also “Server Sockets Accessed by Client” on page 1-13 for
information about port usage.)
When you start a cluster, Cloud Center creates a security group called
mdcs_cluster_node if it does not already exist. Whether the group already exists
or is new, Cloud Center then opens the necessary ports for cluster communications.
Depending on your own client security settings, you might need to add firewall access
rules to this security group.
1-12
Create and Manage Cloud Clusters with MathWorks Cloud Center
Server Sockets Accessed by Client
MATLAB Distributed Computing Server™ and the Cloud Center require the client to
contact servers listening on certain sockets within the cloud. If you limit access to remote
ports from your client machines, you should be sure to allow access to the following
remote ports for communication with the cluster resources:
TCP Ports
Usage
443
Web access to Cloud Center
22
SSH
27355
Access to MATLAB job scheduler on head node
14350–14415
MATLAB pool or parallel pool workers
In addition, all ports are open for communication between machines within the same
cloud cluster, as defined by rules in your AWS security group.
Security Within Clusters
Users with access to a cluster can perform all supported cluster activity. More
specifically, anyone with access to the cluster can see or manipulate all the files,
processes, and jobs in the cluster, regardless of ownership. If security is a concern,
consider limiting who has access to shared clusters or providing users with their own
clusters.
1-13
1
Cloud Computing
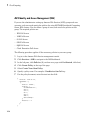
AWS Identity and Access Management (IAM)
If you are the administrator setting up Amazon Web Services (AWS) groups and user
accounts, each user needs particular policies for using MATLAB Distributed Computing
Server EC2 clusters. You can define a group of users, and attach the policies to that
group. The required policies are:
• EC2 Full Access
• IAM Full Access
• S3 Full Access
• SNS Full Access
• SQS Full Access
• Cloud Formation Full Access
The following procedure applies all the necessary policies to your user group.
1
Log in to the Amazon Web Service management console.
2
Click Services > IAM to navigate to the IAM dashboard.
3
In the left pane, click Policies. (If you then see a page with Get Started, click that.)
4
Click Create Policy at the top of the page.
5
Select Create Your Own Policy.
6
Specify a policy name. For example, CloudCenterUserPolicy.
7
For the policy document, enter this text into the field:
{
"Version": "2012-10-17",
"Statement": [
{
"Effect": "Allow",
"Action": [
"cloudformation:*",
"sns:*",
"ec2:*",
"s3:*",
"sqs:*",
"iam:*",
"autoscaling:*"
],
"Resource": "*"
}
]
}
1-14
Create and Manage Cloud Clusters with MathWorks Cloud Center
8
Click Create Policy at the bottom of the page. You now have a policy to apply to
your groups.
9
In the left pane, click Groups.
10 Click Create New Group.
11 Specify a group name. For example, CloudCenterUsers.
12 Click Next Step at the bottom of the page.
13 Now on step 2 (Attach Policy), use the search field to find the policy you just created
(CloudCenterUserPolicy or whatever name you gave it). Check the box next to
your policy, and click Next Step at the bottom of the page.
14 Now on step 3 (Review), click Create Group.
This should return you to the Groups dashboard.
15 In the Group Name column, click on the name of the group you just created. (Not
the check box; click the group name.)
16 Click Add Users to Group.
17 Check the appropriate users for your group, then click Add Users. (If you do not
have any users listed on this page, click Users in the left pane and proceed to define
your users, then return to the Groups dashboard to add users to your group.)
1-15
1
Cloud Computing
Create an Amazon Machine Image (AMI)
You can use an Amazon Machine Image (AMI) when creating a cloud cluster. To create
your custom AMI for this purpose, you modify an AMI provided in Cloud Center.
Then you can install drivers, libraries, or other utilities, so that they are available for
subsequent clusters without having to reinstall them each time.
Use the following procedure to create and customize a cluster AMI in the Amazon EC2®
Dashboard of the AWS Management Console.
1
Start a cluster in Cloud Center as usual, specifying the MATLAB Version you need.
This cluster needs only one worker, and under Advance Options you can choose None
for persisted storage space.
2
In a separate browser window, navigate to the AWS Management Console at
https://console.aws.amazon.com. Select Services > EC2, then click Running
Instances. Your instances will include clusters you start in Cloud Center.
3
Select the running instance you started in step 1. It has the same name as the
cluster in Cloud Center.
4
In the Instance Details section (lower half of page), look for the AMI ID of your new
instance. Note or copy the value shown in parentheses. It will be the string starting
with ami- followed by some hexadecimal code.
5
Shut down the cluster in Cloud Center. You no longer need it; you can delete it if you
want to.
6
In the AWS Management Console, click Launch Instance at the top of the page.
This starts a wizard with the steps shown in tabs at the top of the page; the first tab
is Choose AMI.
7
On the left side, choose the following settings:
a
Select My AMIs.
b
Select Ownership: Shared with me.
8
In the Search My AMIs field, enter the AMI ID value noted above (starts with
ami-, do not include parentheses). When your instance is shown, click Select.
9
Click the tab Choose Instance Type, and select a type.
10 Click the tab Configure Security Groups.
1-16
Create and Manage Cloud Clusters with MathWorks Cloud Center
11 Modify or add a security rule with the following settings:
Type
SSH
Protocol
TCP
Port Range
22
Source
My IP
12 Click Review and Launch.
If you see a dialog box asking about booting from General Purpose (SSD), select your
preferred option and click Next.
13 If everything looks correct in the review dialog box, click Launch.
14 You will be asked to select a key pair. You can use an existing key pair that you have
access to. After acknowledging, click Launch Instances.
You can track the progress of your instance. Click View Instances. The Instance
State for your new instance should say Running before you proceed.
15 If necessary, log on to the new instance via SSH and install any libraries, drivers,
etc.
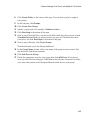
16 Stop the running instance by selecting it in the AWS Management Console, then
clicking Actions > Stop.
17 In the AWS Management Console select the instance (it might still be selected) and
click Actions > Create Image.
18 Provide a name and description that will help you identify your new AMI. Use a
name that suggests the MATLAB version, installed libraries or drivers, etc. Click
Create Image. Note its AMI ID.
In Cloud Center, you can now use that AMI when starting a new cluster. It will be
available in the Operating System Image drop-down list in the Advanced Options of the
Create Cluster dialog box.
1-17
1
Cloud Computing
Access Cloud Cluster from MATLAB
In this section...
“Import Cluster Profiles” on page 1-18
“Create Job on Cloud Cluster Using Command-Line Access” on page 1-19
When your cloud cluster is running, you access it and workers in much the same way
you access a cluster in your own on-site network. Through cluster profiles or parallel
computing functions, you identify available clusters for creating and submitting jobs.
Import Cluster Profiles
You can use the Cluster Profile Manager to import the MJScomputecloud profile that
you downloaded from the Cloud Center, so that parallel applications in your MATLAB
session can use the desired cloud cluster by default.
1
On your MATLAB desktop, select Parallel > Manage Cluster Profiles.
2
Click Import in the toolbar.
3
Navigate to the location where you saved the profile you downloaded from the Cloud
Center, and select the profile with its .settings extension.
4
Select the newly imported profile in the Profile Manager list of profiles, then click
Set As Default in the toolbar. Setting a profile as a default allows your parallel
computing code to use this profile and its cluster with minimal code changes.
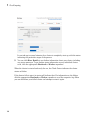
Test Your Cloud Cluster with the Profile Validator
With your cloud cluster profile selected, you can test your cloud cluster by running a
validation of the profile:
1-18
1
If the profile manager is not already open, on your MATLAB desktop, select Parallel
> Manage Cluster Profiles.
2
Select the name of your cloud profile and click Validate in the toolbar. This
automatically displays the Validation Results tab so you can view the tests in
progress. A pop-up dialog box might require you to log in to your MathWorks account
to validate your cluster profile.
Access Cloud Cluster from MATLAB
With your cloud cluster profile set as your default, you can now run parallel computing
applications on the cloud with functions such as parpool (and therefore parfor and
spmd), batch, createJob, etc.
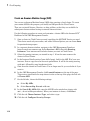
Create Job on Cloud Cluster Using Command-Line Access
Find Clusters on Cloud
As an alternative to downloading a profile and importing it through the Profile Manager,
you can use the fetchCloudClusters function to create cluster objects in MATLAB for
your own clusters on the cloud. A pop-up dialog box might require you to log in to your
MathWorks account when you execute this command. If you have more than one cluster
running on the cloud, fetchCloudClusters returns an array of cluster objects; if you
have only one cluster running, it returns just a single object:
c = fetchCloudClusters
MJSComputeCloud Cluster Information
===================================
Profile:
Modified: true
Host: ec2-107-21-71-51.compute-1.amazonaws.com
NumWorkers: 32
JobStorageLocation: Database on [email protected]
ClusterMatlabRoot: /mnt/matlab
OperatingSystem: unix
- Assigned Jobs
Number Pending: 0
Number Queued: 0
Number Running: 0
1-19
1
Cloud Computing
Number Finished: 0
- MJSComputeCloud Specific Properties
Name:
State:
NumBusyWorkers:
NumIdleWorkers:
MyCluster
online
0
32
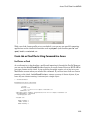
Now you can use the cluster object to create jobs and tasks in the usual manner. For
example:
parpool(c,8)
or
createJob(c)
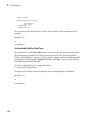
Use Downloaded Profile for Cloud Cluster
As an alternative to fetchCloudClusters, you can use the a profile downloaded from
the Cloud Center to identify the cluster you want to access. (See “Download Cluster
Profile to Local Machine” on page 1-9.) For example, suppose you downloaded the profile
settings file to a file named C:\temp\MyCluster.settings. You can access and use
this profile programmatically with:
parallel.importProfile('C:\temp\MyProfile')
c = parcluster('MyProfile')
Then proceed to use this cluster for creating jobs or running parallel algorithms:
parpool(c,2)
or
createJob(c)
1-20
Transfer Data to or from a Cloud Cluster
Transfer Data to or from a Cloud Cluster
In this section...
“Transfer Data from Amazon S3 Account” on page 1-21
“Transfer Data with Job Methods and Properties” on page 1-21
“Download SSH Key Identity File” on page 1-22
“Transfer Data with Standard Utilities” on page 1-22
“Transfer Data with the remotecopy Utility” on page 1-24
“Retrieve Data from Persisted Storage Without Starting a Cluster” on page 1-25
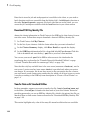
Transfer Data from Amazon S3 Account
When creating your cluster, the advanced options provide access to your Amazon S3
account files. Click Add Files to specify which files you want to make available to your
cluster nodes. (This option is not available after you have created a cluster.) When the
cluster starts up, before the mdce process starts, the specified S3 files are copied into the
folder /shared/imported on the cluster’s shared file system. If any of the files have the
extension .gz, .gzip, .tar, or .zip, they are automatically expanded.
Note Transfering a large amount of data from your Amazon S3 account can cause the
cluster to time out during its startup. If your data size exceeds approximately 5 GB, start
your cluster without the S3 data transfer, then upload the necessary data to the cluster
/shared/persisted folder from a local drive as described in either “Transfer Data with
Standard Utilities” on page 1-22 or “Transfer Data with the remotecopy Utility” on
page 1-24.
Transfer Data with Job Methods and Properties
To transfer data to the cloud cluster, you can use the AttachedFiles or JobData
property, in the same way you use these for other clusters. For example:
1
Place all required executable and data files in the same folder.
2
Specify that folder in the AttachedFiles property of the job.
When you submit your job, the files are transferred to the cloud and made available
to the workers running on the cloud cluster.
1-21
1
Cloud Computing
Data that is stored in job and task properties is available to the client, so your task or
batch function results are accessible from the finished job’s fetchOutputs function or
the tasks’ OutputArguments property. For batch jobs that run on the cloud, you can
access the job’s workspace variables with the load function in your client session.
Download SSH Key Identity File
Among the cluster information in Cloud Center is the SSH key for that cluster, for nonroot user access. Follow these steps to download a cluster’s SSH key identity file:
1
In Cloud Center, click My Clusters.
2
In the list of your clusters, click the cluster whose key you want to download.
3
In the Cluster Summary display, click More Details to expand the display.
4
In the SSH Keys information field is a hyperlink labeled User Access. Click this
link to download and save the key (.pem) file to your local client machine.
You can use your saved .pem file for SSH or other access to the cloud nodes for
transferring data, as described in “Transfer Data with Standard Utilities” on page
1-22 and “Transfer Data with the remotecopy Utility” on page 1-24.
Note that the only key available here is for user access (username clouduser), not for
root access. A root access key (user name: ubuntu) is provided only when you create a
new cluster. If you require, but do not have access to the root private key for a cluster,
you could create a new cluster using another key for which you do have access, or create
a new key according to the SSH key name description in “Create a Cloud Cluster” on
page 1-4.
Transfer Data with Standard Utilities
In these examples, suppose you want to transfer the file /home/cloudtmp/emem.mat
to the folder /shared/persisted on the head node of your cloud cluster. Instead of
providing passwords, you use an SSH key identity file, which is the private key file you
download from a cloud center cluster as described in “Download SSH Key Identity File”
on page 1-22.
This section highlights only a few of the many file transfer utilities that are available.
1-22
Transfer Data to or from a Cloud Cluster
SFTP
The sftp utility is a command-line interactive interface, similar to ftp, that lets you
connect to a remote host, navigate its file system, and transfer files. The following
example shows how to use sftp at a UNIX command prompt:
cd /home/cloudtmp
sftp -i /home/.ssh/your-key.pem \
[email protected]:/shared/persisted
sftp> put emem.mat
sftp> ls
emem.mat
sftp> exit
For more information about the sftp utility, use the following commands:
sftp -help
man sftp
SCP
The scp utility lets you access the remote host, and transfer the file, in a single
command. This example shows the UNIX version of the command:
scp -i /home/.ssh/your-key.pem emem.mat \
[email protected]:/shared/persisted
For more information about the scp utility, use the following commands:
scp -help
man scp
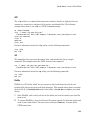
FileZilla
FileZilla is a GUI utility which lets you connect to the cloud cluster head node and
transfer files with an easy drag-and-drop technique. This example shows how to transfer
the local file C:\cloudtmp\emem.mat to the folder /shared/persisted on your cloud
cluster.
1
Start FileZilla, and set its Local site to the folder you want to transfer your local file
from (or to).
2
To connect FileZilla to your cloud cluster file system, specify the host that is the head
node of your cloud cluster. The user name is always clouduser. Use port 22 for
SFTP connections.
1-23
1
Cloud Computing
3
Do not provide a password, but instead provide your SSH key identity file under
Edit > Settings. In the Select pane of the Settings dialog box, choose SFTP. In the
Public Key Authentication pane, click Add keyfile. Navigate to the key file that
you downloaded from the Cloud Center for this cluster. (Note: On Windows, the
.pem format key file you download from Cloud Center is not directly compatible
with FileZilla, but when you select that key file, FileZilla can automatically convert
the format for you.) When the key file appears in the list, click OK to dismiss the
Settings dialog box.
4
When FileZilla is configured with the proper key file, click Quickconnect.
5
After connecting, set the Remote site path to /shared/persisted.
6
Now drag the file emem.mat from the local column to the remote column. That
completes the transfer.
Transfer Data with the remotecopy Utility
You can transfer between your client file system and your cloud cluster with the
remotecopy utility provided with Parallel Computing Toolbox as:
matlabroot/toolbox/distcomp/bin/remotecopy
The remotecopy utility uses an identity file instead of passwords. This is the private
SSH key file you download for a cluster from Cloud Center as described in “Download
SSH Key Identity File” on page 1-22.
Transfer Data to the Cloud
This example shows how to copy the file /home/cloudtmp/emem.mat from a local UNIX
machine to a cloud cluster node:
1
Navigate to the location of the remotecopy utility, and run the command as shown.
cd /matlabinstall/toolbox/distcomp/bin
./remotecopy -local /home/cloudtmp/emem.mat \
-to -remote /shared/persisted/emem.mat \
-remotehost ec2-107-21-71-51.compute-1.amazonaws.com \
-protocol scp -username clouduser -identityfile /home/.ssh/your-key.pem \
-passphrase ""
(For Windows, use appropriate slashes, path names, and ^ to indicate continuation
of the command on multiple lines. For other options or information about mixed
platforms, see remotecopy -help.)
1-24
Transfer Data to or from a Cloud Cluster
The -remotehost name is available in Cloud Center under the details for the head
node of a running cluster.
2
With the data files in place on the cloud cluster nodes, you can specify their location
in the job’s AdditionalPaths property to provide access to them for the MATLAB
workers.
Retrieve Data from the Cloud
This example shows how to copy the file /shared/persisted/emem.mat from a cloud
cluster node to a local UNIX machine as /home/cloudtmp/return_emem.mat.
cd /matlabinstall/toolbox/distcomp/bin
./remotecopy -local /home/cloudtmp/return_emem.mat \
-from -remote /shared/persisted/emem.mat \
-remotehost ec2-107-21-71-51.compute-1.amazonaws.com \
-protocol scp -username clouduser -identityfile /home/.ssh/your-key.pem \
-passphrase ""
(For Windows, use appropriate slashes, path names, and ^ to indicate continuation of the
command on multiple lines. For other options or information about mixed platforms, see
remotecopy -help.)
The -remotehost name is available in Cloud Center under the details for the head node
of a running cluster.
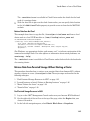
Retrieve Data from Persisted Storage Without Starting a Cluster
This procedure describes how to retrieve your persisted data from Amazon EC2, without
starting a cluster to access /shared/persisted. The major steps are described in the
following subtopics:
1. “Find Persisted Storage Resources in AWS” on page 1-25
2. “Launch Instance or Attach Volume to Existing Instance” on page 1-26
3. “Mount Volume for Access” on page 1-28
4. “Transfer Data” on page 1-29
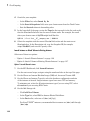
Find Persisted Storage Resources in AWS
1
2
3
Log in to the AWS® Management Console and access your Amazon EC2 Dashboard.
On the right side of the tool bar at the top of the page, select the Region that your
cluster is located in.
In the left side navigation pane, select Elastic Block Store > Snapshots.
1-25
1
Cloud Computing
4
Search for your snapshot:
• In the Filter list, select Owned By Me.
• In the Search Snapshots field, enter your cluster name from the Cloud Center.
• Sort the Started column in descending order.
5
In the lower half of the page, review the Tags for the top result in the list, and verify
that the ClusterInfo value has the correct cluster name. For example, the result
when your cluster name is MyR12b might look like this:
MyR12b / first.last__AT__company.com / 4006224
6
Select the snapshot with the correct ClusterInfo value and the most recent
Started value. In the Description tab, copy the Snapshot ID (for example,
snap-20cd6642) and note its Capacity value.
Launch Instance or Attach Volume to Existing Instance
Select one of these two options:
• “Option 1: Launch Ubuntu Instance” on page 1-26
• “Option 2: Attach Volume to Existing Ubuntu Instance” on page 1-27
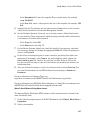
Option 1: Launch Ubuntu Instance
1
On the EC2 Dashboard, click Launch Instance.
For the next several steps, navigate using the numbered tabs at the top of the page.
2
On the Choose an Amazon Machine Image (AMI) tab, choose an Ubuntu AMI.
3
On the Choose an Instance Type tab, select the hardware configuration and size
of the instance to launch. Larger instance types have more CPU and memory.
To minimize cost, select the t2.micro instance type if you are using VPC; select
m3.medium if you are using EC2-Classic.
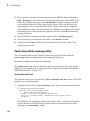
4
On the Add Storage tab:
• Click Add New Volume.
• In the Type list, select EBS for Amazon Elastic Block Store.
• In the Device list, select one of /dev/sd[f-p].
For Linux®/UNIX® instances, recommended device names are /dev/sdf through
/dev/sdp.
1-26
Transfer Data to or from a Cloud Cluster
• In the Snapshot field, enter the snapshot ID you copied earlier; for example,
snap-20cd6642.
• In the Size field, enter a value equal to the size of the snapshot; for example, 100
GiB.
5
(optional) On the Tag Instance tab, give the instance a Name value so you can more
easily find the instance in the Amazon Management Console.
6
On the Configure Security Group tab, use a security group to define firewall rules
for your instance. These rules specify which incoming network traffic is delivered to
your instance. All other traffic is ignored.
• In the Type list, select SSH.
• In the Source list, select My IP.
7
On the Review Instance Launch tab, check the details of your instance, and make
any necessary changes by clicking the appropriate Edit link. When all settings are
correct, click Launch.
8
In the Select an existing key pair or create a new key pair dialog box, make your
preference. For example, select Choose an existing key pair, then in the
Select the key pair list, choose a key pair that you have access to. This is the
key pair you will use later to connect to the instance for mounting the volume and
transferring data.
9
After you launch the instance, wait for the instance state to become Running. You
can view this information in the EC2 Dashboard by navigating to Instances >
Instances
For more information on Instance Types, see
http://docs.aws.amazon.com/AWSEC2/latest/UserGuide/instance-types.html.
For more information on AWS Block Device Mapping, see https://docs.aws.amazon.com/
AWSEC2/latest/UserGuide/block-device-mapping-concepts.html
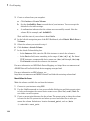
Option 2: Attach Volume to Existing Ubuntu Instance
The Amazon Elastic Block Store (EBS) volume and the instance must be located in the
same Availability Zone.
1
In the left-side navigation pane of the EC2 Dashboard, select Elastic Block Store >
Snapshots.
2
Select your snapshot.
1-27
1
Cloud Computing
3
Create a volume from your snapshot:
a
Click Actions > Create Volume.
b
Set the Availability Zone to match that of your instance. You can accept the
defaults for the other settings.
c
A confirmation indicates that the volume was successfully created. Note the
volume ID, for example, vol-8a9d6642).
Wait until the state of your volume is Available.
4
In the left-side navigation pane of the EC2 Dashboard, select Elastic Block Store >
Volumes.
5
Select the volume you created in step 3.
6
Click Actions > Attach Volume.
7
In the Attach Volume dialog box:
• In the Instance field, enter the ID of the instance to attach the volume to.
• In the Device field, enter something in the range of /dev/sd[f-p]. For Linux/
UNIX instances, recommended device names are /dev/sdf through /dev/sdp.
• Click Attach to attach the volume to the instance.
For more information on AWS Block Device Mapping, see https://docs.aws.amazon.com/
AWSEC2/latest/UserGuide/block-device-mapping-concepts.html
For more information on EBS volumes, see
http://docs.aws.amazon.com/AWSEC2/latest/UserGuide/ebs-restoring-volume.html.
Mount Volume for Access
Make the volume available for use from the instance.
1
Connect to your instance using SSH.
2
Use the lsblk command to view your available disk devices and their mount points
to help you determine the correct device name to use. (Most likely xvdf.) Note: Do
not create a new file system.
3
Create a mount point directory for the volume. The mount point is where the volume
is located in the file system tree and where you read and write files to after you
mount the volume. Substitute a location for mount_point, such as /data.
~$ sudo mkdir mount_point
1-28
Transfer Data to or from a Cloud Cluster
4
Use the following command to mount the volume at the location you just created.
$ sudo mount device_name mount_point
For example,
$ sudo mount /dev/xvdf /data
For more information on using EBS volumes, see
http://docs.aws.amazon.com/AWSEC2/latest/UserGuide/ebs-using-volumes.html.
Transfer Data
You can now transfer data between the mounted volume and your local drive, as
described in either:
• “Transfer Data with Standard Utilities” on page 1-22
• “Transfer Data with the remotecopy Utility” on page 1-24
1-29