1
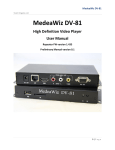
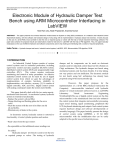
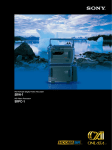
For Powerful Digital Marketing and Total Multimedia Solution DV-66104 & DV-66104T User’s Guide version 2 Acknowledgements The MedeaWiz logo and DV-66104 are trademarks of MedeaWiz Corporation. All other trademarks or registered trademarks are acknowledged as the exclusive property of their respective owners. Notice The information contained in this document is subject to change without notice. MedeaWiz Corporation makes no warranty of any kind with regard to this material, including, but not limited to, the implied warranty of merchantability and fitness for a particular purpose. MedeaWiz shall not be liable for any errors or for incidental or consequential damages in connection with the furnishing, performance, or use of this material. All rights reserved. Reproduction, adaptation, or translation of this manual is prohibited without prior written permission of MedeaWiz Corporation, except as allowed under copyright laws. No part of this document may be photocopied, reproduced, or translated to another language without the prior written consent of MedeaWiz Corporation. © MedeaWiz Corporation 2004 Table of Contents 1. INTRODUCTION ................................................................................................................................. 1 1.1 Package Contents......................................................................................................................... 1 1.2 Features (Latest Version HW1.3 & FW1.6, Sept. 2004)............................................................... 1 2. SETTING UP YOUR DV-66104 .......................................................................................................... 2 Step 1. How to program the contents to your CompactFlash® card ................................................. 2 Step 2. Insert Hi-Speed CompactFlash® Card into DV-66104.......................................................... 3 Step 3. Connect your DV-66104 to other display device (Optional) .................................................. 3 Step 4. Turn on the display device (Optional).................................................................................... 4 Step 5. Plug in the power................................................................................................................... 4 3. USING YOUR DV-66104..................................................................................................................... 5 3.1 DV-66104’s AUX Inputs ................................................................................................................ 5 3.2 Control panel outlook .................................................................................................................... 5 Button Switches .............................................................................................................................. 6 DIP Switches................................................................................................................................... 7 Control Swtiches ............................................................................................................................. 8 3.3 Using the controls ......................................................................................................................... 8 4. INTRODUCING DV-66104 OPTIONAL ACCESSORIES ................................................................. 10 4.1 DV-66K, Keypad Controller......................................................................................................... 10 4.2 DV-66U, Universal Controller...................................................................................................... 10 4.3 DV-66F, Function Selector.......................................................................................................... 10 5. TOUCH SCREEN SPECIFICATIONS............................................................................................... 11 6. DV-66104 SPECIFICATIONS ........................................................................................................... 12 1. INTRODUCTION DV-66104 is a compact and rugged solution that features our reliable DV-66 MPEG-2 Player linked to a crisp 10.4" TFT-LCD. It can be programmed up to 14 minutes of video (with 512MB CF card), and up to 99 tracks. It is small and light-weighted enough to be wall mounted or integrated into a full size kiosk. DV-66104 provides high quality hardware solution at an affordable price. The unit is available with or without touch panel. DV-66104 - w/out touch screen feature DV-66104T - with touch screen, see page 9 for touch screen specification. 1.1 Package Contents • DV-66104 MPEG-2 Digital Player • AC adapter • Video/Audio cable 1.2 Features (Latest Version HW1.3 & FW1.6, Sept. 2004) 10.4” TFT LCD display Touch screen option Supports multiple format support: MPEG-2, MPEG-1, MP3, and JPEG Repeat or Menu modes available Multiple track selection, up to 99 tracks Instant track response Stereo audio output Auto-start on power on Board-Level Features in addition to section 1.2 Supported S-Video & VGA output PIR Connection CON1, 44-pin pitch 2.0mm connection for using 2.5” Hard disk 6 position DIP switch for multiple commands Support 16:9 file format Support RS232 Interface TTL control Commands 1 2. SETTING UP YOUR DV-66104 Step 1. How to program the contents to your CompactFlash® card In order to setup your content to work with the DV-66104 you must have a high speed CompactFlash® card. To integrate your media content (MPEG-1, MPEG-2, MP3, or JPEGs) you will need to use a CompactFlash® reader with your computer to load the appropriate files and setup. See programming below for more details. Connect your card reader to your PC (note: be sure that the card reader driver is installed) and insert the CompactFlash® card (we recommend 128 MB minimum) into the reader. To program your multimedia content on to the media card, open the file manager and copy the files to the card reader drive. The DV-66 utilizes a three-digit numeric ID system for programming your content tracks, so you will need to number your tracks using this system. Please note that you can keep your track descriptions as well. There are two types of play modes, MENU and REPEAT, which determine what number is the first track. For instance, in the MENU mode the first track is 000, which is the looping track. For the REPEAT mode the first track is 001. Menu mode: This is the factory default mode. Track 000 is the looping track for your menu file and it will continue to play until another track is selected from a push button or touch screen input device. To switch from Repeat mode back to Menu mode, please depress & hold switch button #1, then plug in the power until the unit start initialing, then the unit will be setup to play files as “menu mode”. Switch button #1 can be located either on the touch screen (if used) or on the DV-66K (keypad controller, sold separately). Repeat mode: To change to repeat mode, please depress & hold switch button #2 then plug in the power until the unit start initialing. Repeat mode will play in sequence, one track at a time in numeric order, and after the last track it will start with track 001 again. Note: Setup changes will be saved on the flash memory, so the selection made will not change when the power is off. 2 Step 2. Insert Hi-Speed CompactFlash® Card into DV-66104 Caution: DO NOT plug in the power before the CompactFlash® Card is inserted into DV-66104 card slot. MedeaWiz recommends that the CompactFlash® Card to be inserted into the slot first, and then the power can be applied to the unit as described later. Keypad AV out DV IN 12V/3A CompactFlash® card slot Step 3. Connect your DV-66104 to other display device (Optional) Simply connect DV-66104 to any video display such as a PC monitor or TV with A/V inputs, and you can start watching the video clips stored on your CompactFlash® Card. You can control the track selection with the optional DV-66K Keypad Controller, and it gives you the ability to control up to 99 tracks on the DV-66 player. Television AU DIO IN VIDEO IN L R AV out red white yellow Audio/video cable (included) DV-66104 Note: Normally the A/V inputs are located in the back of a TV or VCR. For more instructions on how to use A/V input on your displaying device, consult the manual for the device. 3 Step 4. Turn on the display device (Optional) Turn on the display device and change the channel to the corresponding A/V input channel if necessary. Please see the manual of your display device for further instruction. Step 5. Plug in the power You are one step away from playing your media files on DV-66104! Just plug in the included power adapter and the DV-66104 will automatically start playing the first video clip on the CompactFlash® Card! Note: Make sure that you have inserted the CompactFlash® Card correctly, and its content meets DV-66’s specifications. DV IN 12V/3A DV-66104 AC Adapter (included) 4 3. USING YOUR DV-66104 3.1 DV-66104’s AUX Inputs S-Video Video VGA AUX INPUT DV-66104 also provides various inputs: S-Video, Video, and VGA for added versatilities. Note: Connect any input device with the connector, turn on device then power on the DV-66104 unit, the DV-66104 unit will autoselect the aux. input signal and display. * Turn off the device and remove the connector. DV-66104 unit will go back to display its default input. 3.2 Control panel outlook Button Switc hes LEFT Button SW1 - SW8 wiring C 0 S1 S2 C0 + S1 = SW 1 C0 + S2 = SW 2 C0 + S3 = SW 3 C0 + S4 = SW 4 Control Switc hes C0 S1 S2 S3 S4 C1 S 3 S 4 C1 C1 + S1 = SW 5 C1 + S2 = SW 6 C1 + S3 = SW 7 C1 + S4 = SW 8 Dip SW1: Dip SW2: Dip SW3: Dip SW4: FUNCTION SETTING DOWN UP Auto-Mute On/Off Not available On On Off Off On Off On Off 6*4 3*2 1*4 NA 5 DIP SW 1 2 3 4 ON OFF Touch Screen RIGHT Dip Switc hes BUTTON SWITCHES With the button switches, you can have an external set of buttons or control pad. Note: only 8 tracks are supported in the mode. To Buttons SW wired for SW1 – SW8 C0 S1 S2 C0S1 = TRACK 1 C0S2 = TRACK 2 C0S3 = TRACK 3 C0S4 = TRACK4 S3 S4 C1 C1S1 = TRACK 5 C1S2 = TRACK 6 C1S3 = TRACK 7 C1S4 = TRACK 8 Wires are fed into the holes located on top of the metal housing. Button SW1 - SW8 wiring C0 S1 S2 S3 S4 C1 C0 + S1 = SW 1 C1 + S1 = SW 5 C0 + S2 = SW 2 C1 + S2 = SW 6 C0 + S3 = SW 3 C1 + S3 = SW 7 C0 + S4 = SW 4 C1 + S4 = SW 8 Dip SW1: Dip SW2: Dip SW3: Dip SW4: LEFT C0 S1 S2 S3 S4 C1 DOWN Auto-Mute On/O ff Not available On On ffO Off On On ffO Off FUNCTION SETTING UP RIGHT DIP SW 1 2 3 4 ON OFF Fixing the wires by fasten the screws on the wiring socket. 6 DIP SWITCHES With the DIP switches, you can control “Auto-mute On/Off,” and configure the touch screen to have 4, 6, or 24 tracks. Note: Auto-mute will disable sound after 5 minutes of inactivity; this is only available upon request for DV-66104T, not for DV-66104. When Auto-Mute is activated, it will only be released with the selection by pressing touch screen. This function is only available in DV-66104T. Dip SW1: Dip SW2: Dip SW3: Dip SW4: Auto-Mute On/Off Not available On On Off Off On Off On Off Touch Screen: 4x6 2x3 4x1 NA Note: The default setting is SW1 & SW2 off, SW3 & SW4 On. Touch screen matrix definition for 4x6, 2x3, and 4x1 after calibration 1. Touch Screen SW type: 4x6 X1 X2 X3 X4 X5 X6 Y1 SW1 SW2 SW3 SW4 SW5 SW6 Y2 SW7 SW8 SW9 SW10 SW11 SW12 Y3 SW13 SW14 SW15 SW16 SW17 SW18 Y4 SW19 SW20 SW21 SW22 SW23 SW24 2. Touch screen SW type: 2x3 Y1 Y2 Y3 Y4 X1 X2 X3 X4 X5 X6 SW1 SW1 SW2 SW2 SW3 SW3 SW1 SW1 SW2 SW2 SW3 SW3 SW4 SW4 SW5 SW5 SW6 SW6 SW4 SW4 SW5 SW5 SW6 SW6 3. Touch Screen SW type: 4x1 X1 X2 X3 X4 X5 X6 Y1 SW1 SW1 SW1 SW1 SW1 SW1 Y2 SW2 SW2 SW2 SW2 SW2 SW2 Y3 SW3 SW3 SW3 SW3 SW3 SW3 Y4 SW4 SW4 SW4 SW4 SW4 SW4 7 Dip SW 1 2 3 4 ON OFF CONTROL SWTICHES The control buttons can control the Video and Audio characteristics and the OSD off time and location. LEFT FUNCTION SETTING DOWN UP RIGHT RIGHT & LEFT - To turn on menu; move to next tablet when menu is on, or increase/decrease setting values. UP & DOWN - Press to increase/decrease the Volume setting or select the desire setting option. 3.3 Using the controls After turn on DV-66104, you can start controlling its various options by following the steps below. Step 1. You will need a small screwdriver or any similar type of tool to reach the controls of DV-66104. Note: A tool is not included in the package. A small screwdriver like the one shown in the picture will do. Step 2. Determine which control you like to configure, see page 7. If only the volume needs to be adjusted, simply depress UP/DOWN buttons to set to the desired volume setting. CAUTION: The button only requires a light touch. Do not press too hard on the button. MedeaWiz is not responsible for any damages caused by the abuse. 8 LEFT DOWN FUNCTION SETTING UP RIGHT Step 3. YOU MAY WANT TO START FROM PRESSING THE “RIGHT” BUTTON, A MENU WILL APPEAR ON THE LCD DISPLAY AGAINST WHATEVER VIDEO IMAGE IS PLAYING AT THE TIME. PRESSING THE "RIGHT" BUTTON TO SELECT THE DESIRED TABLET OF "VIDEO", "AUDIO" OR "OSD". THEN PRESSING "DOWN" TO GO TO THE OPTION THAT YOU WOULD LIKE TO CHANGE, Video Audio OSD Video Audio OSD Video Audio OSD Note: The default setting of Menu off time is 5 seconds ONLY, the menu will be auto off and the changes will be saved when no selections made for more than 5 seconds Step 4. When an option is selected, use the "RIGHT" and "LEFT" buttons to increase/decrease setting values of each option. LEFT DOWN FUNCTION SETTING UP RIGHT Step 5. After changes are made, wait for 5 seconds, the menu will be auto off and the changes will be saved when no selections made for more than 5 seconds. CAUTION: Any changes will not be saved if power is turned off before the menu is properly exited. CAUTION: Use carefully when making any setting changes, MedeaWiz is not responsible for any damages that you made during the operations described in this chapter. 9 4. INTRODUCING DV-66104 OPTIONAL ACCESSORIES 4.1 DV-66K, Keypad Controller The required interface for connecting and controlling the DV-66104 player with an external input device, such as push buttons. There are eight buttons per controller. 4800 baud rate. 4.2 DV-66U, Universal Controller The required interface for connecting the DV-66104 player with an analog touch screen. There are eight switch buttons per controller. 4800 baud rate. CAUTION: Analog touch screen used with DV-66U is subject to any dimension of the standard 4-wire resistive type touch screen; it is different with the matrix type touch screen built in the DV-66104 unit 4.3 DV-66F, Function Selector The function selector provides the custom options available on the DV-66 (4800 baud rate), which include: • OSD - on or off • Repeat or Menu mode • VGA or Composite video output • Volume - up and down 4.4 PIR Sensor Module Motion sensors, used to detect moving objects • • • • • • • • An extremely compact passive infrared (PIR) movement detector which has a wide variety of applications. 3 leads for easy connection (default cable length is 20”) The output is a logic signal that pulses high when movement is detected and is otherwise low. The PIR sensor module connected directly to DV-66B. Small size: 25 x 35 mm High Sensitivity Power up delay to prevent false triggering Adjustable cable length to fit your need. 10 5. TOUCH SCREEN SPECIFICATIONS For DV-66104T (DV-66104 unit with built-in touch screen) ITO Film 280Ω/SQ, Anti-Glare, 0.188mm thickness ITO Glass 110Ω/SQ, 1.1mm thickness Tail FPC, ITO Glass Operating Resistance ≤3.5k ohm Insulating Resistance ≥20M ohm Transparency > 70% Hardness ≤ 3H, ITO film Voltage DC 0 ~ 5 V, 30mA FPC Peeling Strength ≤ 700 gram Actuation Force > 100 gram Life ≥1000000 times Operating Temperature 14°F ~ 140°F, 50±30R. H Storage Temperature -4°F ~ 158°F, 50±30R. H Pin Assignment Pin Y1 Y2 Y3 Y4 X1 A G M S X2 B H N T X3 C I O U X4 D J P V X5 E K Q W X6 F L R X measurement unit: mm 11 6. DV-66104 SPECIFICATIONS System Type Digital Audio/Video playback Format MPEG-1 (VCD), MPEG-2 (DVD), JPEG, MP3 Dimension W/housing: 11.25” (L) x 7.812” (W) x 1.812” (H); board level: 6" x 4" Power Consumption 15 Watts Power Supply Universal Switching Power Supply Input AC 100/240V, Output DC 12V/3A Operating Current 1.25Amps @ 12V Operating Voltage 12 VDC Video Input Video, VGA, and S-video input Video Output NTSC/PAL, Composite, VGA(DV-66B), and S-video (DV-66B) Audio Output Stereo (line level) Storage Format High Speed CompactFlash® Card (min. 40X or up) Data transfer rate is 1X=150KB/sec, 40X=6.0MB/sec Storage Capacity 128MB up to 2.2GB CompactFlash® and MicroDrive MP3 bitrate vary from 8kbit/sec to 320kbit/sec MP3 Est. Avg. Playback CBR @ 128kbit/sec 256MB CF holds 512MB CF holds 1GB CF holds 2.2GB CF holds 273 minutes/ 4.55 hrs. 546 minutes/ 9.1 hrs. 1066 minutes/ 17.76 hrs. 2346 minutes/ 39.1 hrs. MPEG-1 bitrate vary from 1.15Mbit/sec to 3Mbit/sec MPEG-1 Est. Avg. Playback CBR @ 1.35Mbit/sec 256MB CF holds 512MB CF holds 1GB CF holds 2.2GB CF holds 25 minutes 50 minutes 98 minutes/ 1.63 hrs. 217 minutes/ 3.62 hrs. MPEG-2 bitrate vary from 3Mbit/sec to 15Mbit/sec MPEG-2 Est. Avg. Playback CBR @ 4Mbit/sec 256MB CF holds 512MB CF holds 1GB CF holds 2.2GB CF holds 8.5 minutes 17 minutes 33 minutes 73 minutes The information in this document is subject to change without notice. For more information about DV-66104 or its optional accessories, please visit our website at http://www.medeawiz.com/ Or e-mail us at [email protected] 18688 San Jose Ave., Industry, CA 91748 (USA) Tel: 626-839-1488 • Fax: 626-839-7038 www.medeawiz.com Copyright©2004 MedeaWiz Corporation All rights reserved. 12